Patterns for Pirates

P4P stylish, modern, wearable patterns

  • Home
  • Blog
    • Frequently Asked Questions
    • Pattern Releases
      • Free Patterns
    • P4P University
      • Fitting
      • Sewing with Stretch, Knit Fabrics
      • Sewing with Woven Fabrics
      • Sewing Machines
    • Sew-A-Longs
    • Fabric for Pirates
    • Pattern Hacks
    • Announcement
      • Blog Tours
      • Contest/Giveaway
  • Shop
  • Bundle Discounts
  • Gift Cards
  • My Account
  • Cart

Essential Tank Update & Youth

July 23, 2020

It’s release day!  Some years ago, 4 to be exact, we released the Essential Tank.  We hadn’t added the youth version to the pattern line-up and after years of requests, we thought it would be a great addition while we updated the Essential Tank to include our extended sizes.

The Essential Tank still ranks as one of the most popular and well, essential pieces that many P4P members rave about and now your littles can wear them too!


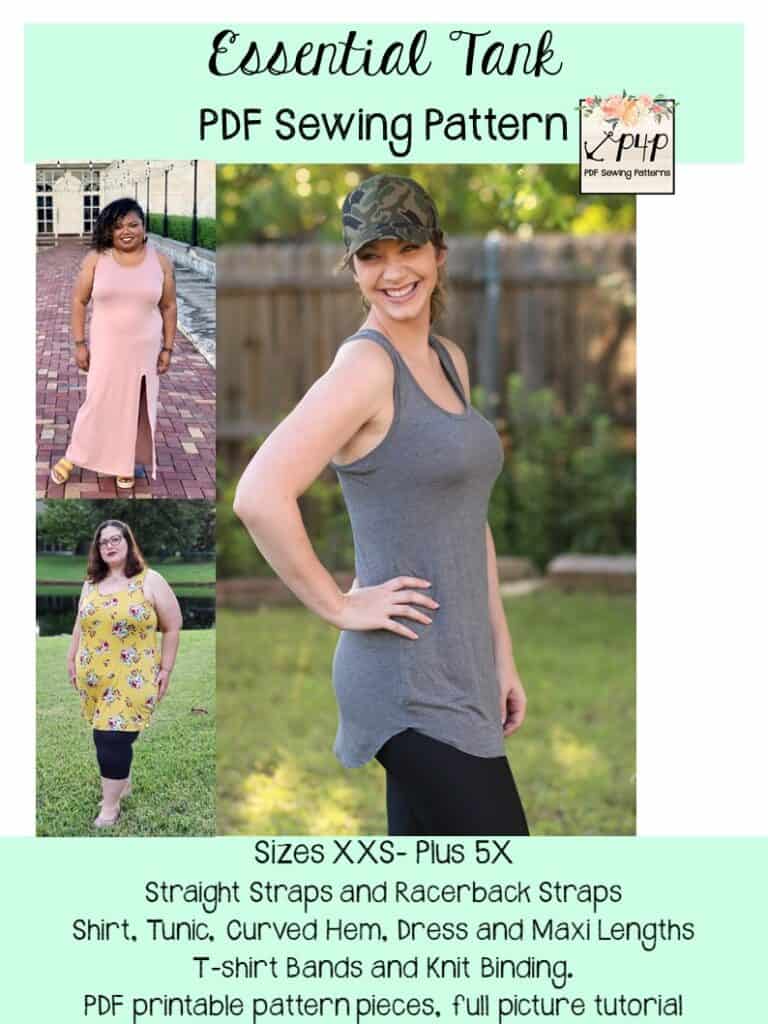
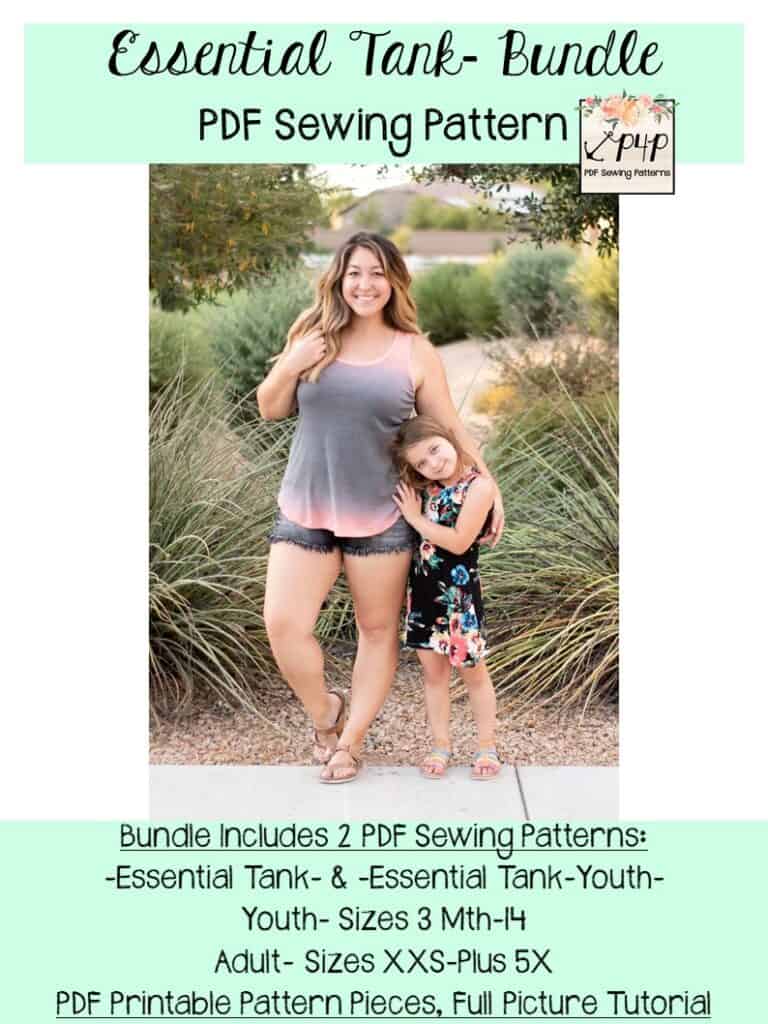
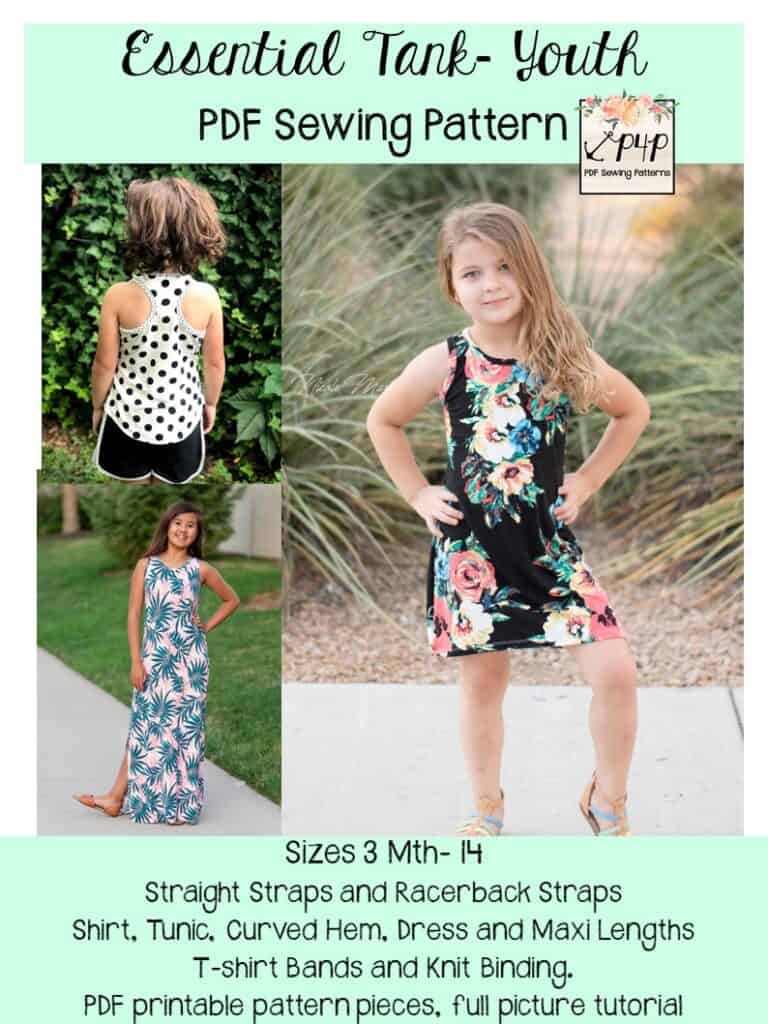
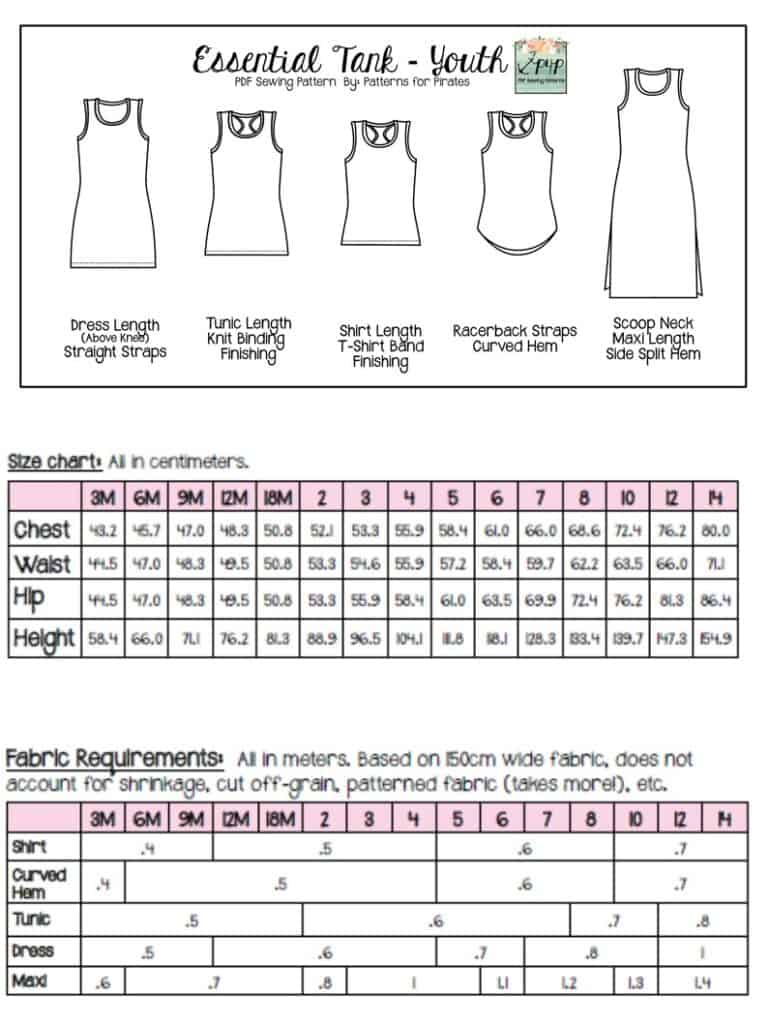
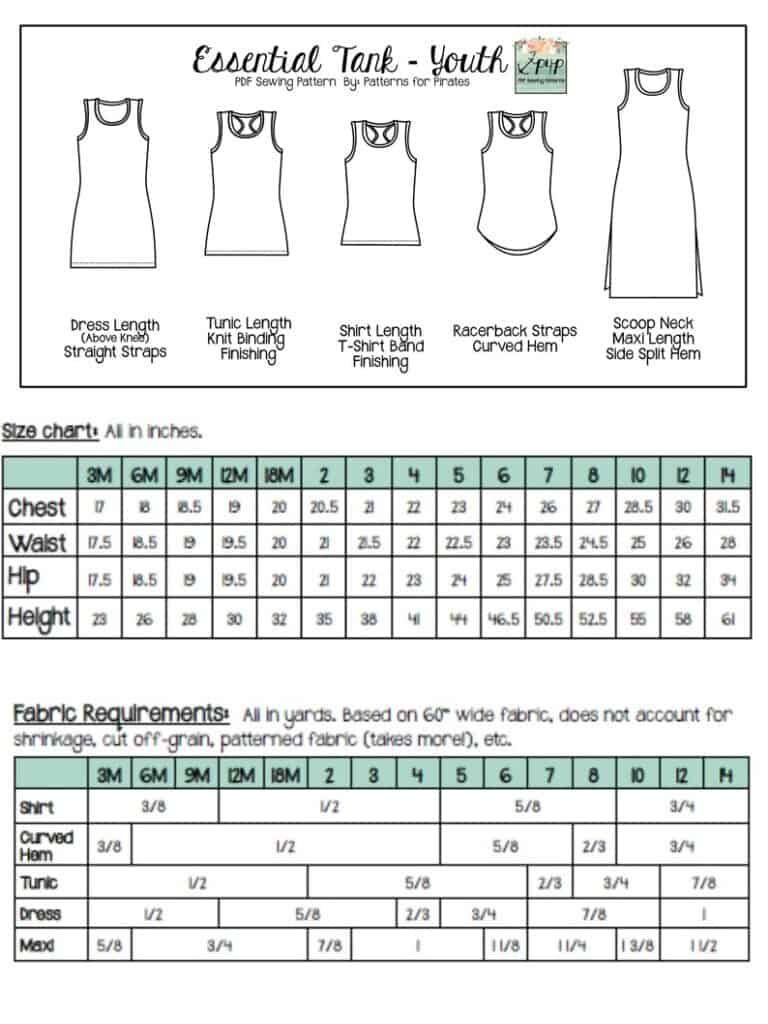
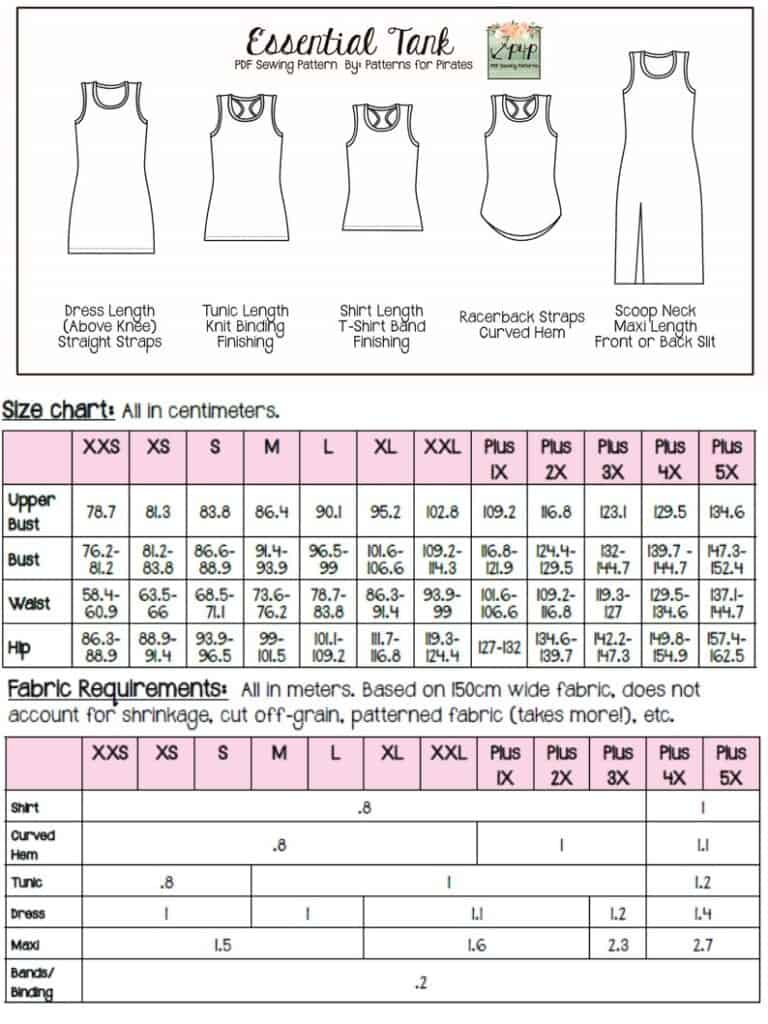
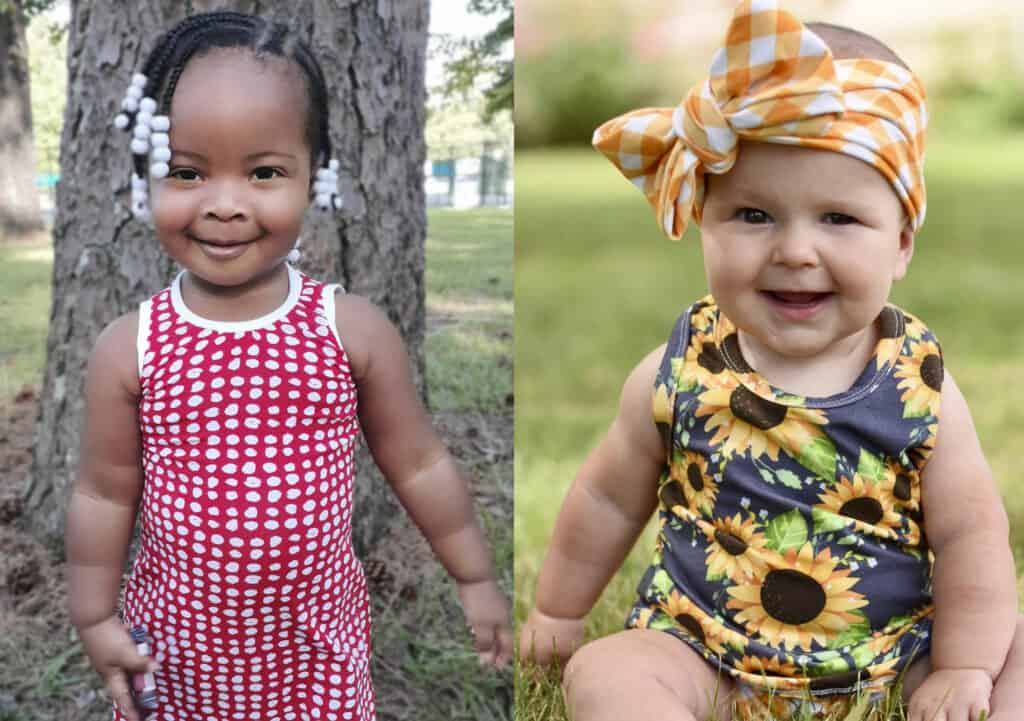
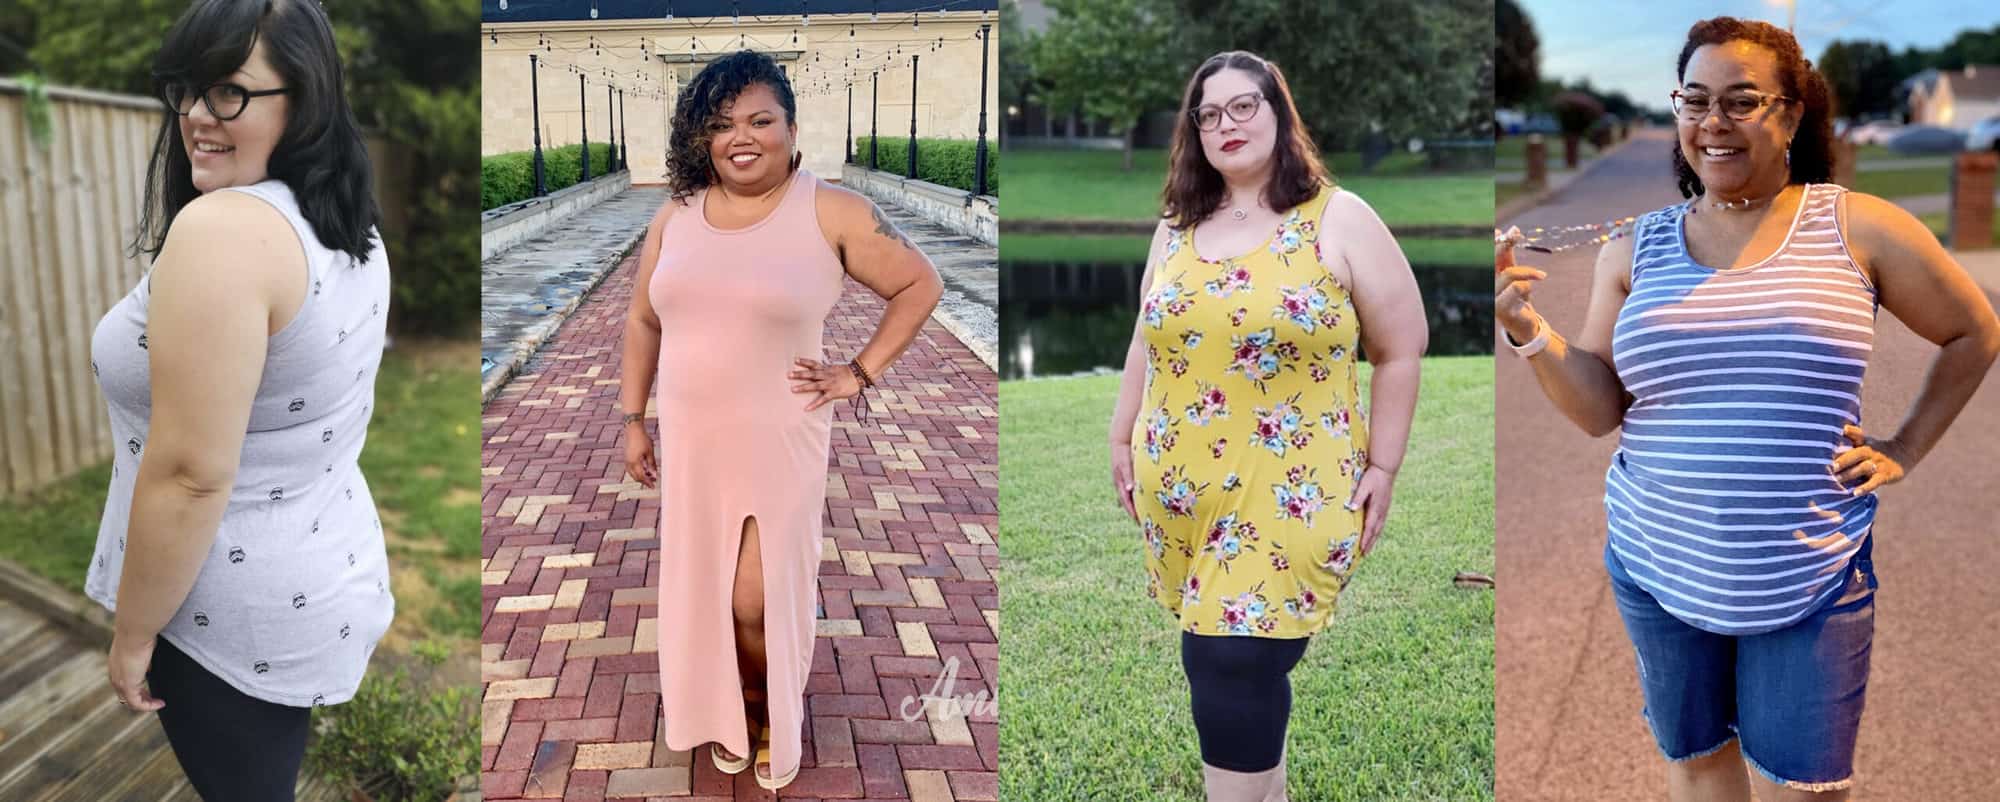
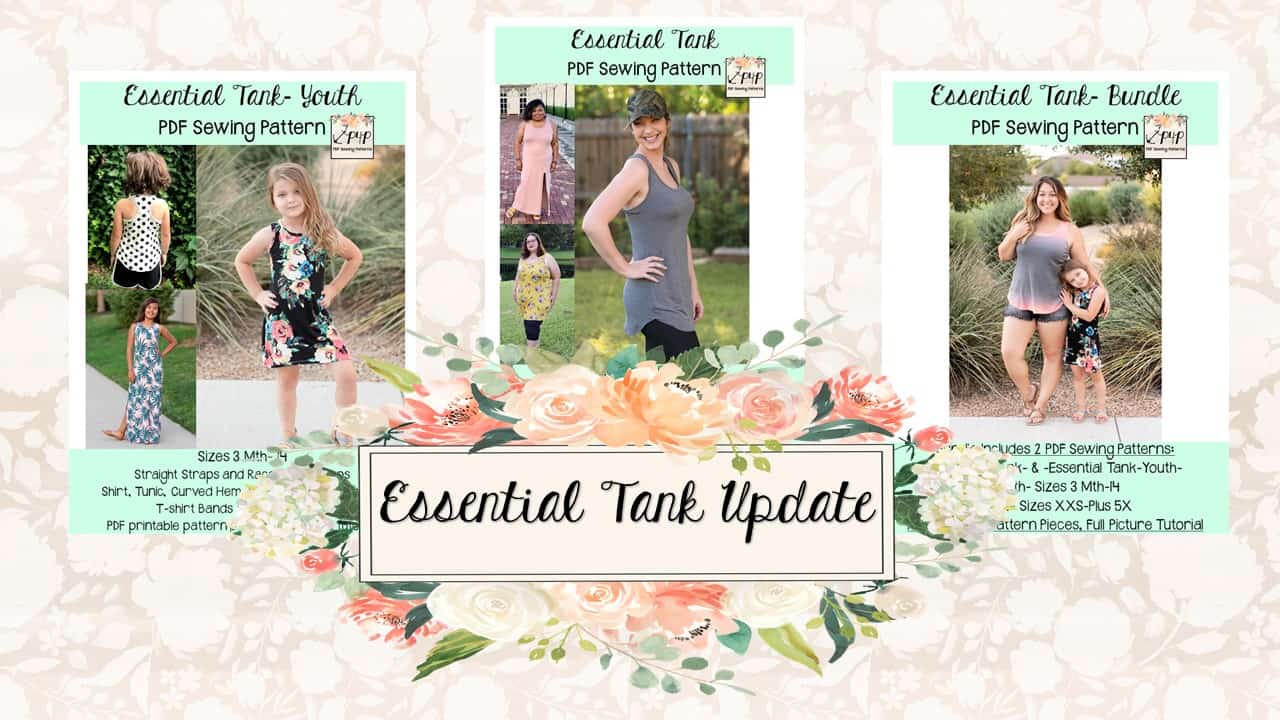
The Essential Tank received an update to include our extended sizes up to Plus 5x.  The original options remained, but don’t worry there are plenty to choose from while the Youth Essential Tank is brand new!  You can choose from 2 backs (racerback and straight tank straps) and a multitude of hem lengths that include: shirt, curved hem, tunic, above knee dress and maxi dress lengths.  You can also finish y our neckline and armholes with traditional t-shirt bands or binding.  Both patterns include all the usual digital file formats and the most recently requested projector files!


**Want to learn more about how to measure yourself for these pattern?  We’ve got you covered with an in-depth blog HERE.  And in case you’re new to Patterns for Pirates and PDF patterns in general, we have a great blog full of new-user tips HERE to help you get started!  As with all of our current releases and updates, the pdfs now include our layers feature and can be found in Letter, A4 and A0 sizes and a projector file.  And for even more helpful fun, we have a *free* printable that you can use to help record your measurements as you take them.

Let’s take a quick look at the different options!

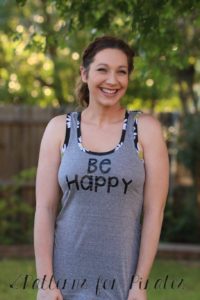
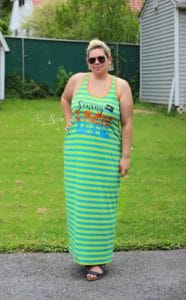
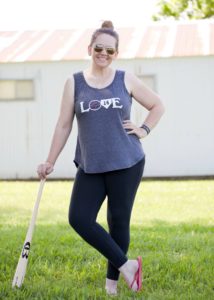
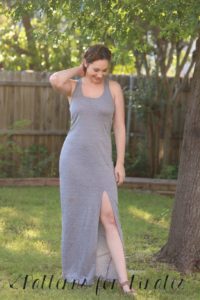
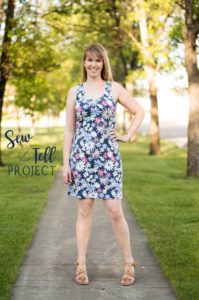
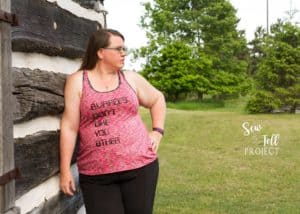
HEM OPTIONS: SHIRT, CURVED HEM, ABOVE KNEE DRESS, MAXI (side slits for youth)


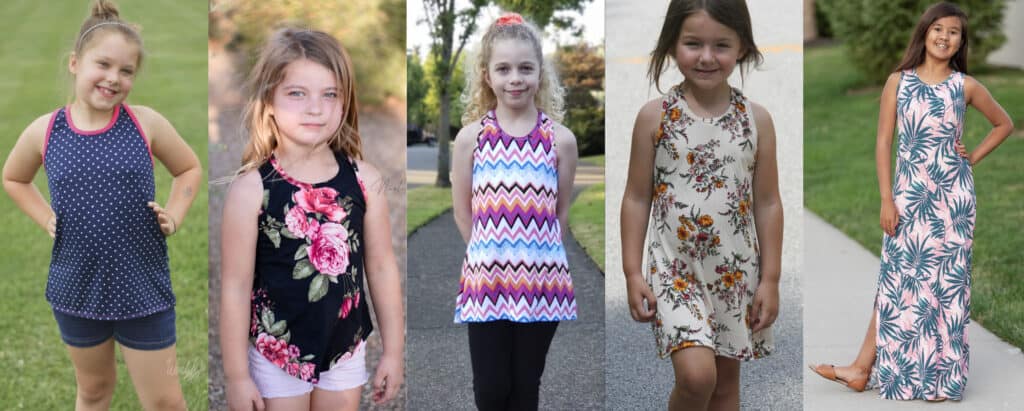
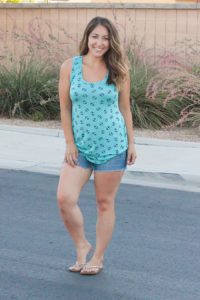
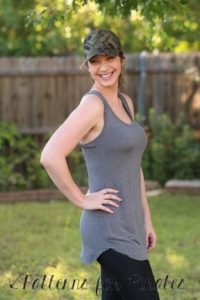
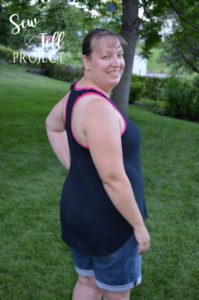
RACERBACK OR STRAIGHT STRAPS TANK

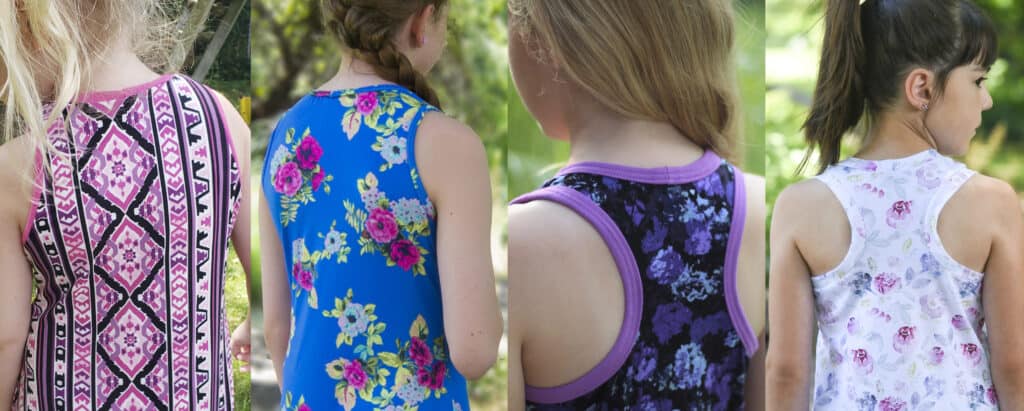
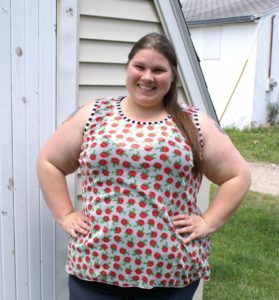
T-SHIRT BANDS OR KNIT BINDING


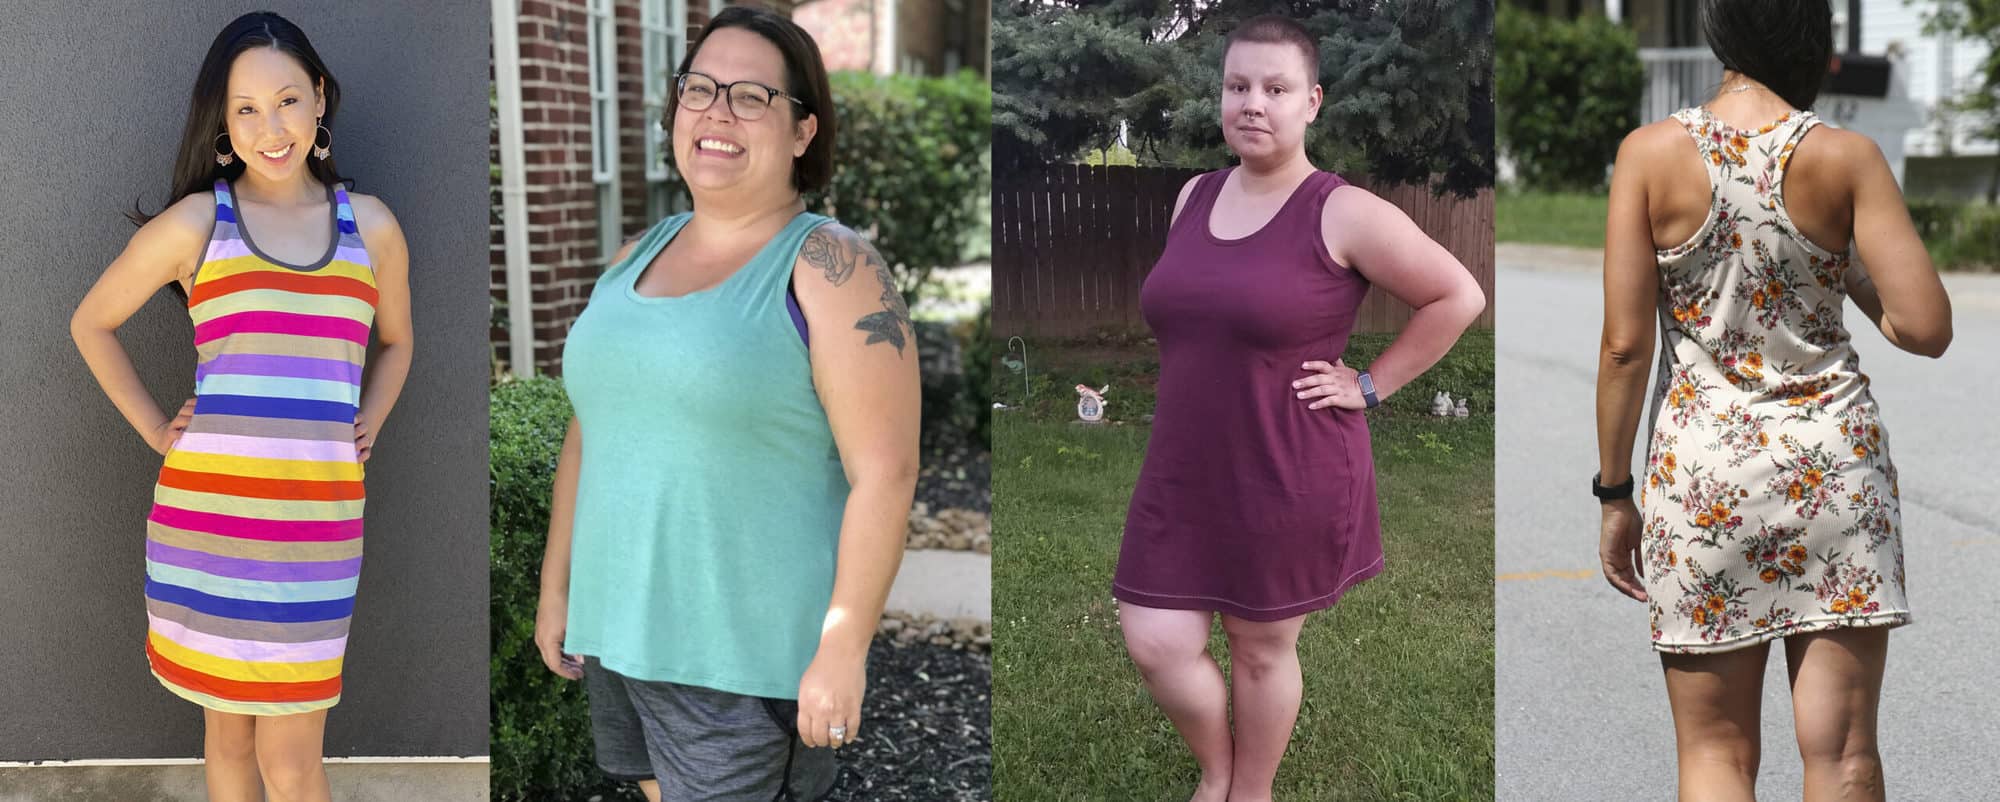
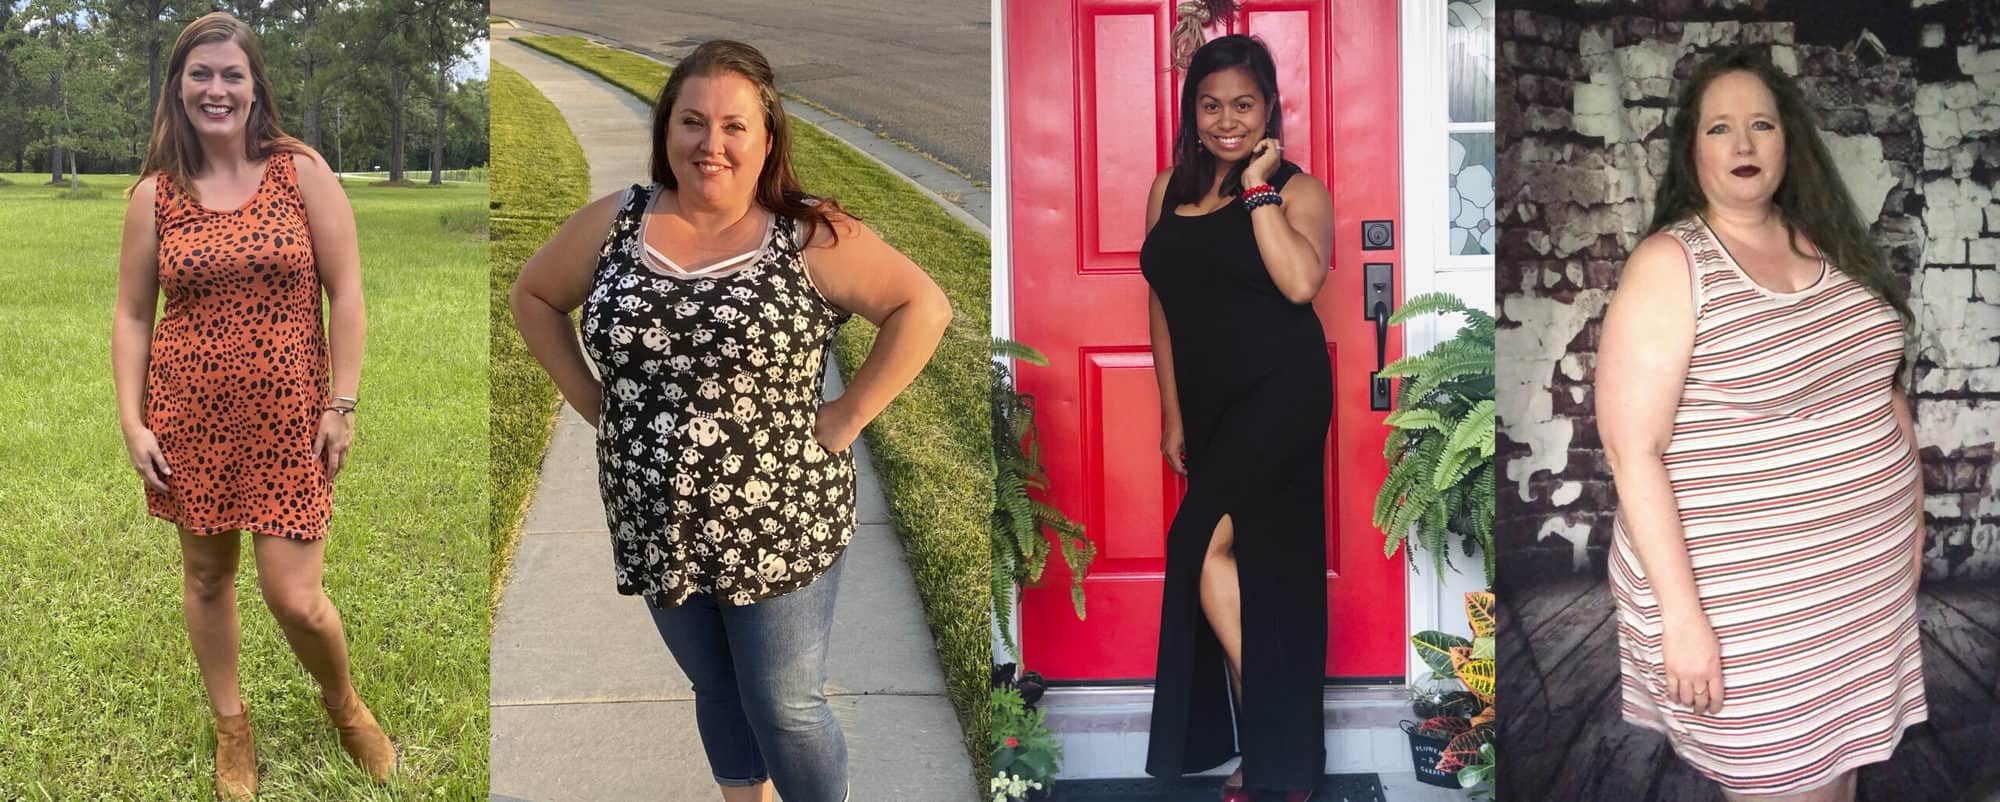
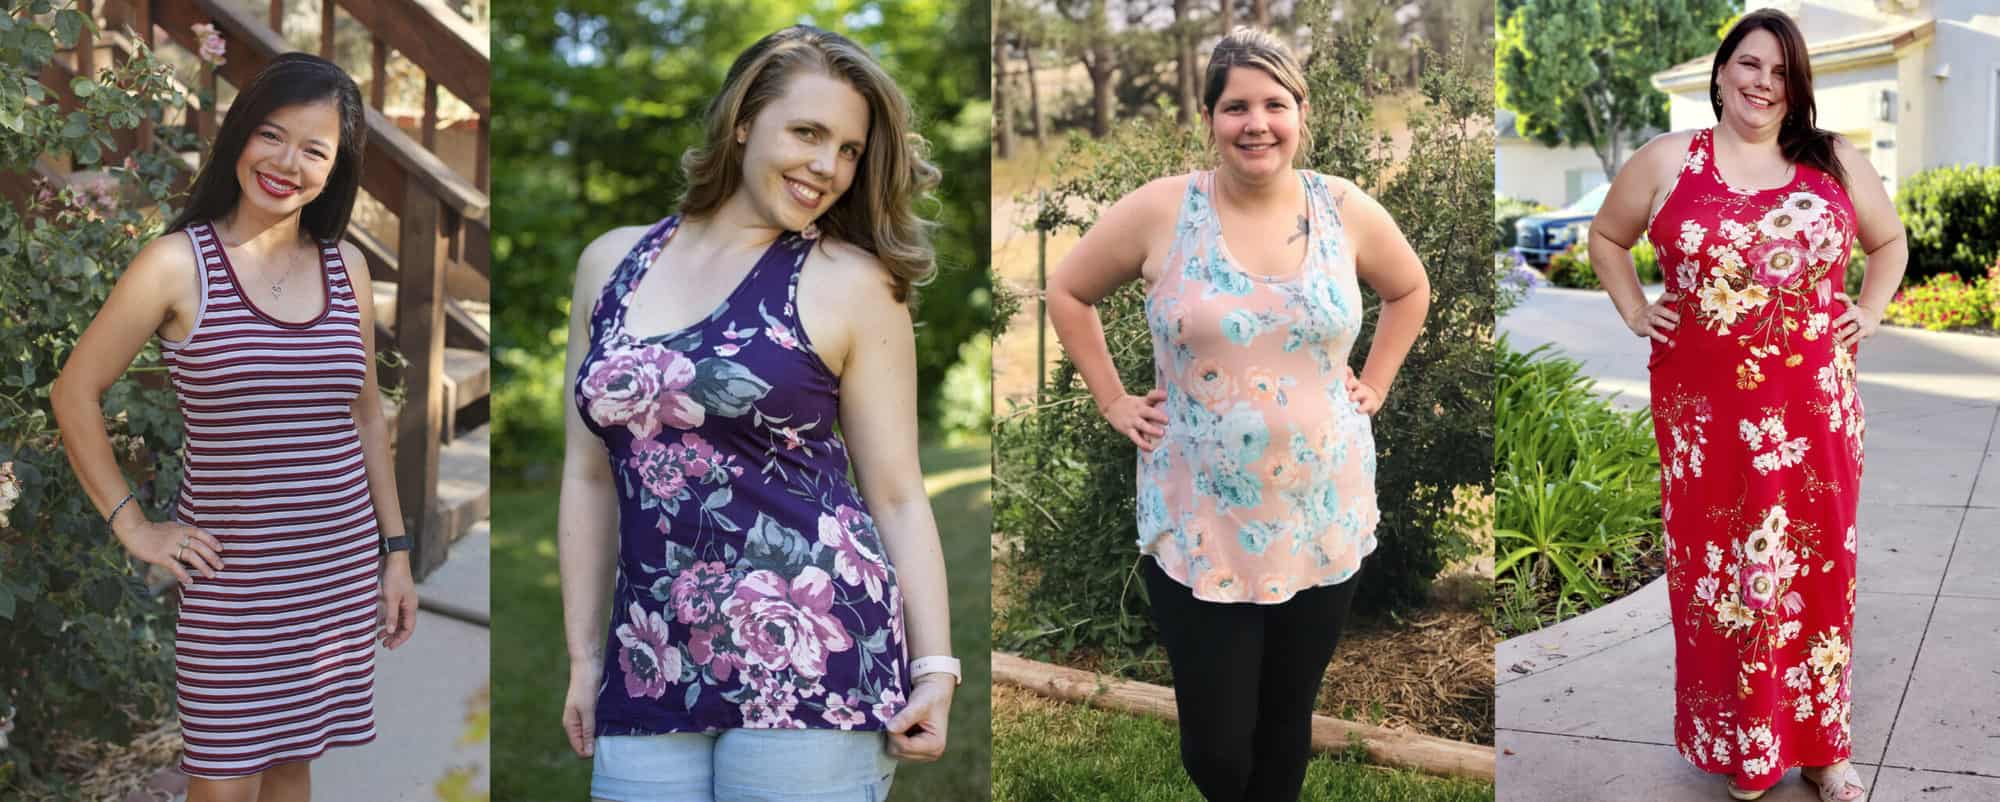
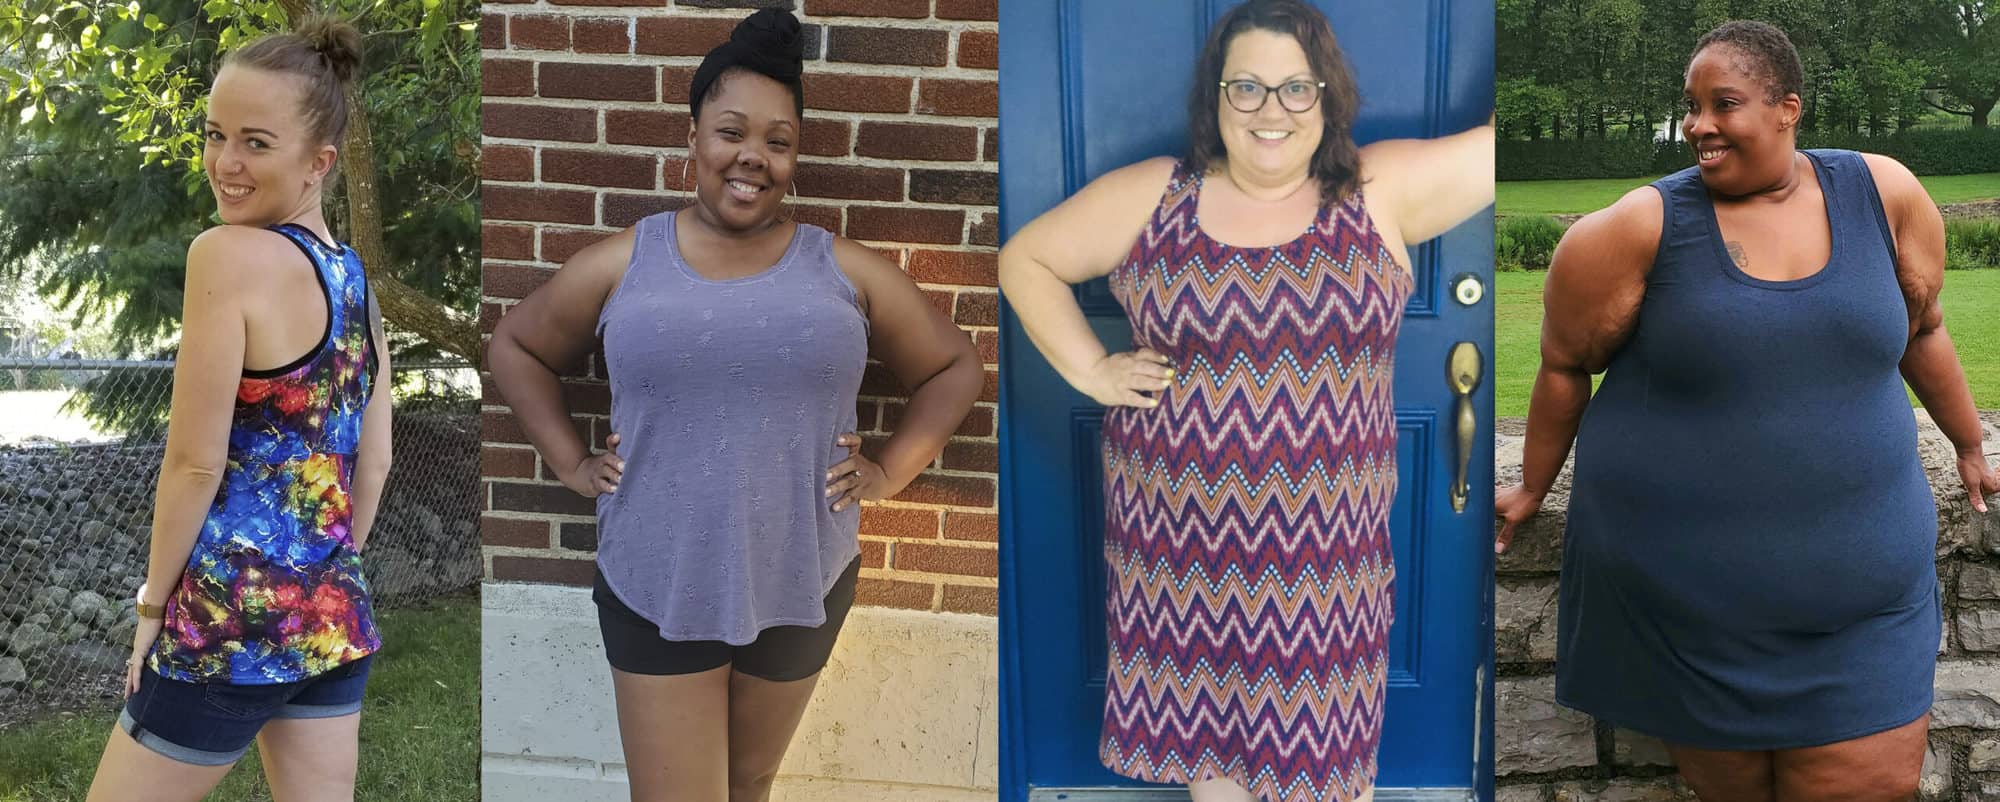
You can also check out our round-up blog post from the original release for more in-depth deets about the adult version HERE but couldn’t leave out a few of our amazing testers from this re-release! How gorgeous do they look?!?!


In case you were looking for some more inspiration, you can find all of our tester images in our Facebook group!  Go check them out: Essential Tank Facebook Album | Essential Tank – Youth Facebook Album

Are you ready to sew your new favorite tank?  Go grab the patterns now!  If you already purchased the Essential Tank, just go into your downloads and download the file again.  (you will see 2016 and 2020 on the copyright so you’ll know its the updated one 😉 )

ESSENTIAL TANK | ESSENTIAL TANK – YOUTH | ESSENTIAL TANK – ADULT/YOUTH BUNDLE


Last but not least, check out some of our previous hacks!  OPEN BACK ESSENTIAL TANK and MATERNITY

The release sale (no code needed) will be through Wednesday, July 29th (11:59PM US Central Time Zone).

Happy Sewing, Pirates!

Filed Under: Pattern Release Leave a Comment

Essential Tank- Open Back Hack

June 12, 2016

Presentation1

I’m excited to share another hack to the new Essential Tank pattern! I’ve seen this look in the popular athletic wear brands and love it! But being 5’10” means no way I can buy it off the rack, even if I wanted to splurge on the price tag 😉

So, I hacked the newest pattern in the P4P collection and I’m so in love with the result! I used a brushed polyester blend that is super soft.

listing pictures1 listing pictures3

I took the front and raise the neckline by 2″ (although the inspiration tank was probably 3″ higher I just can’t take a neckline that close!). Make sure your neckline ends at a straight angle or you will have a point when you open up your folded front.  If you have a french curve use it for a nice smooth neckline. If not, you can get it as smooth as possible.

IMG_6990

Next I cut the back. Here I cut the full piece to help demonstrate, but you can skip cutting the entire piece to save on fabric.

IMG_6993

I took my straight edge and alined it to the widest part of the racerback.  I sliced it straight from the top of the shirt to the bottom hem. (I’ll mention here I did shirt length cutline. but left it unhemmed).

IMG_6995

Then I cut another MIRROR image back piece.

I decided to leave my hem and back edges raw. If you wanted to hem, go ahead and hem those back center edges now.

Tip-I ALWAYS cut a center notch on the necklines of every shirt- they’re cut on the fold and you always need that center mark for attaching your neckband marked anyways.  It is such a quick, easy time to mark it with a notch!

With both right sides up and aligning the center, baste the overlapping sections along the neckline.  Looking back I would also advise to baste just outside the 3/8″ seam allowance as well to hold it in place while attaching the neckband. It’s such a small section that extra baste will really help keep it nice and neat.

IMG_6997

Then just sew up the shirt as the tutorial recommends, treating the back as 1 back piece.  If you make the neckline higher you will need to shorten your neckband a bit as well.  A good ratio is about 80-85% of the finished neckband plus your seam allowance.

IMG_6999 IMG_7001

And wa-lah! Now you can waer it open and loose or tie it at the bottom for a more fitted look! And a big bonus (for me anyways ;)) is that you can untie the back and it’s super nursing friendly! I already have 2 more fabrics that need to become this hack! I can see myself wearing these with some capri peglegs throughout the hot TX summer!  I have it paired with a cute Siren Swim Top I made for a sports bra!

13402172_151754171904282_974103483_n(1)

Don’t forget to share your final creations in the P4P Facebook group, tag me on Instagram, or in your favorite sewing forum! <3 I absolutely love to see your P4P creations!


Filed Under: Pattern Hacks Leave a Comment

The Essential Tank | Pattern Release!

June 9, 2016

If you’re like a ton of other women on our Facebook group, you’ve been checking the page daily…ever since Judy posted that first sneak of the new tank top pattern.  Well guess what?  The wait is over!  It’s here!

Allow me to introduce you to the newest P4P pattern: The Essential Tank.

listing pictures1

Probably one of the most appropriately named patterns in the lot, this is going to be your new essential for summer.  It’s a quick, easy, and super flattering sew.  And is jam packed full of options!

The Essential Tank is the perfect everyday tank. It is fitted at bust and semi-fitted through waist and hips.  Wondering where it stacks up against the other P4P patterns with fit?  Judy has an amazing blog that compares the fits of her patterns HERE.

listing pictures3

The pattern is drafted for sizes XXS – Plus 3X.  There are FIVE hem lengths (dress, shirt, tunic, curved and maxi), two strap types (straight and racerback), and two arm/neck finishing options (binding and traditional tshirt bands).  And on top of all of that, we have also included a  PDF layers feature for printing.  Want to learn more about how to measure yourself for this pattern?  We’ve got you covered with an in-depth blog HERE.

Go grab yourself a copy of the Essential Tank.  It will be discounted through the end of the weekend, no coupon needed.

Hoping for more inspiration?  Take a peek at all of our fabulous testers!  And if that’s not enough, head over to the Essential Tank album on Facebook for more.  Happy sewing!


Filed Under: Pattern Release 1 Comment

Essential Tank Maternity Hack | Guest Post

June 9, 2016

MATERNITY BLOG TUTORIAL: Applying the Layer Me Up Maternity Modification to Other Patterns For Pirates Patterns

Guest Blog Written by Kelly Bailey

LAYER ME UP_edited-1

Hi there! I’m Kelly and I am here to share with you my knowledge of making maternity garments; more specifically, how to apply Judy Hale’s Layer Me Up maternity modification to the rest of her other patterns. I have been a pattern tester for Judy for a while now and love it. I also run my own sewing shop Spindle & Seams and I work for the fabric shop So Sew English! If you are here I imagine you are expecting or expecting to sew for somebody who is. Congratulations! This is a step by step tutorial and I hope that after reading through this you feel much more comfortable trying your hand at maternity wear. For this tutorial you will need your pattern of choice and the Patterns for Pirates Layer Me Up Maternity pattern.

NOTE: I am 20 weeks gestation (4th baby) in all of these photos.

PHOTO 1

STEP 1: Does the pattern even require a maternity modification?

Does the pattern your thinking of making really need a maternity modification? There are several patterns out there that are maternity friendly without even trying to be and some that would turn into a mess if you tried. Two of my favorites are the Patterns for Pirates Free Spirit Tank in the curved hem and the Boundless dress in the empire waist option. The Free Spirit tank leaves lots of ease throughout the bodice and angles out wider as it approaches the bottom hemline. The Boundless dress, in an empire waist, is only fitted just under the bust and accentuates the baby belly in the most darling way! The Everyday Elegance can also be maternity friendly if you opt to make it using a knit fabric with great stretch. This one has a lot of ease throughout the bodice even without using knit fabric but definitely will fit you until the end if knit is used. Some patterns just are not meant to be altered to be maternity. There is one P4P pattern that I just wouldn’t attempt for this purpose; the Sweetheart dress and peplum. This pattern is drafted to be an “at the waist” and is very fitted from the waist up. The Sweetheart looks best in thicker, more stable knits like ponte or scuba that only provide restricted stretch and are the most fitted in a location where your belly is going to grow drastically.

So when looking at a pattern ask yourself; Does the pattern have an empire waist? Does it have an at the waist skirt/peplum? What is the ease like through the waist and hips? What patterns cannot be modified easily for maternity and which ones IMO just wouldn’t look great on me? What kinds of patterns are COMFORTABLE for maternity wear? Will I be able to wear this garment post partum to ease the transition back into non pregnancy clothes?

Here is a rough guide of the patterns I would, wouldn’t or might alter:

Patterns that don’t necessarily require maternity modifications:

  • Everyday Elegance
  • Free Spirit Tank
  • Boundless Dress

Patterns that I wouldn’t attempt to make maternity:

  • Sweetheart Dress and Peplum Top

Patterns that can be easily modified for maternity:

  • Layer Me Up
  • Pumpkin Spice Dolman
  • Sweet Tee
  • Relaxed Raglan
  • Slim Fit Raglan
  • Women’s Henley
  • Boyfriend Vneck
  • Essential Tank and Dress

BOUNDLESS DRESS_edited-1 FREE SPIRIT TANK_edited-1EVERYDAY ELEGANCE_edited-1

STEP 2: Choose your fabric content wisely. What fabrics to use for maternity and what to avoid.

Sometimes you can get away without making any maternity modifications if you use the right fabric on a pattern that has enough length to accommodate. Tunic length garments can be a great way to have a before and after baby closet staple. But most of the time you will need to make the modifications to comfortably fit until after baby is born. Here are a list of some knit fabrics to use and some to try to stay away from when sewing maternity.

Fabrics that are great for maternity use:

  • Rayon Spandex Blends (This can include french terry)
  • Polyester Spandex Blends (like ITY or brushed poly)
  • Cotton Spandex/Lycra Blends (This can include french terry)
  • Cotton Spandex Interlock Knits
  • Liverpool depending on the amount of horizontal stretch
  • Lightweight Sweater knits with lots of stretch

These fabrics all have great stretch and recovery. 4-way stretch is great but because you are adding in length to the front bodice you can easily use 2-way stretch knits as long as the horizontal stretch is pretty good.

Fabrics to try your best to steer clear of using for maternity wear:

  • 100% cotton Jersey knits or Interlock
  • 100% cotton French Terry
  • Ponte
  • Scuba
  • Nylon spandex and other athletic knit blends

These types of knits typically do not have very good overall stretch or they have what I call restricted stretch. Restricted stretch would be a fabric that has good overall stretch but is tougher to pull to get there. Similar to how some athletic knits try to hold you in as you work out. Maternity garments made with these knits may fit for a little while, but will likely not comfortably last you up until that cute little babe pops out of your full-grown belly.

Now that you have chosen a good sewing pattern and paired it with the right fabric we can move on to altering the front bodice piece of your chosen pattern. There is no need to alter any other pattern pieces. Yay!

STEP 3: Assembling and analyzing your maternity modification pattern piece and what the modifications mean.

Your Layer Me Up maternity pattern is going to give that belly some ease throughout the waist to accommodate growth width wise. It is also going to give you more length through the front bodice to completely cover your full-grown baby belly. You definitely don’t want your hand crafted top turning into an early 90’s belly shirt ¾ of the way through your pregnancy! For this tutorial you are going to need to purchase the Layer Me Up maternity mod pattern and a maternity mod friendly pattern of your choice. Now is the time to assemble both of these patterns and to cut out your sizes. Pay attention to your current bust and hip size. They may have changed since before you became pregnant. You may need to do some pattern grading because of it. See Judy’s blog post on pattern grading if this is something new to you.

PHOTO 2


STEP 4: Picking the pattern you wish to modify and lining up the maternity mod pattern correctly on top of it.

Now we are going to lay the pattern pieces on top of one another to see where we need to make modifications to our non maternity pattern. We will only be modifying the FRONT BODICE piece of the non maternity pattern. We are using the Layer Me Up maternity piece as a guide to adjust our original pattern. Line up your maternity pattern piece on top of your original pattern piece using the armpit at the reference point. The Layer Me Up mod piece should be placed a couple inches below the armpit of our front bodice piece. As you can see in this photo I have also laid the top original Layer Me Up front bodice piece to show that the reference point. If you do not own the Layer Me Up original pattern, don’t worry, just place the maternity piece a couple of inches below the armpit.

photo 3


STEP 5: Adding paper along the original patterns waist curve for tracing.

You can see from the above photo that some parts of the maternity piece fall within the bodice piece of your original pattern, but there are parts that stick out as well. We are going to do some gentle transitioning and tracing on our original pattern to accommodate. First things first, decide where you need to add your tracing paper to your original pattern. Tape that piece of paper into your original pattern like so.

PHOTO 4

Now once again lay your maternity pattern piece over the top so that we can trace the new curve.

PHOTO 5

Be sure to use some gentle grading to transition the curve from your original pattern bodice piece to the maternity pattern piece. Trace along the maternity curve. When you are finished tracing trim off the excess paper.

PHOTO 6

Here is where you can decide to use the full width of the maternity curve or to trim it down about 1/3” to be more fitted for early pregnancy. If you choose to slim it down your top may not fit all the way up to your due date.

STEP 6: Adding Length to the front bodice piece.

Analyze the pattern pieces to see how much length discrepancy there is for the hem lengths. Pick a good location on the original pattern to cut and add in more length there. I like to add the length in at the shortest hem length on the original pattern. Once again, we are going to lay the Layer Me Up maternity piece on top of your original pattern piece.

PHOTO 7

As you can see from the above photo there is several inches of difference between the hem lengths. For this part of the tutorial I am going to illustrate how to add in the length necessary for rouching. Take measure of the difference.

PHOTO 8PHOTO 9

Take note of this measurement and then cut your original pattern piece at the shortest hem length. On this particular pattern, this falls at the curved hem.

PHOTO 10

Add in your blank paper here and tape your original pattern pieces to the blank sheet being sure to only add the measured difference back into the original pattern. Trace a smooth transition line and trim off excess paper on the sides.

PHOTO 11

Now once again lay the Layer Me Up maternity pattern piece on top of your now altered original pattern and be sure that your hem lengths now line up with one another.

PHOTO 12

STEP 7: Transfer over the elastic sewing markings.

Line up the two pattern pieces and from the Layer Me Up maternity add on pattern and transfer the triangle elastic markings to your now altered original pattern.

PHOTO 13

Wallah! You now have altered your original front bodice pattern piece to be maternity! 

STEP 8: Check out your new maternity pattern.

It’s super easy from here! Cut out your altered front bodice piece from your fabric and follow the LMU Maternity mod instructions as written. Make any adjustments through the bodice as necessary for a better fit for you! Again, you do not need to modify any other pieces from your pattern to make it maternity. I highly suggest trying on your top or dress BEFORE you attach the binding or hem in order easily make any necessary adjustments.

ESSENTIAL DRESS_edited-1ESSENTIAL TANK_edited-1


Filed Under: Pattern Hacks 3 Comments

Newest Patterns

  • Uptown Joggers - Youth $10.00 $8.50
  • Uptown Joggers $12.00 $10.50
  • Uptown Joggers - Bundle $20.00 $18.00
  • Notch Top & Dress $12.00
  • Notch Top & Dress - Youth $10.00
  • Privacy Policy
  • Refund Policy
  • Affliliate Program
  • Contact Us
  • About

Copyright © 2023 Patterns for Pirates

Copyright © 2023 · Genesis Framework · WordPress · Log in