Patterns for Pirates

P4P stylish, modern, wearable patterns

  • Home
  • Blog
    • Frequently Asked Questions
    • Pattern Releases
      • Free Patterns
    • P4P University
      • Fitting
      • Sewing with Stretch, Knit Fabrics
      • Sewing with Woven Fabrics
      • Sewing Machines
    • Sew-A-Longs
    • Fabric for Pirates
    • Pattern Hacks
    • Announcement
      • Blog Tours
      • Contest/Giveaway
  • Shop
  • Bundle Discounts
  • Flash Friday
  • Gift Cards
  • My Account
  • Cart

New Pattern Releases :: Sunflower Swim Top + Busy Bee Swim Bottoms!

June 27, 2020

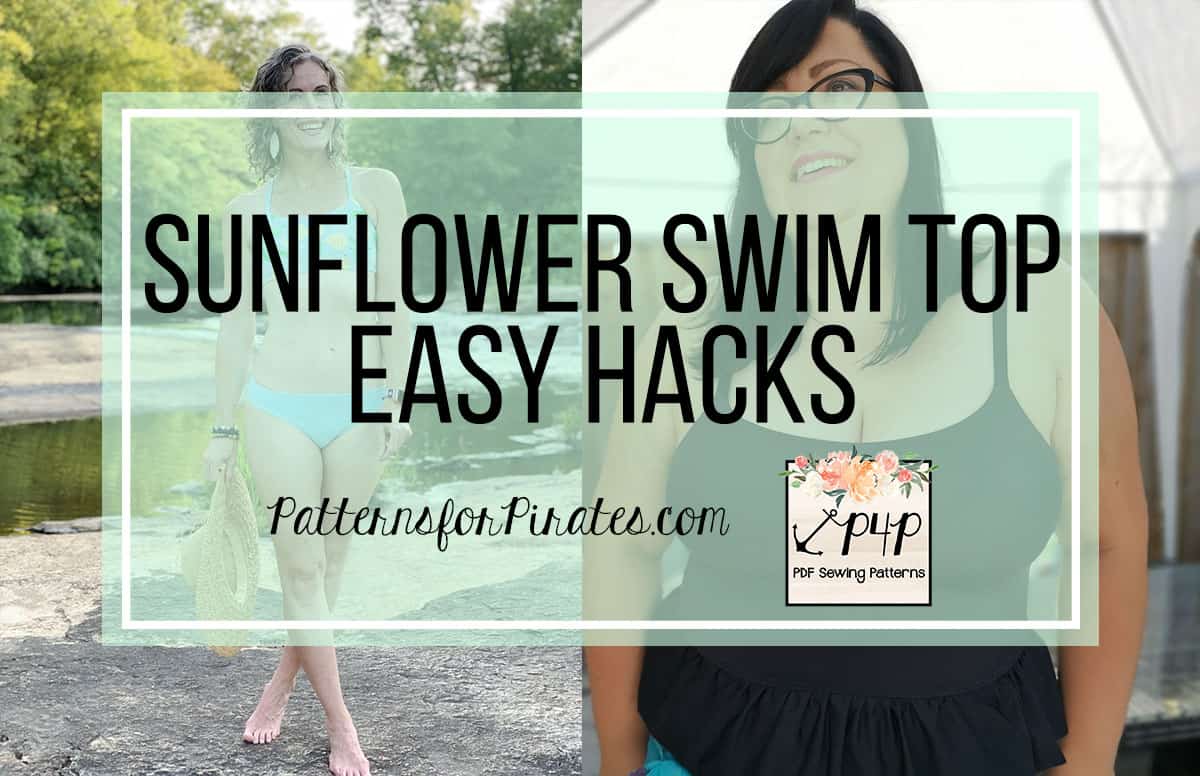
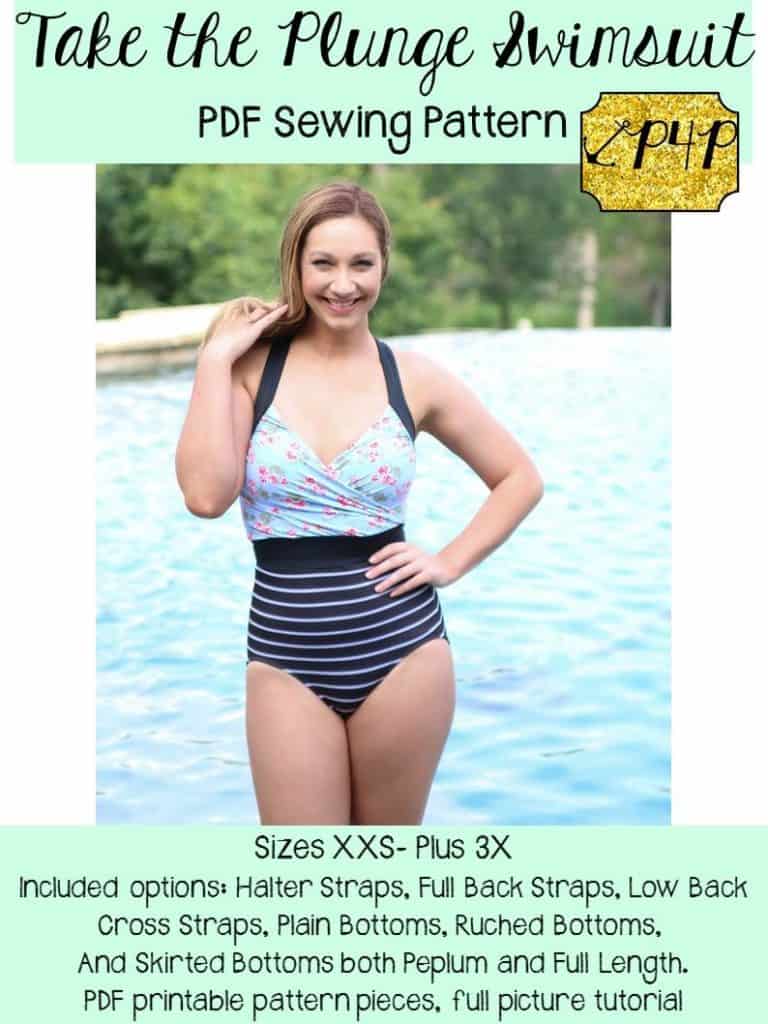
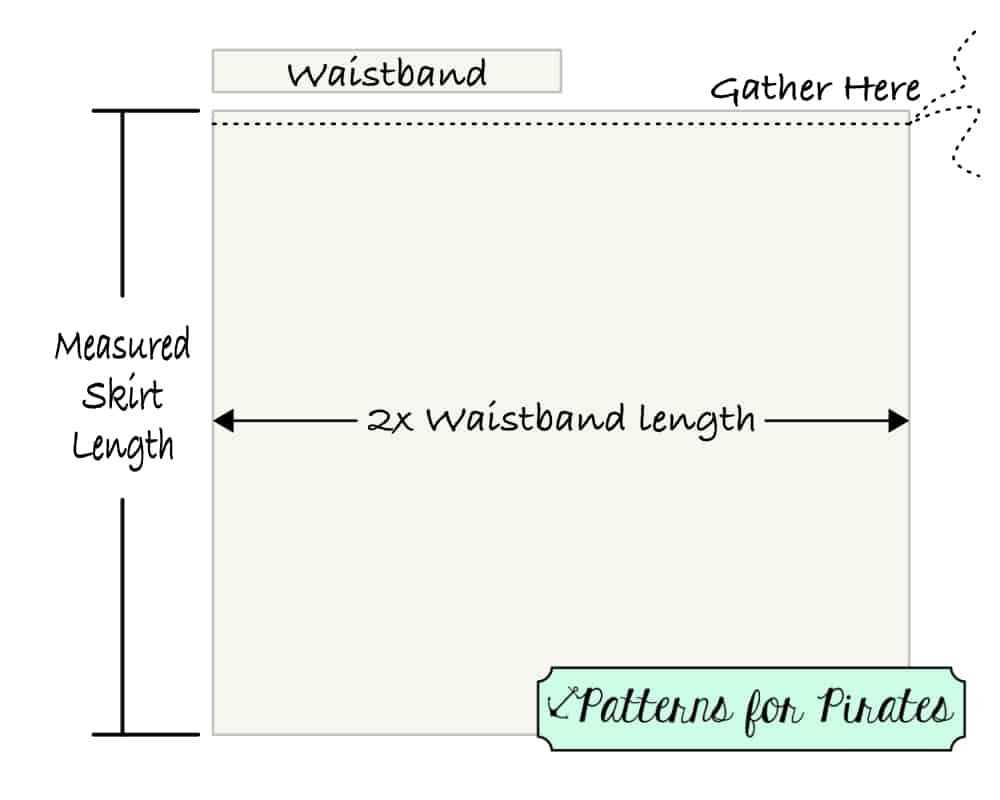
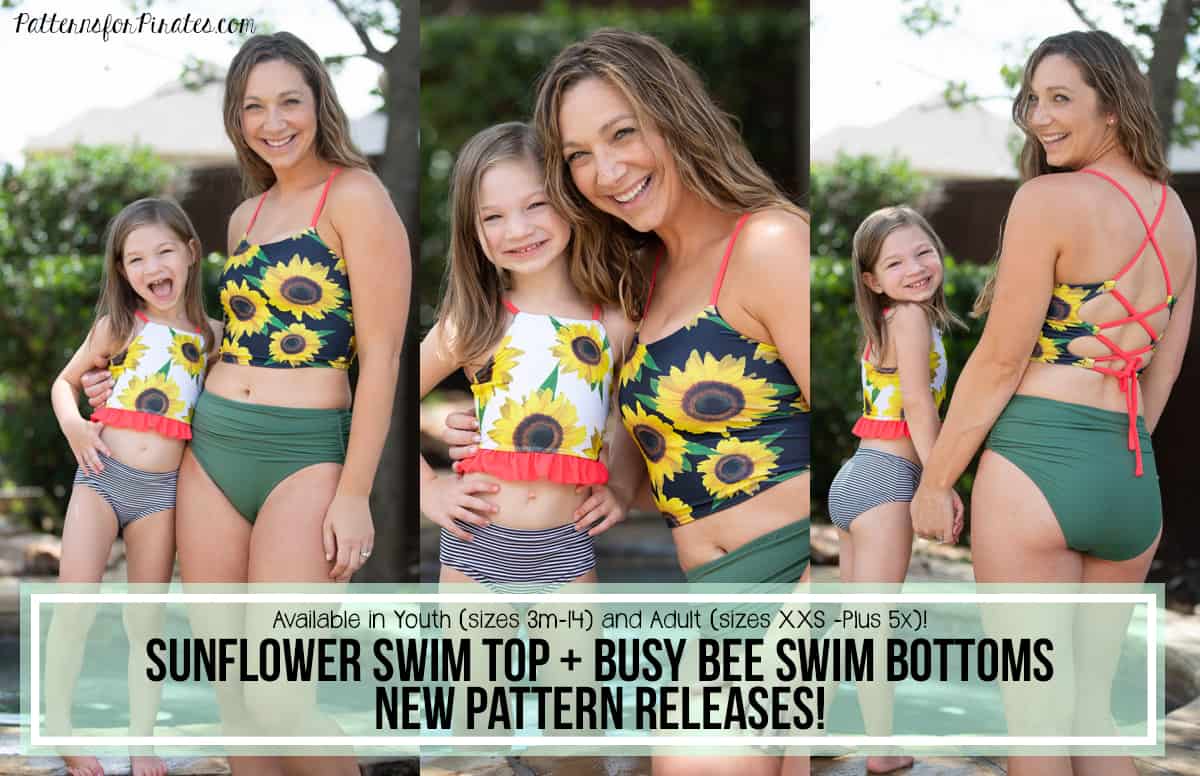
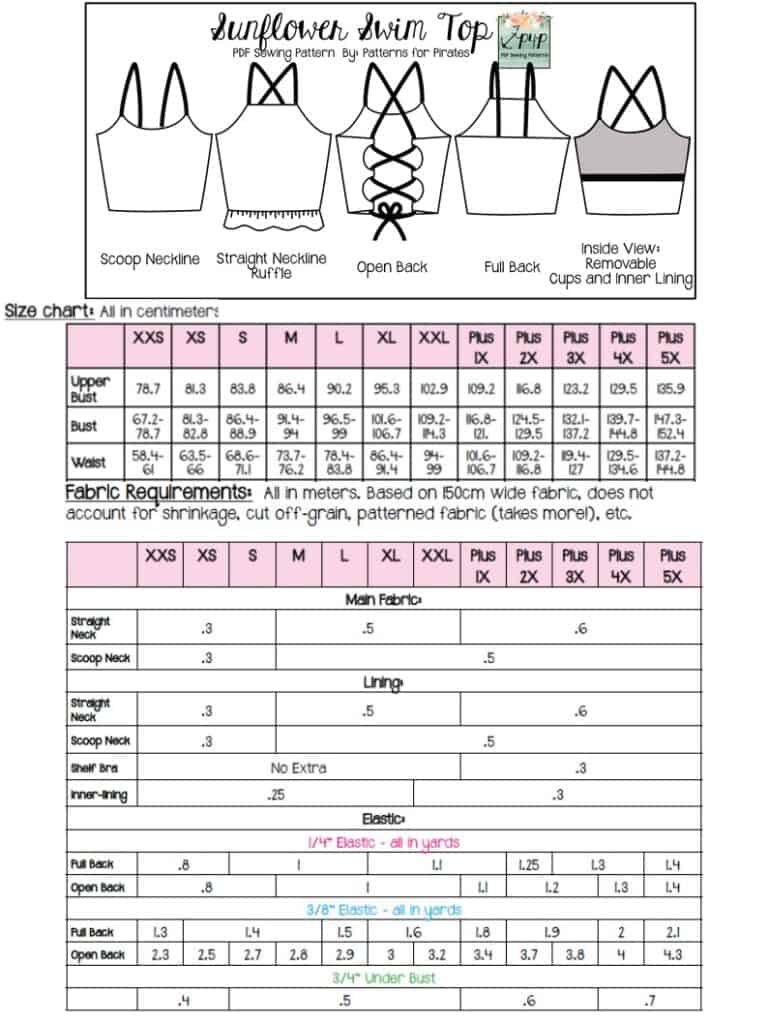
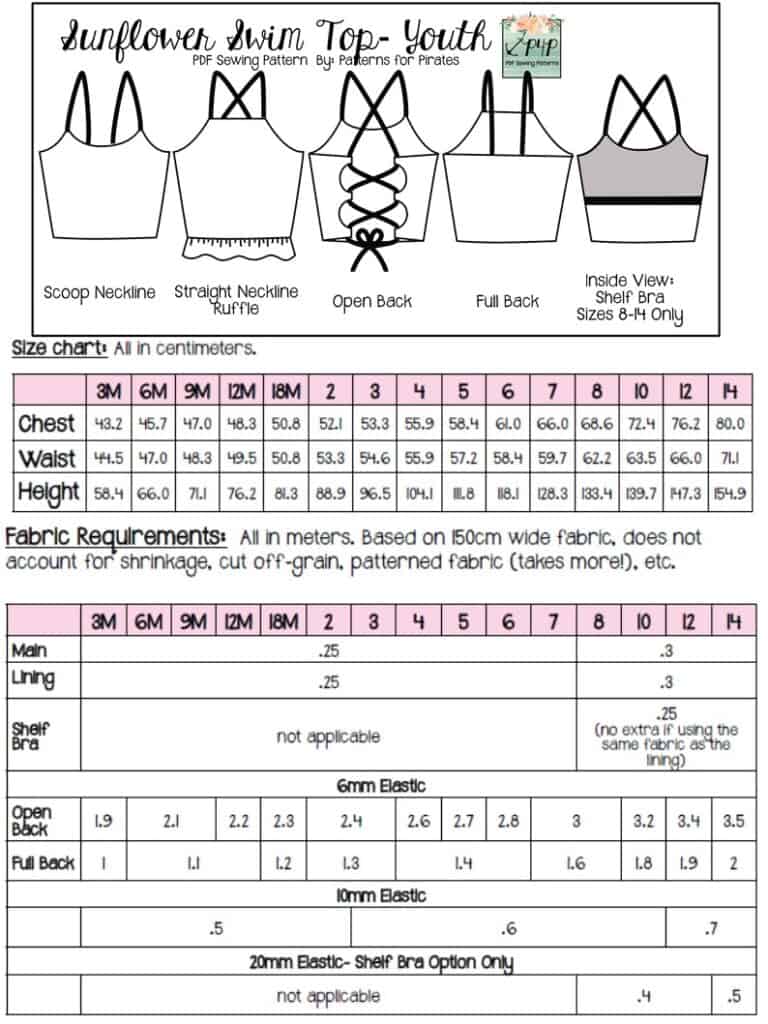
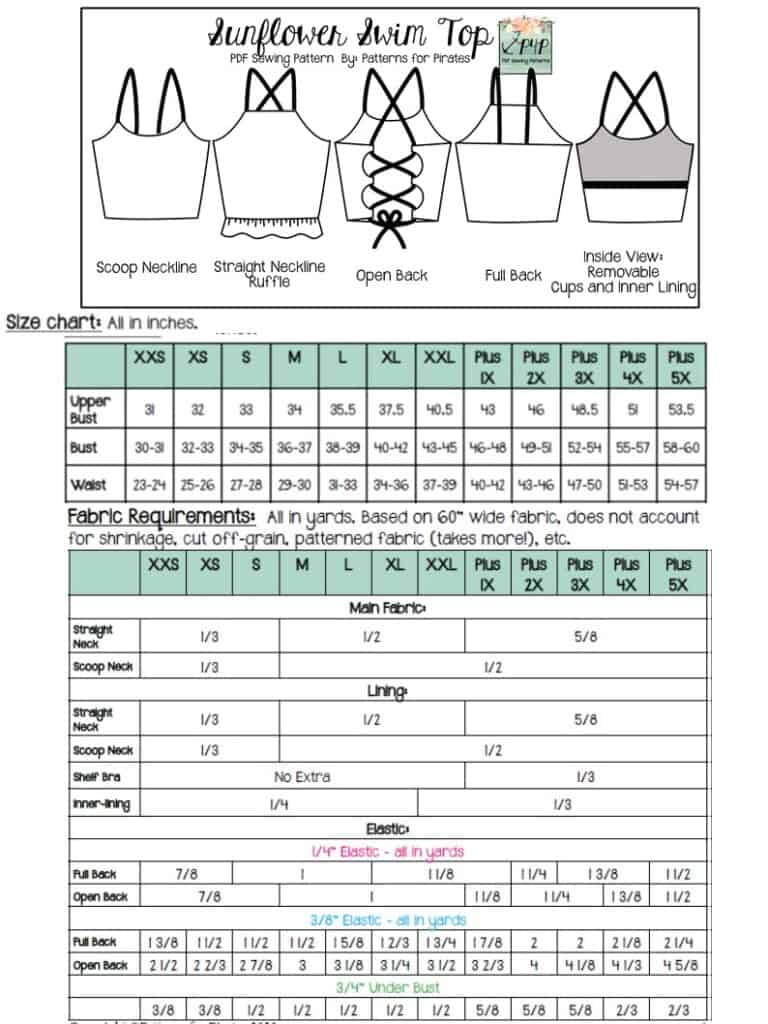
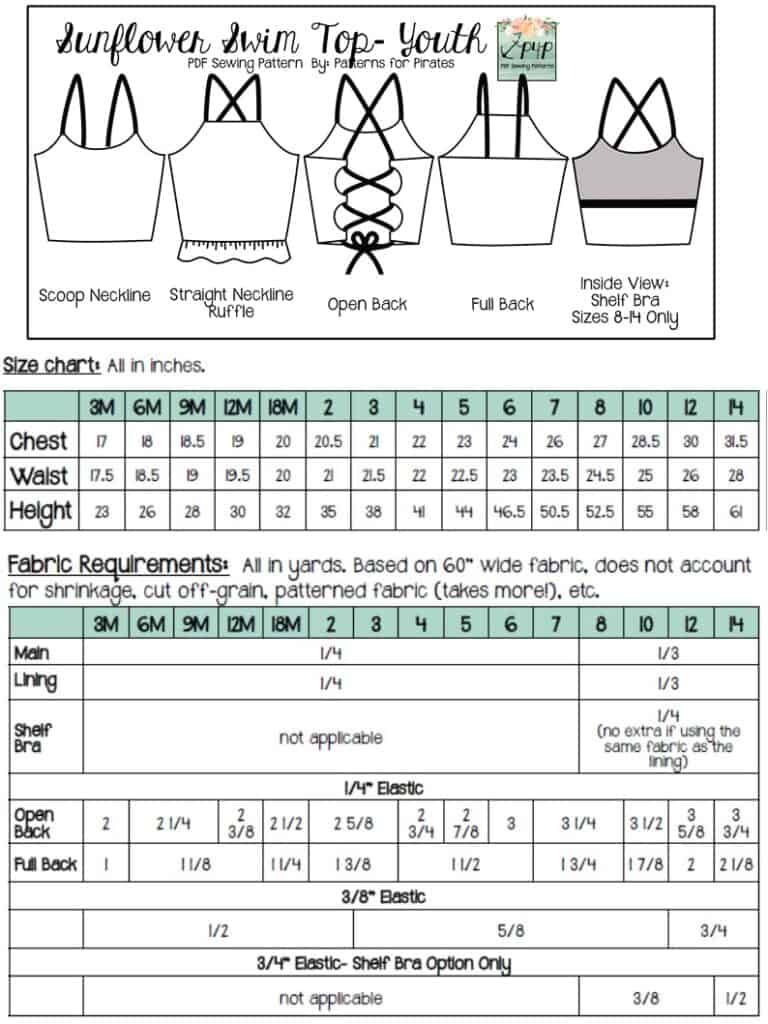
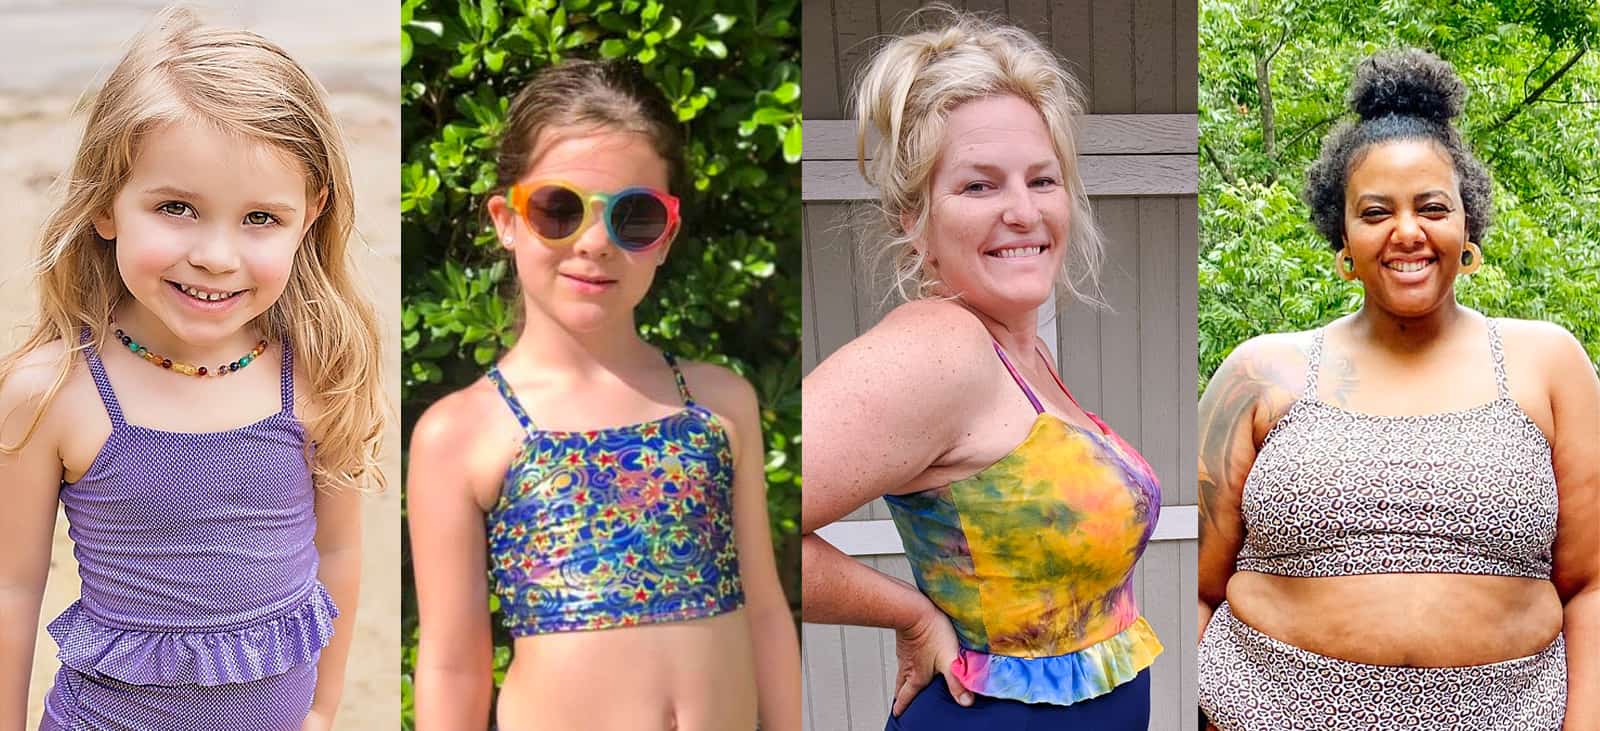
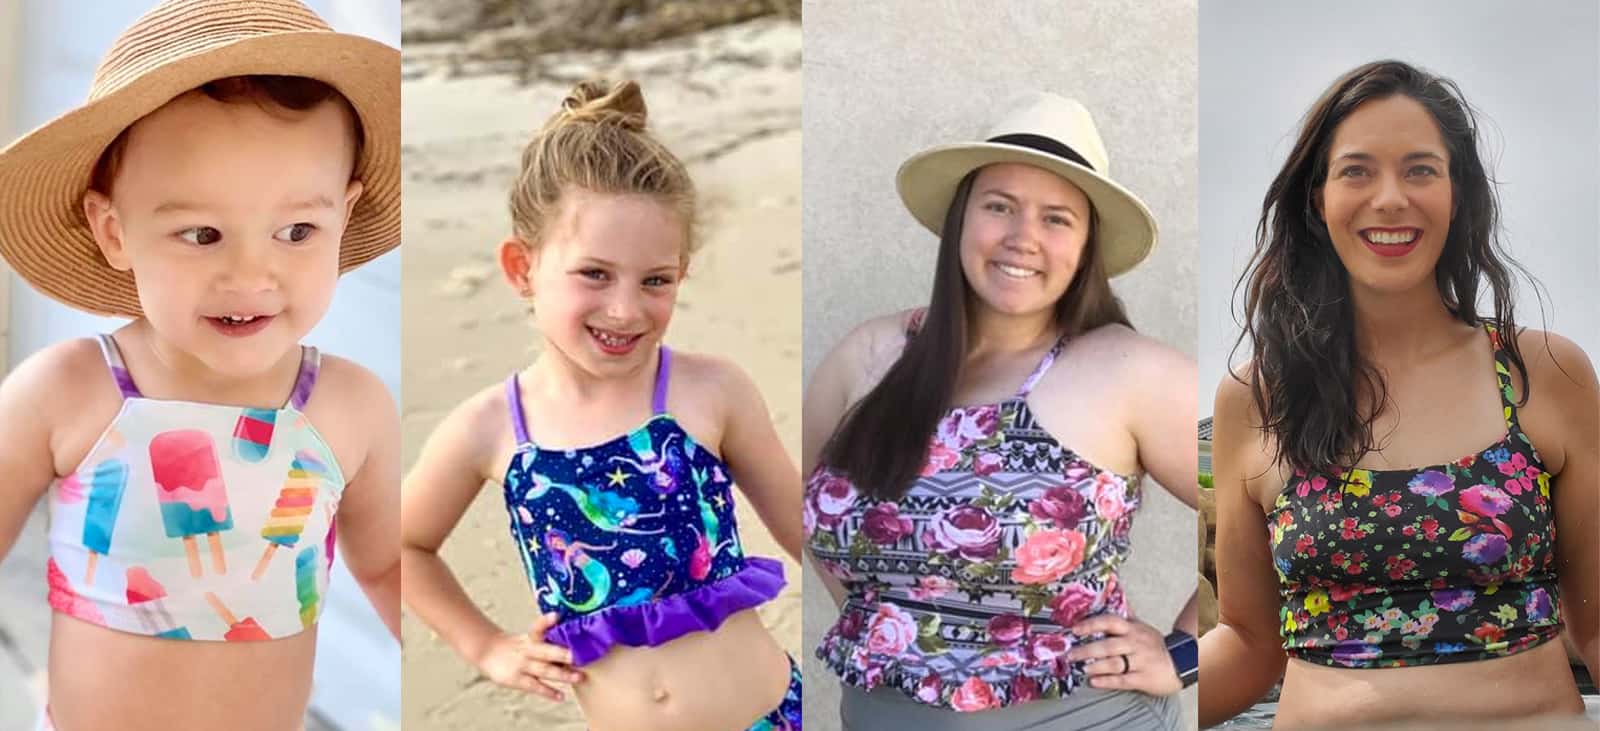
To help your summer go swimmingly well (ba-dum-ching!) we are bringing you a brand new set of swimwear tops and bottoms!  And we couldn’t be more excited about sharing them with you all.  In both adult and youth sizes, we are happy to introduce you to the Sunflower Swim Top and the Busy Bee Swim Bottoms!  For both of these patterns, the youth sizes range from 3m – 14.  And the adult sizes are for the full, newer size chart, extending from XXS – Plus 5X!  If you haven’t sewn with us in a while, please make sure to check the size charts, as there were slight adjustments made to accommodate the new size range for adults.

Okay, now that we’ve got that out of the way, let’s start first by telling you all about the Sunflower Swim Top, shall we?


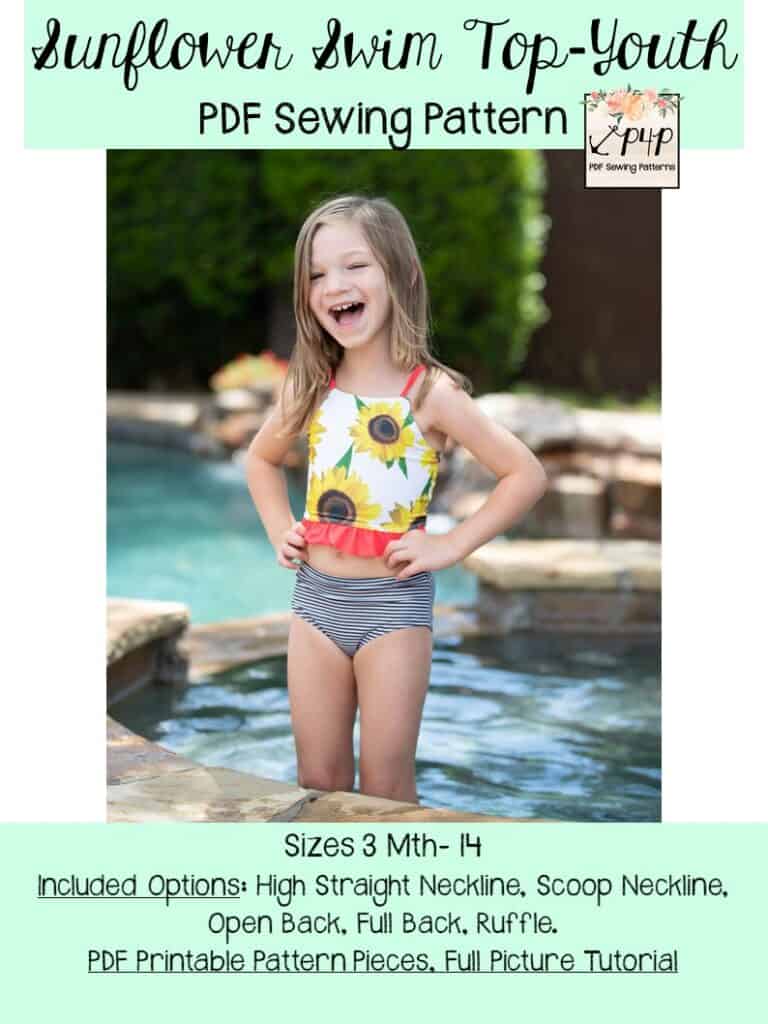
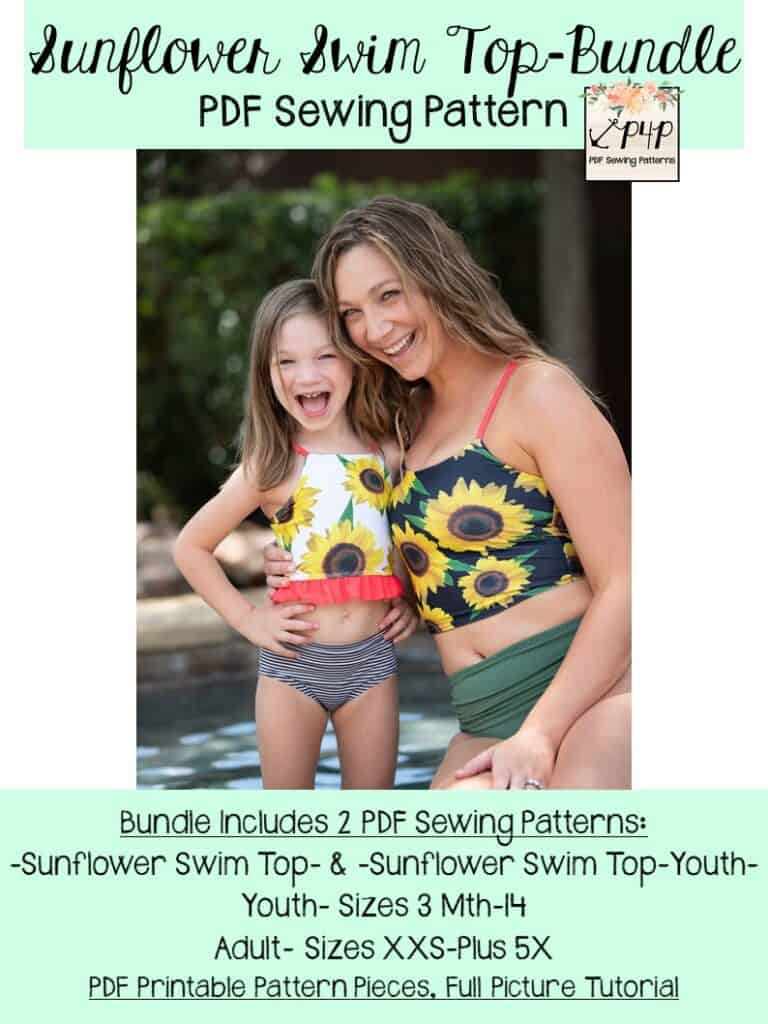
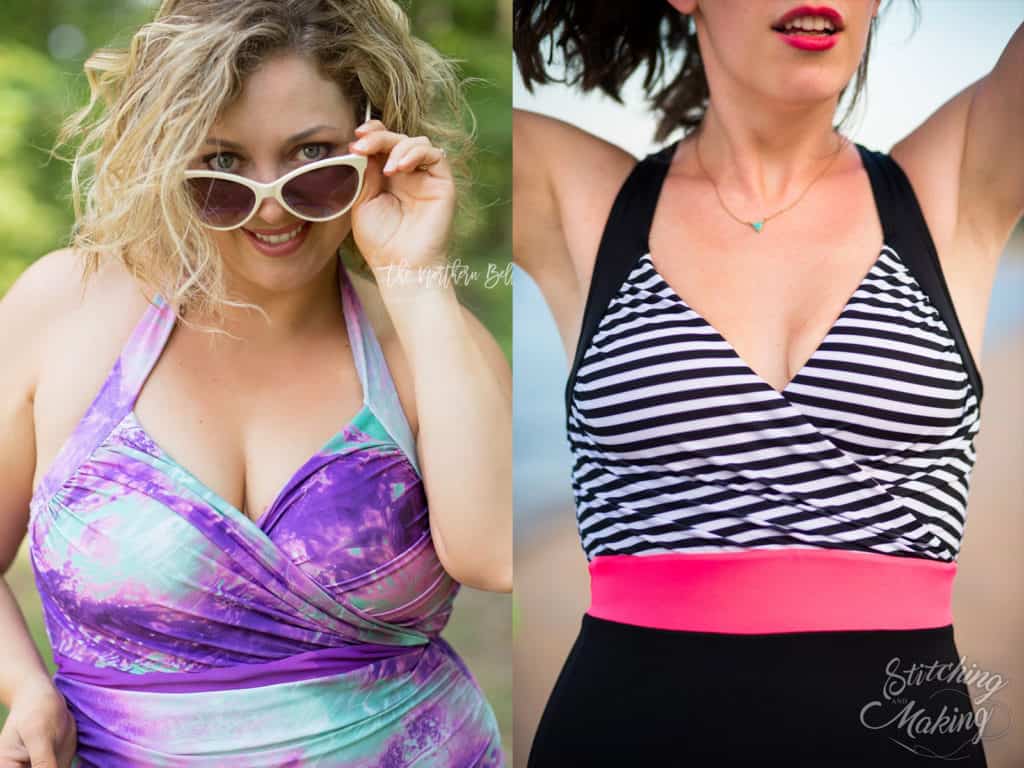
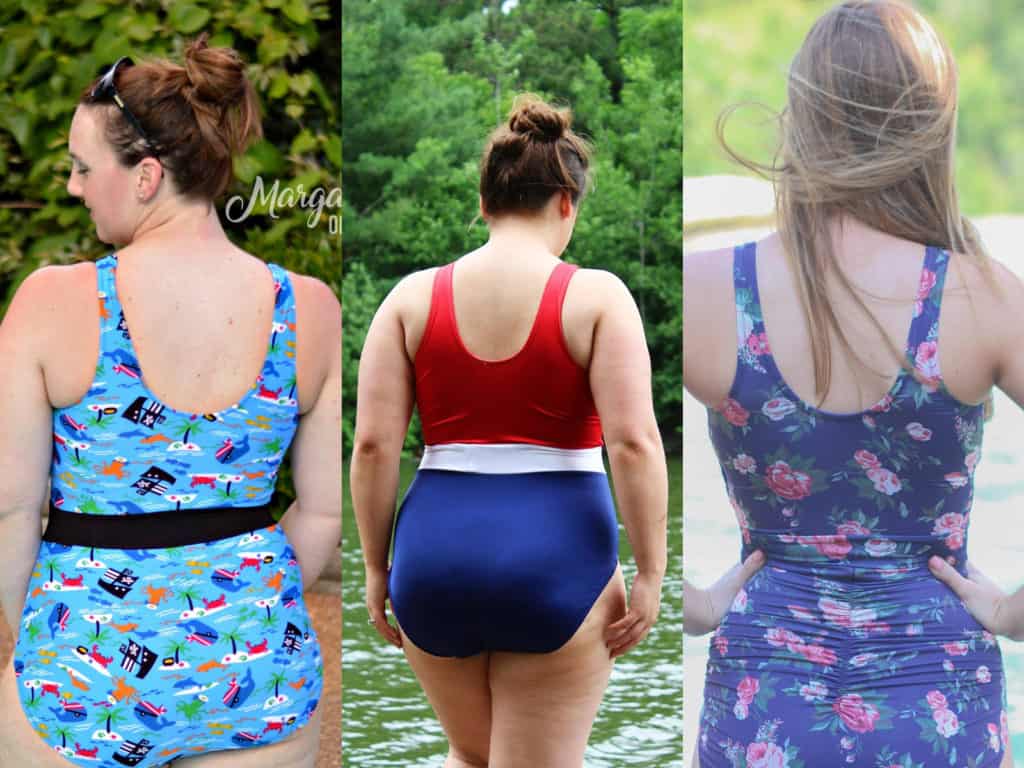
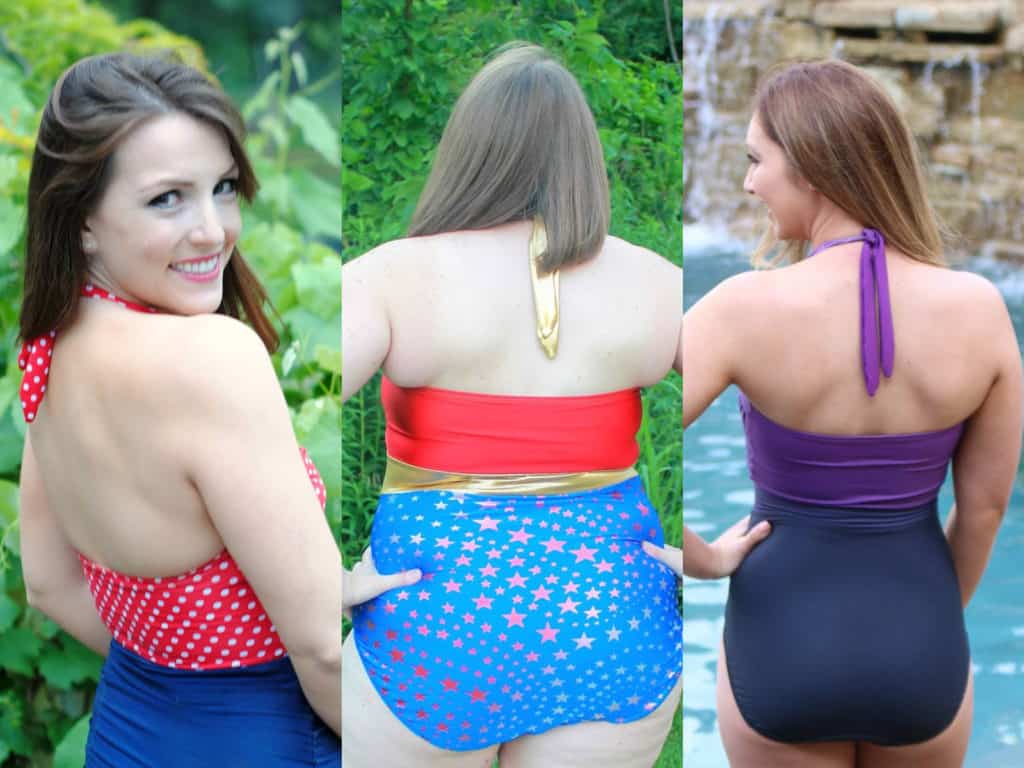
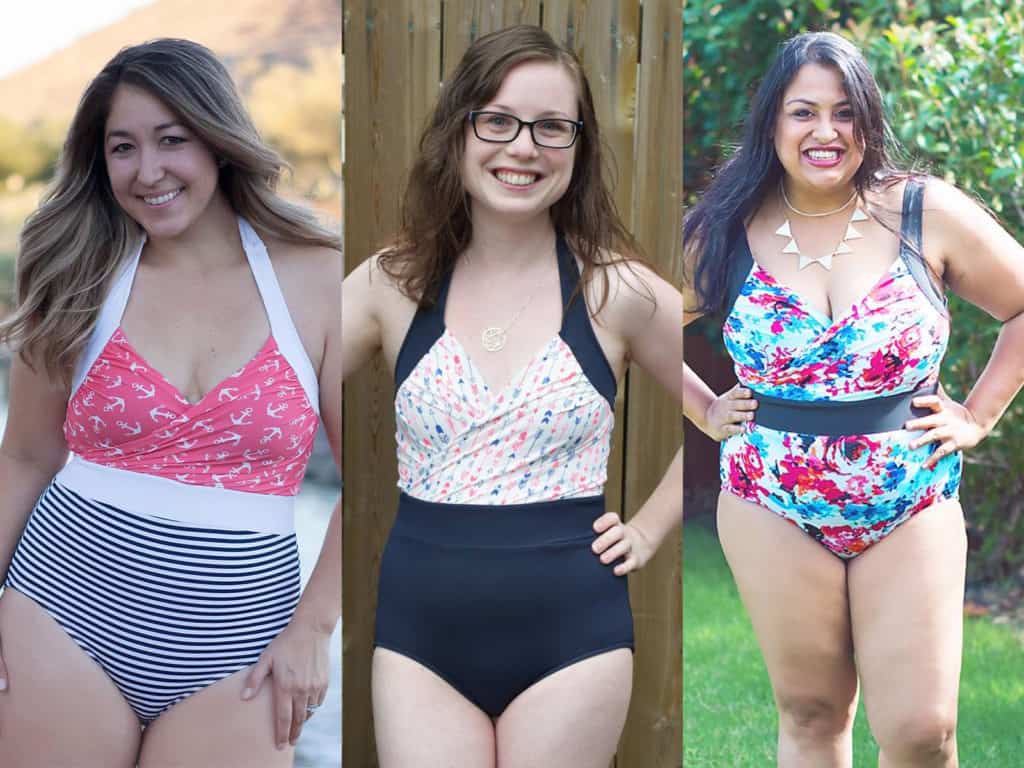
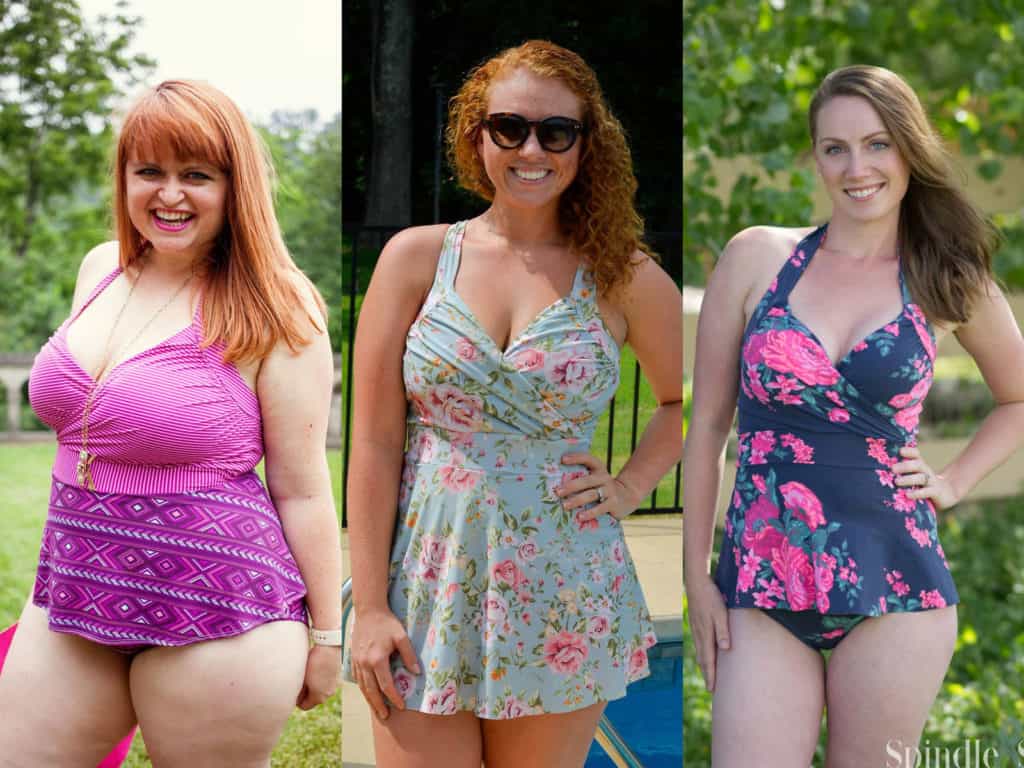
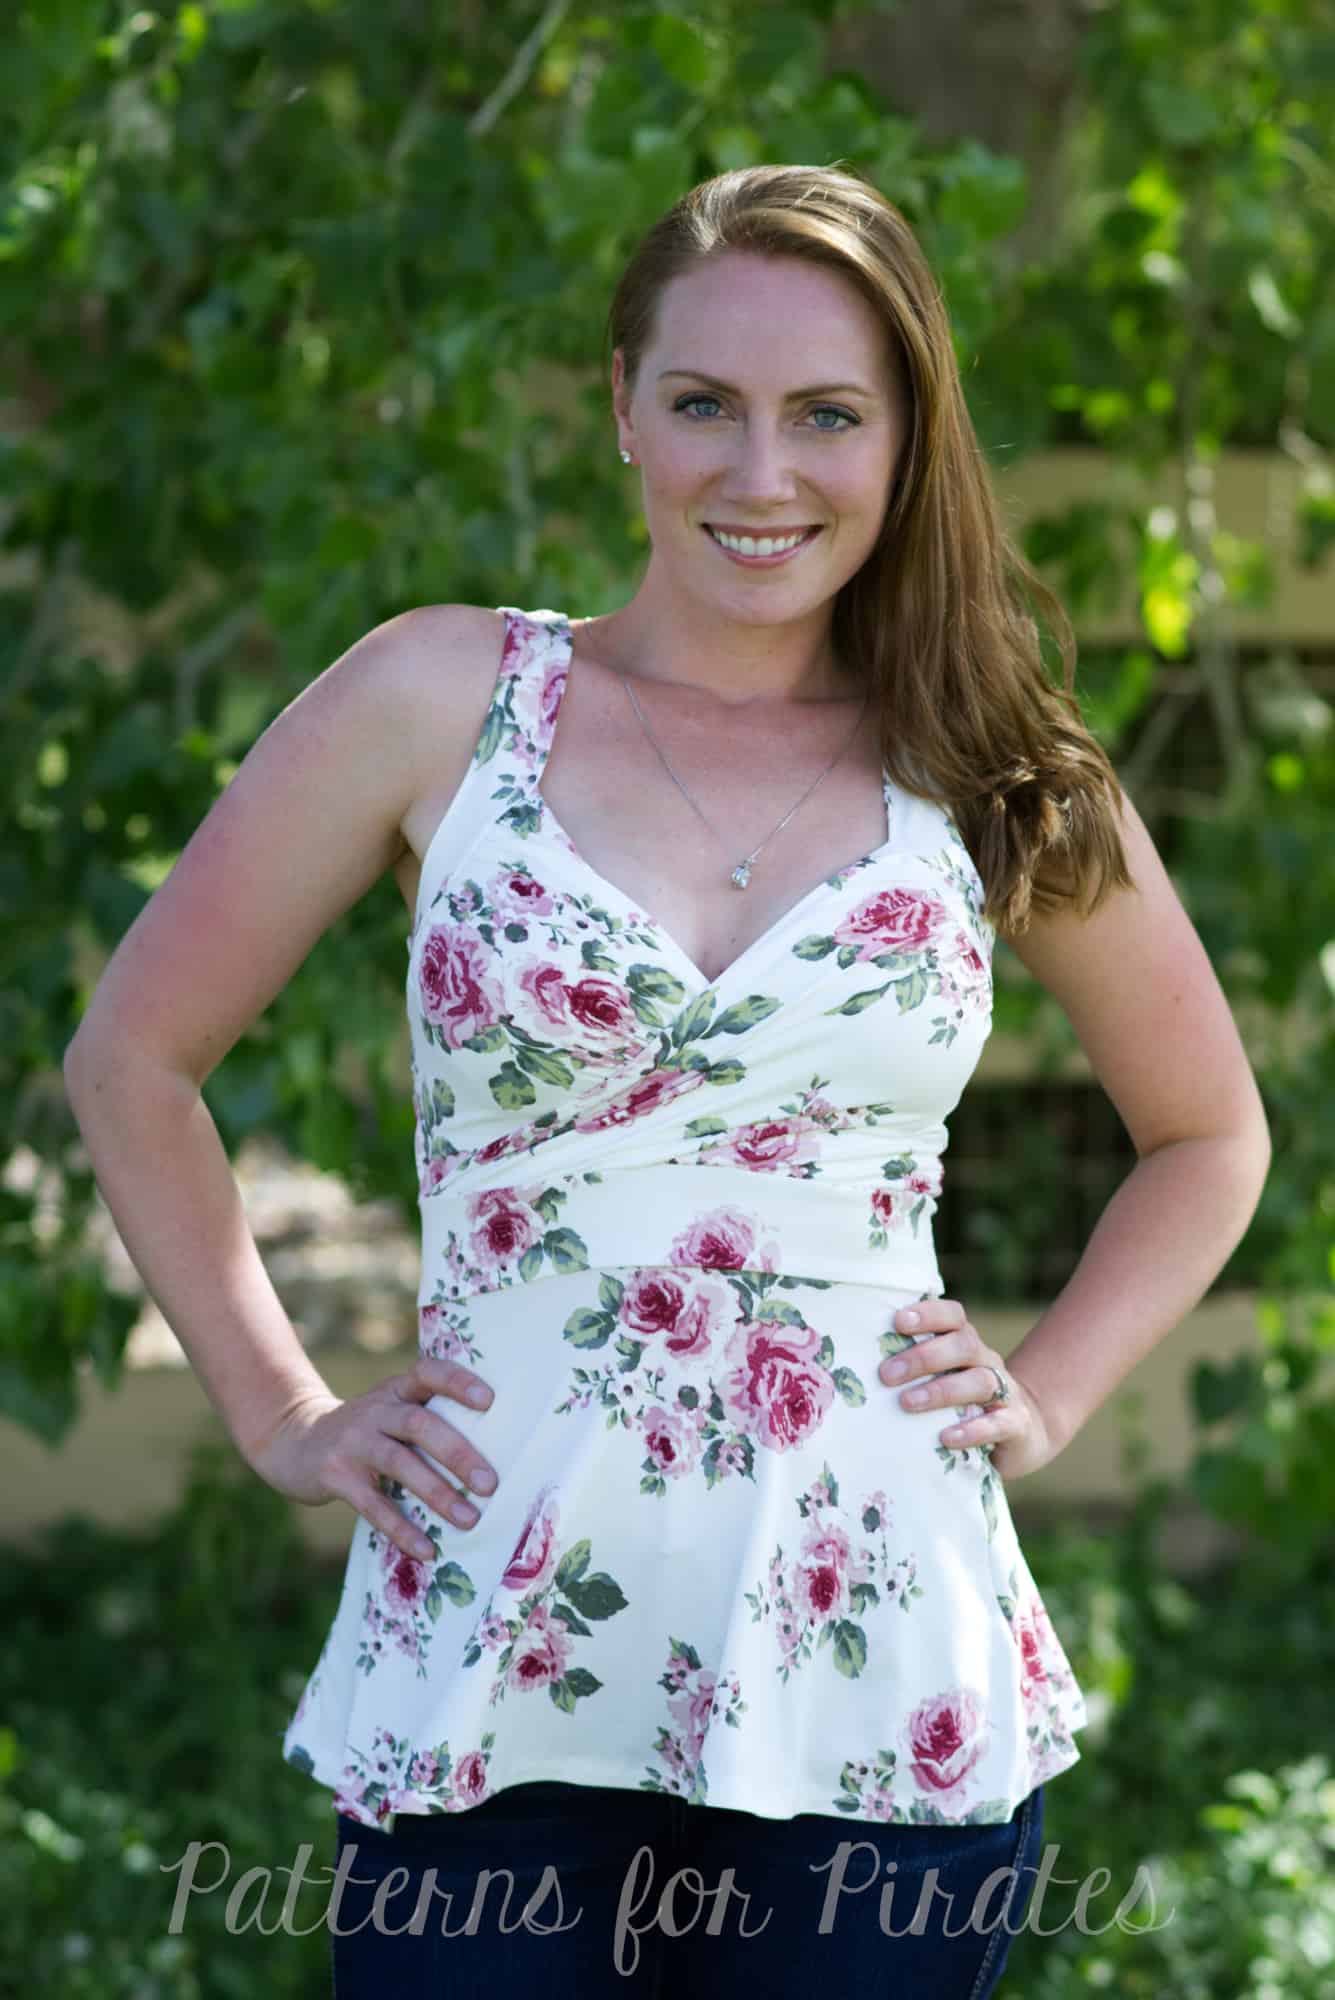
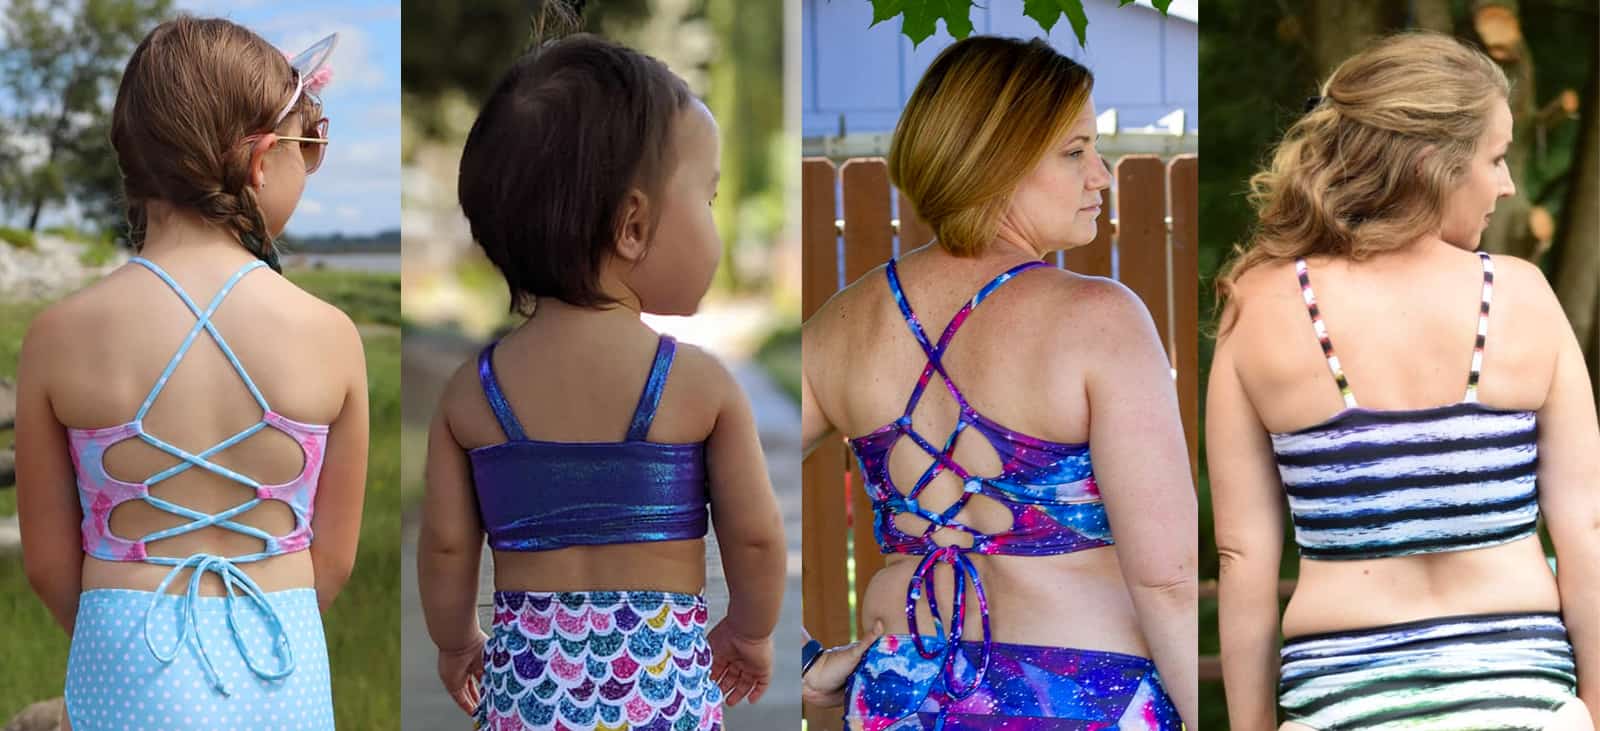
The Sunflower Swim Top is a great beginner swim top to try out if you’re wanting to start sewing swim for adults! The open back is very forgiving in fit since you can tie it a bit tighter or looser to get your perfect preferred fit. You can pick your bust coverage with a higher straight neckline or the lower scoop neckline. The full back is a very quick and easy sew that you can sew up for a simple and quick top. The flattering fit ends right at your smallest point to show off your natural waistline. But if you want a little more coverage you can add the optional ruffle. The top is fully lined and has the optional shelf bra. You can also add innerlining and removable cups to the shelf bra for even more support.

Options include: high straight neckline, scoop neckline, full back, open back, shelf bra, removable cups, and ruffle.

Enjoy several videos throughout the tutorial like complete sew ups of 2 different tops which cover all the options.

SUNFLOWER SWIM TOP | SUNFLOWER SWIM TOP – YOUTH | SUNFLOWER SWIM TOP – BUNDLE


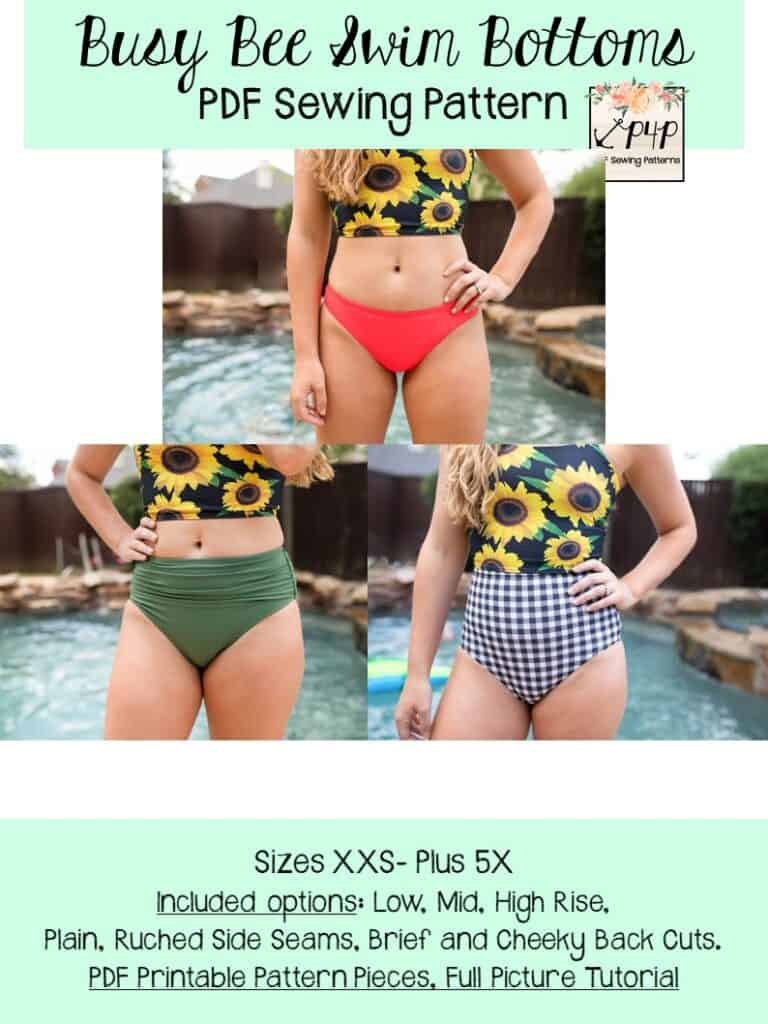
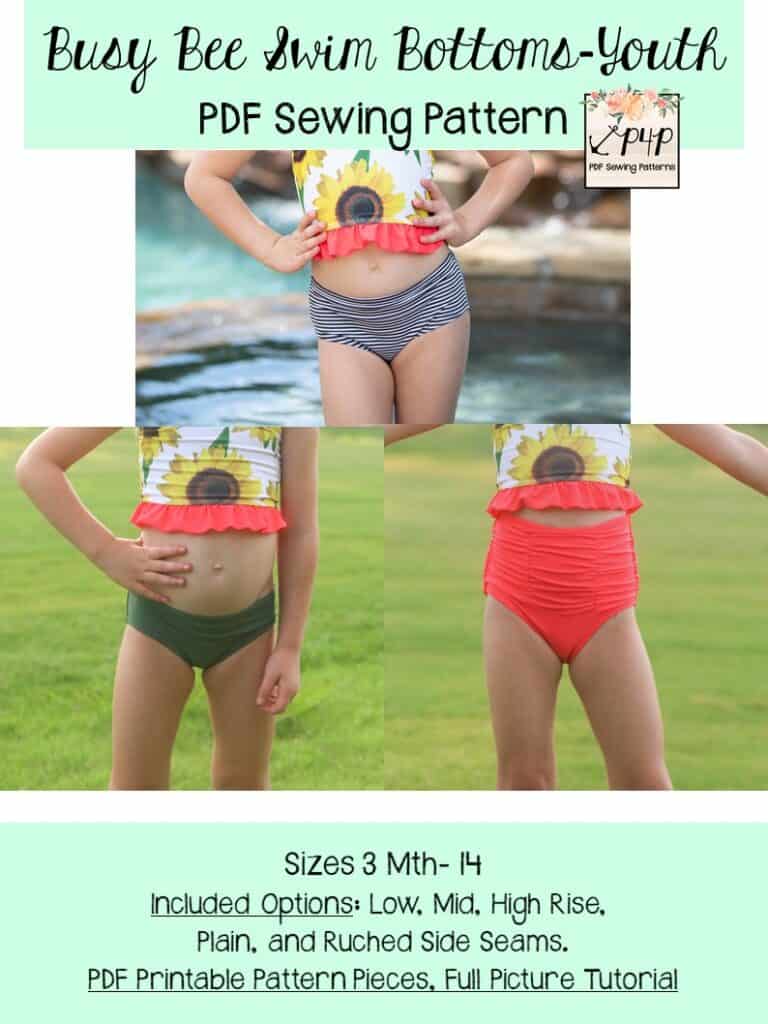
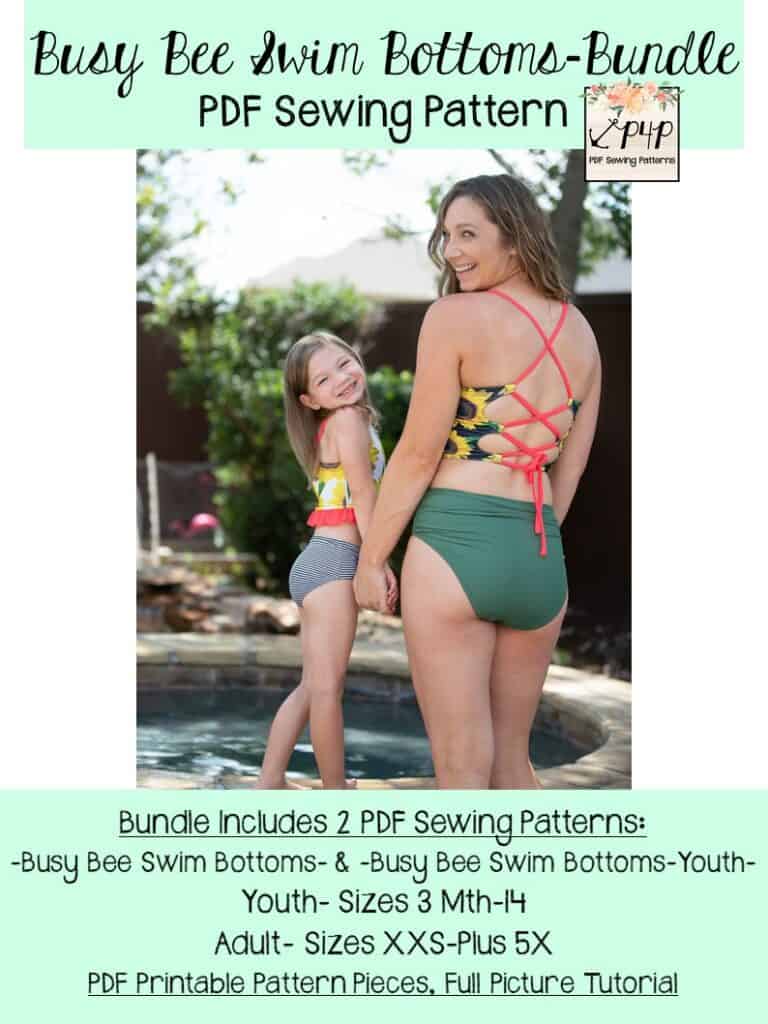
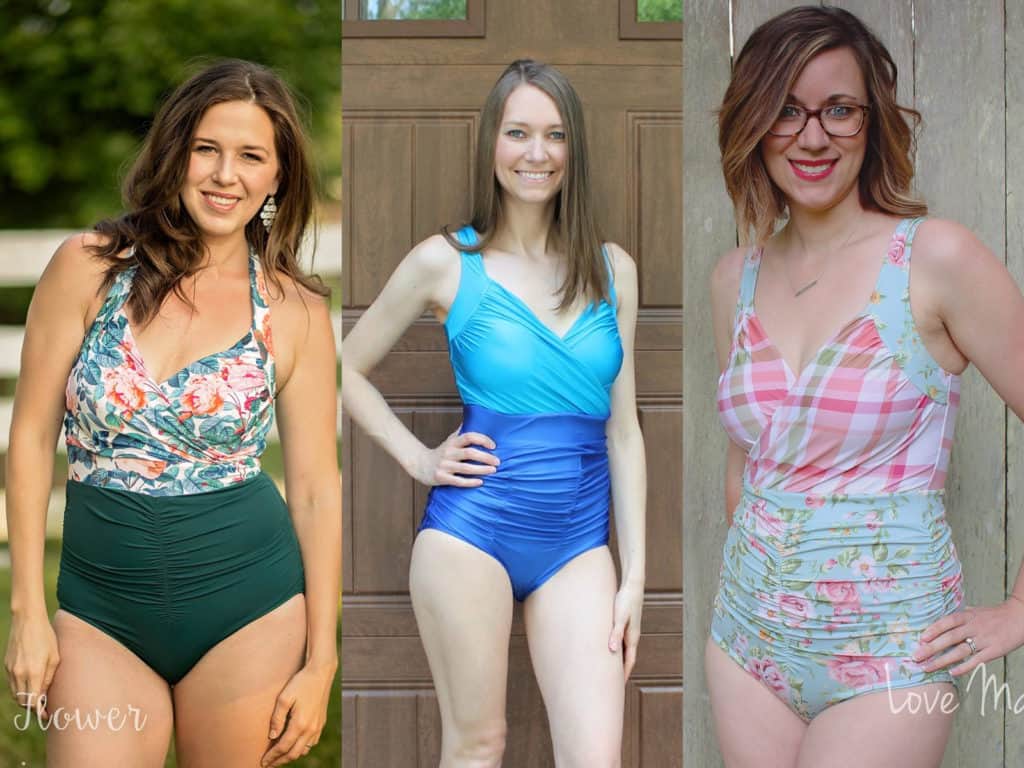
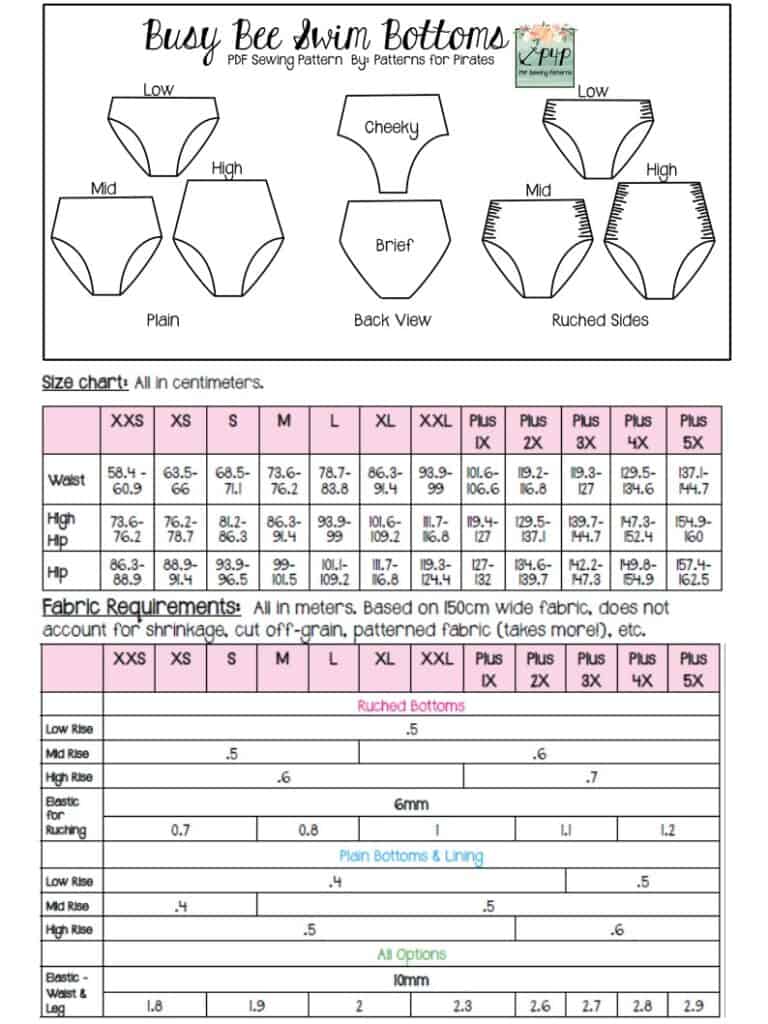
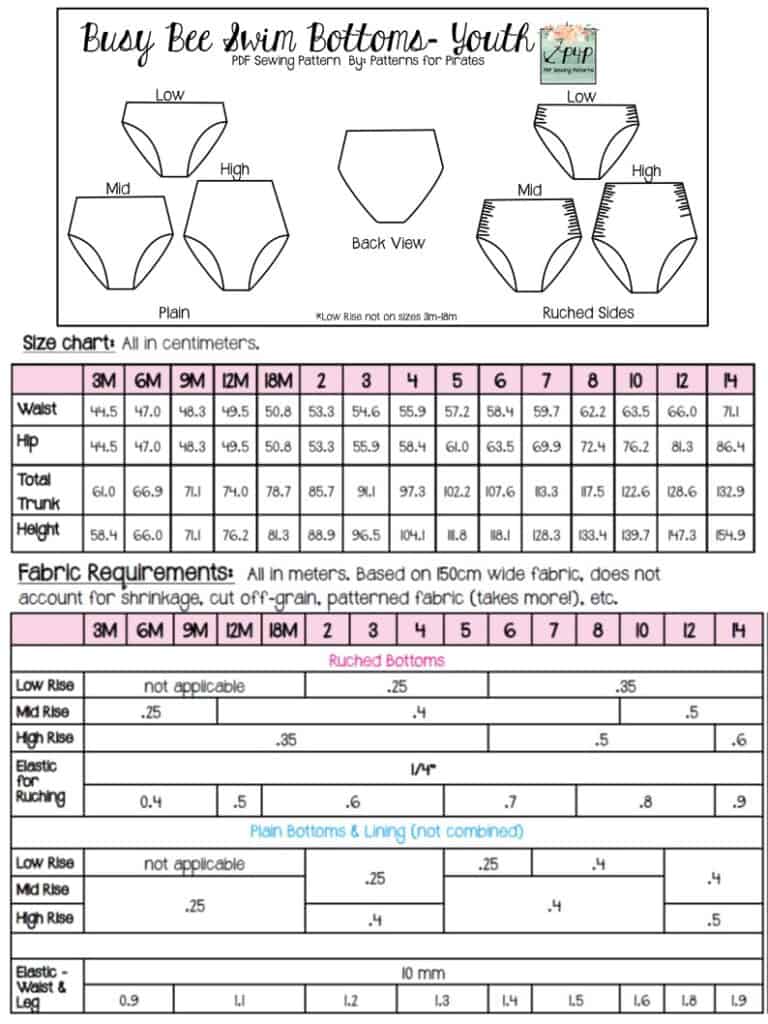
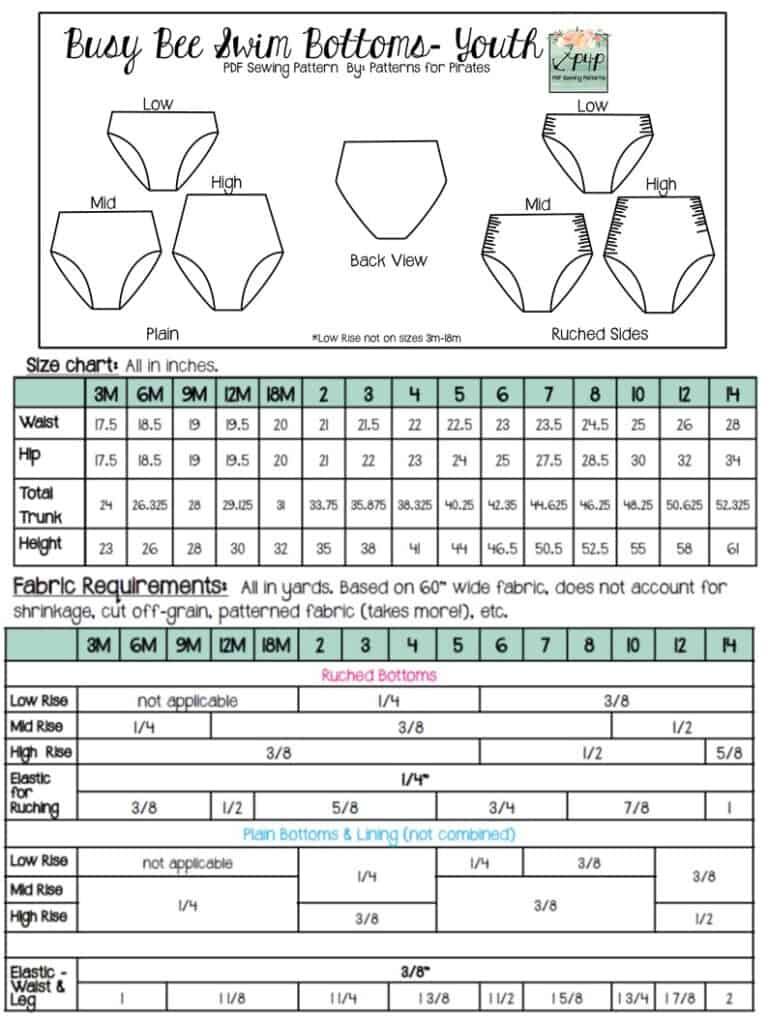
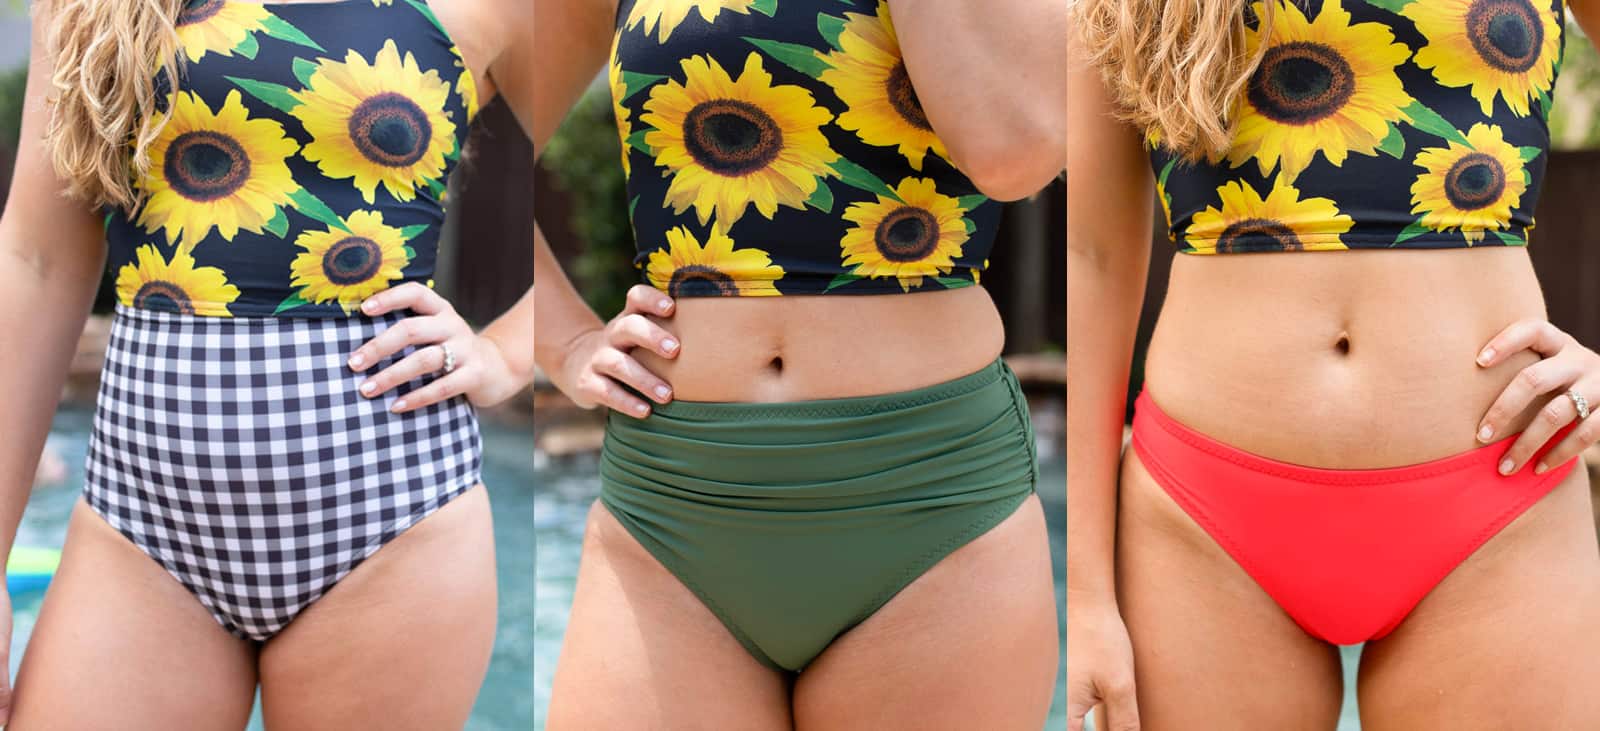
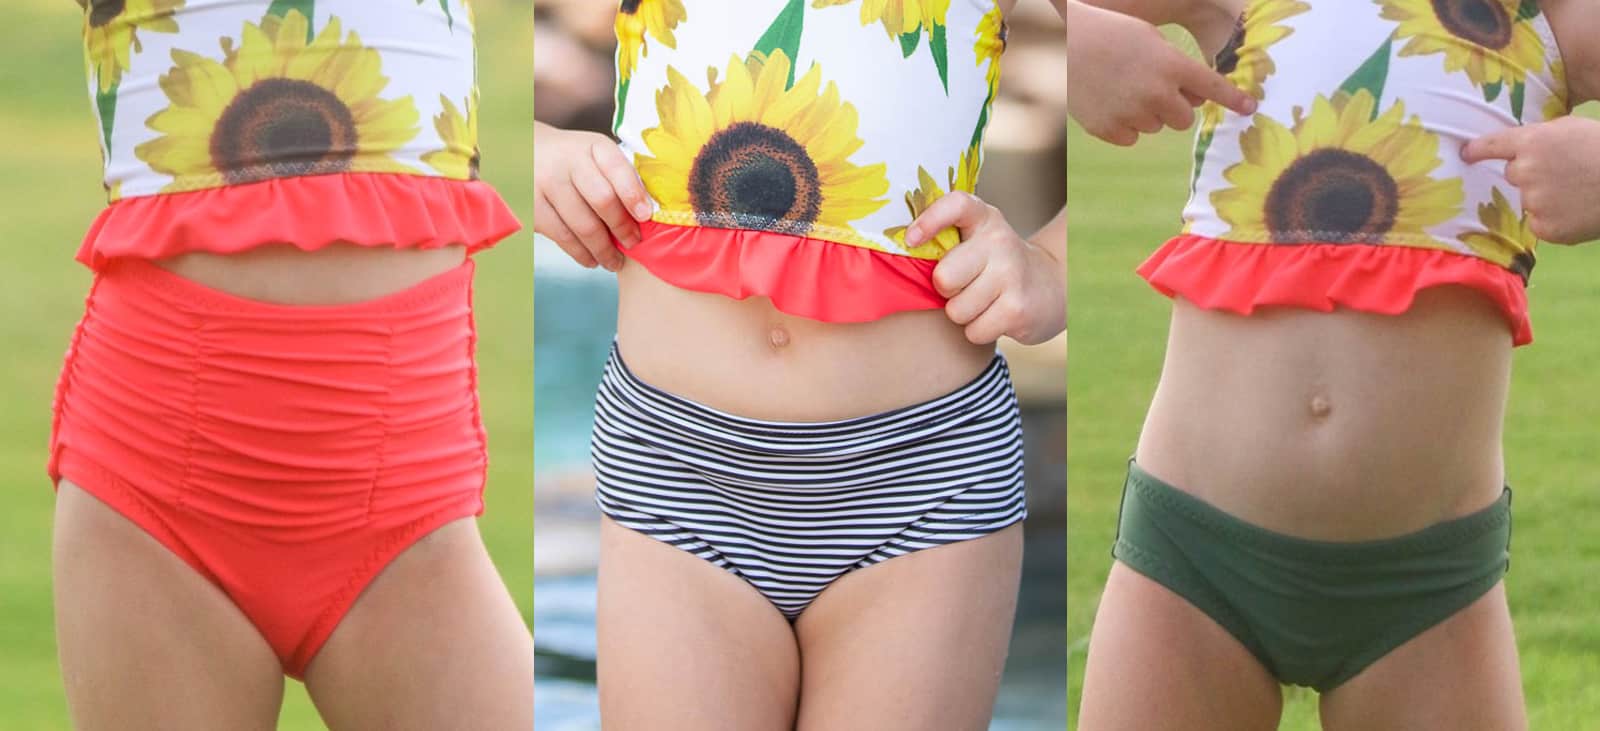
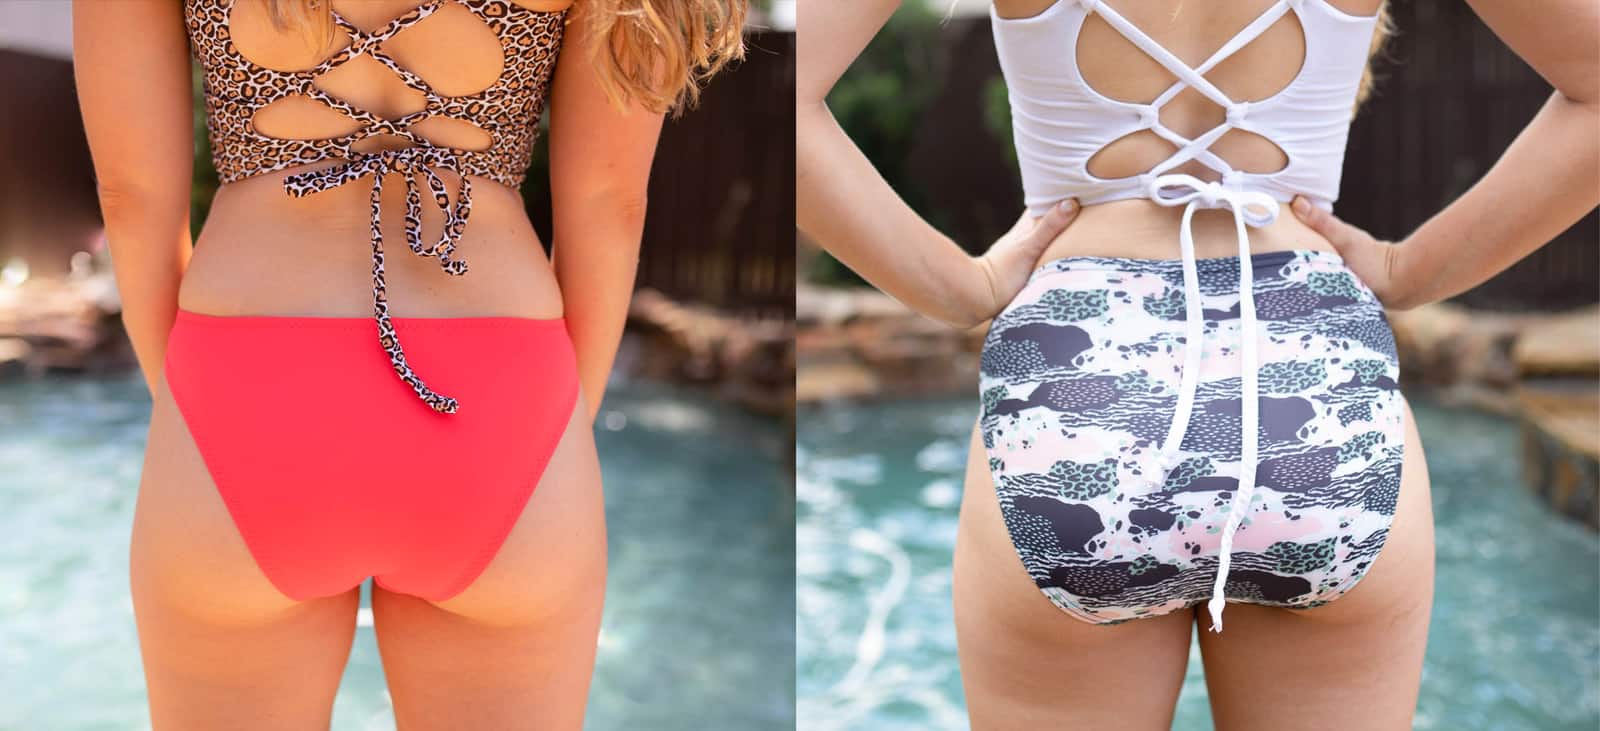
The Busy Bee Swim Bottoms will have your swimsuit drawer full in no time with a variety of looks! You can mix and match with your tops easily, depending on your mood or where and who you’re going swimming with!  In case you’re feeling like you want more coverage, you can grab the high rise and brief options.  But in the event that you’re feeling like baring it all for less obtrusive tan lanes…go for the cheeky and low rise. Or you can pick between those two with a mid-rise, which hits just below the belly button.  Mix in some ruching at the side seams for a fun detail. These bottoms are very simple and quick to make with the waistline and leglines hemmed under with swim elastic. You can also choose to partially line or fully line.

Options include: low rise, mid rise, high rise, cheeky booty cutline (adult only), brief booty cutline, ruched side seams, partially lined or fully lined.

Enjoy several videos throughout the tutorial like adding/removing length, complete sew ups of ruched, plain, partially and fully lined bottoms.

BUSY BEE SWIM BOTTOMS | BUSY BEE SWIM BOTTOMS – YOUTH | BUSY BEE SWIM BOTTOMS – BUNDLE


**Want to learn more about how to measure yourself for this pattern?  We’ve got you covered with an in-depth blog HERE.  And in case you’re new to Patterns for Pirates and PDF patterns in general, we have a great blog full of new-user tips HERE to help you get started!  As with all of our current releases and updates, the pdfs now include our layers feature and can be found in Letter, A4 and A0 sizes.  And for even more helpful fun, we have a *free* printable that you can use to help record your measurements as you take them.

Let’s take a quick look at the different options and features!

SUNFLOWER BACK FINISHES

SUNFLOWER TOP HEMS

SUNFLOWER NECKLINES

BUSY BEE RISES

BUSY BEE LEG LINES (ADULT ONLY)

What are you waiting for?  Head on over and grab yourself a copy of these swim separates!  The Sunflower Swim Top and Busy Bee Swim Bottoms will be on sale (no code needed) through 11:59pm CST, July 5, 2020.

Don’t see the perfect bundle for the patterns you’d like to buy? Don’t forget you can always make your own bundle!

SUNFLOWER SWIM TOP | SUNFLOWER SWIM TOP – YOUTH | SUNFLOWER SWIM TOP – BUNDLE
BUSY BEE SWIM BOTTOMS | BUSY BEE SWIM BOTTOMS – YOUTH | BUSY BEE SWIM BOTTOMS – BUNDLE

Maybe hoping for a little more inspiration before you make the purchase?  Head over to our Facebook group where you can see tester albums full of amazing images!

Sunflower Swim Album | Busy Bee Swim Album | Sunflower Swim Youth Album | Busy Bee Youth Album

If you’re looking for even more options, we show you a few more ways you can use this pattern in our Sunflower Swim Top Easy Hacks Blog Post!

Filed Under: Pattern Release Leave a Comment

Take the Plunge Swimsuit :: New Pattern Release!

June 15, 2017

Just about this time last year, we released our first ever swim patterns.  The Siren Swim Top and Hello Sailor Bottoms have received a lot of love, but we still had a lot of requests for a one-piece suit.  Your wishes are being fulfilled today, with the brand spankin’ new release of the Take the Plunge Swimsuit!

Take the Plunge will make you want to swim all summer long.  We’ve done all we can to pack it full of options and to make it flattering for ALL body types, sizes XXS – Plus 3X.

This is an intermediate knit pattern, and fits in a traditional, body hugging, one-piece swimwear style.  The suit is fully lined and includes directions to add bust support (swim cups / power mesh / under bust elastic).  All of your seams are enclosed for that professional finish, and the edges are all finished with elastic so you will be completely secure in your suit while taking a dip in the pool.

The pattern features a cross-over front bodice that plunges a little lower for a sexy look, while still keeping you contained, covered, and secure.  The waistband hits at and slightly above the natural waistline, to create an extra slimming silhouette, and is also great for color blocking.  And the leg openings come up a little higher in the front for a longer, leaner look.  There are three band-back options (high back with straight straps / low back with cross straps / halter back), two bottom types (plain / ruched) and an additional option for a skirted bottom in two lengths (peplum / full).

The retro vibe of the Take the Plunge Swimsuit will be a classic for years to come and can be paired with so many different fabric prints for unlimited looks!

**Want to learn more about how to measure yourself for this pattern?  We’ve got you covered with an in-depth blog HERE.

And now let’s see some suits!

FRONT CROSS-OVER BODICE

HIGH BACK, with straight straps

LOW BACK, with cross straps

HALTER BACK

PLAIN BOTTOMS

RUCHED BOTTOMS

OPTIONAL SKIRTED BOTTOMS

Feeling inspired to go buy all the swim knits now and sew a million suits for yourself?  Before you do, don’t forget to snag the Take the Plunge Swimsuit pattern HERE.

And don’t think we’d leave you with only the original pattern.  We’ve explored the extra potential of Take the Plunge and have an entire set of pattern SWIM HACKS and even a DRESS + PEPLUM HACK.

Needing more inspiration?  Head over to our Facebook Group Album, where are gorgeous testers of every shape and size have shared their versions!  Happy Sewing, friends!

Filed Under: Pattern Release Leave a Comment

Take the Plunge Swimsuit :: Dress & Peplum Hack

June 14, 2017

We are all loving the new Patterns for Pirates Take the Plunge Swimsuit that was just released! So naturally, we had to take this pattern a step further and morph it into some cute apparel! In this tutorial I am going to show you how to add some super cute skirts in place of the swim bottoms to create adorable everyday garments! As a total bonus you can follow the swim pattern instructions to add built in bra cups and under bust support. How awesome!

:: Fabric Requirements ::

This pattern is intended for pretty sturdy but stretchy swim knit. So in order to turn this into a comfortable dress I recommend choosing a main (outside) fabric that has both great 4-way stretch and good recovery. Brushed poly, rayon spandex, cotton spandex and maybe a very very stretchy scuba or liverpool would work. For the bodice lining you will want to choose something light and stretchy such as rayon spandex or brushed poly. All versions pictured in this tutorial were made using double brushed poly spandex. Also, you do not need to use swim elastic on this, regular braided elastic is sufficient. I will also detail how you may omit the elastic altogether for the full back option.

:: Assemble your Bodice ::

First things first. Go ahead, cut out all pieces of your bodice exactly as instructed in the pattern. None of these pieces need to be altered. You can choose any strap/back option. Choose to add bra cups and under bust support elastic if you feel like having an all-in-one dress! I personally love the push up bra cups for a little extra support when going with the all-in-one option. Remember, you do not need to use swim elastic for non-swim garments. Traditional braided elastic will be a little easier to sew with. Go ahead and assemble the bodice exactly as instructed by the pattern and skip to the Skirt Options portion of this tutorial.

{Optional} :: If you are choosing not to include bra cups, you are using the full back option AND you are using a sturdier fabric like brushed poly or cotton spandex, you may omit the elastic. Fabrics like rayon spandex and ITY, and built in bras that provide support do require that elastic be used to prevent your straps from stretching out. Also, the low back or halter version likewise require elastic to hold the dress up. To omit the elastic follow along with these next steps before getting to the skirt options.

First construct the front bodice pieces as instructed by the tutorial. You can skip the part when you clip the inner strap to fold it over and attach elastic. Instead sew the entire length up the strap to give a nice seam.

Next attach the main back bodice to the lining back bodice by laying them right sides together and stitching along the neckline. Then match up all bodice pieces at the shoulders right sides together and stitch.

Topstitch inner neckline now if preferred. Next, lay your bodice out and fold the back bodice over on top of the front bodice pieces, matching up side seams main fabric to main fabric. Stitch side seams together and then baste the front bodice pieces together along the bottom as instructed in the pattern tutorial.

At this point you can baste stitch the outer armholes to prevent fabric shifting. I chose to run my serger around them. Fold the unfinished edges under about 3/8″  and topstitch armholes in place. The burrito roll method to enclose the armholes cleanly does not work here. There is simply too much fabric on the front bodice to work around. Now it’s time to add your skirt!

•  •  •  •  •  •  •  •  •  •  •  •  •  •  •  •  •  •  •  •  •

:: Skirt Options ::

There are 3 skirt options that I will show you. The first option is a super fun peplum length. Cut your peplum piece to match the “skirt length” on the swimsuit pattern. I suggest measuring yourself for a preferred peplum length and double checking it against the pattern. You might want to shorten it up an inch or possibly add length depending. See  the option below for more details on how to measure your skirt length. Once cut, simply follow the pattern directions and omit the swim bottoms to complete the top.

NOTE: The “peplum length” on the swim pattern will be too short for an everyday top.

•  •  •  •  •  •  •  •  •  •  •  •  •  •  •  •  •  •  •  •  •

Next, I will show you an above the knee half circle skirt option. Decide where you would like your dress to land and measure skirt length by holding the end of the tape at your natural waist and allowing the tape to drape along your body. Add 1/2″ to that measurement for your bottom hem and another 3/8″ for your seam allowance. I also like to add an extra inch or so to this measurement just to be safe! You can always trim the hem length down at the end but you can’t easily add extra later! Place your TTP skirt pattern on your fabric and measure out as indicated below. Alternatively you can grab skirt lengths from the Patterns for Pirates Sweetheart Peplum and Dress for the ‘at the waist’ option if you already own that pattern.

Take the Plunge swimsuit dress peplum hack

Cut out your skirt piece, trying to keep your curve as even as possible. Cut your waistband (main and lining as indicated the the pattern) and assemble as instructed omitting the swim bottoms. Attach your waistband/skirt to your bodice. I do recommend cutting both the main waistband and the lining waistband to add structure. Try on your dress for length, hem it and you’re finished!

•  •  •  •  •  •  •  •  •  •  •  •  •  •  •  •  •  •  •  •  •

For the final option I will detail how to add a gathered skirt in place. This option is really simple. If you own the Boundless dress pattern you can simply attach the waistband from the TTP pattern instructions to the gathered skirt size from the Boundless. If you don’t own that one you can simply cut your rectangle skirt piece by doubling the waistband length and finding your desired skirt length through measuring as described in the previous option. Cut two skirt panels and sew them together if your fabric isn’t wide enough. Direction of greatest stretch should go across the 2x waistband length. See Illustration below:

Gather one of the doubled waistband length sides by running a long baste stitch across and pulling the bobbin thread. Fit and sandwich the gathered end between the waistband pieces being sure the main fabrics are right sides together. Stitch in place.

Fold the long ends of the skirt to meet right sides together. Stitch down the entire side seam, from waistband to bottom of the skirt. Now attach your skirt/waistband to your bodice, right sides together. Try on your dress and hem to the appropriate length. You’re all done!

•  •  •  •  •  •  •  •  •  •  •  •  •  •  •  •  •  •  •  •  •

So you can see how versatile this swim pattern really is! I hope you have all found this tutorial to be helpful. Go forth, make some swimsuits, peplum tanks and dresses for the summer. Share them with us in the Patterns for Pirates Facebook group. Don’t forget to check out the TTP pattern release roundup for some more swimsuit photos and check out the hack post for some more fun Take the Plunge swimsuit options!


Filed Under: Pattern Hacks, Pattern Release 1 Comment

Featured Patterns

  • Loosey Goosey Loosey Goosey $12.00
  • Loosey Goosey- Youth Loosey Goosey- Youth $10.00
  • Loosey Goosey - Bundle Loosey Goosey - Bundle $20.00
  • Everyday Shirt Everyday Shirt $12.00
  • Everyday Shirt- Youth Everyday Shirt- Youth $10.00
  • Privacy Policy
  • Refund Policy
  • Affliliate Program
  • Contact Us
  • About

Copyright © 2025 Patterns for Pirates

Copyright © 2025 · Genesis Framework · WordPress · Log in