Patterns for Pirates

P4P stylish, modern, wearable patterns

  • Home
  • Blog
    • Frequently Asked Questions
    • Pattern Releases
      • Free Patterns
    • P4P University
      • Fitting
      • Sewing with Stretch, Knit Fabrics
      • Sewing with Woven Fabrics
      • Sewing Machines
    • Sew-A-Longs
    • Fabric for Pirates
    • Pattern Hacks
    • Announcement
      • Blog Tours
      • Contest/Giveaway
  • Shop
  • Bundle Discounts
  • Gift Cards
  • My Account
  • Cart

Boys can wear Pink Blog Tour with Handmade Boy

June 13, 2015

10403212_10203606554227703_5404214825045129306_n

I <3 the Handmade Boy Blog! Kelly makes the CUTEST clothes for her son and daughters (and sometimes even herself when I can talk her into it 😉 ) She is the sweetest; always going above and beyond for me testing patterns and even trying to help me with photo tips!  So when she told me she was doing her first series I could never turn her down!

Boys Can Wear Pink!

10373803_10203669746407468_16103805812955764_n

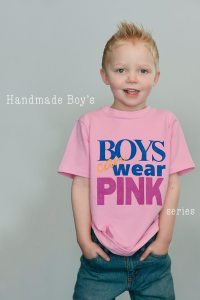
To be honest, I’ve never put my little guy in pink before… I’m not a huge pink lover…I tend to always go with greys and blues for myself, my husband and for little guy! Boring, I know… if you could see my fabric stash, it is pretty dull! I also tend to dress him like a little macho man in camo, dinosaur, anything you would label “very boyish”…So, this really pulled me out of my comfort zone to design and make something for him with pink!

I decided to go with a classic “pirate/sailor” look and theme to help me get inspired…since I love this look and theme! I went with a white and pink stripe I got from my local Hobby Lobby, in their spring collection. In person the pink is almost neon.

IMG_1477IMG_1529

I knew I wanted the oh so classic “Mom” heart tattoo on it as well (just pink instead of red).  I struggled on placement! But in the end I went with the shoulder, where a tattoo would be and I’m so happy with it!

IMG_1569 IMG_1527 IMG_1483 IMG_1416

I added an iron on transfer of a black anchor to the front right side to help fill and even it out overall.

IMG_1423 IMG_1455 IMG_1521 IMG_1544 IMG_1550

I paired it with his Cpt. Comfort Jeans that are distressed and bribed him to wear the black tennis shoes (instead of his Woody boots that he wears EVERY DAY!!!) It took a piece of candy and going outside to play to get them on!

IMG_1570 IMG_1464  IMG_1461

His hair… oh my… he woke up with the most wild hair ever that day… So I tried to put a little gel in it to calm it down and it didn’t help much! But it kind of fits the sailor look right? Wind blown? We’ll go with that 😉

IMG_1452 IMG_1434 IMG_1429IMG_1461

In the end I love the bright colors on him… it fits his wild, rambunctious personality so much better then the greys I usually go for! (Although, I tend to be quiet and shy…so I’ll stick with my muted tones for myself 😉 ) I am going to try to add more bright colors into his wardrobe for sure! Thank you Kelly for having me in your series!! <3

IMG_1634IMG_1655IMG_1675 IMG_1670   IMG_1635  IMG_1621  IMG_1482 IMG_1462

Now you can participate too!

  • Here is a pinterest board with inspiration! https://www.pinterest.com/simonsphoto/boys-can-wear-pink/
  • Here is a great “Sew for Boys” Facebook Group you can join and use the hashtag #boyscanwearpink https://www.facebook.com/groups/sewforboys/
  • You can also enter the Rafflecopter here to win some awesome prizes! https://www.rafflecopter.com/rafl/display/23c963171/
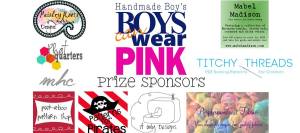
10451056_10203685980053299_4539772564669910279_n

Prizes:

One yard of http://www.mabelmadison.com/pit-stop-pink-stenzo-poplin.html Stop Poplin in pink http://www.mabelmadison.com/
$25 gift certificate, plus a surprise fat quarter from https://www.etsy.com/people/phatquarters?ref=pr_profile
One yard of solid cotton/lycra &amp; one yard of coordinating fabric from  https://www.facebook.com/pages/Purpleseamstress-Fabric/135198749843668
One pattern of choice from http://www.paisleyroots.com/
$20 store credit from http://peekaboopatternshop.com/
One pattern of choice from Patterns for Pirates http://www.craftsy.com/user/3301275/pattern-store
One pattern of choice from  http://www.welcometothemousehouse.com/shop

Bottoms Up Pants Pattern from http://ifonlytheywouldnap.net/

One Pattern of choice from http://www.titchythreads.com/patterns

Filed Under: Blog Tours Leave a Comment

Tips and Tricks on How to Up-Cycle Jeans/Denim

June 13, 2015

Making jeans can be a little intimidating for some… and we’ve already had a post here about making jeans look more like store bought jeans with details like top-stitching thread and distressing.

But, a really easy way to get your jeans looking professional is to use an old pair that an adult is throwing/giving away! This means a lot less work for you distressing and top-stitching if you’re smart about laying out your pattern pieces! So here it goes…my tips on using pre-existing jeans:

1- Making a few cuts along the seams can really make cutting your pieces much easier! I like to cut along the inside legs/crotch, cut off the waistband and beltloops, and the back pockets.

IMG_9003IMG_9001 IMG_9004

2- Be cautious about distressed/washed jeans and laying out your pattern pieces… meaning, if your jeans have a very obvious fade/wash/distress pattern on them then you need to make sure you like where it will be placed and that it will match when you sew up your jeans. For this pair, I wanted the distressed area of the original jeans, so I laid my patterns around that.  Notice that my two pieces are very close to the same area horizontally, and that the back yoke is placed above the back piece.  All of this will ensure that the distressing and wash look natural on my finished jeans.

IMG_7758

You can also use the original hem line if you prefer to get that instead. Remember to account for hem allowance. I did that with this pair, because my jeans didn’t have a very noticeable distressing.

IMG_9000

Use the back pockets when cutting your new pockets, Remember to account for the hem allowance at the top.

IMG_9005

If you’d like to use the waistband and belt loops you can…. but warning, unpicking those belt loop stiches is not fun 😉

If you pattern calls for elastic in the waistband, like my Cpt. Comfort Jeans, then you will have to cut a slit on the wrong side of the waistband to slip your elastic through- I just use a wide zigzag to mend the slit after (I hide the zigzag stitches behind a belt loop!).  Make sure when overlapping that you line up your jeans button and button hole, you can see here on mine they overlapped much more then the pattern called for.  Then you will tack down the bottom of the belt loops 🙂

IMG_9006IMG_9012IMG_9213

3- Now that you have your pieces cut you will continue to sew them just like the pattern calls for  matching the store bought top-stitching thread as best you can. And although they have a wash and distressing, I STILL distress along the way! That way my finished jeans will have the distressing where store bought jeans do, like along pocket lines.

IMG_7260 IMG_9009

IMG_9010

Now you have a great fitting (no plumbers crack!) pair of jeans that cost you nothing but the thread and time <3 and plus they look amazing!

IMG_9218   IMG_9422IMG_9403

Filed Under: Pattern Hacks, Sewing Techniques, Sewing with Woven Fabrics, Uncategorized 1 Comment

How to Sew “ready to wear” looking Jeans/Denim

June 13, 2015

Jeans can be an intimidating sewing task, but they really aren’t that difficult and it is so great to have well fitting jeans for you or your little ones! No more plumbers crack when bending down!!!!! 😉

IMG_9403

With my recent release of the Cpt. Comfort Jeans I wanted to post about how to distress your new denim to look more like ready to wear jeans! I personally LOVE the distressed look! Although a super clean dark denim can look nice as a “dressy” pair of jeans like here:

_DSC4859

But for everyday, I just love the little distressed look… something about looking like Daddy gets me every time with my little guy!

So, lets get started on those great store bought look jeans!

You really MUST use a top-stitching thread for all your top-stiching if you want store bought look… I scoffed at my Mom the first time she told me it was a must… BUT she was right, like always!!

IMG_7260

You will use this heavier/thicker weight top-stitching thread in the top only and for top-stitching only. You will use regular thread in the bobbin and for all seams sewing the jeans together– yep, you have to rethread a lot ;). But it is absolutely worth it if you want ready to wear looking jeans! I promise!

You will also NEED a bigger needle designed for heavy weight fabric like denim or you will be breaking needles on those thick belt loops!… here is a single and double needle:

IMG_7259

Now, I only have one machine, so there is A LOT of switching threads and needles if I use the double needle. So, I will often just sew two lines with my single needle instead of switching to my double needle 😉

Now for the distressing, you will need some sandpaper! To be honest, I’m not sure the BEST kind of sandpaper to use… I asked my husband if he had some and used whatever he handed me 😉 Here is a shot of the kind I happen to use!

IMG_9008

The trick to distressing your denim is to do at WHILE you’re sewing the jeans! If you try to do it before it’s hard to gauge where the distressing needs to be. If you do if after you’ve top-stitched them then you will be breaking your top-stitching threads (ask me how I know that one 😉 ) see left top pocket with it’s broken threads :/ oops!

IMG_9422

So, I suggest sewing the jeans together with your normal thread, then distressing with sandpaper before you top-stitch. Here is my patch pocket sewn, turned right sides out, and distressed along the edges (and any other places I fancied at the moment). Then I top-stitched.

IMG_9010

Some areas are harder to distress before topstitching like back pockets, belt loops, any piece that you are top-stitching closed or onto the jean.  But I still follow the same steps.  I just fold and press, distress, then top-stitch onto the back piece.

IMG_8998

So have fun with a little distressing or A LOT! lol! I like a lot 😉 I end up with a mound of blue fuzz all my sewing room by the time I’m done!

Last is the button! I love to use “real” jeans buttons- and honestly, I always have been lucky enough to take them from my loving mother’s stash! But they are very easy to put on, just line up the two parts and hammer away! Yep, you’ll have sandpaper and a hammer in your sewing room for jeans!!

I’ve always used snaps, which are very common on ready to wear for younger children 🙂

IMG_9000 IMG_9218 IMG_9245

Filed Under: Fitting, Frequently Asked Questions, Sewing Techniques, Uncategorized 3 Comments

Newest Patterns

  • Uptown Joggers - Youth $10.00
  • Uptown Joggers $12.00
  • Uptown Joggers - Bundle $20.00
  • Notch Top & Dress $12.00
  • Notch Top & Dress - Youth $10.00
  • Privacy Policy
  • Refund Policy
  • Affliliate Program
  • Contact Us
  • About

Copyright © 2023 Patterns for Pirates

Copyright © 2023 · Genesis Framework · WordPress · Log in