Patterns for Pirates

P4P stylish, modern, wearable patterns

  • Home
  • Blog
    • Frequently Asked Questions
    • Pattern Releases
      • Free Patterns
    • P4P University
      • Fitting
      • Sewing with Stretch, Knit Fabrics
      • Sewing with Woven Fabrics
      • Sewing Machines
    • Sew-A-Longs
    • Fabric for Pirates
    • Pattern Hacks
    • Announcement
      • Blog Tours
      • Contest/Giveaway
  • Shop
  • Bundle Discounts
  • Flash Friday
  • Gift Cards
  • My Account
  • Cart

P4P University- Pants and Their Wrinkles

May 14, 2019

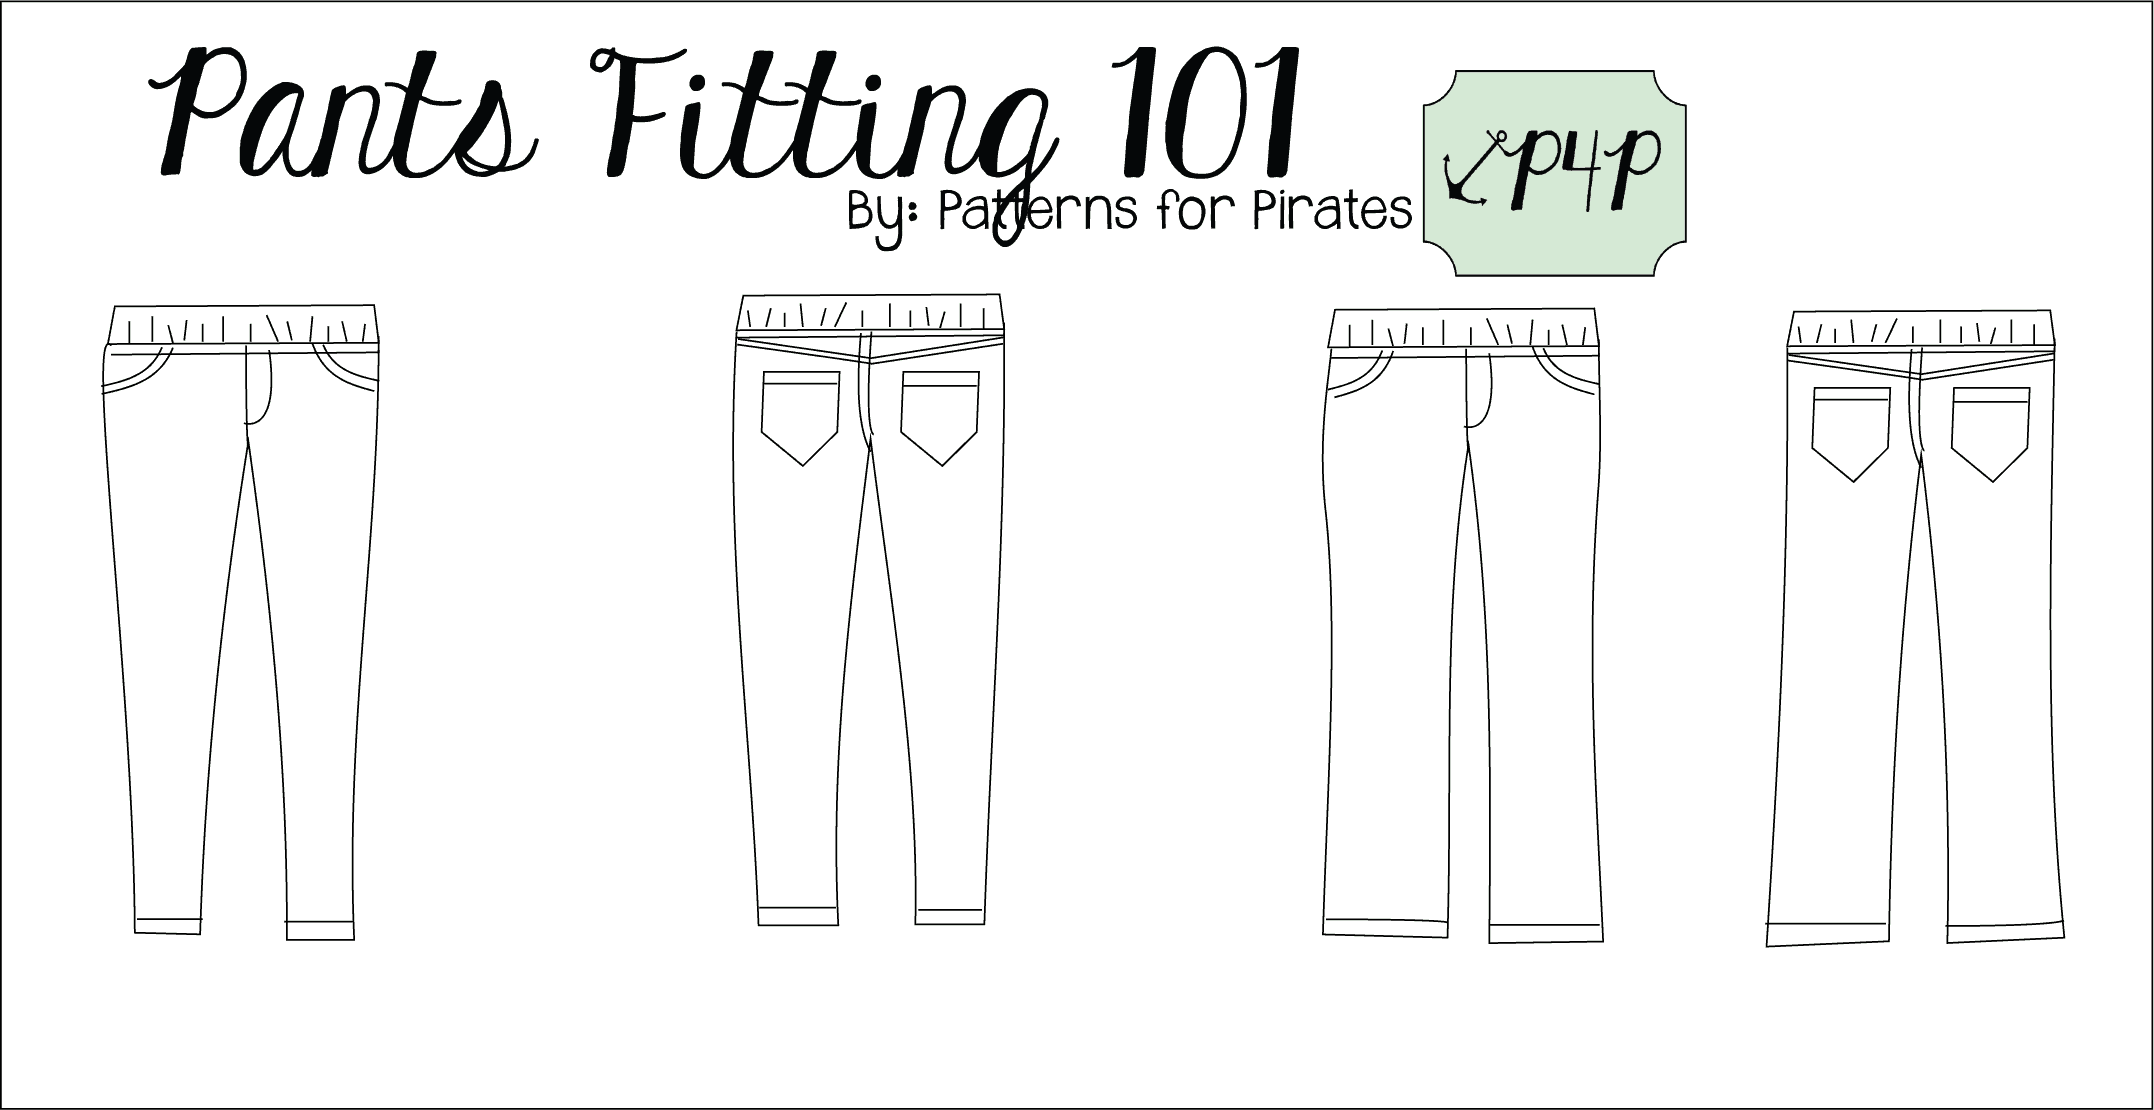
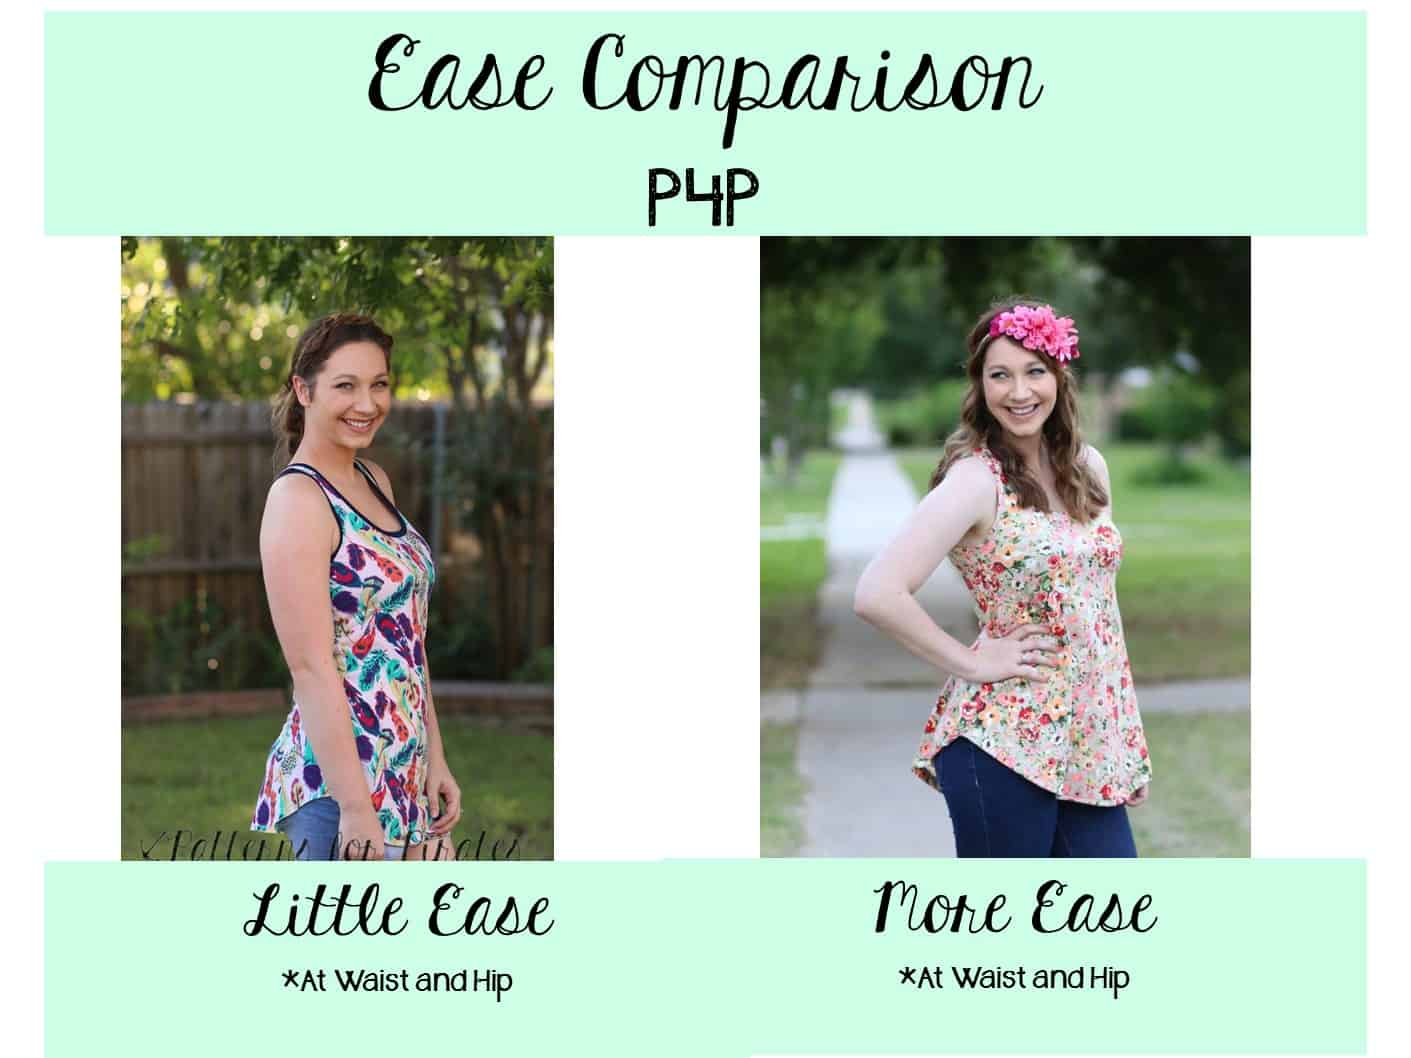
We get a lot of questions about fitting, wrinkles and pull lines and how to fix those when sewing for different body types.  Pants seem to cause a lot of anxiety for some sewists when it comes to the crotch area and the lines they can see there, but it isn’t too complicated as it seems.

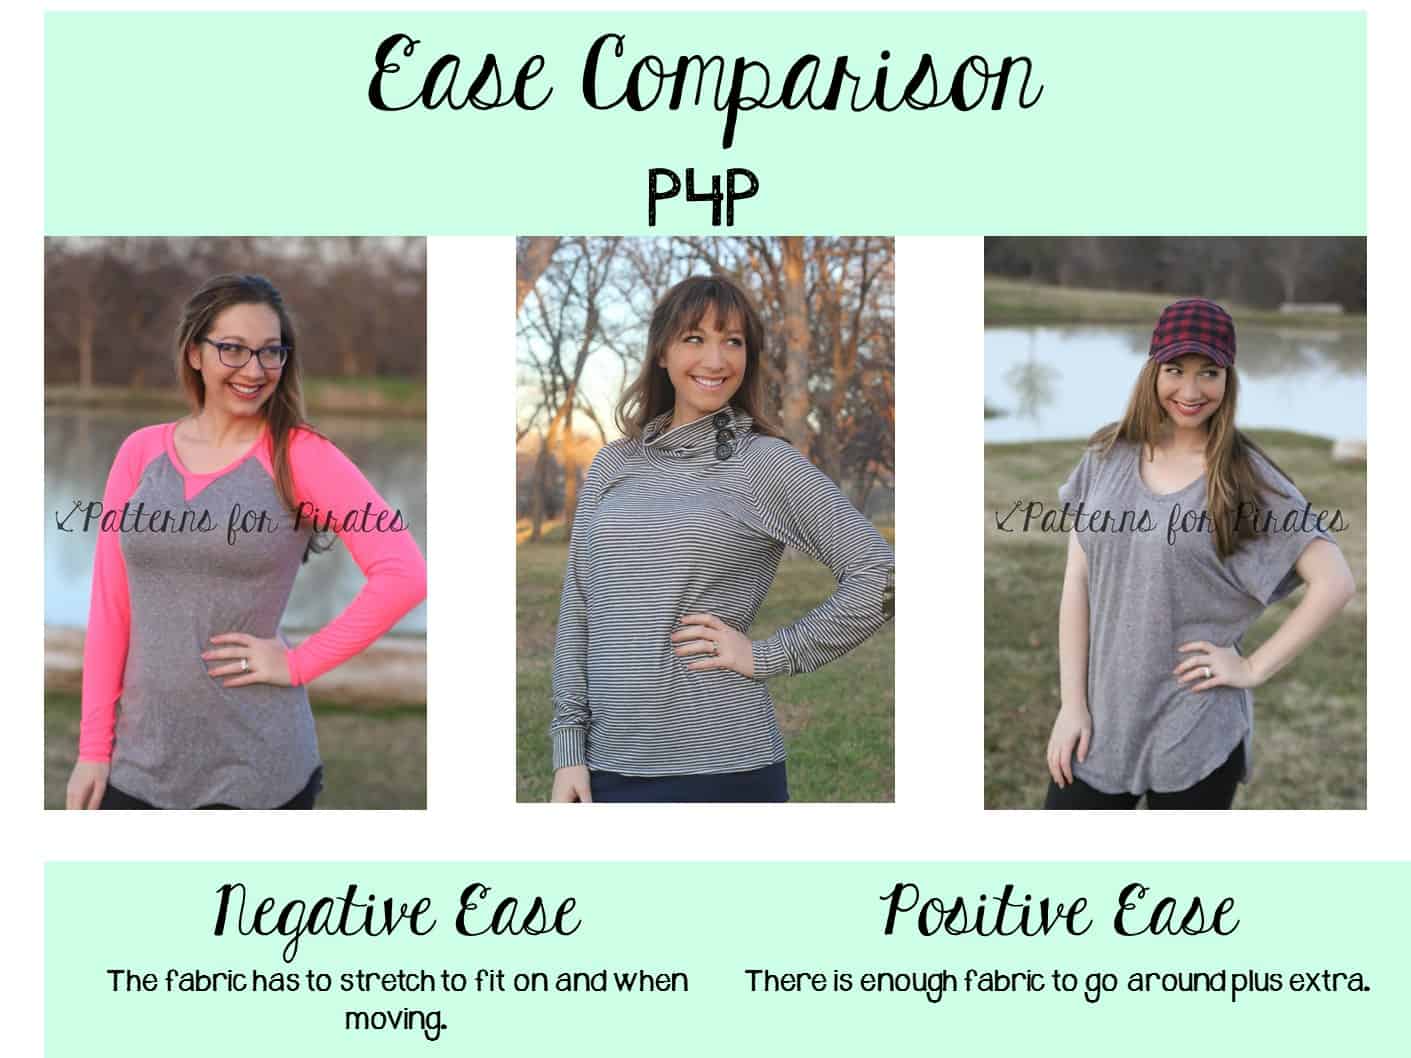
First, lets talk about wrinkles and pull lines in general.  You will never have a garment that will never have any in any position.  Meaning a garment is drafted and fitted to look great in one main position (usually standing up straight with feet slightly apart for pants).  So, if you’re only getting wrinkles or pull lines when moving a certain way don’t worry! A garment can’t be perfectly drafted and fitted to every movement you’re going to be in.  I often see that sewists are worried about this though… “I have wrinkles when I sit” is a very common plea for help… but the truth is you should! You need that extra length when you’re standing and it will wrinkle or bunch when you’re not using that length when sitting.


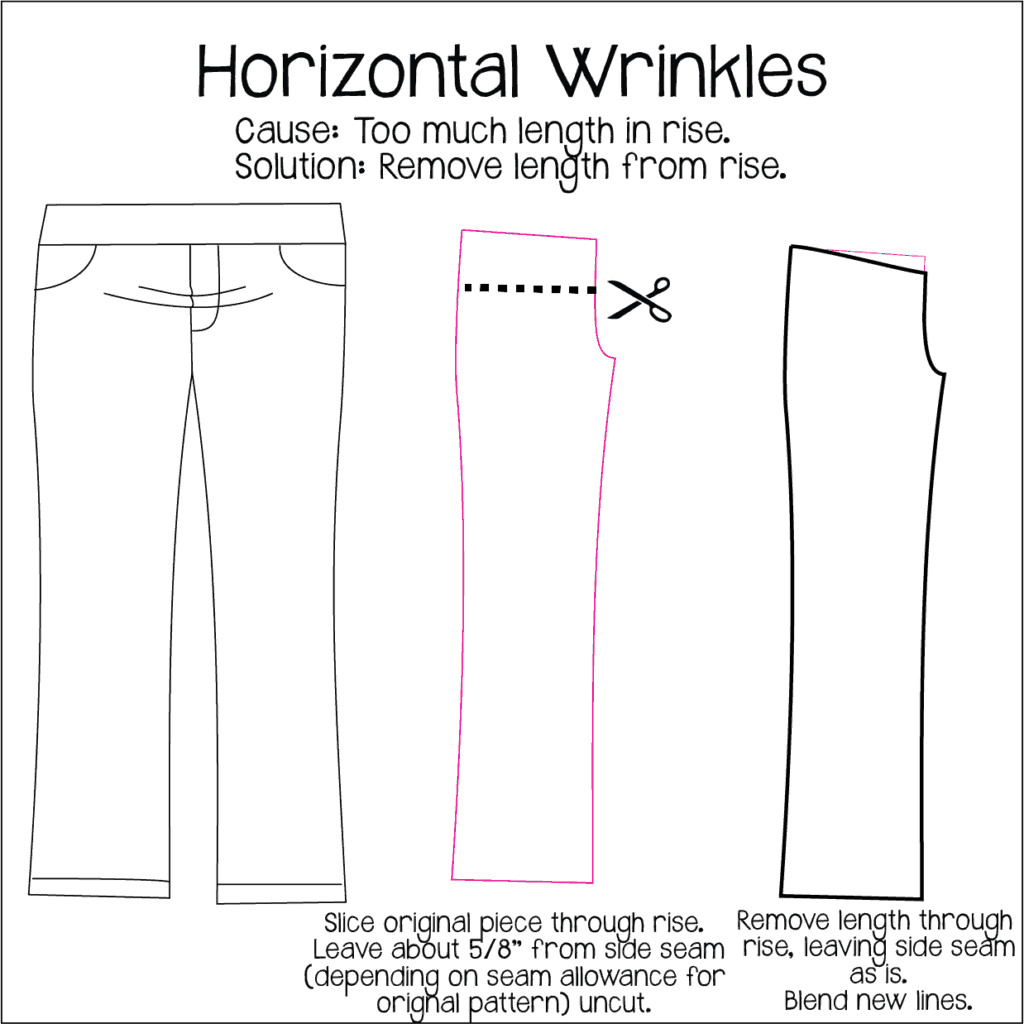
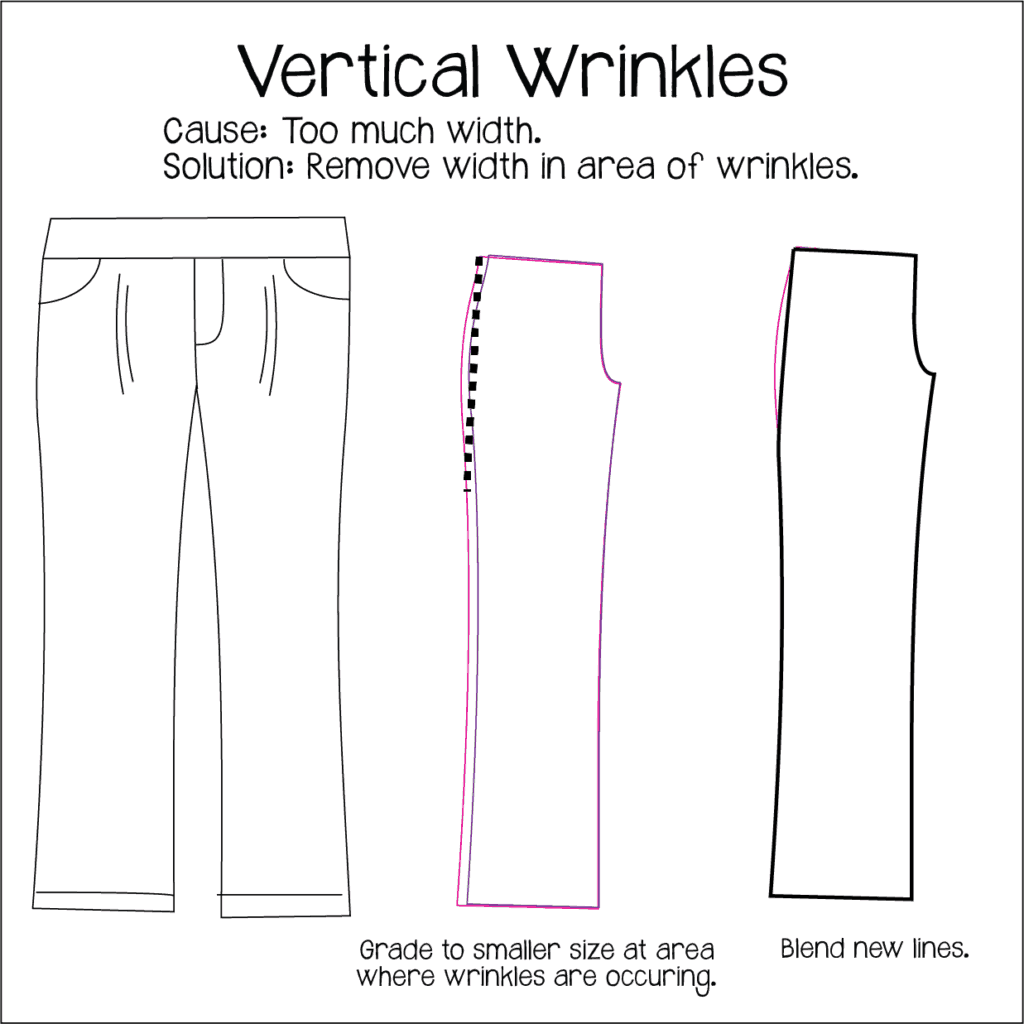
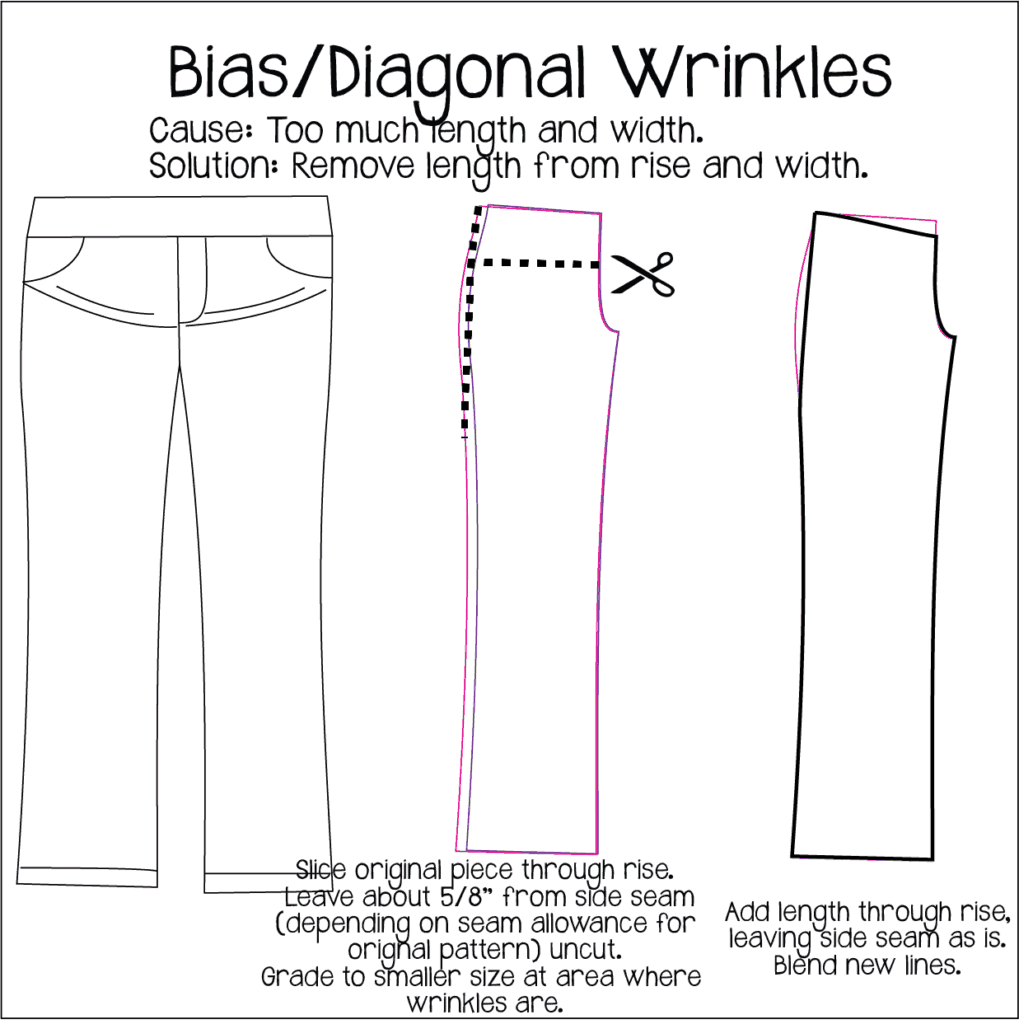
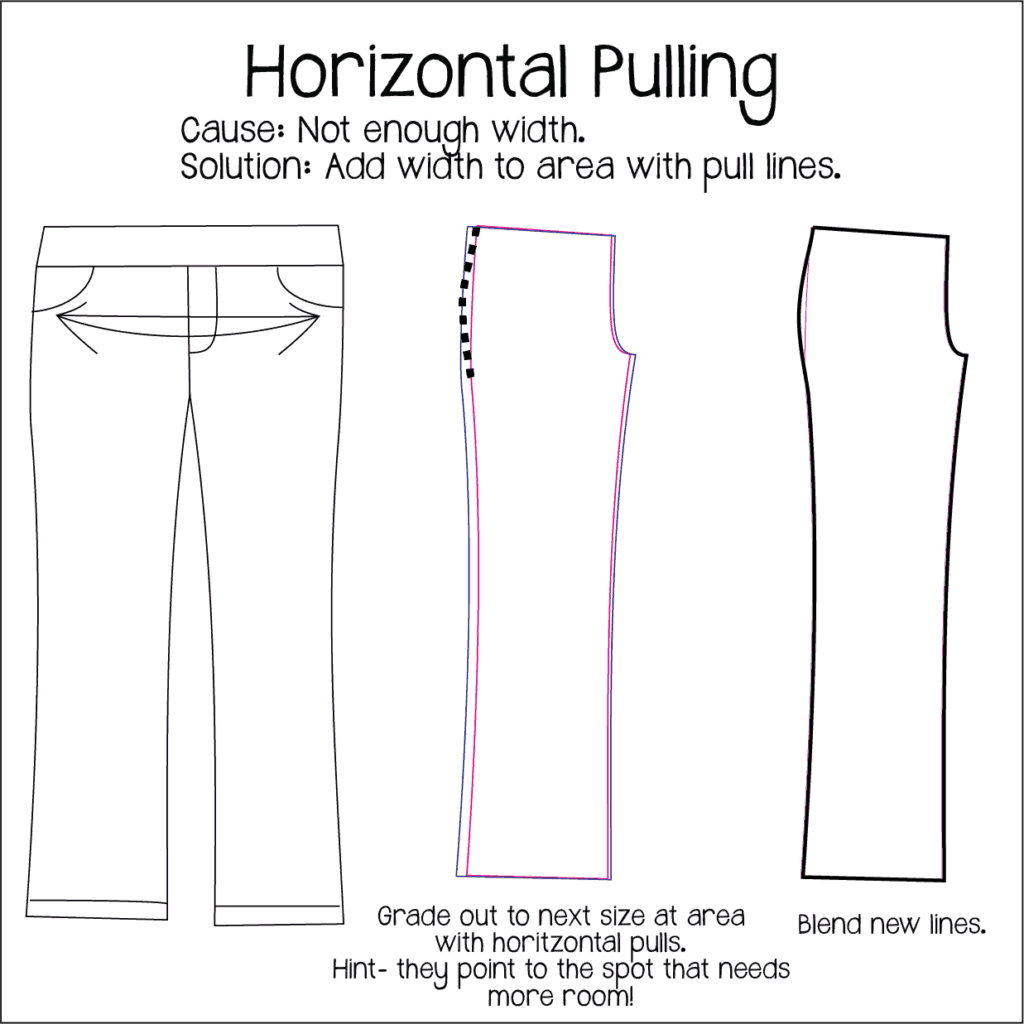
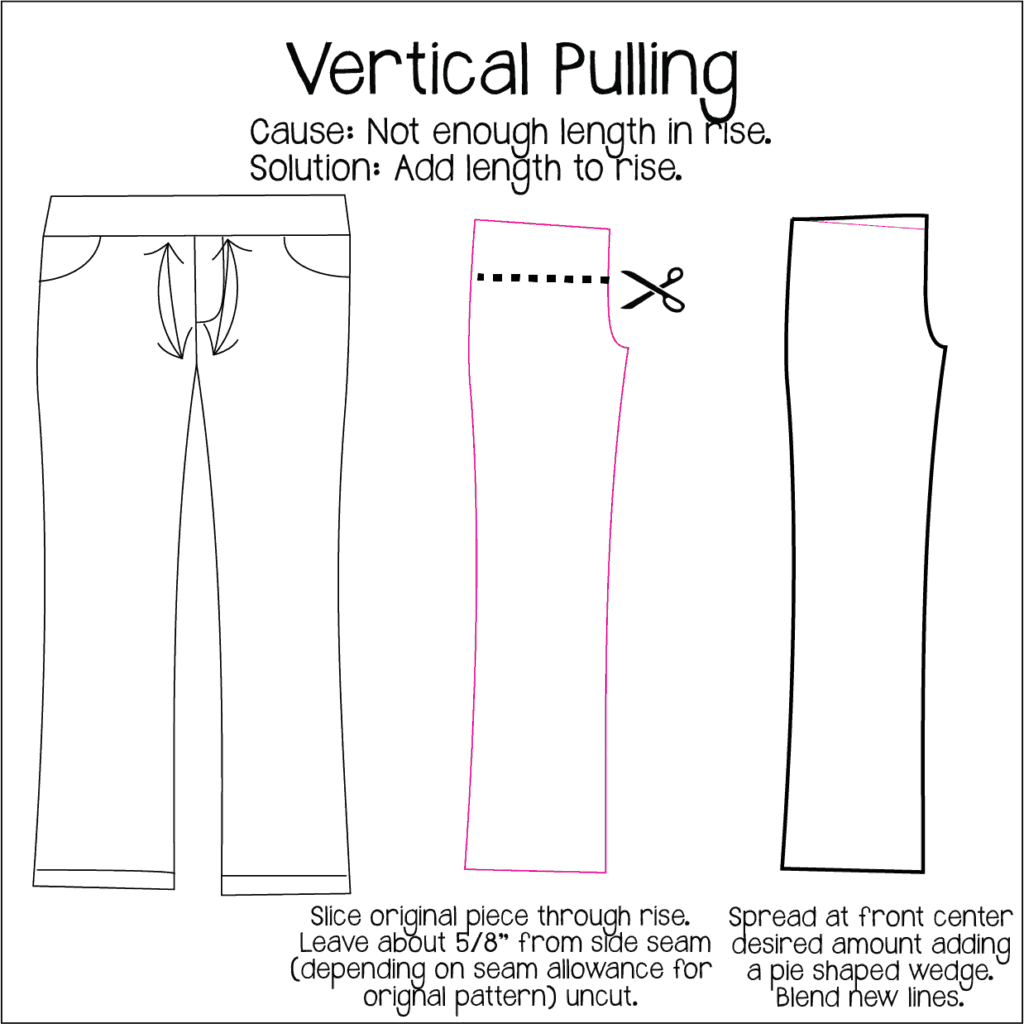
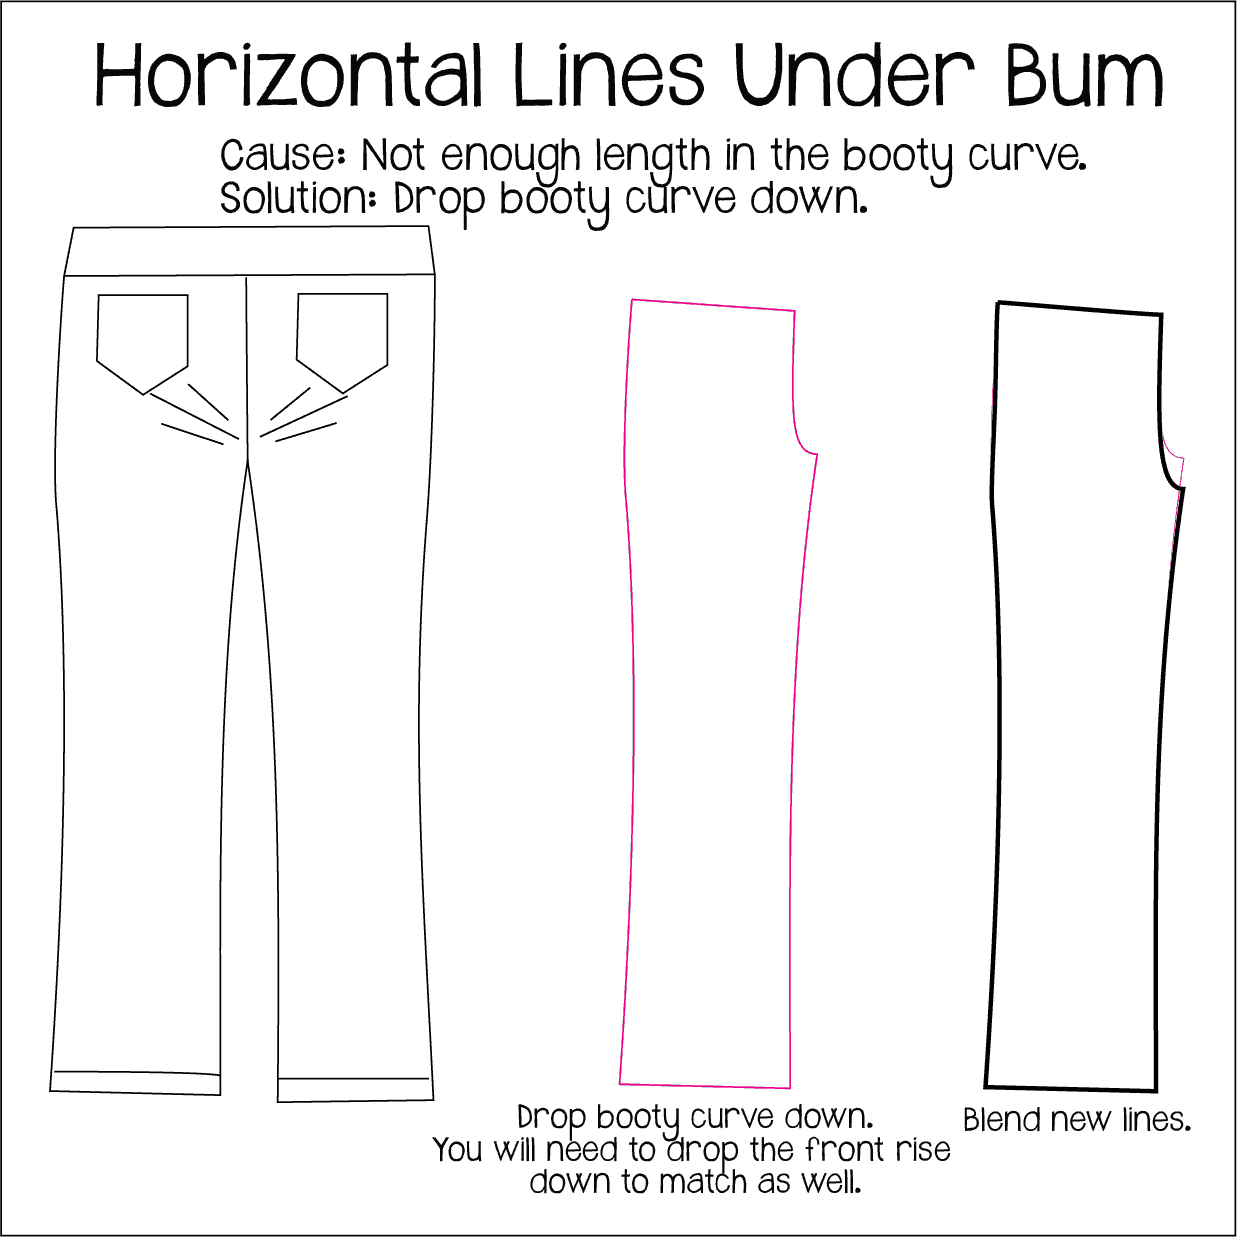
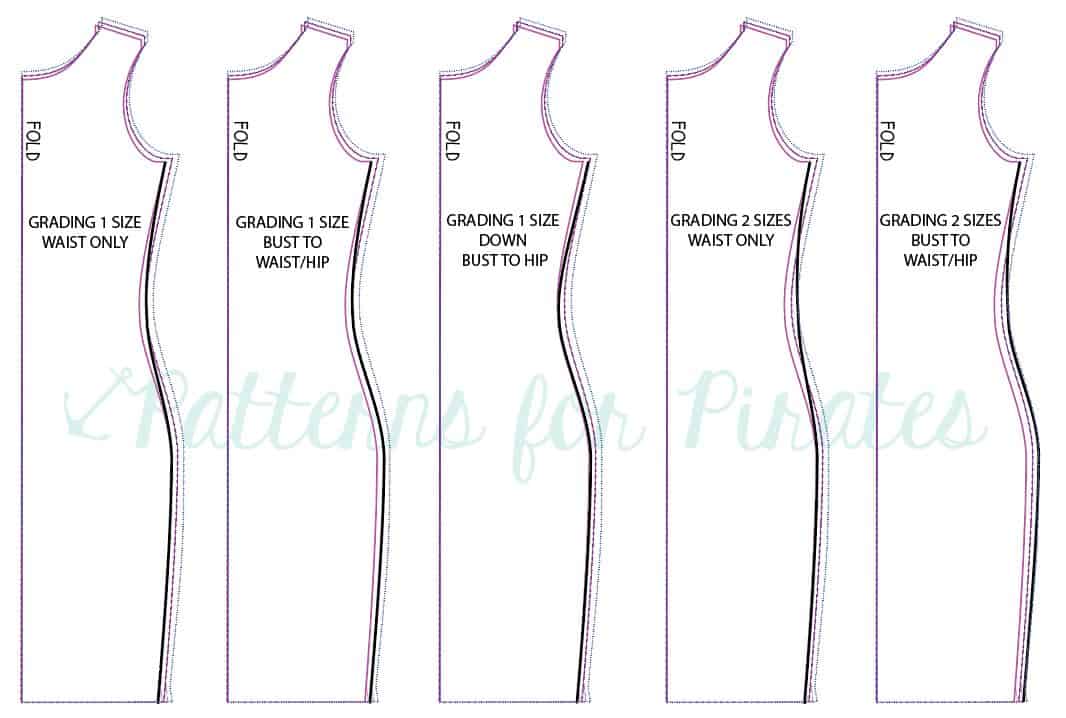
But, if you’re fitting pants and you’re having wrinkles or pull lines when just standing straight then you’ll want to alter the pattern for a better fit.  Lets go over some wrinkles and pull lines and what you would need to do to fix them.  I have the issue on the left, followed by how you would alter the pattern in the middle, and to the right what your new pattern piece will look like against the old one (old pattern in pink and new altered in black).

When you have wrinkles this indicates that you have too much fabric somewhere and it is bunching up.  Pinching out the excess will show you exactly where the extra fabric is coming from usually and if it is horizontal, vertical, or both that needs to be taken out.


When you have pull lines this indicates that there is not enough fabric somewhere and it is straining.  If you’re unsure you can unpick to let the tension out and see if the lines go away.  The gap that your seam spreads would be the amount your pattern needs to not strain.  You can unpick along the side seam to check for horizontal pulling or along the top waistband for vertical.  You might need both as well if you’re getting bias pulling.


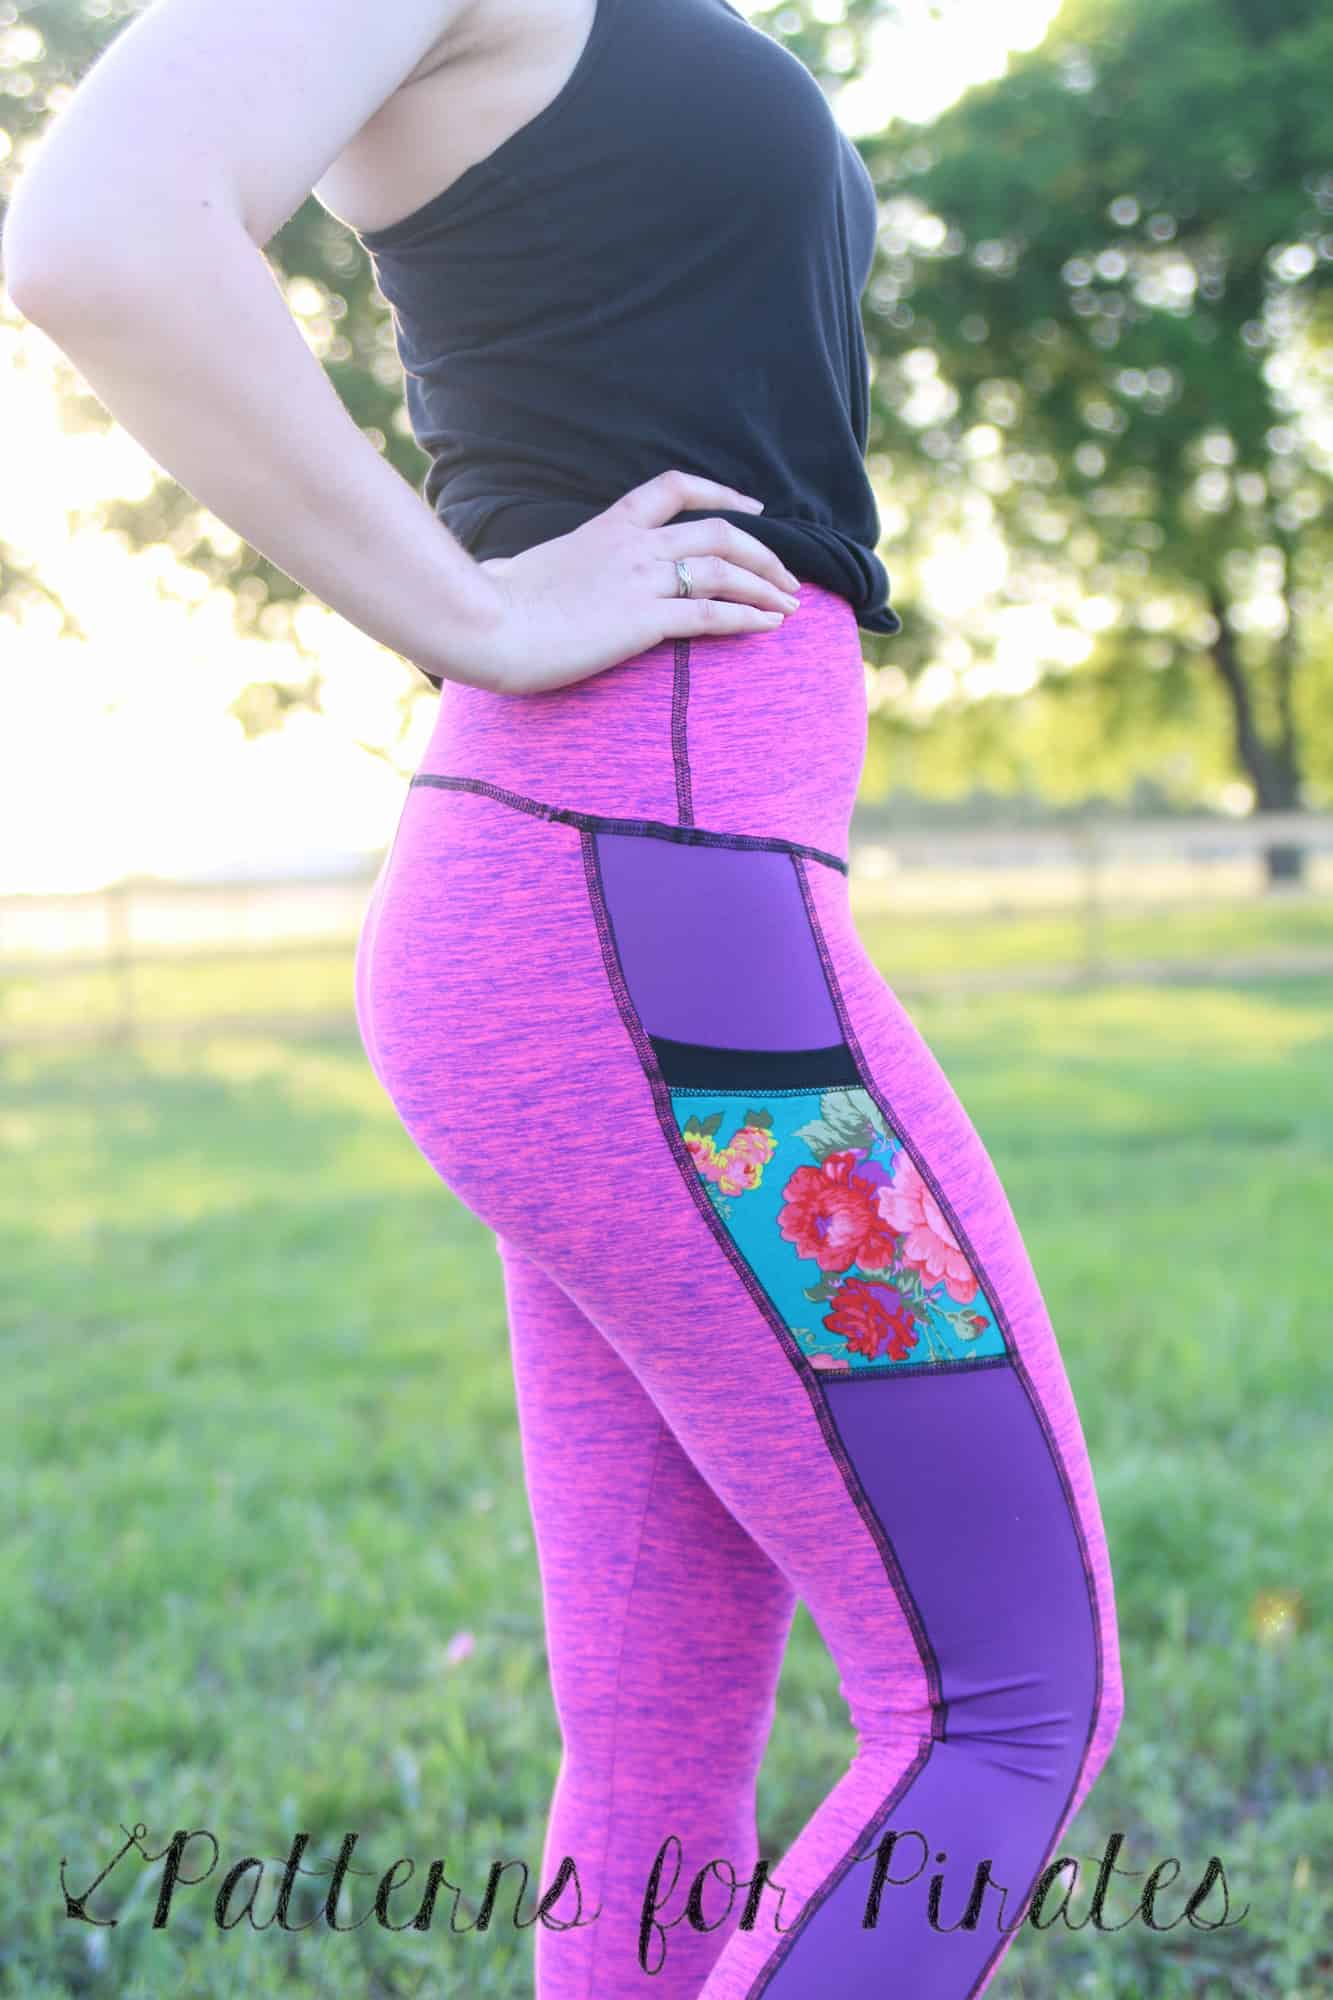
The same goes for booty with wrinkling vs pull lines and vertical vs horiztonal.   But, I wanted to touch on a common fit issue I see asked about, which is pulling under the bum.  This is generally when your booty is a bit lower then the pant is drafted for.  Lowering the booty curve will help elevate that straining and pull lines.


Pants aren’t all that scary 🙂 Once you learn the basics you can alter the pattern for your perfect fit easily!  Good luck!

Filed Under: Fitting, P4P University, Uncategorized Leave a Comment

P4P University- Ease

September 23, 2017

Ease is a term using to describe how much extra fabric there is around your body after the garment is sewn up. In sewing and pattern groups you often see the question, “Does this run big/small/true to size?”  And most the time the same pattern and size will have an array of answers! Confusing right?  The truth is the pattern is designed with a certain amount of ease the designer has picked based on the size chart.

So, when the designer like me drafts a pattern they decide how much ease they want for the intended fit.  They use not only the listed body measurements, but an entire book of standard/average measurements for each part of the body to give the pattern a certain amount of ease everywhere along the body.  I try to give the most important measurements in the measurement chart and finished measurements to help you pick the perfect size for your preference of fit.  I usually have more measurements in the tutorial than on the listing pictures so that when you’re ready to pick a size for that certain garment you can see if you need to modify, grade between sizes on that particular pattern. Here is the size chart within the tutorial for the Peg Legs:

Some ease is needed for certain garments.  Woven/non-stretch fabrics require much more ease since they don’t stretch.  A body requires ease to move, bend, breathe, etc comfortably.  Designers use the recommended amount in general for guidelines and can add more if they want a looser fit.  Knit garments can, and often do have negative ease.  Negative ease means the garment finishes smaller than your body and much stretch to fit on to your body as well as when you move.

There is a very wide span of “what fits” within a single garment.  For a knit shirt using a stretchy fabric- lets pick cotton spandex with about 75% stretch) you can have up to about 50% negative ease and still move and breath, this would be what most would call “skin tight”.   You can also have a few inches of ease for a looser fit, what most would call relaxed or baggy. And within that range, everything technically “fits” because you have enough ease for movement.  The rest is up to the designer to create the design ease they have in mind.  When the question is asked, “Is it true to size?” it really can’t be answered.  It is true to the designer’s intended fit with the amount of ease they drafted into the garment.  Whether it is how much ease you prefer personally for that garment depends on if your personal preference is the same as the intended fit.  I’m always surprised to see someone post in our FB group “this is huge” or “it’s too tight”, I try very hard to show intended fit through listing pictures, use the best describing words in the listing and give a good description in the tutorial along with the measurements.  But, what one person with the exact same measurements and fabric choice finds “too snug” another might describe as “huge”.  It’s all personal preference!

Lets think about what a big range that is… I’m going to go down to 30% negative ease since this is a pretty tight standard athletic/swim amount of ease, most clothes wont be tighter unless we’re going to add in compression fit/slimming undergarments.  I will do hips at 40 (top end of the medium).  So you could easily have a well drafted pant pattern with a finished full hip measurement of anywhere from 28″ all the way to 45″ depending on the intended fit and suggested fabrics.  Most knit pants can easily range from 28″-42″ depending on the kind of knit they’re drafted for.

Woven pants don’t have quite the range, since you take away the option of having negative ease and using stretch for the movement ease needed.  But, A woven pant for a 40″ full hip can still range from about 42″ up to 46″ depending on the intended look of the design.  We very often get the question if you can sew a knit pattern with a woven non stretch fabric.  The answer is mostly no.  Most knit patterns depend on the stretch of the fabric to give some, if not all, of that movement ease you HAVE to have for your body to comfortably move, bend, breathe, get the garment on and off, etc.  If you would like to know how much wearing ease you need to get the slimmest possible woven garment there are ways to measure that.  For your full hip you can place the measuring tape around your full hip-mine is about 40″.  Keep the tape carefully in place, but loosen your grip at the front.  Very slowly sit down, or bend/squat.  You will notice that the tape will pull and need more room.  This is called your “sitting spread”.  Lovely name right 😉 , but it is how much you “spread” when you sit/squat.  You need this much ease or extra fabric around your hip in any woven garment to be able to move comfortably.  There are tighter dresses out there with less ease there, but you aren’t sitting cross legged on the floor in that tight woven pencil skirt.  You probably aren’t even sitting comfortably in it.  The hip is the easiest measurement to check your ease need.  But, the same concept can be a check for bust, arms, thighs, etc. putting the tape measurer around and moving and breathing, letting the tape slide to the biggest range you use while moving.  If you check this sitting/moving measurement against the finished measurements of the pattern you will know if you can use a non-stretch fabric and still move comfortably.

I did a quick video about measuring your needed “wearing ease” here:

A designer’s job is to choose how much ease they want for a certain intended fit and look.  Lets take one of my patterns The Pumpkin Spice Dolman.  It is a looser cut with a quite a lot of ease through the bust and about 0 ease at the full hip.  I intended it to be a loose, slouchy fit and works best with fabric that has a soft drape.  Some might find the design ease I added too much if they don’t like the loose, slouchy look.  It doesn’t mean the pattern “runs big” since that is exactly the amount of ease intended for the look I was after.  It just means you prefer a tighter fit that intended.

A slimmer cut shirt like the Slim Fit Raglan or Layer Me Up has negative ease at the best and less ease through the body.  Again, this doesn’t mean the pattern “runs small” it is meant to be smaller and tighter as designed.

Lets take another pattern, this time a fitted one, the Peg Legs.  The Pegs are a traditional tight fit legging with negative ease.  The standard ease used in athletic wear is usually 20-30%.  The Pegs are right in the middle through legs and up at the higher end at 30% at full hip and high hip.  Since they do not have elastic I preferred the tighter end of normal to help them from inching down.  We’ve seen them compared to others with less negative ease and neither are wrong, just a different preference on how fitted the designer had in mind.

Now lets talk about how you can use this knowledge to your advantage in sewing for yourself!  Once you understand ease and fabric choices you can essentially make the perfect garment fit you every time before even cutting! WHAT? I know, amazing right?  Now, this doesn’t happen overnight.  It’s something you will come to learn about your preferences over time and experimenting.  But, the more you pay attention to both your fabric choices and the design ease the faster you will get there!

Take all the clothes you love and look at them, study them! For that matter take the ones that you think are a little tight or loose too.  How much ease does it have to your body? On the bust, waist, hip?  What fabric is it made out of (this doesn’t have to be exact, but “thin and drapey or thick and stable categories work well).  Now you can apply this to your sewing choices.  You will learn if you like a looser fit with those thinner drapey knits- or a tighter fit with those.  Maybe you tend to always love thicker stable knits with you do have a more fitted garment.  Whatever you find in your “research” try to apply that to your pattern, fabric, size choices.  If you know you tend to like at least 2″ of ease at your waist you can know if you want to grade in or out at a waist on any t-shirt pattern.  Maybe you only like knit pants with some negative ease on the booty… When you open up a new knit pant pattern you can pick your size off that finished measurement chart and know for certain you’ll like the fit on the booty.  If you are just beginning it’s something you will want to make an effort to pay attention to.  Eventually it will become second nature 🙂 You’ll be able to open up a new pattern and know just how to use it to create YOUR OWN intended fit if you happen to not love the designer’s intended fit.

Filed Under: Fitting, Frequently Asked Questions, P4P University 8 Comments

Pivot and Slide FBA Method`

June 22, 2016

fba header picture

We get a lot of questions about Full Bust Adjustments.  Since I draft for a true hourglass, curvy figure lots of our ladies have bigger busts. So here is a quick and easy method for knit tops if you need a FBA.

Do you need a FBA?

I see a FBA suggested A LOT in sewing groups, even though it’s not always the problem/solution for ladies (Especially for a P4P pattern that already drafts for a bigger bust.)

So, how do you know?  I began putting both upper/over bust and full bust in my measurement charts to help! (Need a refresher on these measurement terms? Here is our How to Measure Yourself post explaining them.)

If your upper bust is a size smaller than your full bust- you need a FBA.  If you don’t have those measurements on your pattern then you will have a neckline and shoulder fitting too large when choosing your size from your full bust measurement.

I do NOT advise “choosing your size based on your upper bust measurement” and doing a FBA for that many inches.  Indie patterns like mine are much more “true to size” than traditional paper patterns that tend to have a lot more ease built into them. With traditional paper patterns it is often very easy to size down 1-2 sizes on them and still have enough wearing ease.  Most indie patterns are not drafted with that much extra ease.  I draft my patterns right from that measurement chart meaning if I picked my size based on my upper bust (34.5) I would choose a size small, but I don’t need a small! Both my upper and full bust fit into a medium on the full size chart.  I do not need a small with a FBA becuase my frame/upper body isn’t a small.  It’s a medium 🙂 This is why I began adding the upper bust measurement into my patterns, to take out that guess work when I saw this recommendation quite a lot.  And while it might work well for those traditional paper patterns with more ease- I do not suggest using this method for P4P patterns-or most indie patterns in general.

Here is my size chart with both upper/over bust and full bust.

listing pictures3

Got some wrinkles on the full bust area? A FBA is NOT always the answer 🙂 There are a lot of other reasons you might have some wrinkling there!

Both raglan and dolman style sleeves will naturally have some wrinkling there. No matter who that pattern designer is, who is wearing it, fabric choice, or even gender wearing it! The drafting of these two sleeves lay flat when arms are out, which means when arms are down it naturally creates some wrinkling in the armpit area. No biggie 😉

IMG_0238 IMG_0413 IMG_9552 IMG_3842 IMG_4147 IMG_4387

Length is the armsyce is another reason one might have some gaping or pulling.  If you are shorter or taller then the height the pattern is drafted for (P4P drafts for average 5’5″), or if you happen to have a different proportion there. You might need to adjust the length of your pattern from the top of shoulder to the armpit rather than needing a FBA.   This is difficult to tell just from a picture.  It is however much easier in person to see.  If you’re not sure try pinching at the shoulder seam to take out some length if you think it might be too long.  If it is too short you will feel like the entire shoulder area is too tight and that armpit seam will be up touching your armpit too tightly.  For both it is easy to see if you try on the shirt prior to putting the sleeves in.  If it is a tank, remember the bands will pull the armysce in though.

Here my lovely tester and model has a little wrinkling because she is a bit shorter than the drafted height. She would benefit from taking just a touch of length from the armsyce.

11036978_10207178765452450_6301409831053611894_o

Here my lovely tester would benefit from the opposite, a bit more length in the armsyce.

11807358_10207360915846870_5189633883074489071_o


You might have some issues with fit through the armsyce and bust if you are wide chested/through the upper back.  You would find your upper bust measurement in a bigger size than your full bust.  You would need a Small Bust Adjustment (follow the same method just pivoting and tracing to the smaller full bust size).

Here is a gorgeous tester of mine who has begun to trace off a size larger through the neckline and shoulders and adjust down to her smaller bust. This is prior to doing so. You can see it is a bit tight across her shoulders and upper chest area. but fits well in her full bust.

12512545_10156480108785282_629169134466680487_n12669689_10156480108610282_565742808129966782_n


The last reason you might be having fit issues through the bust is not using the appropriate fabric for the top.  If your pattern suggest 50% and you sew up a cotton jersey with only 20% you might have pulling at the chest.  The opposite problem would be using a very stretchy fabric like a lightweight rayon spandex with a lot of horizontal and vertical stretch making the armsyce droop lower or even gape.

Here I am in the exact same size, but the feathers are a more stable cotton jersey with very little stretch and the grey is a rayon spandex with a ton of stretch and drape.  The armsyce is an 1-1.5″ lower in the drapey, stretchy rayon spandex.

IMG_7635 IMG_7920

One more thing I see sometimes is the drag lines from bust to waist.  This is something you will get naturally with an hourglass figure. You have a large difference from your full bust to waist.  If your shirt/dress is semi-fitted then you will see those drags pulling into that smaller measurement at the waist.  This isn’t asking for a FBA, it’s asking for a dart 🙂 But, most knit shirts don’t have darts, just curves along the side seams. You can’t get as drastic of a change from full bust to waist without a dart.  But that’s okay! It’s the nature of a semi-fitted knit top.  It doesn’t mean it is ill-fitting.  Here are some pictures showing those drag lines, but I have room for my bust and the armsyces are fitting perfectly for my frame.  My side seams aren’t pulling drastically to the front of my body on my bustline and it isn’t too tight across my back at the bustline.  I don’t need a FBA for my patterns (yay! I do need them on patterns drafted for a more rectangular figure like traditional paper patterns! Just one reason why I love drafting for a curvy figure).

IMG_7564 IMG_7753 IMG_1758 IMG_1791 IMG_1804

Okay, now if you’re still with me 😉 and you need a FBA here is my favorite, quick and easy method for a knit top. This only adds a bit of width right at the bust.  It doesn’t add length.  For most women and most knit tops this is sufficient.  If you have 2 sizes difference in your upper and full bust you might also add some length to the front center at the bust line and ease it back into the side seam (making the front center curve down). To give your bust some extra length as well.

Here is one of my favorite testers.   She has a smaller size upper bust than full bust.  Here she did not do a FBA.  You can see she has a bit of pulling pointed right to the apex of her full bust. She is your classic case of needing a FBA 🙂 Her side seam will be pulling towards the front of her body instead of laying more evenly along her side.

12109259_10156165083900790_2794494373974819072_n  12094846_10156165083630790_3745559963982436088_o


Here is the “Pivot and Slide FBA Method”:


Step 1: Choose your sizes based off the measurement chart.

z

Step 2: Pivot

fba pictures-02

Step 3: Trace

fba pictures-03

Step 4: Slide back

fba pictures-04


Now you have a new armsyce that goes wider at the bust, but the same smaller neckline/shoulder fit as the smaller size.

I hope this helps those out there needing this fit adjustment! Once you’ve got it down it really is a very quick and easy method to adding a bit more room for the ladies 🙂

Filed Under: Fitting, P4P University, Uncategorized 35 Comments

P4P University:: Grading Sizes

June 20, 2016

grading sizes

Patterns for Pirates grades to a true curvy, hourglass, 5’5″ frame.  Often times, one’s measurements may not fit within one size for bust, waist, and hip and in order to keep the intended fit of the garment, grading sizes is needed.  Is it always necessary to grade sizes? No, but depending on the fit and ease of the item, it may be worth taking the extra step to custom fit it to your measurements.  Unsure if you want to grade?  Check out the Shirt Fits Explained post and our post about Ease as they may help you decide if you are comfortable with a different fit.  For some of the looser cut tops like the Everyday Elegance and Relaxed Raglan, grading up a size for the waist is likely, not necessary as they are straight cuts from the bust down.  But a top like the Layer Me Up, that is very fitted to the body would fit the best if graded to your measurements/size.  Be sure to measure yourself prior to sewing!  Our measurements tend to fluctuate without us really noticing, so I try to measure myself every couple of weeks to be sure I am still sewing the same size my measurements put me.  Not sure where to measure? Read this: How to Measure Yourself.  Below is the size chart for reference.


Now that you have determined your size and if you’d like to grade, how do you do it? Below are a few examples of grading for a larger waist and hip size.  Any adjustments should be made to both the FRONT and BACK pieces.  Do not be discouraged if your measurements put you within different or larger sizes than ready-to-wear store-bought clothes as pattern sizing does not translate the same.  Our bodies come in all shapes and sizes, and we are all uniquely beautiful.  The beauty of sewing for oneself is the ability to create an item custom fit to you.

P4P grading sizes, pdf patterns

Still need help or have more questions about P4P patterns?  Join us over in the P4P Facebook Group and get to sharing!


Filed Under: Fitting, P4P University, Uncategorized 19 Comments

How to do a Full Booty Adjustment

June 13, 2015

n my post about the Greenstyle Taylor Shorts I made myself here … I mentioned I did a “full butt adjustment”.. well because I have a FULL butt 😉

IMG_0749 IMG_1308

Well apparently the apple didn’t fall far from the tree… because when I went to measure my LO for some cute Winter Wear Aviator pants, I shared about them here in this post …  his measurements all hit a size 2… but THAT BUM was a size 5! UH-OH! ha ha ha ha… so I flat measured the bum area to see how much ease the pattern had… I decided he did need more room then the size 3 had… so I went to work doing a full butt adjustment for my not quite 2 year old…I thought kids were easier to sew for?????

IMG_6900 IMG_6928

I had lots of inquires about a more detailed blog post, so I thought I would share his… it is the same on any size pattern 🙂

It is a really quick and simple adjustment!

Take your back piece and splice it across where the roundest part of their/your booty is.  usually about mid rise on younger/athletic builds 🙂 You will want to leave the seam allowance! Here is a picture of his:

IMG_6879

Now when you go to cut, you will spread out the back rise however much you need to add for the bum… I added about 1/2″ to my LO’s after flat measuring and comparing to his measurements.

Then you will need to “true up” the sides… since you’re adding length into the rise it wont match perfectly anymore, neither will the outer leg seam… Here is where you can customize your fit even more…

IMG_6880

For my Little Guy who still has a baby figure I didn’t want to loose ANY width on the waist or high hip… so when I “trued up” the outer leg I took the outer edge and added slightly straightening the line up.

When I adjust for myself, I have a small high hip and waist… so I don’t mind taking the inner angle and loosing some width up there.

(Looking back I should’ve taken another picture with a chalk line describing these… I will add those when I need to adjust a pattern for myself, or my little one!!)

I hope this helps those blessed with big bums! 😉

Filed Under: Fitting, Uncategorized 3 Comments

P4P University: Petite and Tall Fitting Adjustments

June 13, 2015

So… I’m tall… I mean… I’m TALLLLL 🙂

5’10” no shoes ha ha ha See me towering over my tiny mom?

10271502_10101467547479973_2882136477492759705_n

It makes finding RTW clothes a CHALLENGE to say the least… yes, I can pay an arm and a leg for “talls” but I want young trendy clothes!! So making my wardrobe is so rewarding for me!

I’ve already posted tips for blending sizes for children’s clothing here but this method doesn’t work well for adult patterns because all of the sizes are made to fit an average height adult, rather than differing heights on the youth patterns.

Here are some tips for adding, or taking away length to a pattern for an adult.


Our patterns are drafted to two different size charts, as well as different heights for both charts.

  • for our Hourglass Figure chart, patterns are drafted to a 5’5″ height.
  • for our V-Figure Chart, patterns are drafted to a 5’6″ (short) / 5’10” (average) / 6’2″ (tall) height.

The “rule of thumb” is to add or remove 1/2″ for every 1″ that you differ from the height that the pattern is drafted for.

For example, at 5’10” there is a 5″ difference so I would need to add 2.5″ throughout the pattern.  If I were 5’1″ then I would remove 2″ of length since there is a 4″ difference.

If you are shorter or taller you need to add/take away length throughout the whole pattern!
Just like children’s patterns I DO NOT recommend only adding to the bottom hemline. Knit patterns are much more forgiving in fit. And sure, adding only to the bottom hemline will make your garment longer. But using the method of lengthening at the bottom only will most likely not give you the desired fit.

The four places I recommend adjusting for height are:

  • at the shoulder/armscye
  • just under the bust line
  • just under the waistline
  • at the bottom hemline.

Adding throughout the pattern helps keep the bust, waist, and hip where they actually hit you. P4P uses a standard side waist length of 8″ and a waist to hip length of 8.25″ so if you know your specific length measurements between those points, you will want to add/remove the exact amount in those areas.

(Not sure where to measure yourself for garment sewing? Check out our post here.)

I have made myself enough clothing to know how much I need to add to MOST patterns designed for average height.
–  I add about 2 1/8″ to every shirt I make, or I add about 2 5/8″ to my tunic length tops
–  I even know how much I like in each spot: at my shoulders I add a scant 1/8-1/4″, at the chest and waist area I add 3/4-1″, and my bottom hems get about 1/2-1″ added to them.

The shoulder/armscye adjustments can be tackled a couple of different ways. I personally like to take a smaller seam allowance there to add some length. But you can also splice your pattern straight across where the armsyce is and spread the pattern pieces to add length that way. I only add about 1/8-1/4″ to mine, but that tiny difference makes SUCH A HUGE difference in how a shirt fits me!

Because of how our no-trim patterns are assembled with the Letter and A4 formats, there are margins on each of the overlapped pages that make slash + spread adjustments easy as pie! For the chest and waist, I simply untape the pattern pieces, move them down (adding what I need for extra length), and then retape that section.

Or you can (with any pattern)… splice it straight across and measure what you’d like to add.

Shortening is the same method, you would just be overlapping instead of adding.

With the height adjustments you’re making, with adding or removing length, the pattern pieces won’t line up perfectly without a one extra step. All you need to do is cut out the pattern and “true up” the sides. Simply match the lines up and straighten them out the best you can to even out the adjustments made.

Repeat the process for the other pattern pieces as needed.

Remember: If you added length in the armscye on the bodice piece, you need to add length in the sleeve as well. Or if you changed the length of the rise on the back leg piece, you’ll need to do that same adjustment to the front leg piece.


Pants (like our Peg Legs, Vintage Jumper or Uptown Joggers) should also be shortened or lengthened throughout.  Each of the patterns include a finished inseam length.  Measure your inseam and compare to the pattern to make your length adjustments.


Ta-Da!!!! Now you have shirts and pants that will FIT you…ALL over! 🙂


Filed Under: Fitting, P4P University, Sewing Techniques 30 Comments

How to Mash Sizes for a Custom Fit!

June 13, 2015

Do you have a tall skinny minny? Or a little one who needs a bigger width then their height? This is a simple easy route to mashing sizes for children to get a better fit! No more just adding to the hem!! If your child needs length they need it throughout the whole garment, not just the hem! And vice versa if your child is shorter they need it shortened throughout the whole garment.

So here is the quick guide. You will take their overall height and match that to the size chart of your pattern… for this example I’m going to be using my niece who is 44″ tall- which matches my size 5.  Her chest and waist match a size 4. So I will be using the width of a 4 and the length of the 5 on every pattern piece!

**I’m going to note in here too that going more then 2 sizes is very hard to keep the proportion and shape of the pattern.

Here is a picture where I highlighted the size 4 and 5 (Size 4 in yellow and size 5 in orange). I don’t typically do this, but I did to help illustrate 🙂

IMG_5433

And here I drew in black to show how I followed the size 4 width overall on the piece and the size 5 length.  See how I made the armhole the size 5 length, and neck hole… these are places where your little ones fit will drastically improve with this method!

IMG_5435

And again, here is the sleeve with a 4 width and 5 length. Make sure you keep EVERY piece the same length/width and your pattern will fit together beautifully 🙂

IMG_5436

Coming from a very tall girl- if your little one needs added length they will be so much more comfortable with that longer armhole/neckhole/bodice!! I can hardly wear shirts that I don’t add that 1/8-1/4″ at my armhole… even though it seems like such a small adjustment it makes such a BIG difference in my fit! 🙂

This method can also be used with a shorter length to width— I used to do this for my little one when he was younger– he is big for age so he was in toddler sizing with a baby figure! He needed a much bigger around then his height and it worked wonderful for him!

Now go create that perfect custom fit!! 🙂


Filed Under: Fitting, Frequently Asked Questions, P4P University 6 Comments

Featured Patterns

  • Mae Top - Bundle Mae Top - Bundle $20.00 Original price was: $20.00.$18.00Current price is: $18.00.
  • Mae Bottom - Bundle Mae Bottom - Bundle $20.00 Original price was: $20.00.$18.00Current price is: $18.00.
  • Loosey Goosey - Bundle Loosey Goosey - Bundle $20.00
  • Bacall Bodysuit Bacall Bodysuit $12.00
  • Privacy Policy
  • Refund Policy
  • Affliliate Program
  • Contact Us
  • About

Copyright © 2025 Patterns for Pirates

Copyright © 2025 · Genesis Framework · WordPress · Log in