Patterns for Pirates

P4P stylish, modern, wearable patterns

  • Home
  • Blog
    • Frequently Asked Questions
    • Pattern Releases
      • Free Patterns
    • P4P University
      • Fitting
      • Sewing with Stretch, Knit Fabrics
      • Sewing with Woven Fabrics
      • Sewing Machines
    • Sew-A-Longs
    • Fabric for Pirates
    • Pattern Hacks
    • Announcement
      • Blog Tours
      • Contest/Giveaway
  • Shop
  • Bundle Discounts
  • Gift Cards
  • My Account
  • Cart

Go To Jacket – SAL day 8 (recap/catch up day)

October 15, 2018

Wow! What an amazing last week we had! We have seen so many beautiful Go To Jackets sewn this past 7 days. But fear not! You still have time to get yours done too. Today is catch up day, so go over the previous blogs and videos and get sewing. The links to all blogs is below.

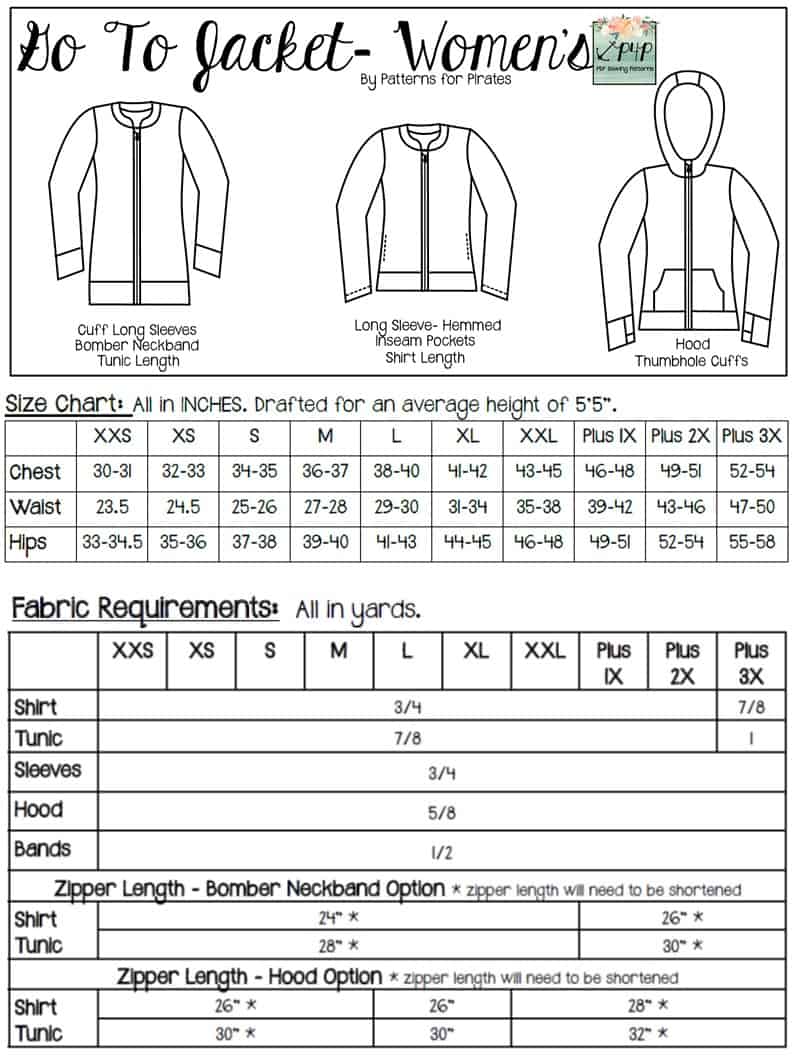
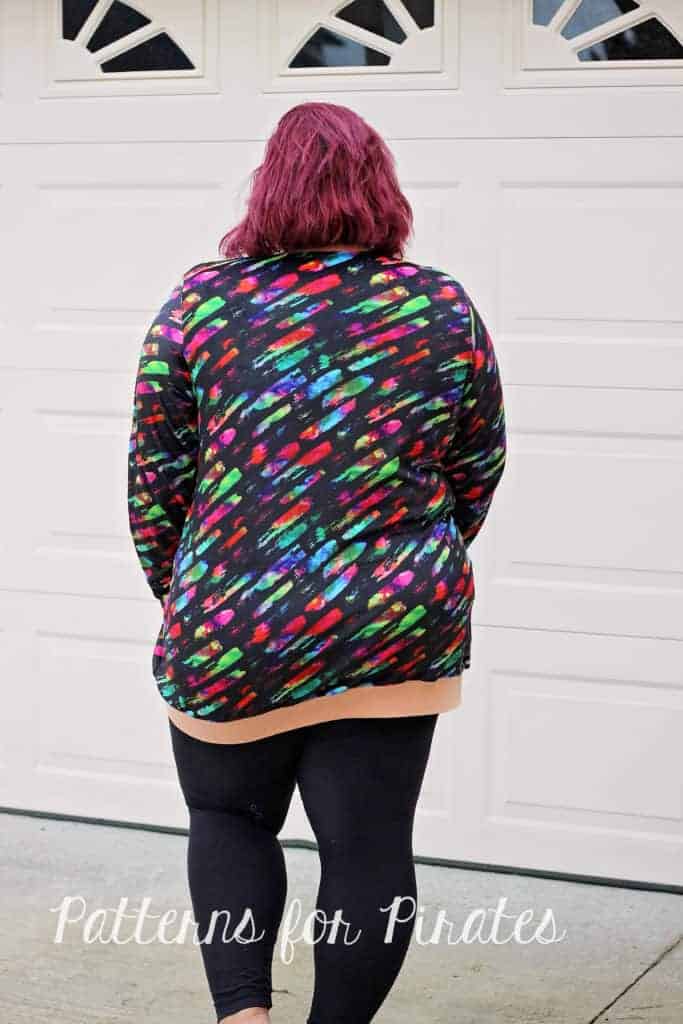
This week I made myself a tunic length bomber style jacket that is unbelievably cozy and comfy. I used squish from RockerbyDestash Fabrics and cotton lycra for the waistband band, cuffs and neckband. I have a feeling those kanga pockets I added will be holding plenty of the boy’s little treasures.

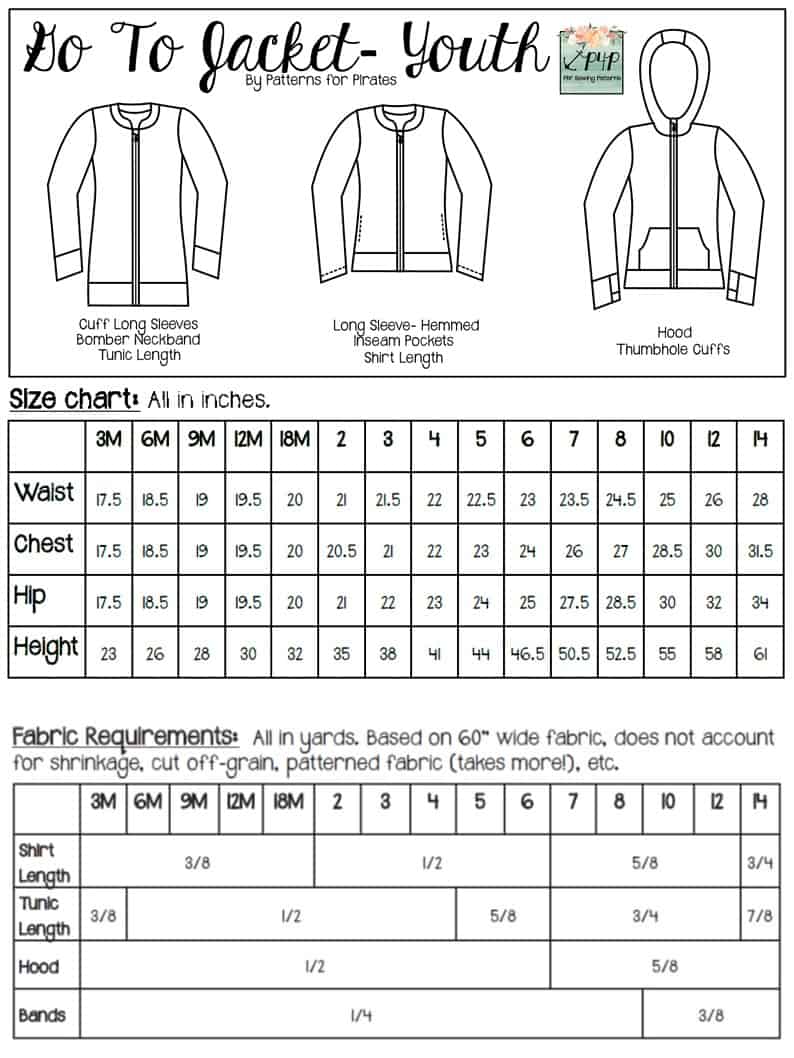
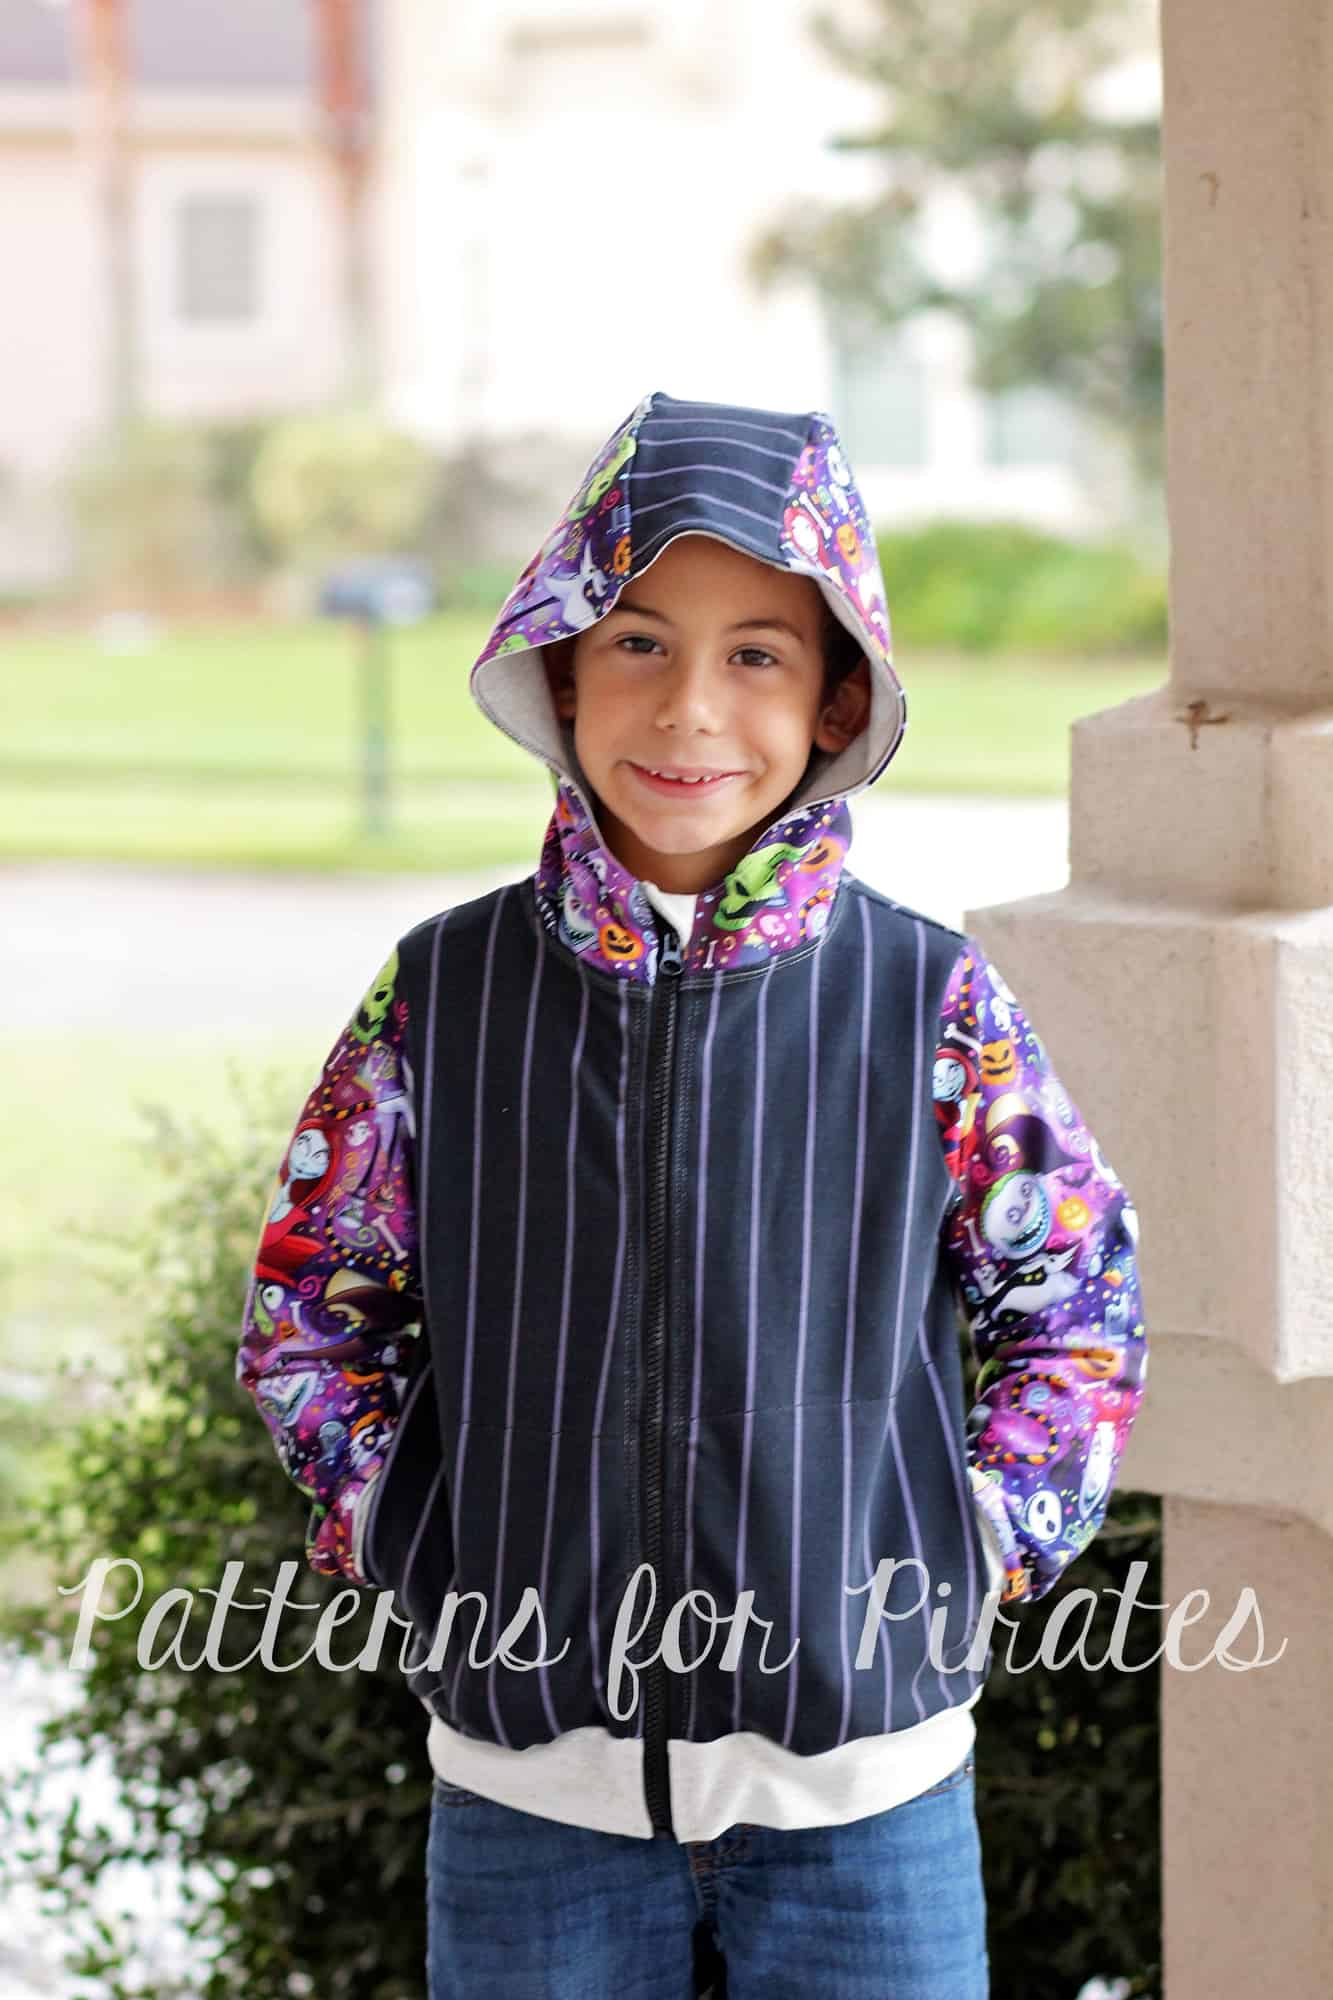
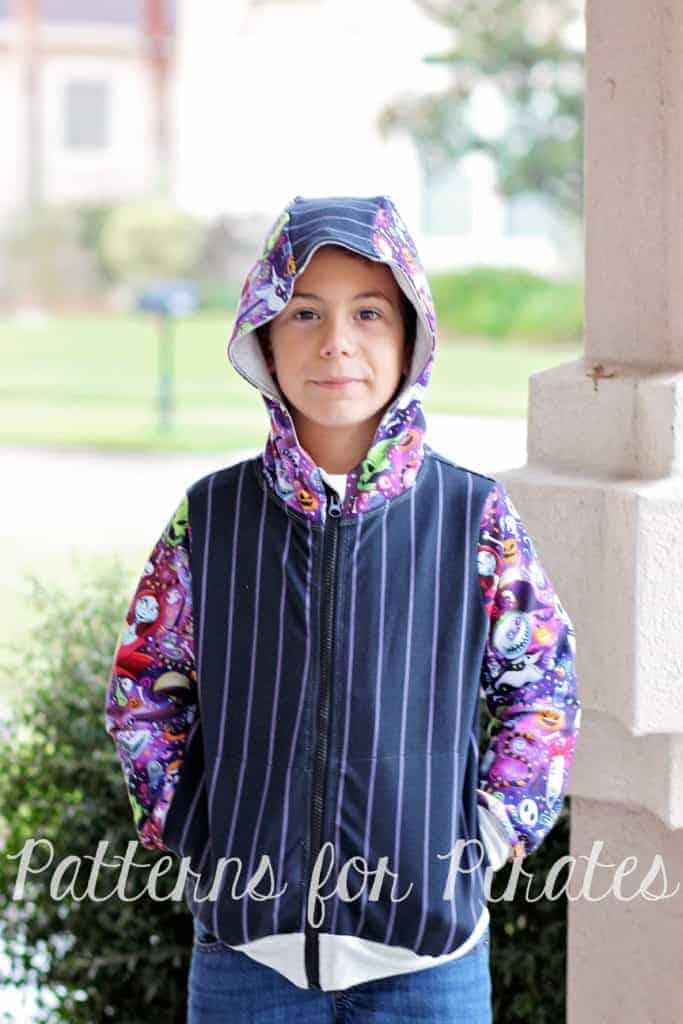
I also made a youth Go To Jacket for my little men. They had to have the hood and I added inseam pockets to this one. This cute French Terry one will be a staple in their wardrobe as soon as we get some cooler weather here in Florida. This fabric is from Vintage Lace.

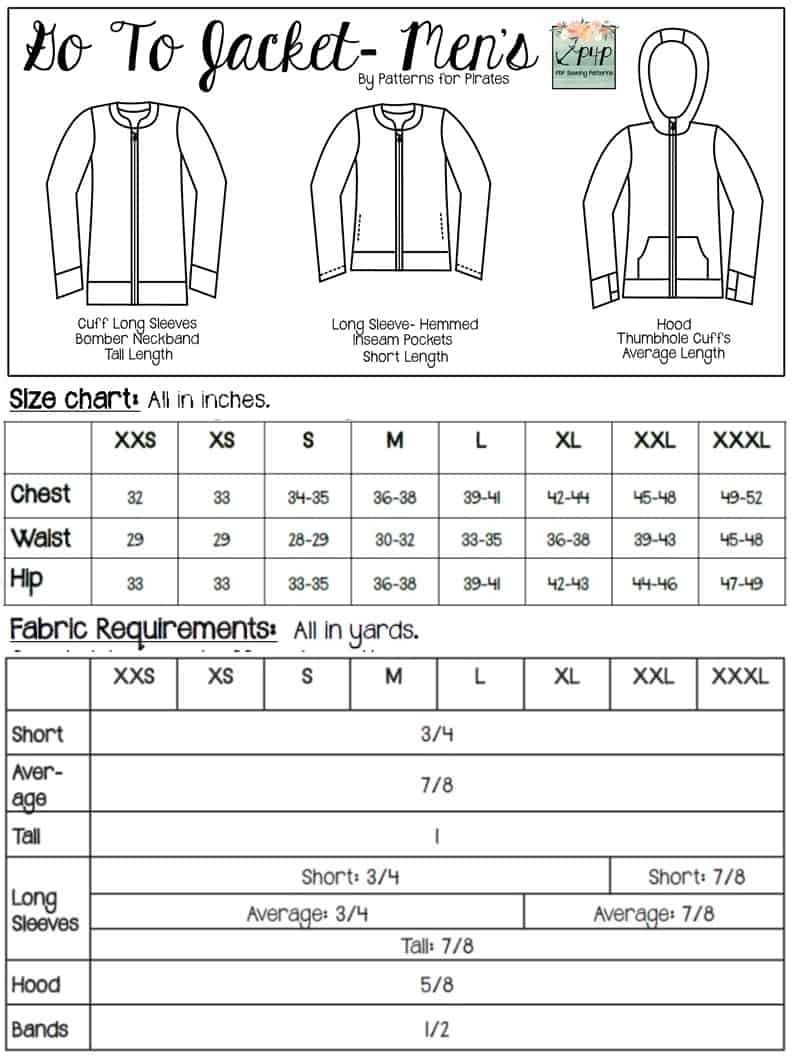
My next one will have to be the men Go To Jacket so my husband gets a comfy zippered hoodie too. He has already picked some fabric.


If you’re not sure which style to pick or which options, take a look over our Go To Jacket Round Up blog post as well as the GTJ albums in the P4P Facebook Group.


Tomorrow the P4P & M4M teams will be picking two SAL winners so be sure to finish up your jackets and post a picture of your project in the Day 7 comments photo of the GTJ Sew Along album in the M4M & P4P Sew Along Group.

Go To Jacket Sew Along

Day 1: Print + Cut Pattern

Day 2: Choose + Cut Fabric

Day 3: Sew Pockets

Day 4: Sew Shoulder Seams + Attach Sleeves

Day 5: Attach Neckband / Hood

Day 6: Add waistband + Finish Sleeves

Day 7: Add Zipper

Day 8: Recap + Catch Up

Day 9: Winners Announcement

Filed Under: Frequently Asked Questions, Sew-A-Long, Uncategorized Leave a Comment

Go To Jacket – SAL day 7 (add zipper)

October 14, 2018

THE day is here! The big ZIPPER day is today. 🙂 Let’s all take a deep breath and remind ourselves it’s really not hard, I promise you! Start by preparing your chin guard, make all markings and press.

If you need to shorten the zipper you are using, take a look over the the videos in this P4P University blog. Shortening plastic zippers is a breeze so don’t be afraid to purchase longer zippers in bulk.

TIP: The Wonder Tape is your best friend when adding zippers! It holds the zipper in place and you can sew through it without gumming up your needles. It will work like magic!

The zipper video is below so take a look over it before your start sewing. As always, don’t be shy to ask questions in the Sew Along group. Once you finish your jacket add a photo of your work in the Day 7 picture comments of the Go To Jacket SAL album. Keep in mind that only pictures posted in that thread will count towards the prizes. 🙂

YOU DID IT! Great job sewing your zippered jackets.

Go To Jacket Sew Along

Day 1: Print + Cut Pattern

Day 2: Choose + Cut Fabric

Day 3: Sew Pockets

Day 4: Sew Shoulder Seams + Attach Sleeves

Day 5: Attach Neckband / Hood

Day 6: Add waistband + Finish Sleeves

Day 7: Add Zipper

Day 8: Recap + Catch Up

Day 9: Winners Announcement

Filed Under: Frequently Asked Questions, Sew-A-Long, Uncategorized 1 Comment

Go To Jacket – SAL day 6 (add waistband/ finish sleeves)

October 13, 2018

Welcome to day 6! Today we are going to add the waistband and finish the sleeves. The key word of the day is: press! 😉 Press your waistband lengthwise, wrong sides together before you attach it, press  and steam it after too! Press and steam your cuffs before and after you add them as well!

  • If you went for the hemmed sleeves all you have to do is hem them 1/2″ allowance using either a zig zag stitch, a triple stretch stitch or your coverstitch. Remember that memory hem we did a few days ago? It makes hemming so easy now.
  • If you chose the sleeves cuffs take a look over our Knit Cuffs 101 blog post and remember to…PRESS! 🙂

In the video below I am adding the waistband and cuffs to my hooded jacket. Once you finished your sleeves post your progress in the day 6 picture comments of the Go To Jacket Sew Along album in the M4M & P4P Sew Along group.

Go To Jacket Sew Along

Day 1: Print + Cut Pattern

Day 2: Choose + Cut Fabric

Day 3: Sew Pockets

Day 4: Sew Shoulder Seams + Attach Sleeves

Day 5: Attach Neckband / Hood

Day 6: Add waistband + Finish Sleeves

Day 7: Add Zipper

Day 8: Recap + Catch Up

Day 9: Winners Announcement

Filed Under: Frequently Asked Questions, Sew-A-Long, Uncategorized 1 Comment

Go To Jacket – SAL day 5 (sew neckband / hood)

October 12, 2018

It’s FRIDAY!! On our 5th sew along day we’ll be attaching the neckband for the bomber style jacket or the hood for the hooded one.

The Go To Jacket hood features a center panel which makes it great for mixing and matching fabrics too. If you’d like to add a leather accents to the hood, you can follow the steps in the Go To Jacket hacks blog post.

TIP: If you like the look of the drawstrings and want to add them to the younger kids’ jackets, go for a FAUX DRAWSTRING. Simply cut two 5-6″ pieces of cord and tie a knot at one of the ends. Pull the other end through the drawstring hole and tack it down in the lining. Repeat with the other side. Done! Now you have the look of drawstrings without the safety concern of a real one.

Watch the video below for a visual step by step of the hood construction.

If you decided to go with the very trendy bomber style then all you have to do is press the neckband in half lengthwise, wrong sides together and attach it to the neckline opening. It is very important to remember to attach the neckband 3/8″ away from the front opening, on both sides!

Once you’ve added the hood or neckband post a picture of your progress on the day 5 photo comments of the Go To Jacket SAL album.

Go To Jacket Sew Along

Day 1: Print + Cut Pattern

Day 2: Choose + Cut Fabric

Day 3: Sew Pockets

Day 4: Sew Shoulder Seams + Attach Sleeves

Day 5: Attach Neckband / Hood

Day 6: Add waistband + Finish Sleeves

Day 7: Add Zipper

Day 8: Recap + Catch Up

Day 9: Winners Announcement

Filed Under: Frequently Asked Questions, Sew-A-Long, Uncategorized Leave a Comment

Go To Jacket – SAL day 4 (sew shoulder seams and add sleeves)

October 11, 2018

Day 4 is here! Today we sew the shoulder seams (easy peasy!) and add the set in sleeves. When attaching the sleeves it is very important to match the notch to the shoulder seam, pin in place and then match the side seams and pin in place.

TIP: If you’re doing a hemmed sleeve now would be a good time to press your memory hem. This will make it so much easier to hem later on. 

The Go To Jacket pattern follows a 1/2″ seam allowance so be sure to not deviate from it when you sew the shoulder seams RST or when you attach the sleeves.

Watch the day 4 video below and be sure to post a picture of today’s progress in the day 4 photo comments of the Go To Jacket album in the M4M & P4P Sew Along Group.

Go To Jacket Sew Along

Day 1: Print + Cut Pattern

Day 2: Choose + Cut Fabric

Day 3: Sew Pockets

Day 4: Sew Shoulder Seams + Attach Sleeves

Day 5: Attach Neckband / Hood

Day 6: Add waistband + Finish Sleeves

Day 7: Add Zipper

Day 8: Recap + Catch Up

Day 9: Winners Announcement

Filed Under: Frequently Asked Questions, Sew-A-Long, Uncategorized Leave a Comment

Go To Jacket – SAL day 3 (sew pockets)

October 10, 2018

Welcome to day 3 of the Go To Jacket Sew along! Today is dedicated to adding pockets. The pattern features two styles, patch and inseam. I will be sewing the inseam one on my kids’ jacket and the kanga on my women one. The inseam pockets will have two openings, one at the side seam and a cool hidden one on the inside of the jacket. Today’s steps are pretty easy and as always, be sure to post in the SAL group if you have any questions.

Watch the videos below for and  post a picture of your pockets in the day 3 photo comments of the Go To Jacket SAL album.

Inseam pockets:

Kanga pockets:

Go To Jacket Sew Along

Day 1: Print + Cut Pattern

Day 2: Choose + Cut Fabric

Day 3: Sew Pockets

Day 4: Sew Shoulder Seams + Attach Sleeves

Day 5: Attach Neckband / Hood

Day 6: Add waistband + Finish Sleeves

Day 7: Add Zipper

Day 8: Recap + Catch Up

Day 9: Winners Announcement

Filed Under: Frequently Asked Questions, Sew-A-Long, Uncategorized 2 Comments

Go To Jacket – SAL day 2 (choose and cut fabric)

October 9, 2018

On day 2 we pick our favorite fabrics for the jacket. The pattern is drafted for medium stretch knit with at least 20% stretch like thicker performance knit, French Terry, fleece with stretch, sweatshirt knit, squish (aka cloud, cush, double brushed stretch minky), even thicker cotton spandex. For the pockets, chin guard, neckband and hood lining we recommend lighter fabric like cotton spandex. You will also need a separating zipper. The zipper length will depend on the size and style jacket you are making.

If you are unsure about which knit type will work best for your desired look, take a look over our P4P University Knit Types blog. Judy also included a cheat sheet that you can print. If you are like me and sometime are just keen on using a specific print for a specific pattern, read our Different fabric, different fit blog post before you cut your fabric.

For this SAL I am going to be sewing a youth Go To Jacket made with Vintage Lace French Terry and a Women’s GTJ with RockerbyeDestash Fabrics.

The Day 2 video is posted below. Check it out and once you are done cutting your fabric post a picture of it in the comments of the Day 2 photo of the Go To Jacket SAL album in the M4M & P4P Sew Along group.

Go To Jacket Sew Along

Day 1: Print + Cut Pattern

Day 2: Choose + Cut Fabric

Day 3: Sew Pockets

Day 4: Sew Shoulder Seams + Attach Sleeves

Day 5: Attach Neckband / Hood

Day 6: Add waistband + Finish Sleeves

Day 7: Add Zipper

Day 8: Recap + Catch Up

Day 9: Winners Announcement

Filed Under: Frequently Asked Questions, Sew-A-Long, Uncategorized Leave a Comment

Go To Jacket – SAL day 1 (print and cut pattern)

October 8, 2018

Welcome to our Go To Jacket Sew Along!

Day 1 is reserved to purchasing the pattern, printing and cutting the size(s) you need. If you plan on sewing for yourself you can get the Women Go To Jacket or Men Go To Jacket here, if you’re sewing for your little one, youth GTJ can be purchased here and if you’re sewing for the family, grab the bundle!

This Sew Along will be hosted in the new M4M & P4P Sew Along group so be sure to join the group not only for the exclusive discount code available for the Go To Jacket patterns, fabric code but also to post your progress this week. Don’t forget to check out the blog daily for videos and tips!

Now that you purchased the pattern(s), print the size needed. In order to do that it is very important that you take your most accurate measurements.

You will need your waist, hips and chest measurements in order to choose the correct Go To Jacket size. Patterns for Pirates has an great blog post that gives you tips for accurately taking your measurements. You can read all about it here. If your measurements put you in a different size for chest/waist/hips be sure to check out our P4P University blog and grade to achieve the perfect fit.

Check out the day 1 video below and then leave a comment on the Day 1 picture of the Go To Jacket SAL album in the M4M & P4P Sew Along Group. Tell us who will receive the Go To Jacket you’re sewing. We don’t allow pictures of the pattern posted so this will be your day 1 check in.

Go To Jacket Sew Along

Day 1: Print + Cut Pattern

Day 2: Choose + Cut Fabric

Day 3: Sew Pockets

Day 4: Sew Shoulder Seams + Attach Sleeves

Day 5: Attach Neckband / Hood

Day 6: Add waistband + Finish Sleeves

Day 7: Add Zipper

Day 8: Recap + Catch Up

Day 9: Winners Announcement

Filed Under: Frequently Asked Questions, Sew-A-Long, Uncategorized 5 Comments

Newest Patterns

  • Uptown Joggers - Youth $10.00 $8.50
  • Uptown Joggers $12.00 $10.50
  • Uptown Joggers - Bundle $20.00 $18.00
  • Notch Top & Dress $12.00
  • Notch Top & Dress - Youth $10.00
  • Privacy Policy
  • Refund Policy
  • Affliliate Program
  • Contact Us
  • About

Copyright © 2023 Patterns for Pirates

Copyright © 2023 · Genesis Framework · WordPress · Log in