Patterns for Pirates

P4P stylish, modern, wearable patterns

  • Home
  • Blog
    • Frequently Asked Questions
    • Pattern Releases
      • Free Patterns
    • P4P University
      • Fitting
      • Sewing with Stretch, Knit Fabrics
      • Sewing with Woven Fabrics
      • Sewing Machines
    • Sew-A-Longs
    • Fabric for Pirates
    • Pattern Hacks
    • Announcement
      • Blog Tours
      • Contest/Giveaway
  • Shop
  • Bundle Discounts
  • Gift Cards
  • My Account
  • Cart

Loggers :: New Pattern Release!

March 12, 2019

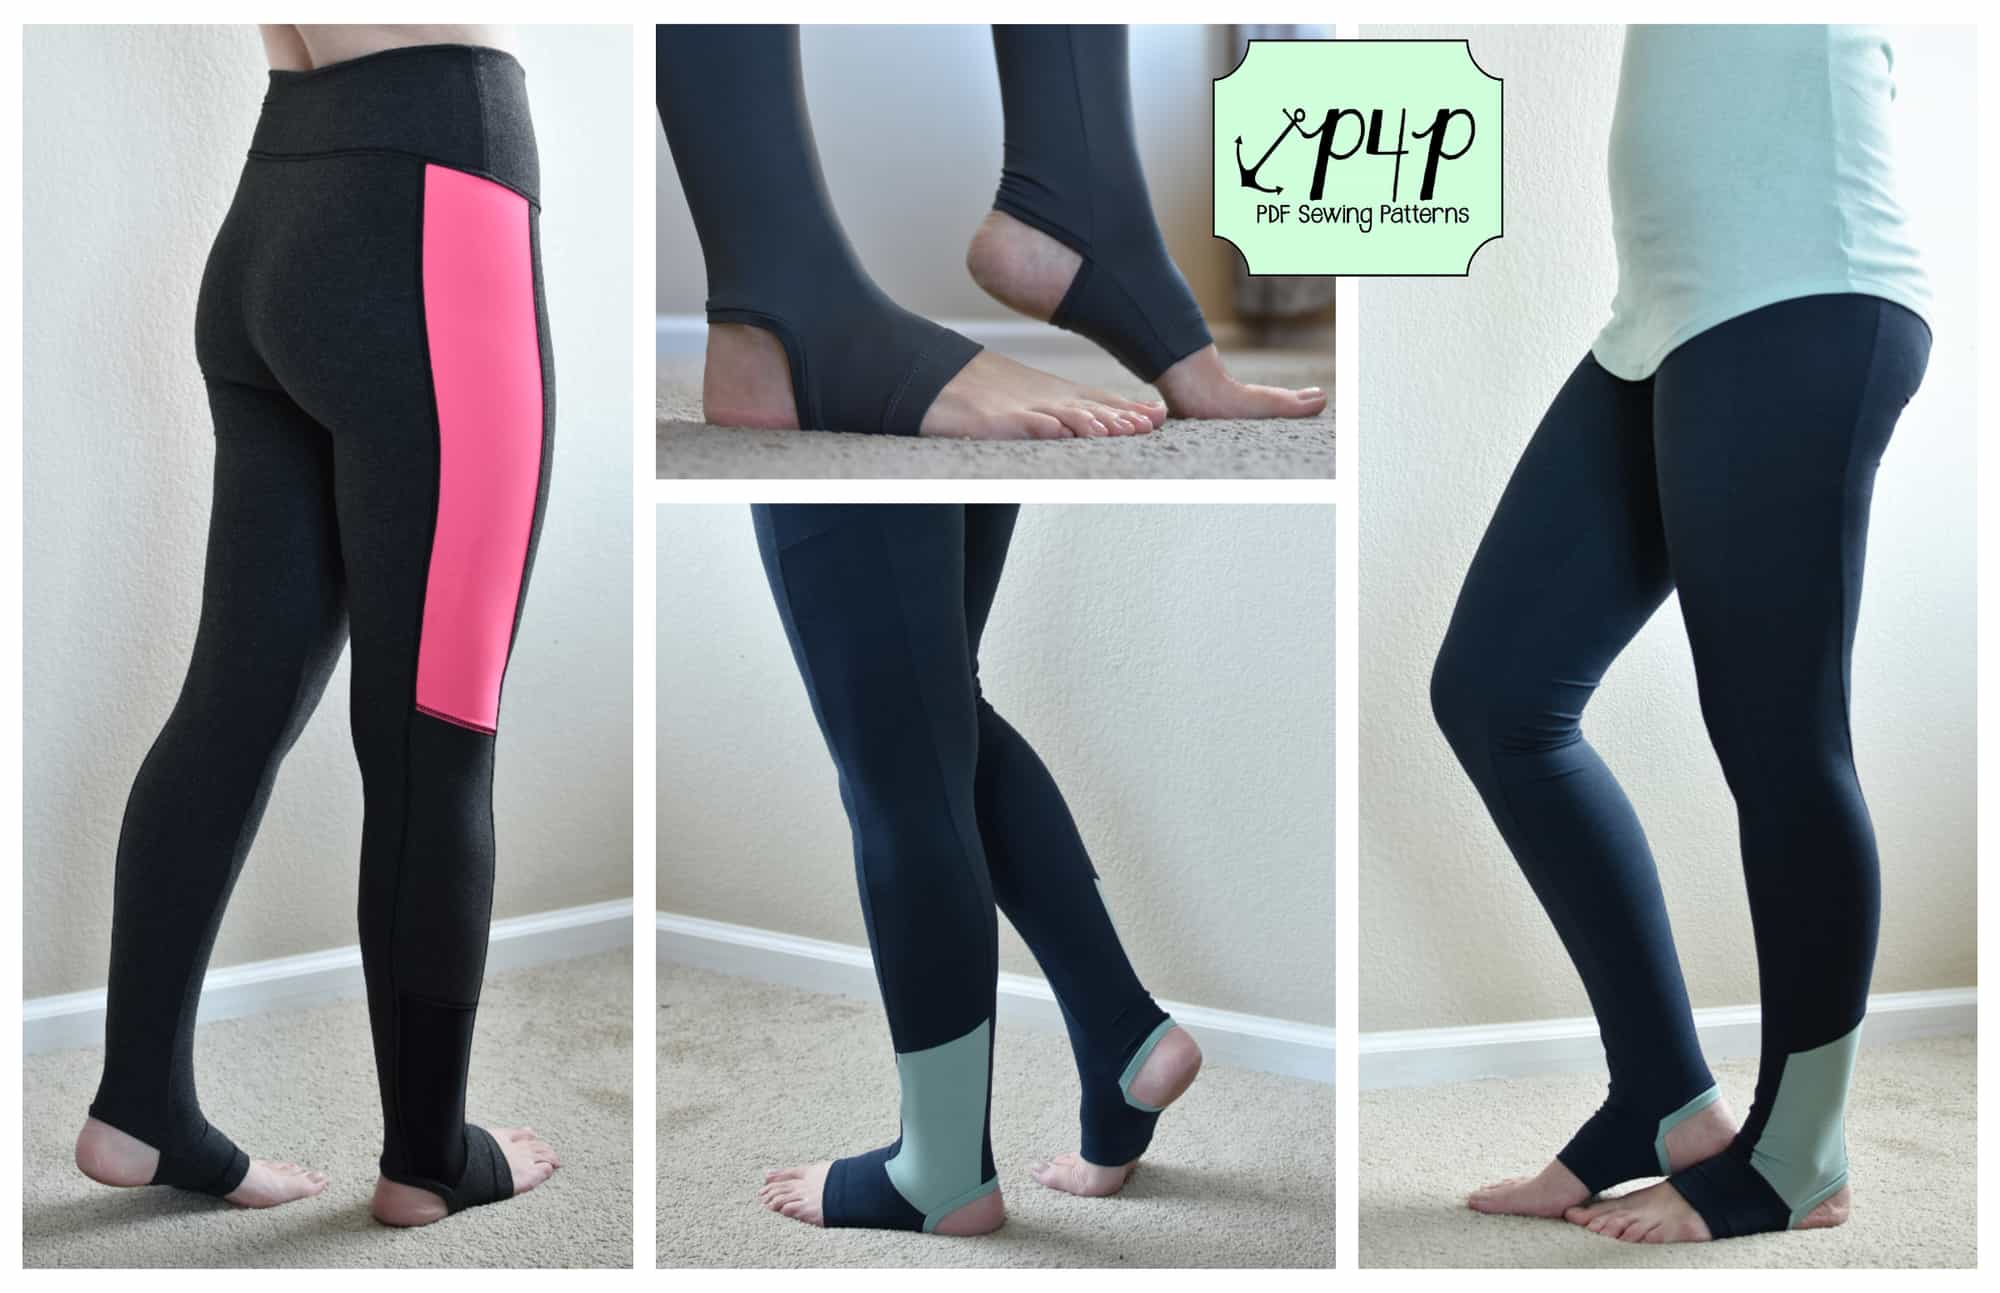
What do you get when leggings and joggers get together and make a baby?  LOGGERS!!

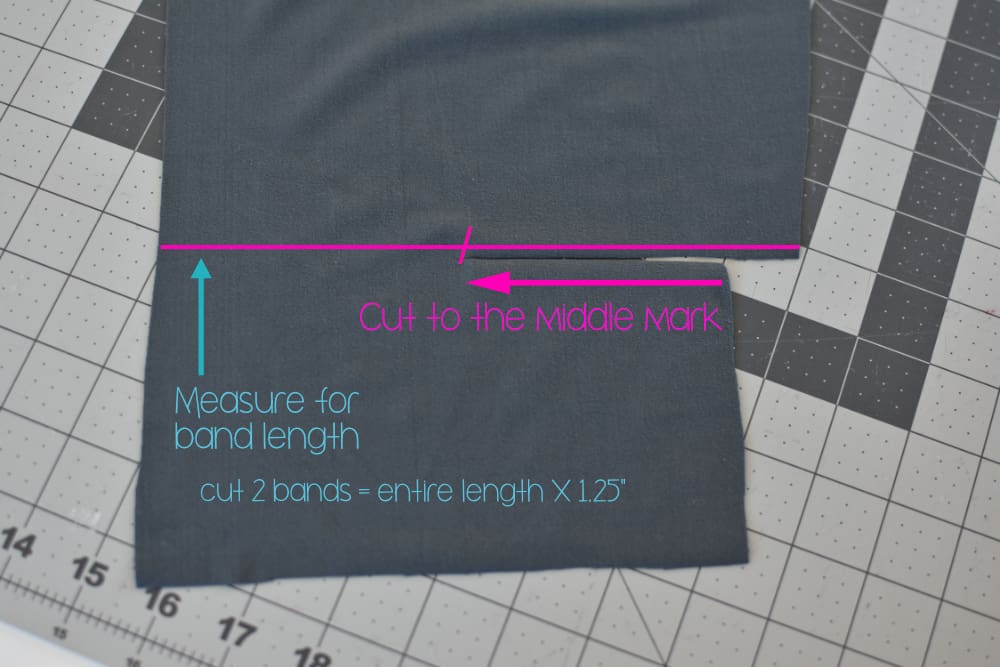
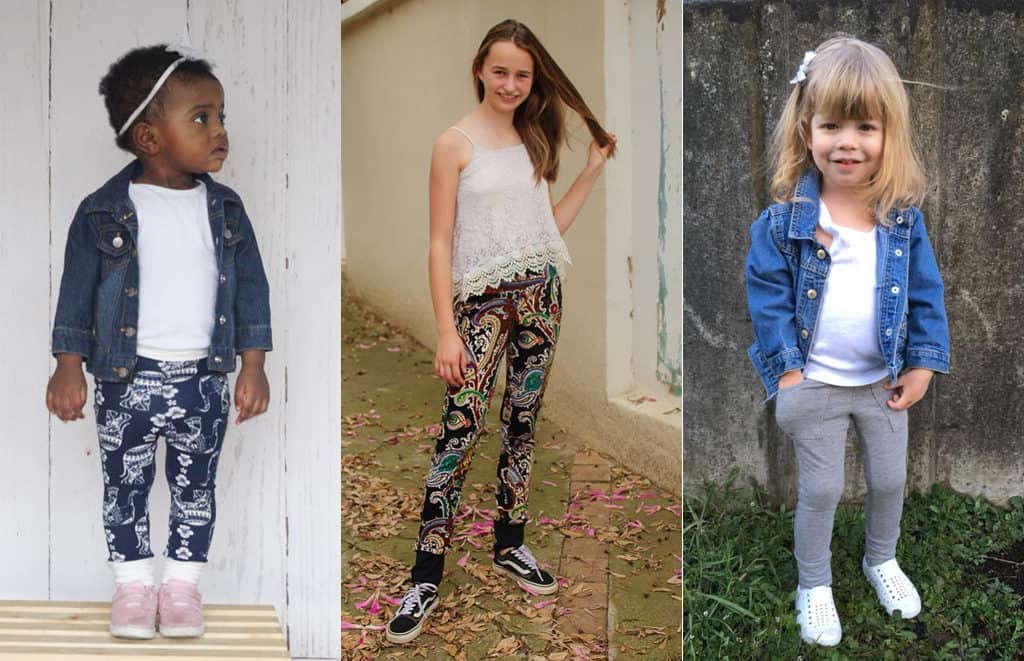
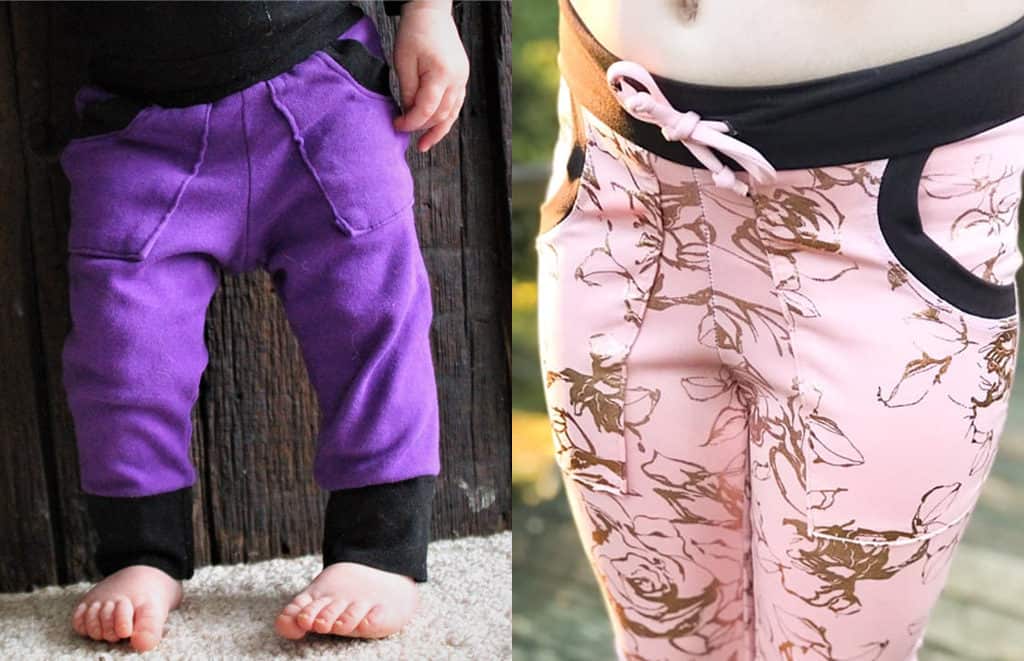
Today is like Christmas and my birthday all wrapped up into one because we are bringing you two brand new patterns that I think you’re really going to love: Loggers and Youth Loggers!
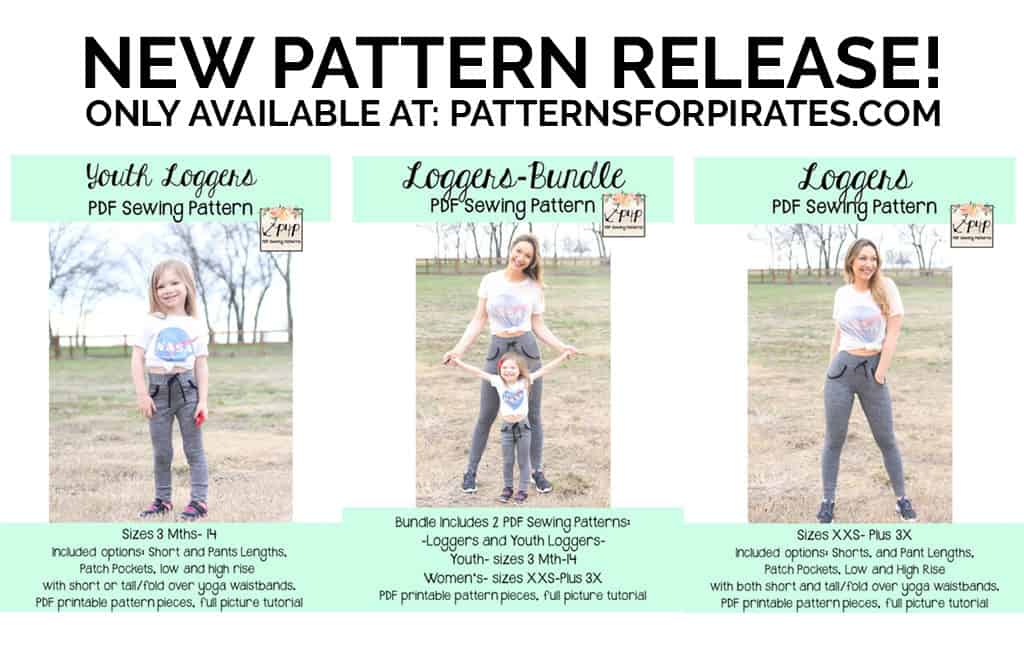
These patterns are drafted for a stretch knit fabric with a 40-50% horizontal stretch, and you will want some vertical stretch for wearing comfort.  Both the adult and youth versions feature a tighter pant with cuffs and optional pockets on the pant length.  They are drafted in two lengths (shorts and pants), a large size range (XXS – Plus 3X in women’s and 3M – 14 in youth), have two rises (high and low), two waistbands (short or tall/fold over yoga) as well as an optional drawstring.

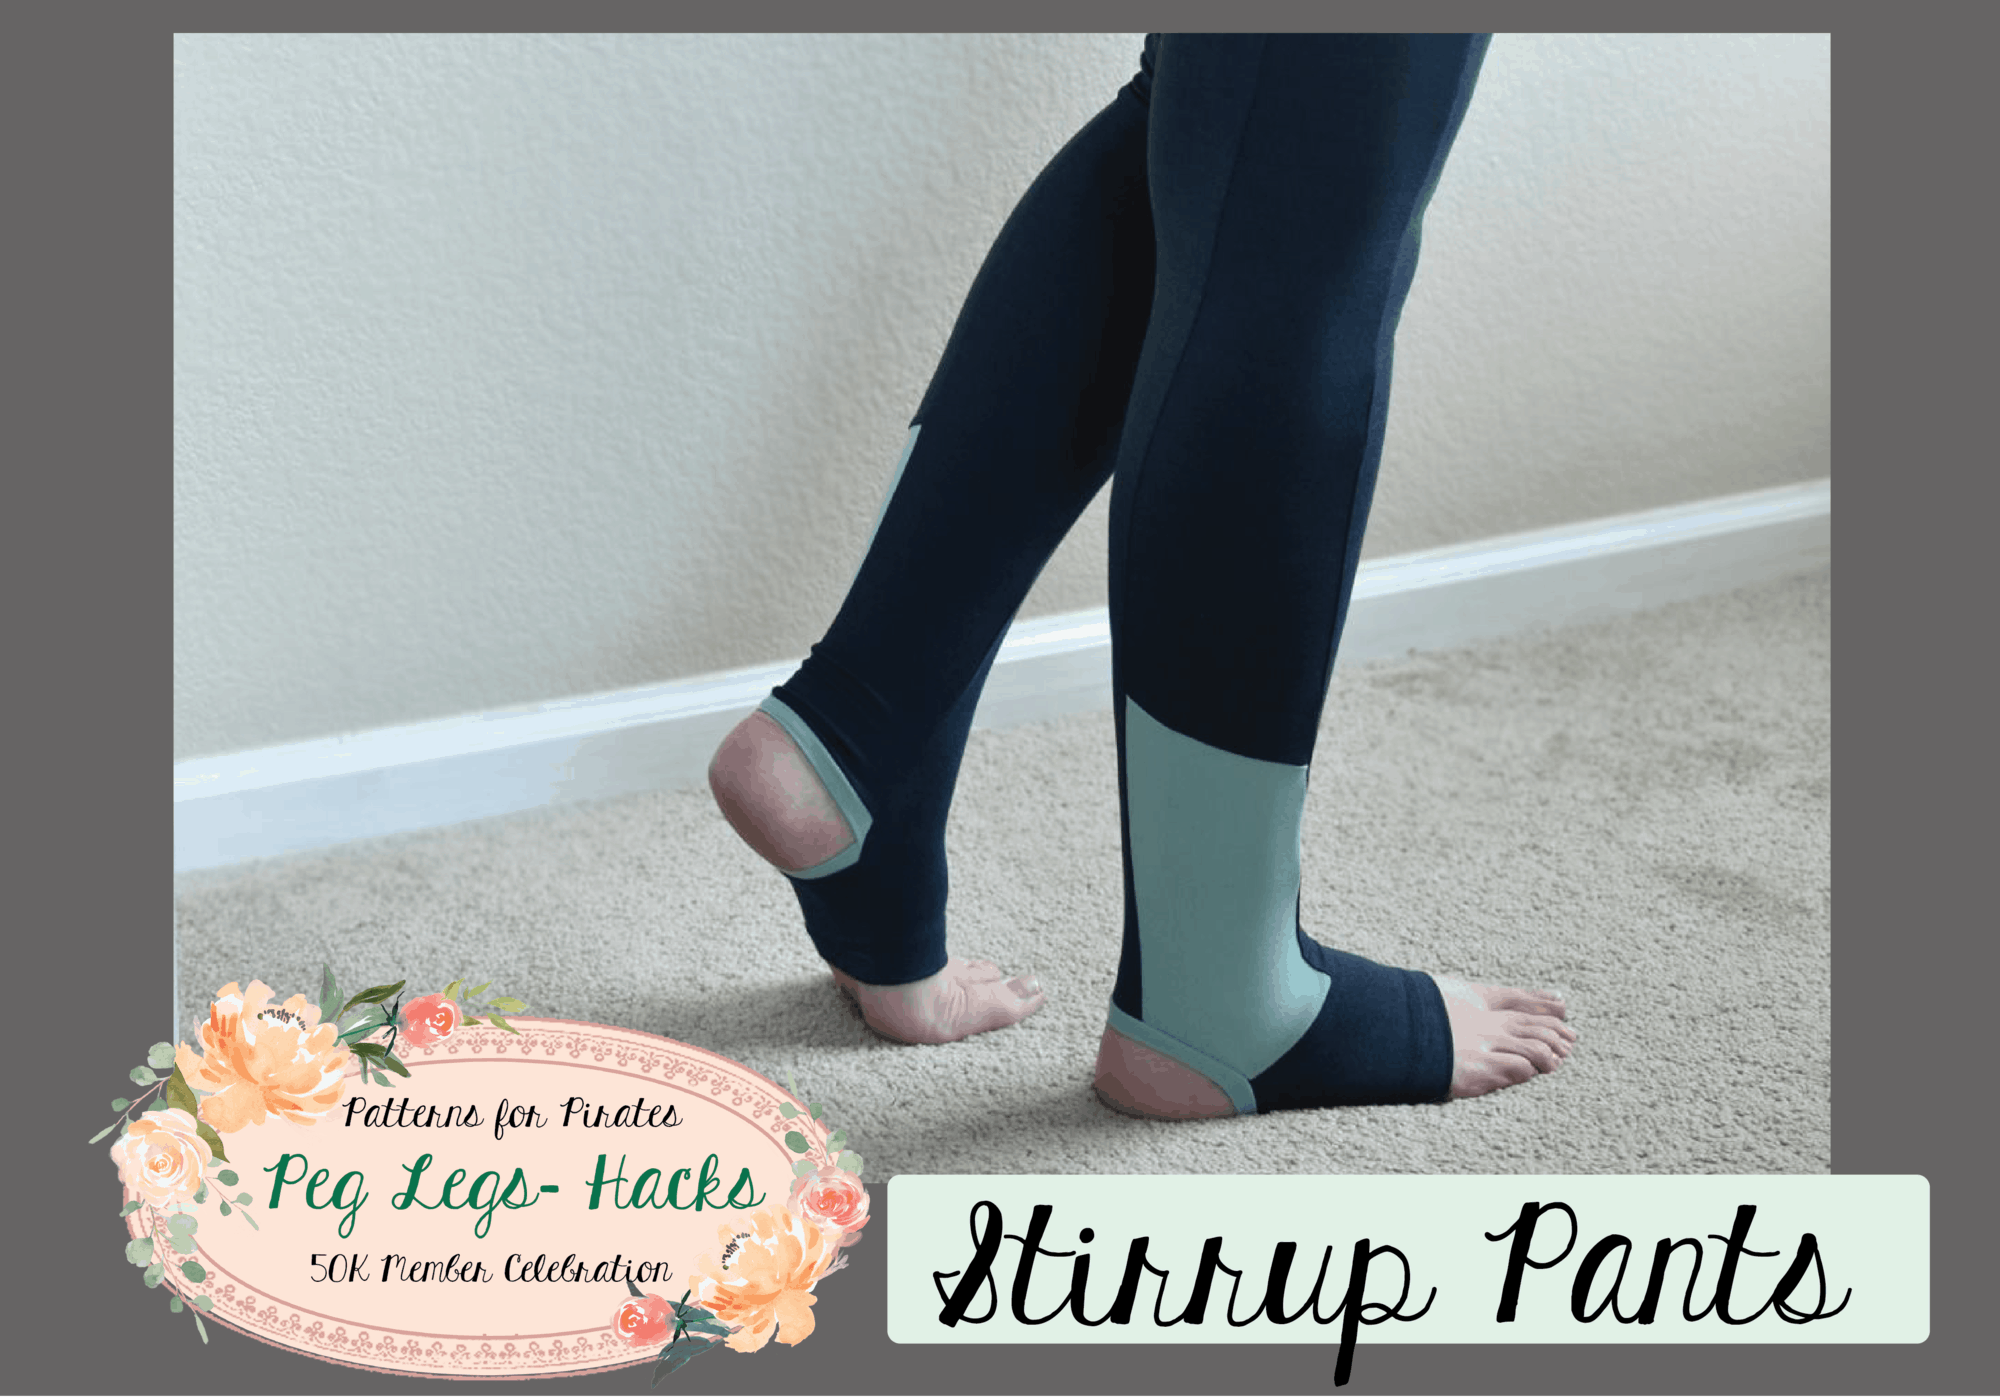
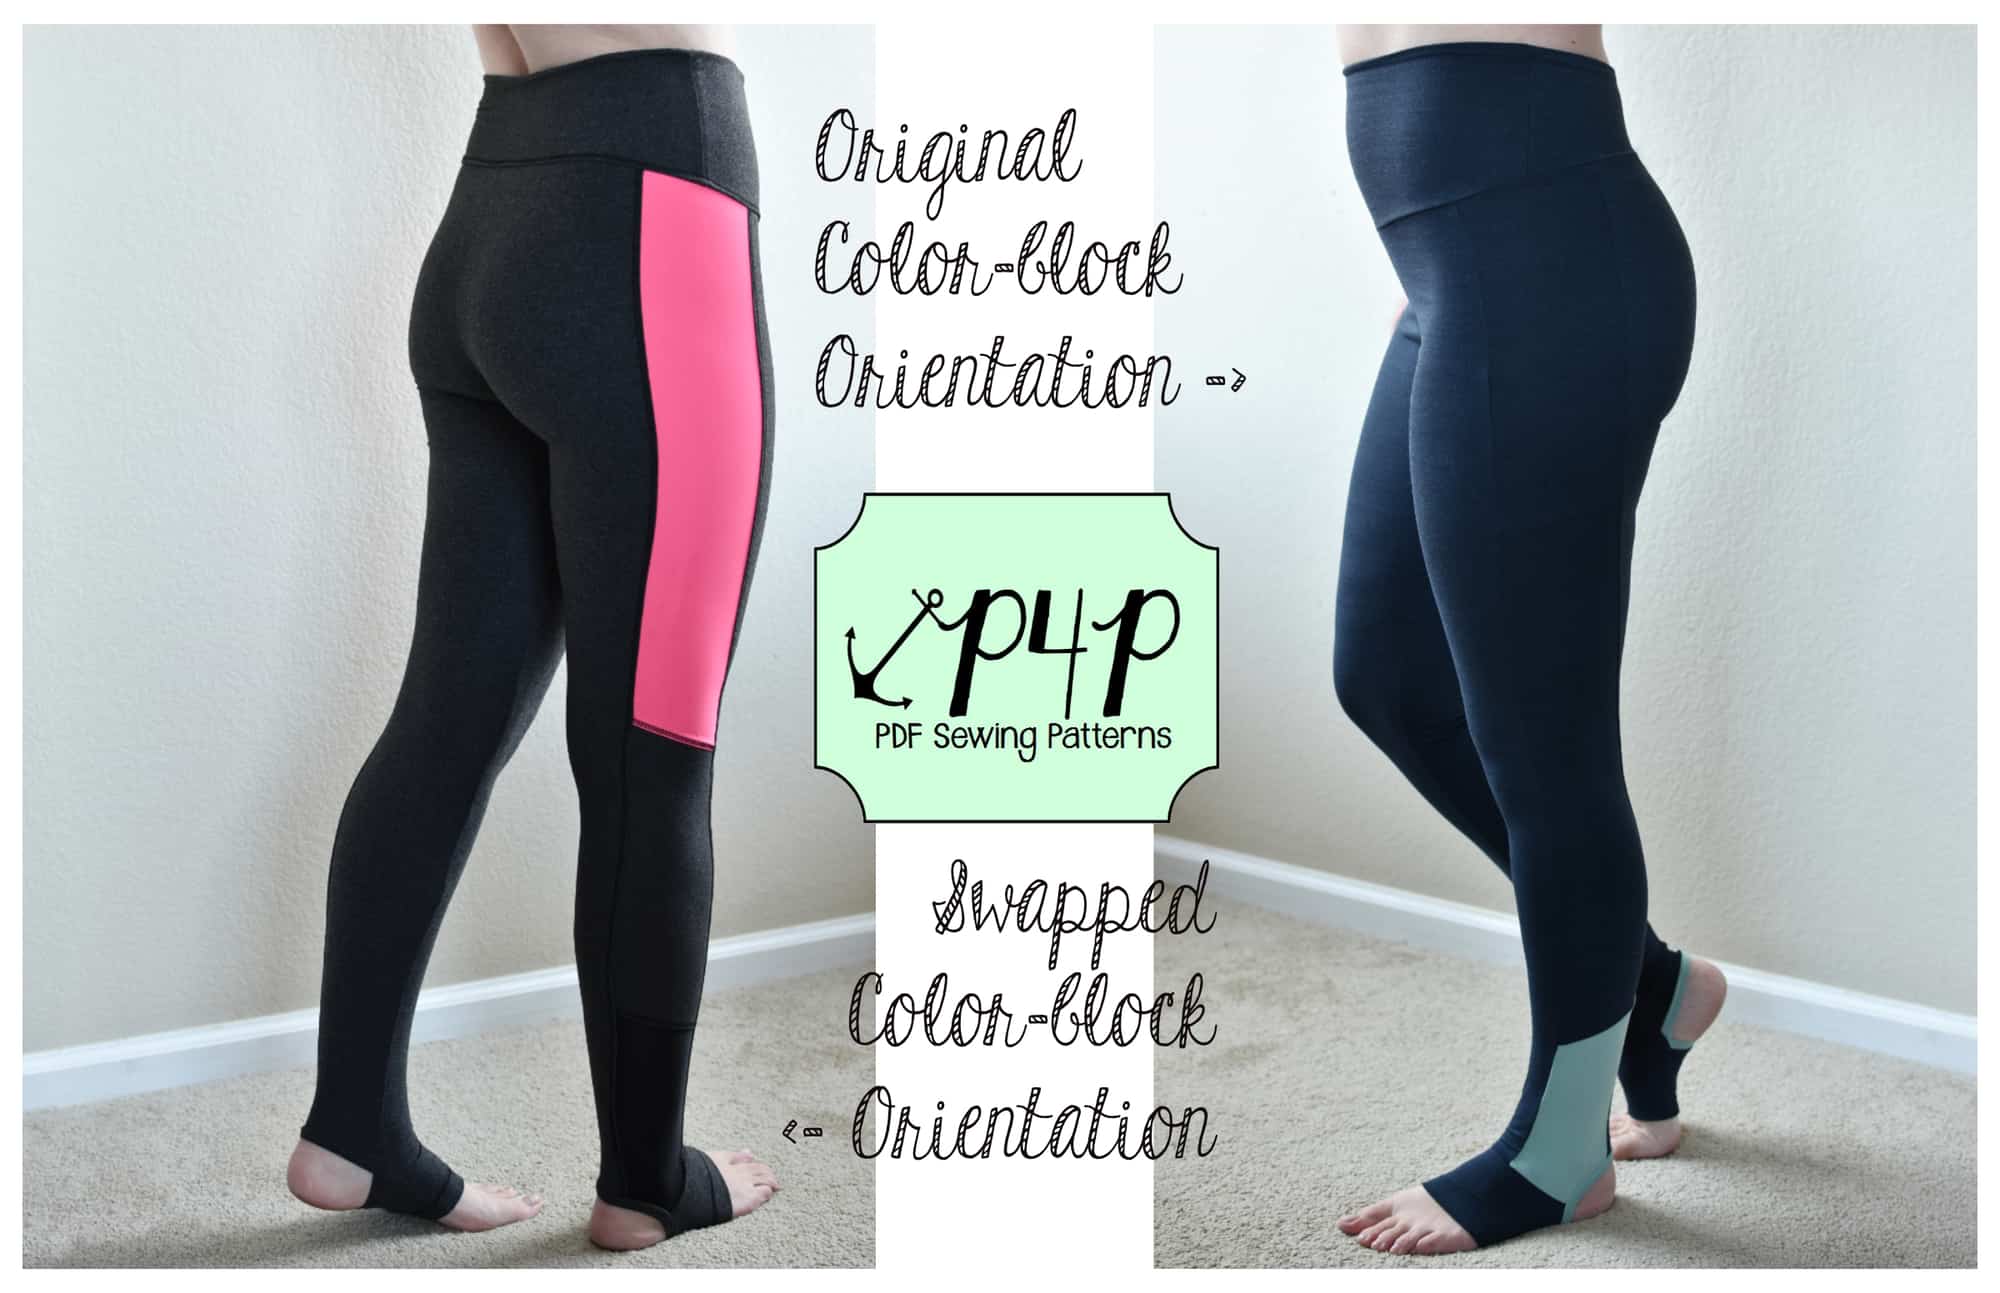
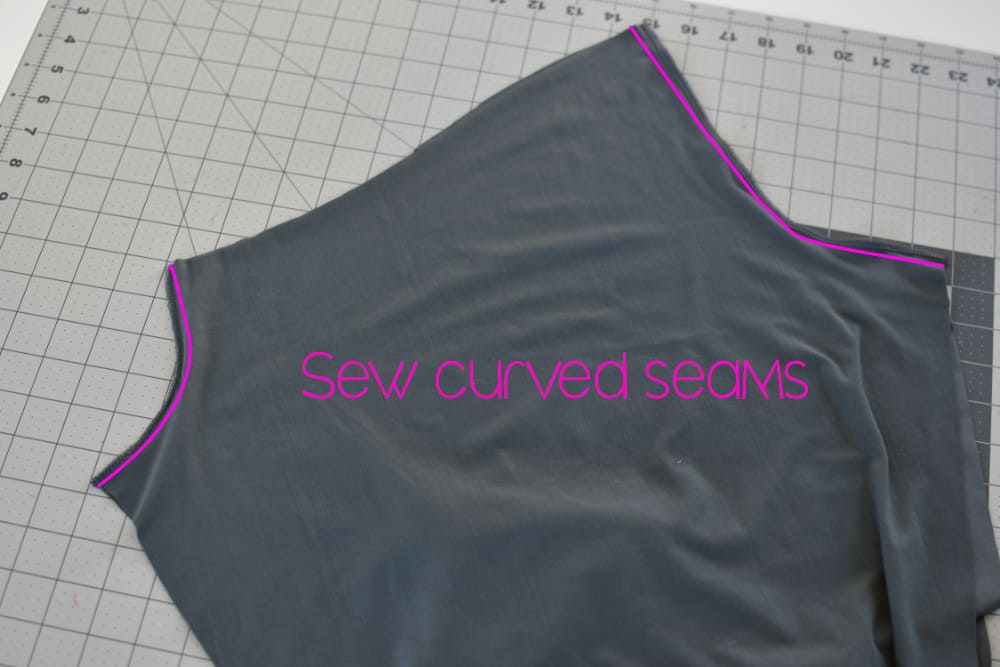
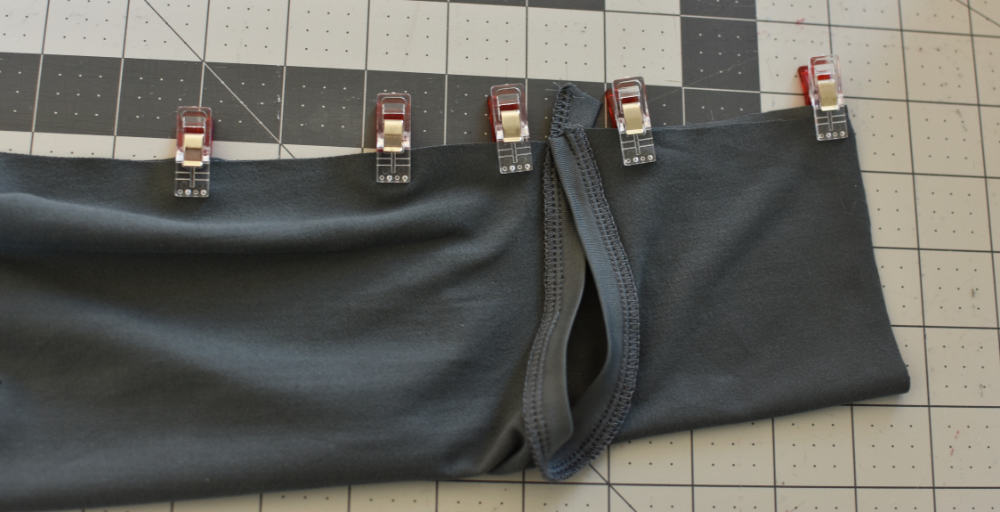
Loggers wear like a jogger but look like a legging.  Everything is finished with a band, meaning there is no hemming required.  And they are perfect for lounge wear, workout gear, swim cover-ups, layers under dresses/skirts, and everything in between.


**Want to learn more about how to measure yourself for this pattern?  We’ve got you covered with an in-depth blog HERE.  And in case you’re new to Patterns for Pirates and PDF patterns in general, we have a great blog full of new user tips HERE to help you get started!  As with all of our current releases and updates, the pdfs now include our layers feature and can be found in Letter, A4 and A0 sizes.  And for even more helpful fun, we have a *free* printable that you can use to help record your measurements as you take them.

Let’s take a quick look at the different options!
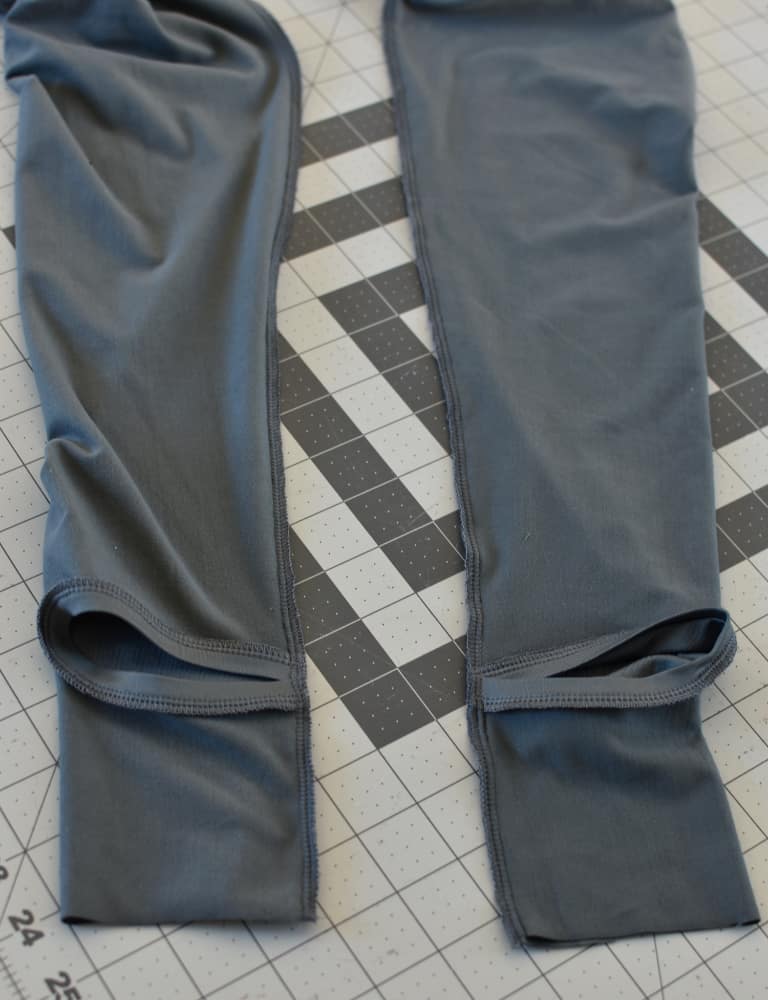
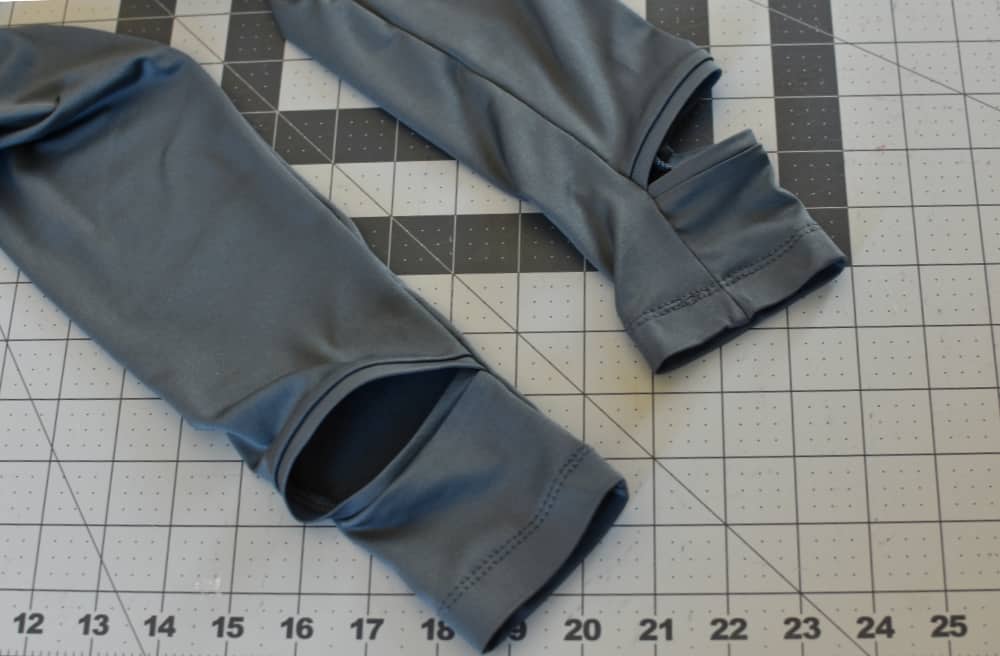
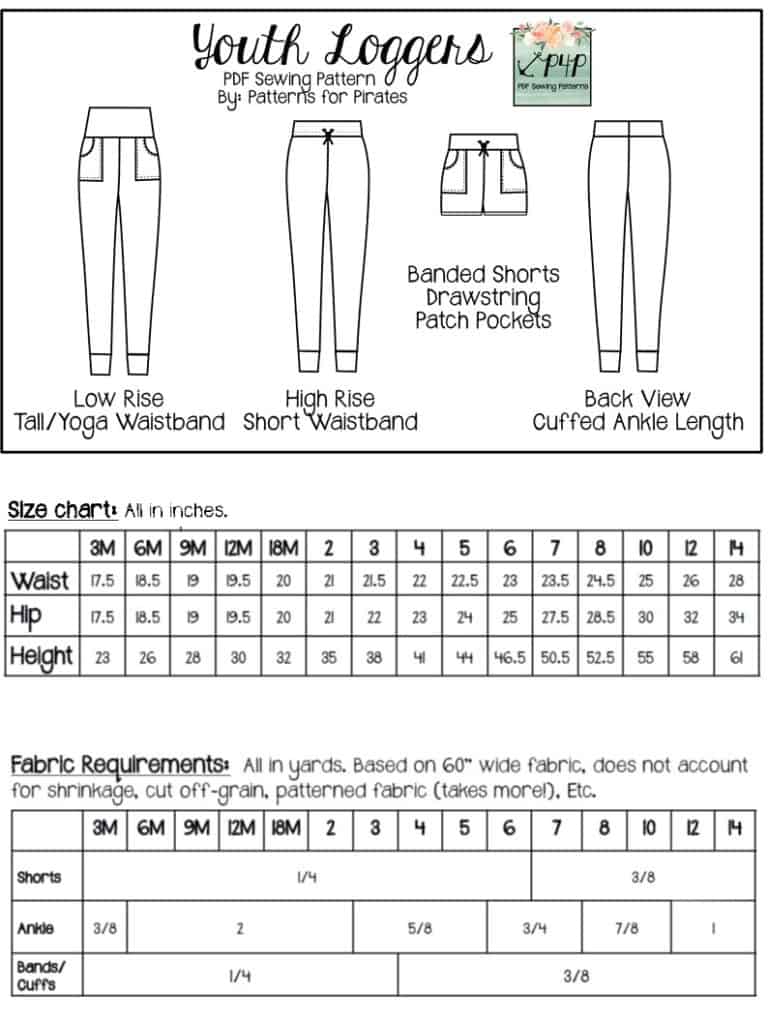
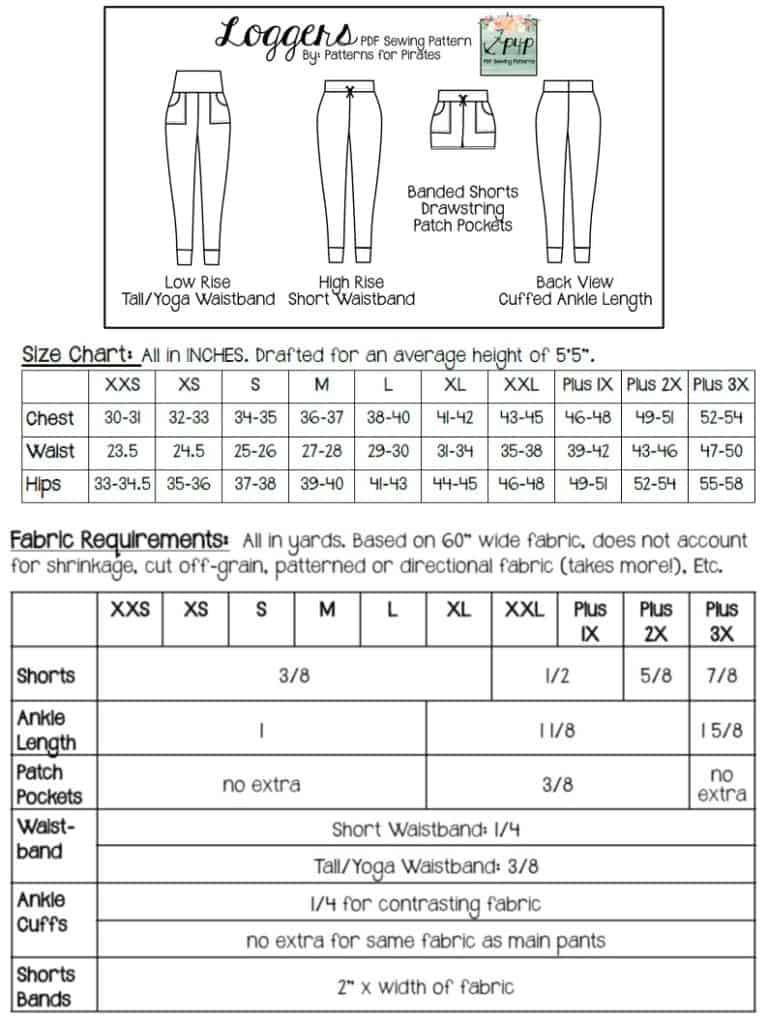
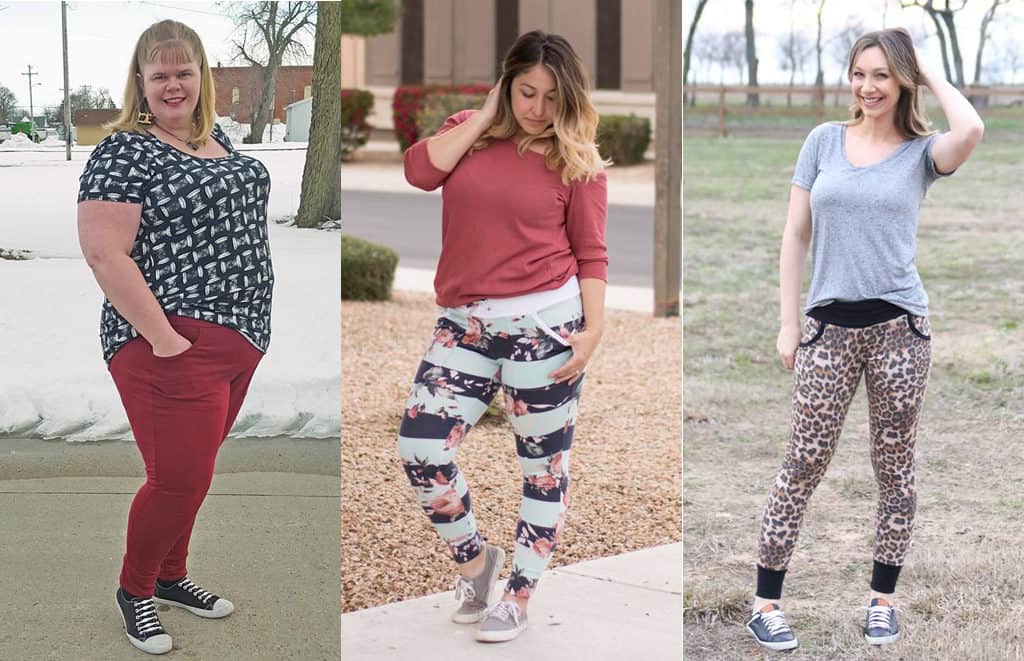
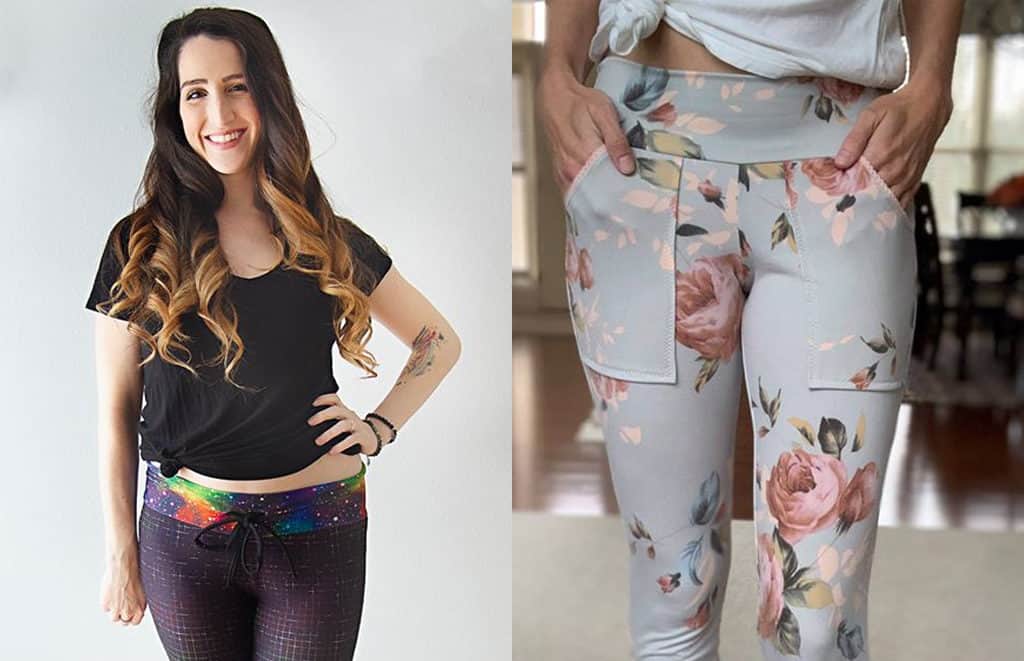
PANT LENGTH W/CUFFS

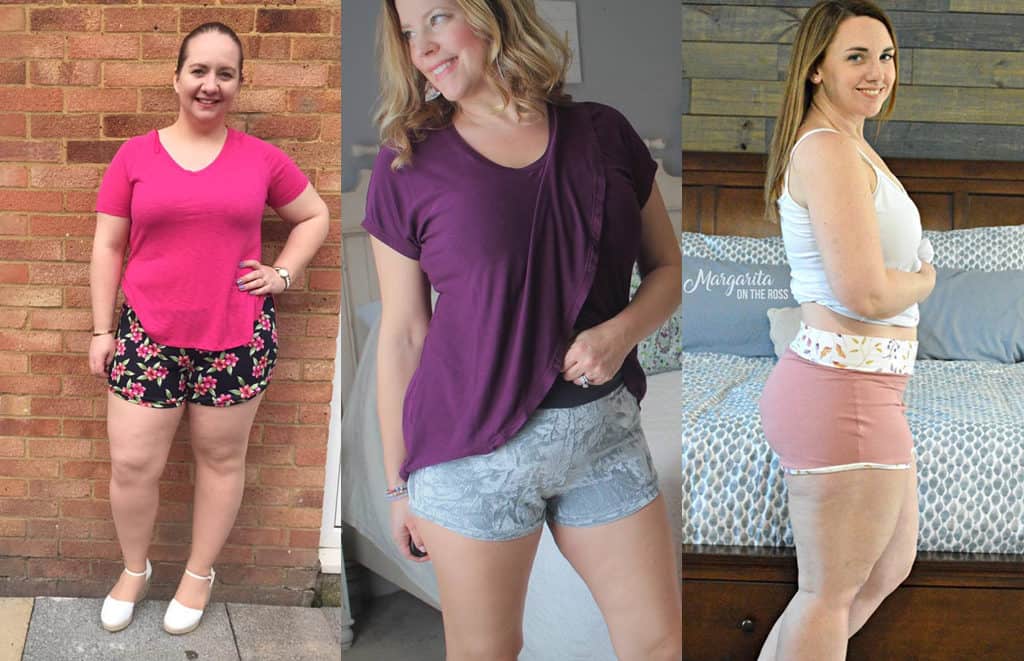
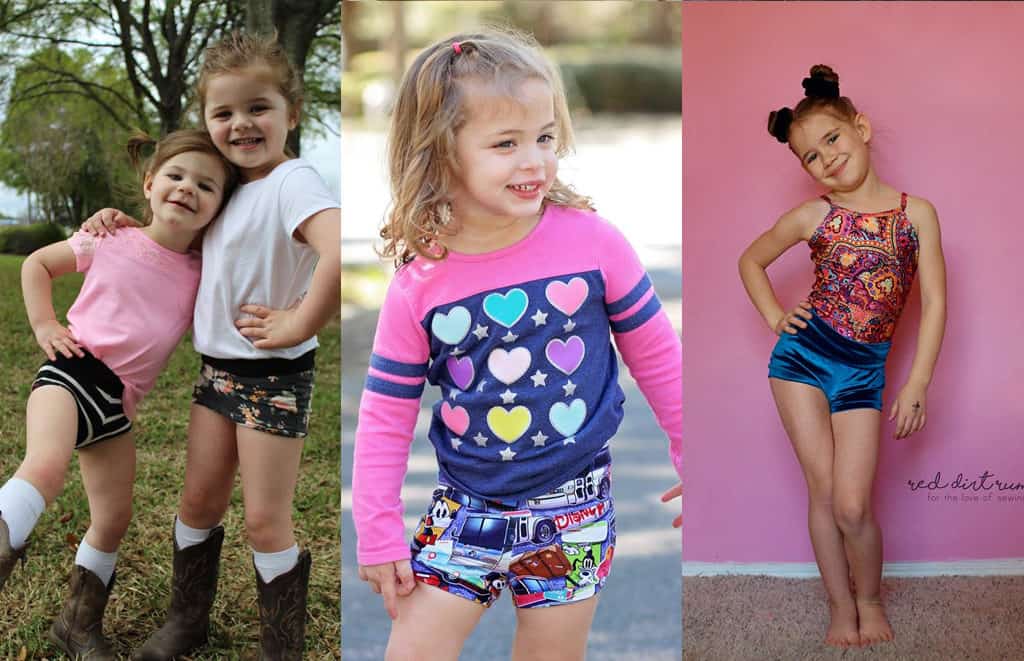
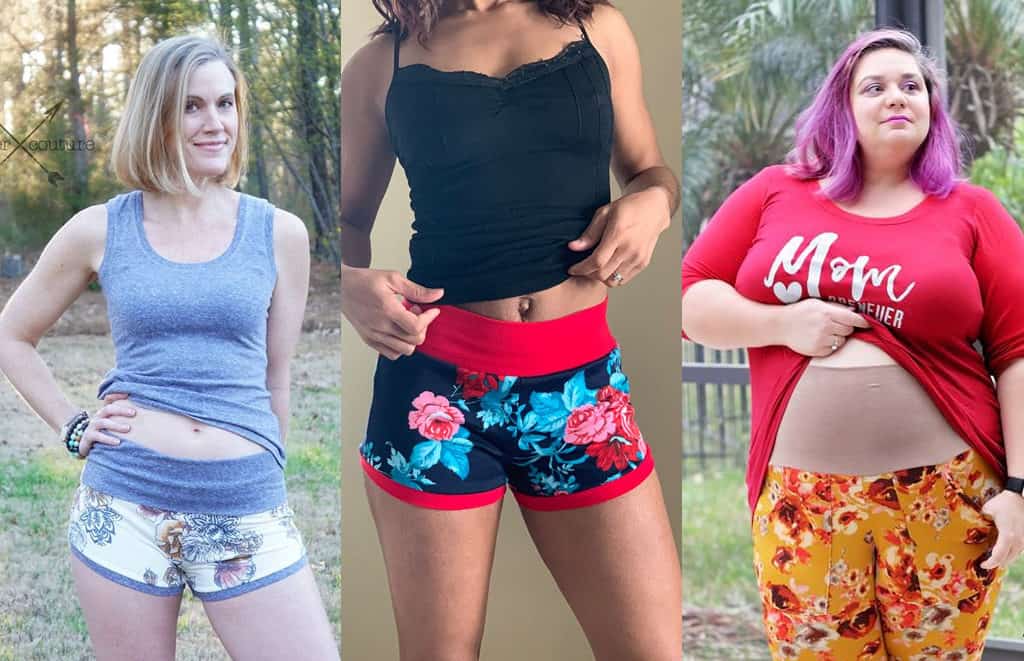
SHORTS LENGTH W/BANDS

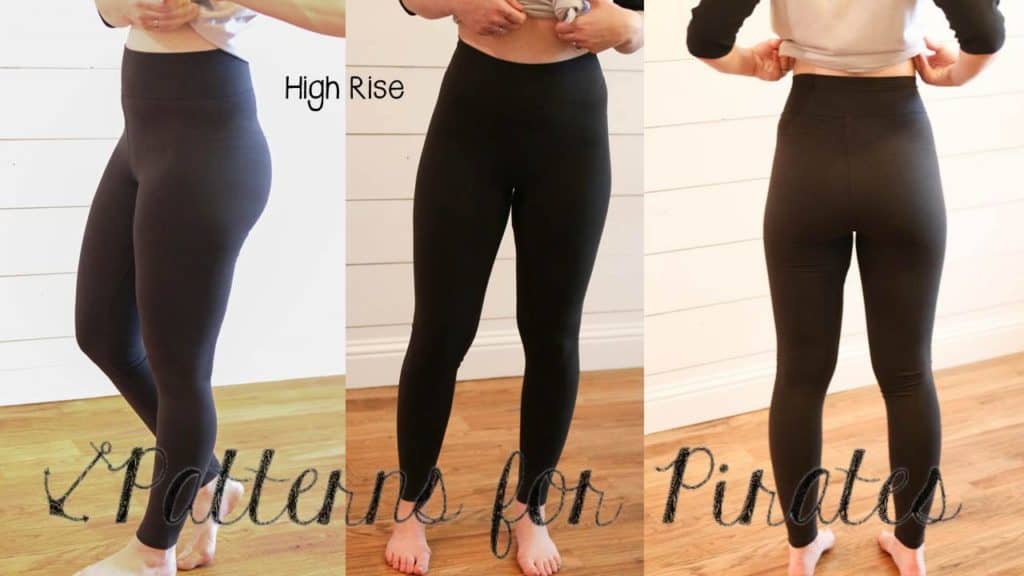
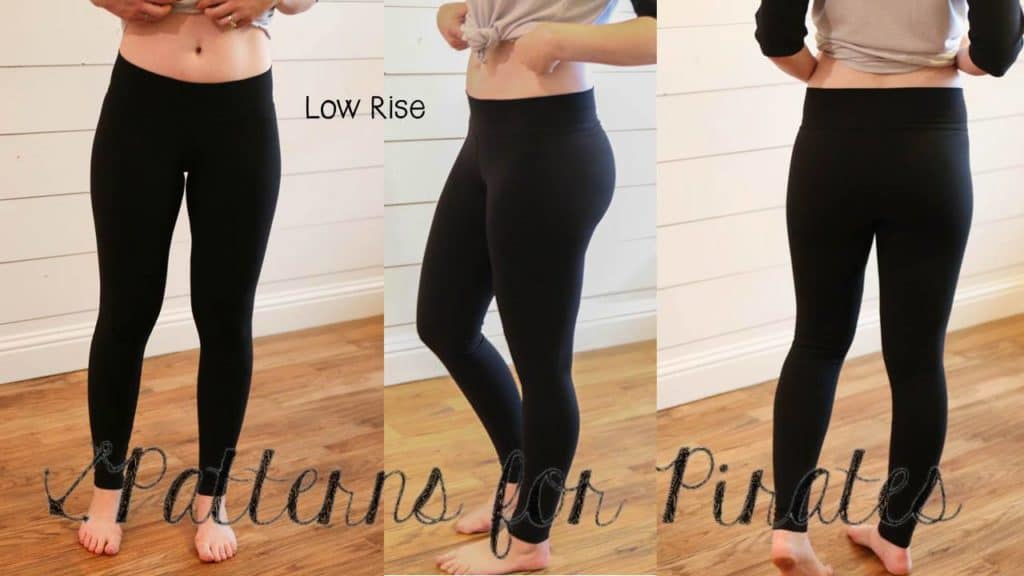
SHORT + TALL/FOLD-OVER YOGA WAISTBANDS

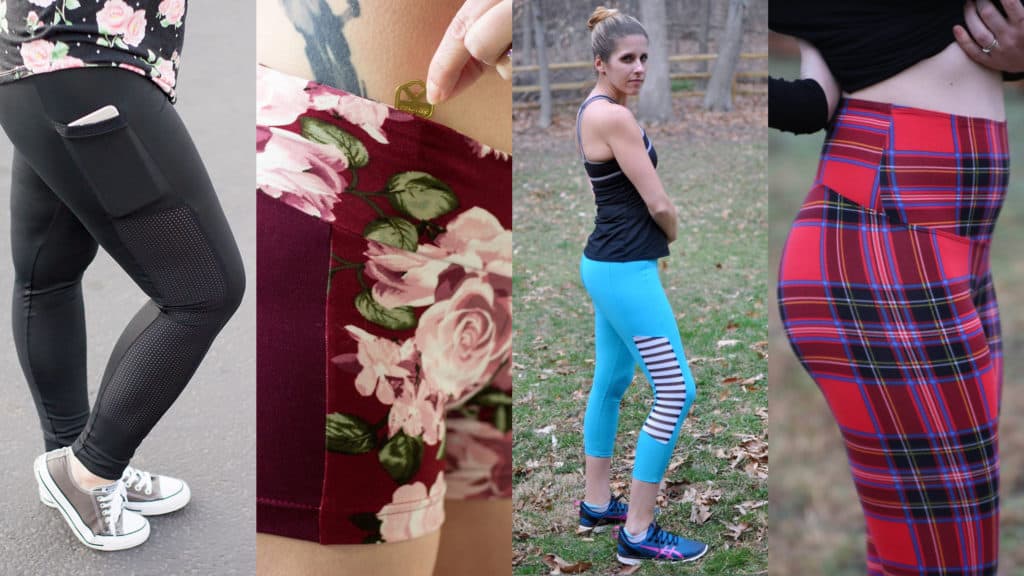
OPTIONAL PATCH POCKETS + DRAWSTRING

Are you ready to get in on the logger fun?  Go grab your pattern(s) now!

LOGGERS | YOUTH LOGGERS | LOGGER BUNDLE

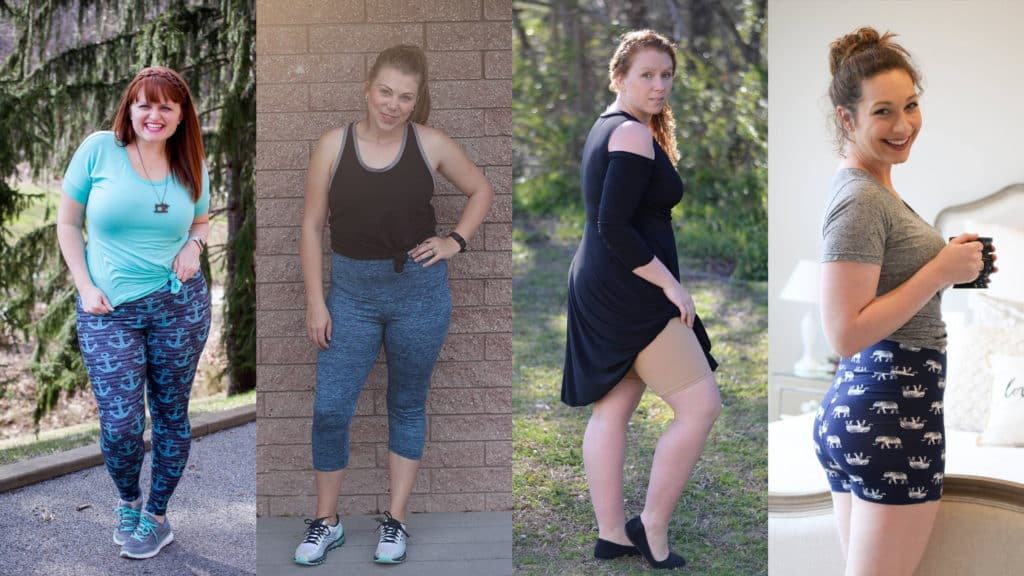
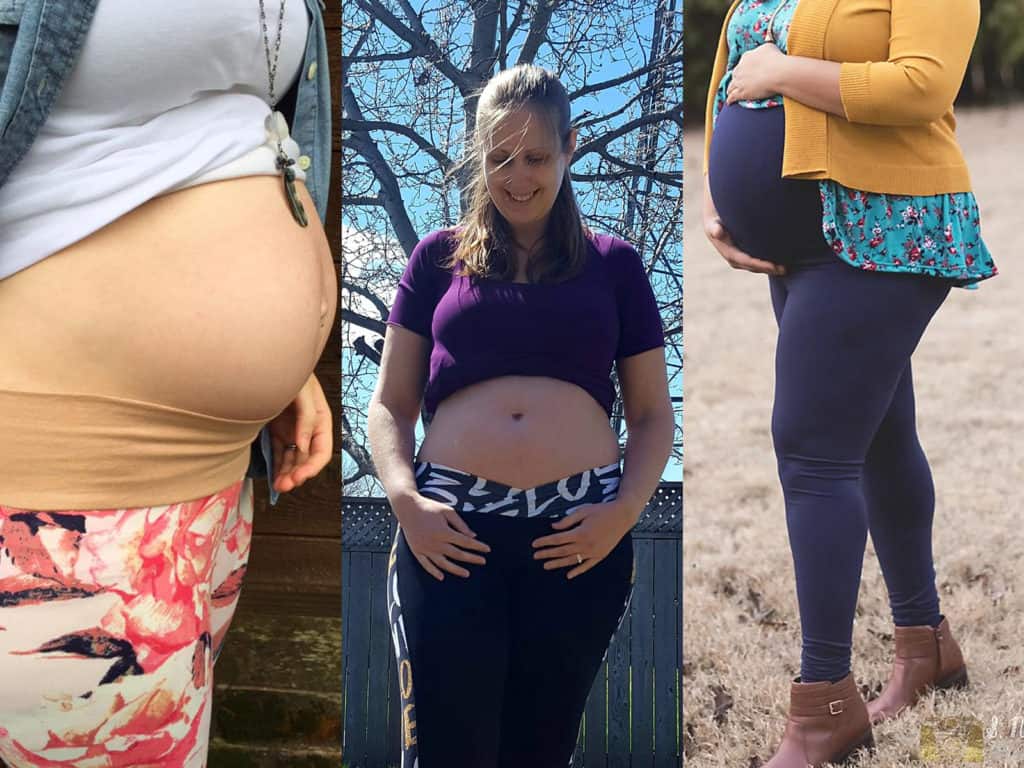
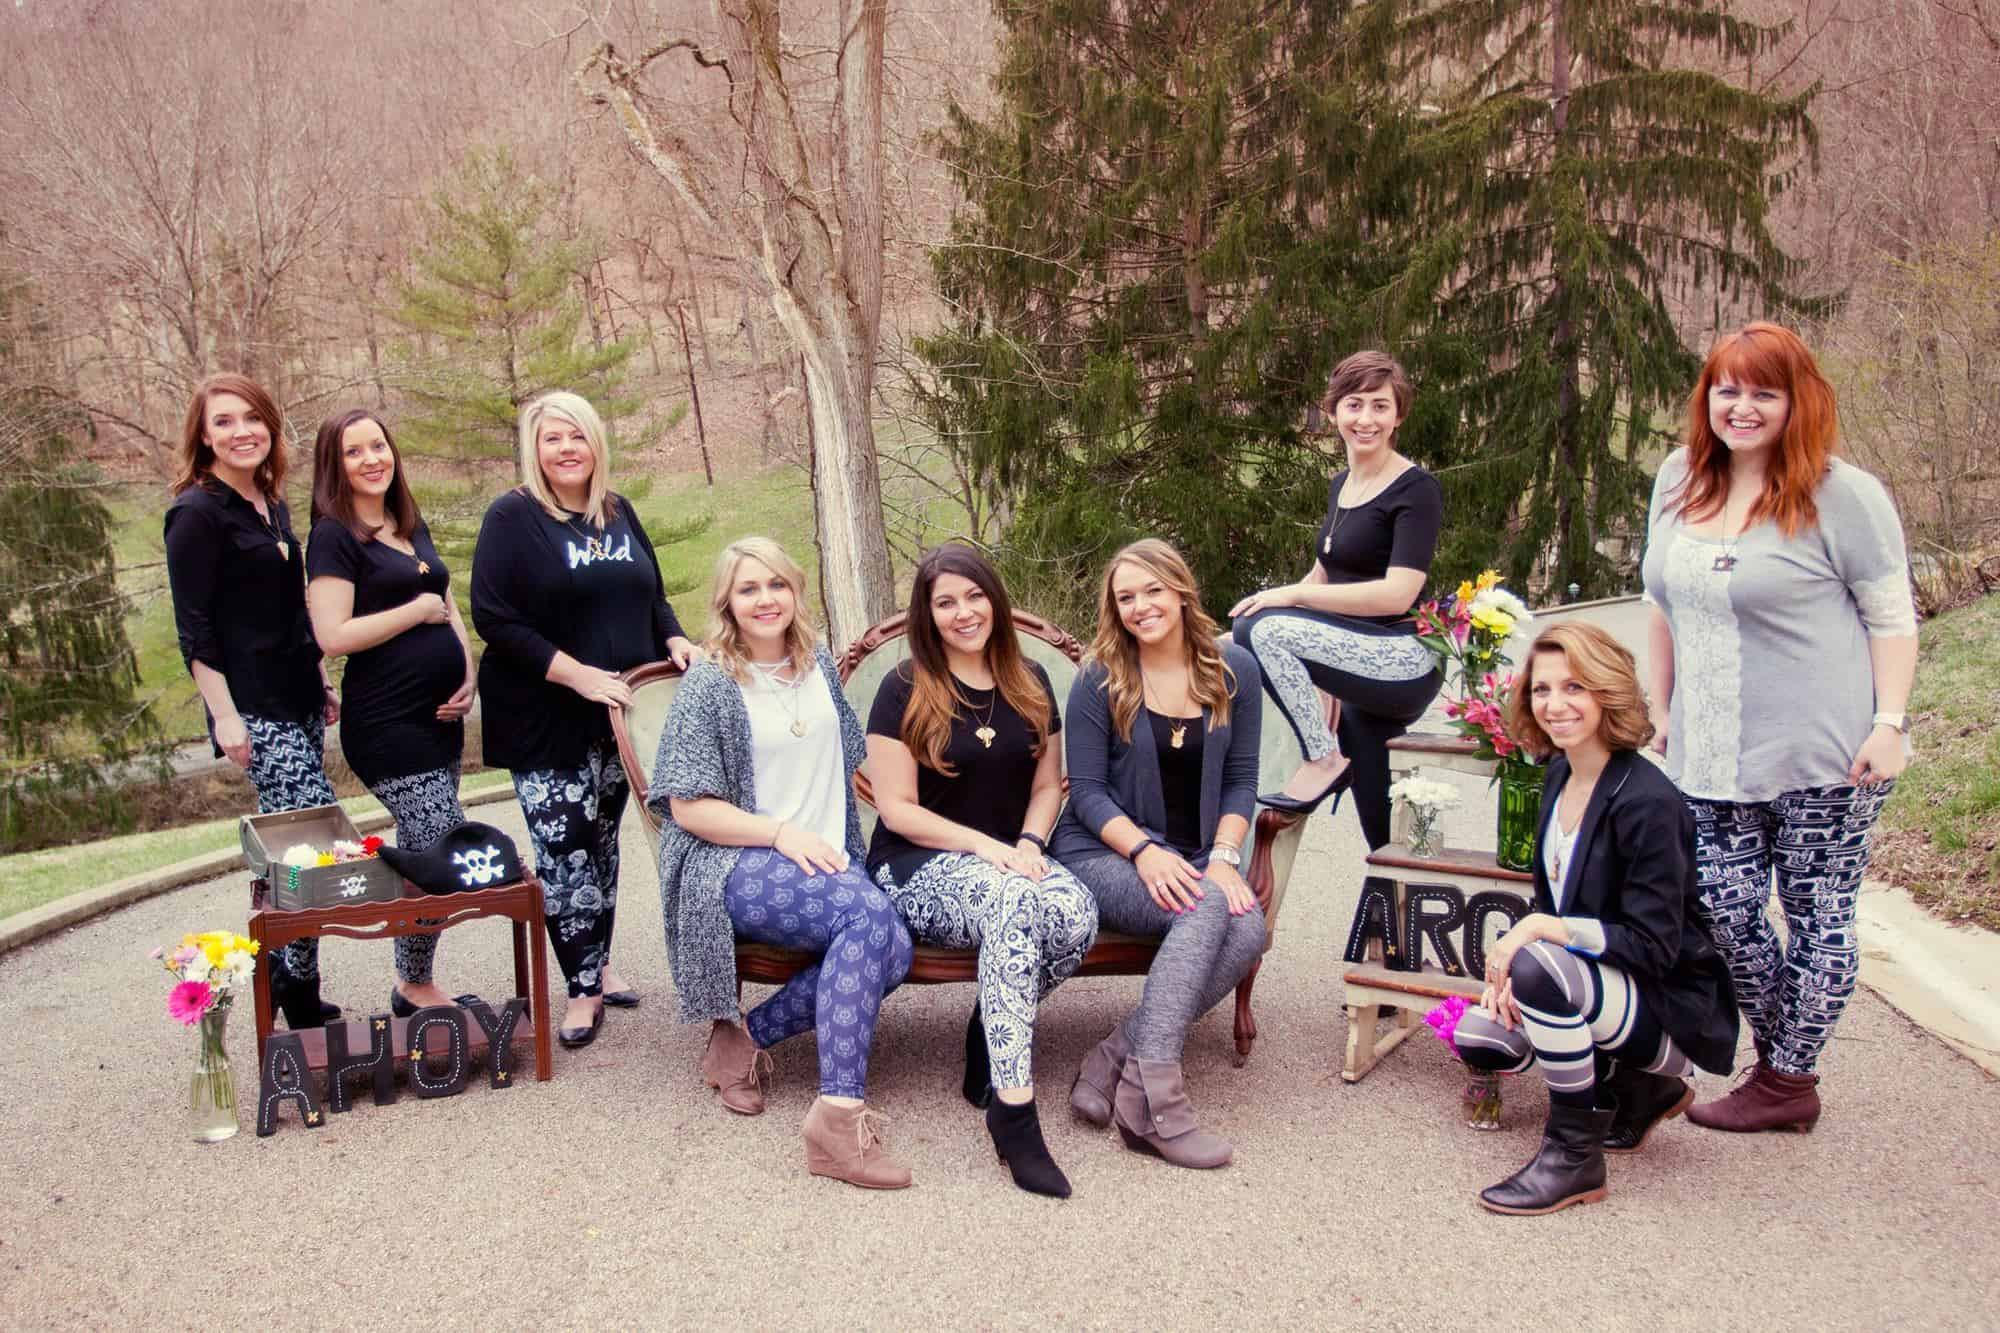
Need more convincing?  Just take a look at this pattern on all of the amazing shapes and sizes of our testers, and get a look at more examples of all the options in our albums in the P4P Facebook group! Logger Album | Youth Logger Album

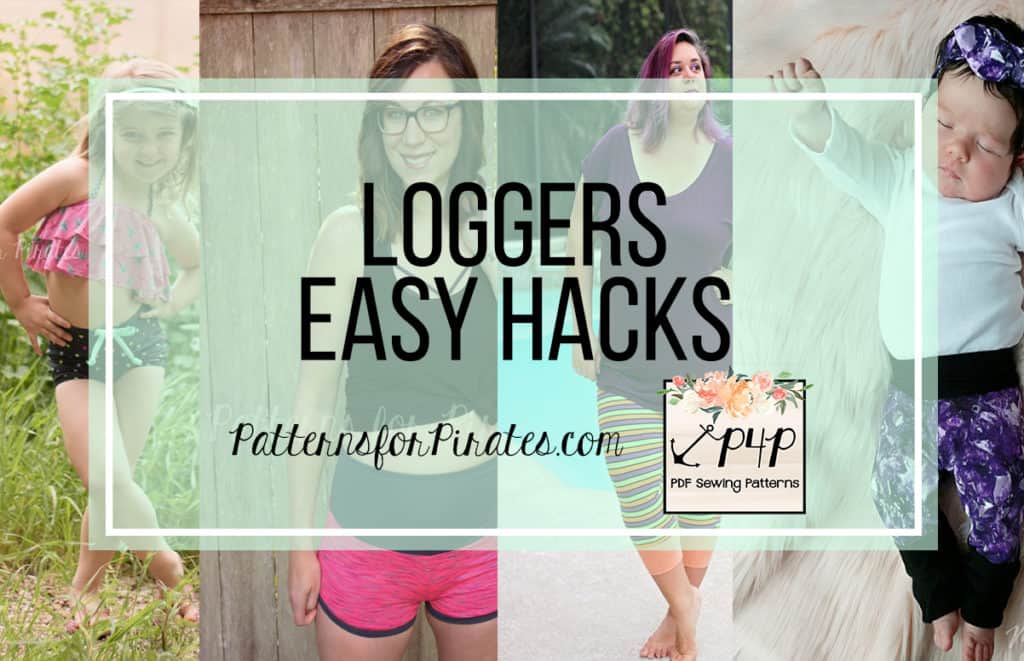
And if that didn’t give you enough options, make sure to check out the hacks post to help take your patterns even further.

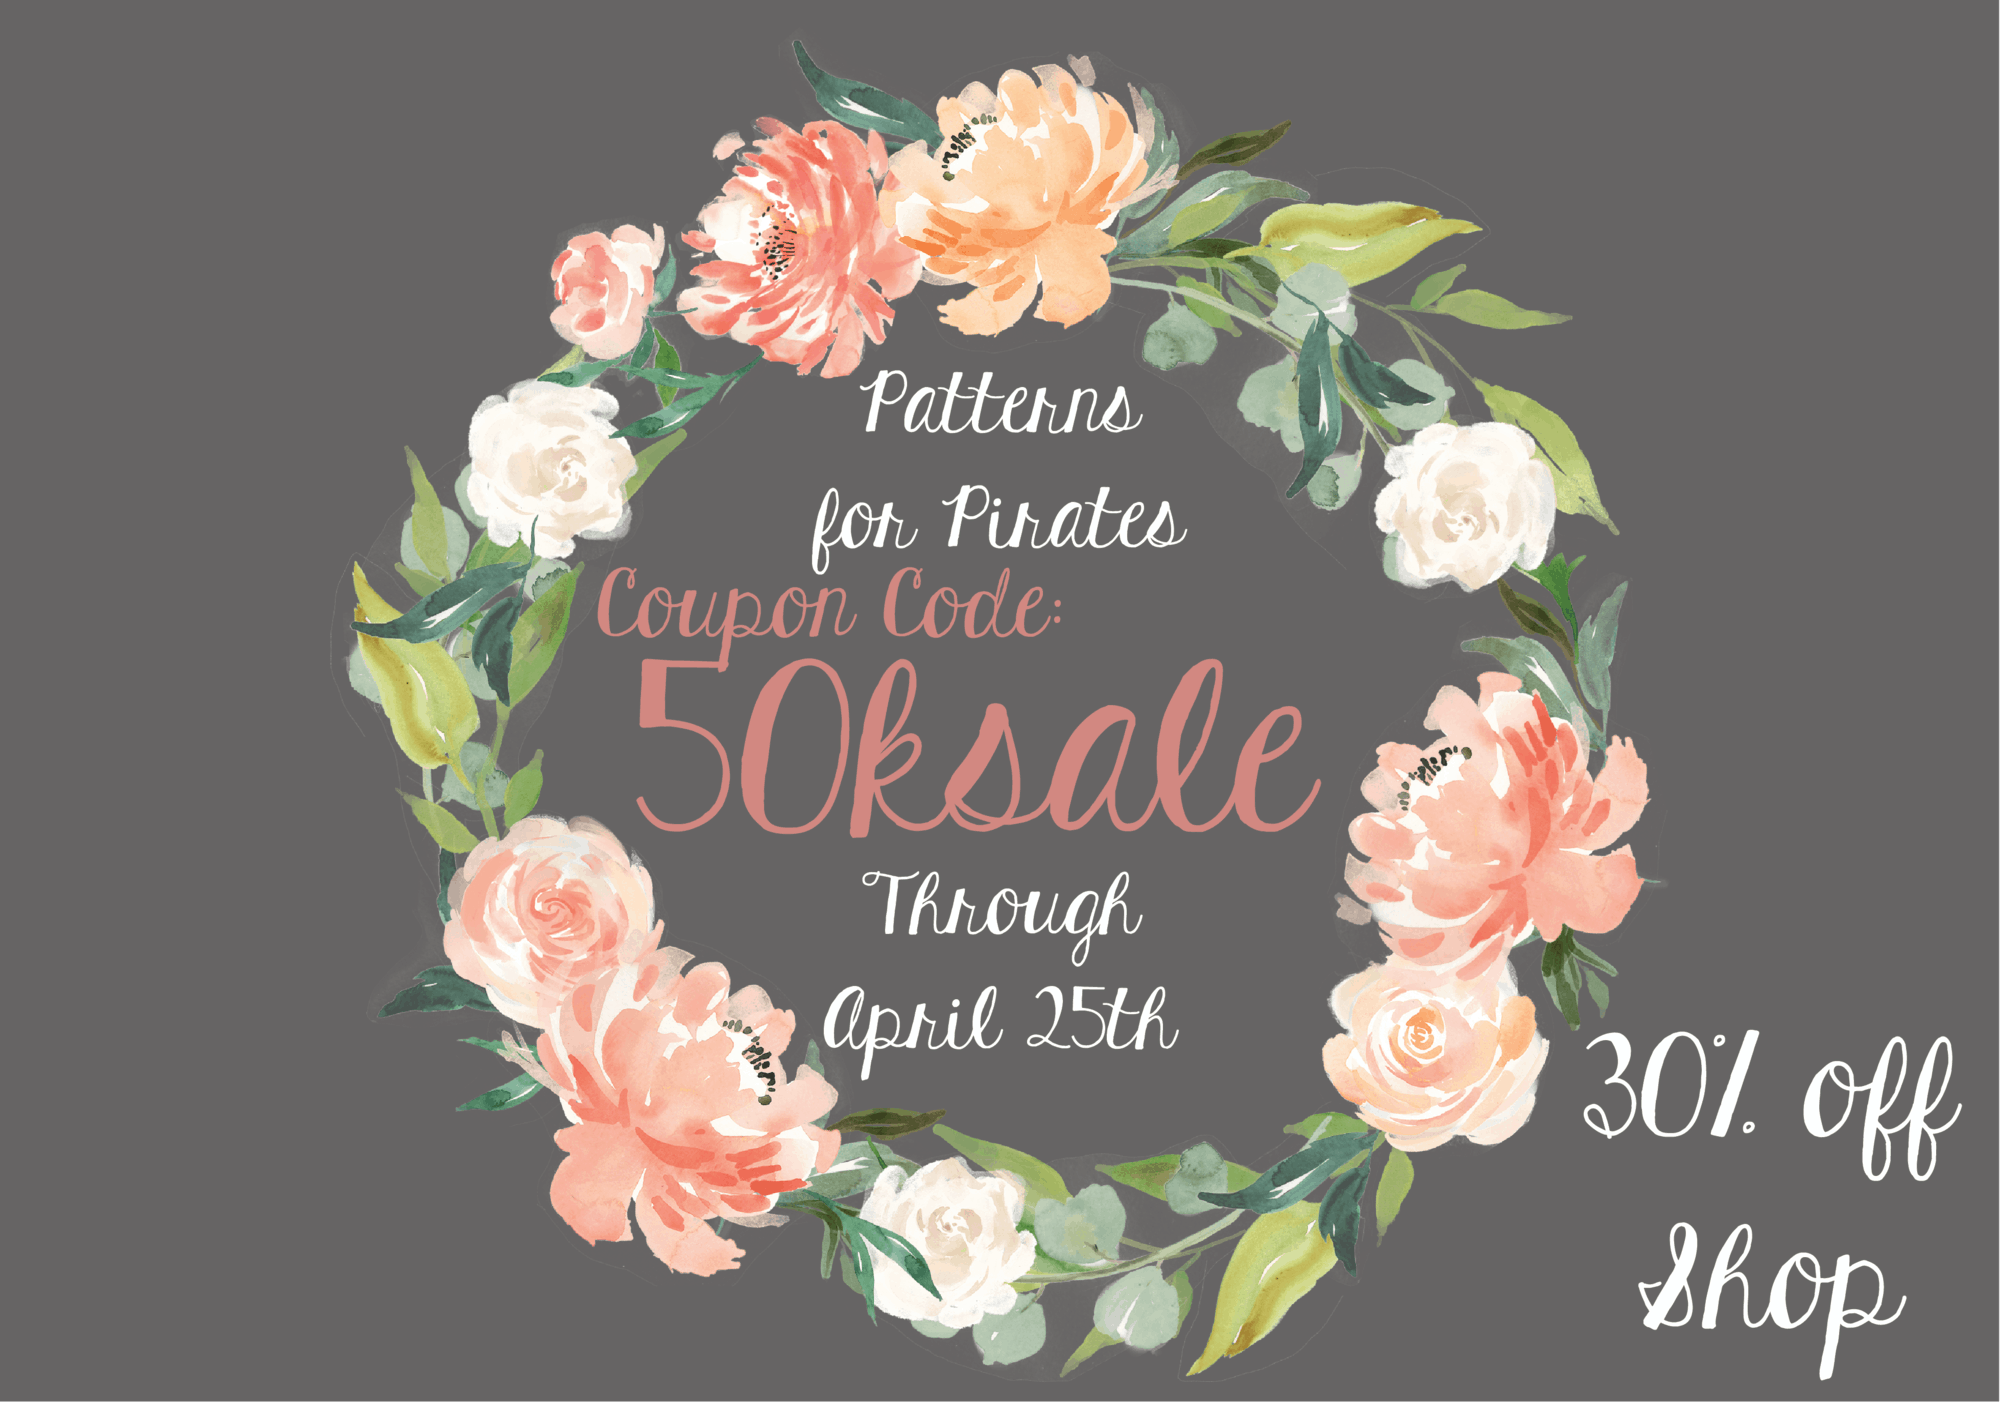
The release sale (no code needed) will be through Sunday, March 17, 2019 (11:59PM US Central Time Zone).

Happy Sewing, pirates!

Filed Under: Pattern Release Leave a Comment

75k Member Sale-a-Bration and FREE Baby Set <3

January 24, 2018

I’m so excited to announce we’ve hit 75k members in our awesome P4P Facebook Group! <3 I love seeing all the inspiration, questions answered, fitting help, and proud first time shares in there! If you’re not a member yet, come join us 🙂

To celebrate we’re having a big sale- 30% off the total site for 10 days! January 24-Feb 2 2018 (US Central Time Zone).  There is a coupon code- 75ksale – but don’t worry it will pop up for you in your checkout! So you don’t need to worry about remembering it or writing it down!

We thought we’d do even more than just a sale though and have worked hard behind the scenes to create a whole Baby Set of Free patterns for you!!! I LOVE getting invited to a baby shower and making some unique handmade items for the mama and baby! Since my patterns start at 3 months there are a few great ones I go to for baby shower gifts…BUT, I’ve always thought there were a few teeny tiny newborn size things I’d love to have a pattern for as well!

I KNEW we needed a Wee Lap Tee, the envelope style neckline makes dressing newborns easier, and OF COURSE we needed Petite Pegs 🙂 We’ve been asked so many times for baby sizes of our Free Peg Legs pattern it was a no brainer! We added the Teeny Beanie to keep those little head and ears warm and a quick and easy burp cloth too. I also couldn’t help myself to a few cute cut files to add on to the gifts as well!

So, next time you find yourself expecting to be a mama, grandma, auntie, or just invited to a baby shower you will be set with this Free Baby Set of Patterns! You can mix and match them with the other favorite P4P patterns you have that start at 3M as well! I love the Baby Bear Joggers for babies!


I love adding an adorable design to the Wee Lap Tee! I hope you enjoy them and make your baby’s wardrobe or baby gifts that much more special!


Thank you for supporting P4P Sewing PDF Patterns! <3

Filed Under: Announcement, Free Pattern, Pattern Release 7 Comments

50K Fan Celebration :: Stirrup Pant PegLegs Hack

April 22, 2017


Written by Kelly Bailey (P4P Blog Contributor)

For this tutorial I will be showing you how to take the updated Patterns for Pirates Peg Leg pattern and hack it into a pair of leggings featuring the stylish yoga stirrups! Have you seen these store purchased versions in your gym classes, or maybe on Pinterest, or maybe you’ve been looking for a comfortable pattern for stirrup leggings to compliment a casual outfit? This simple hack is both comfortable and durable. Follow along with this tutorial and please share your results in the P4P sewing group!

Step One: Fabric

My first, and most important, advice is to choose your fabric wisely. This pattern is intended for 4-way stretch knit with at least 50% stretch. See Peg Leg 101 to review the way the fabric contents and stretch will affect your results. Not all knits are meant for leggings due to the degree of stretch this pattern requires. For all 3 of my versions I have used a brushed polyester spandex knit with varying weights. Athletic knits, such as supplex or heavy weight brushed poly, are the best option if you intent to vigorously work out in your finished garment.


Step Two: Stirrup Pattern Piece

Print out and assemble your Peg Leg pattern as normal, being sure to add or take away height as necessary for you. See Peg Leg 101 for more information on how, where and when this is necessary. The Peg Leg pattern is drafted for an average height of 5’5” and an inseam of 28”. This hack can be applied to both the “plain” version and the “color-blocked” versions. Beware that once you’ve sewn this up you will not be able to simply trim off length at the very end of construction as you would with the standard pattern. So be sure to make a traditional pair and know these height adjustments before attempting this hack.

Next cut out a paper rectangle measuring 7.5” x 4”. The 4” height fits my size 9 foot perfectly but you may need to add or remove a little bit to that measurement depending on your shoe size.

Step Three: Modifying the Peg Leg Pattern

If you’re modifying the “plain” version tape your rectangle to the ankle of your peg pattern as shown. Be sure to pay attention to the side you’re attaching the rectangle to. You want to line the edge of the stirrup rectangle with the FRONT side of the leg piece.

If your modifying one of the “color-blocked” versions line up and attach your stirrup rectangle with the edge of the FRONT pattern piece as pictured.

NOTE: You can switch up the top and middle color-block panel pieces and the pattern will still go together without issue if you are not attaching the pocket. If you do attach the pocket still, it would just sit lower on your leg. My charcoal and hot pink pair show what this swap looks like. My navy and seaglass version show the color-block panel assembly as instructed in the original pattern. I also chose to give a faux flatlock look to my pink version. Follow Alex’s decorative top stitching blog to get this look yourself!

Step Four: Cut Out Your Pieces & Assemble Color-block

Use your modified pattern to cut from your fabric all legging pieces. Add to this the addition of two 1.25” x width of ankle strips with the greatest stretch going with the longer length. Theses will be the bands that stretch around the heel of your foot. The width measurement will leave extra that will get trimmed off after attachment. For a size small I cut a 8″x 1.25″ sized heel band.

For the “plain version” make a cut in each leg piece, as shown in the image below, just to the center width of the leg. This is where you will attach the heel band.

For the “color-blocked” version you are going to sew together all color-block pieces as normal, creating two full leg pieces. You will need to pivot the seam 90 degrees to attach the stirrup to the ankle at the front of the leg. Be sure to only sew the stirrup to the halfway mark along the ankle (mid color-block). Leave the rest unattached so that you can sew the heel band in place.

Step Five: Sew Crotch Seams

Lay your fully assembled leg pieces right sides together on top of one another. Sew your crotch curves together.

Step Six: Attach Heel Bands

Press your heel bands wrong sides together lengthwise and then pin along the unfinished slit along ankle edge. Sew in place being sure to use a stretch stitch but not to stretch either the band or the leg piece.


Step Seven: Pin Inseam in Place

Start by pinning your crotch seams right sides together then go to the stirrup piece and start lining up inseams there. Work your way up the leg making sure to overlap the bands as shown in the photo below. Sew inseam together using stretch stitch. Trim off excess heel band.


Step Eight: Finishes

At this point you can attach your waistband using the directions in the patterns tutorial and then hem the bottom of the stirrups using a stretch stitch and your preferred hem width. Press.

All Done!

Try them on and enjoy. Keep your feet cozy whether in yoga class or sewing your next garment at home!


We are celebrating reaching 50K fans in our Facebook group!  To make it a party, our beloved PegLegs pattern just got an update AND some new add-ons.  Before you go running to your machine to sew up your own leggings, make sure to read our PegLegs 101 blog post.  This way, you’ll have all the the information you’ll need to make the perfect pair before you even cut into your gorgeous fabric.

But wait, there’s more!  After any good party is an after-party.  We are taking it one step further and sharing some easy hacks that’ll bring even more flavor to your favorite leggings pattern!  We hope you check them out, make your new favorite pair of leggings, and know that we appreciate every single one of you amazing sewing guys and gals!

Here are our hacks / tutorials / latest tricks:

Lace Waistband Alternative | Drawstring Waistband Tutorial
Exposed Elastic Waistband | Stirrup Pant Hack
Ruched Ankles Adjustment | Decorative Topstitching Tutorial
Ruched Side Panel Hack

Filed Under: Blog Tours, Pattern Hacks, Pattern Release, Uncategorized 2 Comments

50K Fan Celebration :: PegLegs Update + Re-Release!

April 17, 2017


We are celebrating reaching 50K fans in our Facebook group!  To say the least, it is unbelievable that I have added so many ladies into the tiny group it started from.  I’m so honored to help each and every member learn a little more about sewing.  It makes my heart so happy to see posts about first time sews and the community answering questions with nothing but a kind heart.  I love the P4P group so much! So, we tried to think of something AMAZING to say thank you for supporting us!  To make it a party, our beloved PegLegs pattern just got an update AND some new add-ons.

The Peg Legs original pattern has  gotten more reviews and feedback than any other P4P pattern hands down!  So, naturally we took that feedback and tweaked them slightly.  We also updated them to include the newest features P4P offers: layers feature, as well as A0 and International print options.  Just like before, we have four different length options (ankle, capri, bike and shortie).  *If you already have the Peg Legs in your account you will simple need to redownload them to have the new updated files.

We’ve also added a different rise option, for those of you who like a little higher waist.  You can choose from high AND low/mid rises for your perfect leggings fit. The low/mid rise is the same as the original peg legs.

Now to really bring the celebration up a notch– the Add Ons! But what do the add-ons include?  So many things!
We are giving you color blocking options, pockets (in the waistband AND along the side panel), a contoured high waistband, and a gusset.  All extra options that you can mix-match to your heart’s content.

And, for all of you gorgeous pregnant mommas: a maternity add-on!  You can take the basic Peg Legs pattern and add an under belly, under belly v, or an over belly waistband for your new favorite maternity wear.

We also updated all the Freebies to NO CODES NEEDED.  We loved having everyone join the FB group and amazing community it has built, but we want them to be easy for everyone to get their hands on too! So, we hope everyone will still join the support group as well as enjoy the ease of grabbing the freebies with no codes 🙂

Before you go running to your machine to sew up your own leggings, make sure to read our PegLegs 101 blog post.  This way, you’ll have all the the information you’ll need to make the perfect pair before you even cut into your gorgeous fabric.

But wait, there’s more!  After any good party is an after-party.  We are taking it one step further and sharing some easy hacks that’ll bring even more flavor to your favorite leggings pattern!

We hope you check them out, make your new favorite pair of leggings, and know that we appreciate every single one of you amazing sewing guys and gals!

Here are our hacks / tutorials / latest tricks:

*****These will be made live as we post them throughout the next week! *****

Lace Waistband Alternative | Drawstring Waistband Tutorial
Exposed Elastic Waistband | Stirrup Pant Hack
Ruched Ankles Adjustment | Decorative Topstitching Tutorial
Ruched Side Panel Hack

Still want more?!?! Join us for our Peg Legs Sew-A-Long!

And of course one LAST thing to celebrate reaching 50.000 FB members is a SITE WIDE SALE! Enjoy 30%off your total purchase with coupon code: “50ksale” now through April 25th (ends 11:59PM the night of the 25th US Central Time Zone). *Bundle Discounts will not work with site wide sale code.

Thank you for giving this little work from home mama the chance to do what she loves! I hope each and everyone of you enjoys the updated pattern, the add ons, the hacks, the sew-a-long and the site wide sale 🙂

<3 Judy

Filed Under: Announcement, Free Pattern, Pattern Release, Sew-A-Long 18 Comments

P4P University :: Peg Leg 101

March 21, 2016

peg leg 101

Have you heard about P4P’s Peg Legs?  And no, we are not talking about those wooden pirate legs!  P4P released the Peg Legs some months back in celebration of reaching 5k members in the P4P Facebook Group. (crazy right!?!? since we just celebrated reaching 15k members last month!)  If you don’t have them, you can grab them HERE and don’t forget to join the Facebook Group for a special promo code (check the pinned post for details)! In the last few months, we’ve seen the good, the bad, the fails and the “HAAALLPP” questions posted frequently.  So, just like any introductory 101 college course, we are going to give you all the basics with this crash course to make a successful pair of Peg Legs!

First and foremost, if you are new to P4P, check out our First Time User Tips.  Pattern Assembly, a few fabric shops, general cutting instructions, and sewing machine stitches are all discussed there.  So now that you’re familiarized with P4P, here we go!

  • What are Peg Legs?  A classic mid-rise, tight fit leggings pattern for 4 way stretch knit fabrics.  Options include 4 lengths: shorties, bike, capri and ankle with a no elastic waistband.
  • Sizes Included: XXS – Plus 3x
  • Fabric Recommendations: 4 way stretch knit with at least 50% stretch (vertically and horizontally).  Typically 5% spandex or more will work.
    • Cotton Lycra/spandex (note- Lycra=spandex). Medium weight is usually 10oz or more
    • Rayon spandex.  This is typically thinner so may not be opaque.  One of our tunic tops to cover your booty are a MUST 😉
    • Nylon spandex / Supplex – great for performance wear. This usually has a higher content of spandex and will feel tighter, much like compression wear. Some prefer to size up 1 for a more comfortable fit.
    • Polyester spandex – brushed polyester spandex is what many of the boutique leggings are made from however, it is a slightly harder to find the fabric in retail stores. Be sure to check the vertical stretch percentage as some may be less than the 50% require stretch.
    • Stretch Fleece – Fabrics such as Polartec Powerstretch are a 4 way stretch fleece.  Regular fleece, like blizzard, anti-pill and cuddle fleece found in retail stores are NOT recommended.

Fabric is extremely important to get an accurate fit.   Here is an example of the same size medium, capri length made from a 2 way stretch ponte de roma and a 4 way stretch rayon spandex.  You can see the overall fit of the 2 way stretch is much shorter in length and has a lower rise.  I am able to put on the 2 way stretch pair but because there is no vertical stretch, they do not stretch and bend with movement and tend to slip down over time.  While they are a super cute fabric, sadly, they sit in my drawer as they are not comfortable to wear.

image1 image2

STRETCH PERCENTAGES

So, you ask, how do I know if my fabric is 4 way 50% stretch knit?  A 4″ piece will stretch to a minimum of 6″ both vertically and horizontally.  Below is a stretch percentage guide.  Cut a scrap piece of your fabric 4″ x 4″.  Fold in half so it is now 2″ x 4″ and place at the end of the stretch guide.  Hold fabric at one end (where indicated) and grab the opposite end and stretch.  If you can stretch the fabric to 5.2″, your fabric has 30% stretch, 5.7 is 40% and so on.  Unfold and refold the opposite direction and test again.  To determine horizontal stretch, your grainline will run vertically with the stretch perpendicular and horizontal.   The vertical stretch is with the grainline.  For a printable copy, head on over to our Facebook Group and download a copy from the files section.  🙂  Need more help? Megan from Made from Mermaids has a great blog post with video about stretching fabrics.  You can check it out HERE.

knit fabric stretch guide P4P

PICKING YOUR SIZE

Now that you have checked your fabric, how do you pick your size?  If you are unsure on how to measure your body, check out our “How to Measure Yourself” post.  The peg legs use the high hip (where your hip bones are) and the hip (across the fullest part of  your booty) measurements to determine size.  If you are in different sizes for your high hip and hip, you can grade between the two or use one size for the waistband and the other for your “legs”.  This works best for those that have a high hip 1 size smaller than their hip.  If your high hip is larger than your hip, it would be best to grade your sizes.


ADJUSTING THE RISE AND LENGTH

The Peg Legs are a mid rise legging, meant to hit under your belly button.  For those wanting a higher rise or more tummy coverage, you can either add a taller waistband than the pattern calls for or increase the rise of the legs and use the existing waistband measurements.

  • Taller waistband: increase height of waistband to 10″ instead of 7″
  • Fold Over Yoga Band: double the height of waistband to 14″

To increase the rise of the legs: 1) follow the curve of the rise to a larger size on the pattern and blend. OR 2) Slash and Spread – Cut the pattern horizontally through the rise, add the desired amount and smooth out the curves.

 P4P patterns peg leg rise adjustment

Our patterns are drafted for a curvy 5’5″ frame.  Using the same principle as found in our Petite & Tall Fitting Adjustment post, you will adjust your length of the legs by 1/2″ for every 1″ over or under 5’5″.  The Peg Legs’ have a 28″ inseam for ankle length.  If your inseam is shorter or longer, you will adjust to your desired length in the same manner.

  • Determine the amount you need to adjust your length by.  Using the principle above – A 5’10” woman would need an additional 2.5″ (5’10” – 5’5″ = 5″ ~ 5″ x .5″ = 2.5″ ).  A 5″1″ woman would need  2″ subtracted (5’1″ – 5’5″ = 4″ ~ 4″ x .5″ = 2″).  It is best to split the total length that needs to be added or subtracted throughout the entire leg.  Slash and spread the pattern in equal parts and blend the lines. The most common areas to adjust are the shorties, bike, and capri lengths as there are cut lines already indicated on the pattern.  You may also need to adjust the rise, higher or lower depending on your desired height.

 P4P patterns peg leg length adjustment

CUTTING YOUR FABRIC

You will need the following: 2 legs (mirror images) and 1 waistband.  Note: the greatest stretch should be horizontal and what goes around the body.  To create mirror images you can cut your fabric two ways:

  • Cut 1 pattern piece with pattern writing face up.  Flip your pattern piece over and cut again.

P4P patterns peg legs mirror images

  • Cut your pattern piece with fabric on the fold to create mirror images with 1 cut.

P4P patterns peg legs mirror images on fabric


Once you’ve assembled your pattern, pre-washed your fabric and cut your pattern pieces you are ready to sew up a pair!  Because this is a great beginning knit project, we have included a quick video tutorial! Enjoy!


Sewn up a pair of Peg Legs?  We would love to see what you are all creating. Join the Facebook Group and share away.


Filed Under: Frequently Asked Questions 45 Comments

Newest Patterns

  • Uptown Joggers - Youth $10.00 $8.50
  • Uptown Joggers $12.00 $10.50
  • Uptown Joggers - Bundle $20.00 $18.00
  • Notch Top & Dress $12.00
  • Notch Top & Dress - Youth $10.00
  • Privacy Policy
  • Refund Policy
  • Affliliate Program
  • Contact Us
  • About

Copyright © 2023 Patterns for Pirates

Copyright © 2023 · Genesis Framework · WordPress · Log in