Patterns for Pirates

P4P stylish, modern, wearable patterns

  • Home
  • Blog
    • Frequently Asked Questions
    • Pattern Releases
      • Free Patterns
    • P4P University
      • Fitting
      • Sewing with Stretch, Knit Fabrics
      • Sewing with Woven Fabrics
      • Sewing Machines
    • Sew-A-Longs
    • Fabric for Pirates
    • Pattern Hacks
    • Announcement
      • Blog Tours
      • Contest/Giveaway
  • Shop
  • Bundle Discounts
  • Flash Friday
  • Gift Cards
  • My Account
  • Cart

How to Sew a Faux Layered Look using Just One Pattern

September 9, 2016

IMG_0856- p4p

The other day I was browsing Pinterest for some fall inspiration outfits but since I am now a resident of the sunshine state many of the fall looks I liked were not weather friendly. So what better way than to add “faux” layering to my shirts to pretend fall is in the air? 🙂

IMG_0869

Today I’ll show you how I used the Women’s Henley shirt to make myself a “layered” shirt. I chose the simple crew neckline and the rolled sleeves option but this style would look amazing with the Henley style neckline or the hooded style.

listing pictures

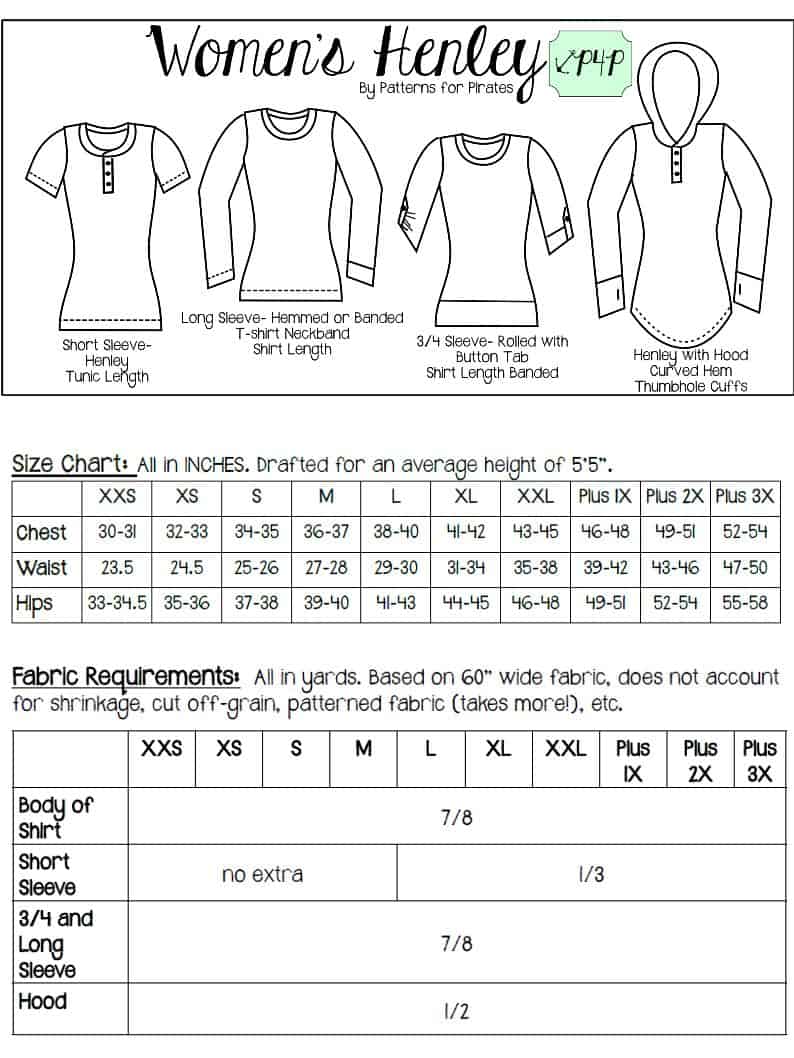
Start by cutting the pattern based on your measurements. Ohh, by the way…did you see that the Henley got an updated? It now has layers so you can just print your desired size. Cut the hemmed shirt option and grab a piece of paper so you can draft the faux layers part. It’s easy-peasy, don’t be scared! Simply trace the curved hem option of the front pattern piece, measure 1.25 inches on the side seam and draw a straight line from that point to the center seam. Repeat the procedure with the back piece of the pattern. Now you will have two extra pattern pieces (front and back) that you need to cut on fold at the center.

fauxlayeredpieces

IMG_0786

Sew your shirt according to the pattern instruction, iron the 1 inch memory hem and set it aside before stitching it. We will now prepare the “faux” layer. With the right sides together sew the side seams with 1/2 inch seam allowance.

IMG_0789

Once you have a loop-like piece you can go ahead and stitch the curved hem with your coverstitch or sewing machine. Press it! You are almost done. All you have left to do now is attach the layered part to your main shirt. Lay the main shirt on a flat surface and insert the faux layer piece matching the side seams. You can match the raw edges inside the shirt and pin all around the hem.

IMG_0798


If you prefer your faux layer to be just “peeking” from under your shirt you can certainly place the layer a little higher inside the main shirt and pin in place. Stitch the bottom hem of the shirt and the faux layer together at about 1 inch above the fold.


IMG_0799

You just made yourself a beautiful shirt that takes you from summer to fall. This style shirt pairs beautifully with the SOS pants and the Pirate Pencil skirt. As always, don’t forget to show off your layered creations in the group. Happy sewing, pirates!

Alex

IMG_0845-1IMG_0857

Filed Under: Pattern Hacks 9 Comments

Essential Tank- Open Back Hack

June 12, 2016

Presentation1

I’m excited to share another hack to the new Essential Tank pattern! I’ve seen this look in the popular athletic wear brands and love it! But being 5’10” means no way I can buy it off the rack, even if I wanted to splurge on the price tag 😉

So, I hacked the newest pattern in the P4P collection and I’m so in love with the result! I used a brushed polyester blend that is super soft.

listing pictures1 listing pictures3

I took the front and raise the neckline by 2″ (although the inspiration tank was probably 3″ higher I just can’t take a neckline that close!). Make sure your neckline ends at a straight angle or you will have a point when you open up your folded front.  If you have a french curve use it for a nice smooth neckline. If not, you can get it as smooth as possible.

IMG_6990

Next I cut the back. Here I cut the full piece to help demonstrate, but you can skip cutting the entire piece to save on fabric.

IMG_6993

I took my straight edge and alined it to the widest part of the racerback.  I sliced it straight from the top of the shirt to the bottom hem. (I’ll mention here I did shirt length cutline. but left it unhemmed).

IMG_6995

Then I cut another MIRROR image back piece.

I decided to leave my hem and back edges raw. If you wanted to hem, go ahead and hem those back center edges now.

Tip-I ALWAYS cut a center notch on the necklines of every shirt- they’re cut on the fold and you always need that center mark for attaching your neckband marked anyways.  It is such a quick, easy time to mark it with a notch!

With both right sides up and aligning the center, baste the overlapping sections along the neckline.  Looking back I would also advise to baste just outside the 3/8″ seam allowance as well to hold it in place while attaching the neckband. It’s such a small section that extra baste will really help keep it nice and neat.

IMG_6997

Then just sew up the shirt as the tutorial recommends, treating the back as 1 back piece.  If you make the neckline higher you will need to shorten your neckband a bit as well.  A good ratio is about 80-85% of the finished neckband plus your seam allowance.

IMG_6999 IMG_7001

And wa-lah! Now you can waer it open and loose or tie it at the bottom for a more fitted look! And a big bonus (for me anyways ;)) is that you can untie the back and it’s super nursing friendly! I already have 2 more fabrics that need to become this hack! I can see myself wearing these with some capri peglegs throughout the hot TX summer!  I have it paired with a cute Siren Swim Top I made for a sports bra!

13402172_151754171904282_974103483_n(1)

Don’t forget to share your final creations in the P4P Facebook group, tag me on Instagram, or in your favorite sewing forum! <3 I absolutely love to see your P4P creations!


Filed Under: Pattern Hacks Leave a Comment

Layer Me Up Nursing Hack

November 23, 2015

I love wearing my Layer Me Up tanks under cardigans during the fall and long sleeve option during the winter.  I can pull down the neckline to nurse, but I love to have something up and down for nursing in public.  So, this hack was born!

It is quick and easy too, which is a plus if you’re nursing and taking care of baby!

I cut out one layer me up exactly as the pattern calls for.  I added one piece using the front piece.  I measured from my armpit to below my bust and transferred that to the pattern piece.  This will become my lift up piece hidden under my normal pieces.

SAMSUNG CAMERA PICTURES

Since the layer me up is a tight fit shirt that requires a 50% stretch spandex blend fabric, you don’t necessarily need to add any elastic to keep it from stretching out with wear/pulling throughout the day.  But, you might want to add it to the bottom raw edge of the hidden lift up piece just to add a little weight and to keep it from shifting around at all during wear.  I serged it on, then hemmed under.

SAMSUNG CAMERA PICTURES


SAMSUNG CAMERA PICTURES

I wanted the under piece hidden, so I trimmed about 1/2″ from the neckline.  You could hem it under if you wanted it to be pretty :).

SAMSUNG CAMERA PICTURES

Pin your under layer to the wrong side of the front piece and sew up your shirt normal–the only other modification is at the neckline.  You will attach the neckband only to the main shirt and leave your hidden piece loose.  This way it is free to come up when nursing.

SAMSUNG CAMERA PICTURES


SAMSUNG CAMERA PICTURES

Now you have a shirt that looks perfectly “normal” and can pull down the neckline and hidden piece up to nurse!  You can wear it after just as is, or cut out your hidden piece and wear :).

SAMSUNG CAMERA PICTURES


SAMSUNG CAMERA PICTURES

I grabbed a lovely colored ribbed knit without thinking (remember I have a tiny newborn 😉 ) and it had HORRIBLE recovery.  No spandex— it grew and grew and grew! So, I will be trying this hack again in the correct material!

SAMSUNG CAMERA PICTURES

And of course, one with Little Guy photobombing 🙂

Filed Under: Pattern Hacks, Uncategorized Leave a Comment

Featured Patterns

  • Mae Top - Bundle Mae Top - Bundle $20.00 Original price was: $20.00.$18.00Current price is: $18.00.
  • Mae Bottom - Bundle Mae Bottom - Bundle $20.00 Original price was: $20.00.$18.00Current price is: $18.00.
  • Loosey Goosey - Bundle Loosey Goosey - Bundle $20.00
  • Bacall Bodysuit Bacall Bodysuit $12.00
  • Privacy Policy
  • Refund Policy
  • Affliliate Program
  • Contact Us
  • About

Copyright © 2025 Patterns for Pirates

Copyright © 2025 · Genesis Framework · WordPress · Log in