Protected: FABRIC FOR PIRATES :: March 2021 REVEAL
Protected: FABRIC FOR PIRATES :: February 2021 REVEAL
Cozy Wrap Sew Along – day 6
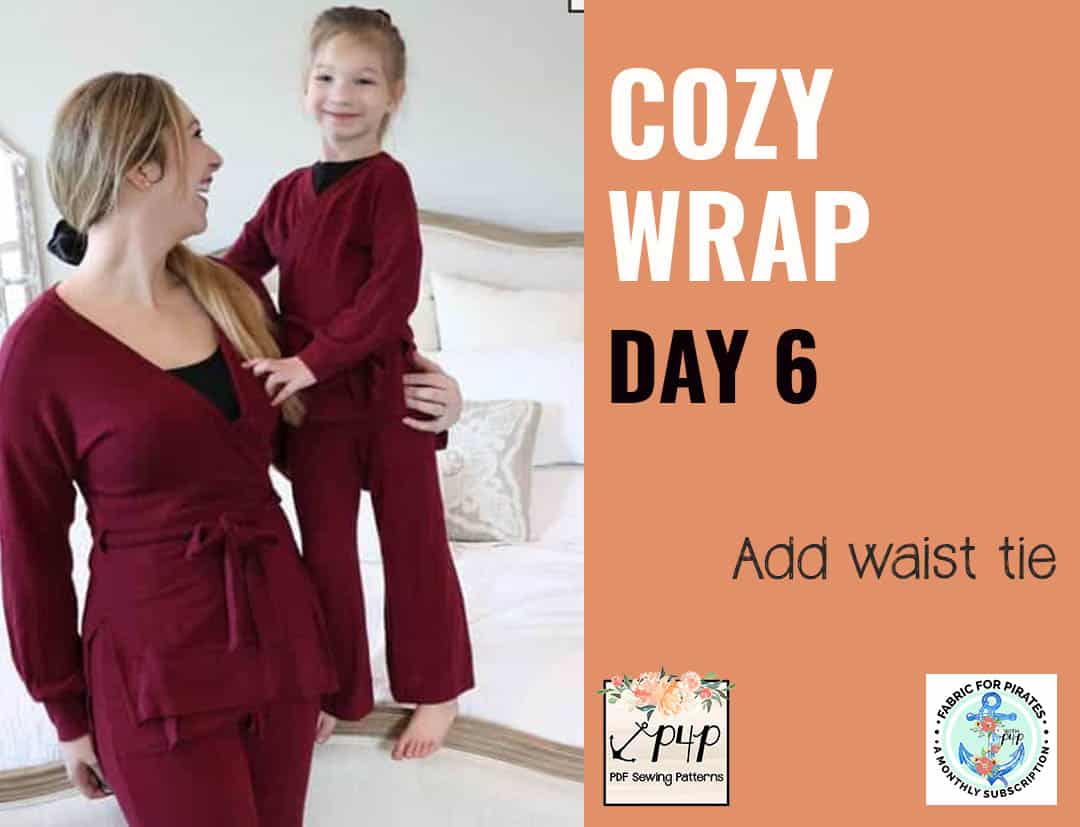
We did it! We made it to the last day of the sew long. Today we create the waist tie and show off our Cozy Wraps.
You should have 4 pieces left in your pile. You’ll be creating the “main” and “lining” of the waist tie by stitching two short ends right sides together. You only have two long pieces now that you are stitching wright sides together, along all 4 raw edges. Don’t forget to leave a 2-3 inch opening to be able to turn the tie right side out. Top stitch all around, or be lazy like me and just close the opening.
Give your tie a good steam press to reduce any waviness. Slide the ends of the tie through the tie openings of the side seams from the inside out. You can see this process in today’s video linked below.
What an amazing job you did this past week! I’m so proud of you all! Here is my finished tunic Cozy Wrap, I absolutely love it! Don’t forget to post a picture of your finished project in the comments of day 6 photo of the Cozy Wrap SAL album. We will choose the winners from that thread!
Cozy Wrap SAL day 1 | Cut fabric
Cozy Wrap SAL day 2 | Sew shoulder and side seams
Cozy Wrap SAL day 3 | Add bottom bands
Cozy Wrap SAL day 4 | Add neckband
Cozy Wrap SAL day 5 | Add sleeves
Cozy Wrap SAL day 6 | Add waist tie
Cozy Wrap Sew Along – day 5
Welcome to day 5 of our Cozy Wrap sew along. Today is probably my favorite day because I get to make those cute, trendy gathered sleeves. The pattern includes a banded short sleeve, a cuffed regular sleeve and a gathered one.
If you opted for short sleeve, you will create the bands by sewing each one right sides together to form loops. I highly encourage you to pre-press the cuffs wrong sides together before creating the loops. Just like we did the past few days.
The standard long and gathered sleeves are attached in the round. That means you are sewing the side seams of the sleeves first. Matching the armpit seam to the sleeve side seam, attach the sleeves to the opening. If you opted for the gathered sleeves, you need to run a gathering stitch or two at the wrist. Pull the gathering threads so that the opening matches the cuff. I personally love gathering with my serger. Our P4P University Gathering blog covers a few gathering methods.
To attach the cuff, simply match the cuff seam to the sleeve seam and sew right sides together. We have a tips and tricks P4P University cuffs 101 blog that I encourage you to check out.
We are so close to finishing! All we have left to do is create the waist tie tomorrow. You can see today’s video below. Check in with your progress in the comments of day 5 photo of the Cozy Wrap sew along album.
Cozy Wrap SAL day 1 | Cut fabric
Cozy Wrap SAL day 2 | Sew shoulder and side seams
Cozy Wrap SAL day 3 | Add bottom bands
Cozy Wrap SAL day 4 | Add neckband
Cozy Wrap SAL day 5 | Add sleeves
Cozy Wrap SAL day 6 | Add waist tie
Cozy Wrap Sew Along – day 4
Welcome to day 4 of our Cozy Wrap Sew Along. Easy day today! All we have to do is add the neckband…the very long neckband. You should have two narrow long strips of fabric (do not mix them up with the tie pieces!) Sew them right sides together on one end so you have an even longer neckband.
Fold the band wrong sides together and give it a good press…just like we did yesterday! Unfold it and fold each end right sides together, sew and re fold wrong sides together. You should not have a neckband with no raw ends anymore. Time to pin it to the neckline and front raw edge. I recommend pinning the center seam to the center back of the neckline first. Proceed with pinning each front raw edge to the band, right sides together, without stretching the band. The only part of the neckband that will be slightly stretched to fit it’s between the two shoulder seams.
After you serge the neckband on, you need to finish the serger tails. I cover a few ways to do that in this P4P University blog.
You can see in today’s video how I attach the neckband to my tunic Cozy Wrap. When you finish adding the neckband, give it a good press and add a picture of your progress to the comments of Day 4 photo.
Cozy Wrap SAL day 1 | Cut fabric
Cozy Wrap SAL day 2 | Sew shoulder and side seams
Cozy Wrap SAL day 3 | Add bottom bands
Cozy Wrap SAL day 4 | Add neckband
Cozy Wrap SAL day 5 | Add sleeves
Cozy Wrap SAL day 6 | Add waist tie
Cozy Wrap Sew Along – day 3
Good morning, pirates! What a wonderful start to the sew along it has been! Today we add the bottom bands. All Cozy Wrap lengths have the same bottom finish. The most important tip I can give you for today’s steps is to start by pressing all 3 bottom bands. Fold them wrong sides together along the length and give them a good steam press! This will help tremendously when you attach them to the bottom raw edge.
Unfold the back band and sew each side folded right sides together. Turn the band out! See how easy that was now that it was pressed. You’ll repeat this steps for the two front bands, except you will only be sewing on one of the sides for each, not both.
The bottom bands are cut at 1:1 ratio to the raw edge of the top so you will not be stretching them to fit. You can sew these steps with a sewing machine or a serger, just remember to keep a constant 1/2″ seam allowance. All you have left to do is give your stitches a good steam press to reduce any waviness from sewing.
You can see today’s steps in the video below. Remember to take a picture of your progress and post it in the comments of day 3 Cozy Wrap sew along album.
See you back here tomorrow!
Cozy Wrap SAL day 1 | Cut fabric
Cozy Wrap SAL day 2 | Sew shoulder and side seams
Cozy Wrap SAL day 3 | Add bottom bands
Cozy Wrap SAL day 4 | Add neckband
Cozy Wrap SAL day 5 | Add sleeves
Cozy Wrap SAL day 6 | Add waist tie
Cozy Wrap Sew Along – day 2
Let’s start sewing! Today we stitch the shoulder seams and side seams. If you are making the midi length and your fabric has lots of vertical stretch I encourage you add clear elastic the shoulder seams. It will help prevent any stretching during wear. I am using a waffle knit with minimal vertical stretch for my tunic Cozy Wrap so there is no need for shoulder reinforcements.
Once the shoulder seams are done we sew the side seams. Yes! This Cozy Wrap pattern has the sleeves added in the round so we will do that in a couple of days. For the side seams you must use your sewing machine as well. Remember, the whole pattern can be sewn with a sewing machine (using stretch stitches). If you chose to use the serger, like I have, you do need to stitch part of the side seams with the sewing machine to ensure a nice clean finish. You can see in the video below achieved a beautiful side seams going between my two favorite machines.
Once you finish today’s steps, post a photo of your progress in the comments of the Day 2 photo of this sew along’s album. You can find the album (and lots of new sewing friends 😉) here, in the SAL group.
Cozy Wrap SAL day 1 | Cut fabric
Cozy Wrap SAL day 2 | Sew shoulder and side seams
Cozy Wrap SAL day 3 | Add bottom bands
Cozy Wrap SAL day 4 | Add neckband
Cozy Wrap SAL day 5 | Add sleeves
Cozy Wrap SAL day 6 | Add waist tie
Cozy Wrap Sew Along – day 1
Welcome to the Cozy Wrap Sew Along!
Happy New Year! I’m so excited to start our 2021 sew alongs with the Cozy Wrap top. The pattern comes in Youth and Adult and you purchase the bundle and save. Don’t forget the Cozy Pants if you’re looking to pair your top with a new bottoms. If you are still undecided which style to make, our Round Up blog will give you an overview of all options included, from sleeve styles to top lengths. You can also use the Easy Hacks blog for added options.
Let’s start by taking the measurements needed for the best fit. P4P has an amazing blog that gives you tips for accurately taking your measurements. You can read all about it here. If your measurements put you in a different size for chest/waist/hips be sure to check out our P4P University blog and grade to achieve the perfect fit. Our most recent patterns include videos as well. On page 3 you will notice an active button that will take you to the video about adding or removing length. Please refer to it if you are taller or shorter than 5’5″.
Still debating which knit type will work best for your desired look? Take a look over our P4P University Knit Types blog. We also included a cheat sheet that you can print. If you are like me and sometime are just keen on using a specific print for a specific pattern, read our Different fabric, different fit blog post before you cut your fabric.
The Cozy Wrap patterns includes a shirt, tunic, knee and midi length as well as short sleeves, long hemmed sleeves and gathered sleeves. This pattern is drafted from light to medium weight fabrics with 20-30% stretch. The Cozy Wrap can be worn both as a wrap or as a cardigan. For my Cozy Wrap tunic I will be using January’s Fabric for Pirates. Fabric for Pirates is this sew along’s sponsor so our winner will get to enjoy their very own January box!
Day 1 video is posted below. I have used the projector file . Once you cut the fabric, post a picture of your pretty pile in the comments of DAY 1 photo of the Cozy Wrap album in the M4M & P4P Sew Along Group.
Cozy Wrap SAL day 1 | Cut fabric
Cozy Wrap SAL day 2 | Sew shoulder and side seams
Cozy Wrap SAL day 3 | Add bottom bands
Cozy Wrap SAL day 4 | Add neckband
Cozy Wrap SAL day 5 | Add sleeves
Cozy Wrap SAL day 6 | Add waist tie
Protected: Fabric for Pirates :: January 2021 Reveal
- « Previous Page
- 1
- …
- 3
- 4
- 5
- 6
- Next Page »