Patterns for Pirates

P4P stylish, modern, wearable patterns

  • Home
  • Blog
    • Frequently Asked Questions
    • Pattern Releases
      • Free Patterns
    • P4P University
      • Fitting
      • Sewing with Stretch, Knit Fabrics
      • Sewing with Woven Fabrics
      • Sewing Machines
    • Sew-A-Longs
    • Fabric for Pirates
    • Pattern Hacks
    • Announcement
      • Blog Tours
      • Contest/Giveaway
  • Shop
  • Bundle Discounts
  • Flash Friday
  • Gift Cards
  • My Account
  • Cart

P4P Cardi Week is here!

January 22, 2017

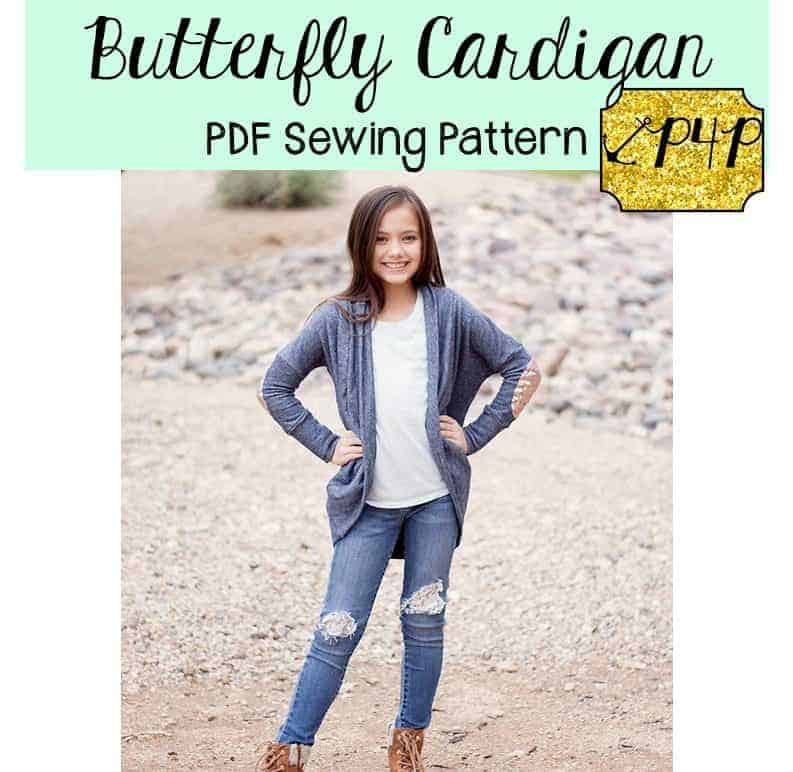
We had so much fun when we ran #P4PRaglanWeek that we decided to do it again.  But this time, we are focusing on our favorite layering pieces: Cardigans!  That’s right, Pirates!  We are asking you to dig out your Grandpa/Cpt Mack, Carefree, and Cocoon/Butterfly Cardigan patterns…and the Kimono pattern too!  Let’s get busy sewing!

cardi logo

We are giving you a full week of cardigan sewing, with hacks and add-ons and easy tutorials.  This is going to be so much fun!

Take a look at our jam-packed schedule of cardigan love!

Saturday, January 21: #P4PCardiWeek Announcement

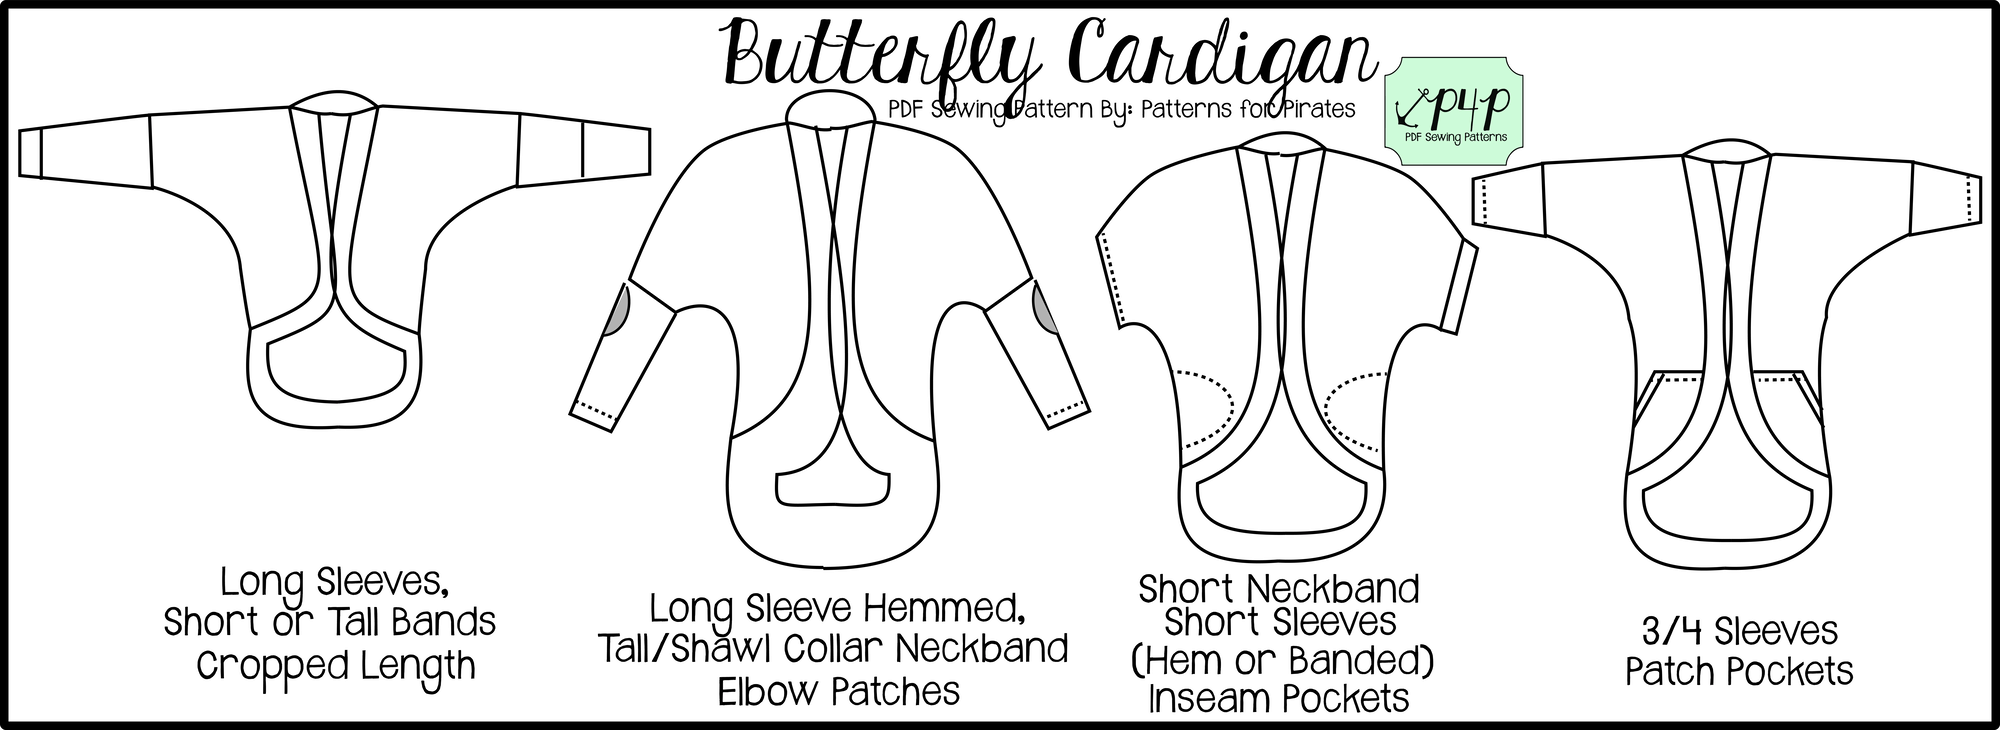
Sunday, January 22: Cocoon / Butterfly Ruffle + Lace Hems

Monday, January 23: Ribbon Tie Closure Hack

Tuesday, January 24: Carefree Cardigan Fringe Hack

Wednesday, January 25: Duster-Length Adjustment

Thursday, January 26: Kimono Ruffle Sleeves

Friday, January 27: Varsity Sweater Style Hack

Saturday, January 28: Carefree Cardigan Flannel + Vest Hack

Monday, January 30: #P4PCardiWeek Winner Announcement

You can follow along on the blog here, or in our Facebook group.  Search #P4PCardiWeek to be able to find our posts all over social media.  And please feel free to sew-along with us on one or all of the days.  The more the merrier!


To sweeten the deal, we’ve gone through and updated the older patterns to include the layers feature, as well as the international and copy shop files.  How do you get the updated copies from previous purchases?  That’s easy!

  • If you purchased from PatternsforPirates.com or Craftsy, log into your accounts and download the updated file.  It’s already in there, waiting for you!
  • If you purchased from Etsy, email a copy of your receipt to help@patternsforpirates.com and the Pirate crew will email you with your updated files.

But wait, there’s more!  We wanted to create a friendly pirate-y competition with our P4P Cardi Week!

Between tomorrow and Saturday, January 28, sew up a Patterns for Pirates cardigan using one of our hacks, or by keeping the pattern as-is.  Share your photo with us on Instagram or in our Facebook group and use the tag#P4PCardiWeek We will pick our favorite and the winner will win a free P4P pattern of choice AND be featured on this blog.  Fun right?

To make it even better we have put all the cardigan patterns in the shop on sale all week (no code needed)!

Grandpa Cardigan | Cpt. Mack Cardigan | Carefree Cardigan | Cocoon Cardigan
Butterfly Cardigan | Summer Kimono

Now get out there and sew some cardigans, matey!

Filed Under: Announcement 8 Comments

Butterfly Cardigan :: New Pattern Release!

January 17, 2017

We are celebrating another pattern release day and you’re going to love it!  Remember the Cocoon Cardigan that we put out right before the holidays?  It’s in mini size now!  Meet the Butterfly Cardigan!

listing pictures youth

The pattern is drafted for girls sizes 3M – 14.  It’s a dolman style sleeve, so it’s got a looser fit and is quick to put together, just like other dolman style tops.  There are THREE sleeve lengths (short, 3/4 and long — each with multiple band options), TWO hem lengths (cropped or tunic length), TWO neckband options (short or tall), and optional pockets (patch or inseam)!  On top of all of that, we have also included a  PDF layers feature for printing.

line drawing

The three different sleeve length options will take your littles from one season to the next.  Choose between short sleeve, 3/4 length, and long sleeves and your littles can easily transition between all four seasons.

butterfly-sleeves

With two different hem lengths, you’ve got all of your bases covered.  Get more coverage with a longer-length tunic…

butterfly-tunic

…or make it in a short and sweet cropped length!

butterfly-cropped

Don’t worry, we made sure to include pockets (!!!) in the Butterfly Cardigan! Who doesn’t love pockets?

butterfly-pockets

Not quite convinced yet?  Go check out all of the rest of the adorable tester images in our Facebook group HERE and get inspired!

Can’t take it any  longer and need the pattern right now?!  Go grab your very own copy of the Butterfly Cardigan and get to sewing!  Don’t have the Mama version of the Cocoon Cardigan yet?

Go grab a special bundle pricing for the Butterfly + Cocoon Cardigans HERE.  Butterfly and bundle will be on sale (no code needed) through Monday January 23,2017.

And don’t forget to share your gorgeous makes with us over in the Patterns for Pirates Facebook group!

Filed Under: Pattern Release Leave a Comment

How to lower or raise a neckline

January 6, 2017

img_4108

We have seen a lot questions about raising or lowering the neckline of various P4P shirts or dresses. On the blog today I show you how easy it is to alter the neckline to achieve the look you want. For this tutorial I will use the Sweet Tee pattern in a beautiful viscose rayon (dress option lengthen 3.5″) but you can apply this technique to either one of the shirt patterns.

img_4118

Start by printing and cutting your pattern in the size needed. The only piece we will be altering will be the front of the shirt (or bodice).

For lowering the neckline you will need to mark on the center fold where you would like the new neckline to be. I usually lower my Sweet Tee neckline 1.5 inches. Using a French Curve (or going slowly) draw a curve similar to the original one from your mark to the inner shoulder point.

raiselowerneckline

img_4502

Cut your fabric using the new front pattern piece. The rest of the pattern pieces will remain the same. The only other change you will need to make is the length of the neckband or binding.

To raise the neckline you will need to grab your front bodice piece and a blank piece of paper. Align the center fold of the front pattern piece  with the side of your paper and glue them together.

Mark a point 1-2 inches above the original top center depending on how high you’d like the neckline. Using the French Curve draw a curve from the center point to the inner shoulder point. Cut the new front using this modified pattern piece and the rest of the pieces as in the original pattern.

img_4503

The only additional modification you will need  to make is to adjust the neckband or binding length. You will need to make it longer or shorter depending on the new neckline. I like to calculate the new neckband length after I sew the front and back pieces together at the shoulder. To find out the new neckline circumference lay the neck opening along a ruler and multiple it by 2.

img_4505

Your new neckband length will be 85% of this circumference plus 1 inch to accommodate the seam allowance. (C * 0.85 +1 ). Cut the new neckband/binding using the new length but keeping the width suggests in the pattern. All you have left to do now is sew the shirt or dress according to the tutorial and you have just made yourself a custom outfit. Easy peasy…right? 🙂

I can’t wait to see your creations in the Pattern for Pirates group.

img_4115

img_4113

Happy sewing, pirates!

Filed Under: Frequently Asked Questions, Pattern Hacks, Uncategorized 6 Comments

2016 Holiday Freebies: Fleece Mittens Pattern!

December 8, 2016

The Pirate Crew is here to bring a little more “yo ho ho” into your holiday with some freebies!  Today is the first of three patterns we are releasing, for FREE!  In case you were stumped on Christmas sewing ideas, here is the first of our scrap-busting, super quick, free patterns.

p4p-fleece-mittensp4p-fleece-mittens2 p4p-fleece-mittens3

These mittens are a one-size fits most.  We’ve also provided a cuff and a non-cuff version, so you can mix other fabrics into these easily if you’d like.  The pattern is written for a basic fleece fabric, though some of our testers have had success with sweater knits and other various fabrics.

Grab your free pattern pieces here. If you need help putting the pattern together, pop over to the First Time Users Tips page or ask in our facebook group .

Note: I use my sewing machine for the construction of the mitten body, because the thumb area can be really tricky if you’re using a serger.   When using fleece, it helps to use a walking foot in your machine to help reduce pulling.  It also makes feeding the fleece through your machine a more even process.

Recommended fabrics: Fleece, cuddle/minky, sweatshirt fleece, upcycled sweaters, etc. I suggest washing your fabric before you begin to pre-shrink & help prevent color bleeding in the future.
(Optional cuff) Any knits with at least a 20% stretch.


Supplies needed:

1/3 yard Fleece fabric
(optional cuff) less than 1/4 yard required

Step 1: Assemble your pattern and cut your pieces out.  You will need two sets of mirror images of the main body pieces.

mitten1

Step 2: Lay two mirror images, right sides together.  Using 1/2″ seam allowance, sew around the entire outside of the mitten body.  Make sure to leave the bottom open.

mitten2

Step 3: Clip the corner between the thumb and fingers, making sure not to cut into your stitching, but getting as close as you can to it.  This step is super important, otherwise the mitten will fit really strange in the thumb and it’ll be super uncomfortable.

mitten3

Step 4: [If doing the cuff version, skip to step 6] Turn the opening up 1″ and hem.  (Optional: turn 1/2″ and then another 1/2″ to enclose raw edge.)

mitten4

Step 5: Turn mitten right-side-out.  Repeat with second mitten.

mitten5

Step 6: CUFF VERSION ONLY Complete steps 1-3.  Also cut 2 cuff pieces, one for each mitten.

mitten6

Step 7: Fold your cuff piece, right sides together, meeting the shorter ends together.

mitten7

Step 8: Stitch (using 1/2″ seam allowance) short ends together.

mitten8

Step 9: With wrong sides together, fold the raw edges together to meet each other.

mitten9mitten10

Step 10: On both your mitten body and cuff pieces, mark raw edges into halves.  (The mitten body will be the two seams.  The cuff will be one seam and the halfway point on the opposite side.)

mitten11

Step 11: Slide the cuff over the mitten body, aligning the raw edges and matching the half-marked points.  Note: The cuff is slightly smaller than the mitten body.

mitten12

Step 12: Stretching the cuff only, stitch through all three layers of raw edges.

mitten13

Step 13: Flip cuffs down.  Repeat with other mitten.

mitten14

Step 14: Sit back long enough to admire your handiwork, and then go sew a million more pairs of these comfy mittens!

mitten15


Check out the adorable mittens that our gorgeous testers made!  (And check back with us next week, because we’ve got more freebies coming your way!)


As always, we love when you share what you’ve made with us.  Head over to the Patterns for Pirates Facebook group and show off the fabulous mittens you’ve managed to make from our freebie pattern!

Filed Under: Free Pattern 2 Comments

Free Spirit Tank – mash up & high low hem

August 30, 2016

IMG_0490

I’m sure by now we’ve all been invited to a least one “Buy these clothes” Facebook party and we’ve been tempted to buy some outfits only to think “nah…I can make it myself”.  Am I right? Well that was my thought when I saw one of this big online company’s newest relaxed fit dress that features a high low hem.

IMG_0556-1

Today on the blog I wanted to show you my version of this popular dress and teach you how to use your favorite P4P patterns to make yourself one. First you will need the Free Spirit Tank (which just got updated to include the Layer Feature!) and the Boyfriend Vneck shirt patterns, a ruler, markers, paper, your fabric of choice, a measuring tape and a French curve ,if possible (A great investment if you don’t have one!). Start by printing the patterns according to the instructions and then cut your size and the high low option.

Screen Shot 2016-08-26 at 11.15.13 AMScreen Shot 2016-08-26 at 11.16.06 AM

I used the sleeves and armcyce from the Boyfriend V neck shirt because it has a looser fit. If you are unsure how to mash the two patterns to add sleeves to the FST, use Judy’s Free Spirt Tank- Layer Me Up mash up tutorial. You would apply the same guidelines and tutorial. Even better, the Vneck Boyfriend tee includes a pocket piece too!

Now that we have the sleeves part covered, let’s move on the the high low hem. Grab your measuring tape because it’s time to take some additional measurement to create the above knee dress length. Measure the length from underarm to above knee, now measure the FST pattern piece from underarm to the hi low hem mark line. In doing so you’ll figure out how many inches you’ll be extending the side. In my case it was approximately 10 inches.

Attach some blank papers to the bottom of your pattern so you extend it. Using a straight ruler add the 10 inches side extension to both the front and back pattern pieces. Now we will create the front and back curved hems. The back curve will be a much more deep one than the front. Take the front piece and mark 12 inches down from the high low hem. Using a French curve draw a curve from the side point to the center seam. We will draft the back curved hem the same way only this time we’ll mark the extended center  mark at 14 inches and carefully draw a curve between the side mark and the center.P4PGRAPHIC

That’s all! You’ve now drafted your own “Carly” inspired dress. Cut out the pieces and sew them according to the pattern instruction.  The Boyfriend V neck shirt includes a pocket so I added it to the FST front too. Simply mark the pocket placement from the Boyfriend shirt on the FST pattern.

TIP: the bottom hem will have a pretty big back curved hem so don’t forget the tips I gave you in a earlier blog about hemming knits.

IMG_0541IMG_0561IMG_0544

Let me know if you have any questions by posting them in the comments below. As always, don’t forget to show off your creations in the group. I can’t wait to see your versions of this dress.

Alex

Filed Under: Pattern Hacks, Uncategorized 16 Comments

How to use the new Layers feature

January 9, 2016

header

Patterns for Pirates has added a brand new feature to their newest upcoming patterns! The Layers Feature! This means you can choose to print one size, a couple, or all of them if you’d like.  They will still be the “No Trim” style.

Here is a few screenshots to help you use the new feature.

As always, you will need to open and print your PDF from Adobe PDF Reader (a free download if you don’t have it yet).

This is what your screen should look like viewing the PDF pattern pieces:

Patterns for Pirates how to print layered pdf sewing patterns using adobe (3)

Patterns for Pirates how to print layered pdf sewing patterns using adobe (1)

Patterns for Pirates how to print layered pdf sewing patterns using adobe (2)

Patterns for Pirates how to print layered pdf sewing patterns using adobe (4)

Now you can print just the sizes you need and save some ink and time tracing off your size! 🙂

As requested, here is our on-going list of patterns that have the layers feature (These are also the patterns that include the A0 Copy Shop File Size):

Freebies:

  • Pirate Pencil Skirt
  • Peg Legs
  • Peg Legs- Add Ons
  • Peg Legs- Maternity Add On
  • Tulip Tee
  • Tiny Tulip- Youth
  • Wee Lap Tee
  • Petite Pegs
  • Teeny Beanie
  • Walk the Plank- Adult
  • Walk the Plank- Youth

Youth:

  • Jolly Roger Raglan
  • Jolly Roger Add-On Pack
  • Sugar Pie Dolman
  • Spice Cake Dolman
  • Me Hearties Dress + Peplum
  • Yo Ho Henley
  • Tiny Timeless
  • Baby Bear Joggers
  • Fav Tee
  • Butterfly Cardigan
  • Heart Breaker Cami
  • Little Loungers
  • Sweet Bow Dress
  • SOS Knit Pants- Youth
  • So Classic Sundress- Youth
  • Go To Jacket- Youth
  • Cpt. Mack’s Cardigan

Womens

  • Slim Fit Raglan
  • Relaxed Raglan
  • Raglan Add-On Pack – for women
  • Sweet Tee Dolman
  • Pumpkin Spice Dolman
  • Sweetheart Dress + Peplum
  • Siren Swim Top
  • Hello Sailor Swim Bottoms
  • Layer Me Up Shirt
  • Women’s Henley
  • Essential Tank
  • Sunshine Dress
  • Free Spirit Tank
  • Women’s Henley
  • Timeless Tunic
  • Mama Bear Joggers
  • Carefree Cardigan
  • Granpda Cardigan
  • Summer Kimono
  • Cocoon Cardigan
  • Cross my Heart Cami
  • Favortie Tee
  • Linen Loungers
  • SOS Knit Pants
  • So Classic Sundress
  • Go To Jacket- Womens
  • Ragdoll Raglan

Mens:

  • Go To Jacket- Mens
  • Papa Bear Joggers
  • Men’s Henley

Filed Under: Frequently Asked Questions 70 Comments

P4P Shirt fits Explained

December 13, 2015

I get asked a lot how the different P4P shirt pattterns compare fit wise.

So to help those visual people (most of us sewing/creative types are!), I created a little line drawing with the hourglass figure in each shirt.

Remember, P4P is designed for an hourglass figure; so if you have a different body type you will have a different fit unless you follow your measurements and grade between the sizes you are.

Also, “hips” are the widest part of you- usually your booty.  So while looking at the line drawings, remember that the widest part is really the booty!

Here is the quick line drawing:


And for more quick overview here I am in every P4P shirt.  I was a solid medium at the time of all pictures unless noted.

Layer Me Up: Tight fit through arms and body meant to be layered under other garments. (Size Medium)

Favorite Fabrics: Knits with lots of stretch (70% more are my favorite) cotton spandex, rayon spandex, and liverpool knit.

IMG_6198 IMG_6266 IMG_6316 IMG_6367 IMG_6393 IMG_6442

Cross my Heart Cami: Fitted through bust and a closefit through waist and hips. This is a medium here.

Favorite Fabrics: Cotton spandex, rayon spandex, jerseys, poly blends, ity, brushed poly and ribbed knit all work well.


The Basic Tee: Fitted through bust and a semi-fit through waist and close at hips. This is a small/medium here.

Favorite Fabrics: Jerseys, tri-blends, double brushed poly, rayon spandex, cotton spandex, poly blends, ity, ribbed knit, sweater knits all work well.

Essential Tank: Fitted through bust and a close semi-fit through waist and hips. This is a medium here.

Favorite Fabrics: Jerseys, rayon spandex, cotton spandex, poly blends, ity and ribbed knit all work well.

13350380_10102709342906983_688272442041579391_o 13418399_10102709342323153_7161703305455901606_o 13411710_10102709342253293_9173902032219237424_o 13418529_10102709341839123_247796028914714387_o 13392179_10102709340891023_5609753226814510102_o 13416881_10102709339658493_6711765543316495162_o

Women’s Henley: Fitted through bust and semi-fitted through waist and hips. (I don’t have many of these since it was drafted and released when I was pregnant 🙂 I made a medium here, but my bust and waist were bigger right after baby girl arrived!)

Favorite Fabrics: thermals, medium weight sweater knits, cotton jerseys, and rayon spandex.

SAMSUNG CAMERA PICTURES


Boyfriend V Neck: Semi-fitted through bust, waist and hips. (Size Medium)

Favorite Fabrics: I like to use a cotton jersey, interlock, medium weight sweater knit for a more fitted look.  For a looser/slub feel I go for rayon spandex.

10511668_10100213568490777_3346501466436650626_o IMG_8828 IMG_8834IMG_8812IMG_8890

Slim Fit Raglan: Fitted at bust and arms, semi-fitted at waist and hips.

Favorite Fabrics: Medium weight sweater knit, rayon spandex blends, cotton spandex, stretch french terry, slub jersey.

IMG_0393 IMG_0287 IMG_0278 IMG_0238 IMG_0231 IMG_0216  IMG_0183 IMG_0175 IMG_0173 IMG_0149 IMG_0135


Women’s Raglan: Loose fit through bust and waist, semi-fitted at hips- straight cut. Loose on arms. (Size Medium)

Favorite Fabrics: More stable knits like french terry, sweatshirt, fleece, interlock, and ponte roma.

1 (14)1 (4)1 (13)1 (28)1 (34)IMG_88011 (2)(PS- I have a light pink undershirt under the lace one! I didn’t realize that was a mistake until after the pictures! lol)

Favorite Tee: this is fitted at bust and semi-fitted through waist and hip. The side vent hem can give you even more relaxed fit through hip.

Favorite Fabics: You have a pretty wide range of knits you can use on this shirt.  I prefer a flowly, drapey knit for the curved hem option like rayon spandex, modal, poly jerseys, ITY.  For the banded hem option I love something with a little more structure like a rayon french terry and poly jerseys. The side vent hem can use either of these and look great.  For the dress length I prefer something more structured again like double brushed poly, cotton spandex, rayon french terry.

Sweet Tee: this is a slimmed dolman with very small “bat wings” under the arms.  It is fitted at bust and semi-fitted through waist and hips.

Favorite Fabics: light to medium weight knits, although it has very small “bat wings” I still strongly prefer a soft drape for any dolman so that your “wings” aren’t puffy 😉  I used tissue jersey, slub jersey, light and medium weight sweater knits, and rayon spandex for my favorites.

IMG_3884 IMG_3896 IMG_3911 IMG_4015 IMG_4036 IMG_4091 IMG_4137 IMG_4162 IMG_4180 IMG_4185 IMG_9451 IMG_9485 IMG_9507


Tulip Tee: this is a boxy, relaxed fit dolman.  Semi-fitted at bust and hip, but a straighter cut through waist.  Although it’s not straight, it is still very loose through waist. The plain option will feel and fit tighter at the waist and hip than the tulip option, which will naturally swing open for a looser feel.

Favorite Fabics: light to medium weight knits. I prefer a soft drape for any dolman so that your “wings” aren’t puffy 😉  I used mostly rayon/modal/ blends for mine personally.  I love it in a soft sweater knit for fall/winter as well.  You could use a slub knit, poly blend, triblend, ITY all as well.


Pumpkin Spice Dolman: oversized/loose fit through upper arms, bust and waist.  Semi-fitted on hips. Tight fit on lower arms. (Medium in the navy/grey and Large in the others- I hit those measurements at the time of sewing/pictures :))

Favorite Fabrics: I like fabric with good drape for this one.  Rayon spandex blends, sweater knits (both medium and lighter work), thinner slub jerseys, french terry with rayon in the blend, and ity.


IMG_3440 IMG_3467 IMG_3493IMG_0447IMG_0418IMG_0417IMG_0407


Free Spirit Tank: Fitted at bust, drastic a-line out to give loose fit through waist and hips. (Size Medium)

Favorite Fabrics: I like fabric with good stretch and drape for this one.  Rayon spandex blends, sweater knits and thinner slub jersey.

20151123_15042420115_10100313906851897_8805792748950944668_n 11051762_10100313891198267_4156963260416149925_o 11169614_10100313891921817_5868655417849932999_o 11187817_10100313901737147_4232944970819534637_o 11212671_10100313892365927_3793099993655718393_o 11218719_10100313910180227_7456640702411835535_n 


Sporty Piko: A very loose, straight cut from the short sleeve juncture.  It is loose throughout the body with relaxed sleeves as well.

Favorite Fabrics: It really depends on the look you’re wanting for this one! I love a french terry for the hoodie options, but for an everyday tee it must have a very soft drape.  You can use various fabrics depending on how boxy you want the shirt to appear- the more stable the fabric the boxier it will look worn.

Brunch Blouse: Fitted at bust, curves in only a touch at waist, loose on hips.

Favorite Fabrics: Rayon challis, crepe, anything with a softer drape.


Everyday Elegance: Loose fit through bust and waist- straight cut to hips. (Size Medium)

Favorite Fabrics: I like fabrics with lots of drape for this one like peach skin, chiffon, rayon challis.

10679813_10100211573383987_4958949390945241951_o 1961948_10100211572959837_2864287625354337808_o 2 (6) 2 (2) 1 (10) 1 (2)

Filed Under: Announcement, Fitting, P4P University 19 Comments

  • « Previous Page
  • 1
  • 2
  • 3

Featured Patterns

  • Mae Top - Bundle Mae Top - Bundle $20.00 Original price was: $20.00.$18.00Current price is: $18.00.
  • Mae Bottom - Bundle Mae Bottom - Bundle $20.00 Original price was: $20.00.$18.00Current price is: $18.00.
  • Loosey Goosey - Bundle Loosey Goosey - Bundle $20.00
  • Bacall Bodysuit Bacall Bodysuit $12.00
  • Privacy Policy
  • Refund Policy
  • Affliliate Program
  • Contact Us
  • About

Copyright © 2025 Patterns for Pirates

Copyright © 2025 · Genesis Framework · WordPress · Log in