Patterns for Pirates

P4P stylish, modern, wearable patterns

  • Home
  • Blog
    • Frequently Asked Questions
    • Pattern Releases
      • Free Patterns
    • P4P University
      • Fitting
      • Sewing with Stretch, Knit Fabrics
      • Sewing with Woven Fabrics
      • Sewing Machines
    • Sew-A-Longs
    • Fabric for Pirates
    • Pattern Hacks
    • Announcement
      • Blog Tours
      • Contest/Giveaway
  • Shop
  • Bundle Discounts
  • Flash Friday
  • Gift Cards
  • My Account
  • Cart

New Pattern Release :: Oversized Sweater!

January 23, 2020

January for the majority of us means sweater weather.  The trend right now seems to be leaning toward an oversized, super cozy, slouchy sweater — and we jumped right on board with that style!  Aptly named, the Oversized Sweaters are about to be your new best friends.  Let’s talk about them, shall we?


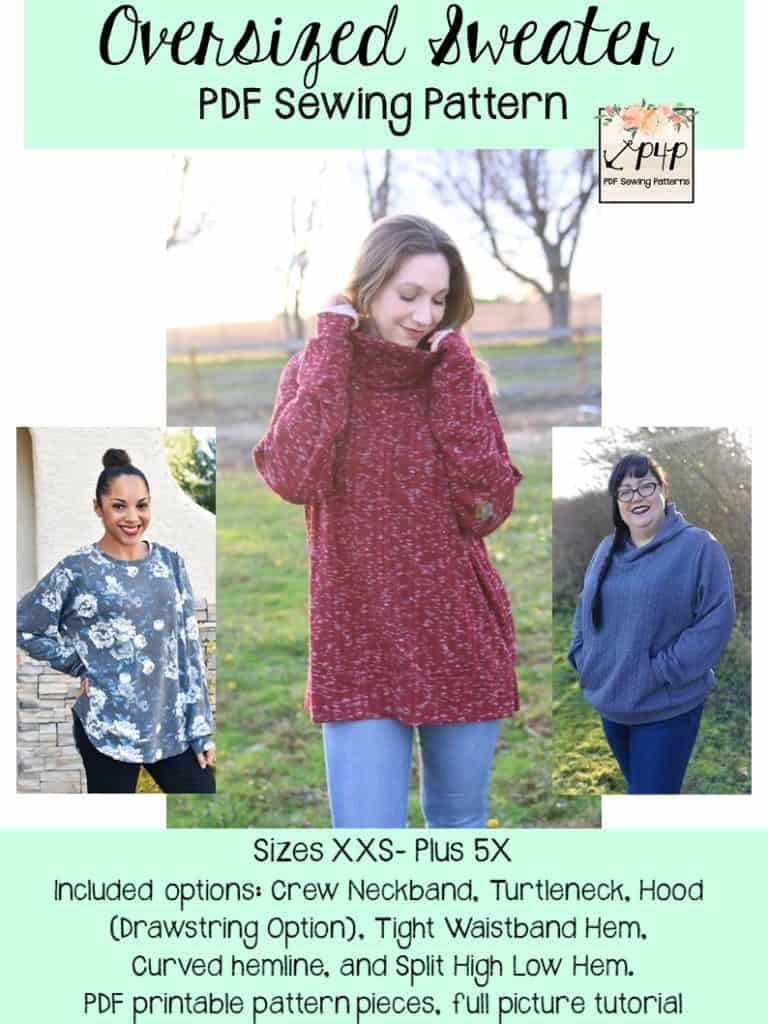
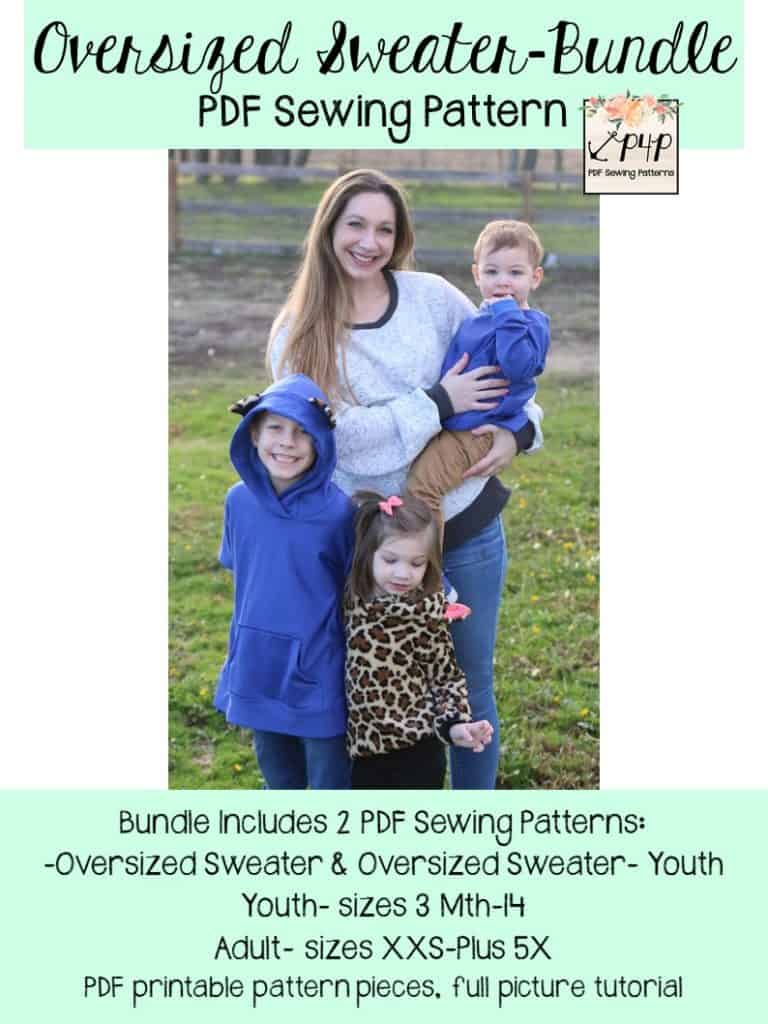
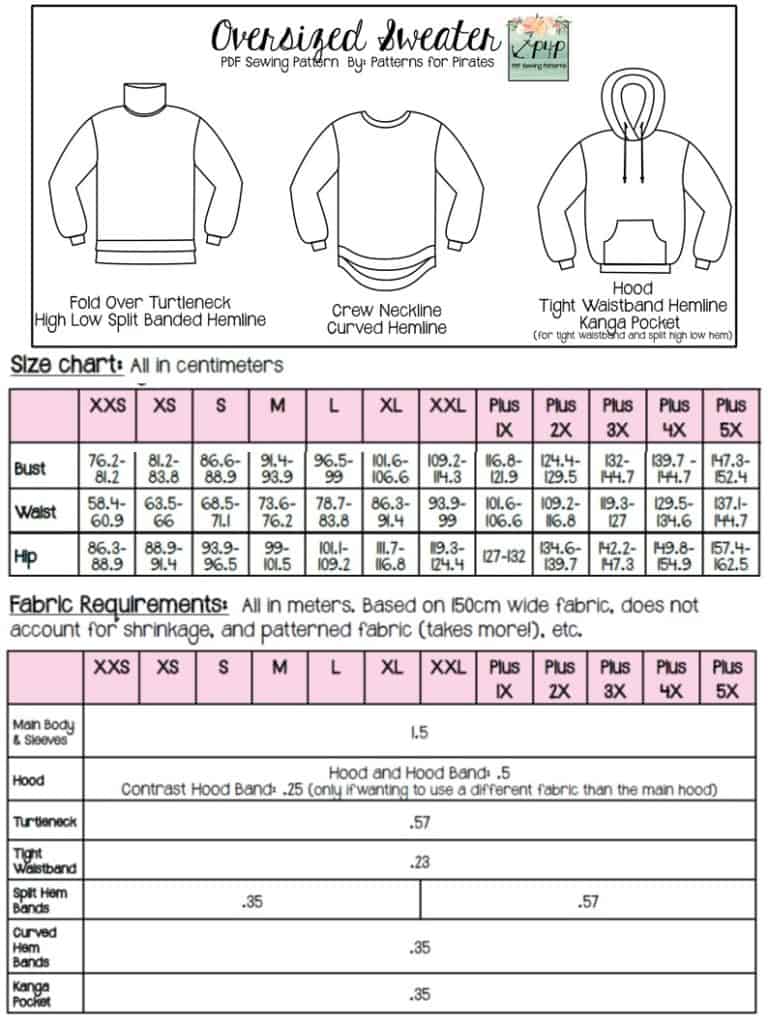
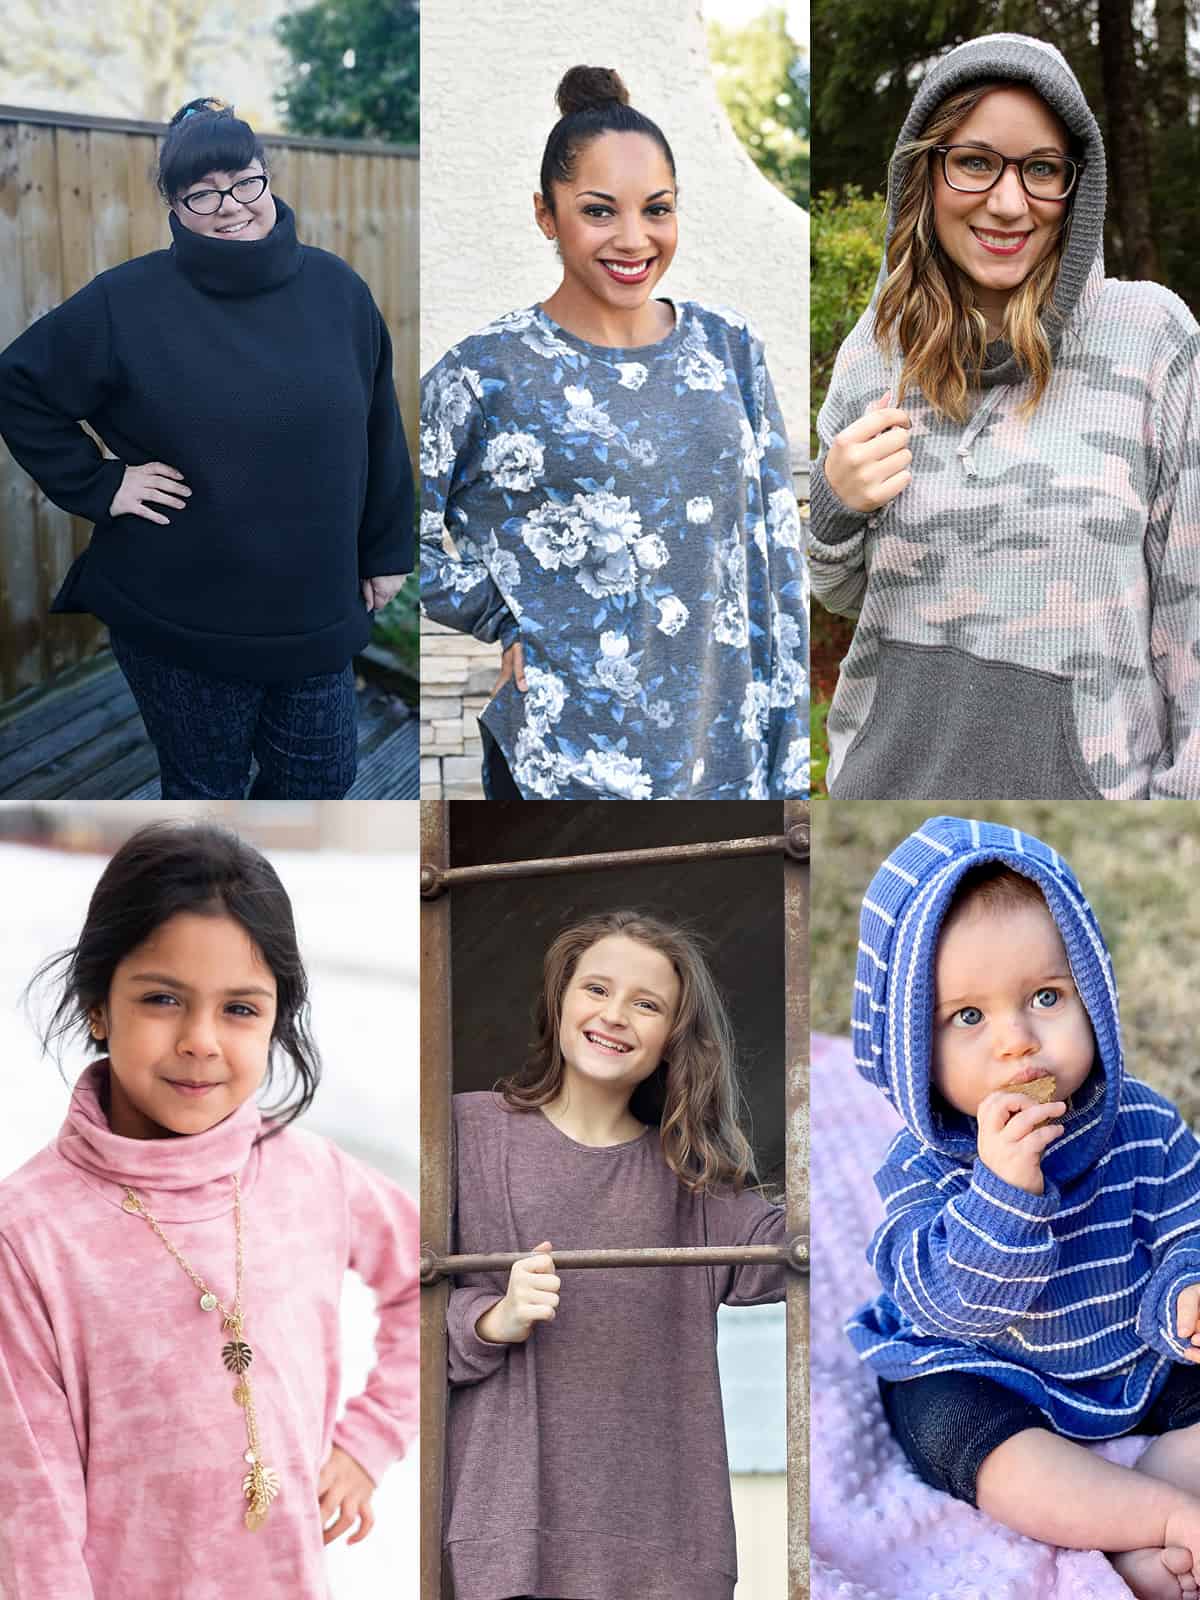
The Oversized Sweater patterns are super classic loose sweater / sweatshirt / jumper patterns. The fit and style is so versatile and can be used with all the cozy fabrics everyone loves and stockpiles during the winter months! It’s time to use that stack of fluffy fabrics you’ve accumulated!  This fast and easy sew will fill up your closets with pieces your whole family will love!

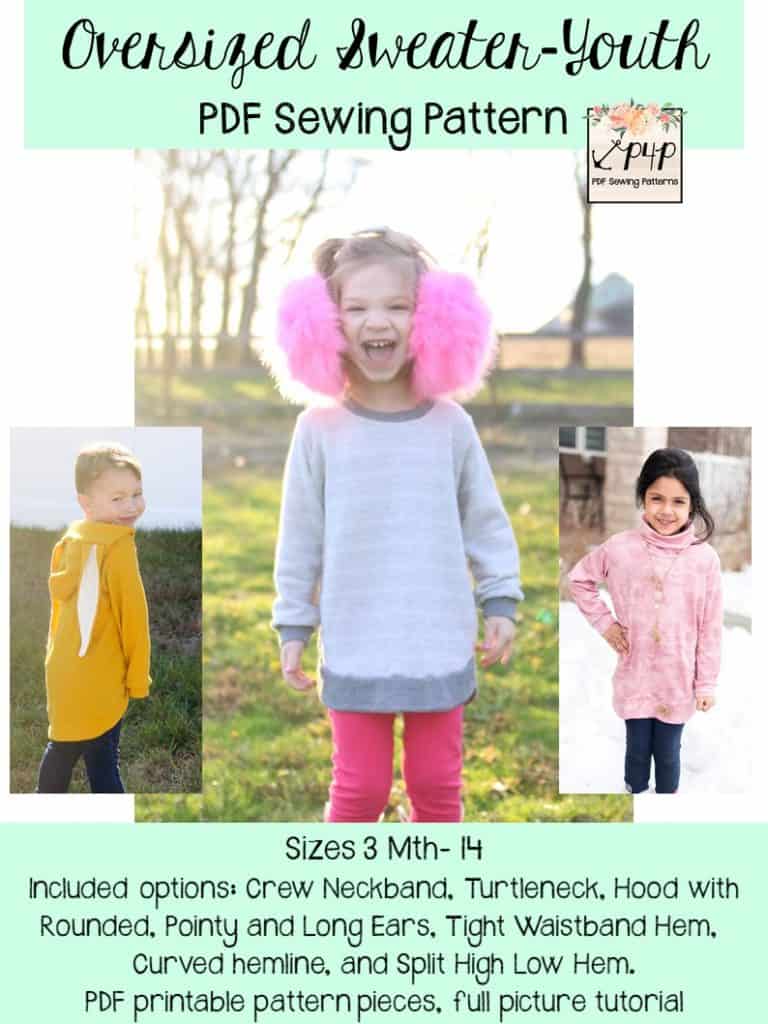
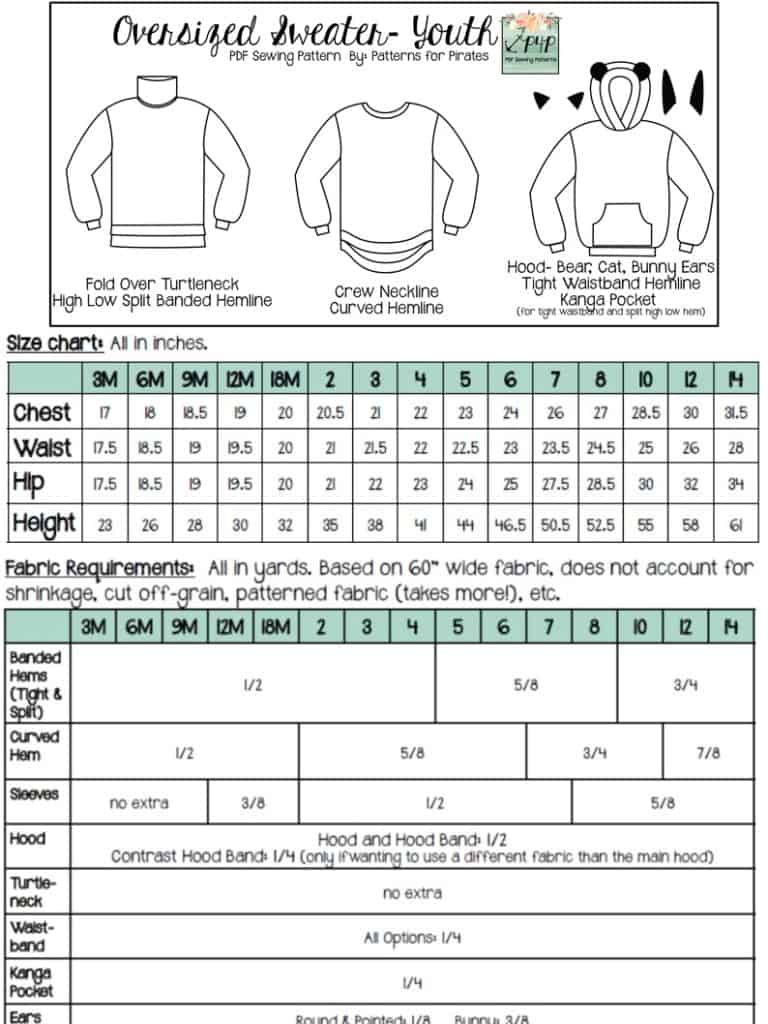
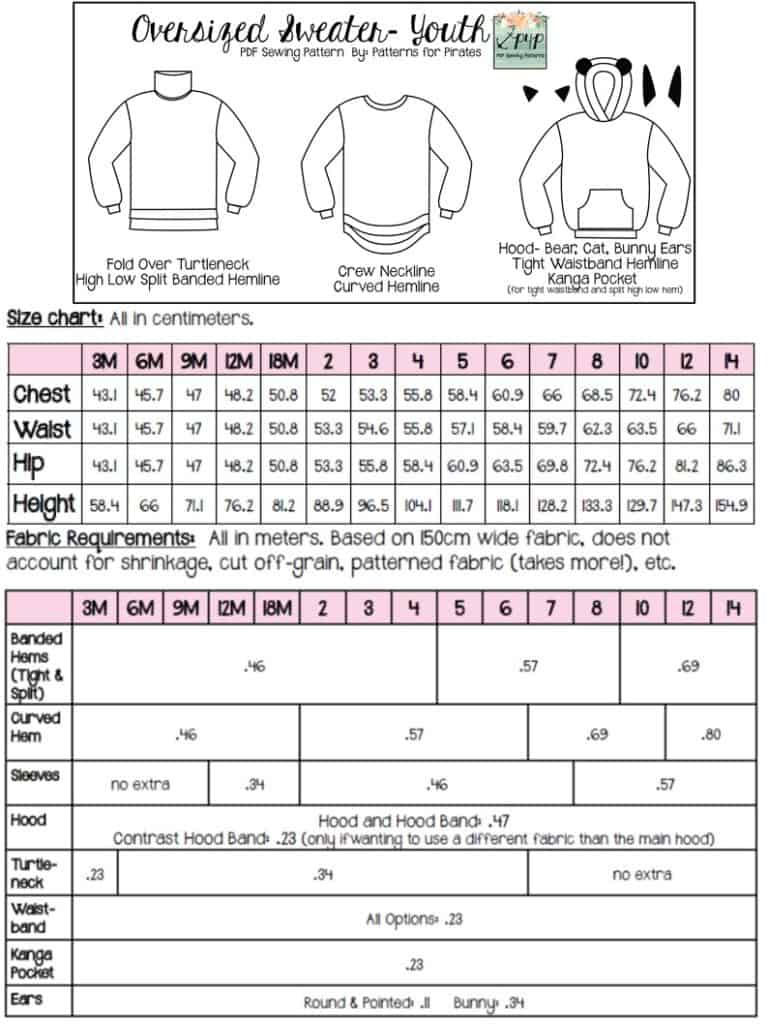
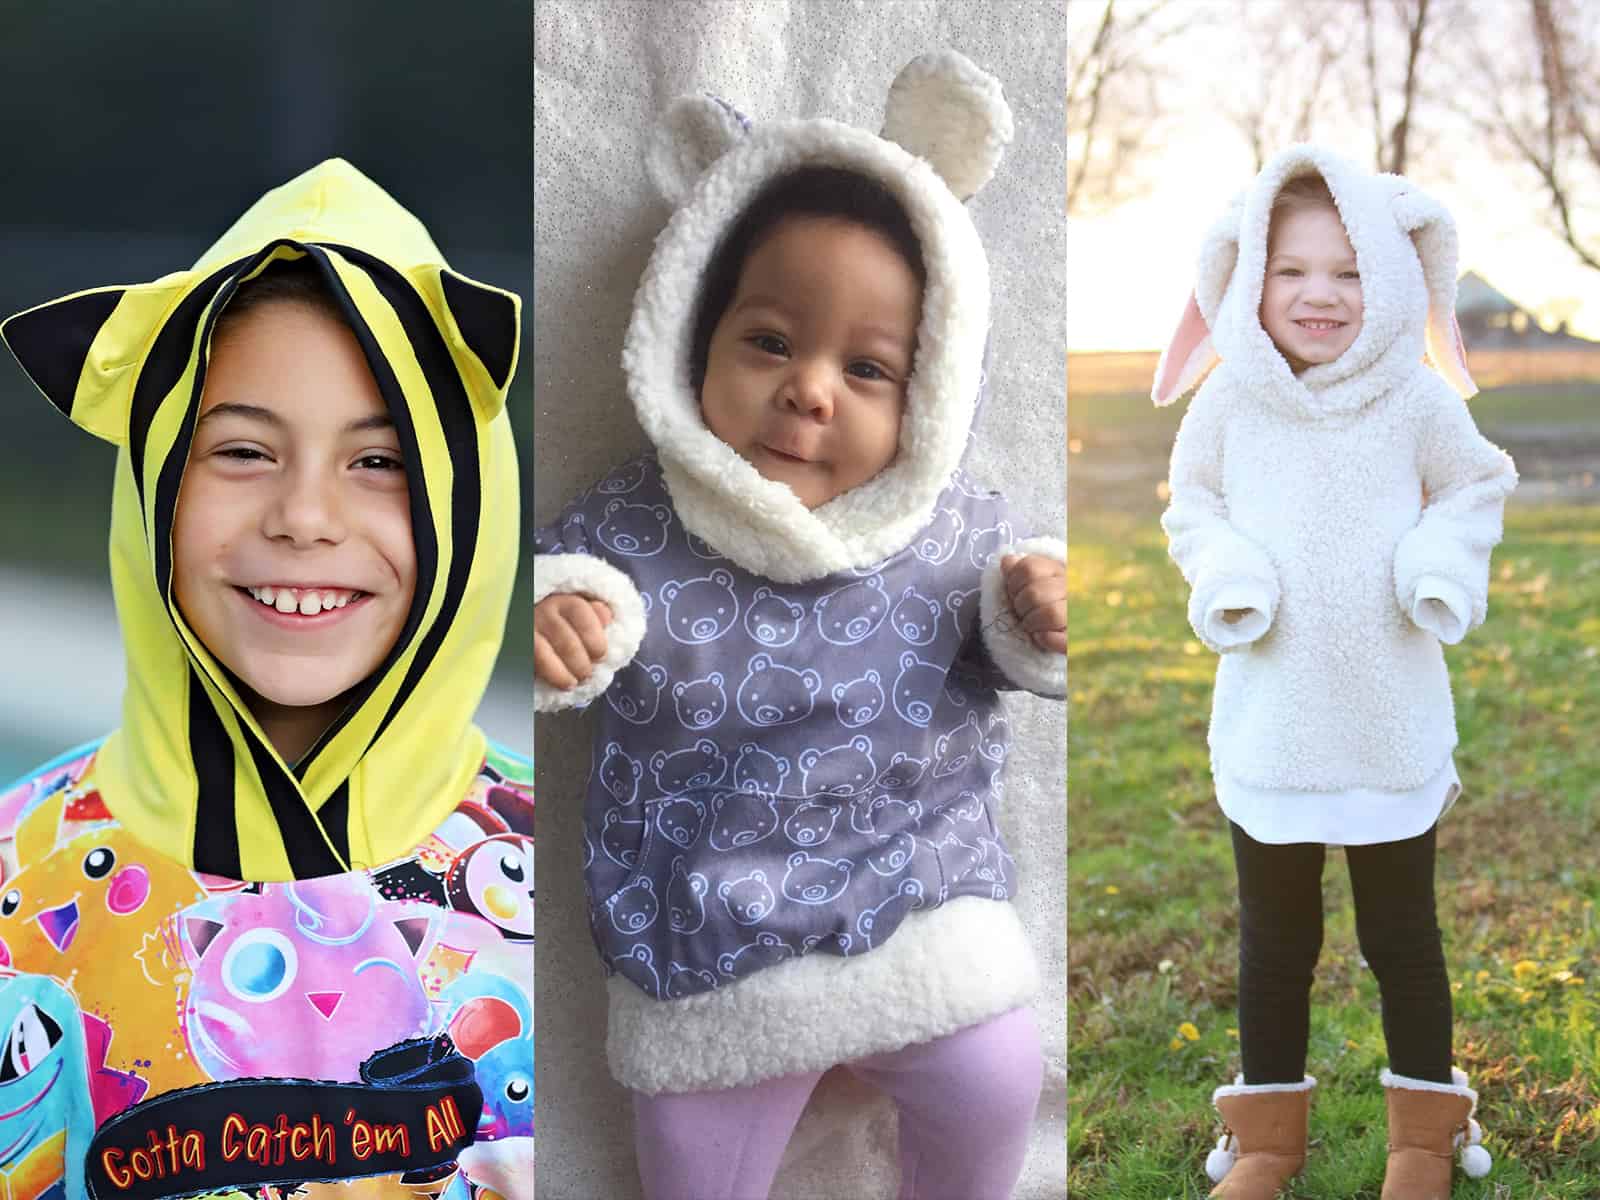
You can pick from 3 different necklines: a classic crew neckband, a tall turtleneck, or a hood — and the youth pattern even comes with optional ears! You can get creative with the short pointy ears (kitty, fox, wolf), rounded ears (bear, koala, panda), and long bunny ears. Who can resist those adorable ears? The hemline also includes 3 options: tight waistband, curved hemline and a split high low hem.

With the loose fit and many options you can create so many different looks with fabrics like french terry, sweater knits, sweatshirt fleece, fleece, sherpa, etc.


**Want to learn more about how to measure yourself for these pattern?  We’ve got you covered with an in-depth blog HERE.  And in case you’re new to Patterns for Pirates and PDF patterns in general, we have a great blog full of new-user tips HERE to help you get started!  As with all of our current releases and updates, the pdfs now include our layers feature and can be found in Letter, A4 and A0 sizes.  And for even more helpful fun, we have a *free* printable that you can use to help record your measurements as you take them.

Let’s take a quick look at the different options!

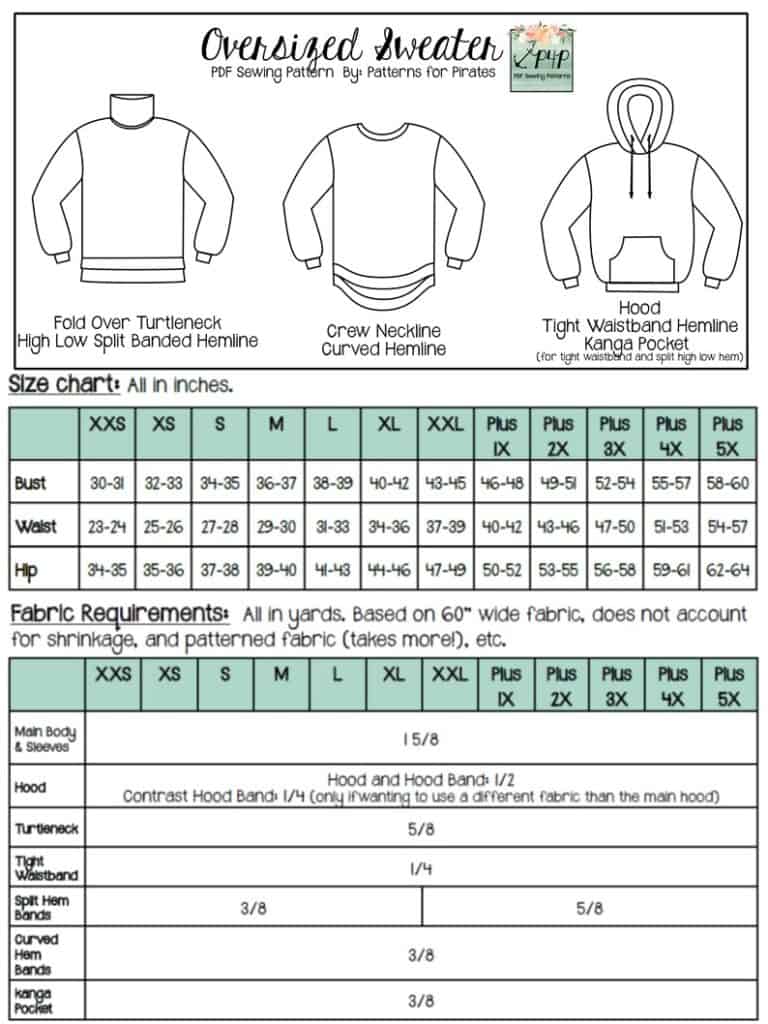
HEM OPTIONS: HIGH-LOW SPLIT / CURVED / TIGHT WAISTBAND

NECKLINE OPTIONS: FOLD-OVER TURTLENECK / CREW / HOODED

OPTIONAL ANIMAL EARS INCLUDED IN THE YOUTH PATTERN: POINTED EARS / ROUNDED EARS / BUNNY EARS

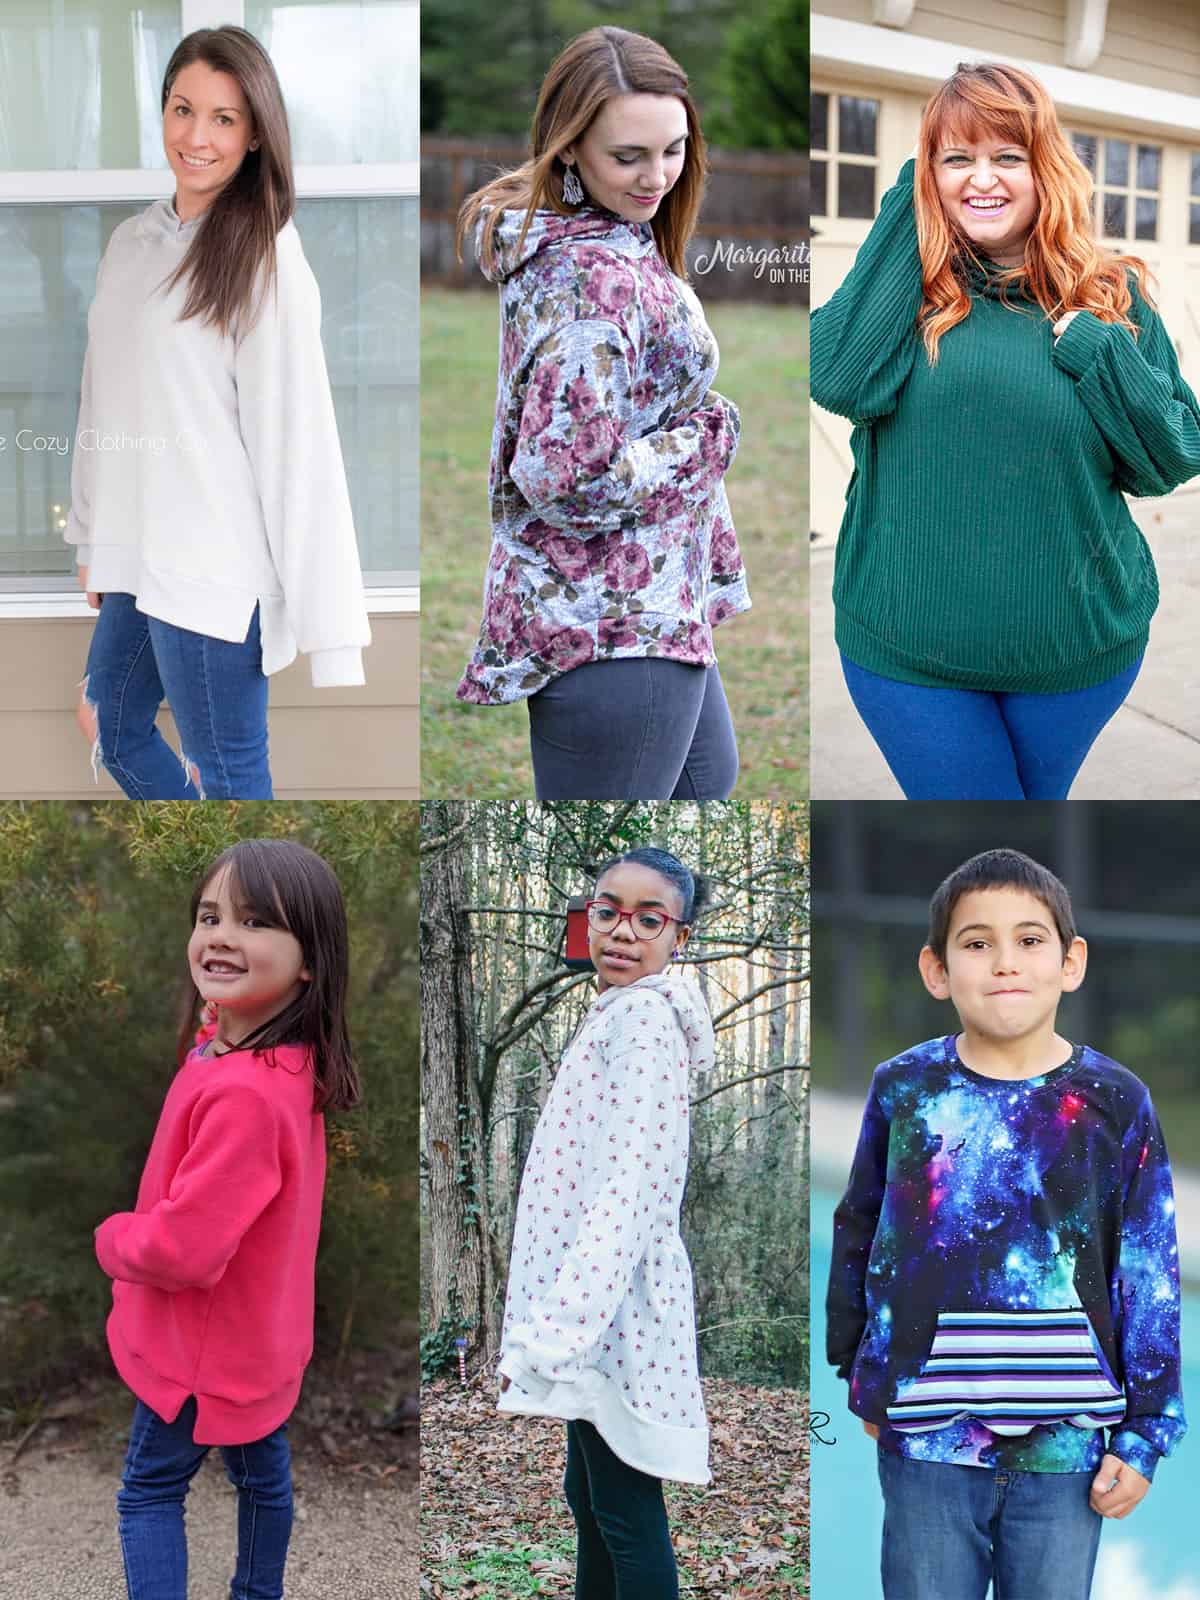
How about some fabric inspiration?  The looser fit means you can use something super drapey or super thick for different looks. Here are some of the favorite tester choices:

SWEATER KNITS:

This slideshow requires JavaScript.

WAFFLE KNITS:

This slideshow requires JavaScript.

FRENCH TERRY:

This slideshow requires JavaScript.

SHERPA:

This slideshow requires JavaScript.

OTHERS:

This slideshow requires JavaScript.

In case you were looking for some more inspiration, you can find all of our tester images in our Facebook group!  Go check them out: Oversized Sweater Facebook Album | Oversized Sweater – Youth Facebook Album

Are you ready to sew your new favorite sweater?  Go grab the patterns now!

OVERSIZED SWEATER | OVERSIZED SWEATER – YOUTH | OVERSIZED SWEATER – ADULT/YOUTH BUNDLE

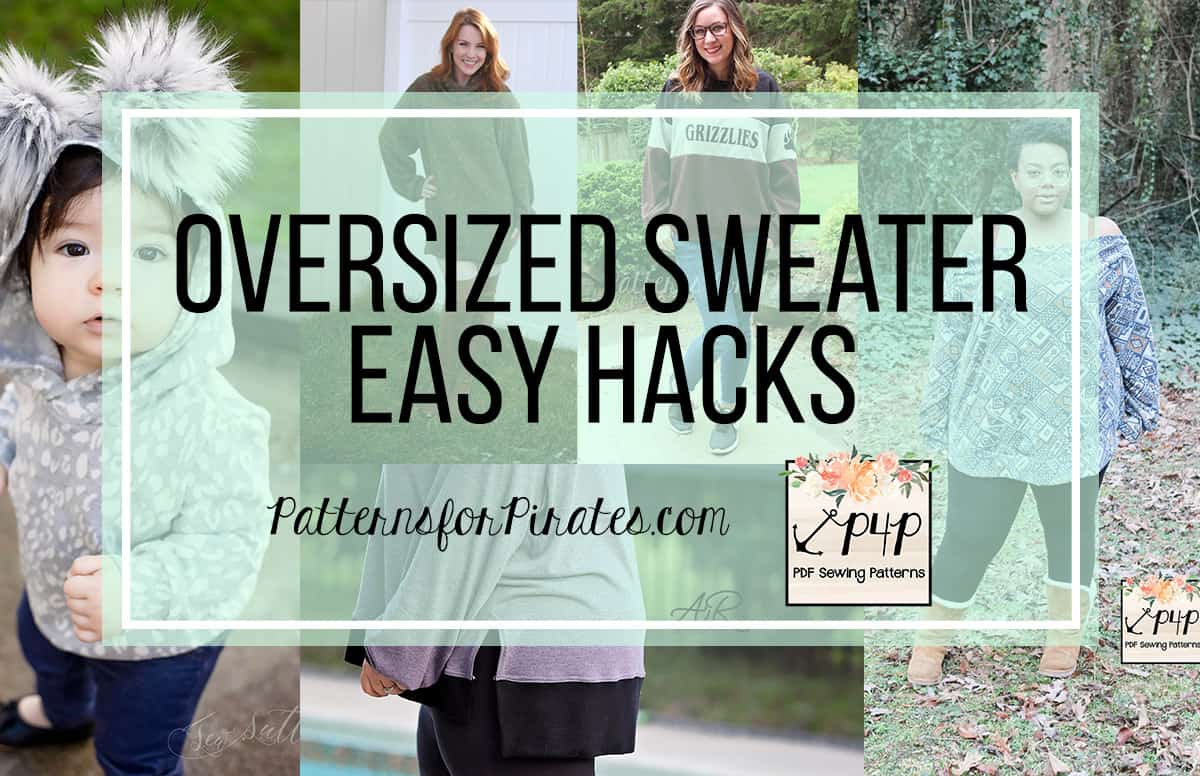
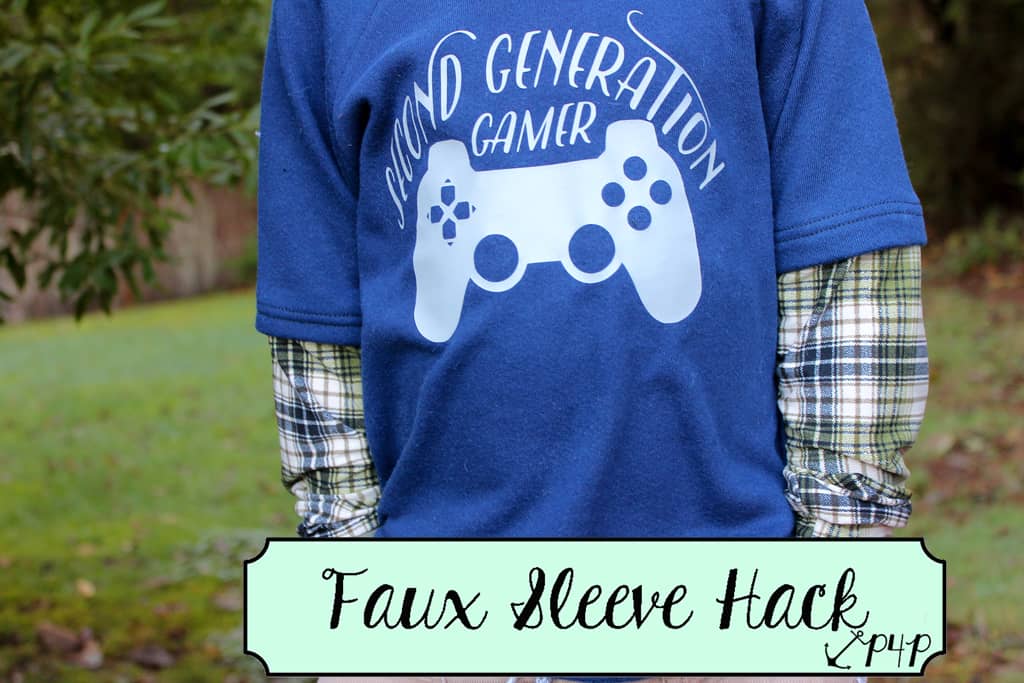
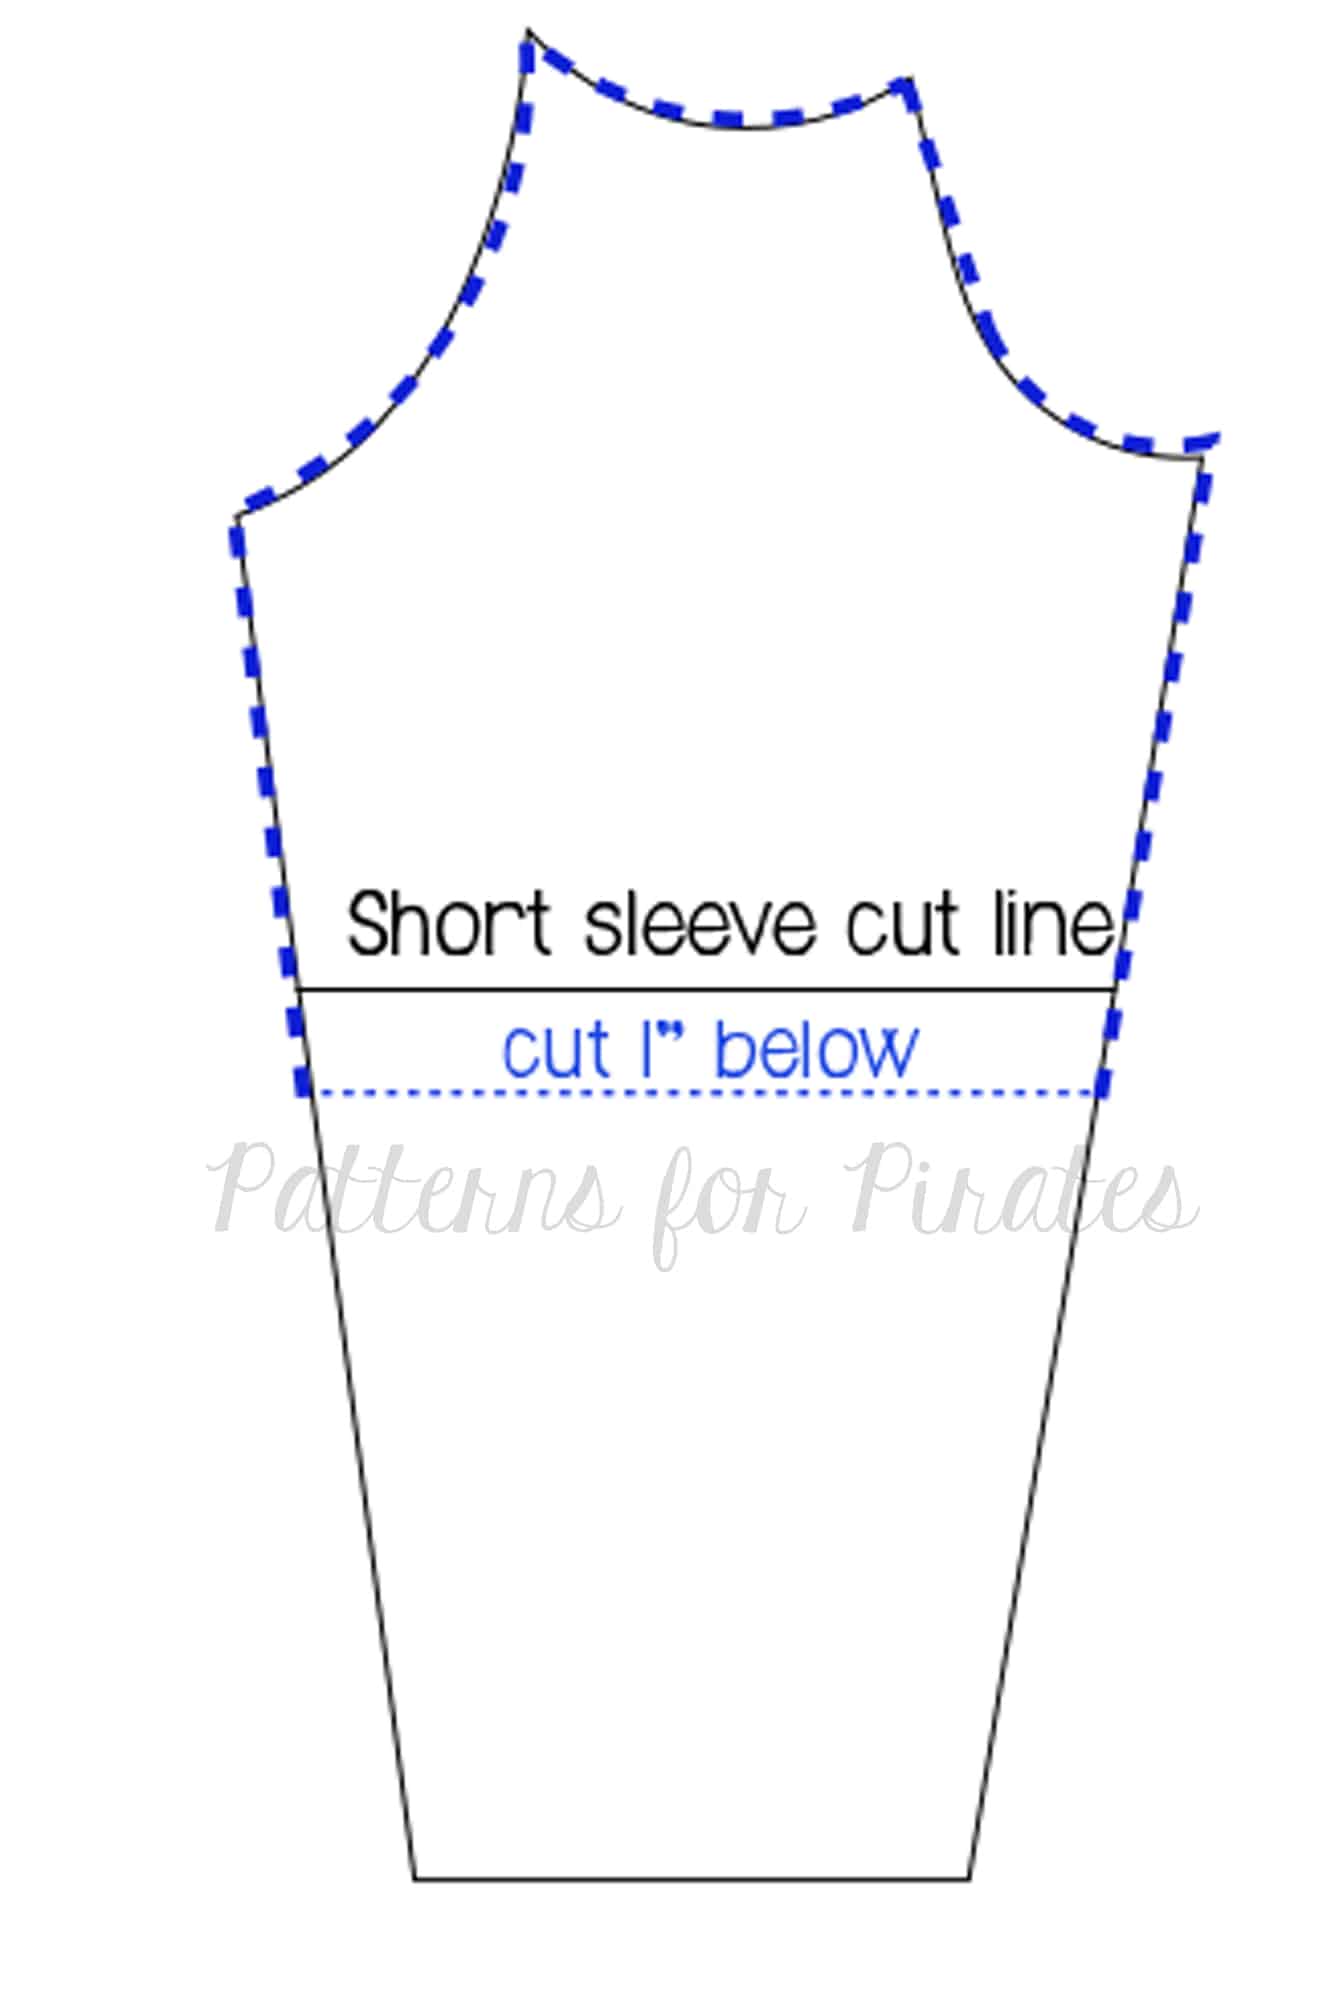
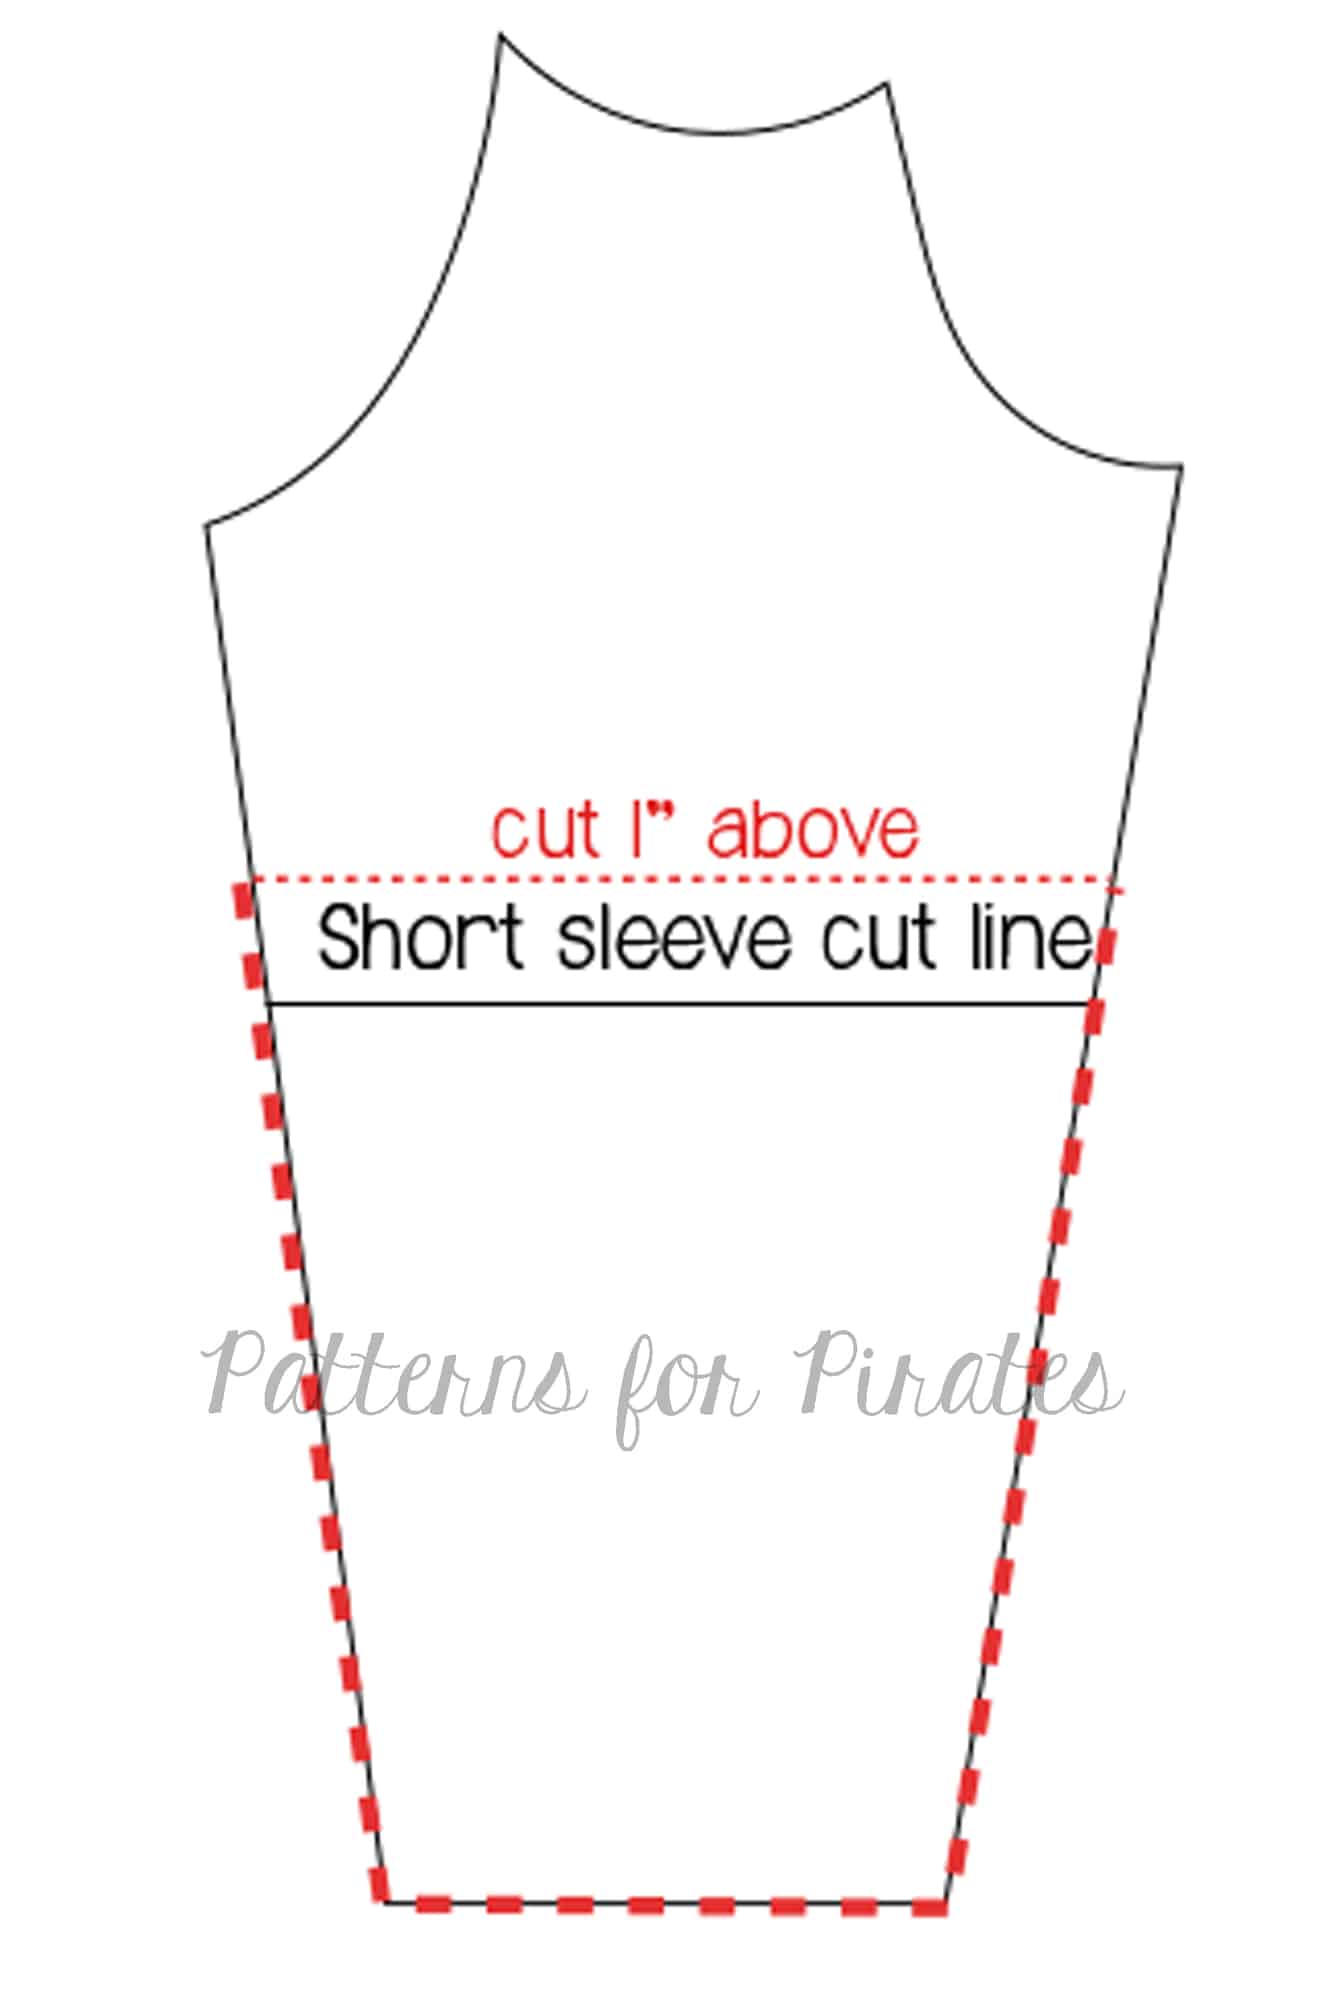
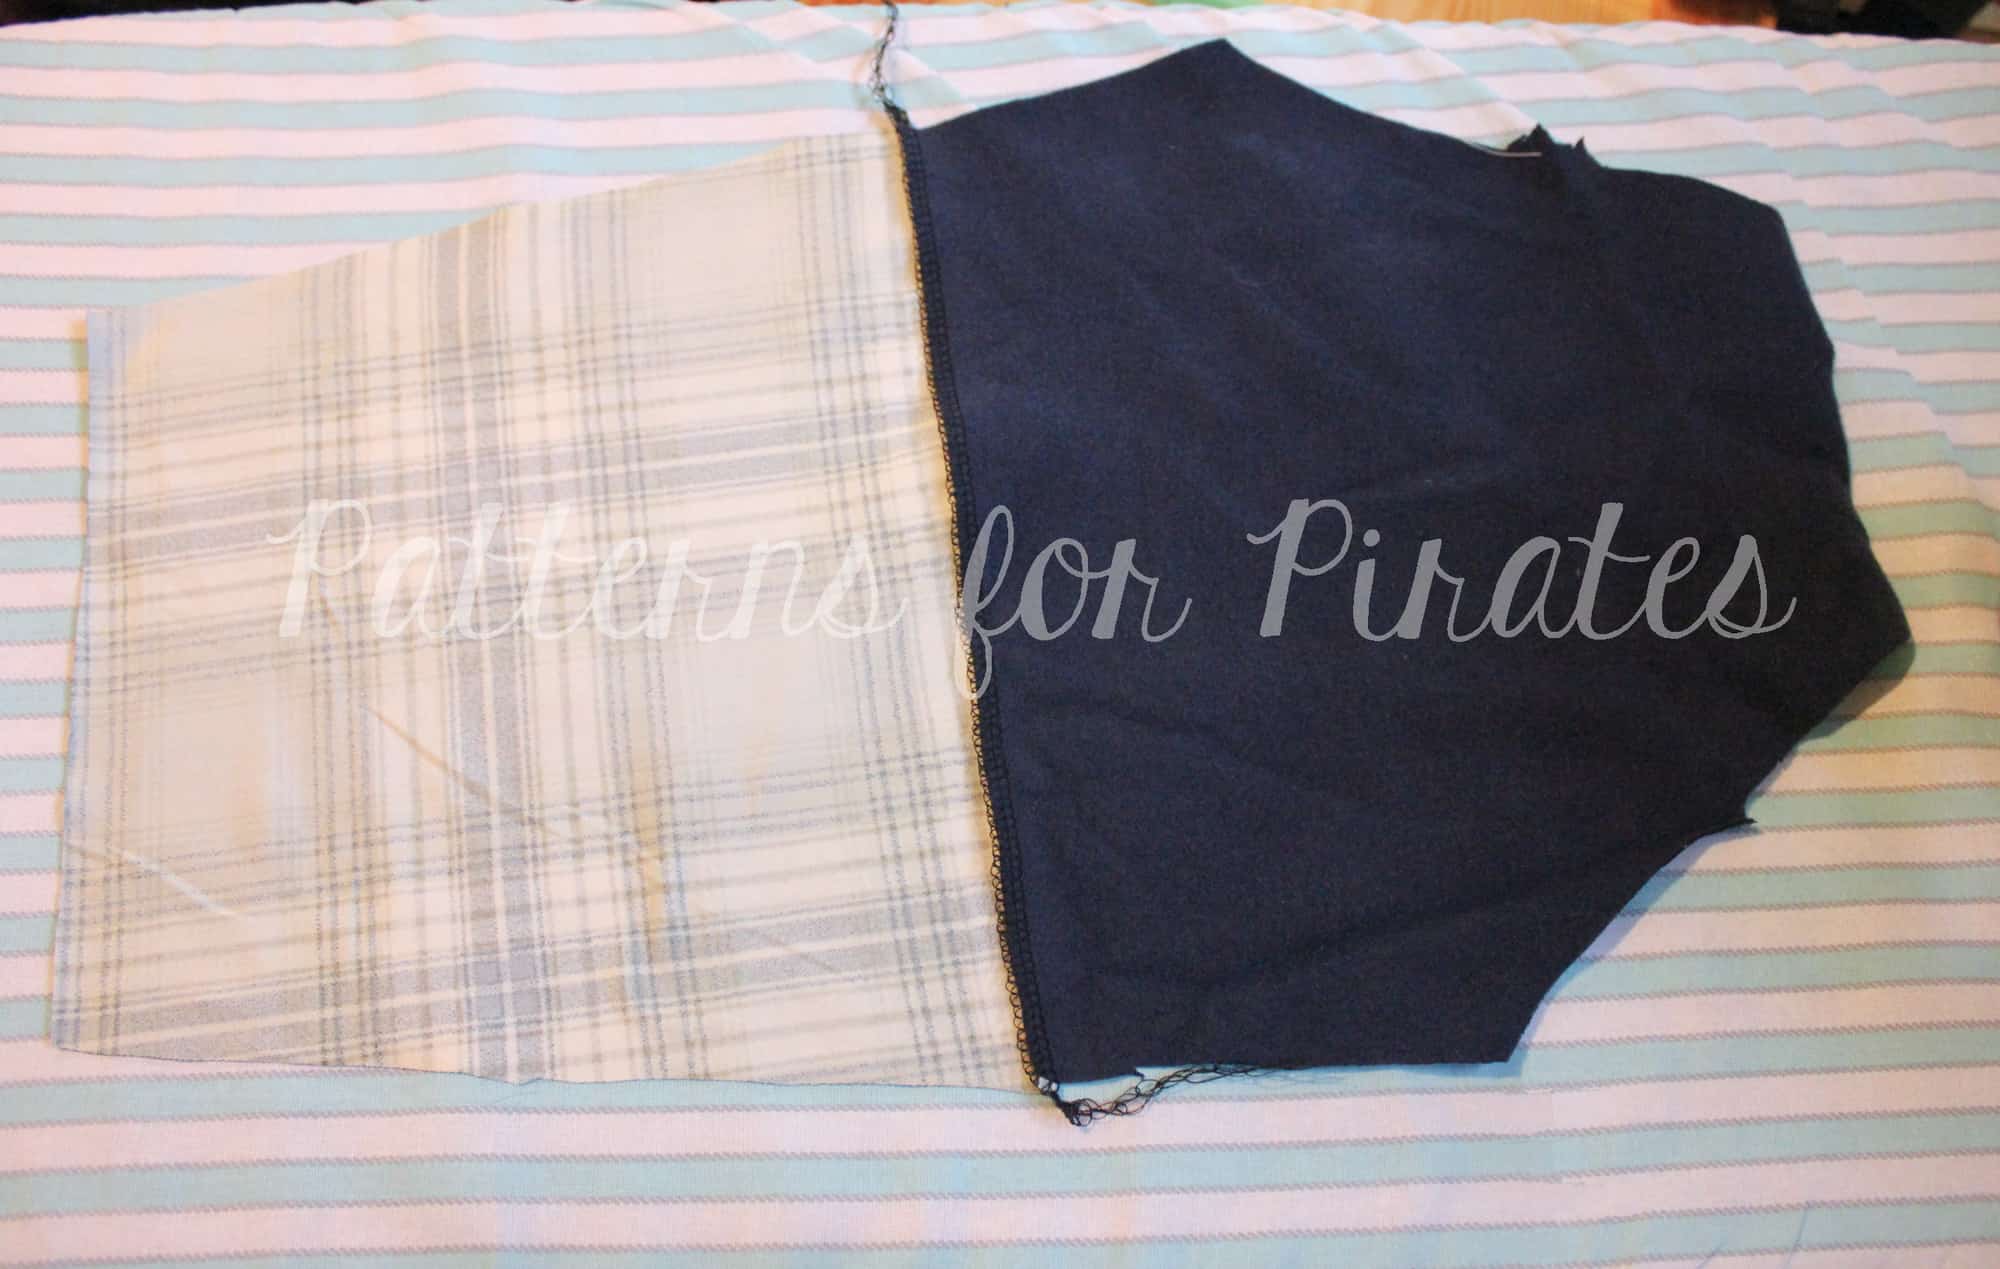
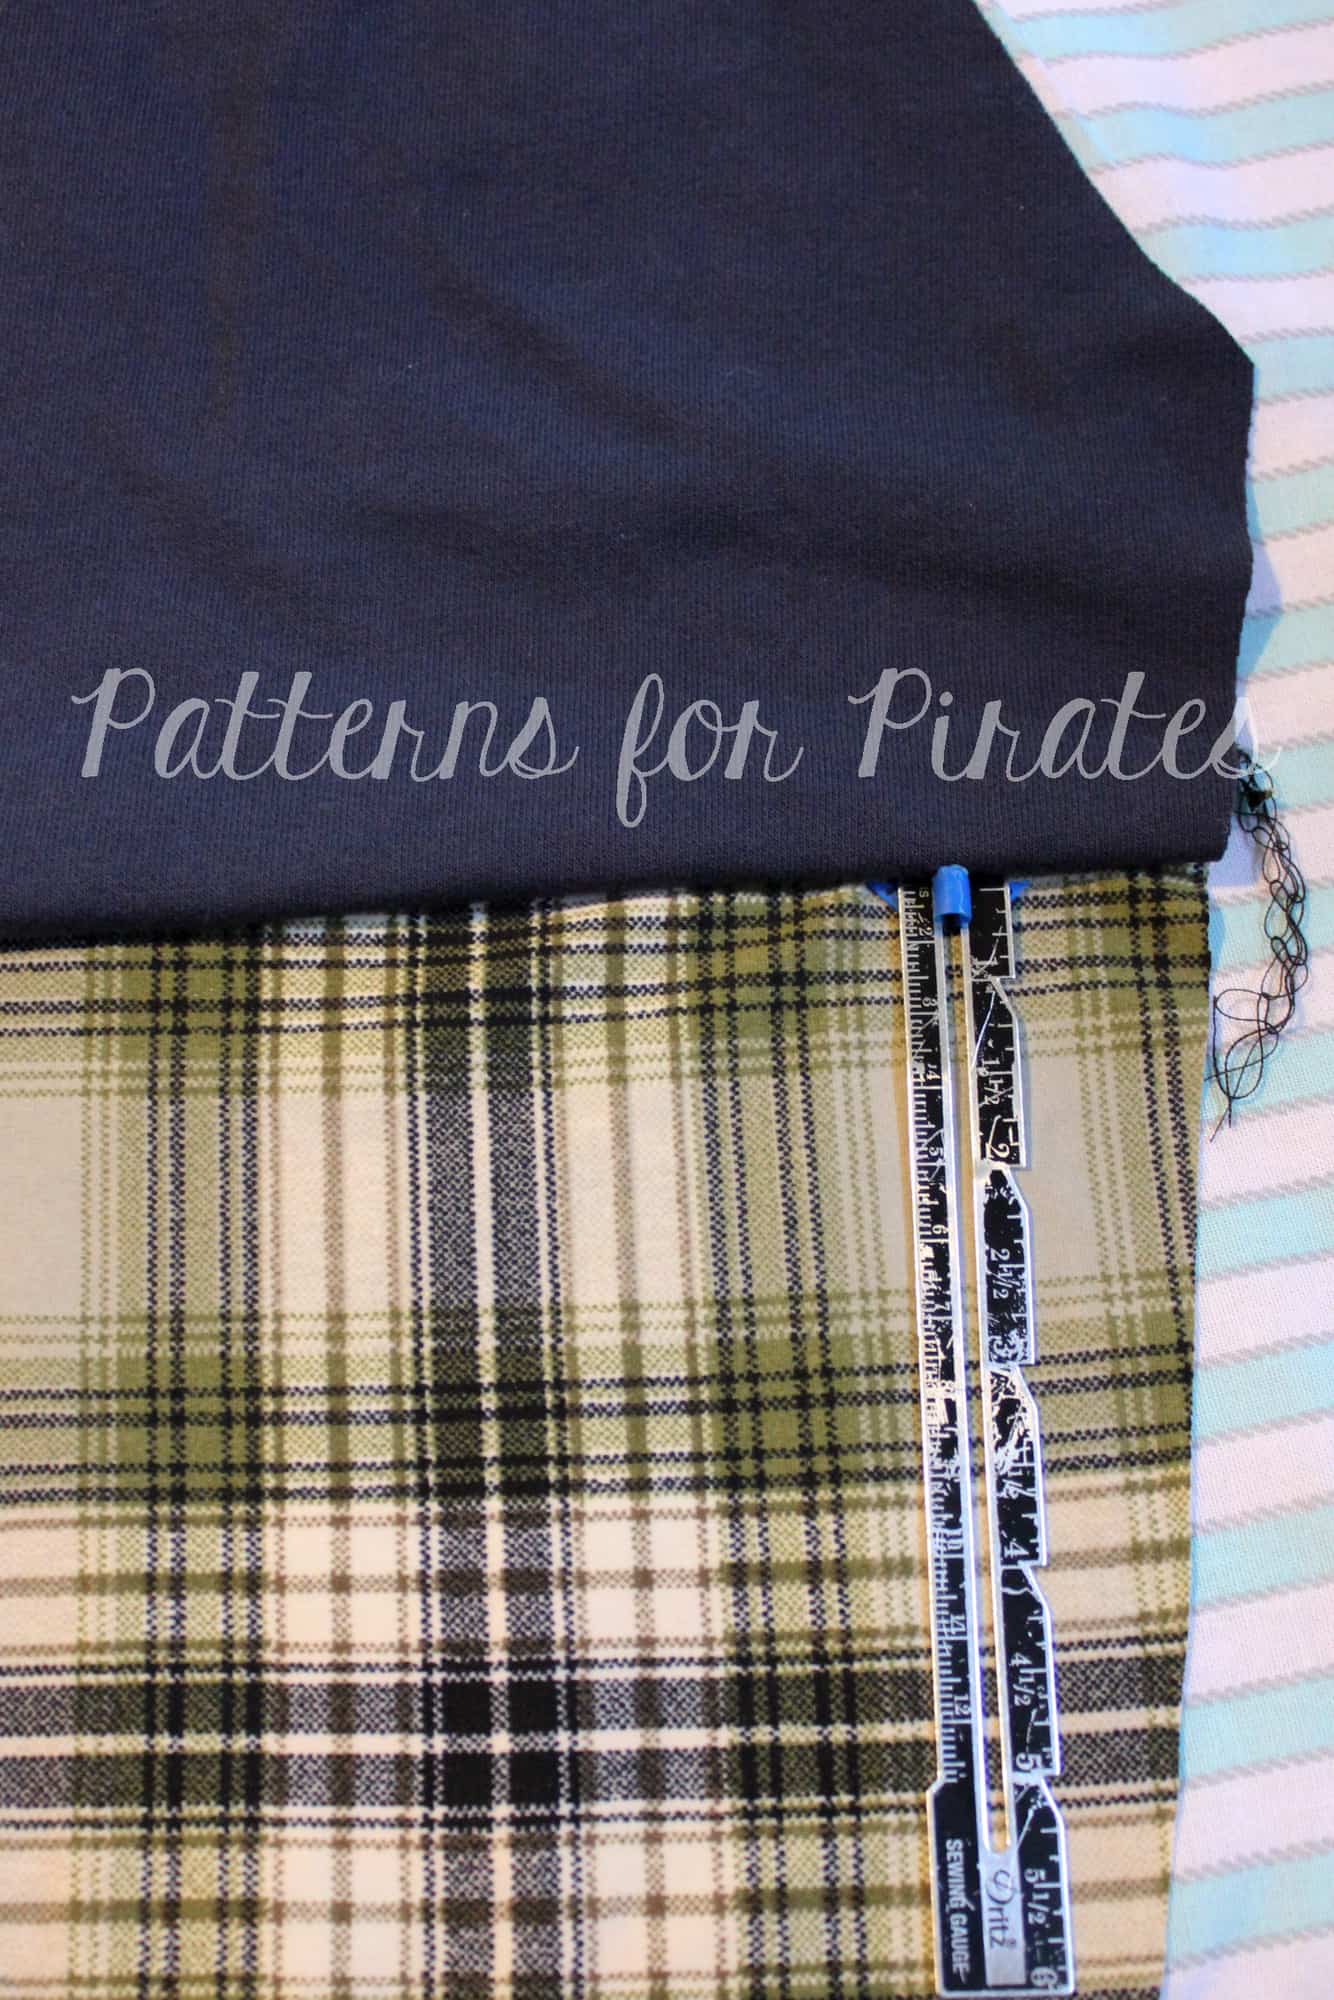
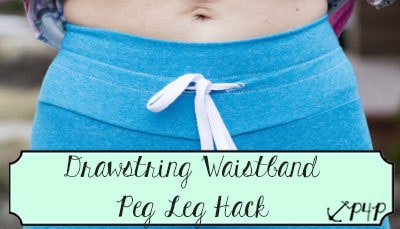
And if our pattern alone doesn’t provide enough options for you, we’ve also included a blog post that will help take your Oversized Sweaters to the next level!  Go check out our Easy Hacks Post to see how to make some slight alterations to the original pattern, to customize it even further!

The release sale (no code needed) will be through Saturday February 1 (11:59PM US Central Time Zone).

Happy Sewing, Pirates!

Filed Under: Pattern Release Leave a Comment

2018 Halloween Costume Contest :: The Winners!

November 2, 2018

Hi friends!  It’s me, Katy, your Halloween-loving Pirate Crew Member!  And I’m here to announce the winners of this year’s Halloween Costume Contest.

We asked our fellow sewists to share their costume creations from this year — and you can see the entire album in our P4P Facebook Group HERE.  They were all amazing and I couldn’t help but pick a few winners, instead of just one.  Because how do you really choose from all of these incredible feats of creativity?

No automatic alt text available.

I almost chose everyone as a winner.  But that’s not allowed, so here are the top three that stood out to me:

Simply Robo-dorable: Erika Tatiana Maldonado
Her Rosie Robot was created using almost only Patterns for Pirates patterns: Relaxed Raglan, Wiggle Skirt, & Peg Leg Leggings.

Image may contain: one or more people and people standing

The Ghost With the Most: Cecsalea Shae Buhles‎
This adorable mini-Beetlejuice was created using the Lumberjack Shirt, Yo Ho Henley, Little Loungers patterns.

Image may contain: 1 person, standing, stripes and outdoor

How Delightfully Tragic: Taryn Renae‎
I love a good family ensemble!  Tish Addams was brought to life by Taryn using the Wiggle Dress.

Image may contain: 5 people, people smiling, people standing and outdoor

Thank you so much to everyone that shared their creations with us!  I can’t wait to see what next year brings!

Filed Under: Contest/Giveaway 3 Comments

Faux Sleeve Hack

December 12, 2017

The Jolly Roger is probably one of the most used patterns in my son’s wardrobe! It’s fast, easy, and has lots of option to mix it up with the add-on pack. However, one of my favorite looks is a layered sleeve, which can be hard to accomplish when my son always wants to wear a sweatshirt! Enter- the faux sleeve! This hack is very easy to do and can also be used with other long sleeve patterns, including the Yo-ho Henley and Relaxed Raglan.

The only modification you will need to complete to achieve this look is to alter the sleeve. All other pieces will be cut out as directed and sewn as per the tutorial.

The first thing you will need to do is cut the upper sleeve piece. To do so, use the short sleeve cut line, however you will want to cut 1″ BELOW this line.  Don’t forget to cut two MIRROR image upper sleeve pieces! After cutting the upper sleeve pieces, you will cut out the bottom pieces. Using the same method, use the short sleeve cut line again, however cut 1″ above this line. Again, don’t forget to cut two MIRROR images. You will now assemble your sleeve pieces. Place right sides together and stitch using a 1/2″ seam allowance. Press your seam towards the upper sleeve piece.

Lastly, you are going to create your faux hem where the two pieces are connected. Using a hem gauge, overlap the two pieces by 1/2″ to create the hem and press, press, press with your iron. 

Pin the hem in place, then stitch using your favorite hemming stitch. 

You will now complete the rest of your Jolly Roger Raglan (or other shirt) according to the directions. Make sure that when you are sewing the sleeve and side seam, to align the faux hem as well.

Be sure to share your creations with us in our Facebook group and I can’t wait to see what kind of fun layering ideas you come up with!
~Erinn

Filed Under: Pattern Hacks Leave a Comment

50K Fan Celebration :: Drawstring Waistband PegLegs Hack

April 21, 2017

Today I’m sharing a quick cute hack to your peg legs to add a drawstring to your waistband.  I wear peglegs all year round and the drawstring changes up the look just a bit.  Let’s get started.

  1. First you sew your legs together as per the pattern.
  2. Before we start the waistband we are going to make some markings.  I am using a disappearing ink pen from my fabric store to mark mine.  I folded my waistband in half to find the center and marked the center with my pen in a few spots.  Next I found folded the fabric long sides together to mark where I wanted my buttonholes.  I wanted my buttonholes in the middle of my waistband. Your waistband is 7 inchs wide so folded it is 3.5 inchs but the bottom .5 inch is your seam allowance therefore I measured 1.5 inchs down from the top fold and marked that as being the center right across the other mark that I had made.  Now I have a little cross right marked.

3. Buttonholes can be a bit of a pain on knits so I added a little piece of interfacing on the back, I didn’t actually iron it on to my fabric I just wanted something to give it a bit of stability, a tear away stabilizer would also do the trick or you can iron on a piece of knit interfacing.  I happened to have a bit of regular interfacing sitting here so that is what I used. I sewed the buttonholes on either side of my cross .25 inch from the center. I just did a really small buttonhole, it doesn’t need to be big cause you are just threading through some drawstring.  Now for all those people that hate sewing buttonholes not to worry knits don’t fray so you can always just cut some little slits in the waistband if that is the option you choose make sure to iron on some knit interfacing thou, it would prevent the knit from stretching out while wearing them.


4. Once you have the buttonholes are done we are going to create a casing for your drawstring.  First you are going to match the short sides of your waistband as the pattern directs and sew them together, fold the waist band in half and then your going to sew all the way around about .25 of an inch above the waistband and below the waistband. Now you can mark your lines here that you are going to sew but I’m a rebel and just went for it by sewing 1.25 inchs from my fold, for the second row of stitching I sewed .5 down from the first line I made.  Once your casing is all done just attach the waistband to your legs as normal.

5. Now you just need to add your drawstring.  I used 50 inchs of drawstring on the xxs size and I just tied off each end but you could certainly fold the ends over and hem the edges of your drawstring.  I like to just put the drawstring around me and leave long tails and then insert it into my casing try it them on and you can always cut the drawstring shorter so start with a long piece and then cut them the length you like best.  Remember you have to leave your drawstring fairly loose or you won’t be able to pull your leggings on! I figured this out while trying mine on! Another simple solution to use elastic for most of your drawstring, I would use 1/4 inch or 3/8 inch elastic.  You could cut your elastic slightly shorter then your drawstring and then sew drawstring onto each end of your elastic and thread it through your casing, it would give you just a bit more give when pulling them on and off.


I hope you try adding some drawstring in your peglegs and don’t forget to show them off in our Facebook group! – Angela


We are celebrating reaching 50K fans in our Facebook group!  To make it a party, our beloved PegLegs pattern just got an update AND some new add-ons.  Before you go running to your machine to sew up your own leggings, make sure to read our PegLegs 101 blog post.  This way, you’ll have all the the information you’ll need to make the perfect pair before you even cut into your gorgeous fabric.

But wait, there’s more!  After any good party is an after-party.  We are taking it one step further and sharing some easy hacks that’ll bring even more flavor to your favorite leggings pattern!  We hope you check them out, make your new favorite pair of leggings, and know that we appreciate every single one of you amazing sewing guys and gals!

Here are our hacks / tutorials / latest tricks:

Lace Waistband Alternative | Drawstring Waistband Tutorial
Exposed Elastic Waistband | Stirrup Pant Hack
Ruched Ankles Adjustment | Decorative Topstitching Tutorial
Ruched Side Panel Hack

Filed Under: Free Pattern, Pattern Hacks, Uncategorized 1 Comment

Spring Mini Capsule Sewing & Contest

March 27, 2017


Hey ya’ll- Judy’s sister, Megan here from Made for Mermaids! Judy and I have been talking about how badly we needed to start sewing warm weather clothes. Our kids have simply outgrown all their Spring (aka Summer in Dallas 😉 ) clothes. While we are constantly sewing for new pattern releases, most the time we’re using prints to show in tutorial and testing photos. Many times pieces end up not making any sense in our wardrobe and I find myself wearing the same staple, simple tops I have in my closet over and over. We decided a mini capsule was the perfect solution!

What is a capsule wardrobe? 

It’s a wardrobe made up of really versatile pieces that you completely LOVE to wear. Pieces that are simple; they can be mixed, mashed and worn several different ways. It’s about quickly and effortlessly being able to put an outfit together.  Now a full capsule wardrobe is made up of jewelry, shoes, accessories, everything you need to wear on a day to day basis. What we’re going to be doing is sewing 9 staple pieces for your closet. I’m trying to sew 3 mini capsules… I know I know, but we really need these so I’m hoping I can get them all done! One for myself, one for my daughter and one for  my son. 

How do you plan capsule sewing?

This will be different for everyone, depending on where you live, lifestyle and personal preferences. I can tell you how and what I have chose for our mini capsules. I love to have a board to help me plan. The visual really helps me be able to put it together exactly how I want. Don’t worry, I have FREE Photoshop templates if you’d like to make your own with photos or text. You can also use picmonkey or another editing/collage type site to help you. If you need directions on how to use the template, check the bottom of this post. Simply click each link below and they will download.

M4MWomensCapsuleTemplate

M4MGirlsCapsuleTemplate

M4MBoysCapsuleTemplate

First I decided what pieces I wanted to sew. I looked in my closet (and kid’s) and tried to see what was missing. Now I just typed these out, but you can do more of a suduko style where each row and column make an outfit, so you can REALLY make sure all your pieces can be worn together.

How do you choose patterns?

I choose patterns a few different ways.

1- What do I LOVE to wear and feel GOOD in? What do I find myself always pulling out of the dryer to wear again? Same for my kiddos. I find them asking to wear the same shirts and dresses all the time.

2- What is my wardrobe lacking? Do I need shorts, tanks, tees? We moved last Fall and my daughter’s new school dress code is much more strict than her last. She can’t wear any sleeveless tops or dresses, which throws out 90% of her Spring wardrobe from last year. I know I sound like a broken record…  but it’s HOT here in Dallas so I plan on making her a LIGHT cardi to be able to throw over tanks.

3- What will work with the warmer weather? Luckily for both M4M and P4P most our patterns have tons of options with different sleeve and hemlines that can be worn year-round 😉

How do you choose fabrics?

What makes capsules great is they are no fuss. So you don’t want to choose fabrics that clash, but rather coordinate and compliment each other. Think solid or solid-like fabric for most of your mini capsule. What am I talking about with “solid-like”?? A print that reads as a solid to blend the other fabrics together and something that coordinates with the focus fabrics. Think subtle: stripes, dots, heathered, burn-outs, etc. Also think about using different textures, so even if the fabric is solid or plain, it looks different against another piece. Choosing different types of fabrics will help your wardrobe not look or feel too bland. Remember to think about the weather and choose fabrics that won’t feel too warm. I know you know, by now that Dallas is HOT 😉 so I like to use ITY, rayon spandex, rayon challis, georgette, model, bamboo jersey, chiffon and light, open weave sweater knits when moving into warmer weather.

Here is Judy’s mini capsule fabric laid out for her Little Guy!  He’s old enough that he wanted to help pick! So, lots of superheros going on, which he considers a neutral 😉 She managed to keep in within a color scheme to help the tops and bottoms coordinate with each other.

How does the contest work?

We have several random participant prizes for you! To enter, all you need to do is sew a 9 piece mini capsule using all M4M and/or P4P patterns…now if you already have a favorite, staple piece you’ve sewn from one of our patterns and MUST have it in your capsule, that’s ok. They can be mash ups or a combo of our patterns. Then post your final capsule in our FB groups (P4P and/or M4M). The final post must be in a collage format. You can also share on Instagram, Pinterest, Twitter or other sewing/fabric FB groups. You MUST use the hashtag #sewminicapsule and we would love if you would tag M4M and P4P, and use #madeformermaids and/or #patternsforpirates . If you don’t use the hashtag we won’t be able to find your entry! You can sew multiple capsules for yourself and little one/s for more than one entry. Contest ends April 10th. We will have 12 random winners, open to international friends. Are you ready for prizes??

5 winners will get 1 pattern of choice from EACH P4P and M4M.

3 winners will get 3 patterns of choice from EACH P4P and M4M.

1 winner will get a $50 store credit to Sincerely Rylee Fabric Shop.

1 winner will get a $50 store credit to Pretty Posh Prints.

1 winner will get a $100 store credit to Knitpop.

Our grand prize winner will get their choice of a Brother Coverstitch 2340cv OR $100 gift card to Joann Fabric!

We can NOT wait to see what you make! If you have questions, need advice, inspiration, make sure to post in our FB groups, (P4P or M4M) we would LOVE to see what you’re sewing for your capsule!!
How to use the Photoshop templates-

Open file in Photoshop. Download all the photos you may want to put on your board. Click on the layer that says ‘Place Photo Here’. Click “File”, “Place” and then choose the photo you’d like. You can resize the photo by holding Shift and dragging the corners. Repeat with each box. Then save as a photo file so you can share with us!

If you want to just add JUST text to the board, click on the layer that says ‘Place Photo Here’ then add your text there for each box.

If you want to add text on top your photo, add a new layer above the layer that says ‘Place Photo Here’. Then add your text there for each box.

Want some inspiration?? Check out these boards from our team and/or blog contributors!


Filed Under: Contest/Giveaway 17 Comments

P4P Raglan Week: Woven Front Hack

September 20, 2016

Welcome back for Day 2 of P4P Raglan Week!  Now that you’ve all grabbed your copies of the Jolly Roger Raglan and the Add-On pack for it, I’m here to share an easy “hack”!

raglan-week-day2

I love being able to make fun shirts for my son.  However, I don’t always love having to spend the money for fancy knit prints, or having to search high and low for something that is geared toward the interest of my 6-year old.  How to do I get around it?  With fun, WOVEN cotton prints, from my local fabric stores!  They are money savers and tend to have a million fun prints that are loved by my little guy.  Want to know how I manage to mix a woven fabric into a knit pattern?  It’s so simple!

jolly-roger-hack-002

No adjustments are needed for the pattern pieces itself.  Out of your knit fabrics cut your neckband, sleeves and back panel as the pattern calls for.  And for the front, simply opt in your woven print instead of a knit!  It’s as easy as that!  Because of the way raglan sleeves are attached, they still provide enough ease, stretch, and room for the shirt to fit over your little’s heads.  And the Jolly Roger Raglan has enough of a relaxed fit that there isn’t any need to add extra space in the body.  Easiest hack ever, am I right?

jolly-roger-hack-004

Create your raglan as the pattern calls for.  I always use a serger to finish the bottom hem of my woven-front raglans, but you don’t have to.  I just like having that serged piece for a sturdier grip when I’m turning the edge under 1/4″ and then another 1/4″ before I edge stitch the hem.  You are welcome to finish the bottom edge however it suits you the best.

jolly-roger-hack-006 jolly-roger-hack-007

Be sure to press your fabric and then have your child wear it (to distract them while you make a million more).

jolly-roger-hack-008jolly-roger-hack-020

If you’ve created your very own woven-front Jolly Roger during P4P Raglan week, we would love for you to share it with us!  Head over to the Facebook Group or share on Instagram.  And be sure to use the tag #P4PRaglanWeek so we can find you!

Curious about what else has been happening during our raglan-loving week of fun?

Just take a look at our schedule!

Monday, September 19: Jolly Roger Raglan Pattern Update + Jolly Roger Add-On Pack Pattern Release

Tuesday, September 20: JRR Woven Fabric Hack

Wednesday, September 21: JRR Animal Faces Add-On

Thursday, September 22: Contrast Band Hack for Kangaroo Pockets

Friday, September 23: Women’s Keyhole / Scoopback Raglan Hack

Saturday, September 24: Off-The-Shoulder Raglan Hack

Sunday, September 25: Adding Stripes to Your Raglan Sleeves

Filed Under: Pattern Hacks, Uncategorized 4 Comments

Lumberjack Shirt :: Sleeve Hack

December 12, 2015

Sometimes, I want/need to make a new dress shirt for my kiddo but I want to make it as quickly as I can.  The collar and button plackets take enough time as-is, so the only thing I can truly eliminate (and save time on) is the cuffs.  Most of the time, Louis is pushing and rolling his sleeves up anyway, so I thought maybe I could cut some corners and give him a shirt with the rolled up sleeve look.  It’s cool and casual, but still has a “dressy” appeal to it.  I love the entire look and idea of it.

P4P-lumberjack-sleeve-hack-002

First, you will need to get your hands on the Lumberjack Shirt pattern.  If you don’t own this yet and you have a little person in your life, you should probably get on that.  The Lumberjack is great in that it can be made lined, with a hood, and be this super awesome fall/spring jacket.  Or you can make it unlined and with a collar and have yourself a custom-fit buttondown shirt.  I’ve done both versions plenty of times now.

To achieve the faux rolled sleeve, it’s just a few easy steps.  Promise.

After cutting out all of your pieces (you won’t need the cuff or placket!), per the pattern’s instructions lay out your sleeve pieces and take two inches off of the bottom edge.  Why?  Because when you roll the sleeves, it is tighter at the bottom and it might be too snug.  Even with those little arms that are fitting into the top.

P4P-lumberjack-sleeve-hack-013

Sew the shirt as you the instructions direct you.  When you get to the cuff/sleeve part, all you’ll need to do to finish the sleeves themselves is a simple three step process.

#1: Finish the edge.  Serge it or do a small rolled hem.  Anything to keep the edge from fraying, as it will not be fully enclosed.

P4P-lumberjack-sleeve-hack-014

#2: Turn the edge up 1/4″ and press.

P4P-lumberjack-sleeve-hack-015

#3: Turn the edge up 2″, but do not press.  You want this to allow the “rolled up” look of the sleeve.  Once rolled, hand tack the sleeve in two places (I chose the arm seam and directly opposite of it).  The tacking will help the sleeve stay in place but still allow for the look to be pulled off.

P4P-lumberjack-sleeve-hack-016

Finish the rest of the shirt as instructed.  And then sit back and enjoy the new beauty you just created.

P4P-lumberjack-sleeve-hack-017P4P-lumberjack-sleeve-hack-018
I adore how the simple change of sleeves moves from a more formal shirt to something more casual.  It’s such a fun look for a little dude, especially one who is singing in a Christmas concert at his school.

P4P-lumberjack-sleeve-hack-006P4P-lumberjack-sleeve-hack-004

Followed one of the hacks shared on this site?  Or maybe you came up with something of your own?  We are DYING to know!  Share your latest make on the Patterns for Pirates facebook group and let us see.

And while you’re at it, make sure to pick up your very own copy of the Lumberjack Shirt.  Happy sewing!

Filed Under: Pattern Hacks Leave a Comment

Featured Patterns

  • Mae Top - Bundle Mae Top - Bundle $20.00
  • Mae Bottom - Bundle Mae Bottom - Bundle $20.00
  • Loosey Goosey - Bundle Loosey Goosey - Bundle $20.00
  • Bacall Bodysuit Bacall Bodysuit $12.00
  • Privacy Policy
  • Refund Policy
  • Affliliate Program
  • Contact Us
  • About

Copyright © 2025 Patterns for Pirates

Copyright © 2025 · Genesis Framework · WordPress · Log in