Protected: Fabric for Pirates :: May 2024 Reveal
New Pattern Release :: Palm Springs Swimsuit
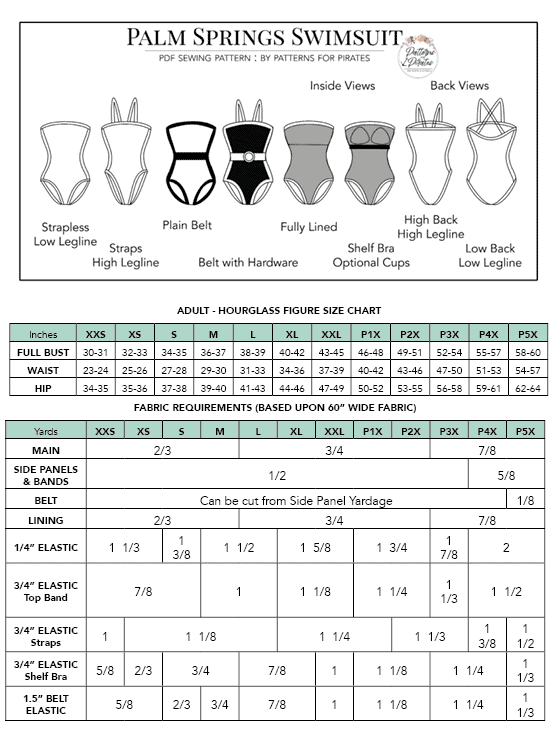
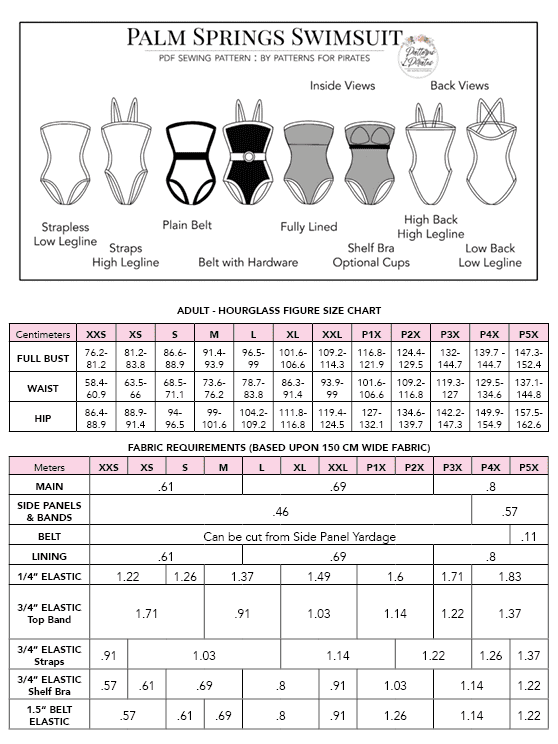
Splish Splash… the newest swimsuit pattern is here and ready for this summer! The Palm Springs Swimsuit is a classic looking one piece suit that will always look stylish.
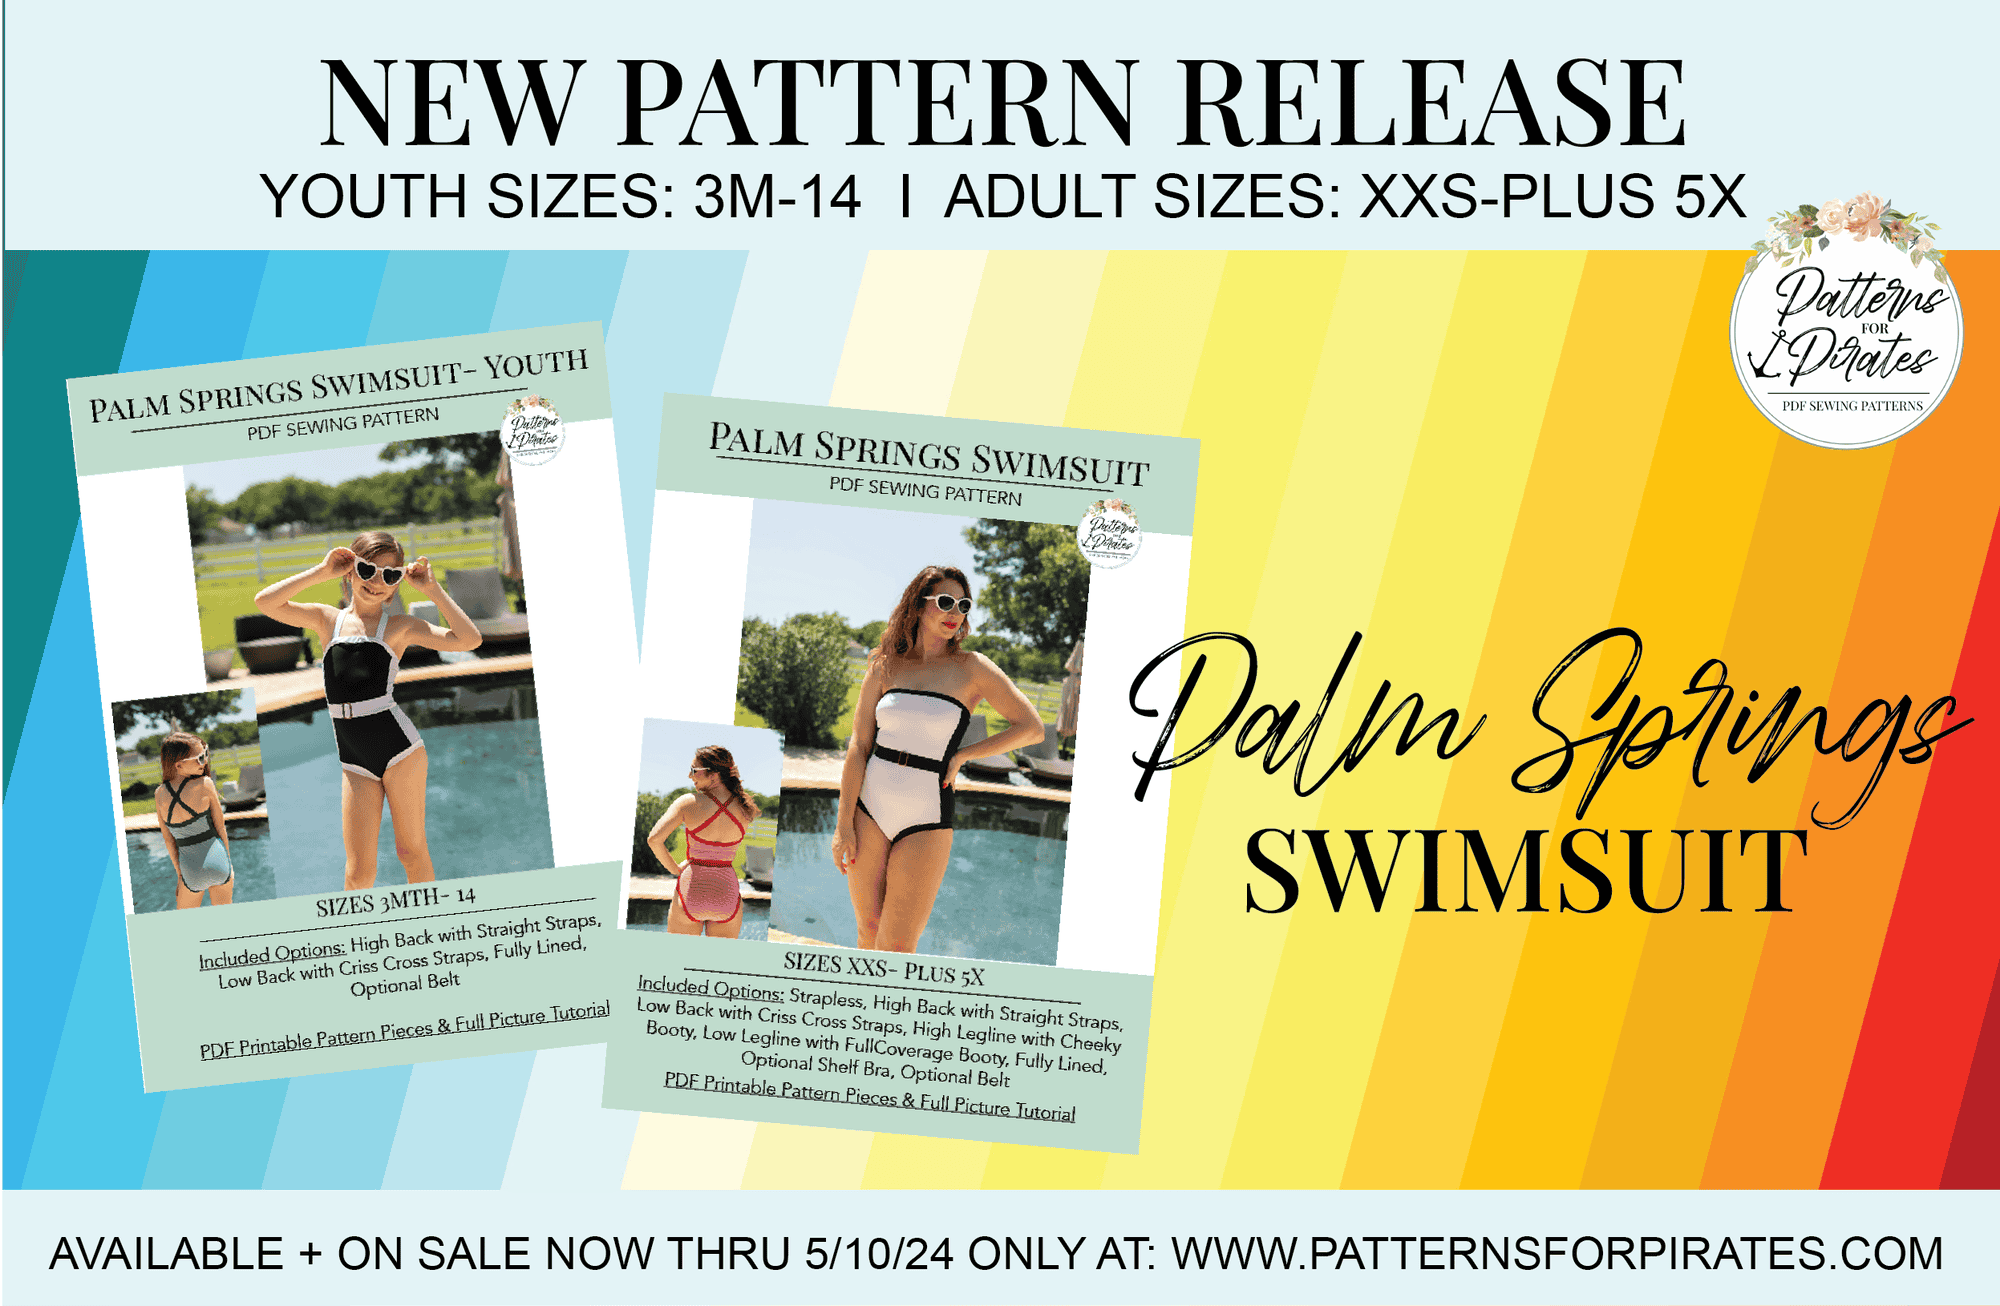
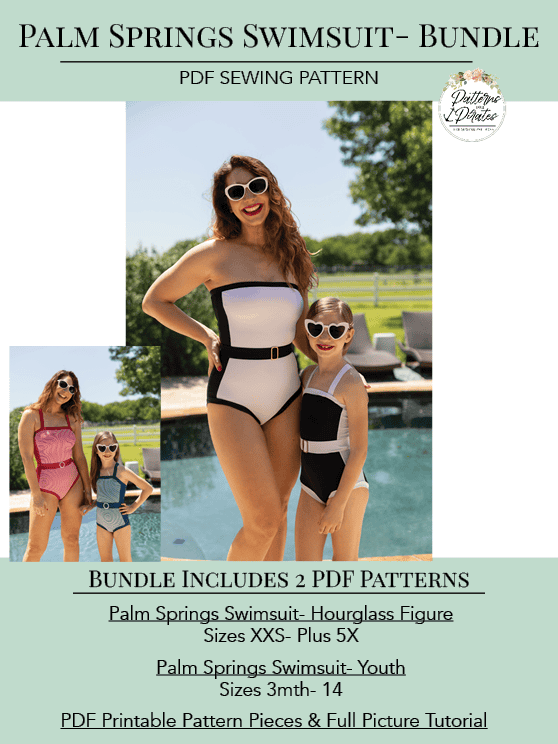
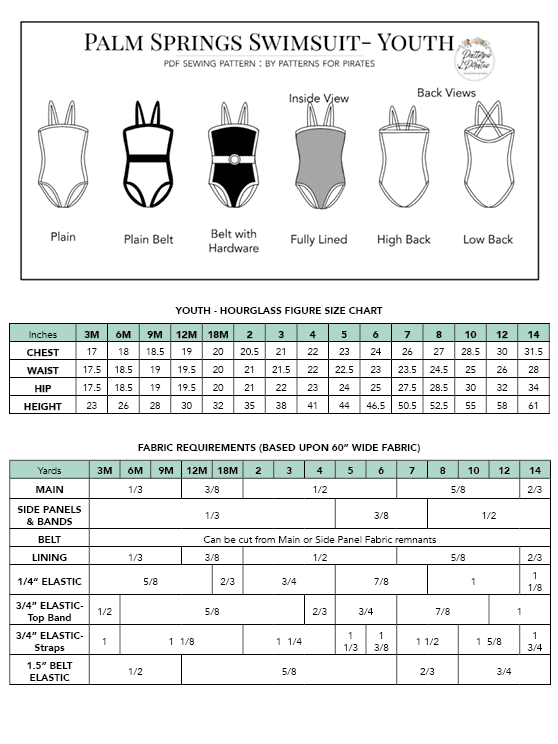
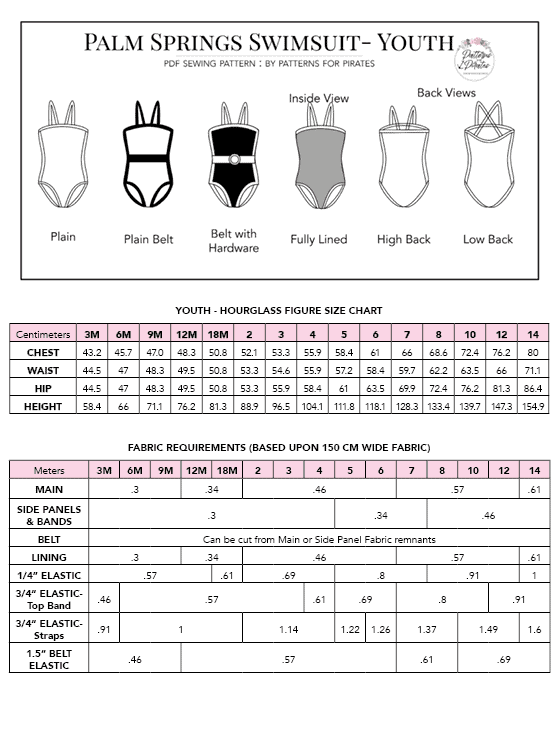
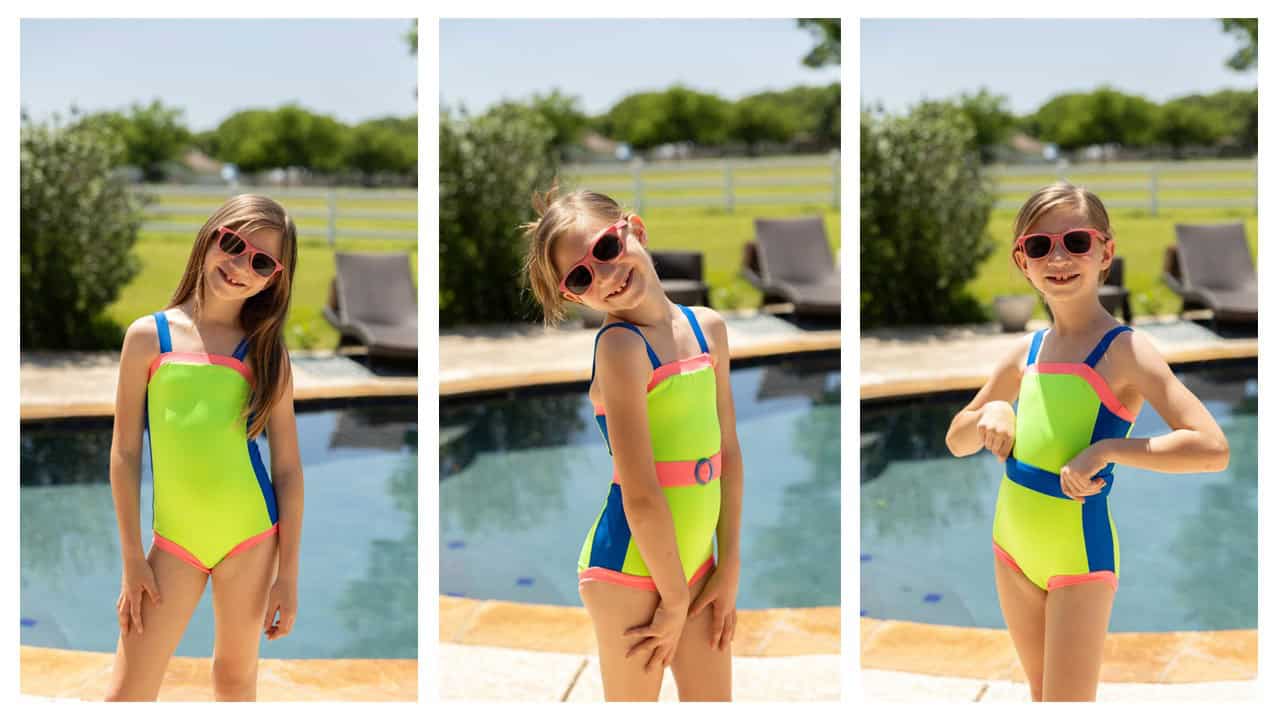
The youth sizes range from 3m – 14 and the adult sizes are for the full, newer size chart, extending from XXS – Plus 5X for the Adult Hourglass Figure.
- *Want to learn more about how to measure yourself for these pattern? We’ve got you covered with an in-depth blog HERE. And for even more helpful fun, we have a free* printable that you can use to help record your measurements as you take them.
- And in case you’re new to Patterns for Pirates and PDF patterns in general, we have a great blog full of new-user tips HERE to help you get started!
- As with all of our current releases and updates, the pdfs now include our layers feature and can be found in Letter, A4, A0 and projector sizes.
- We’ve also got an excellent planning tool for you with our Coloring Pages. It’s a resource that is updated with every new pattern addition, this pattern included!
- Need a way to keep track of the P4P patterns you have? We’ve gone through all of our patterns and created an interactive PDF for you! Grab your copy HERE.
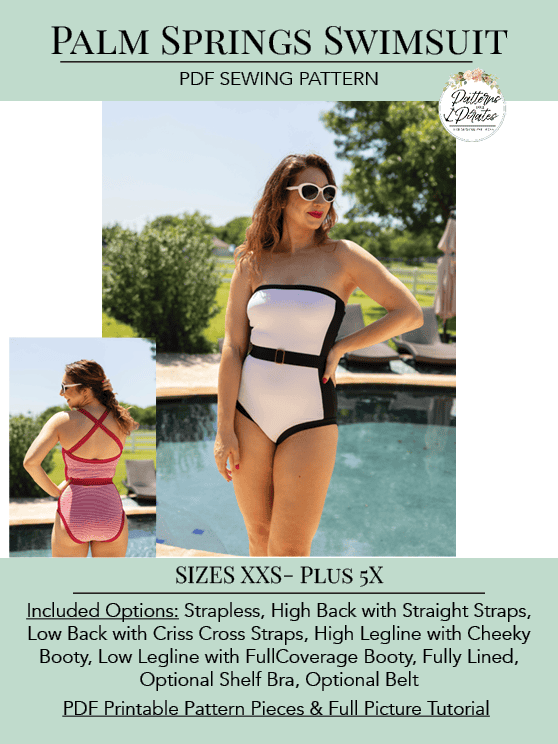
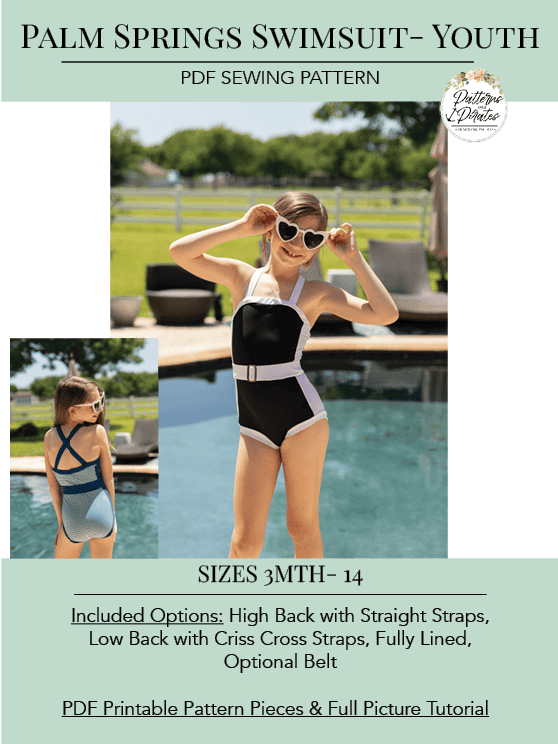
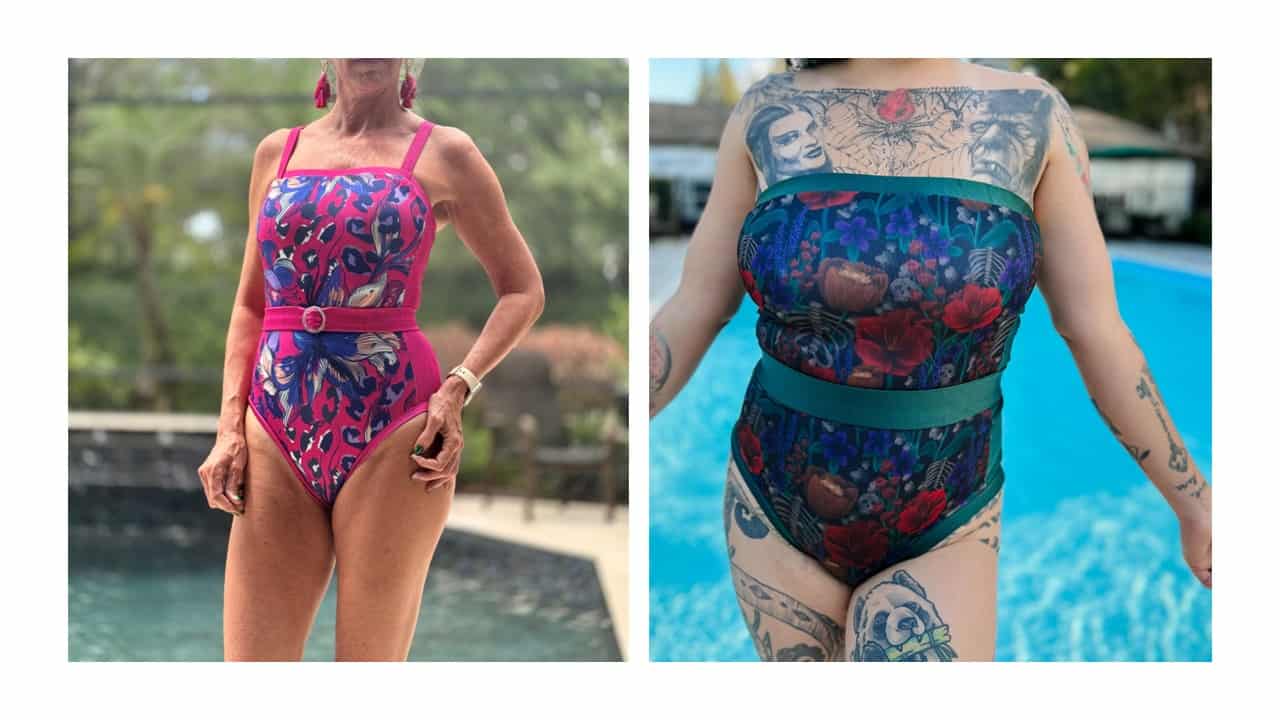
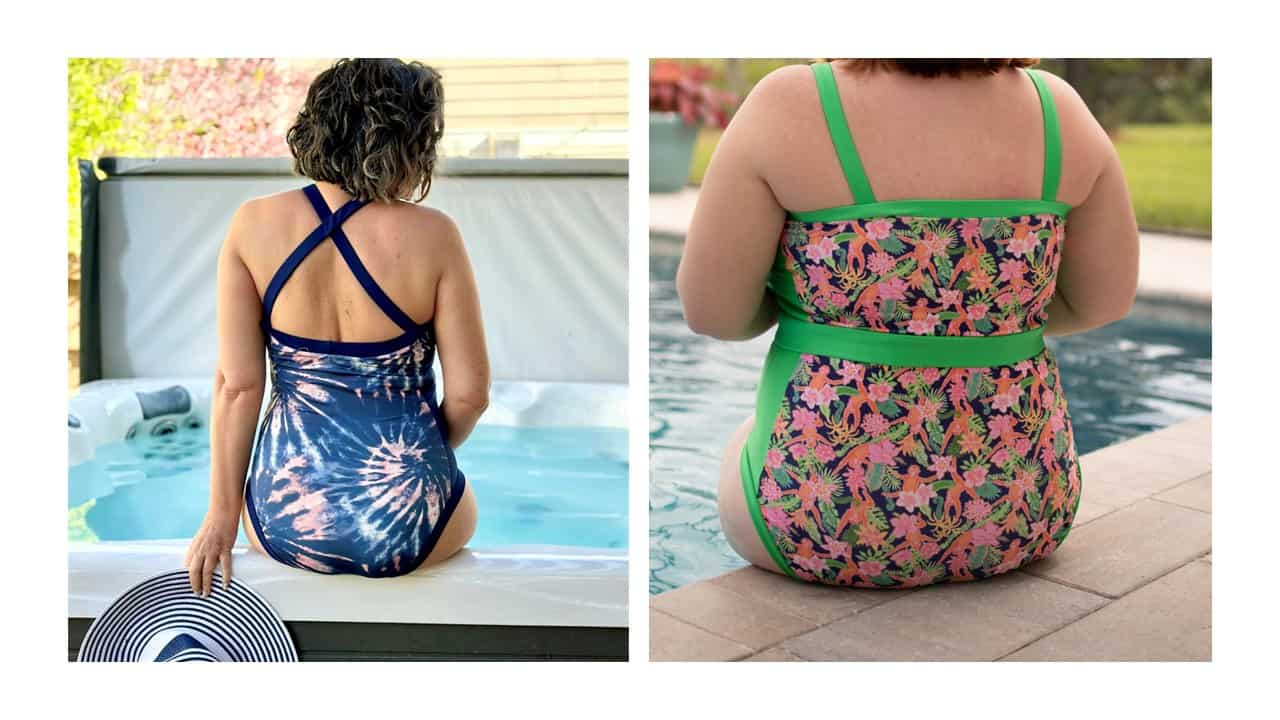
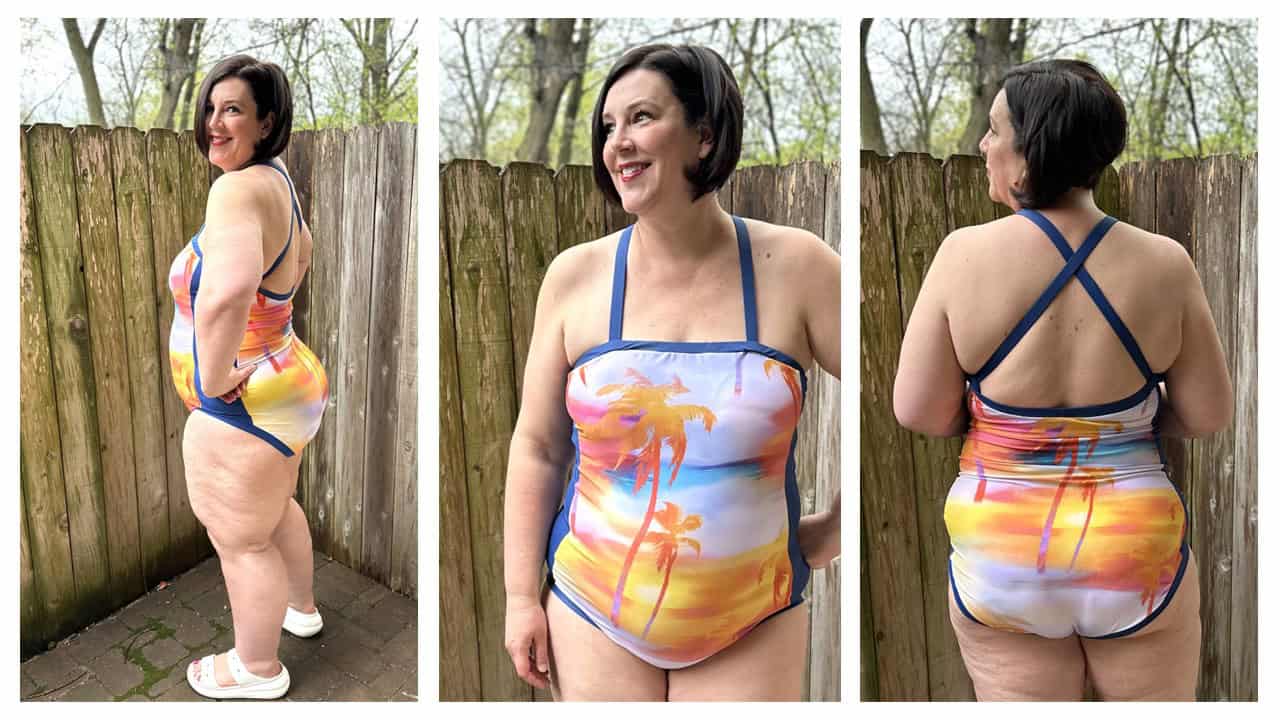
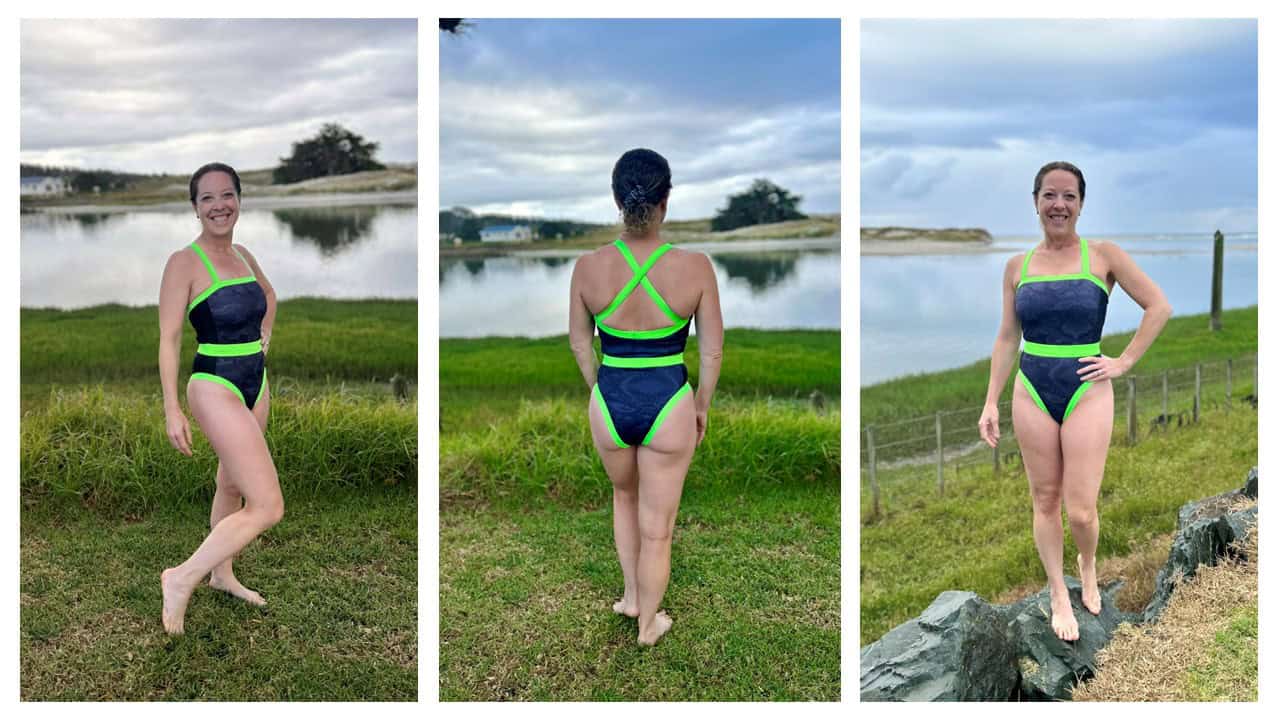
The Palm Springs Swimsuit is a classic look that is comfortable to wear and chic enough for any setting. Sew up a lounging suit with strapless option for tanning those shoulders or choose a strap options so you can run around the beach. The thicker strap style is comfortable and supportive. It is fully lined and includes an optional shelf bra as well. The side panels are a fun way to mix some colors and prints. You can choose from a high back with straight straps or a lower scoop back with criss cross straps for different back looks. You can pick a low legline that has fully booty coverage or go with the high legline and have a cheekier look. The belt makes a fun statement that you can move around to the most comfortable spot for you personally and remove when not in the mood for it.
Pattern options for the Palm Springs Swimsuit includes:
- Necklines: High Back / Low Back
- Straps: High Back (Straight) / Low Back (Criss Cross) / Strapless (Adult only)
- Leglines: Low (Full Coverage)/ High (Cheeky- Adult only)
- Optional Belt
- Optional Shelf Bra: Adult Only
- All Fully Lined
Specific Fabric Suggestions: Swim knit
We obviously wouldn’t leave you hanging without showing you some of the different options in the patterns!
FRONT VIEWS: STRAPLESS (ADULT ONLY) + STRAPS
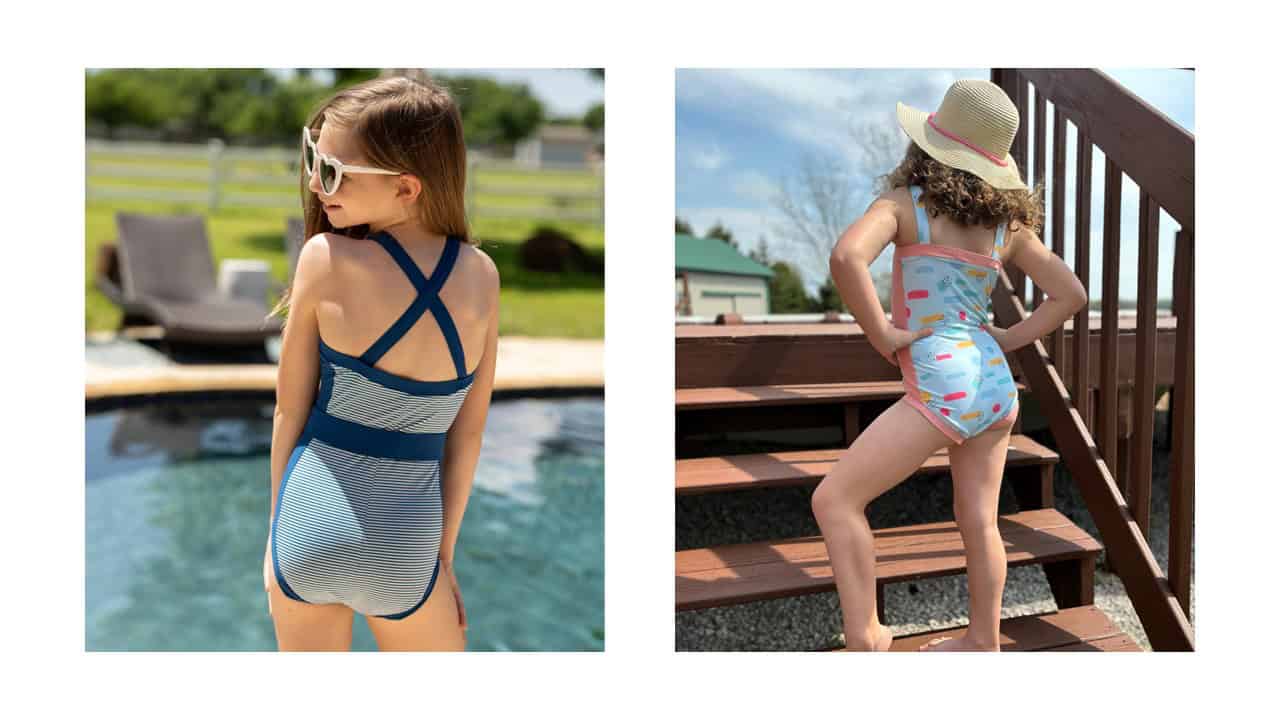
BACK VIEWS: LOW BACK, CRISS CROSS STRAPS + HIGH BACK, STRAIGHT STRAPS
BACK VIEWS: (ADULT ONLY) LOW BACK, STRAPLESS + HIGH BACK, STRAPLESS
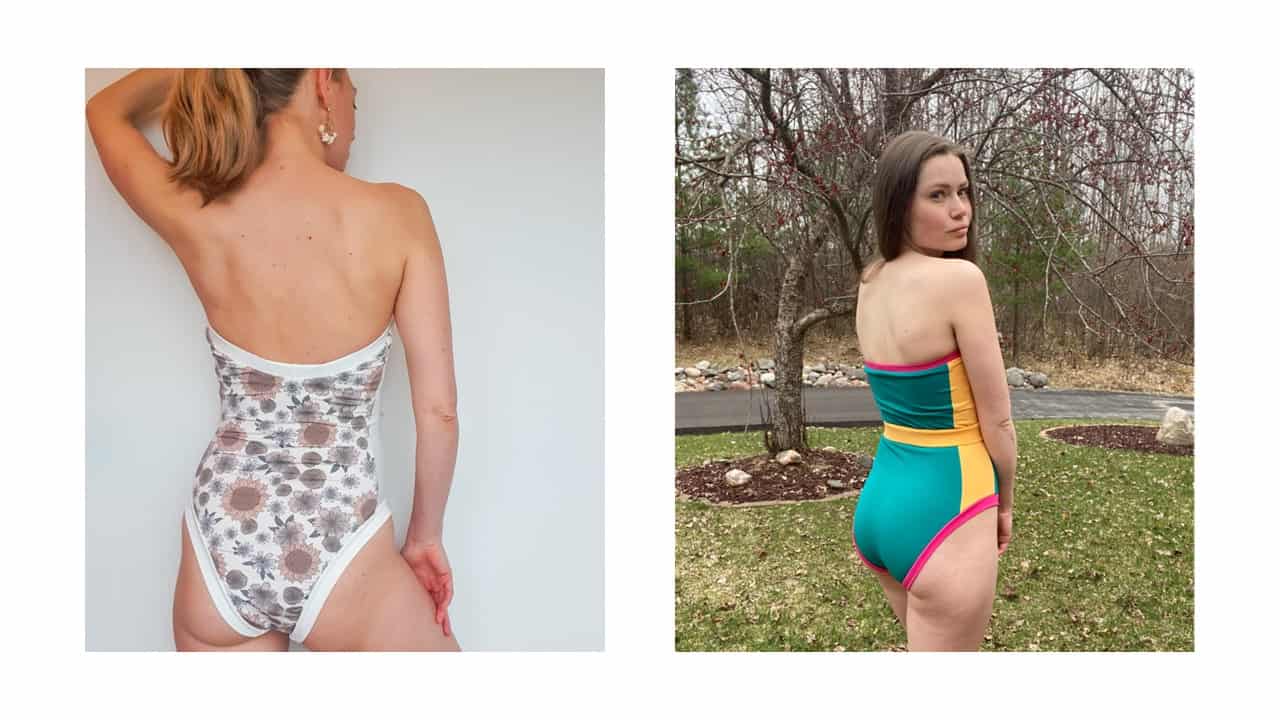
FRONT VIEWS: LOW LEGLINE + HIGH LEGLINE (ADULT ONLY)
OPTIONAL BELT

FULLY LINED + OPTIONAL SHELF BRA
We are so excited to see what you make with the new Palm Springs Swimsuit patterns! Both patterns are available now and on sale (no code needed) through 11:59pm CST, May 10, 2024.
Grab your copy of the Palm Springs patterns here: Palm Springs Swimsuit | Palm Springs Swimsuit – Youth | Palm Springs Swimsuit – Bundle
As always, we’ve got more photos for you to use as inspiration! Head over to the Facebook group to browse our albums full of gorgeous photos, compliments of our tester team!
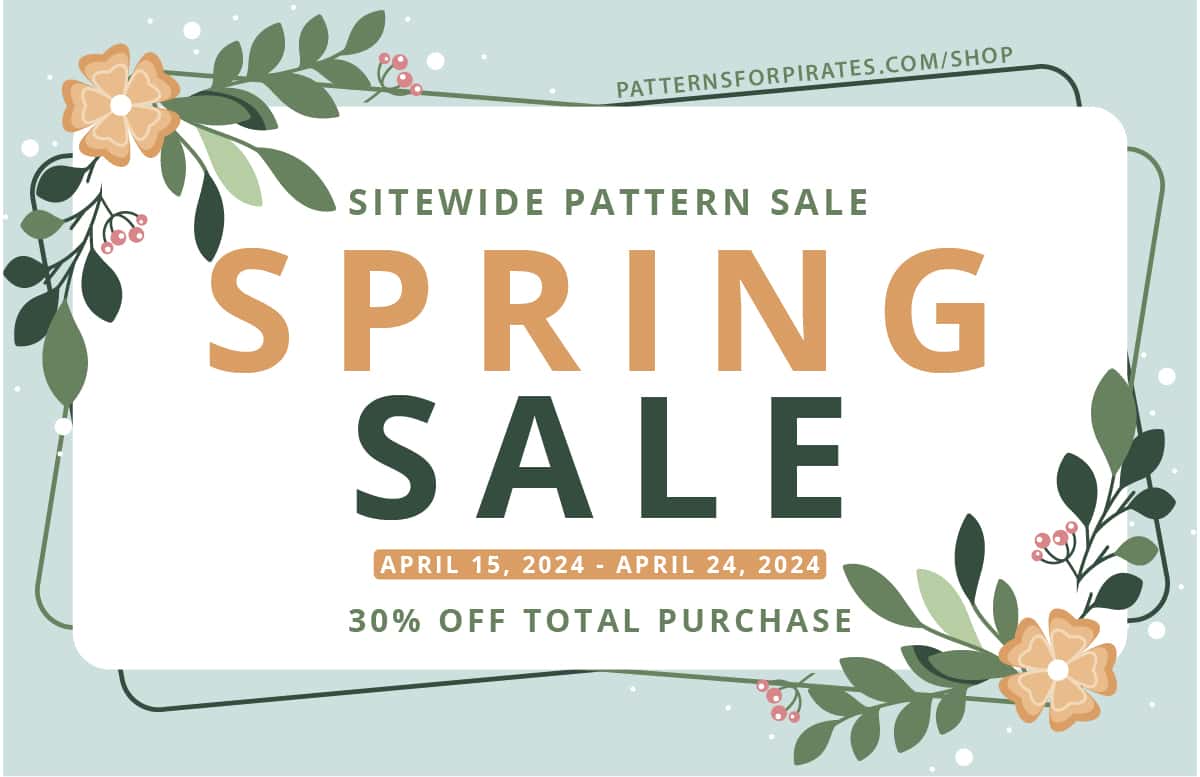
Spring Into Savings: The Patterns for Pirates Spring Sale!
Spring is in the air, and what better way to celebrate the season of renewal than by refreshing your sewing pattern collection? At Patterns for Pirates, we’re excited to announce our much-anticipated Spring Sale, offering an incredible 30% off sitewide on all our patterns. Whether you’re looking to tackle a new sewing project or update your wardrobe with unique, handcrafted items, our sale has something for everyone.
Sale Details
Date: Mark your calendars! The sale runs from April 15 through April 24, giving you plenty of time to browse our extensive collection and pick your favorites.
Discounts: No need to search for a promo code; we’ve made it easy for you. All discounts are automatically applied sitewide, so the price you see is the price you pay. Enjoy a hassle-free shopping experience with 30% off all our sewing patterns.
Exclusions: Please note that our Fabric for Pirates fabric subscription service is not included in this sale. However, with a wide variety of patterns to choose from, you’re sure to find plenty of treasures to keep your sewing machine busy.
Why Shop the Spring Sale?
Refresh Your Pattern Library: With the changing seasons comes the perfect opportunity to refresh not just your wardrobe but your pattern library as well. Explore our collection and discover new favorites.
Spring Projects: Our patterns cater to all skill levels, from beginners to seasoned sewists. Find the perfect project to welcome spring, from breezy dresses to comfortable home wear.
Don’t Miss Out!
With the sale only running from April 15 to April 24, now is the time to stock up on patterns for your spring and summer sewing projects. Remember, no code is necessary to take advantage of the 30% discount, but don’t wait too long – we only have 2-3 sitewide sales a year, so take advantage while you can.
Visit our SHOP today and take the first step towards a stylish, handcrafted spring wardrobe. Happy sewing!

Protected: Fabric for Pirates :: April 2024 Reveal
New Pattern Release :: Chrissy Set
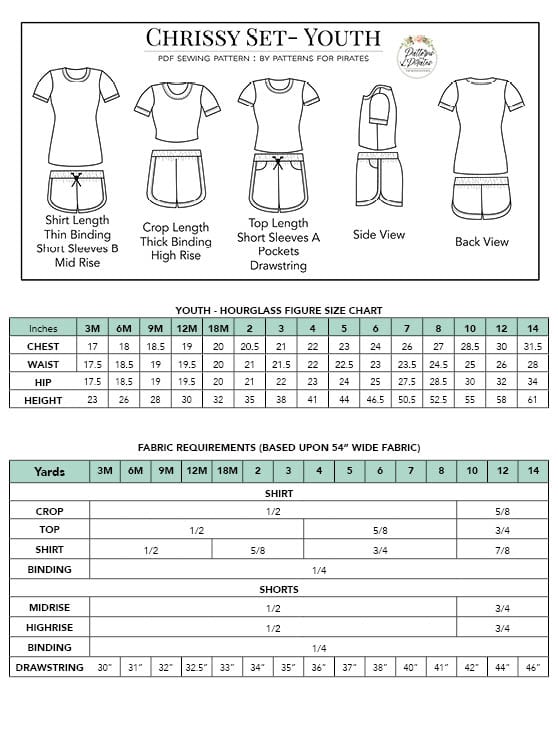
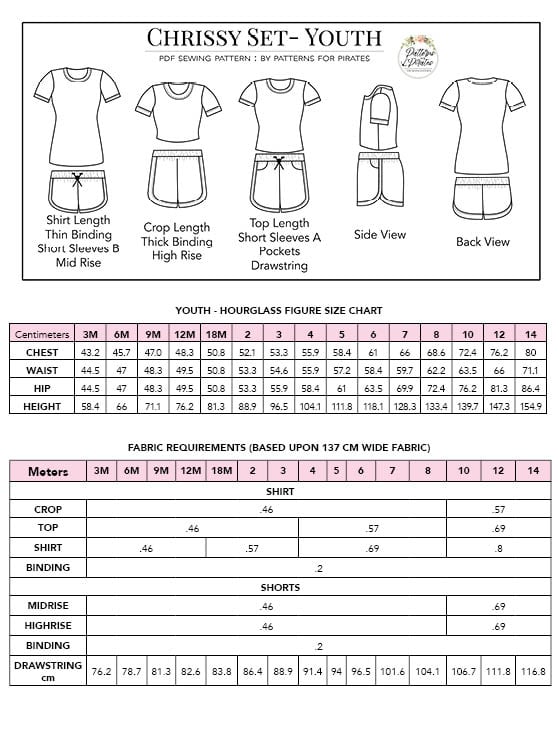
Get ready to make some cute throwback sets with our newest patterns: the Chrissy Set (in youth and adult sizes)!!
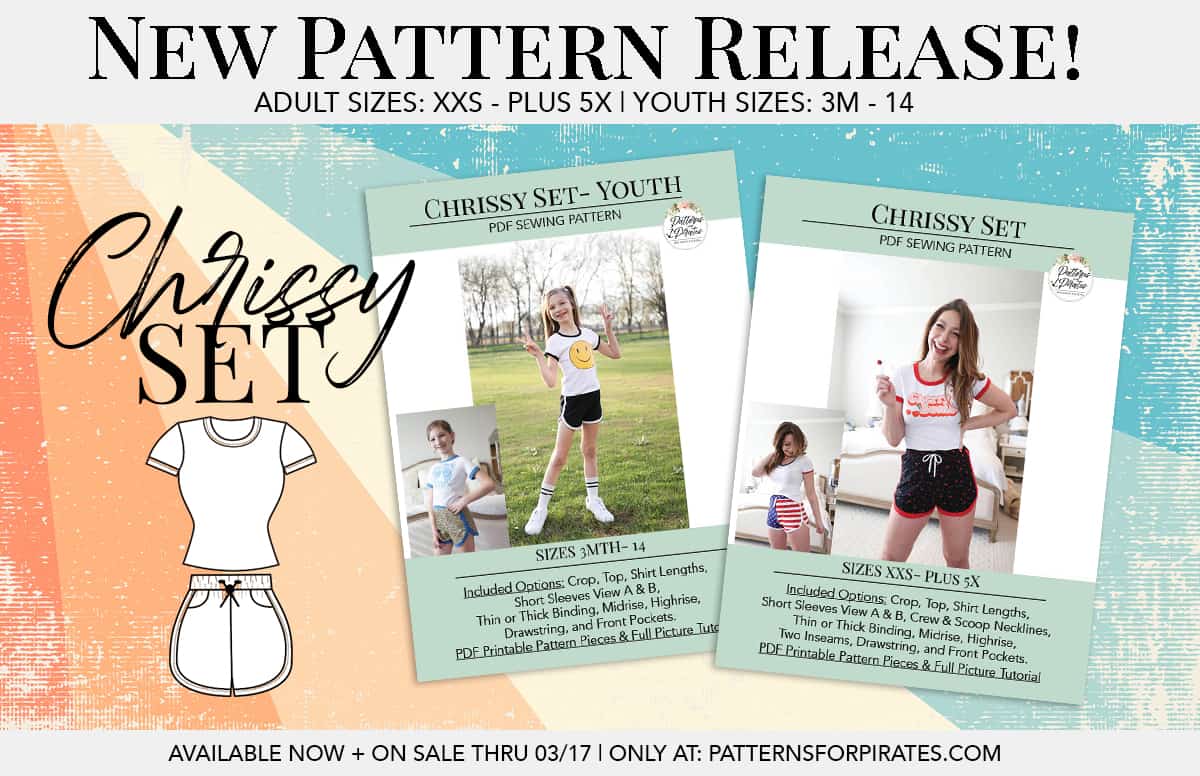
The youth sizes range from 3m – 14 and the adult sizes are for the full, newer size chart, extending from XXS – Plus 5X for the Adult Hourglass Figure.
- *Want to learn more about how to measure yourself for these pattern? We’ve got you covered with an in-depth blog HERE. And for even more helpful fun, we have a free* printable that you can use to help record your measurements as you take them.
- And in case you’re new to Patterns for Pirates and PDF patterns in general, we have a great blog full of new-user tips HERE to help you get started!
- As with all of our current releases and updates, the pdfs now include our layers feature and can be found in Letter, A4, A0 and projector sizes.
- We’ve also got an excellent planning tool for you with our Coloring Pages. It’s a resource that is updated with every new pattern addition, this pattern included!
- Need a way to keep track of the P4P patterns you have? We’ve gone through all of our patterns and created an interactive PDF for you! Grab your copy HERE.
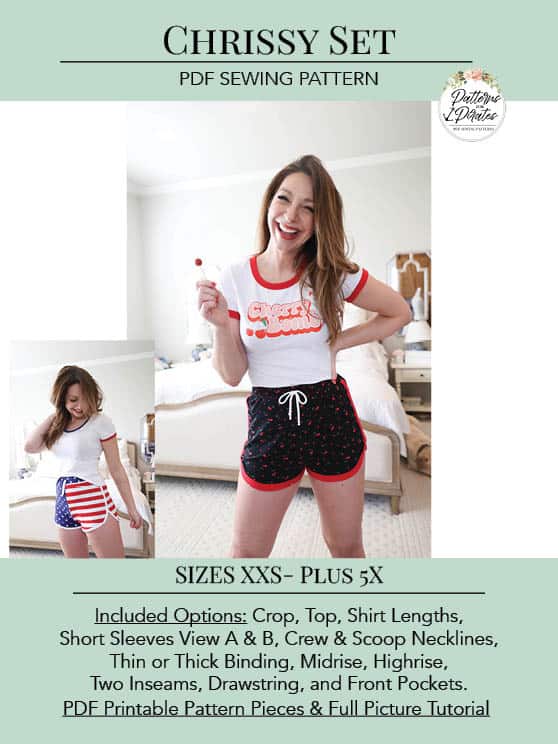
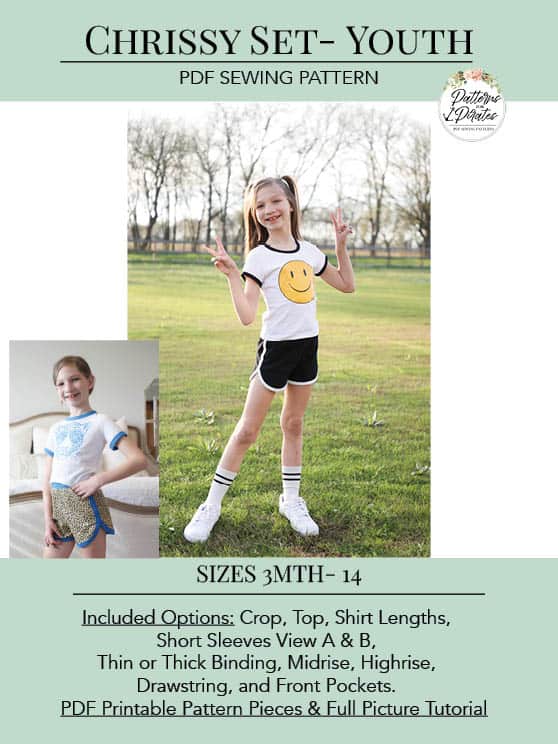

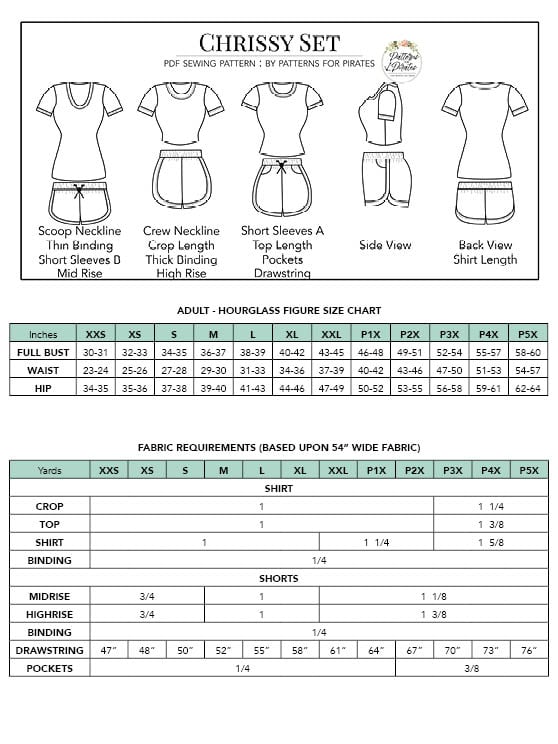
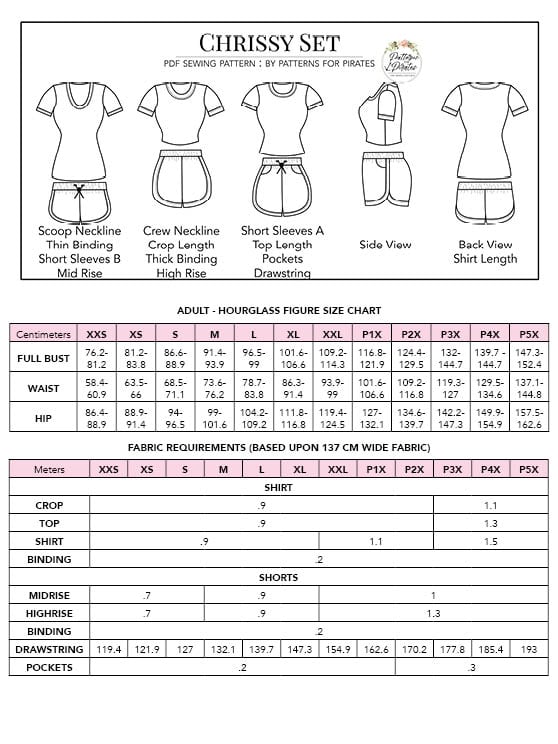
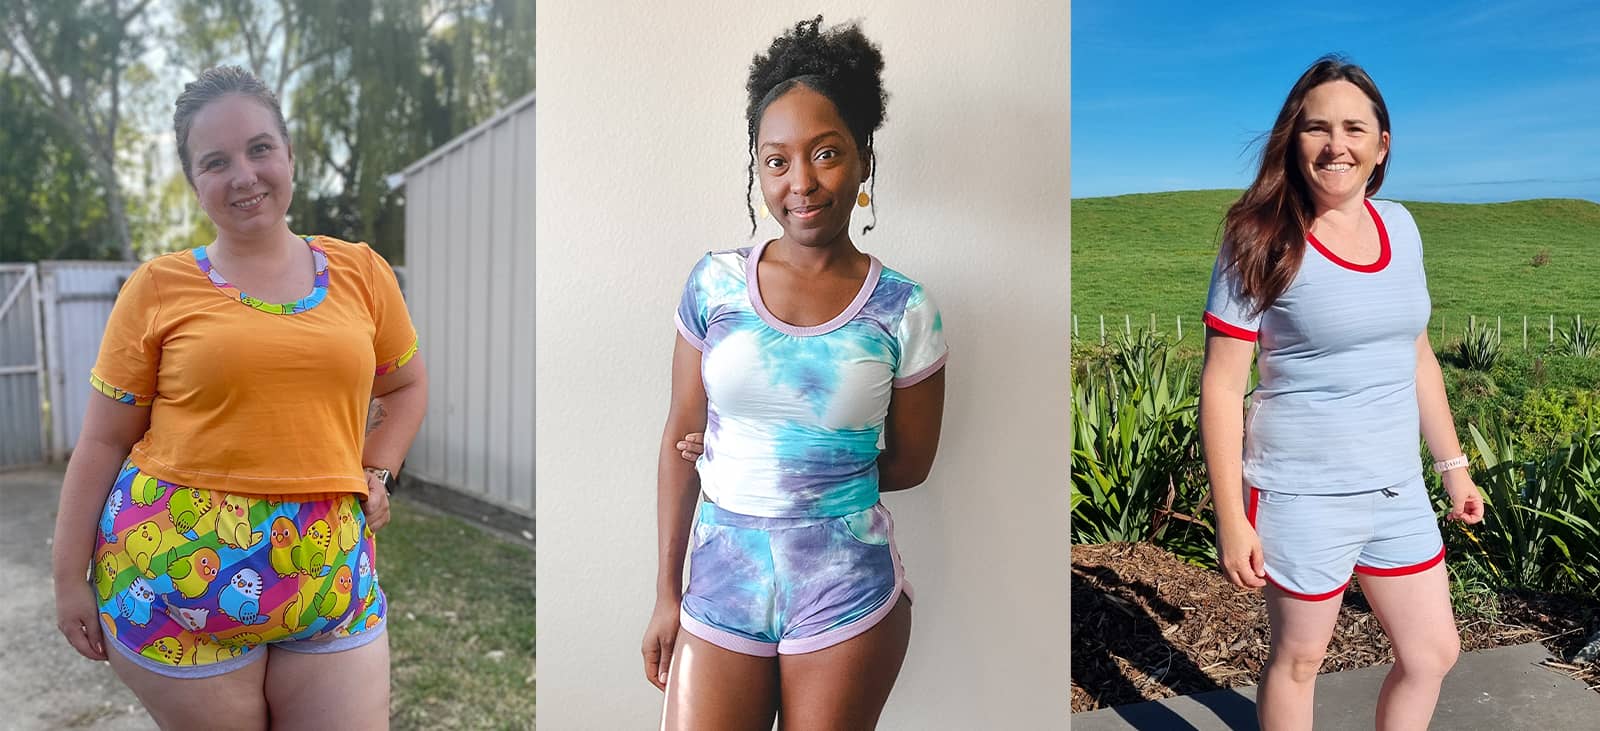
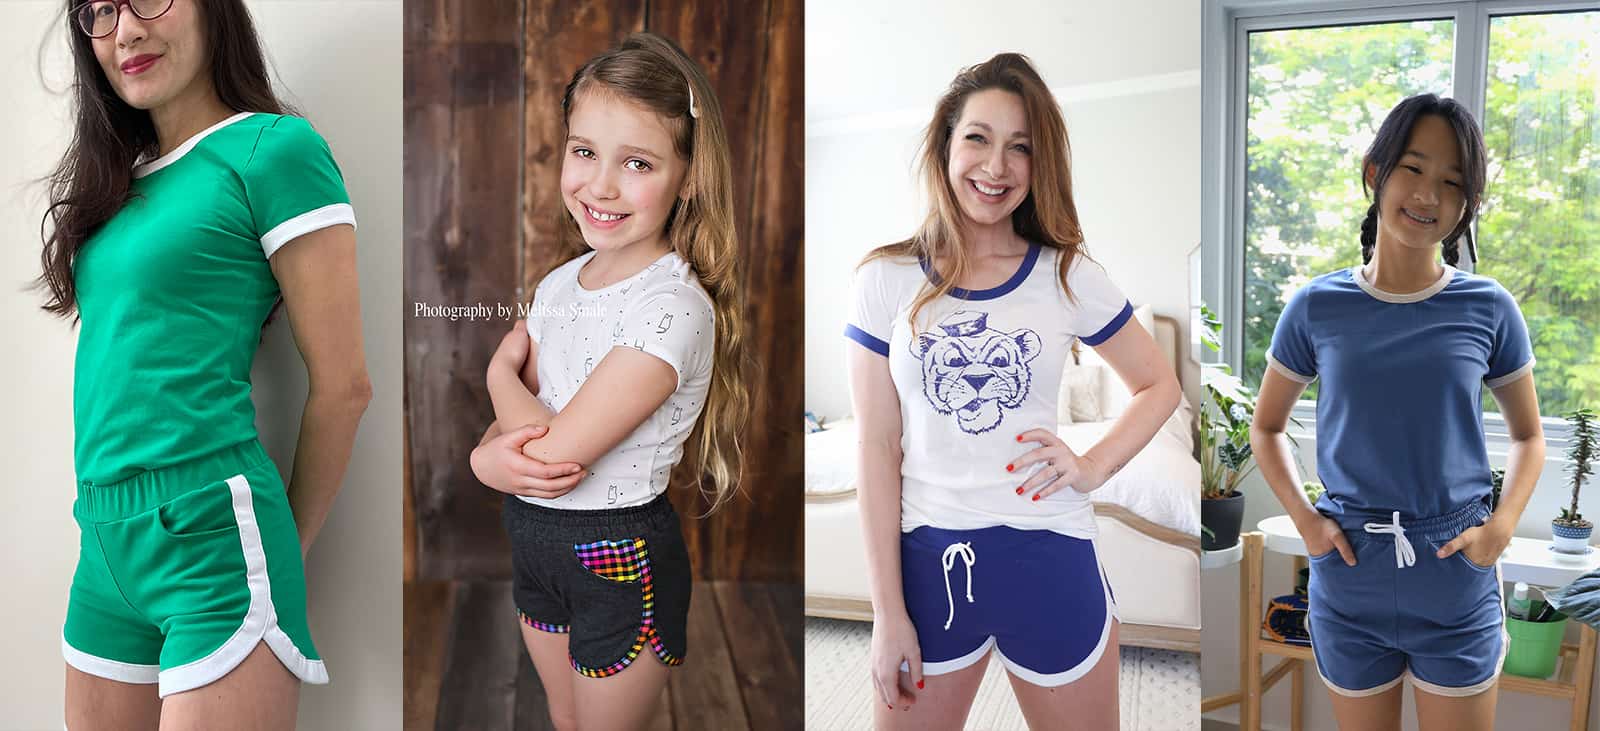
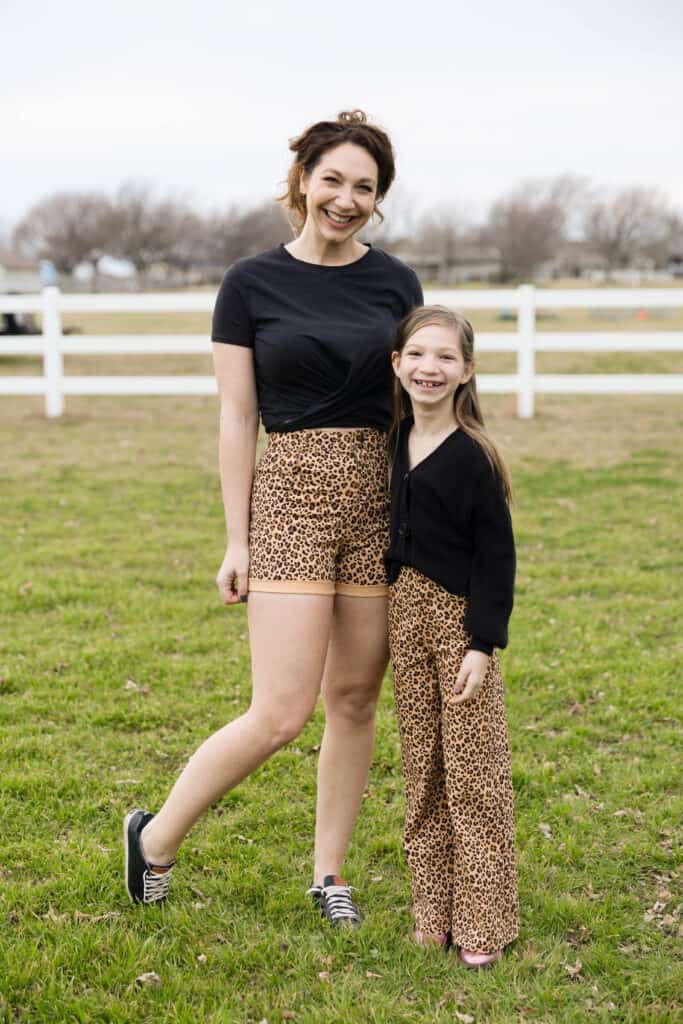
The Chrissy Set is an adorable retro set that has withstood the test of time and proven to be a classic look. This cute set is named after Chrissy from Three’s Company, but was popular again and again throughout the years. You can choose from all different lengths and rises to get the perfect ratio for yourself. We also include pockets, because…pockets! You have the choice between a thinner or thicker binding for a more subtle or bold binding look. Pick from a classic crew or a scoop neckline. You can also decide between a super short sleeve (View A) or a short sleeve that is a bit longer (View B). The shorts come in a classic super shorty length, like Chrissy and Janet donned with a 1″ inseam… but I also included a longer 3″ inseam for more coverage. Wear this set as a cute loungewear or for a cute and comfortable everyday look.
Pattern options for the Chrissy Set includes:
- Necklines: Crew / Scoop (Adult only)
- Binding: Thin / Thick
- Shirt Lengths: Crop / Top / Shirt
- Short Sleeves: View A / View B
- Shorts Rises: Midrise / Highrise
- Shorts Inseams (Adult Only): 1″ / 3″
- Pockets: Front Pockets
- Optional : Drawstring
The Chrissy Set Patterns are drafted for stretch knit fabrics.
Specific Fabric Suggestions: Cotton Spandex, Cotton Jersey, Triblend Jersey, Medium-weight Bamboo, Modal, Rayon Knits, Interlock Jersey, Double Brushed Poly, Ribbed Knits, etc.
We obviously wouldn’t leave you hanging without showing you some of the different options in the patterns!
THICK + THIN BINDING
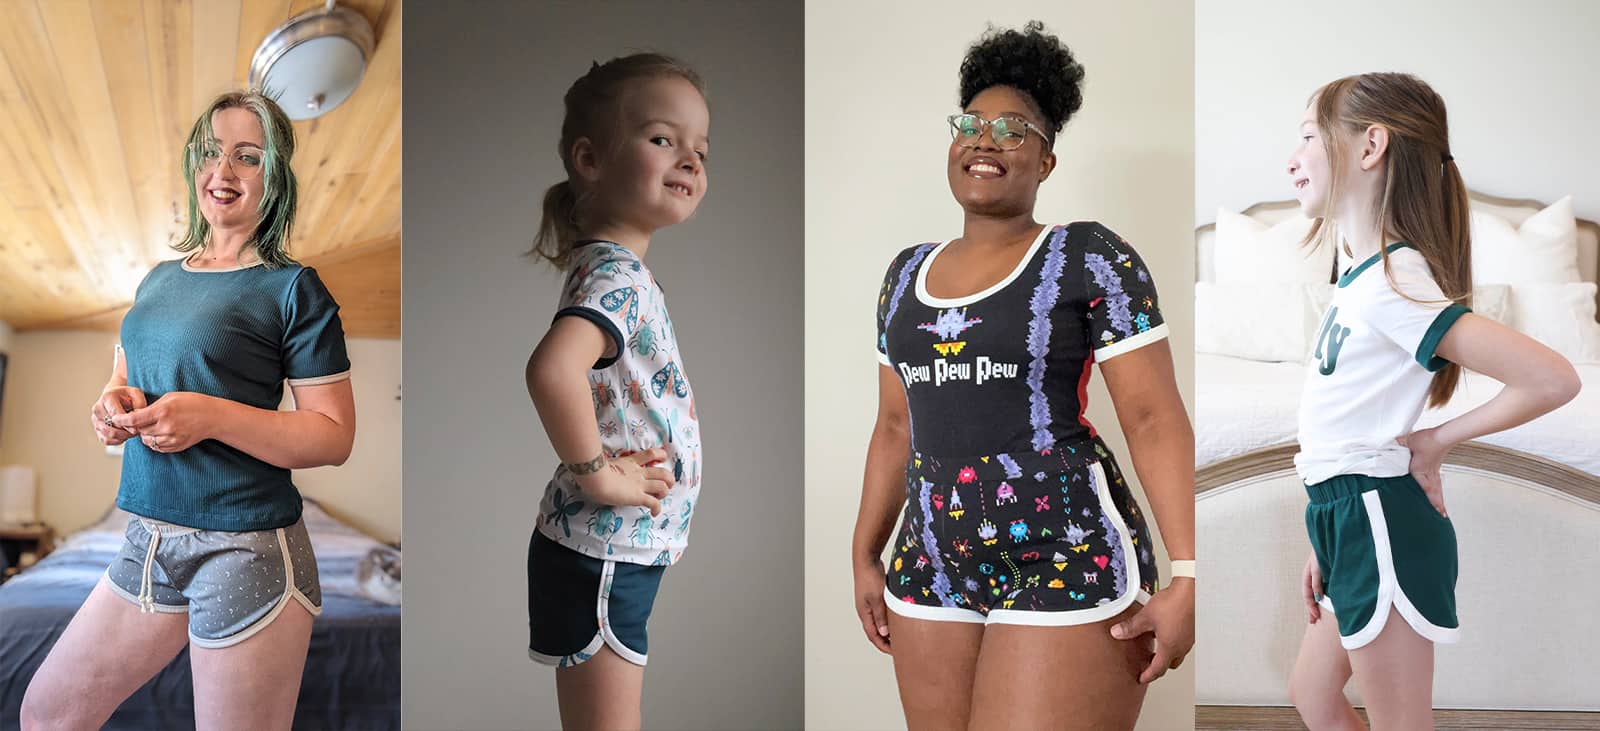
SHIRT LENGTHS: CROP / TOP / SHIRT
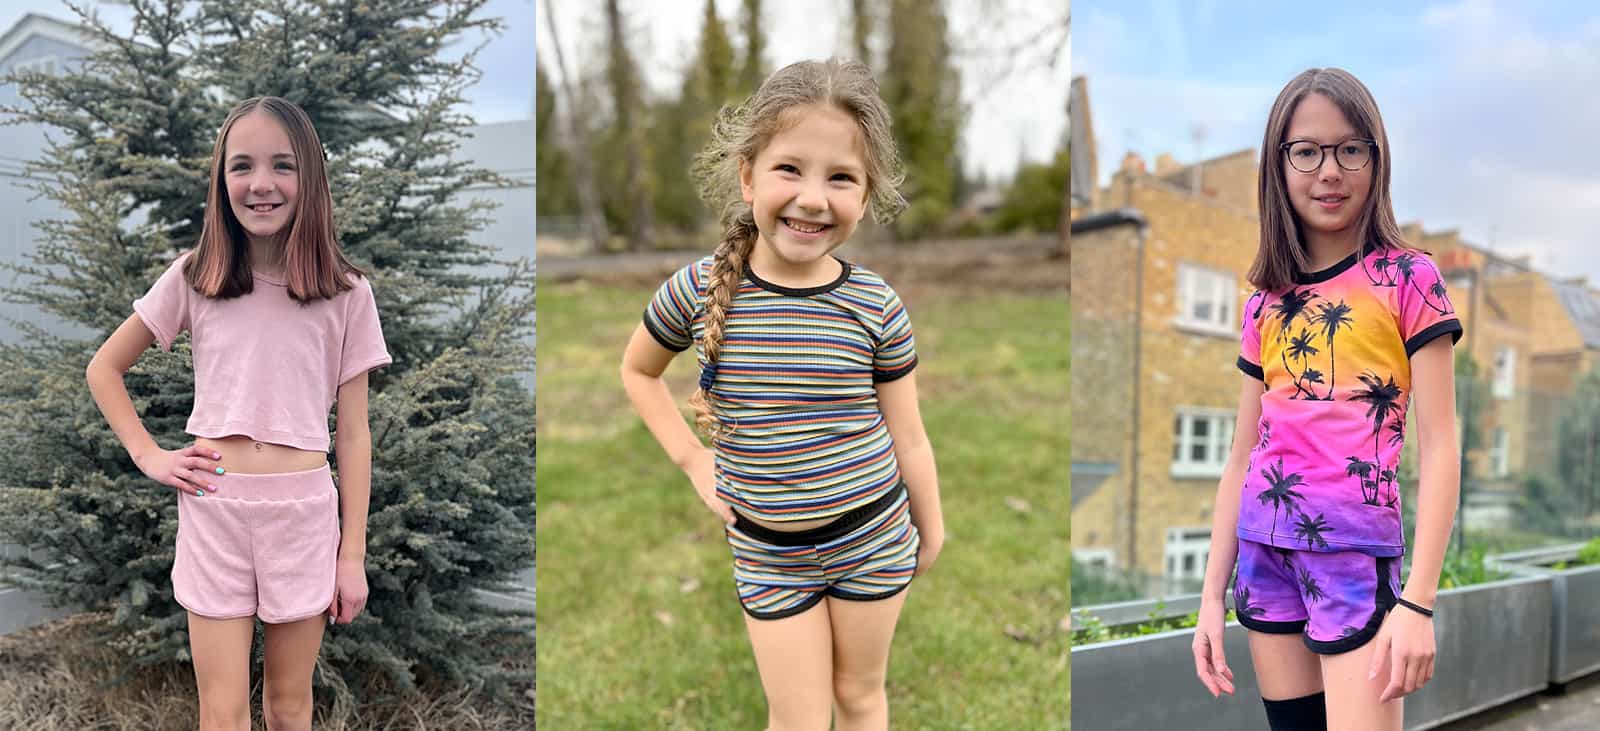
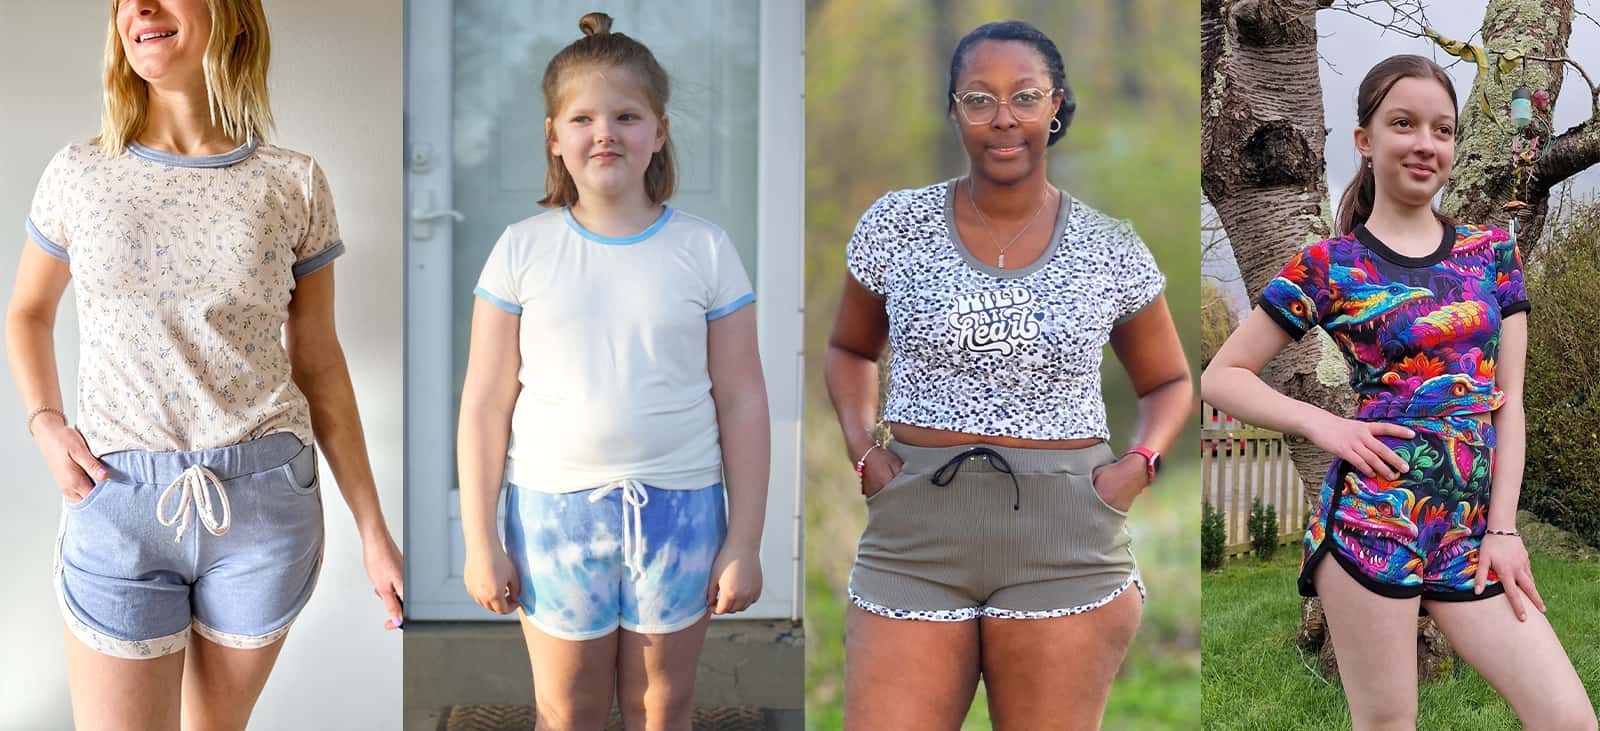
SHORTS RISES: MID / HIGH
ADULT PATTERN ONLY OPTIONS: CREW + SCOOP NECKLINES / 1″ + 3″ INSEAMS
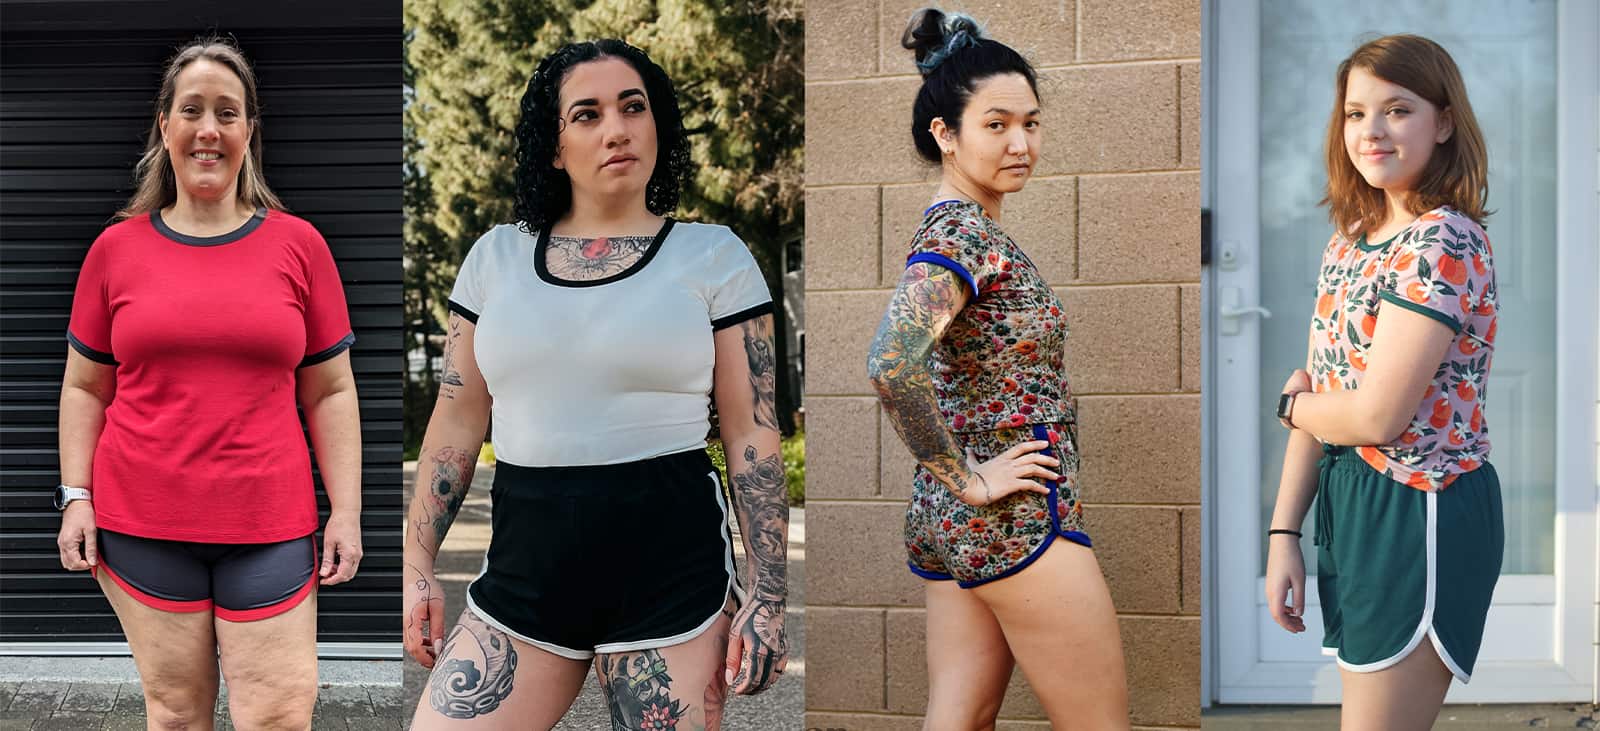
OPTIONAL POCKETS + DRAWSTRING
We are so excited to see what you make with the new Chrissy Set patterns! Both patterns are available now and on sale (no code needed) through 11:59pm CST, March 19, 2024.
Grab your copy of the Chrissy patterns here: Chrissy Set | Chrissy Set – Youth | Chrissy Set – Bundle
As always, we’ve got more photos for you to use as inspiration! Head over to the Facebook group to browse our albums full of gorgeous photos, compliments of our tester team!
Protected: Fabric for Pirates :: March 2024 Reveal
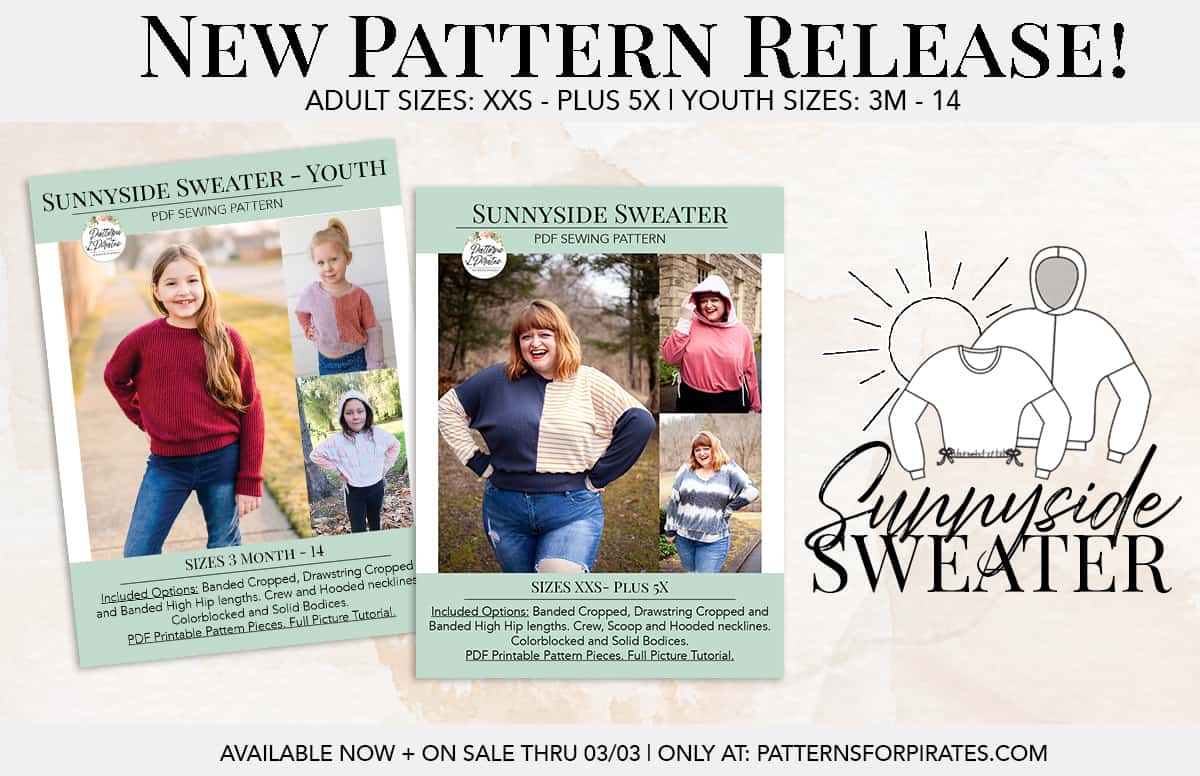
New Pattern Release :: Sunnyside Sweater
We couldn’t be more excited to share our newest patterns here at Pirate Headquarters! Allow us to introduce the Sunnyside Sweater patterns, y’all!
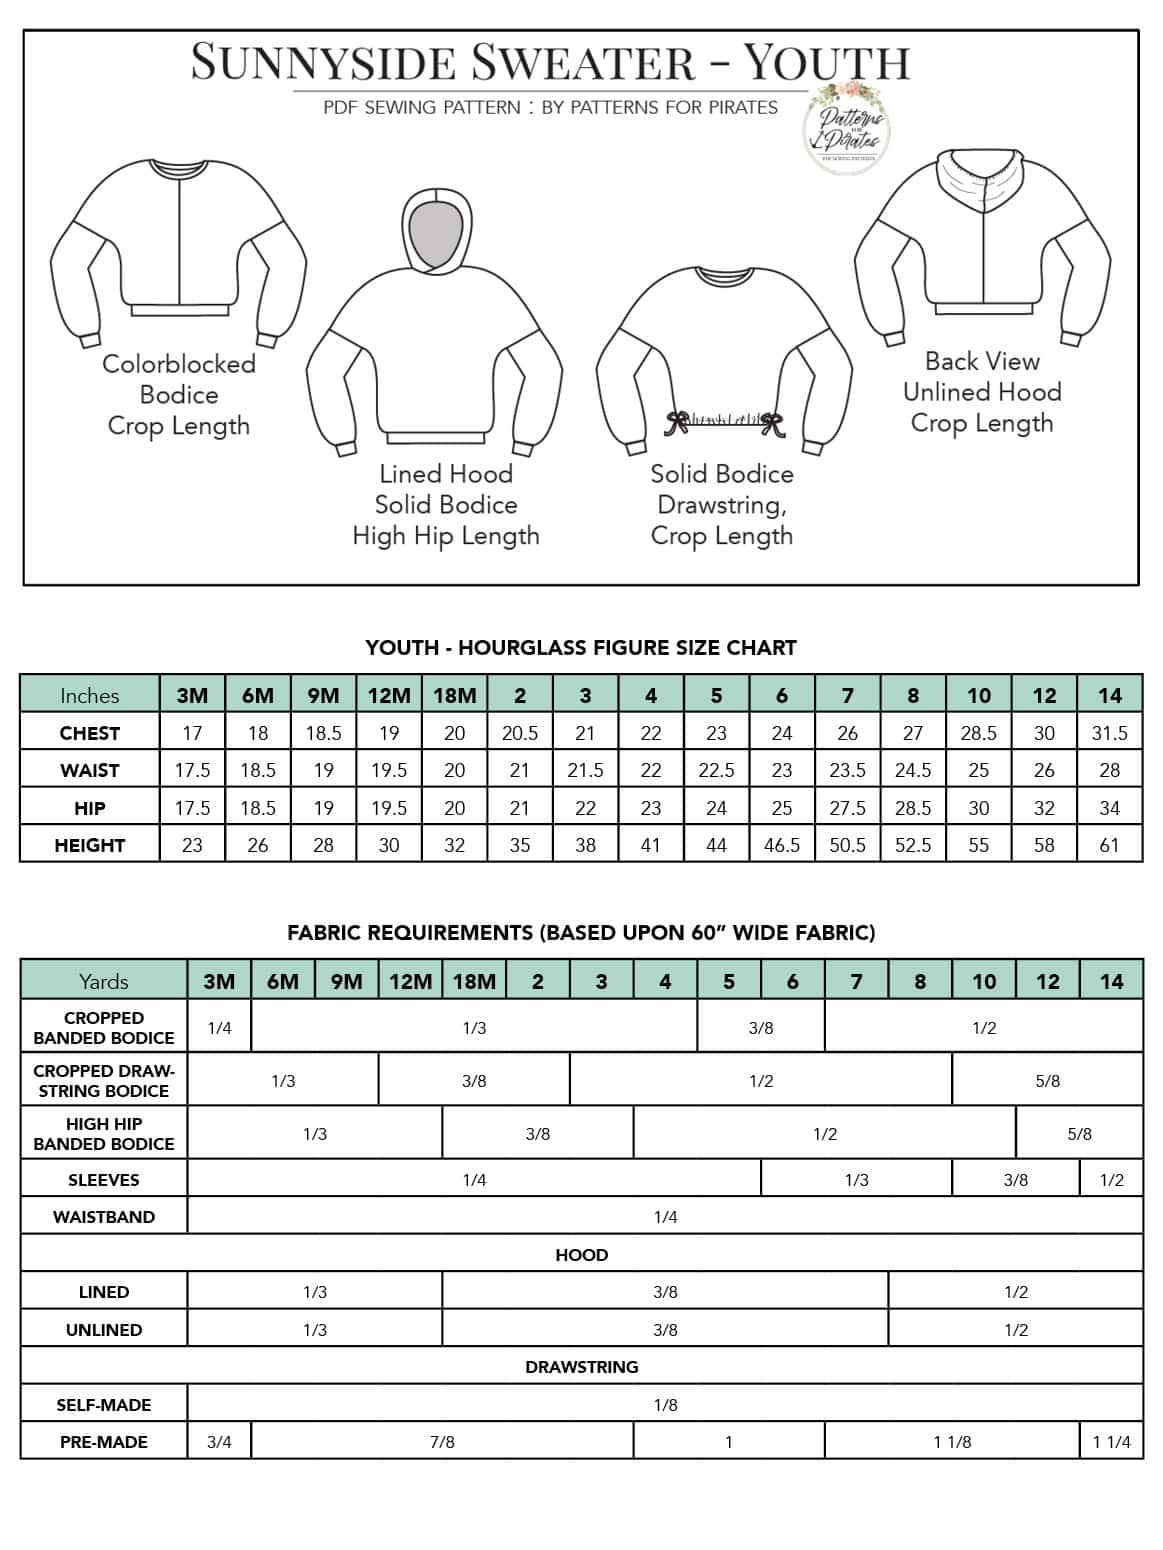
The youth sizes range from 3m – 14 and the adult sizes are for the full, newer size chart, extending from XXS – Plus 5X for the Adult Hourglass Figure.
- *Want to learn more about how to measure yourself for these pattern? We’ve got you covered with an in-depth blog HERE. And for even more helpful fun, we have a free* printable that you can use to help record your measurements as you take them.
- And in case you’re new to Patterns for Pirates and PDF patterns in general, we have a great blog full of new-user tips HERE to help you get started!
- As with all of our current releases and updates, the pdfs now include our layers feature and can be found in Letter, A4, A0 and projector sizes.
- We’ve also got an excellent planning tool for you with our Coloring Pages. It’s a resource that is updated with every new pattern addition, this pattern included!
- Need a way to keep track of the P4P patterns you have? We’ve gone through all of our patterns and created an interactive PDF for you! Grab your copy HERE.
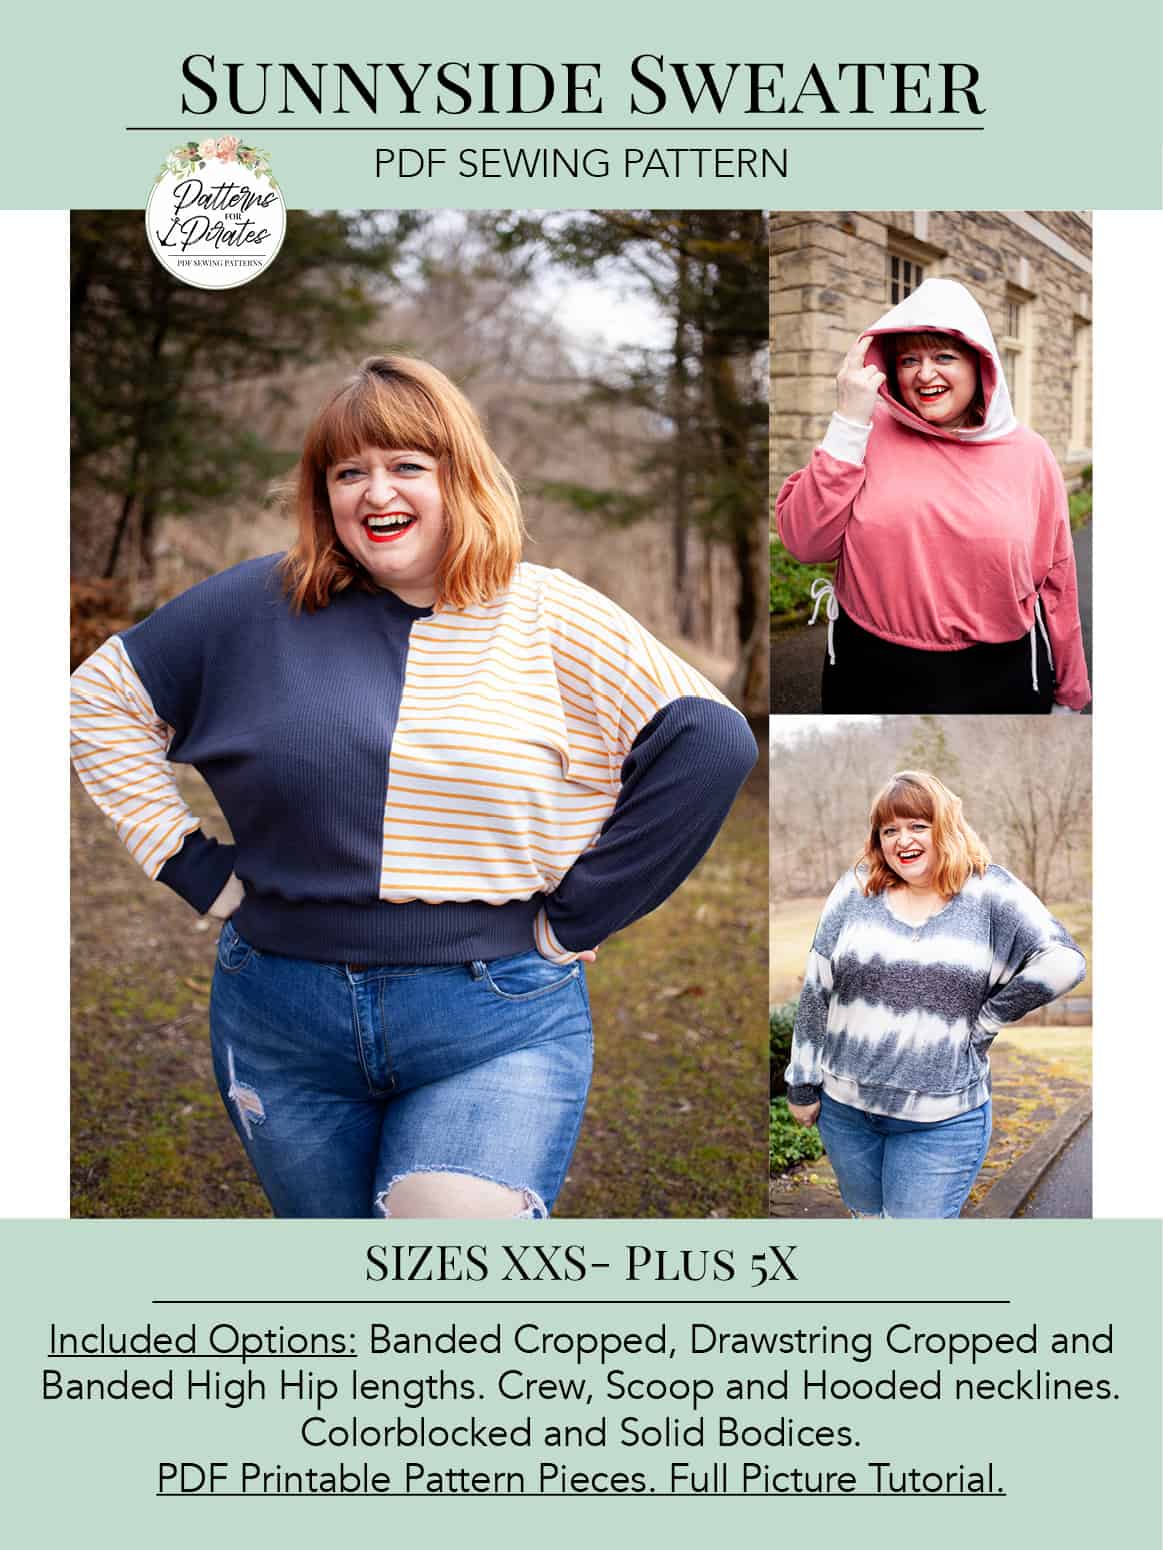
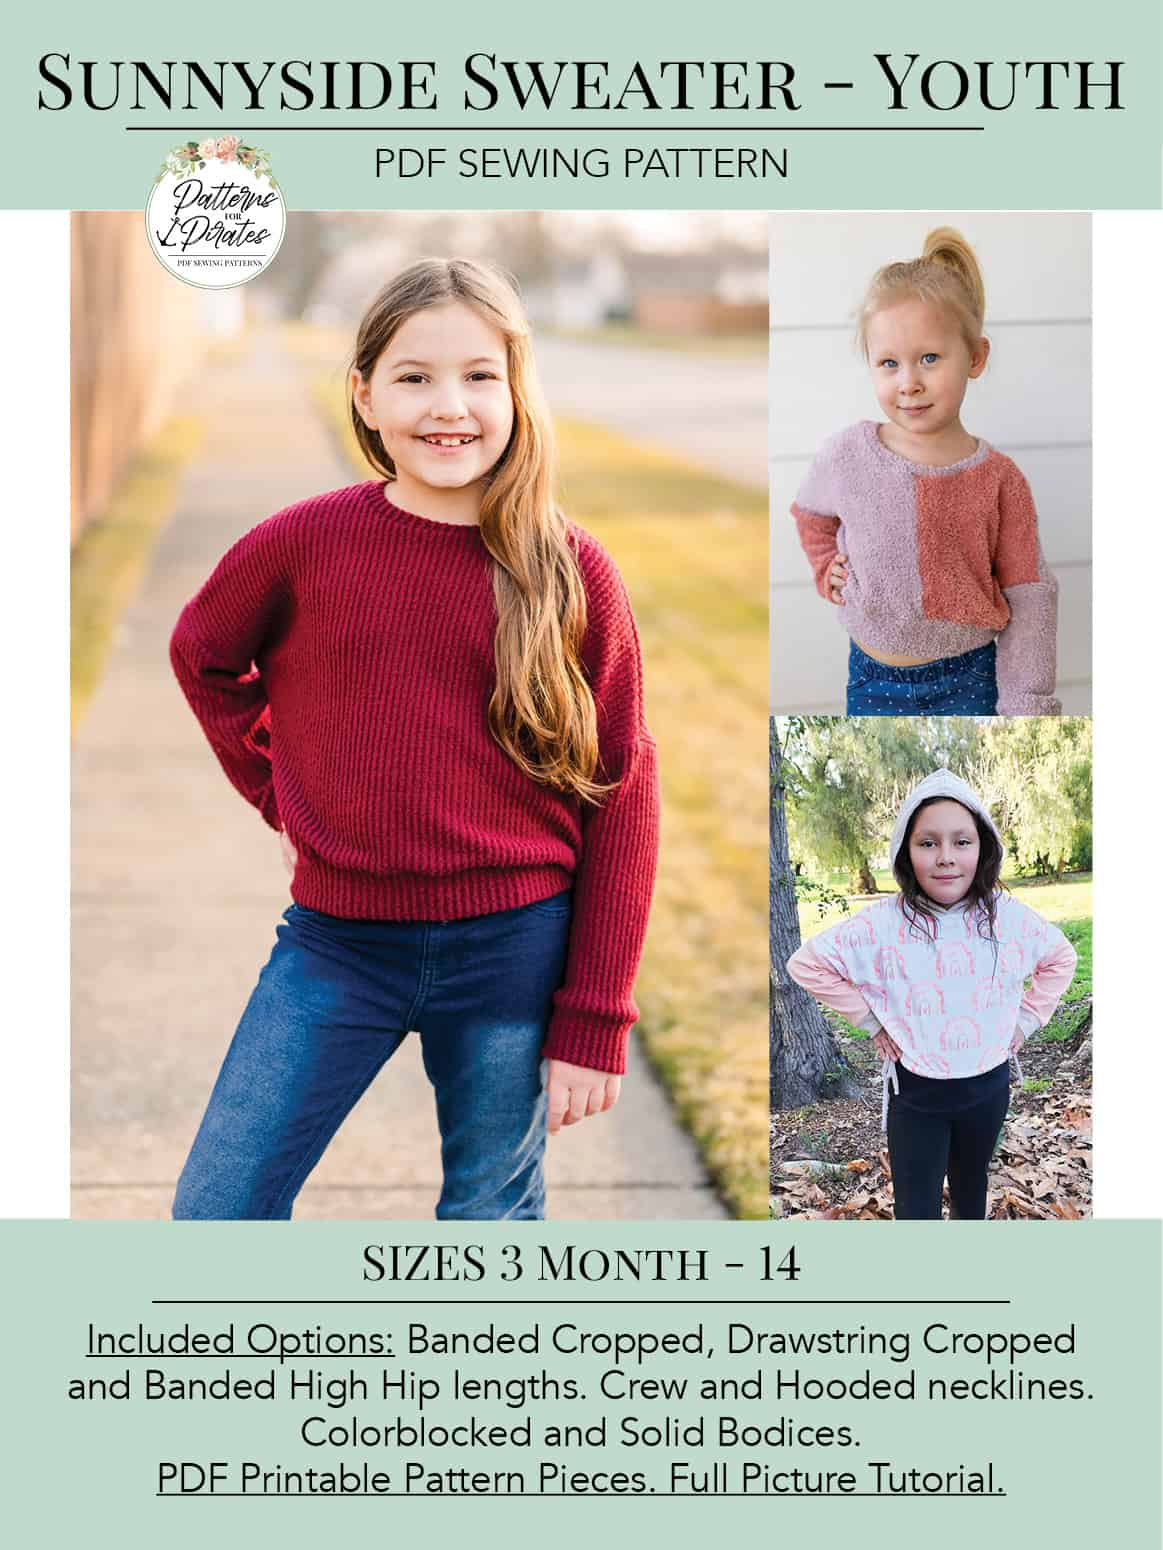
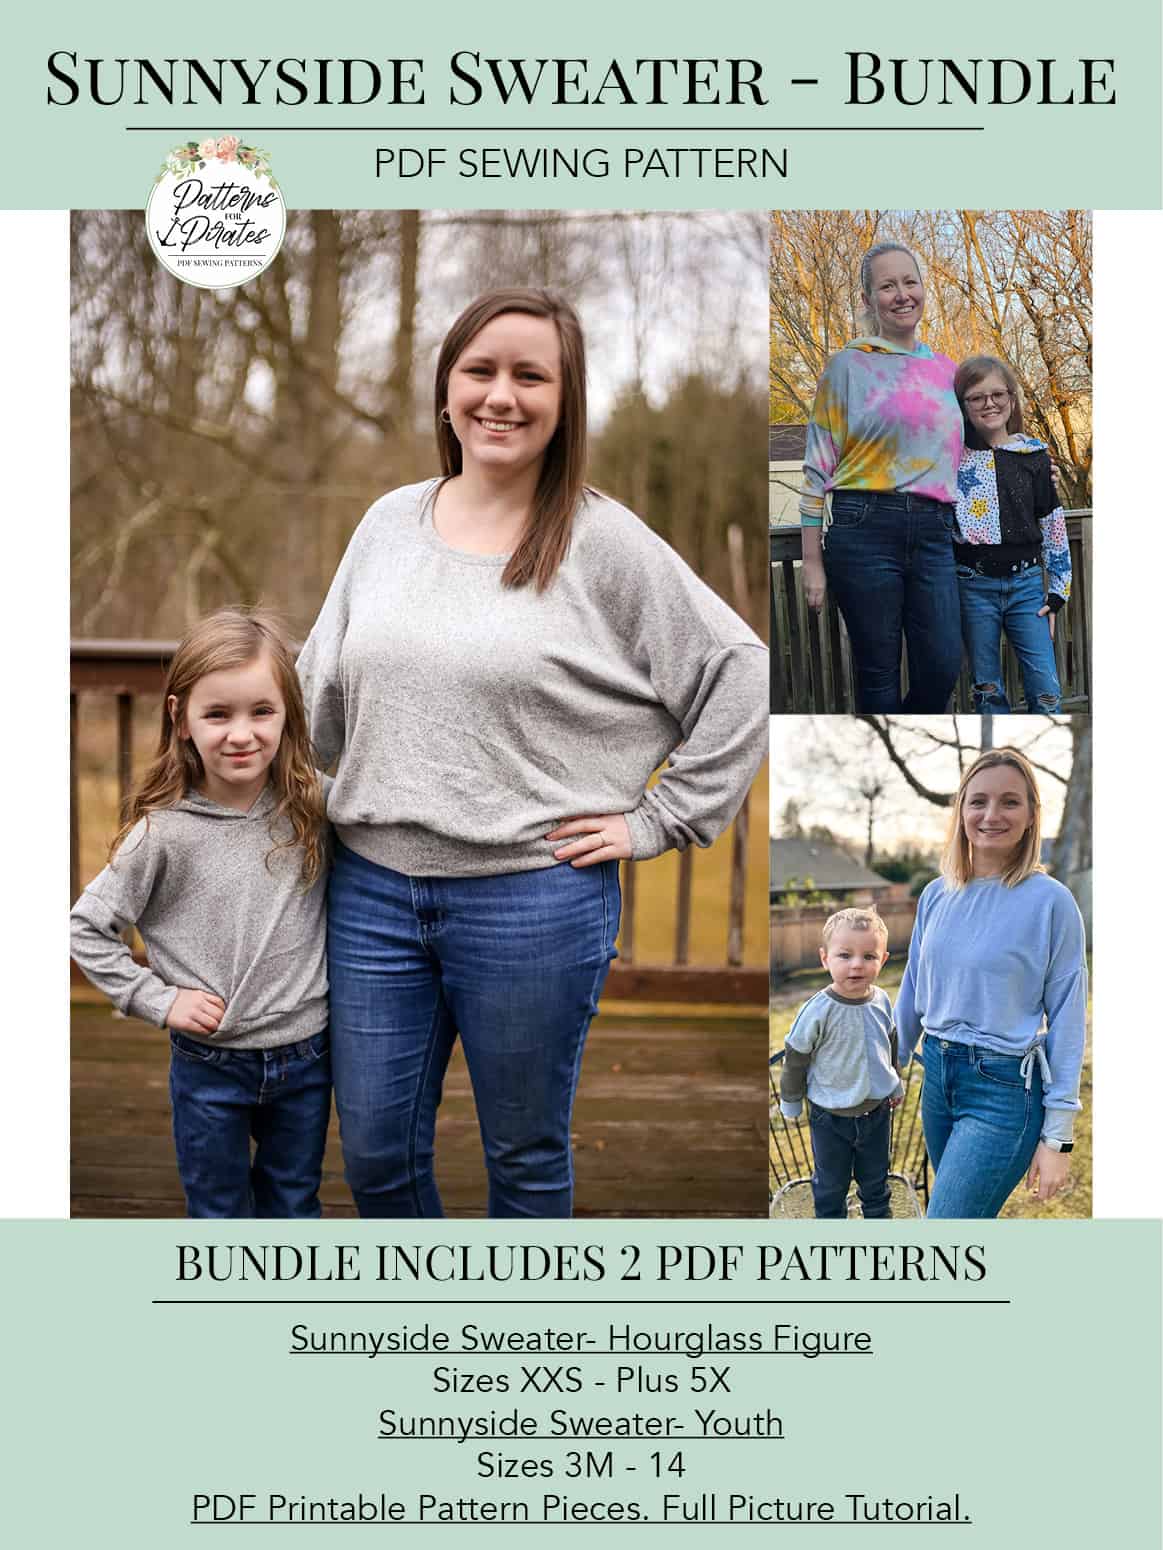
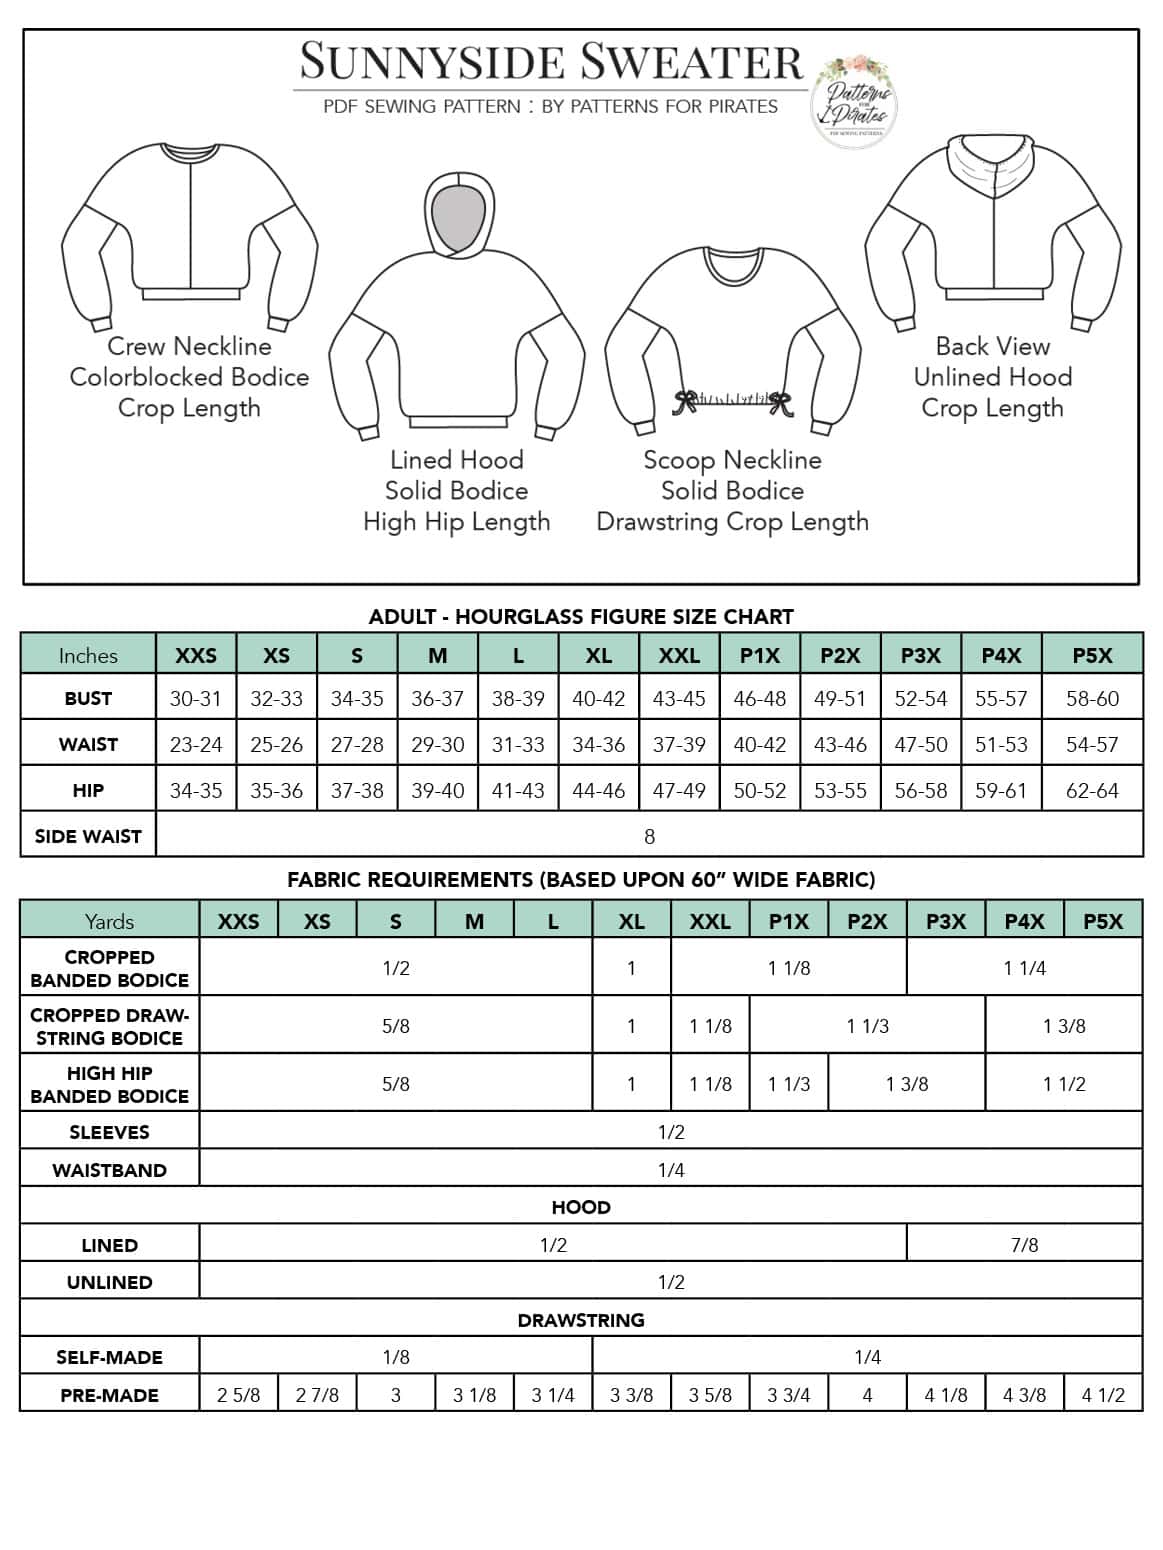
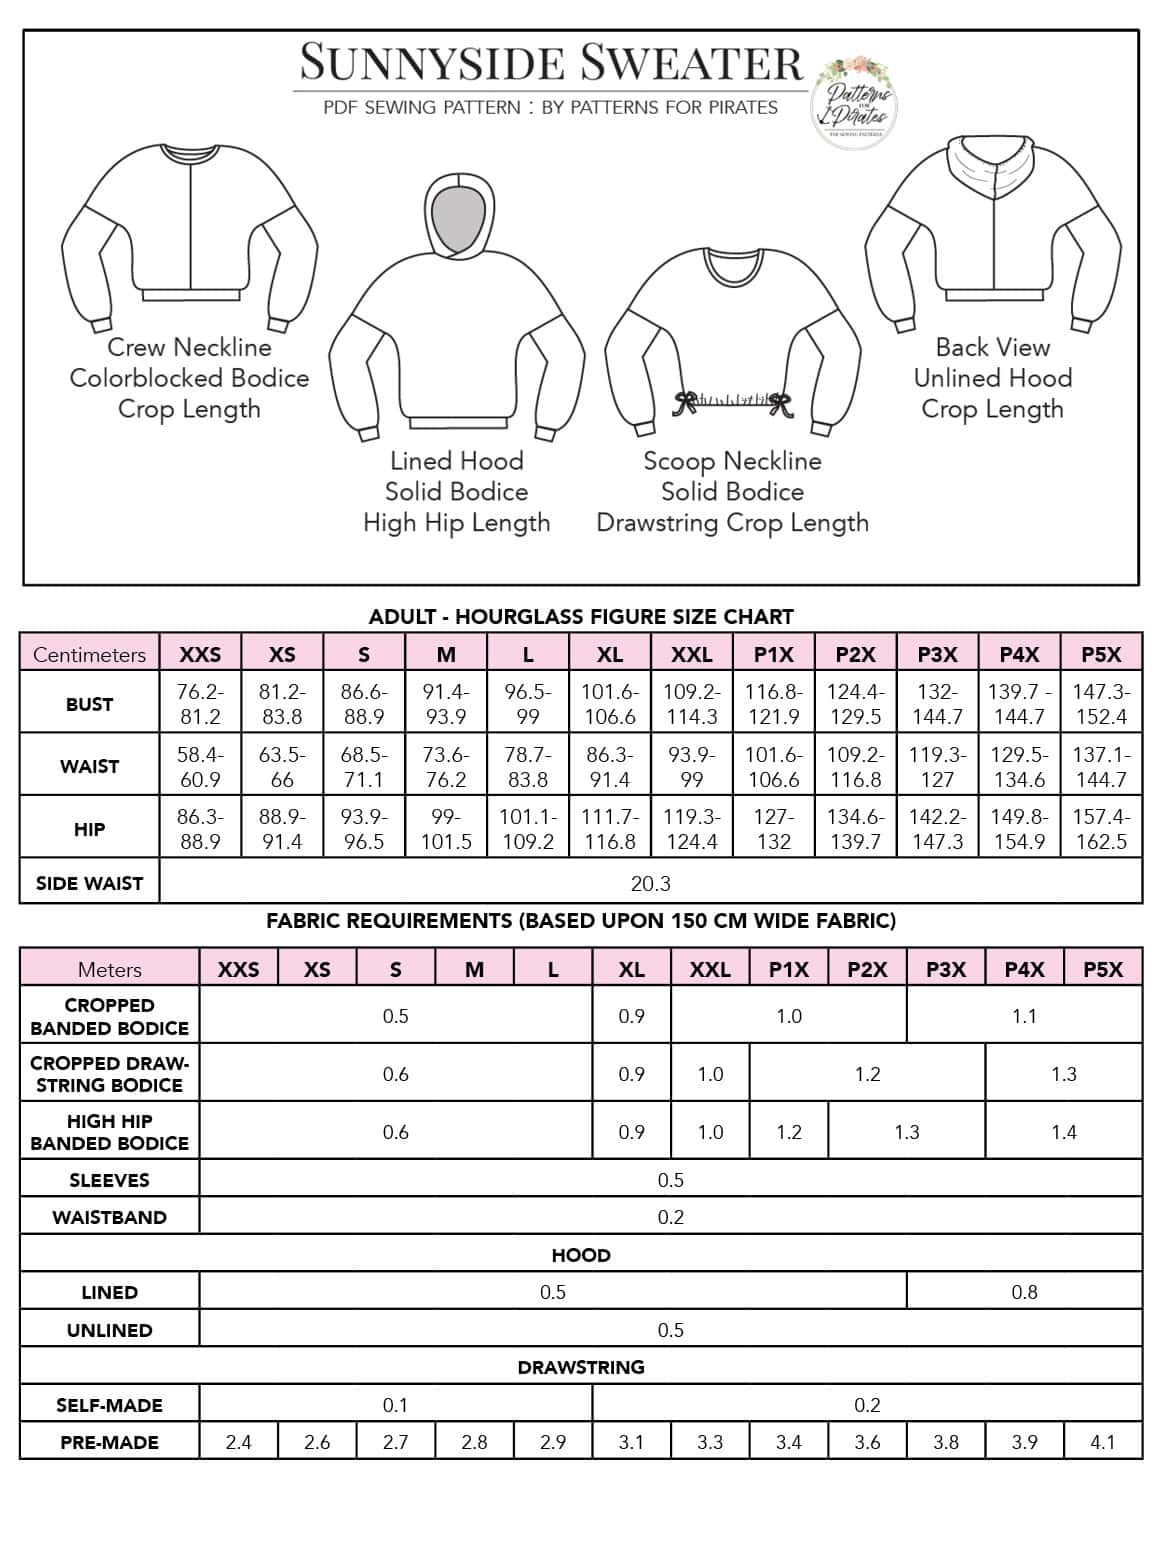
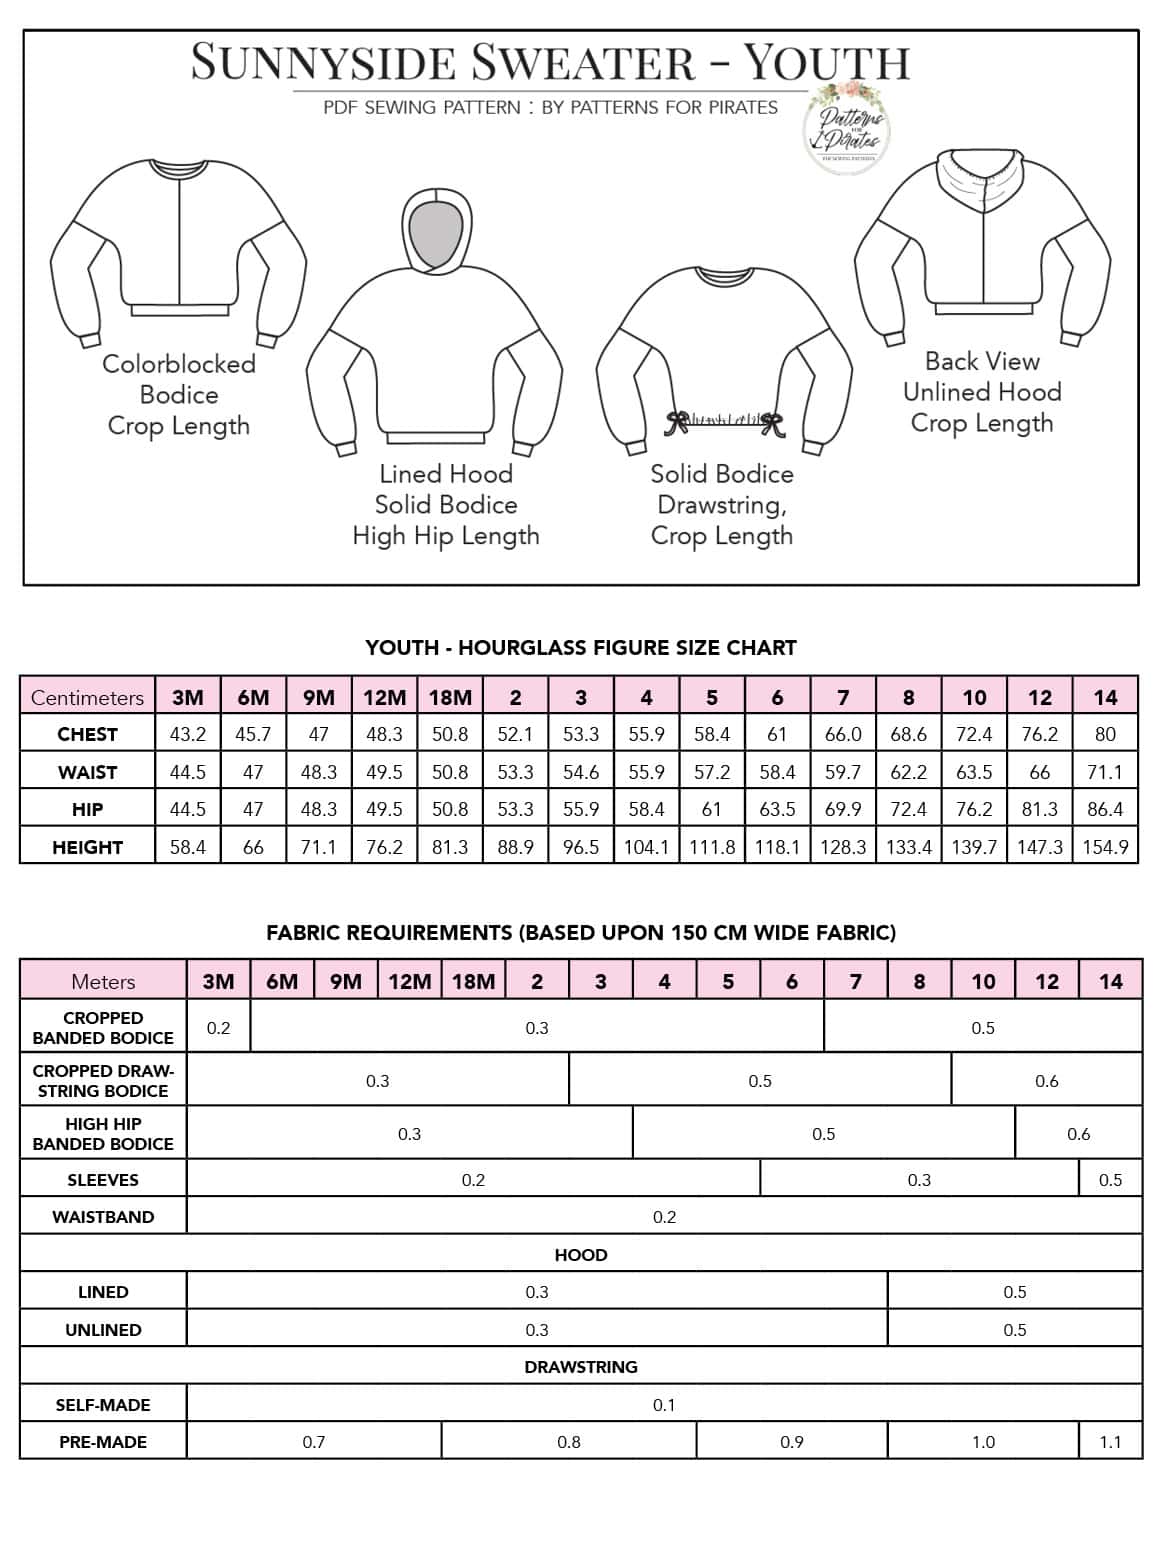
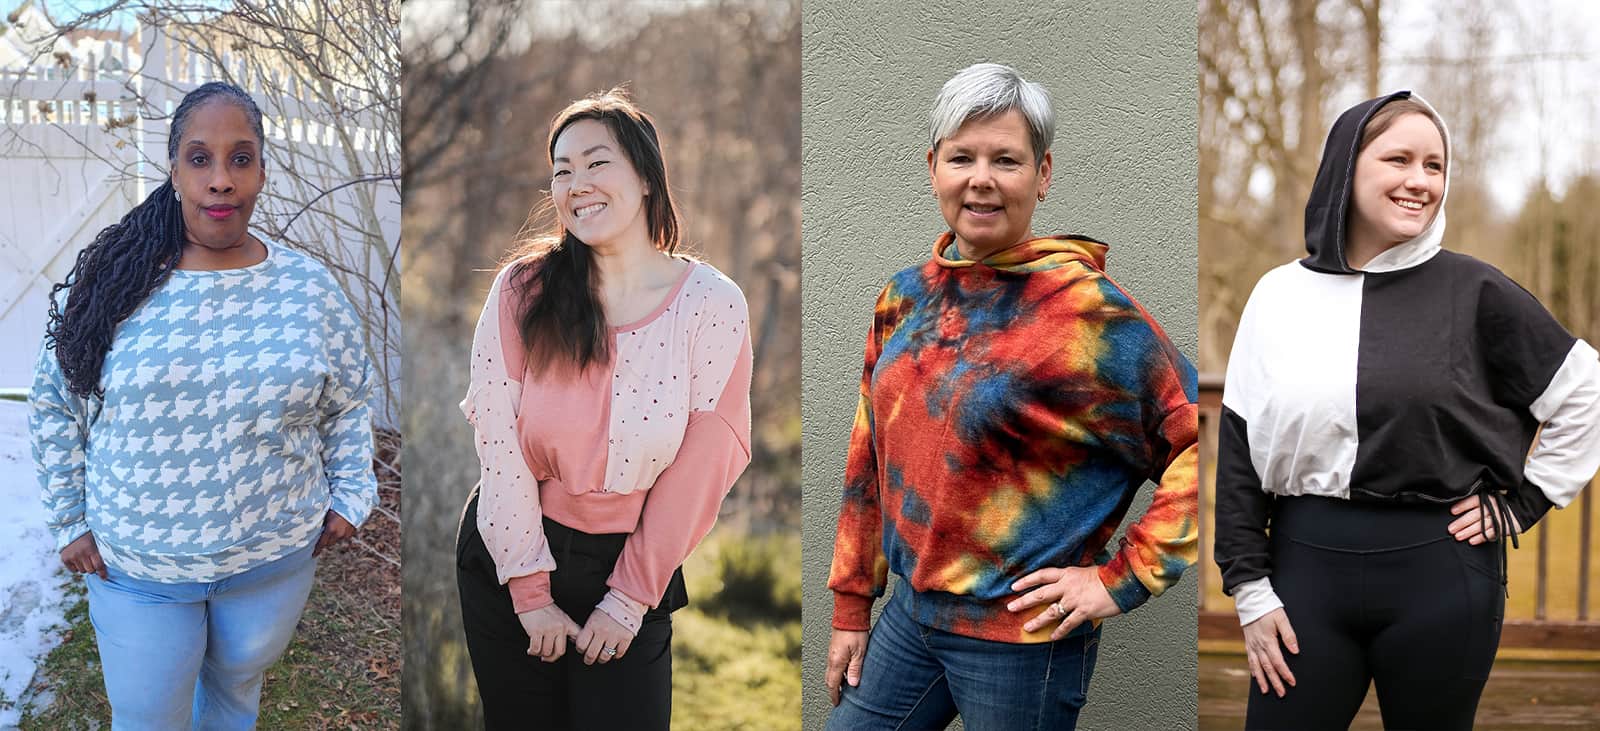
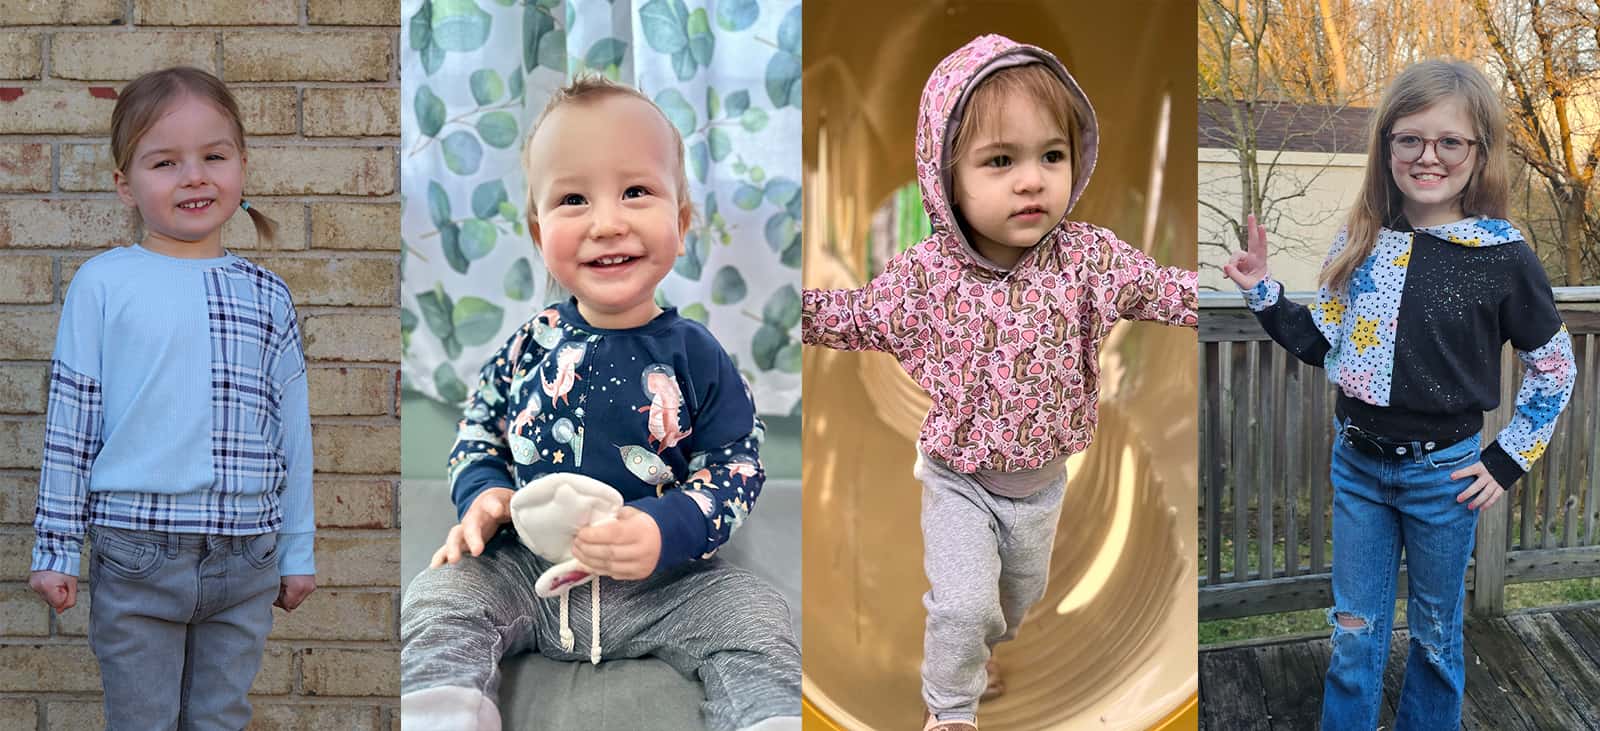
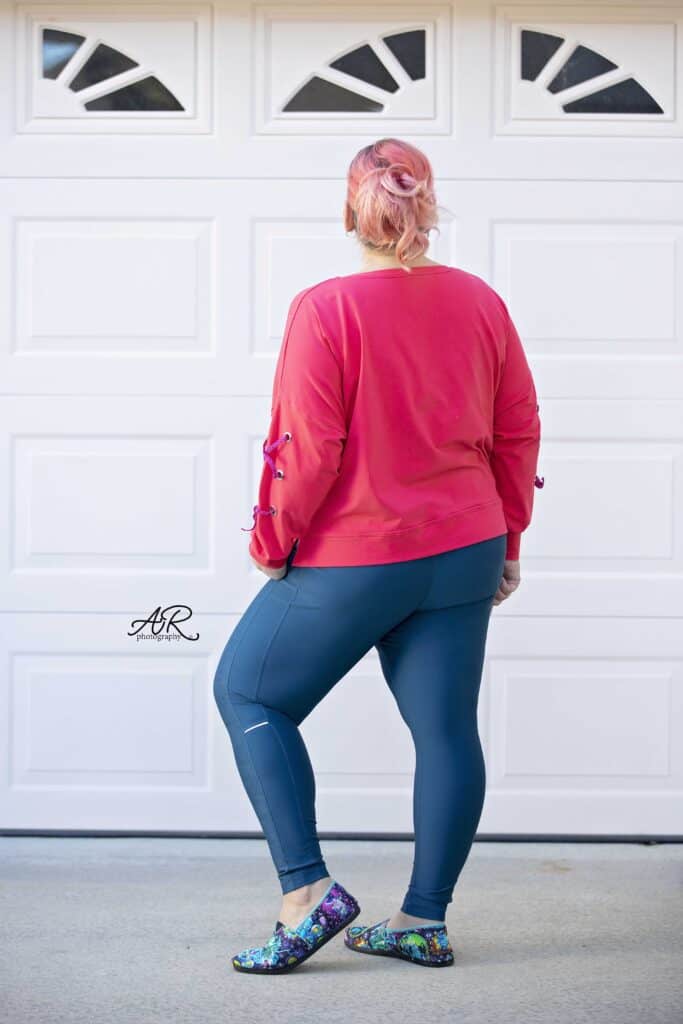
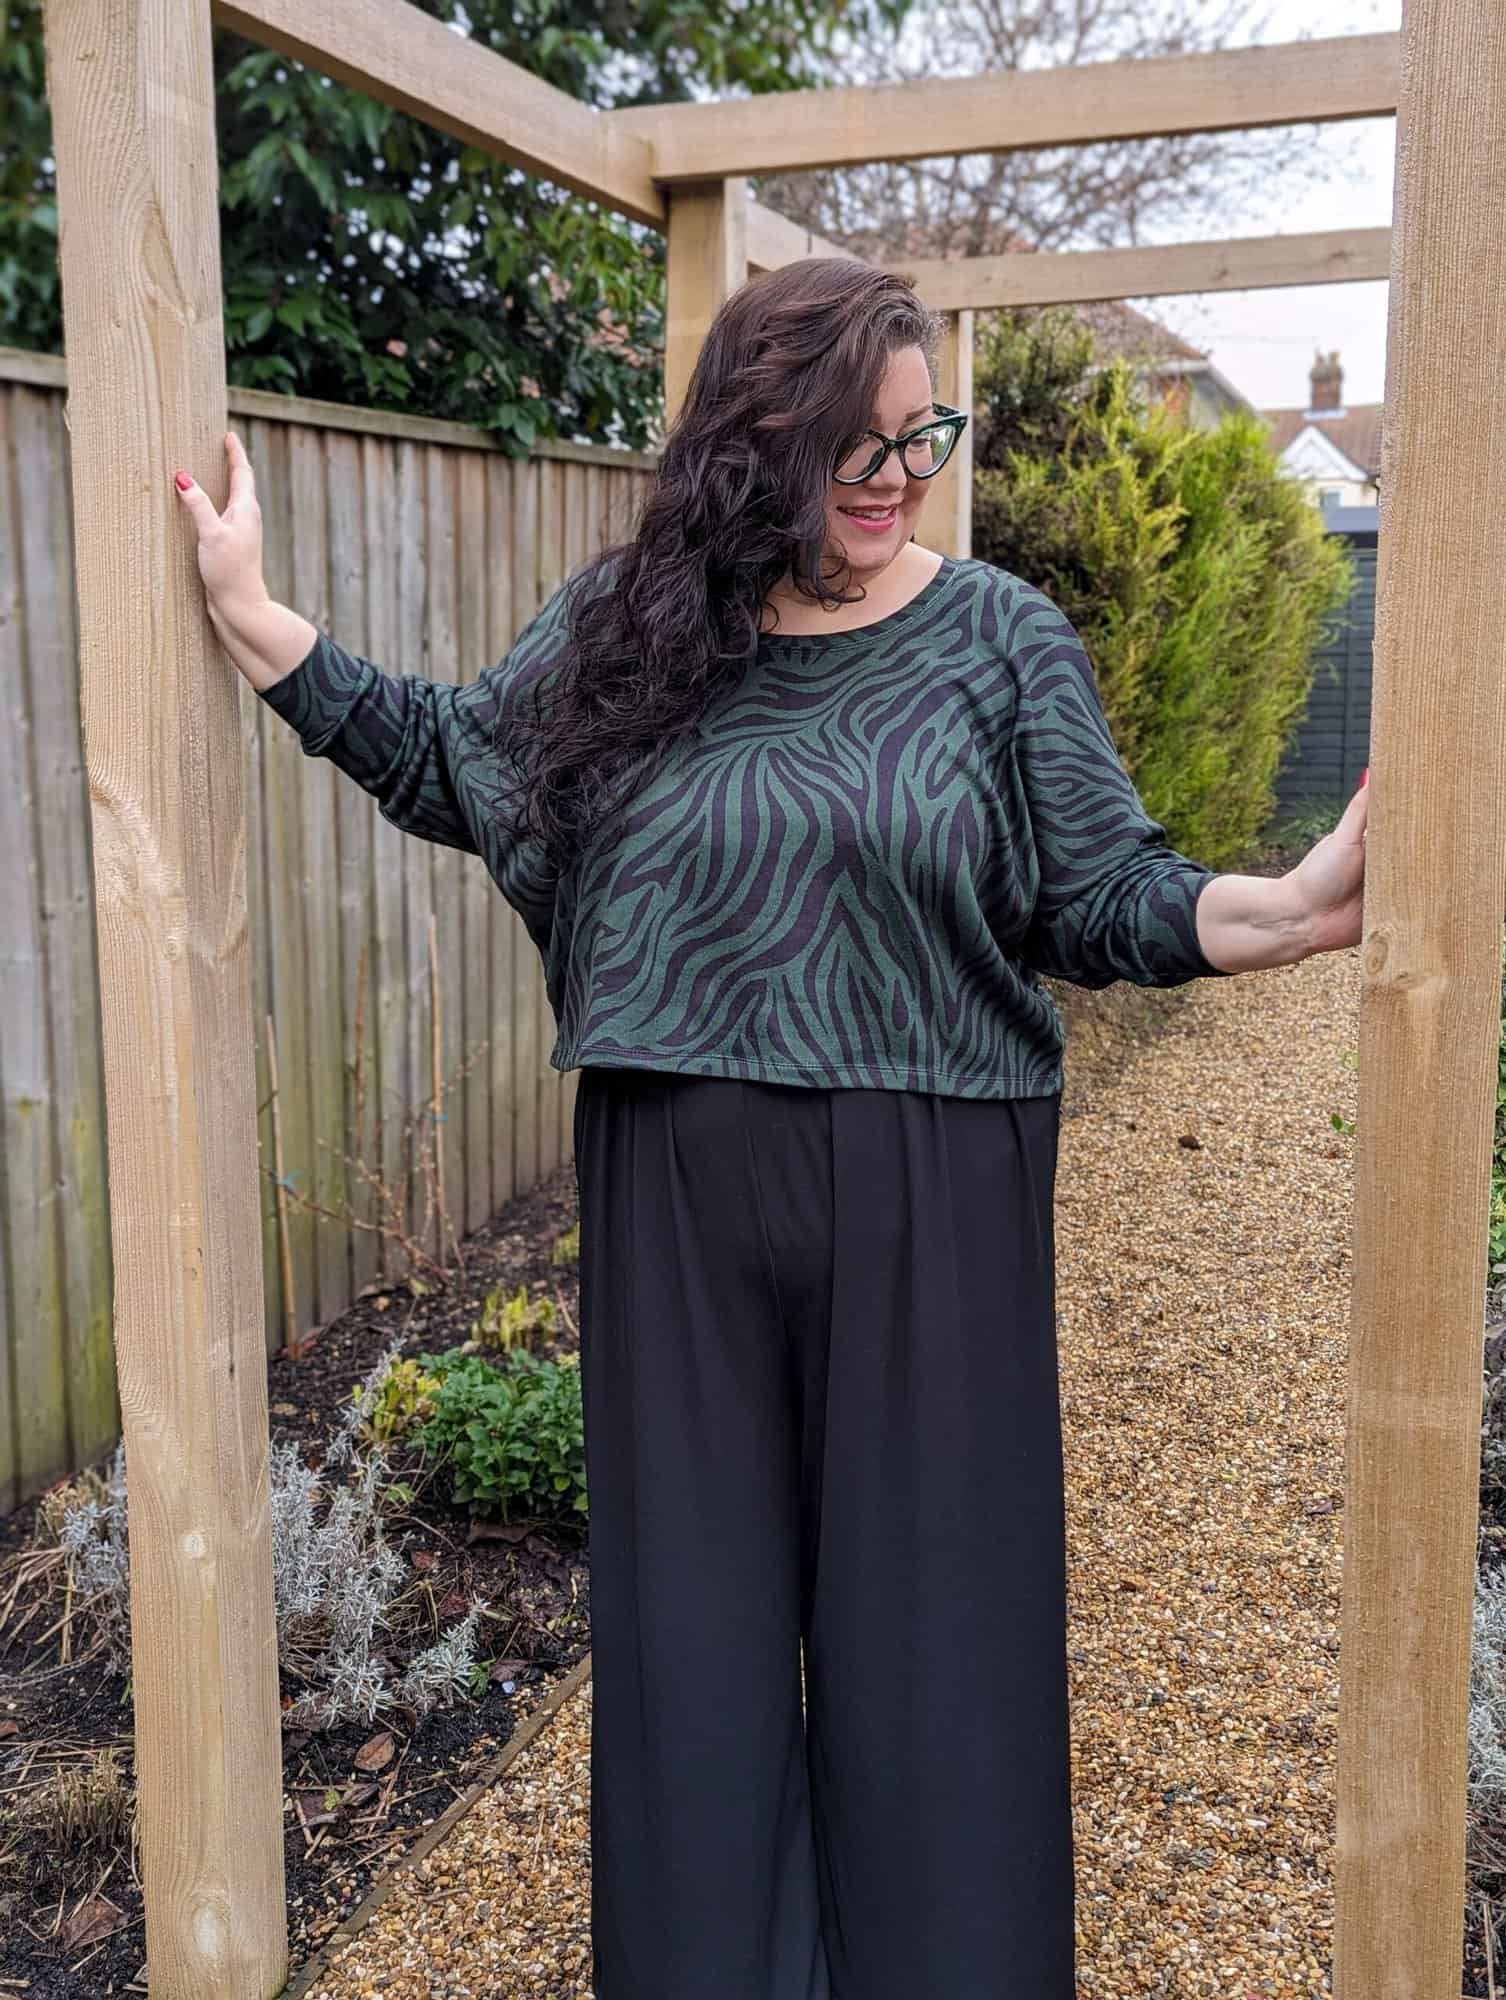
The Sunnyside Sweater is a dolman-style sweater with a generous, oversized fit. It features two hem lengths, crop and high hip, both of which are finished with a waistband to draw the garment back to the body. Alternately, the crop length has an option to finish the waistline with a double drawstring, allowing the wearer to tie the drawstrings at both sides of the waist, providing a unique and adjustable look. Opt for a traditional neckband for a classic look or choose a hood for a more casual and cozy feel. One of the standout features is the ability to create a colorblocked bodice, giving you the opportunity to mix and match different fabric prints and colors, adding a playful and personalized touch to your sweater.
Pattern options for the Sunnyside Sweater includes:
- Necklines: Crew Neckline / Scoop Neckline (adult only) / Lined + Unlined Hoods
- Hem Lengths: Banded Cropped / Drawstring Cropped / Banded High Hip
- Colorblocked + Solid Bodice Options
- All Versions Feature a Drop-Shoulder Dolman Sleeve with Cuffs
The Sunnyside Sweater pattern is drafted for light-to-medium weight knit fabrics with no specific stretch requirements for the bodice. Due to the oversized design of the pattern, fabrics that drape nicely will work best. For bands, use a knit fabric with at least 75% stretch and good recovery.
Specific Fabric Suggestions: Sweater Knits, Ribbed Sweater Knits, Spandex French Terry Blends, Waffle Knits, Brushed Waffle Knits, Double Brushed Polyester, Modal Knit Blends, etc.
We wouldn’t leave you hanging without showing off some of the options first! Let’s take a quick peek!
HEM LENGTHS: BANDED CROPPED / DRAWSTRING CROPPED / BANDED HIGH HIP
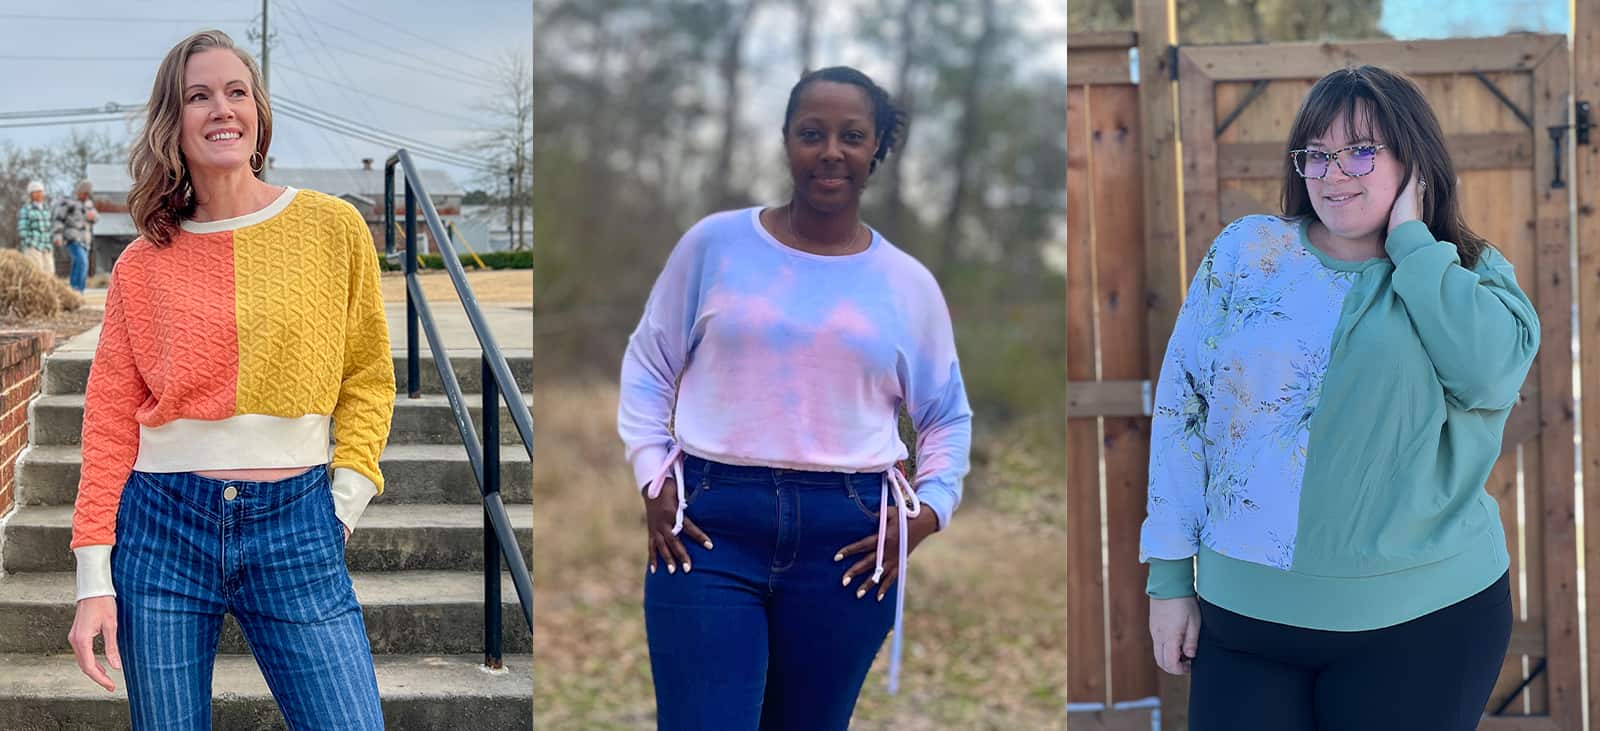
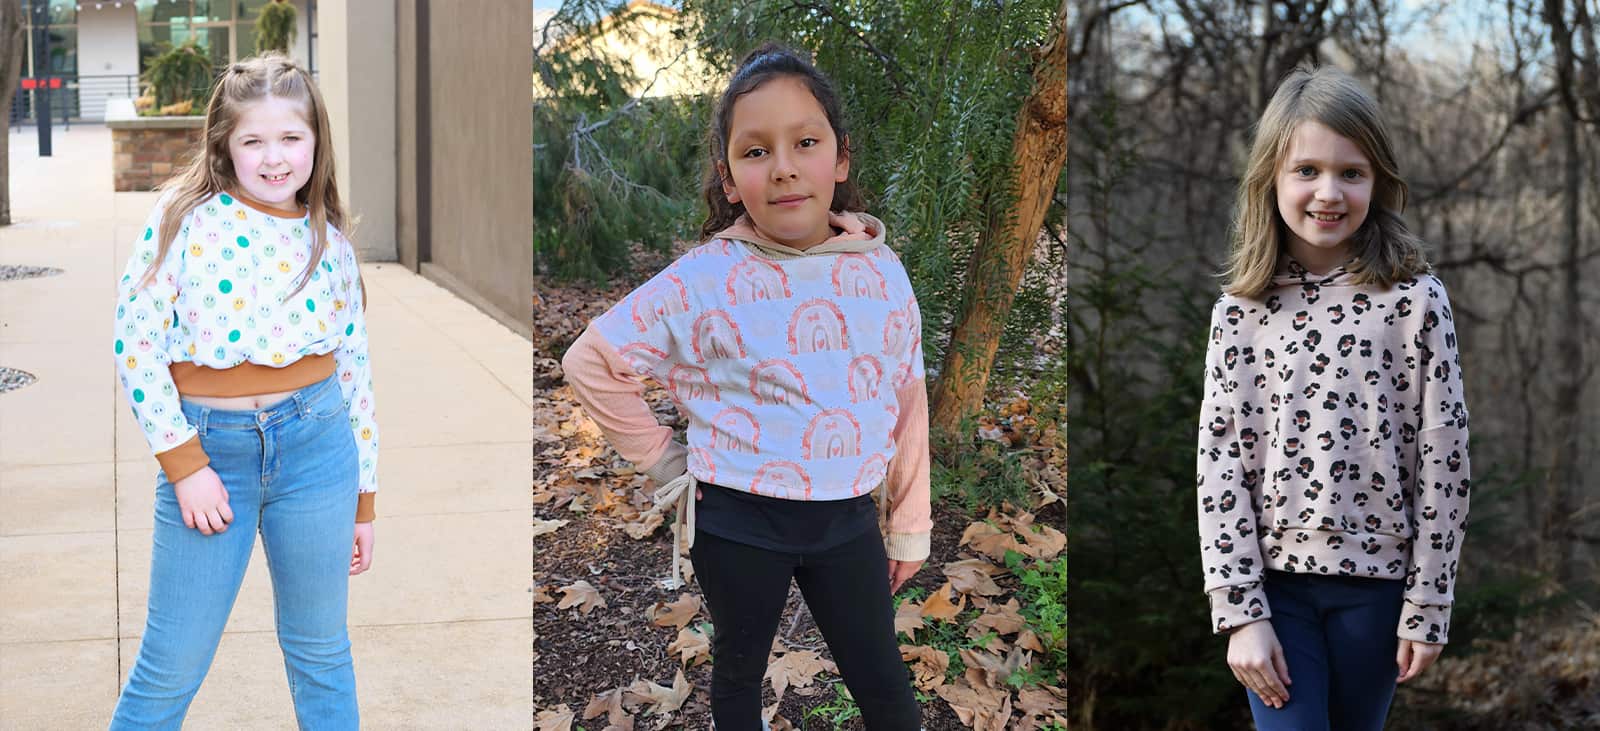
BODICES: COLORBLOCKED / SOLID
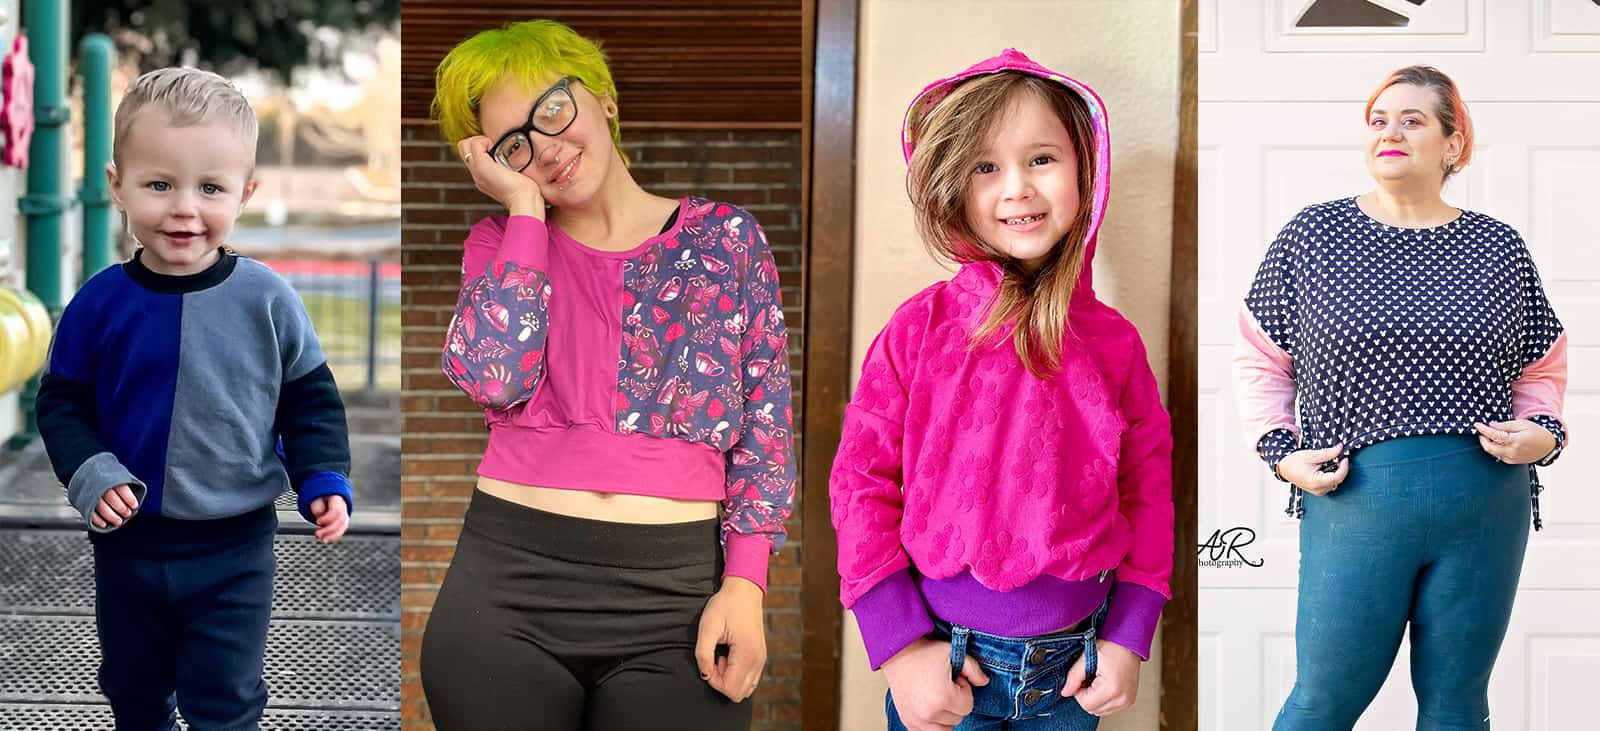
NECKLINES: CREW NECKBAND / SCOOP NECKBAND (ADULT ONLY) / HOODED
We are looking forward to seeing the Sunnyside Sweaters you make for yourself, your family + your clients! Both patterns are available now and on sale (no code needed) through 11:59pm CST, March 3, 2024.
Grab your copy of the Sunnyside patterns here: Sunnyside Sweater | Sunnyside Sweater – Youth | Sunnyside Sweater – Bundle
As always, we’ve got more photos for you to use as inspiration! Head over to the Facebook group to browse our albums full of gorgeous photos, compliments of our tester team!
Sunnyside Sweater Adult Album | Sunnyside Sweater Youth Album
But wait, there’s more! We have an Easy Hacks blog post for the Sunnyside Sweater patterns, to help you take the pattern a little further!
Sunnyside Sweater :: Easy Hacks
The Sunnyside Sweater (in both Adult – Hourglass and Youth sizes!) just landed in our shop!
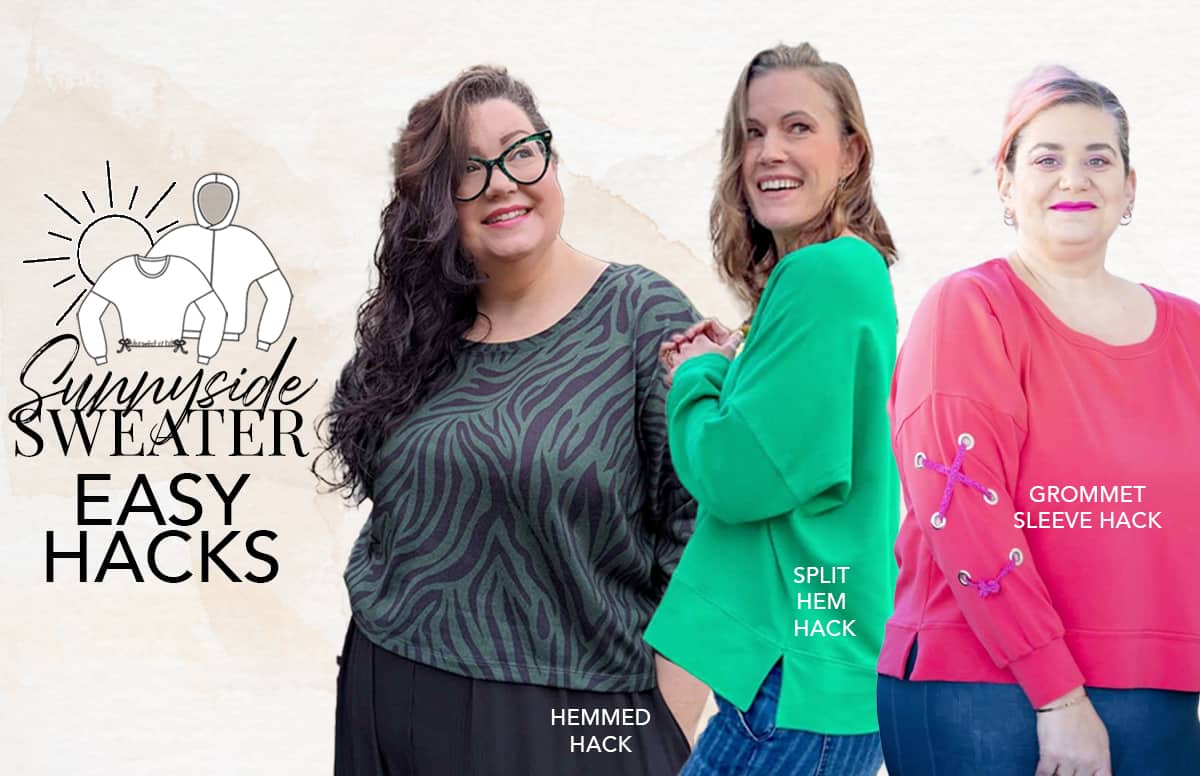
With many of our pattern releases, we like to provide extra ways to style and sew them up. And that’s exactly what we are doing here! We’ve got three more ways for you to make the Sunnyside Sweater patterns. Keep reading for some quick and easy hacks!
The Sunnyside Sweater is a dolman-style sweater with a generous, oversized fit. It features two hem lengths, crop and high hip, both of which are finished with a waistband to draw the garment back to the body. Alternately, the crop length has an option to finish the waistline with a double drawstring, allowing the wearer to tie the drawstrings at both sides of the waist, providing a unique and adjustable look. Opt for a traditional neckband for a classic look or choose a hood for a more casual and cozy feel. One of the standout features is the ability to create a colorblocked bodice, giving you the opportunity to mix and match different fabric prints and colors, adding a playful and personalized touch to your sweater.
Before we get started, make sure you grab a copy of the Sunnyside Sweater patterns in our shop:
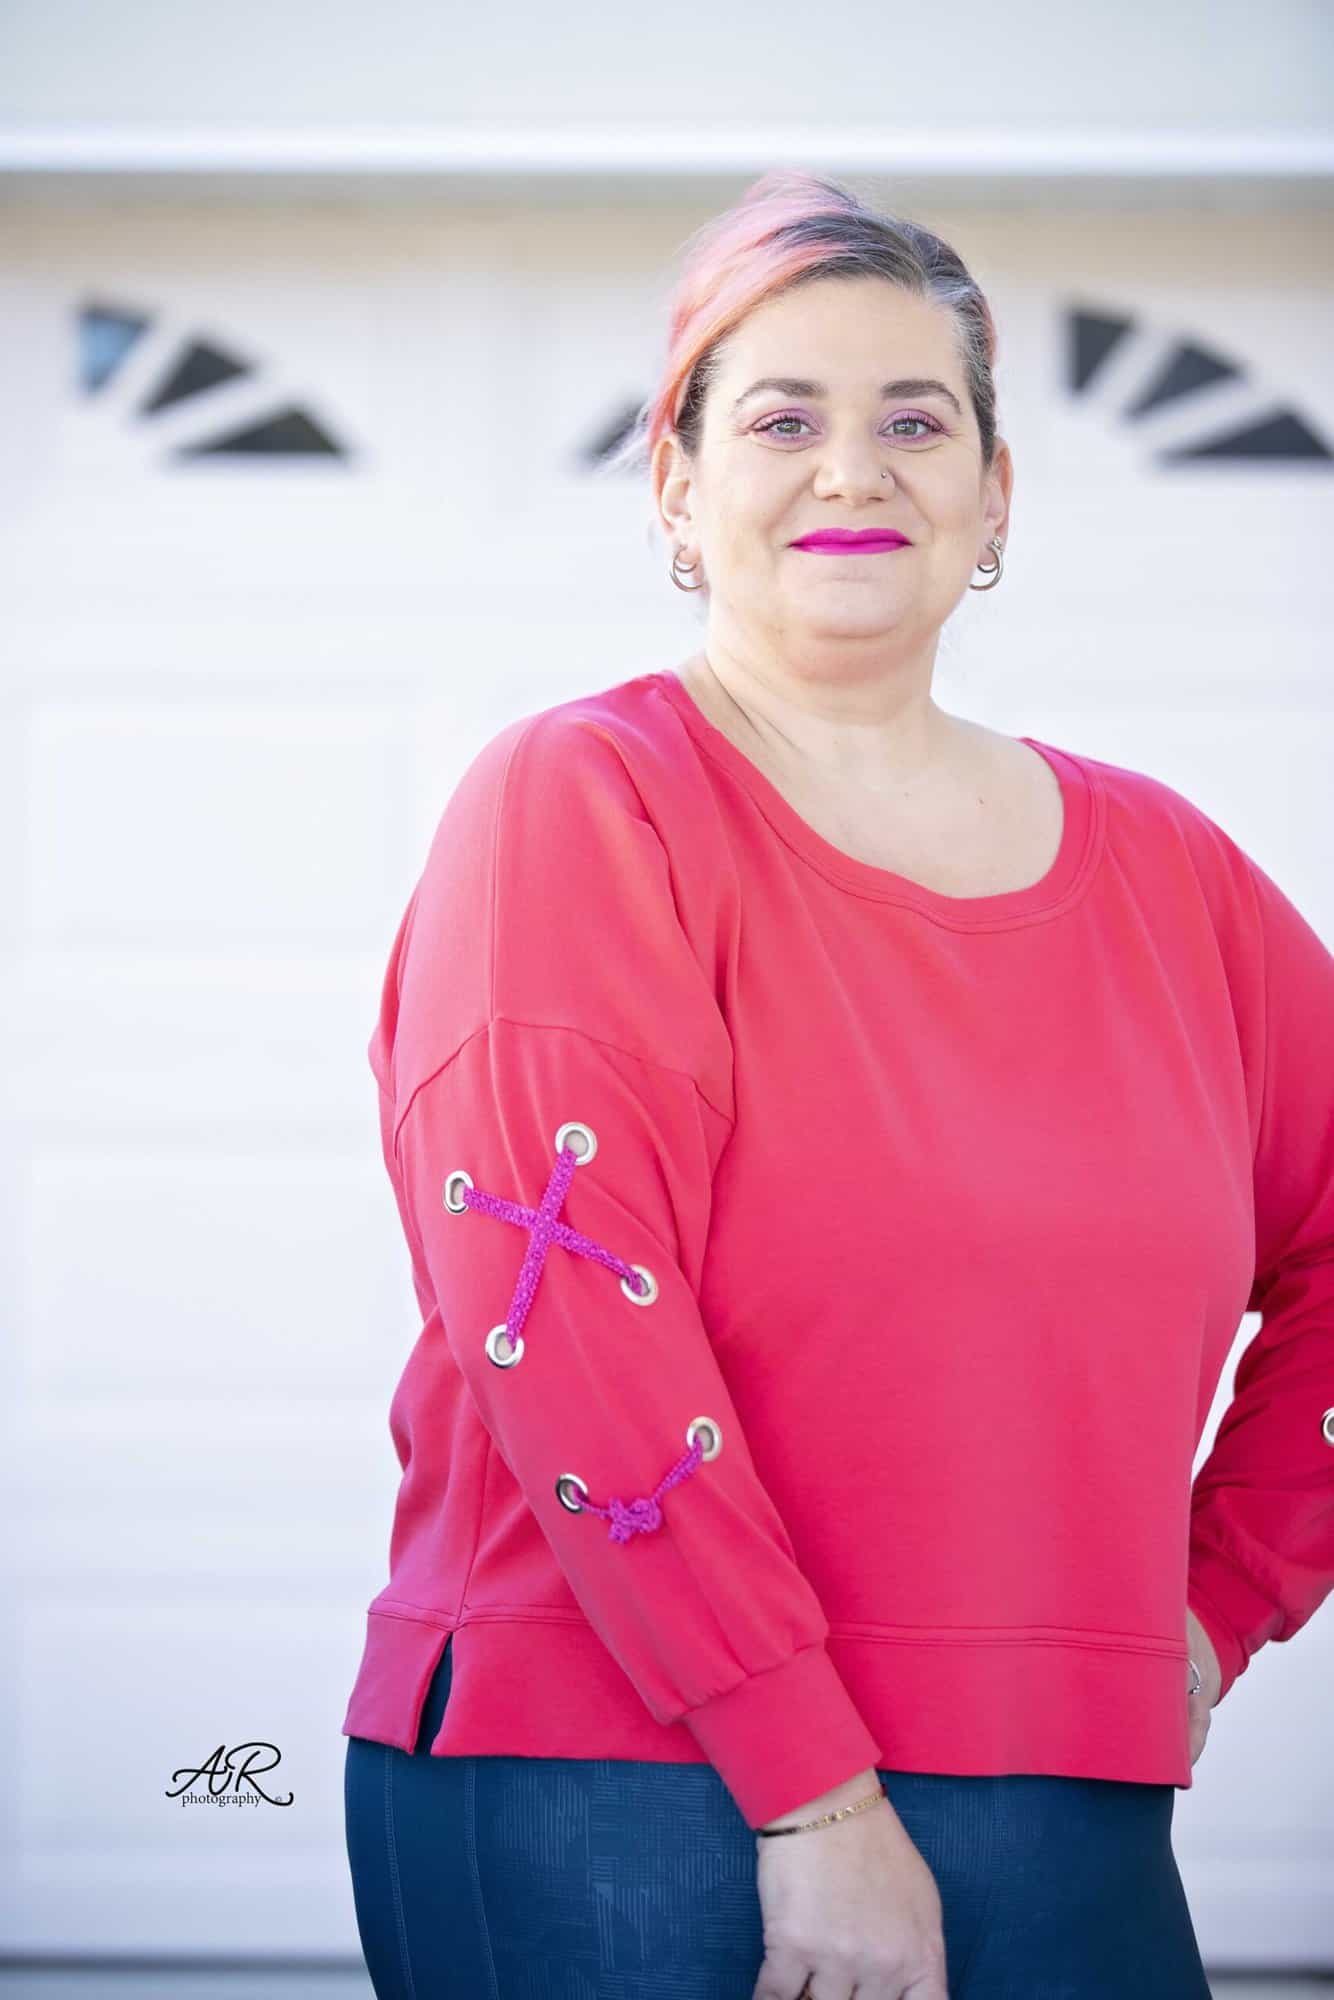
Grommet Sleeve Hack
Let’s start with a super easy sleeve hack! A great way to add some visual interest to the Sunnyside Sweater sleeves is to add grommets and tread ribbon through them. The great thing about this easy hack is that it does not require any modifications to the pattern pieces or even the tutorial, just a couple of extra steps.
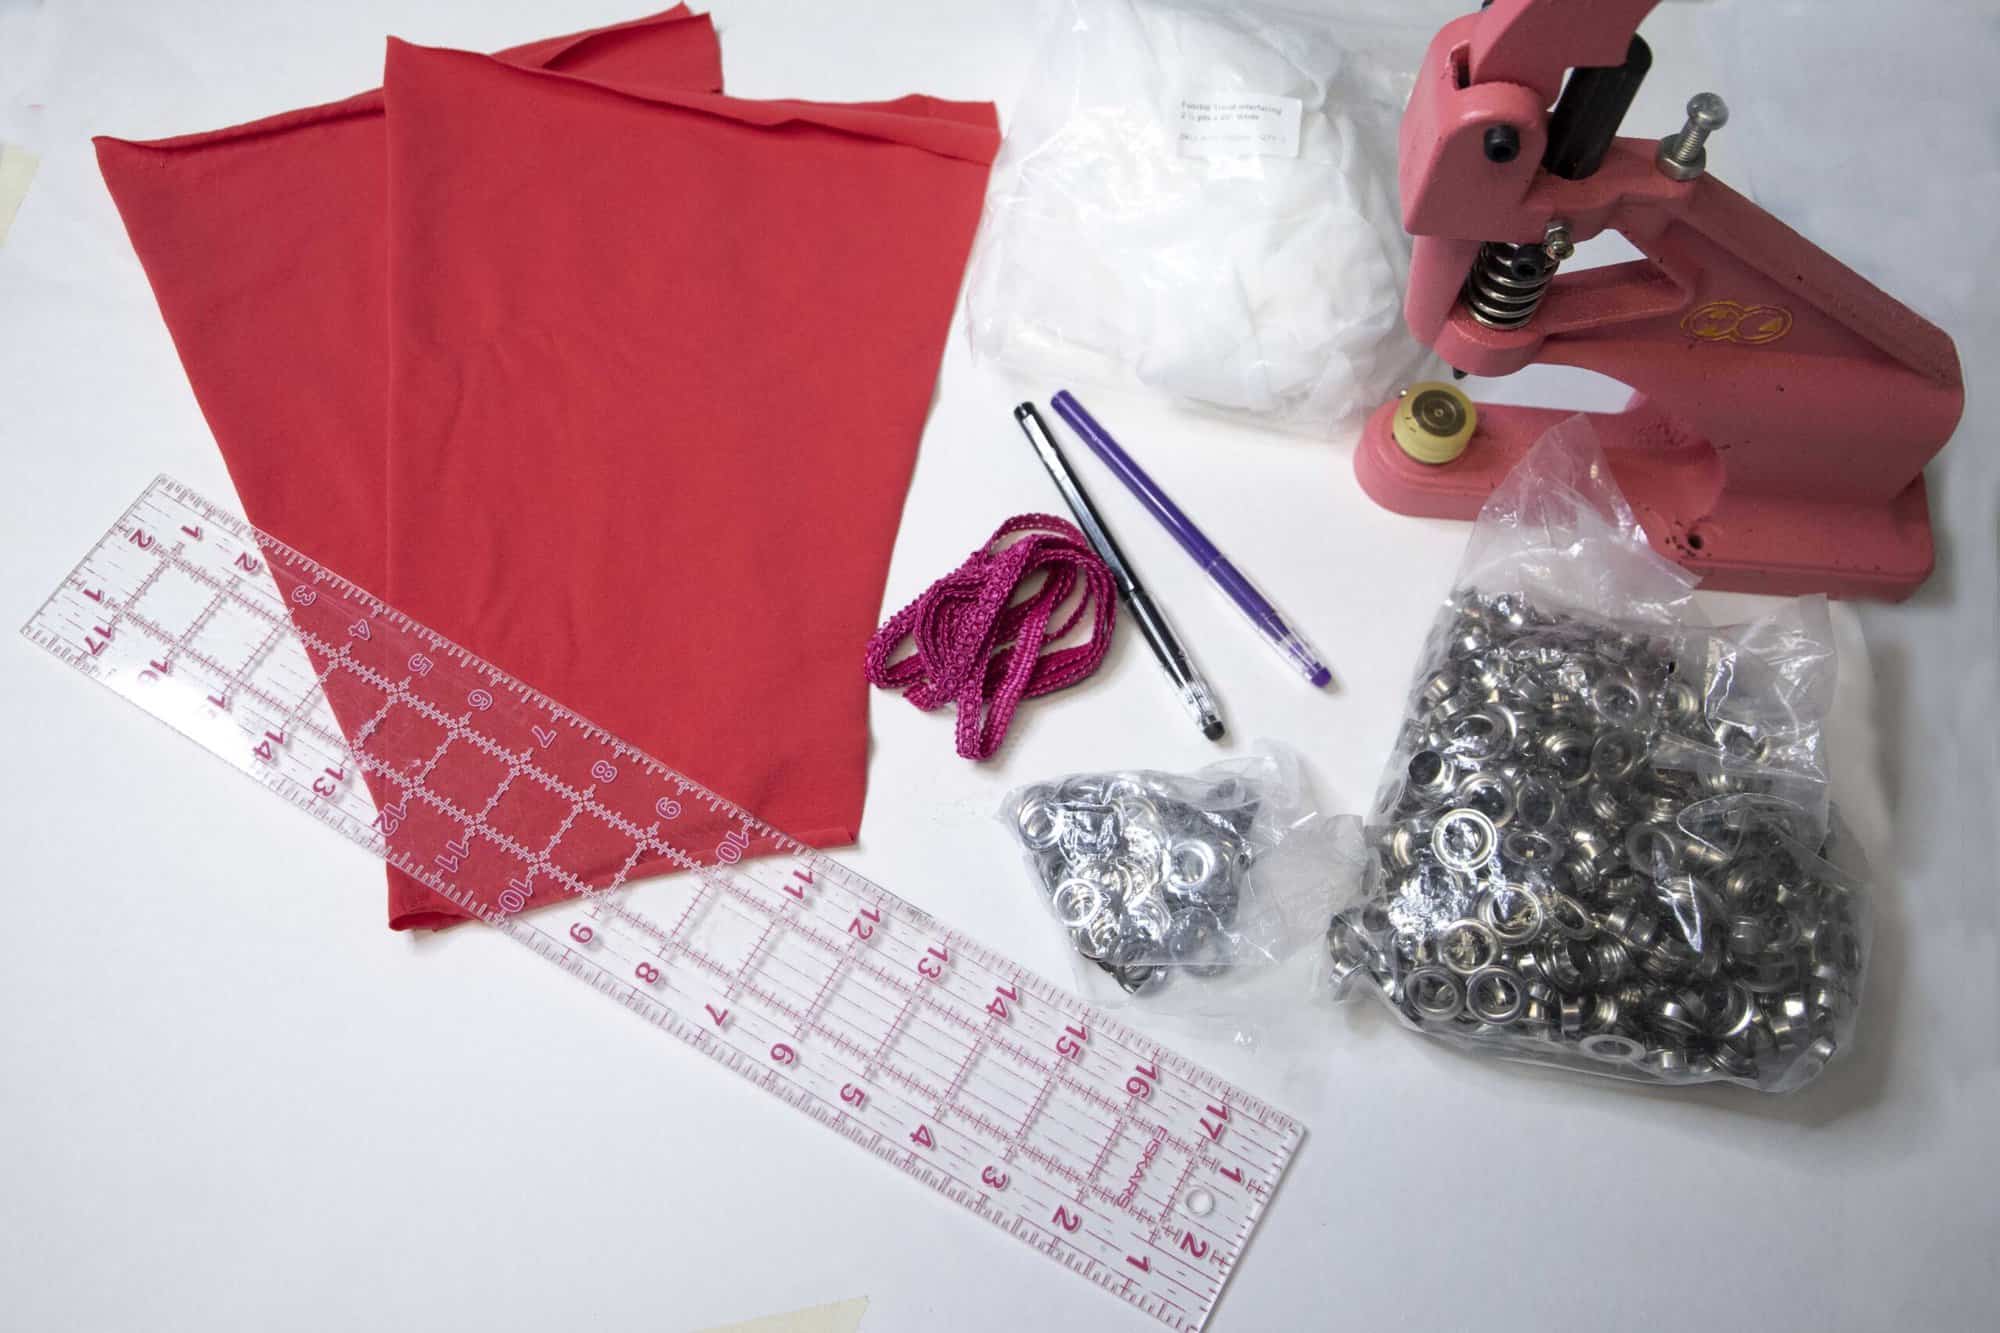
You can create this hack before you sew any of the tutorial steps. You will need:
- the two sleeves
- fusible interfacing (I like tricot interfacing for this, but a slightly thicker one would work too)
- 12 grommets ( I prefer 12 mm ones)
- a marking pen
- quilting ruler
- your preferred hole punching and grommets tool
- ribbon (I didn’t have any on hand but I think a 1/2″ satin ribbon would look the best)
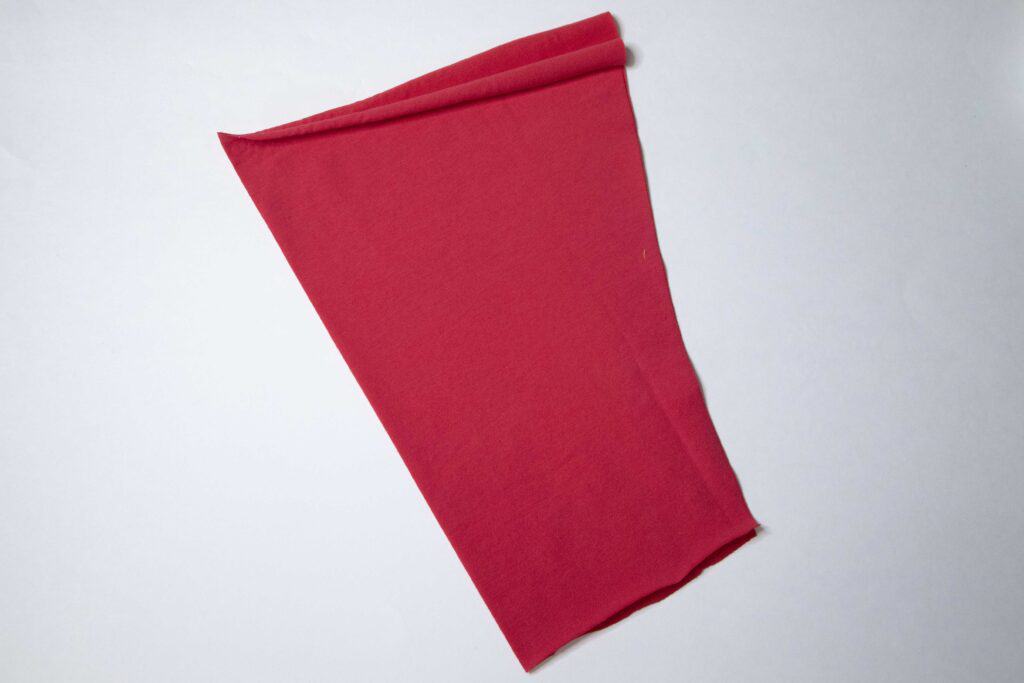
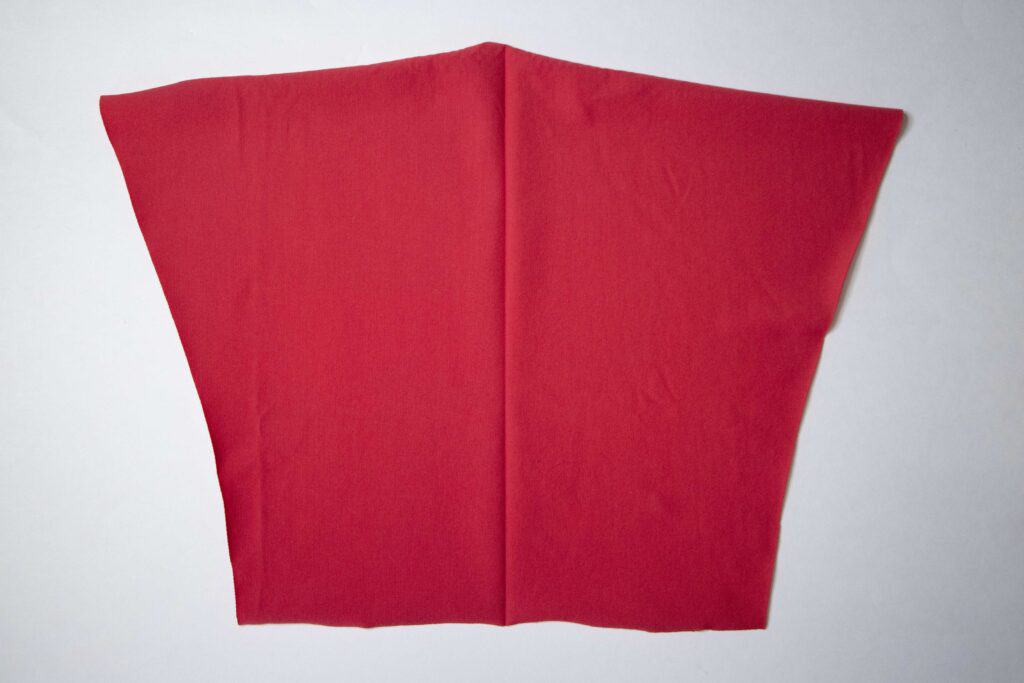
Let’s do this! Start by marking the center of the sleeve. I like to fold it in half and press it with my iron so it creates a crease.
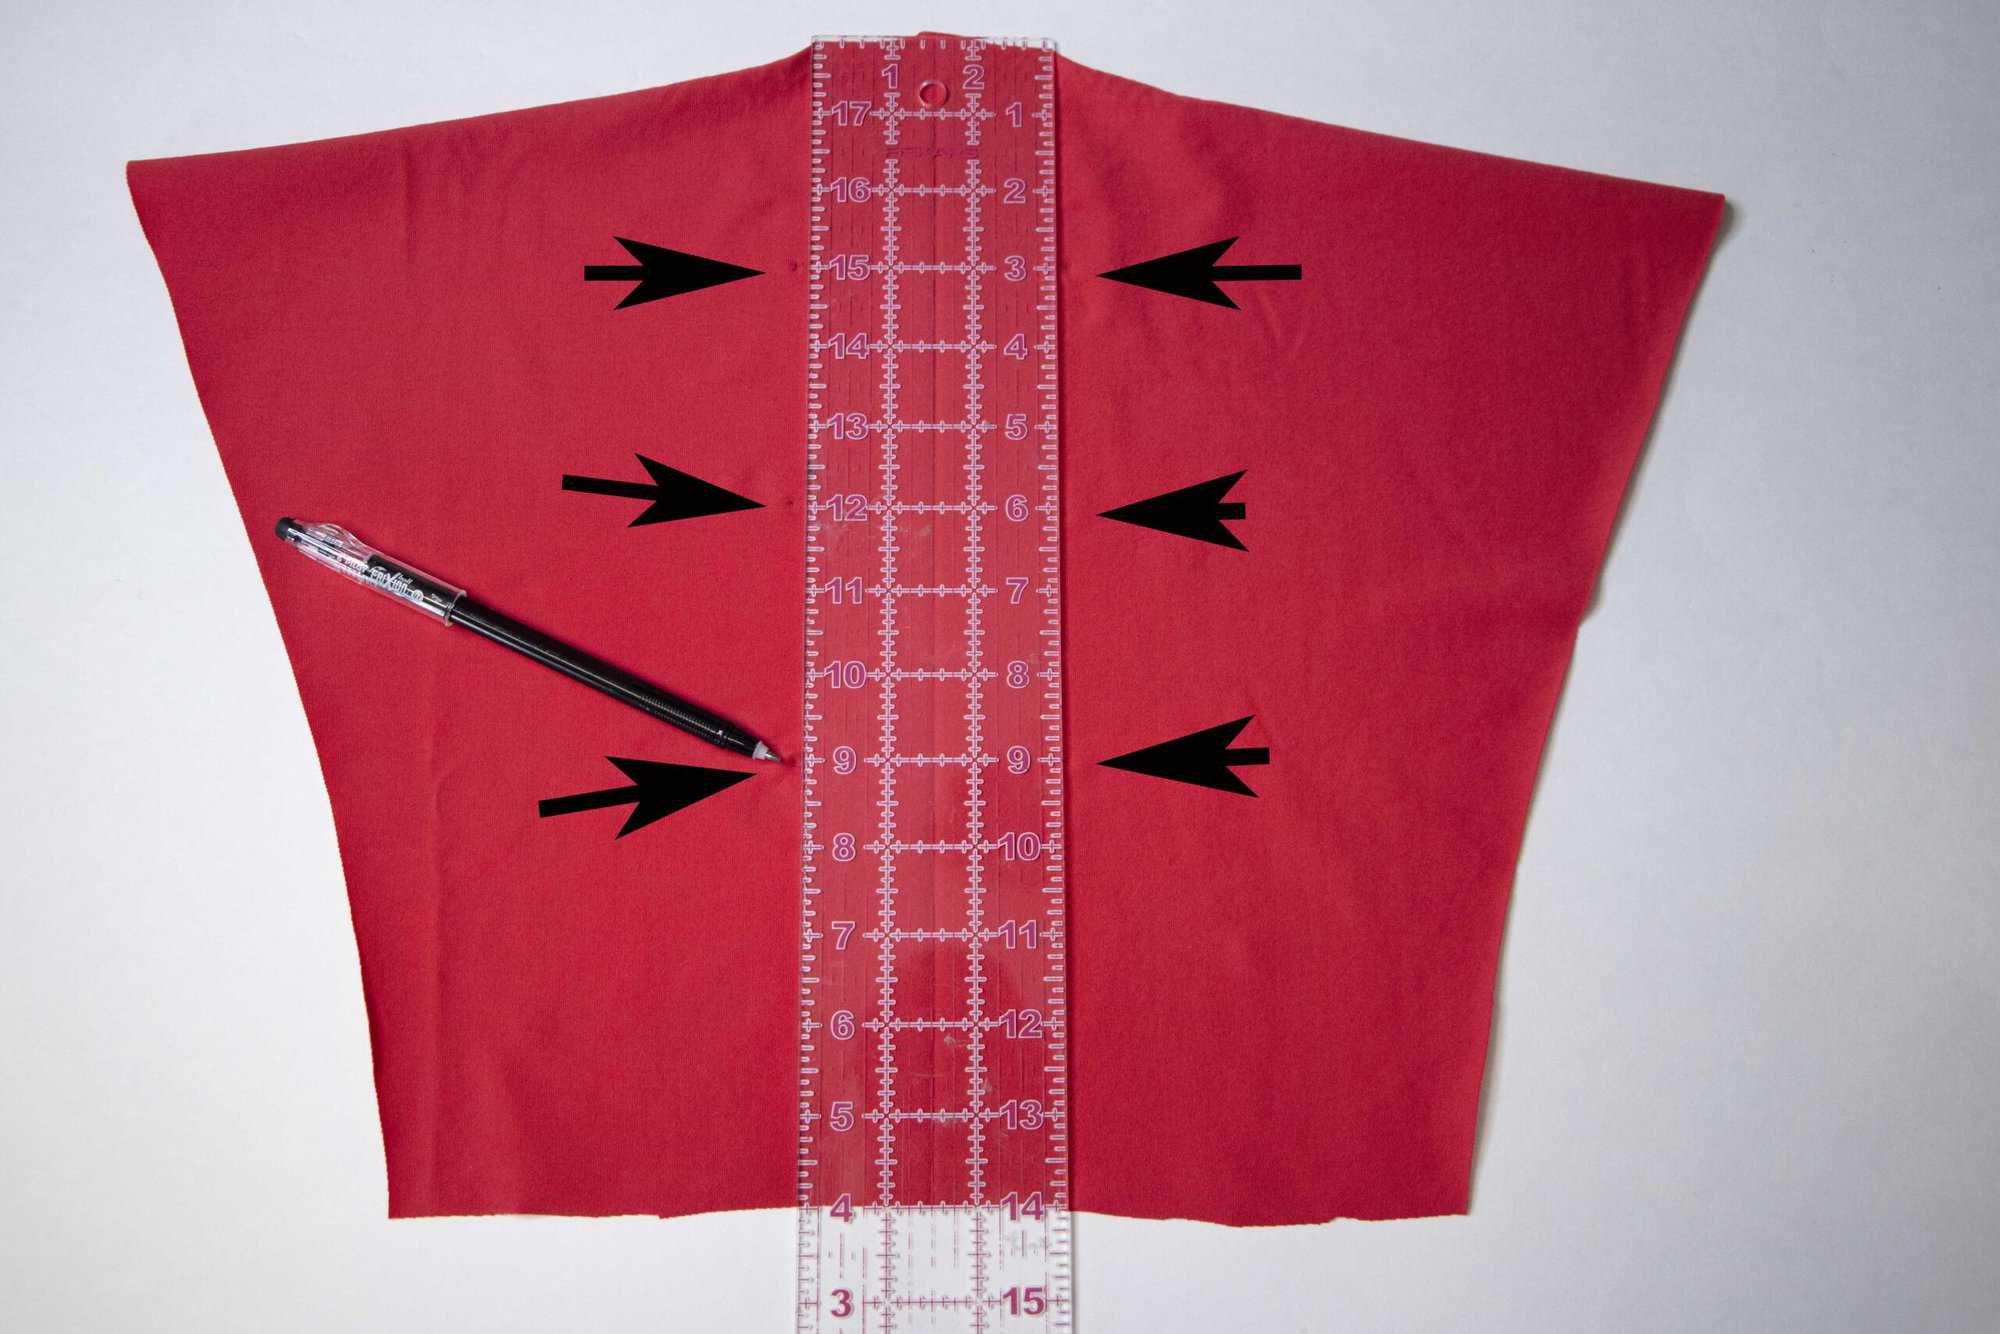
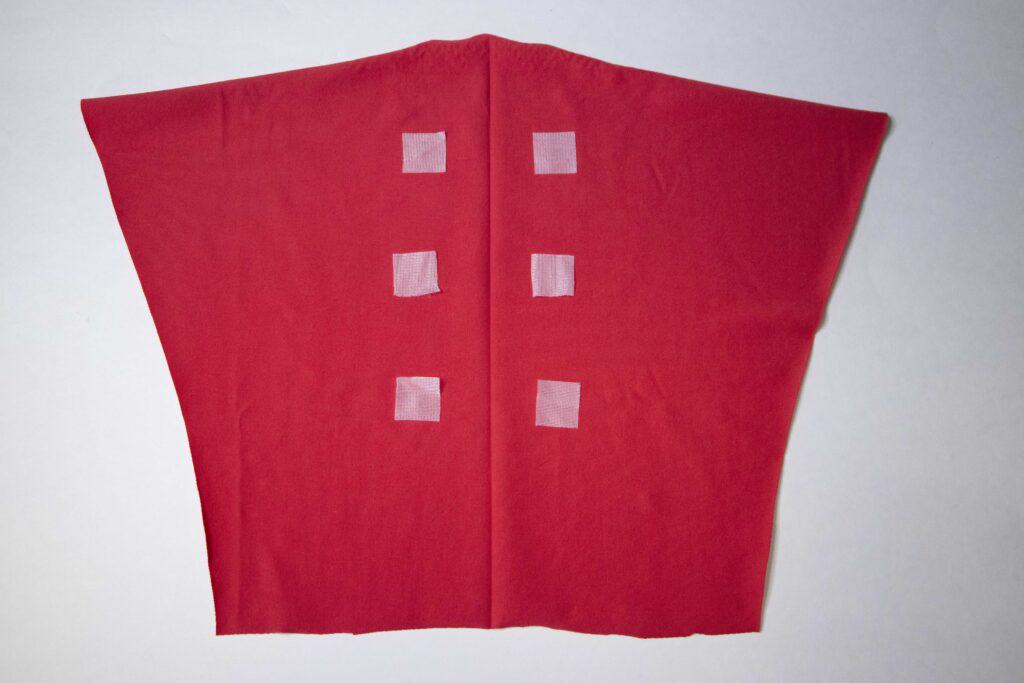
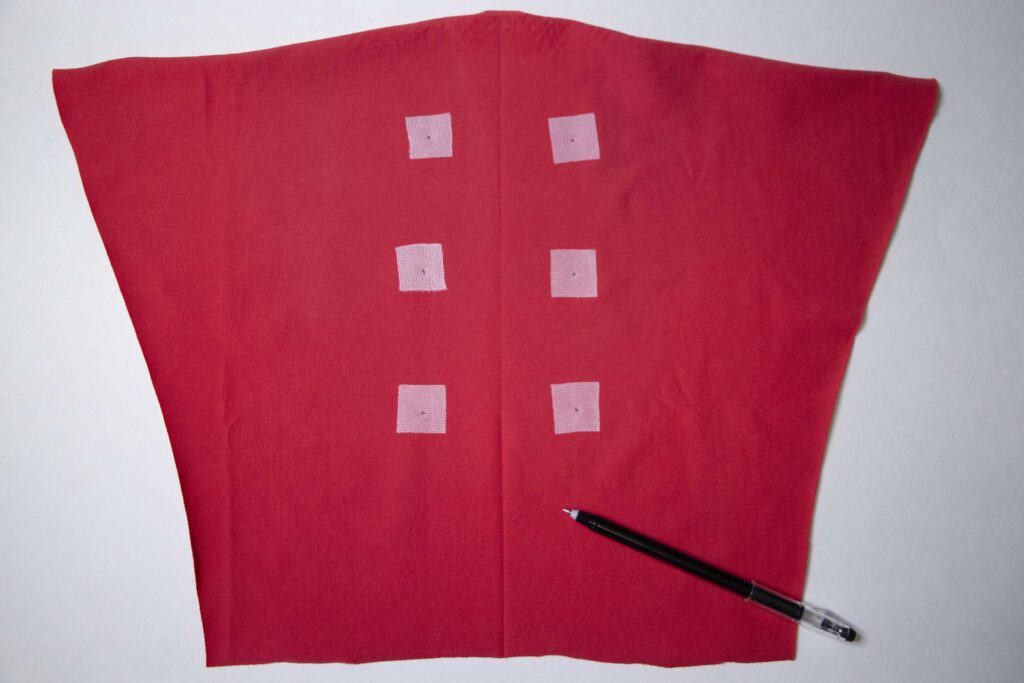
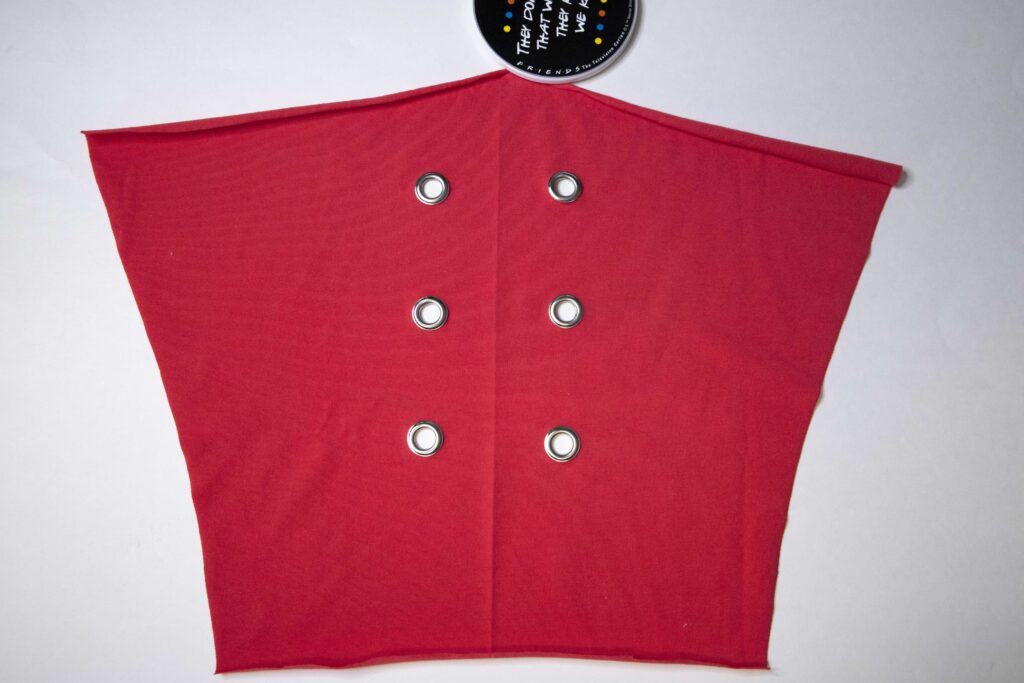
Open the sleeve and mark the grommets placement on the wrong side. I like to space them 3″ from the top and from each other. I also prefer 3 sets but if you want to add more grommets and/or space them closer to each other you can certainly do that.
Cut (12) 1″x1″ pieces of fusible interfacing – you will need 6 for each sleeve. Place them on the marked location and fuse them in place. I used a Frixon pen for my markings so they disappeared when I fused the interfacing. No big deal! Using the ruler, I added them again.
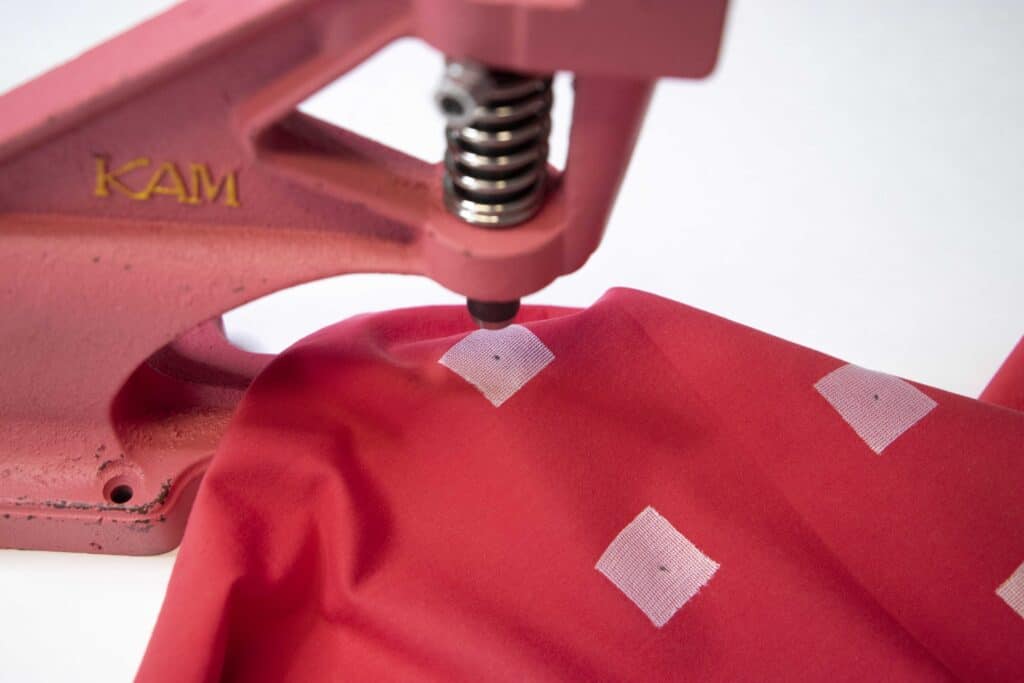
Time to punch the holes for your grommets. My preferred method for this step is using a KAM press with a 12 mm hole punch die. I am also a bag maker so I had this tool already. Admittedly it is a splurge so no stressing if you do not have one. You can simple draw the grommet holes and cut by hand.
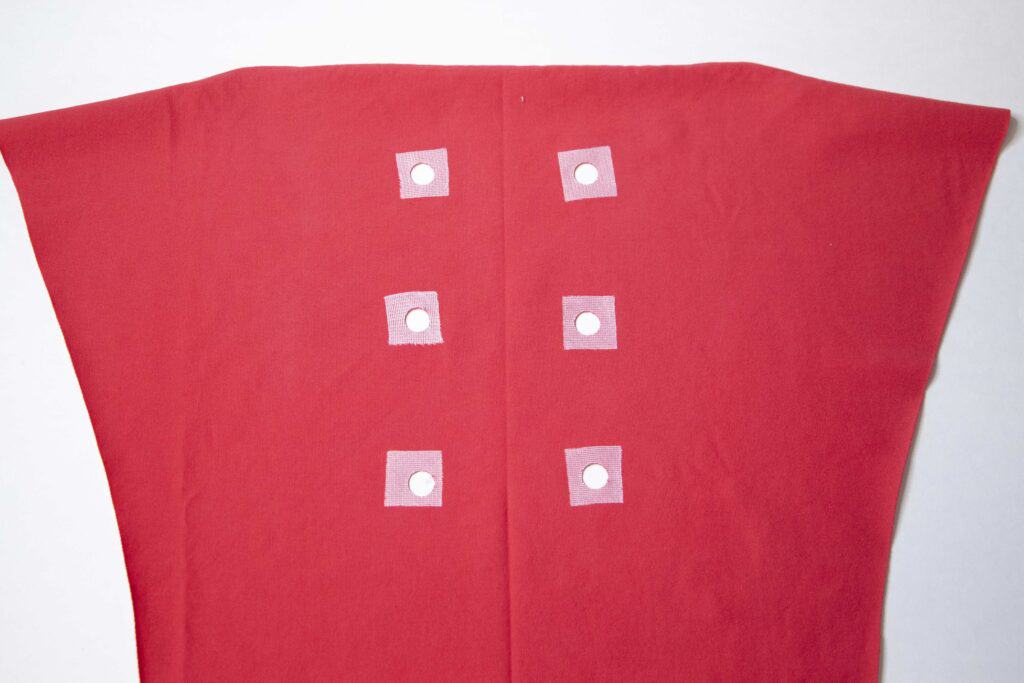
Add the grommets! You can use a grommets table press or a hand held one for this step.

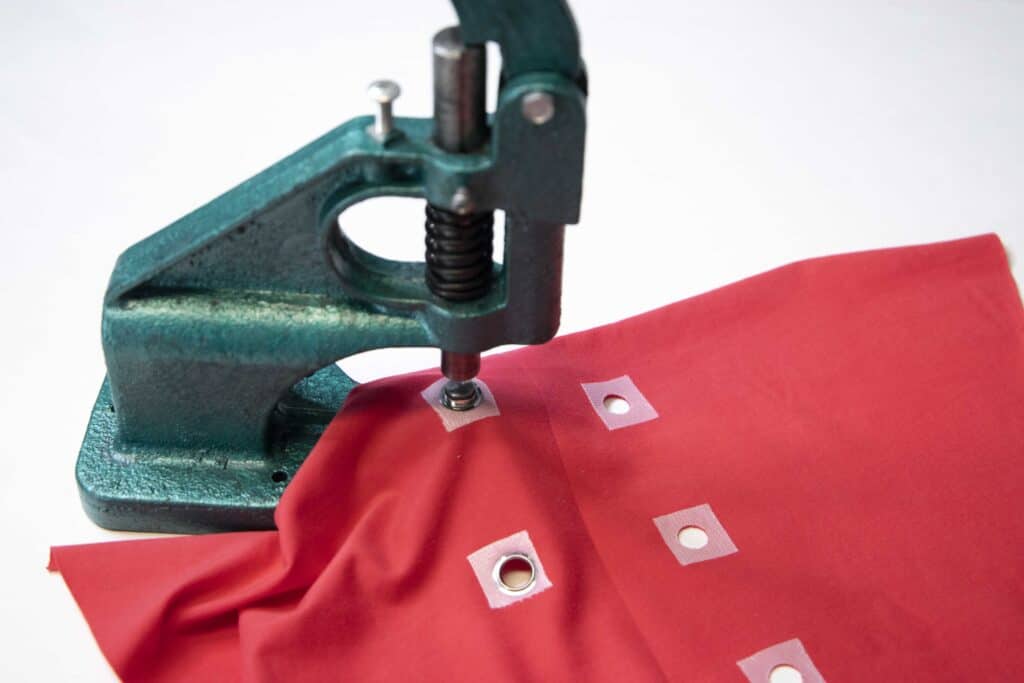
Lastly, admire that sleeve and thread your favorite ribbon through the holes.
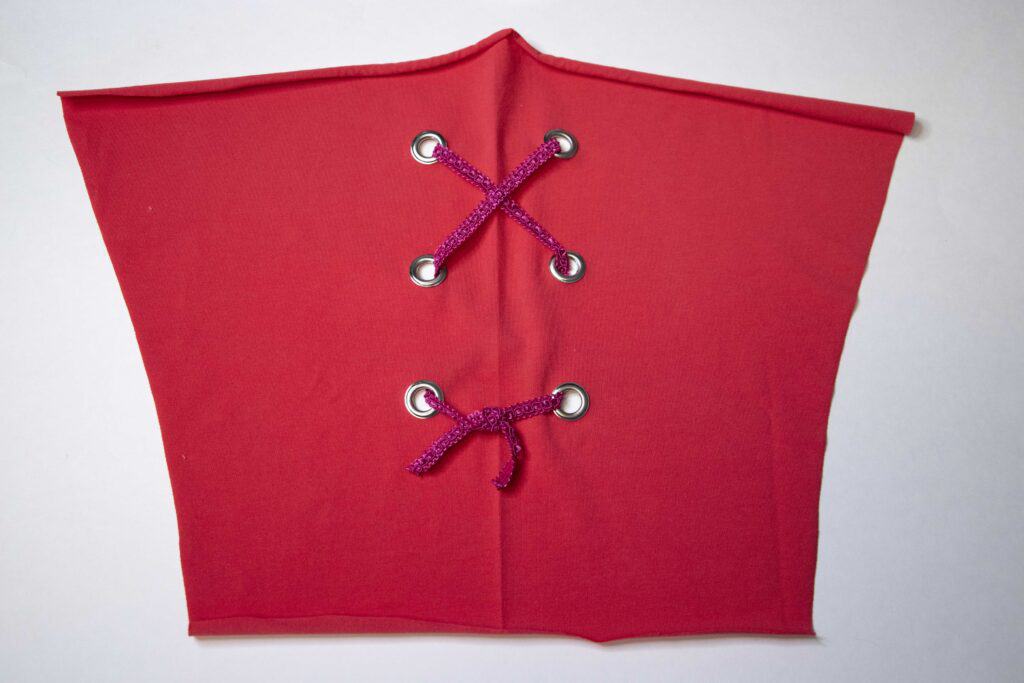
You can now sew your Sunnyside Sweater as instructed in the tutorial.
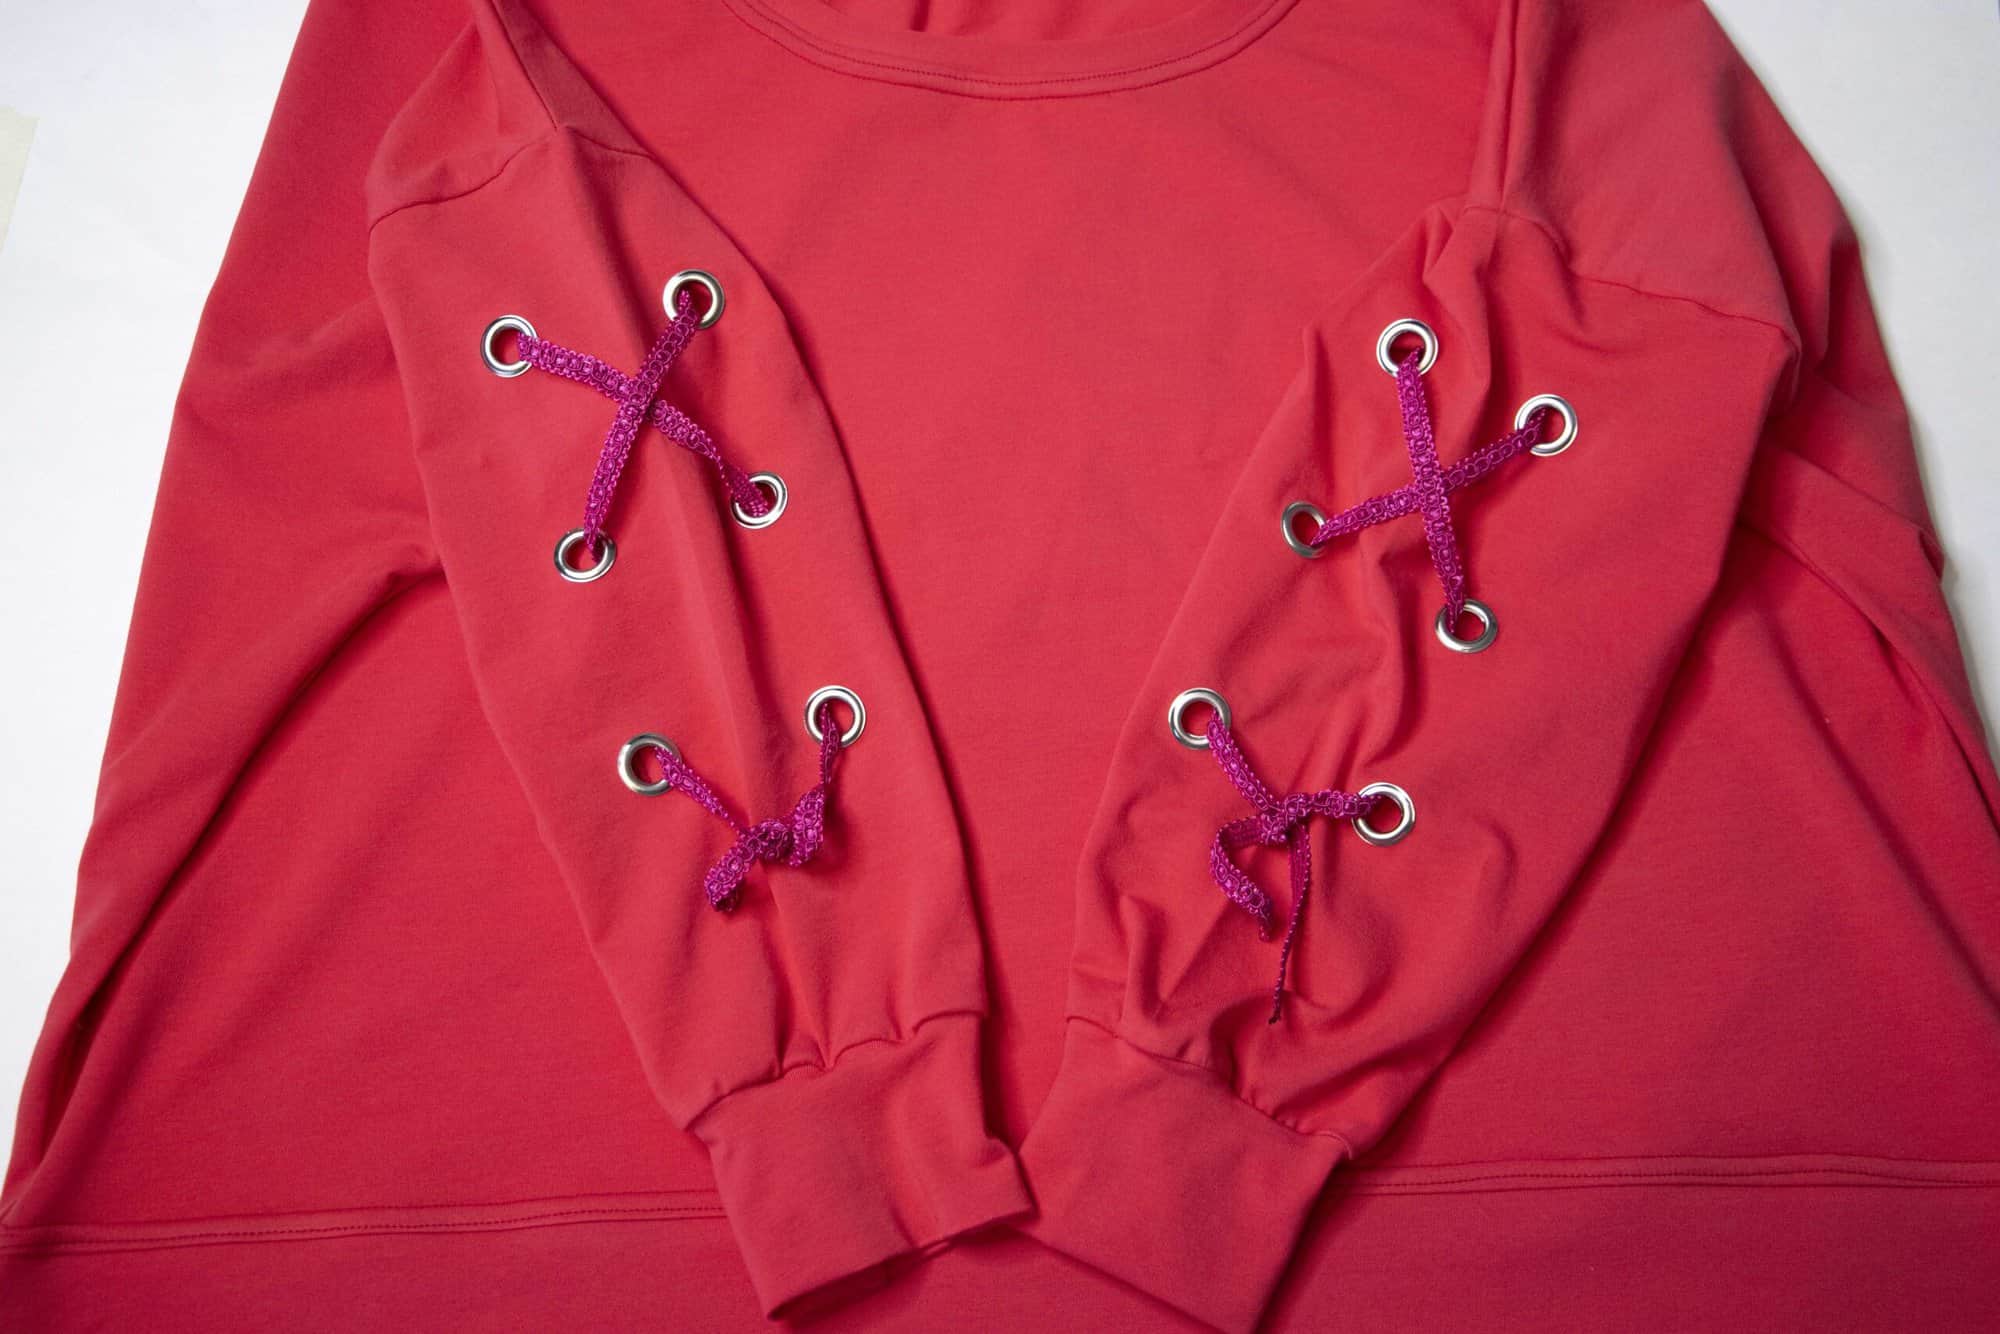
Boom! You did it! I did the high hip, scoop neckline option for this cotton spandex Sunnyside Sweater. I also likes the look of a 1:1 band with a side split so that’s what I used for my waistband. Luckily we have a hack for it too! 💥


Hemmed Hack
Honestly, this one couldn’t be easier! For a trendy oversized look, you can leave off the waistband and simply hem your Sunnyside instead. Here’s how I made mine.
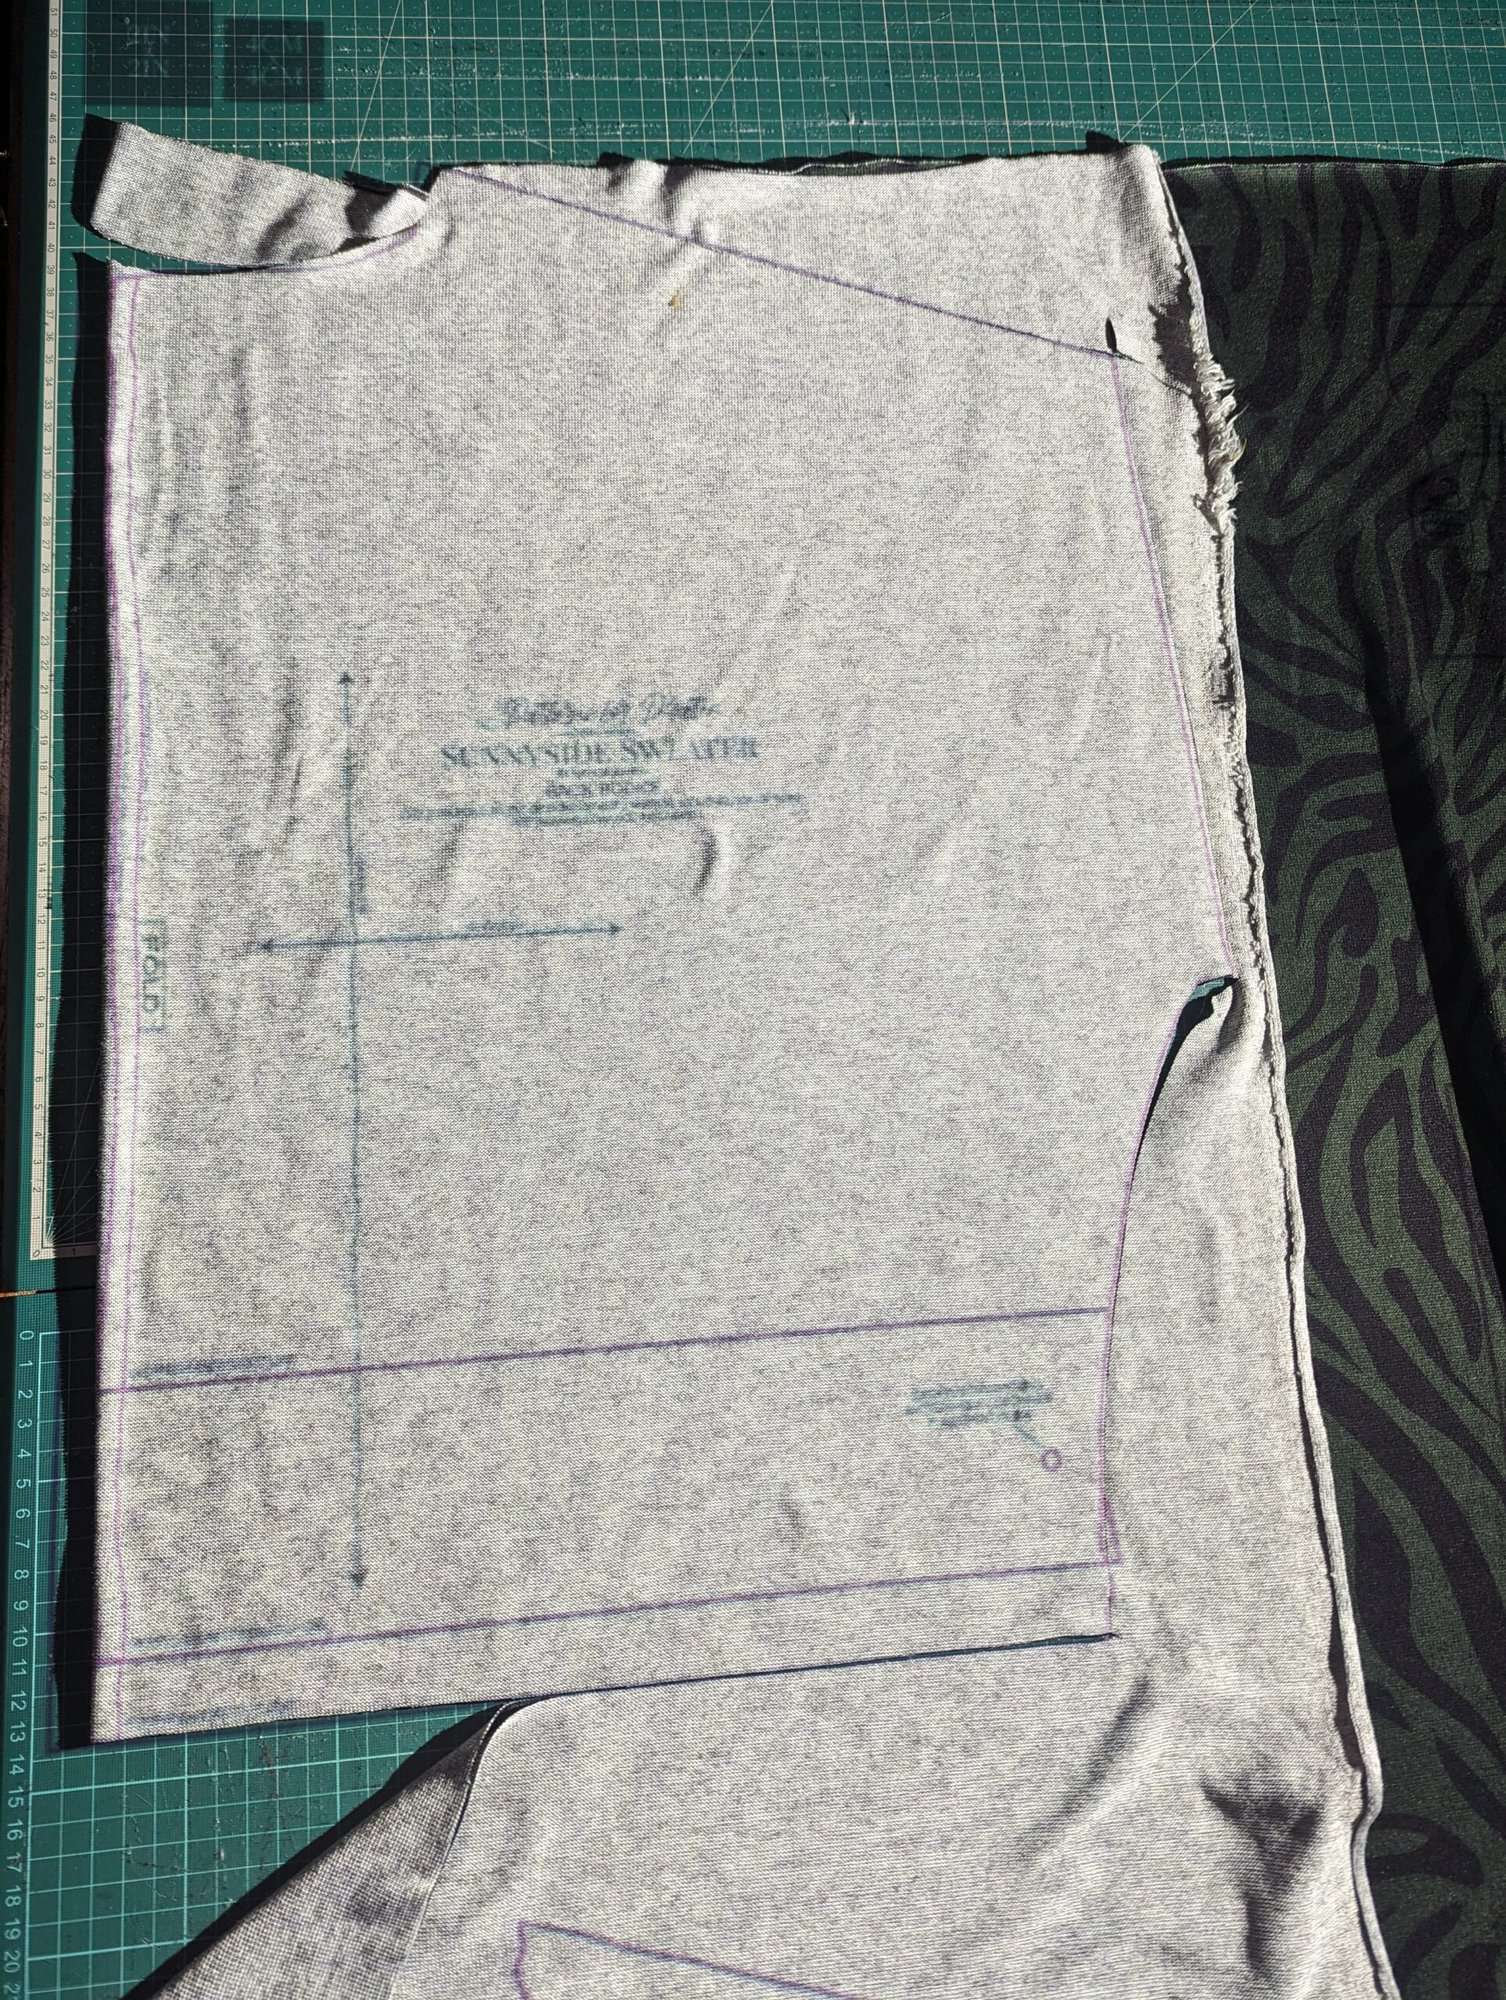
First you’ll want to decide on the finished length you want for your sweater. You can either measure the length of a sweater you already have or run a tape measure down from your shoulder and over your bust, then use the tape to decide on the finished length you want. I had already made a regular Sunnyside and wanted a long crop length for my finished hem, so I cut on the bottom cutline (for the banded high hip length).
Turn the hem up by ¾” and press. I like to use a slightly deeper hem than the usual 1/2″ because I think it hangs a bit better.
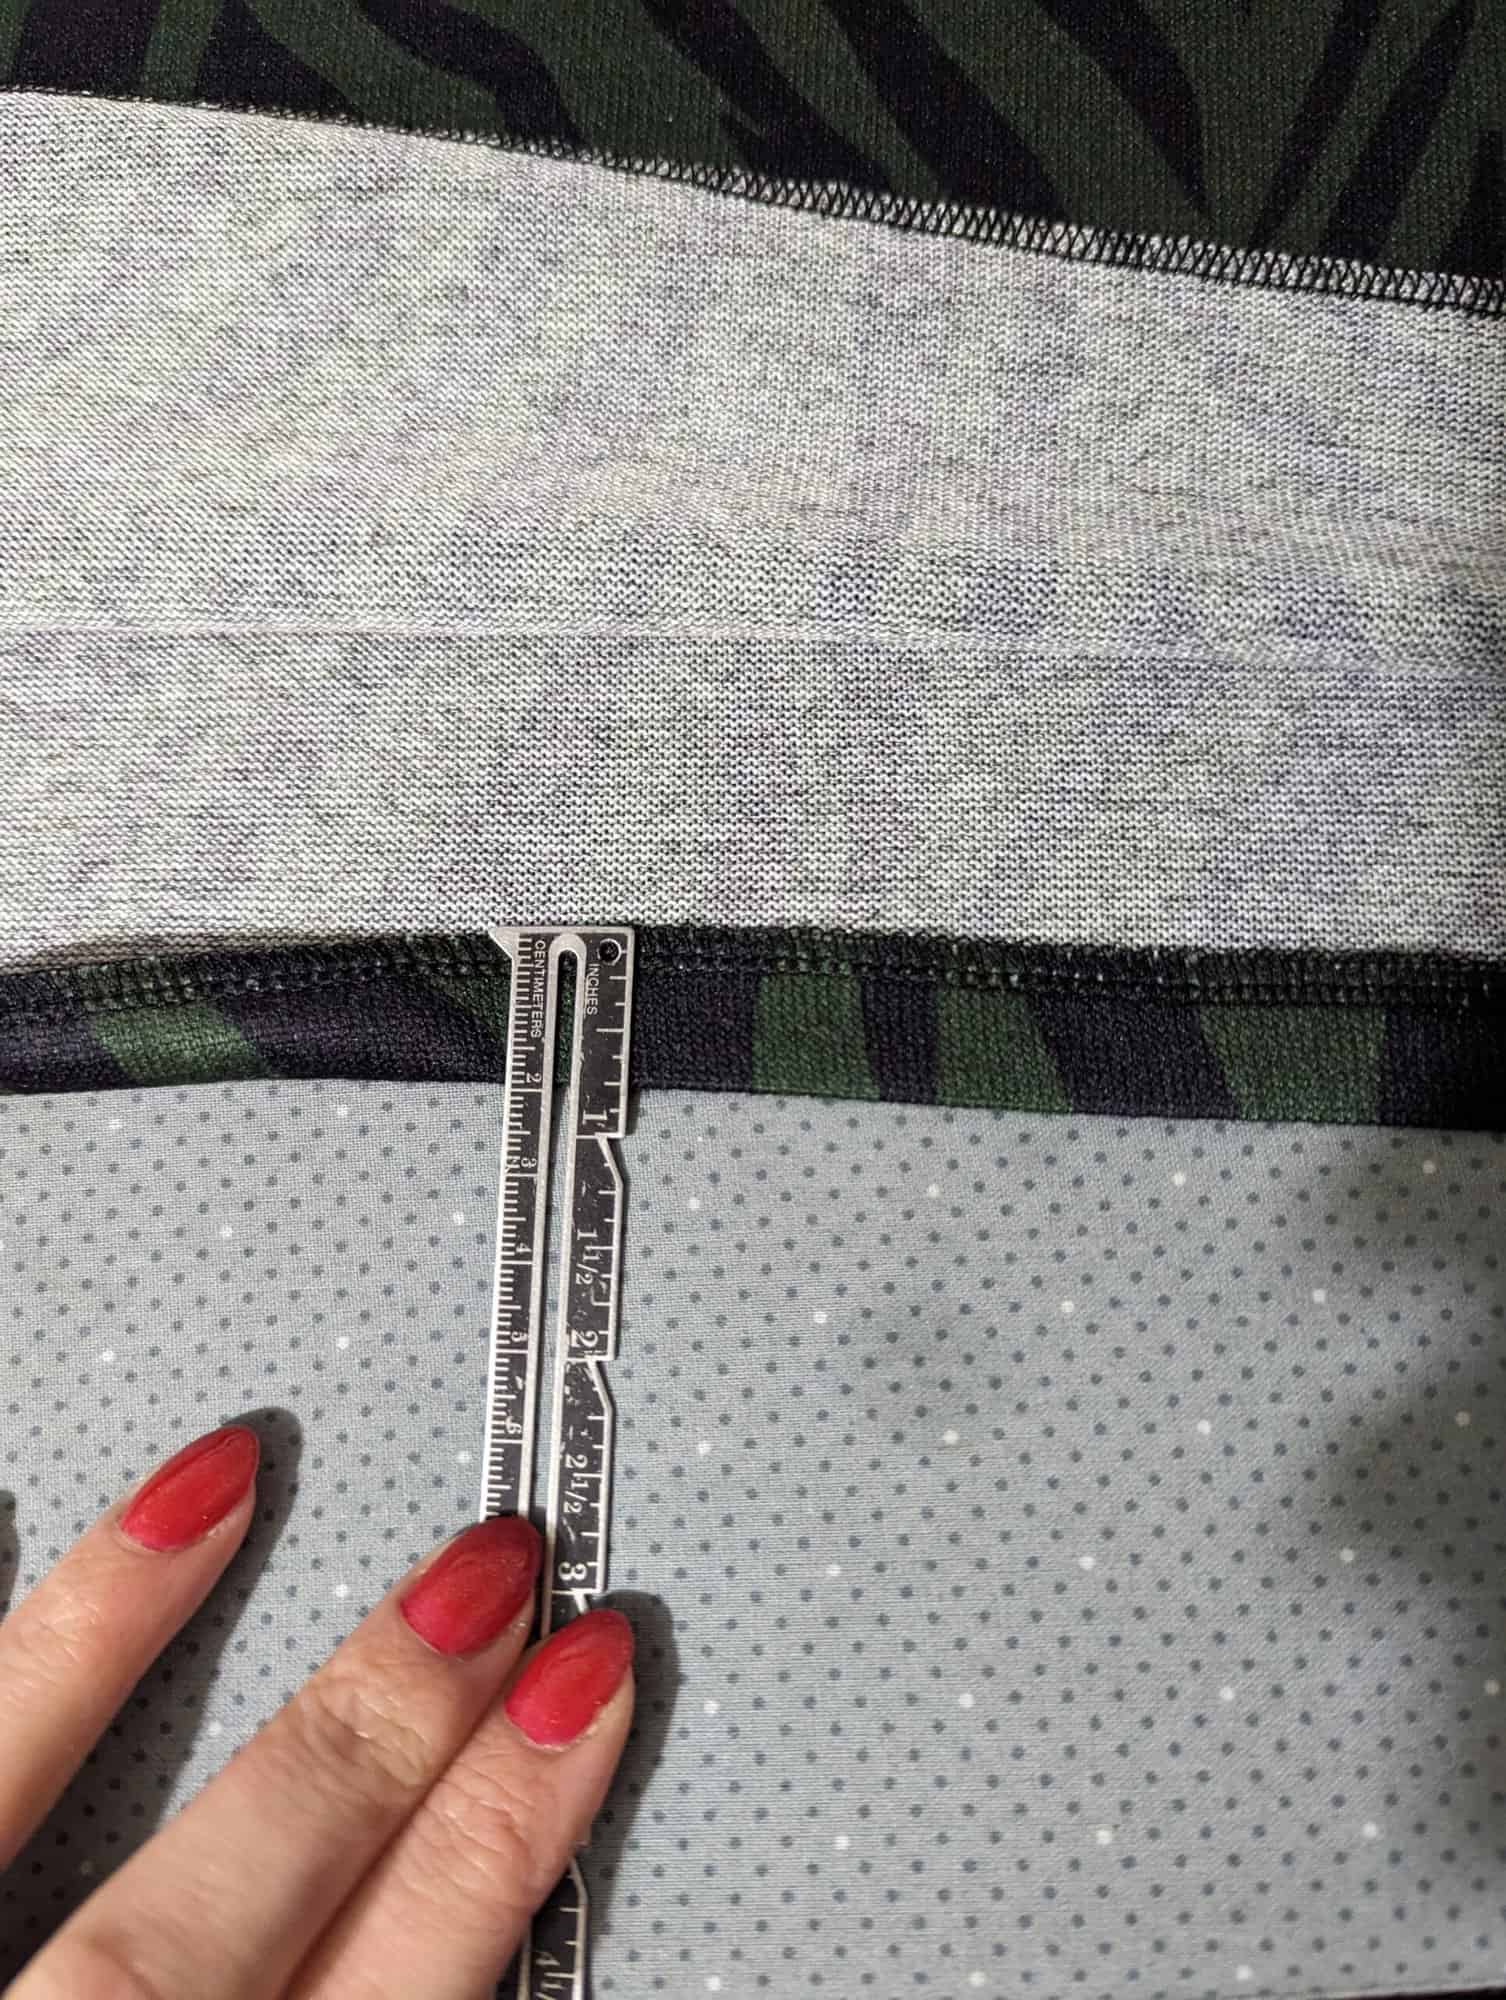
I like to use a ¼” wash away quilting tape for hemming tricky fabrics like sweater knits. It sticks your hem in place so you don’t need to use clips or pins, and stops the fabrics from stretching or shifting as you sew. Then it disintegrates the first time you wash it!
Then just hem using your favourite stretch stitch – I used my Coverstitch here – and you’re done!

Enjoy your new sweater.
Happy Sewing,
Dana xx
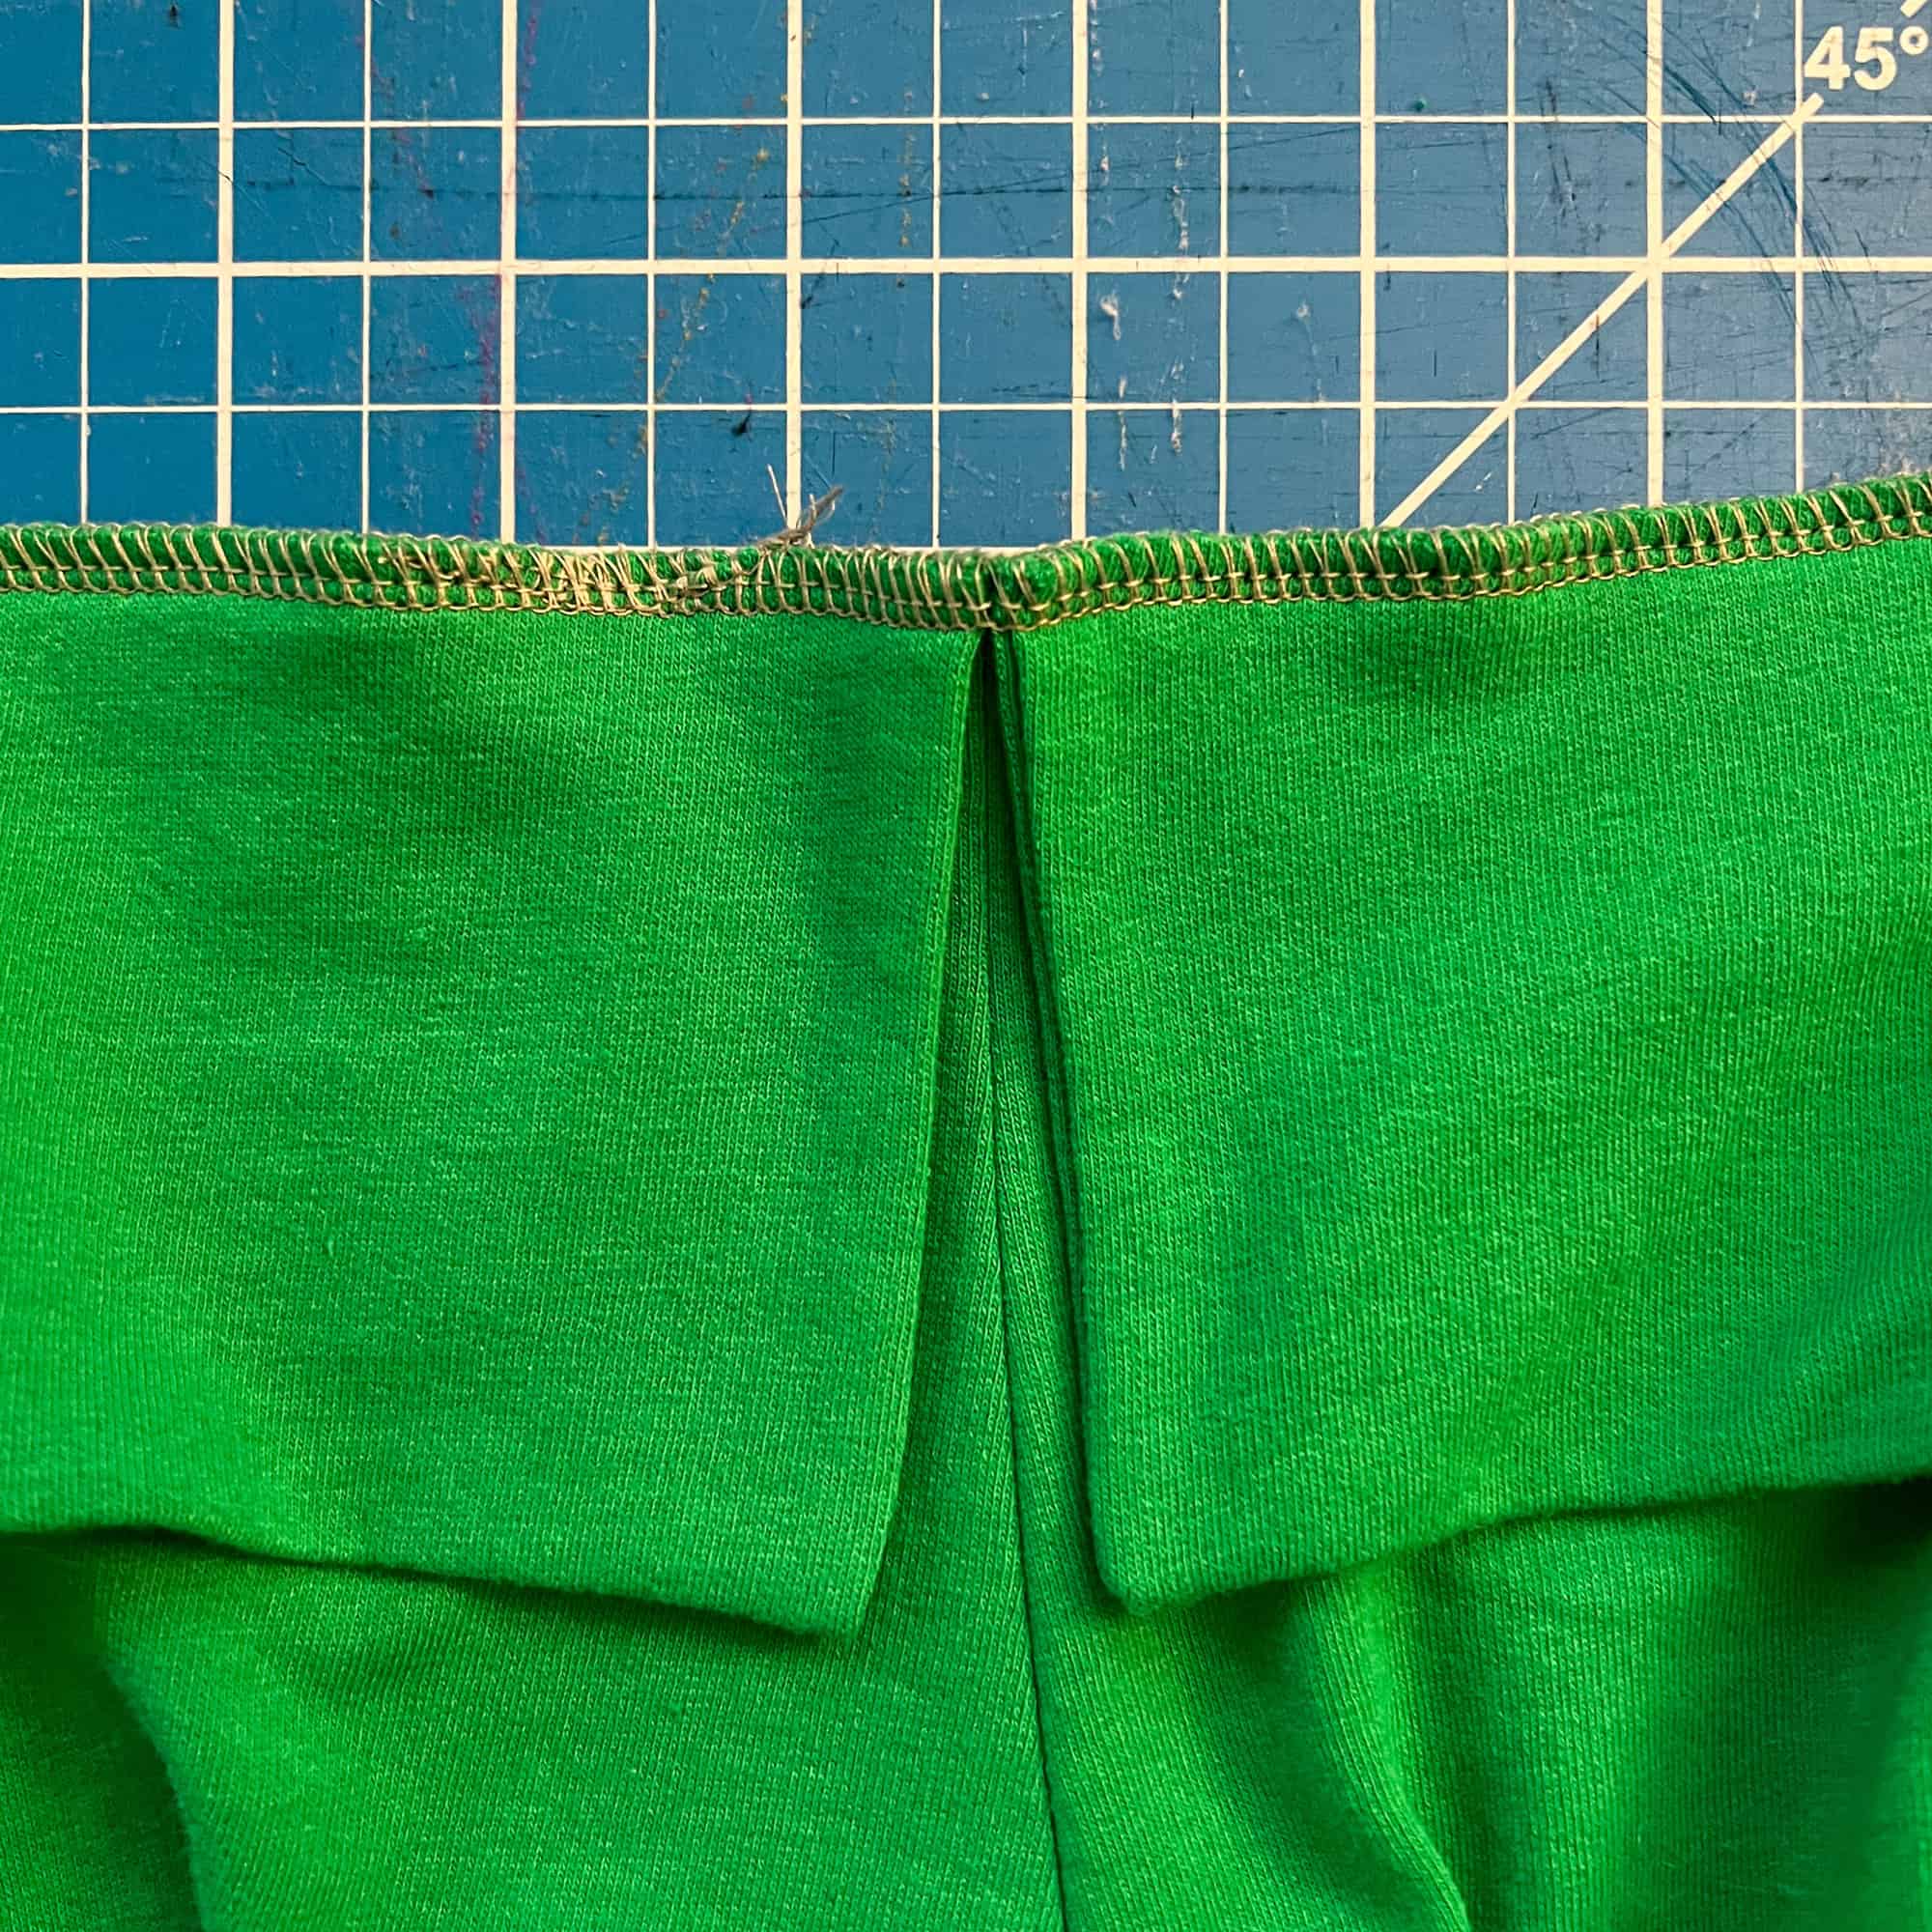
Split Hem Hack

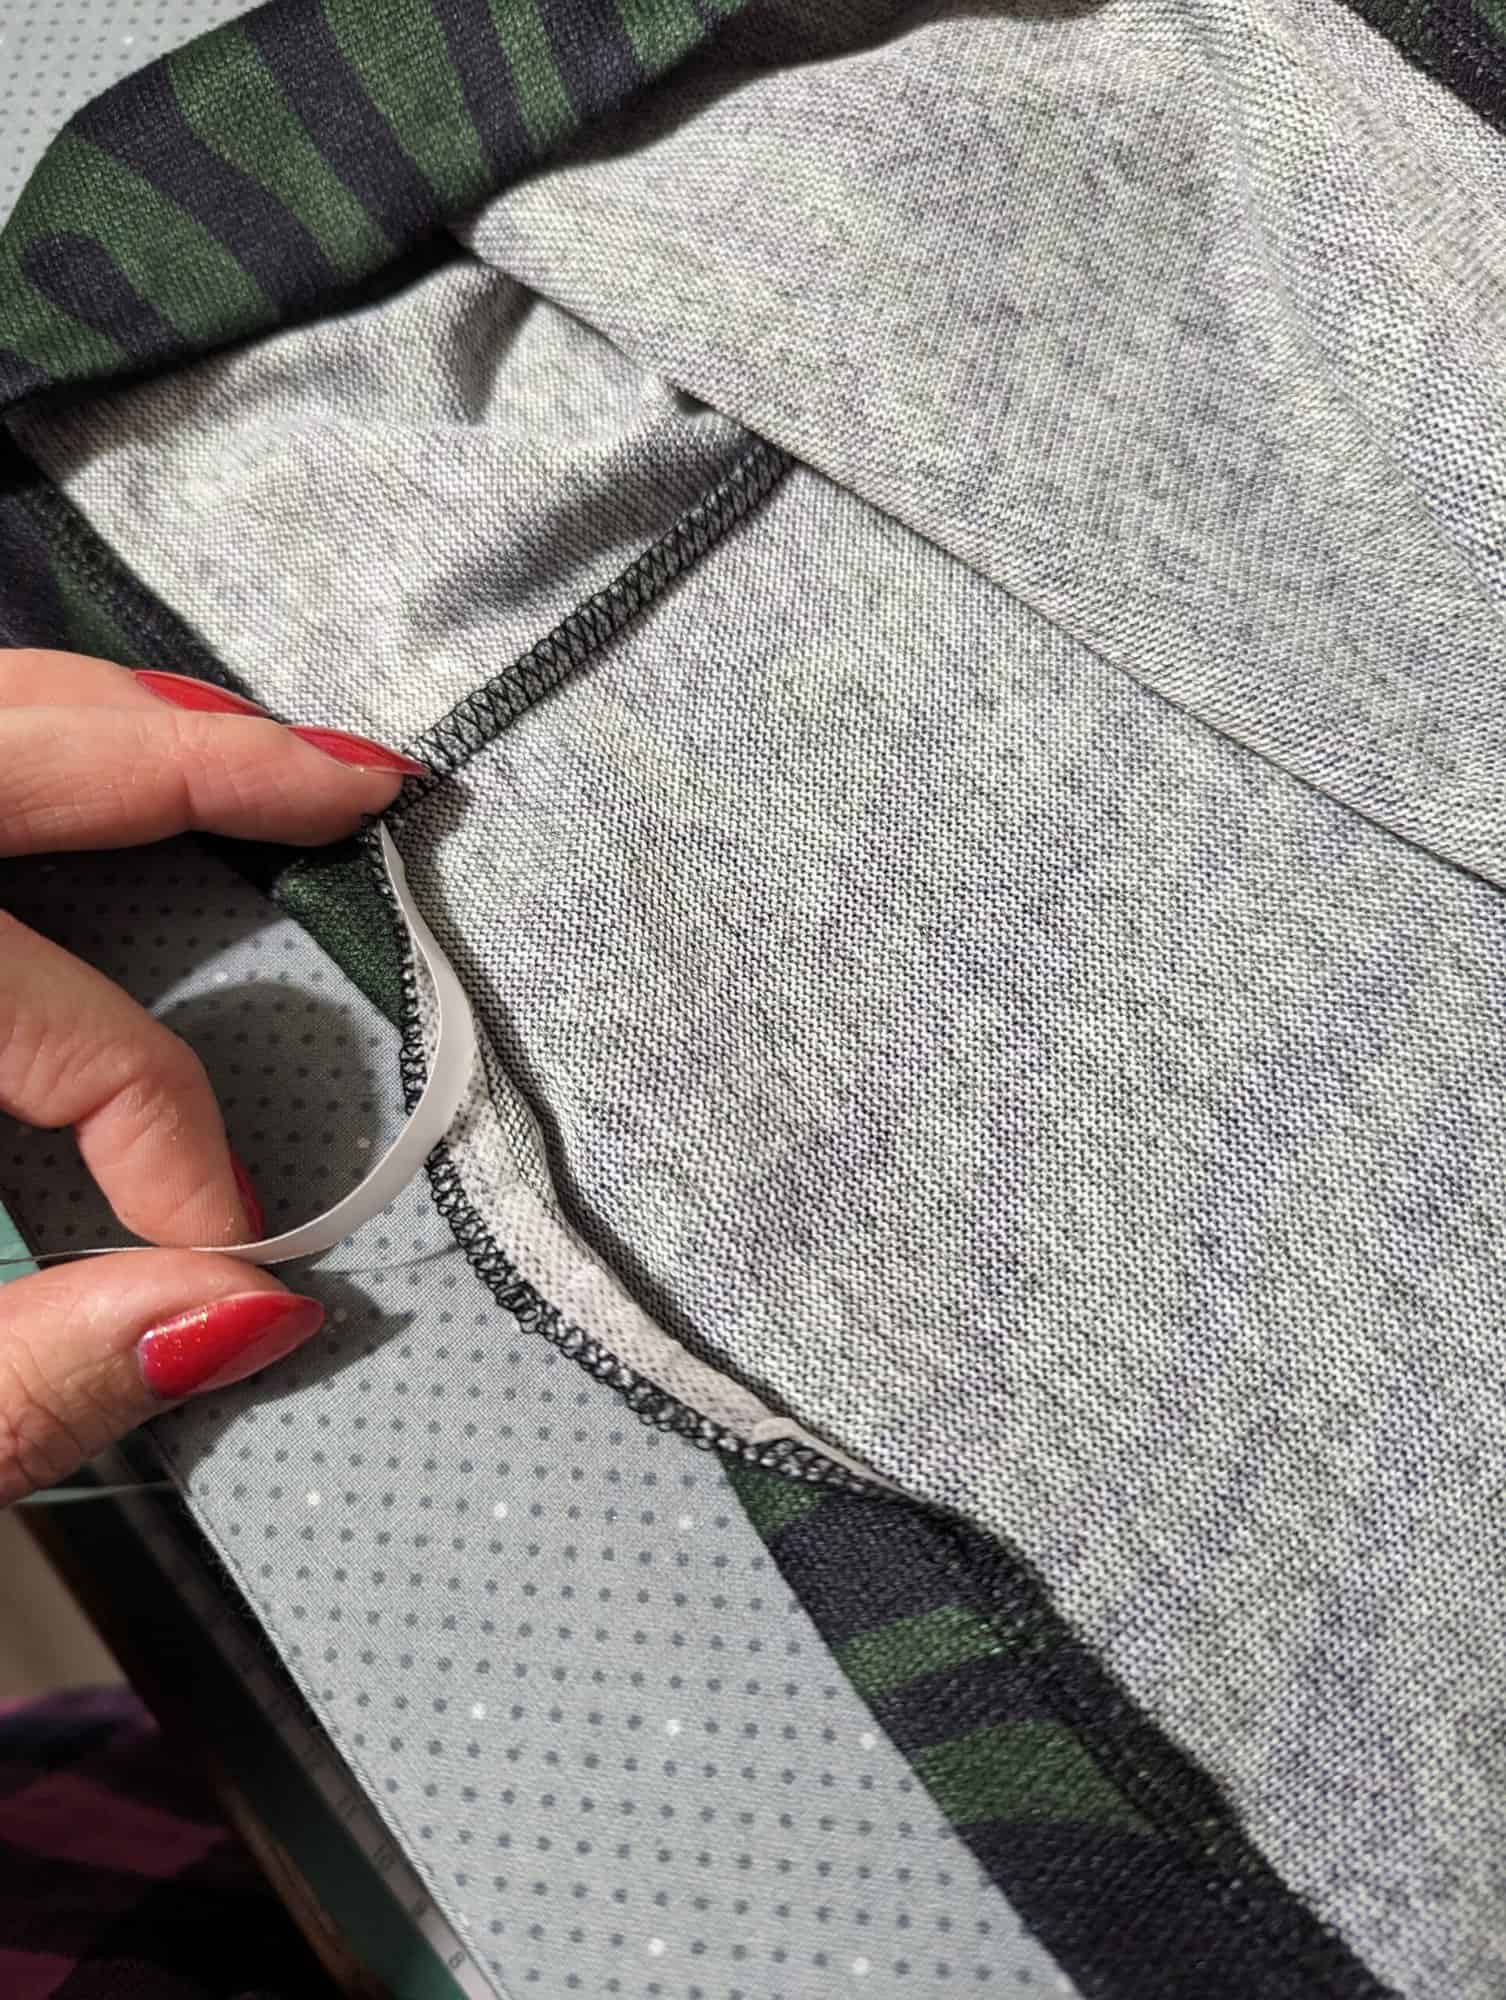
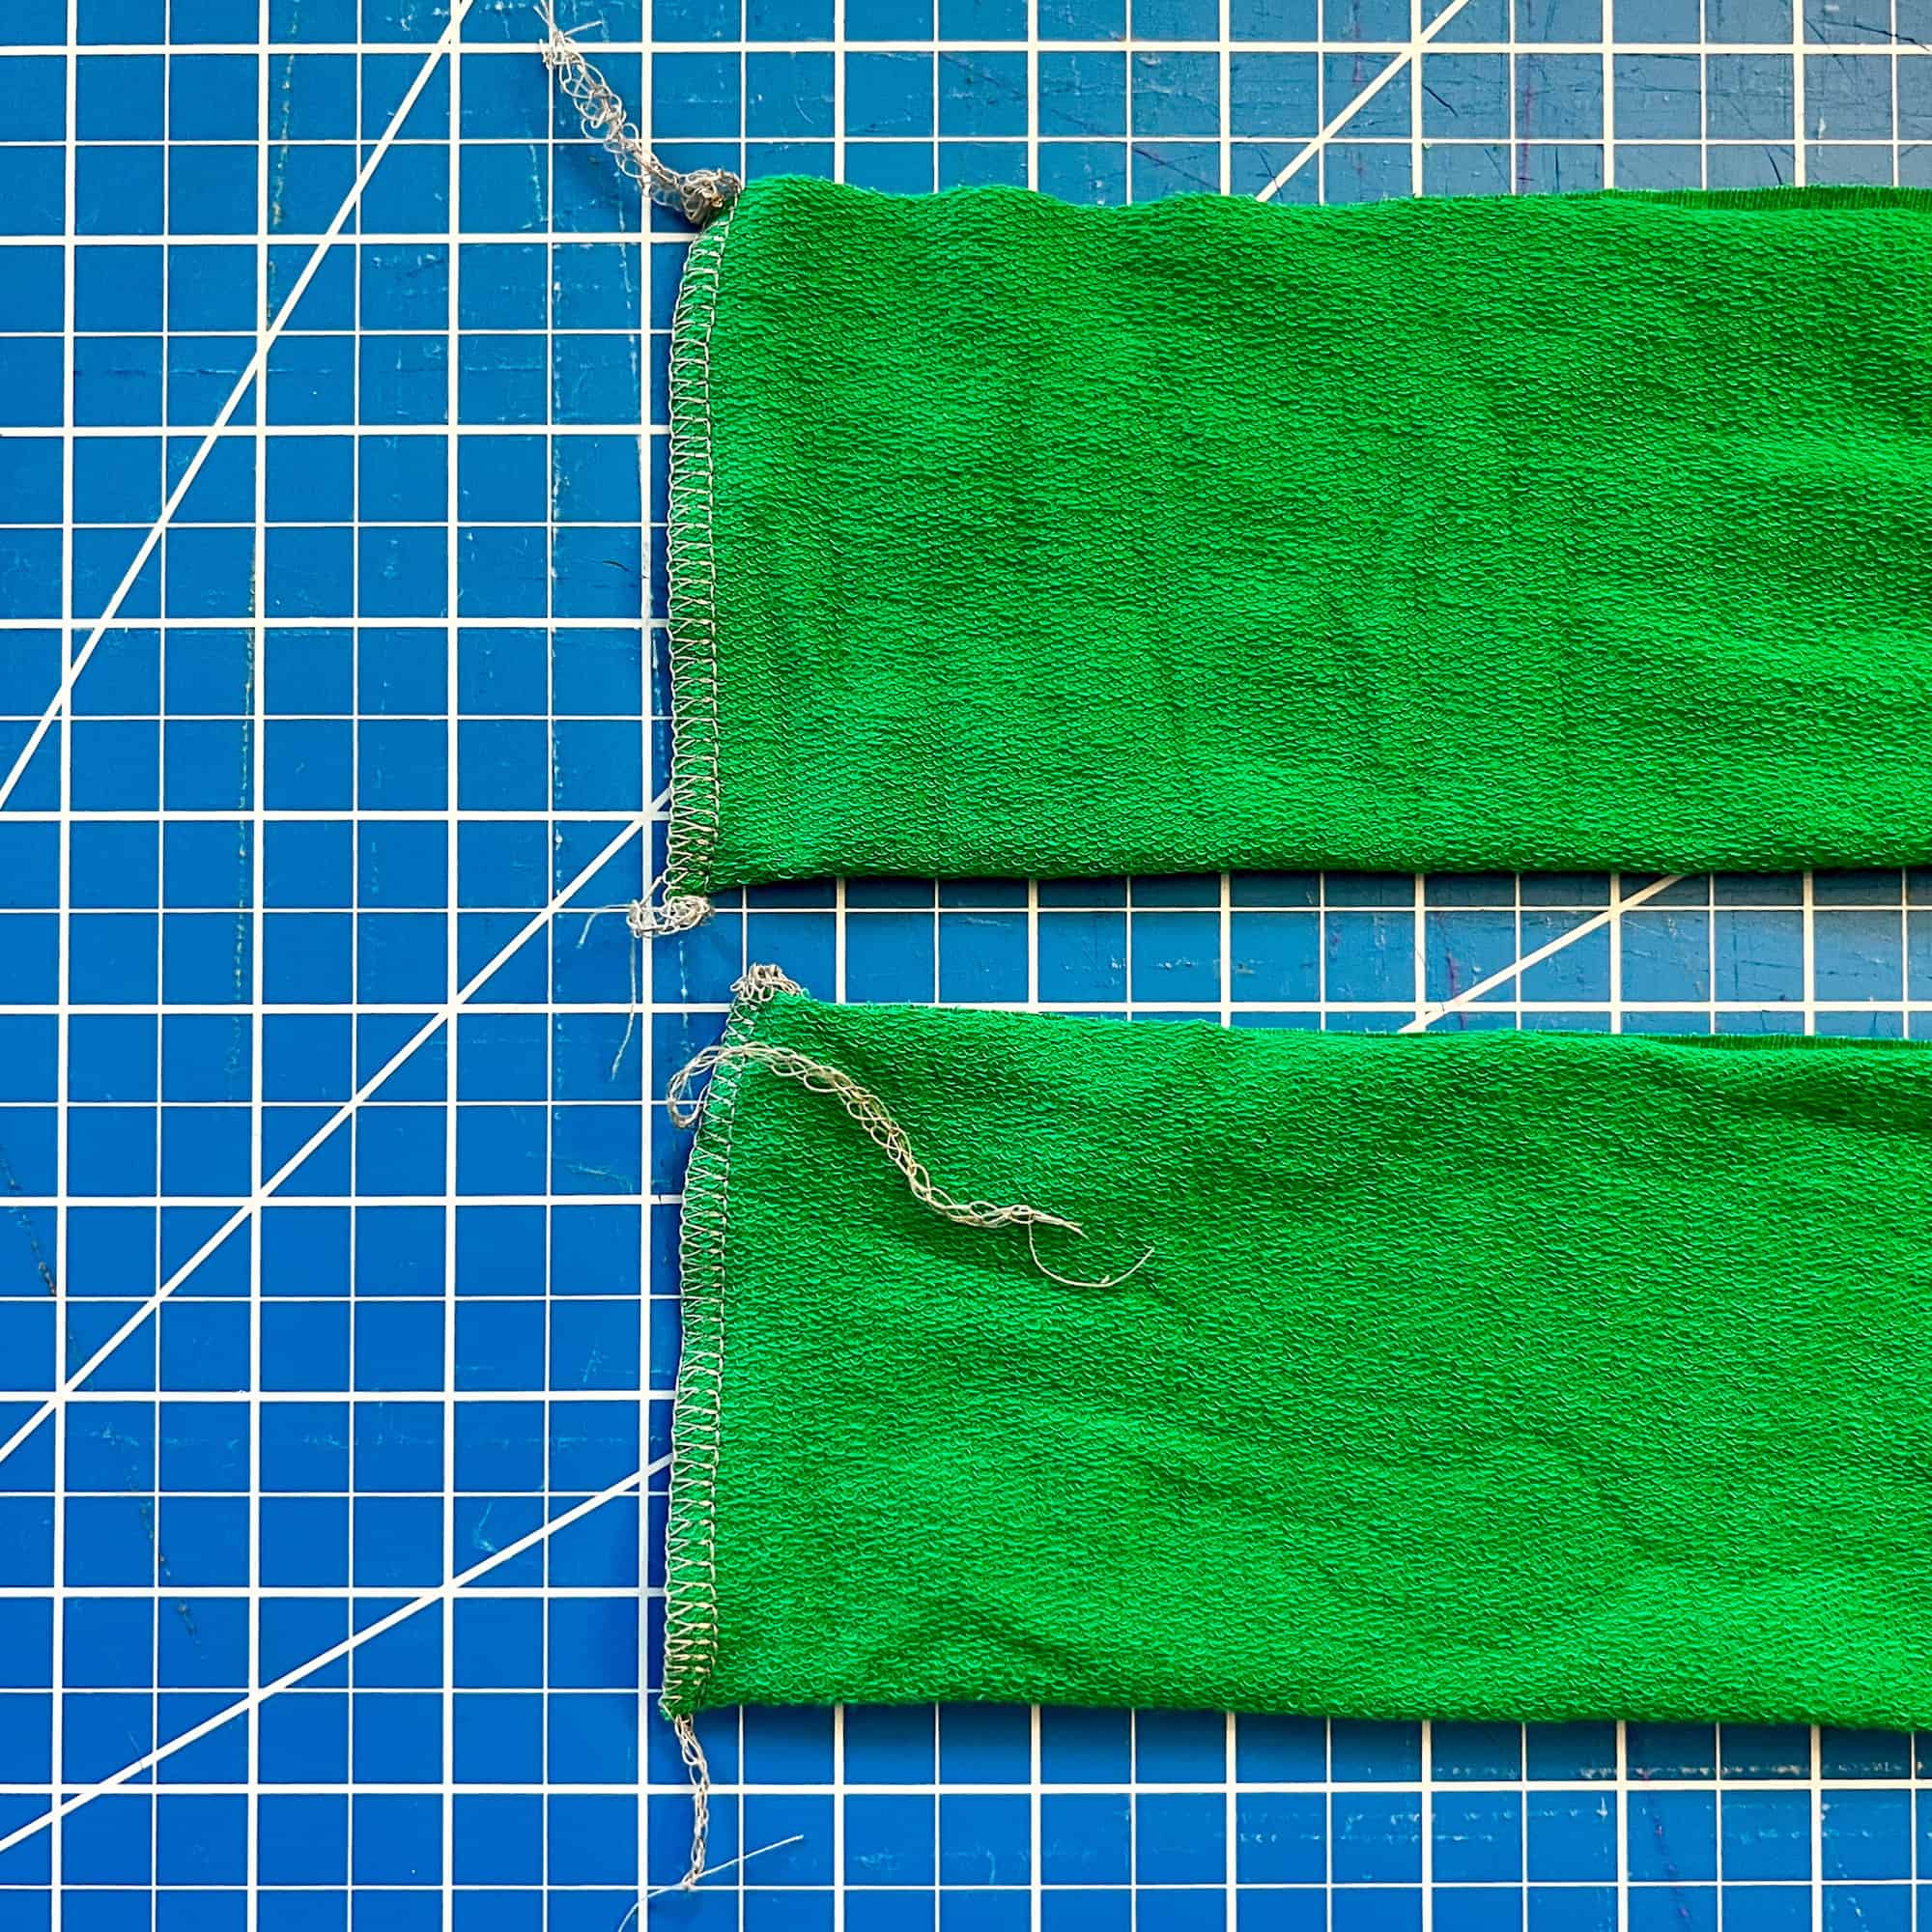
I love the look of a split hem – and it couldn’t be easier to achieve with the new Sunnyside Sweater. Using the hem band pattern piece as a guide, cut 2 bands that are the width of your bodice front and back.
Complete the construction of your sweatshirt to the step where the bottom band is sewn.
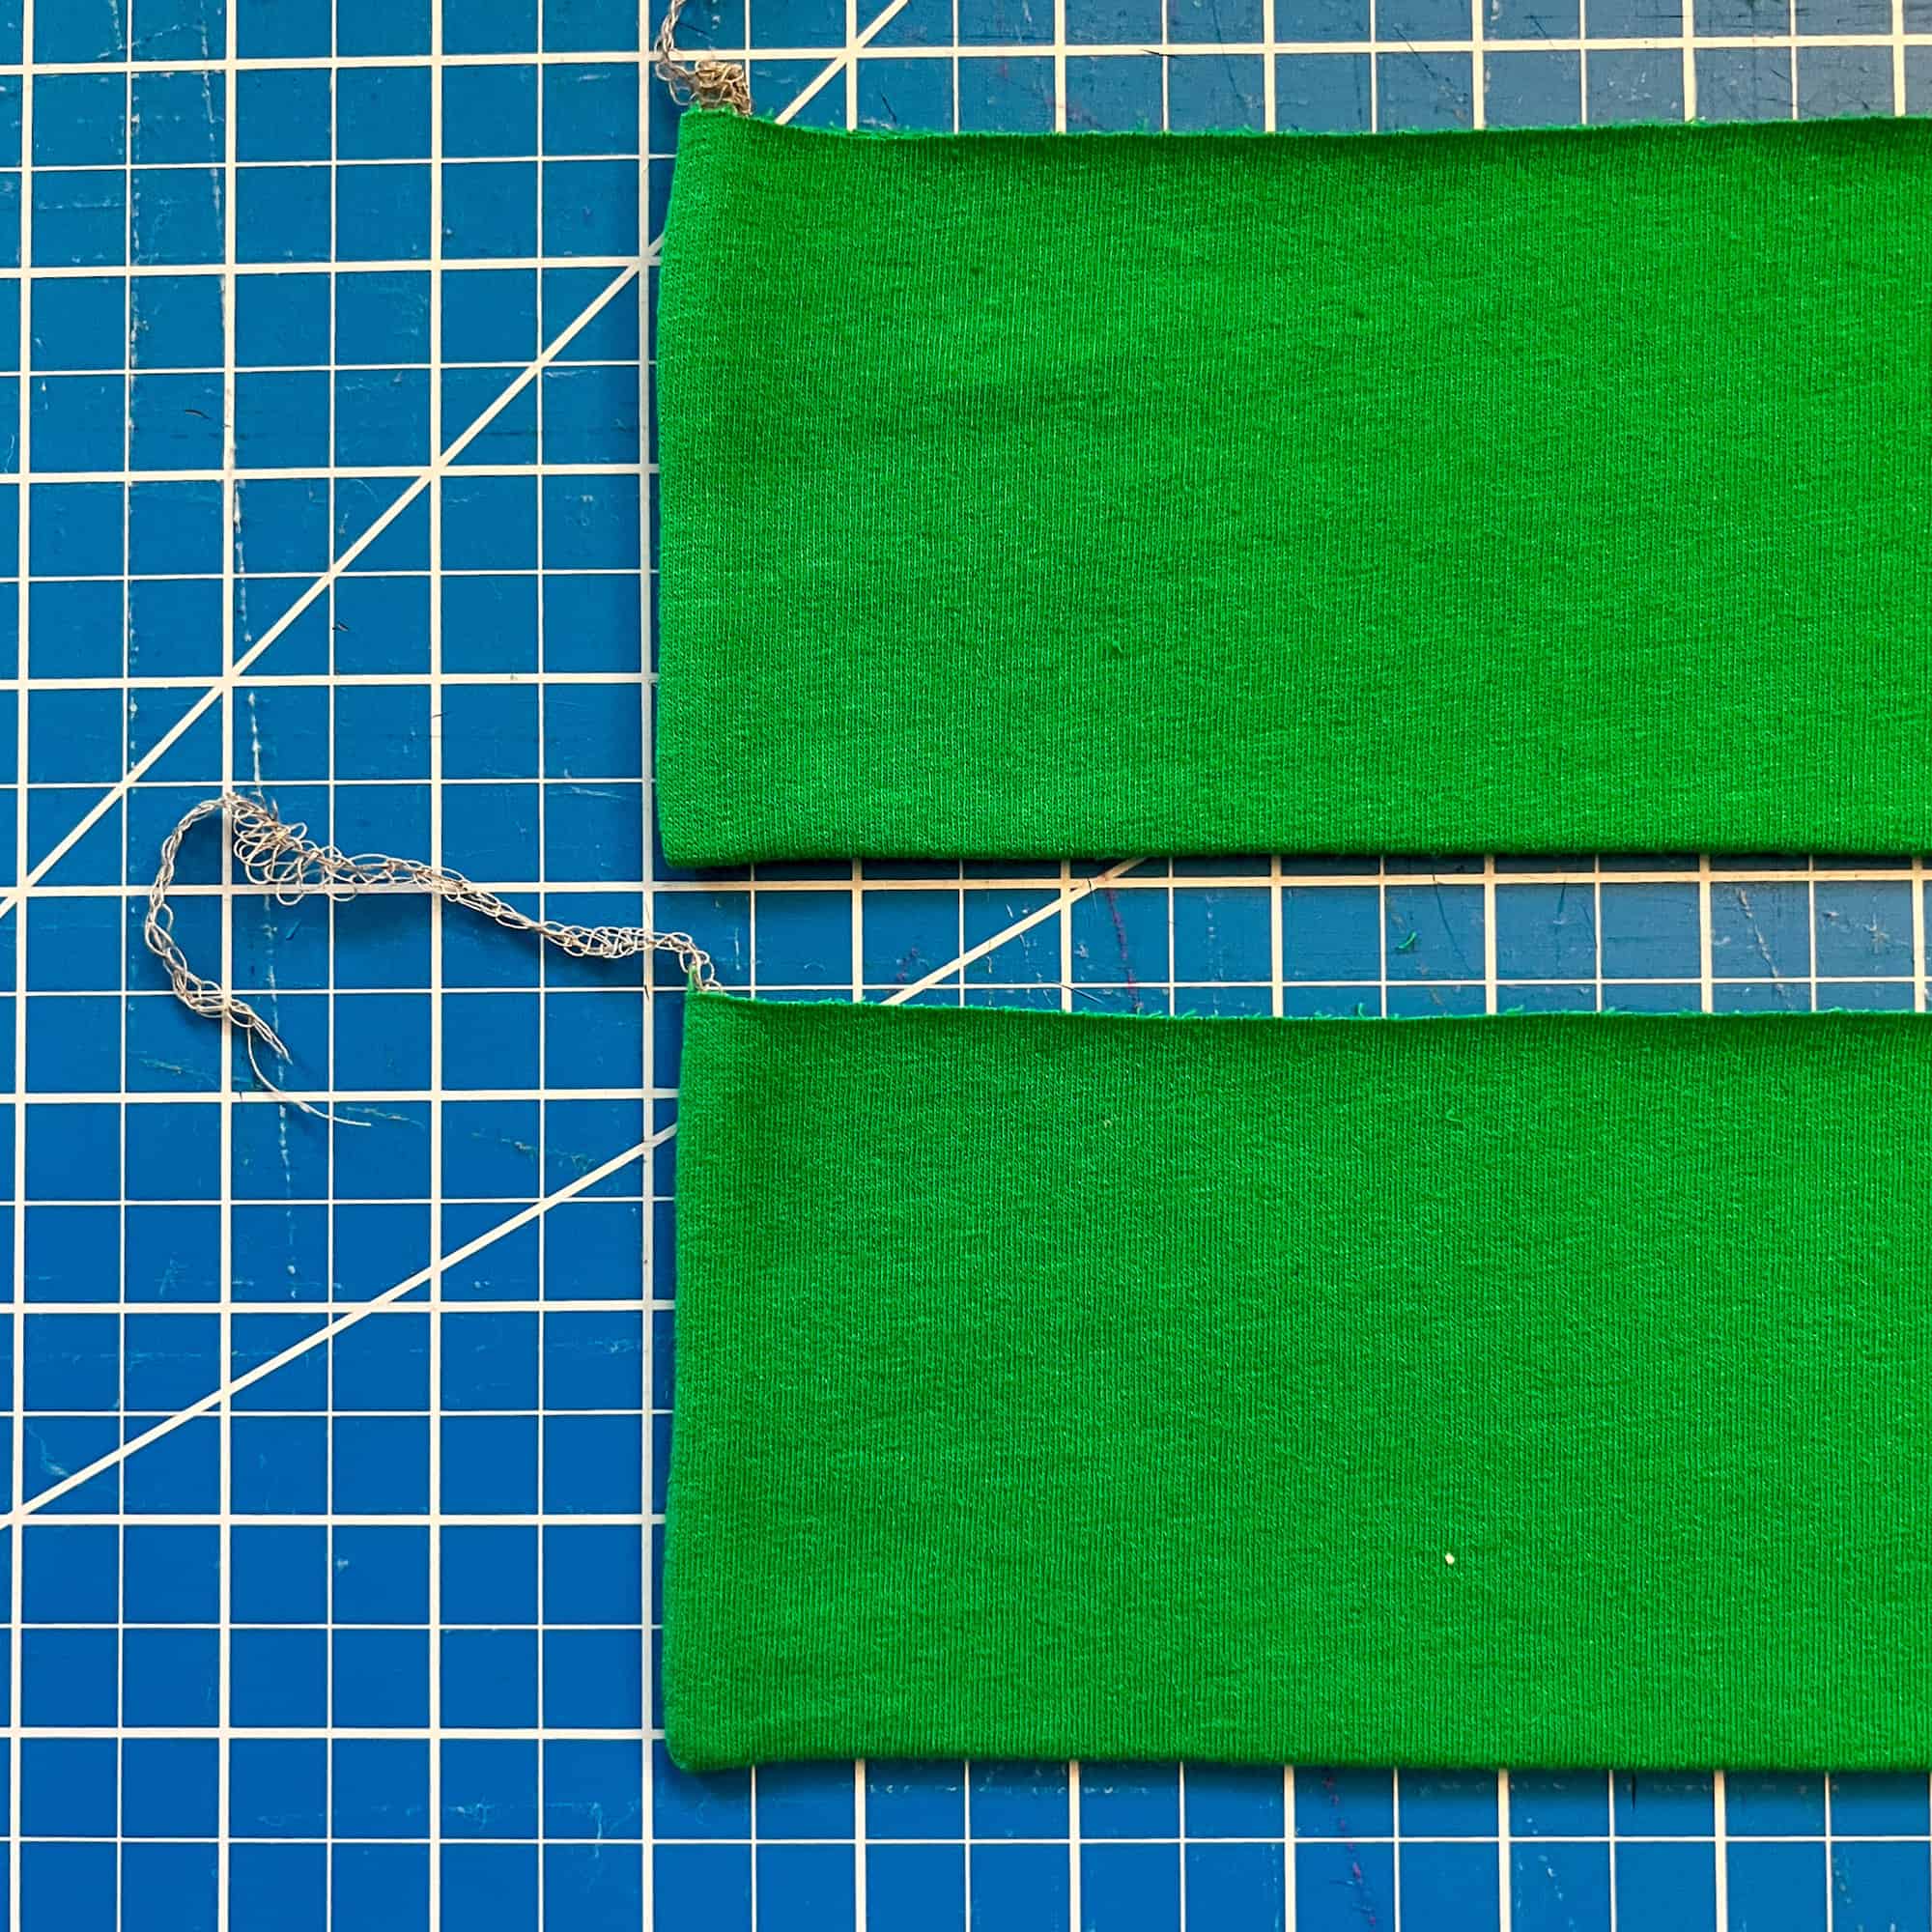
Fold the short ends of your bands, right sides together, and sew using the same seam allowance.
Turn right side out and press.
Clip one band to the raw edge of your bodice, front and back, making sure to butt the edges at the side seam and baste in place.
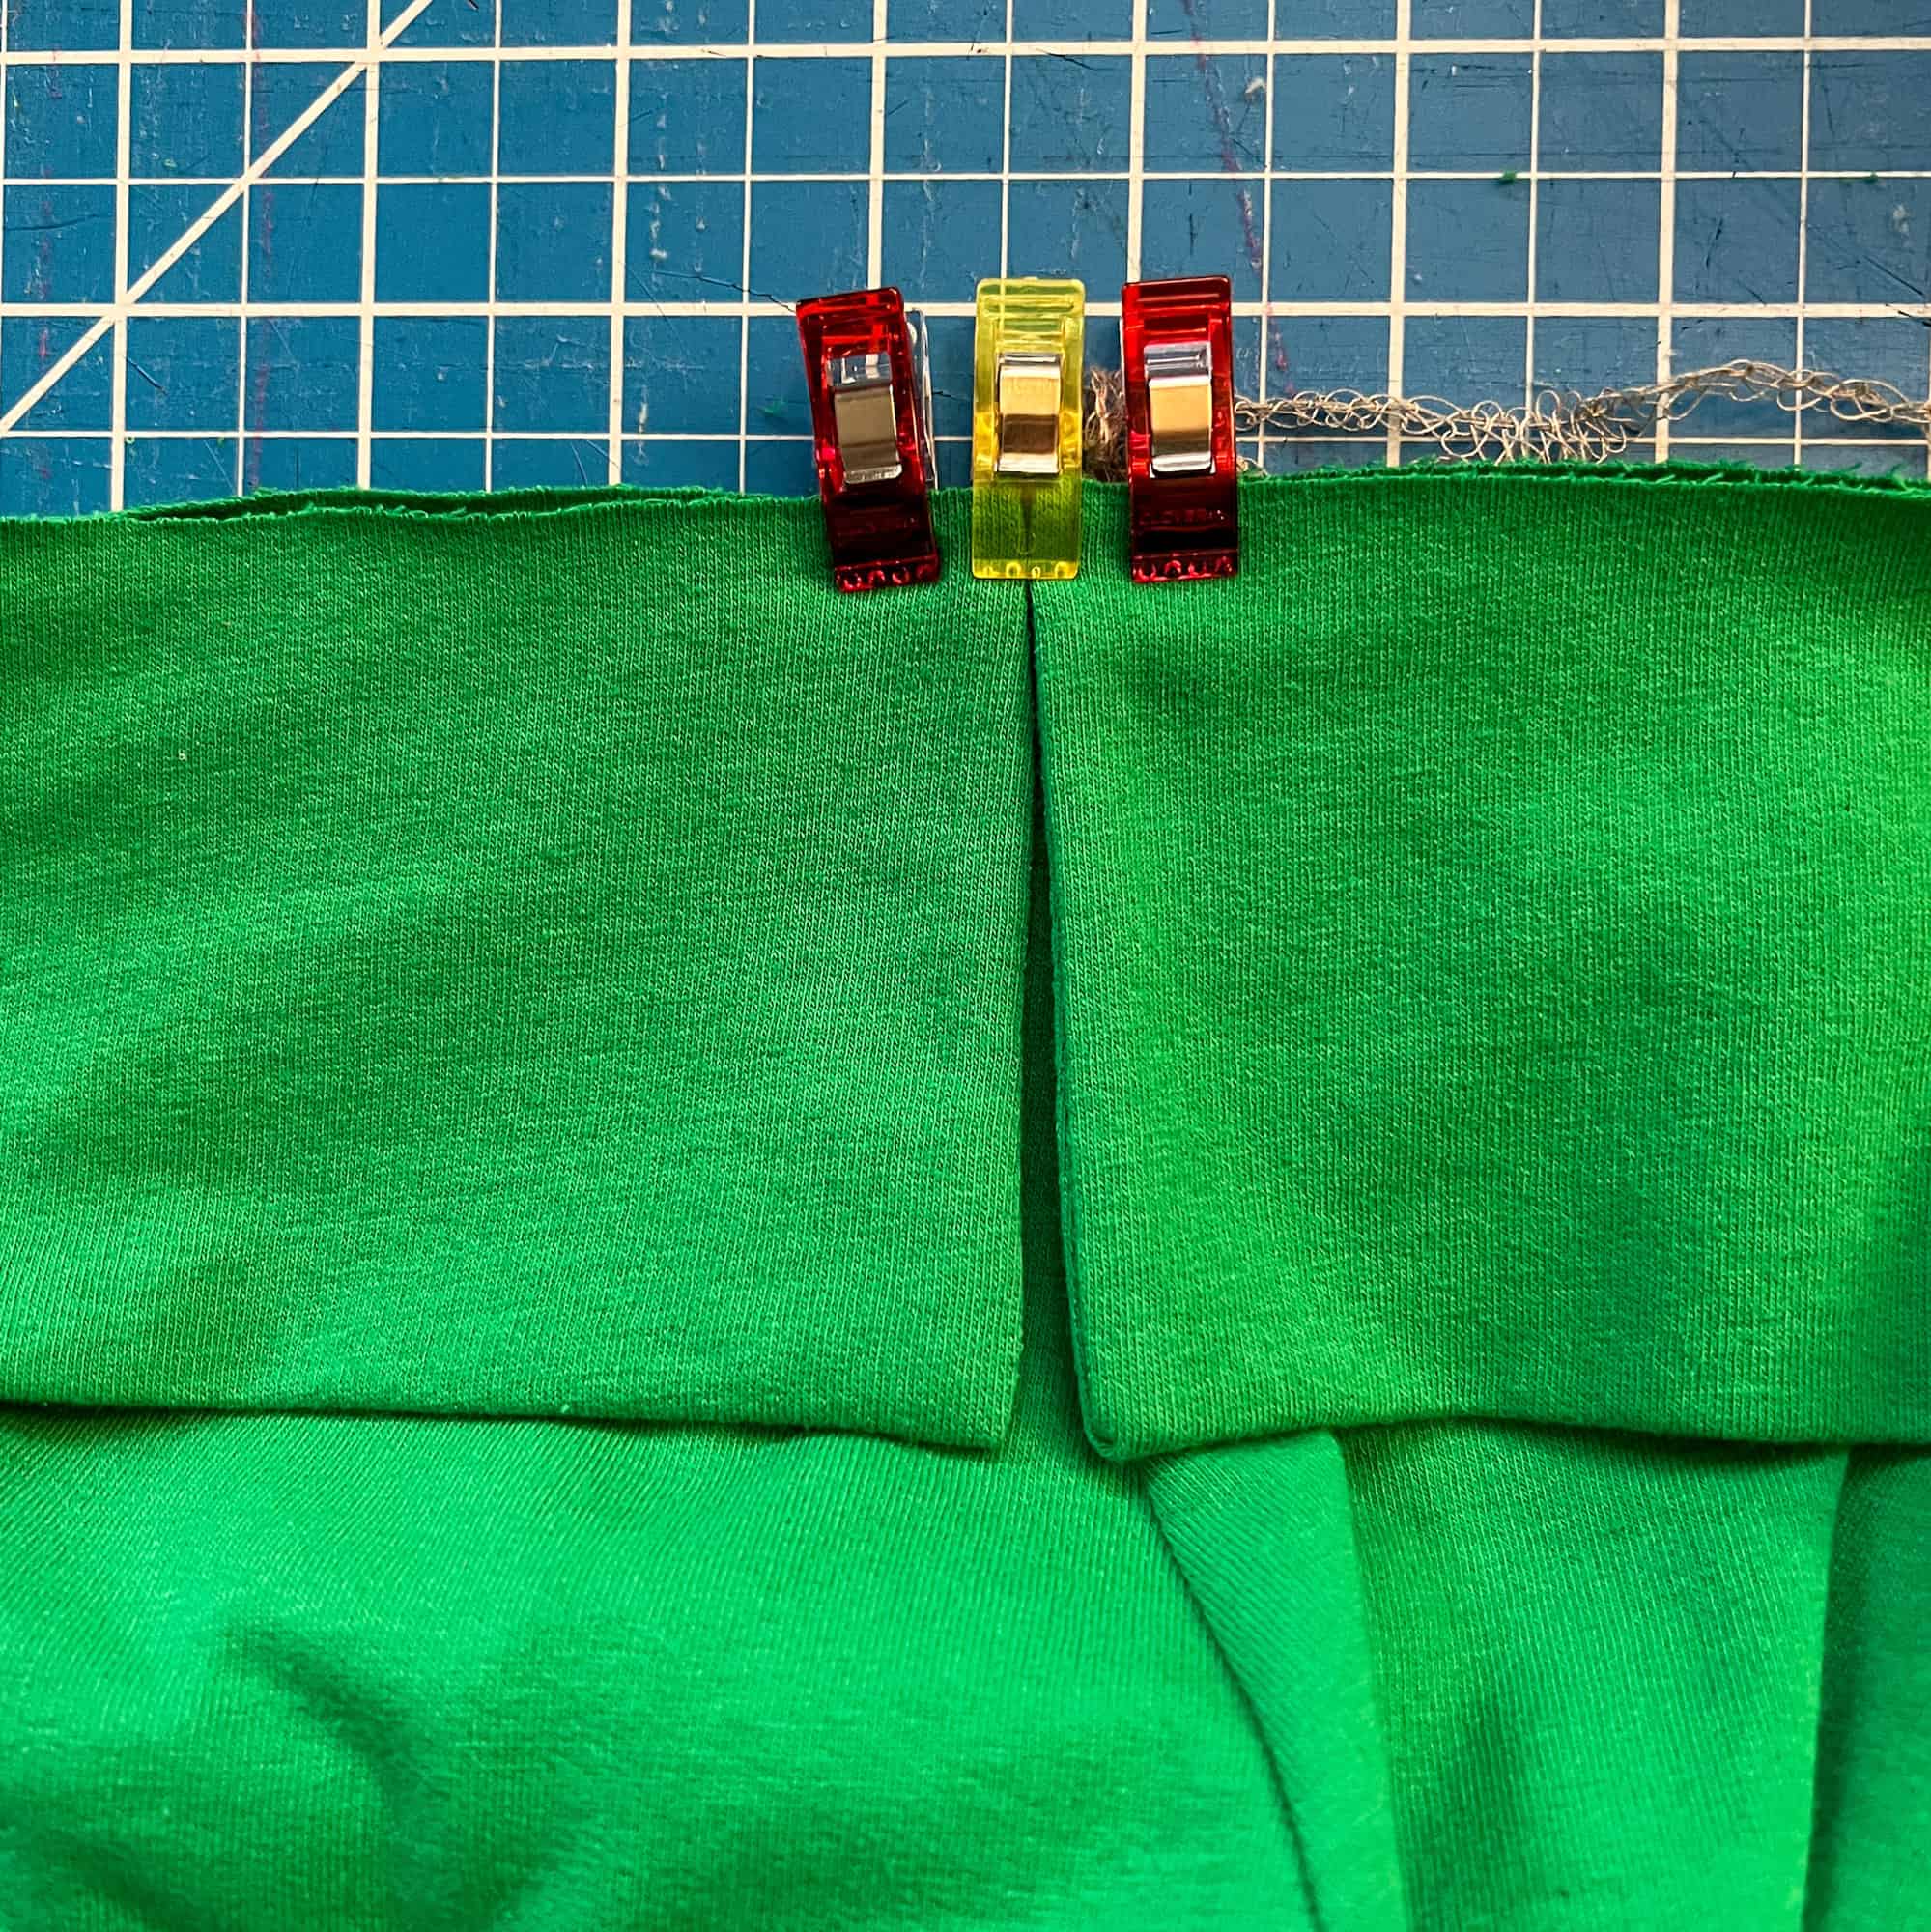
Sew the bands in place, press the seam towards the bodice, and topstitch in place (if you desire!).
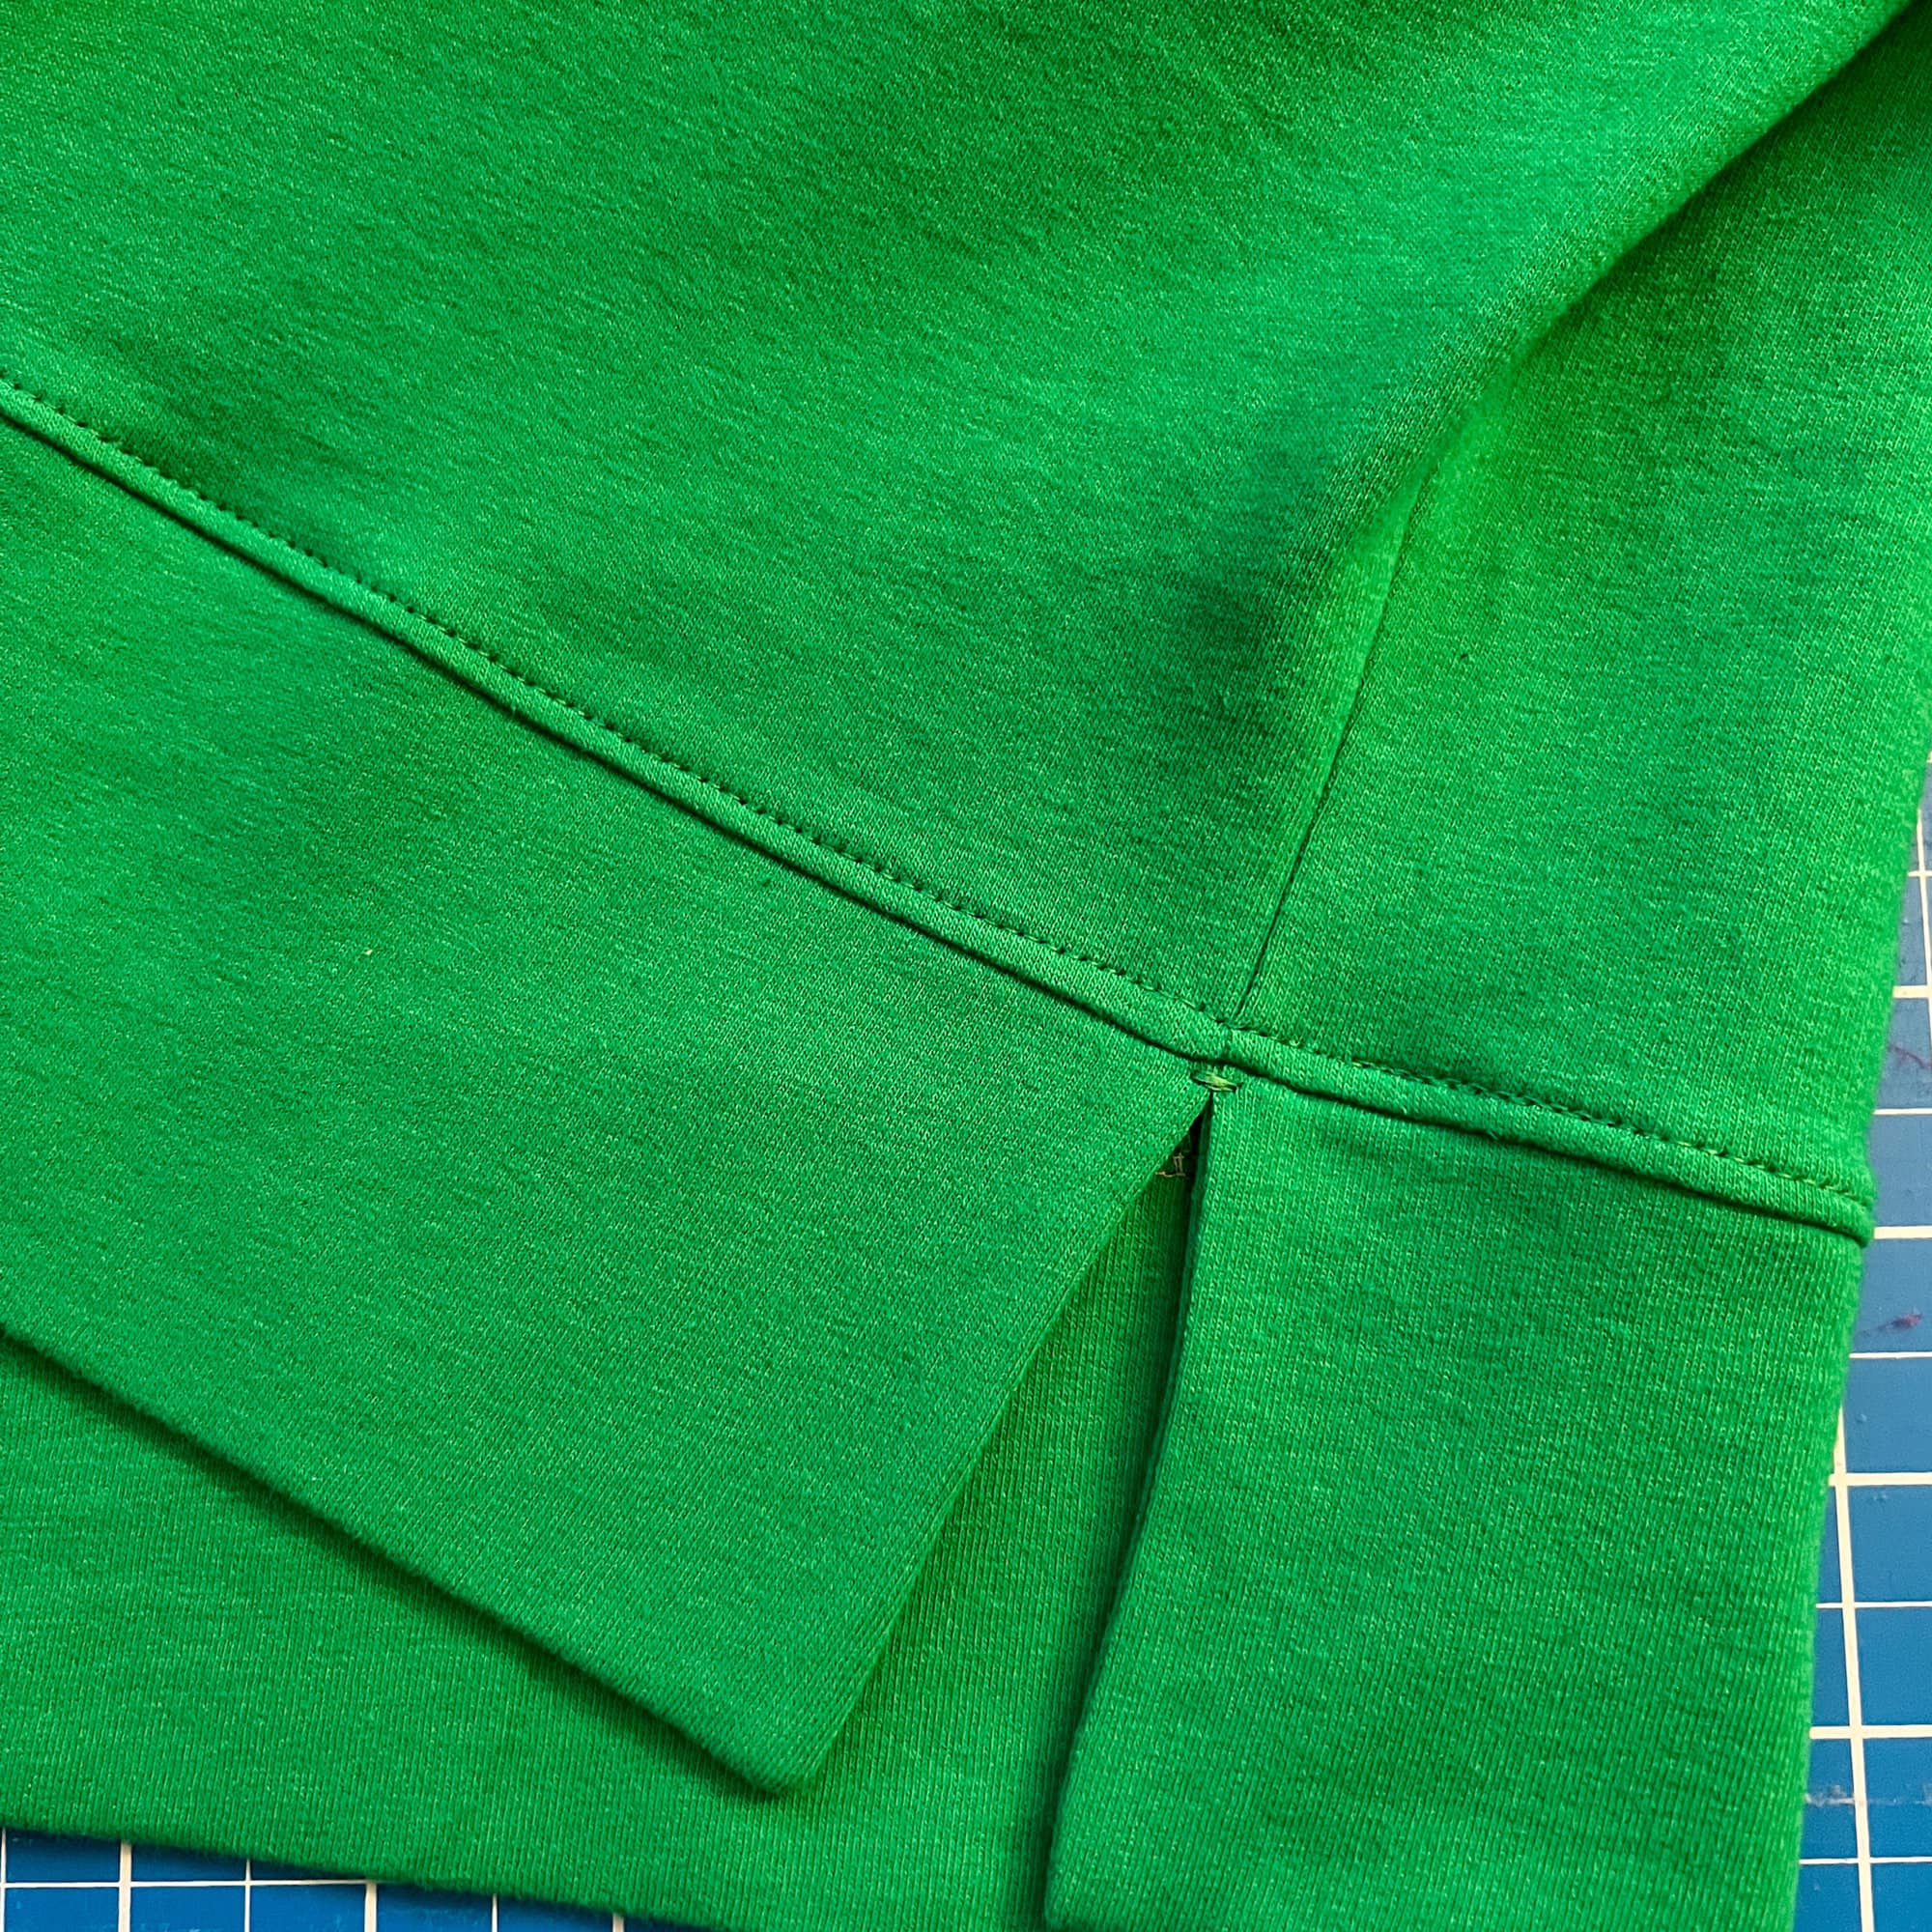
I added a little tack for reinforcement, but this is not necessary! Just my personal preference.
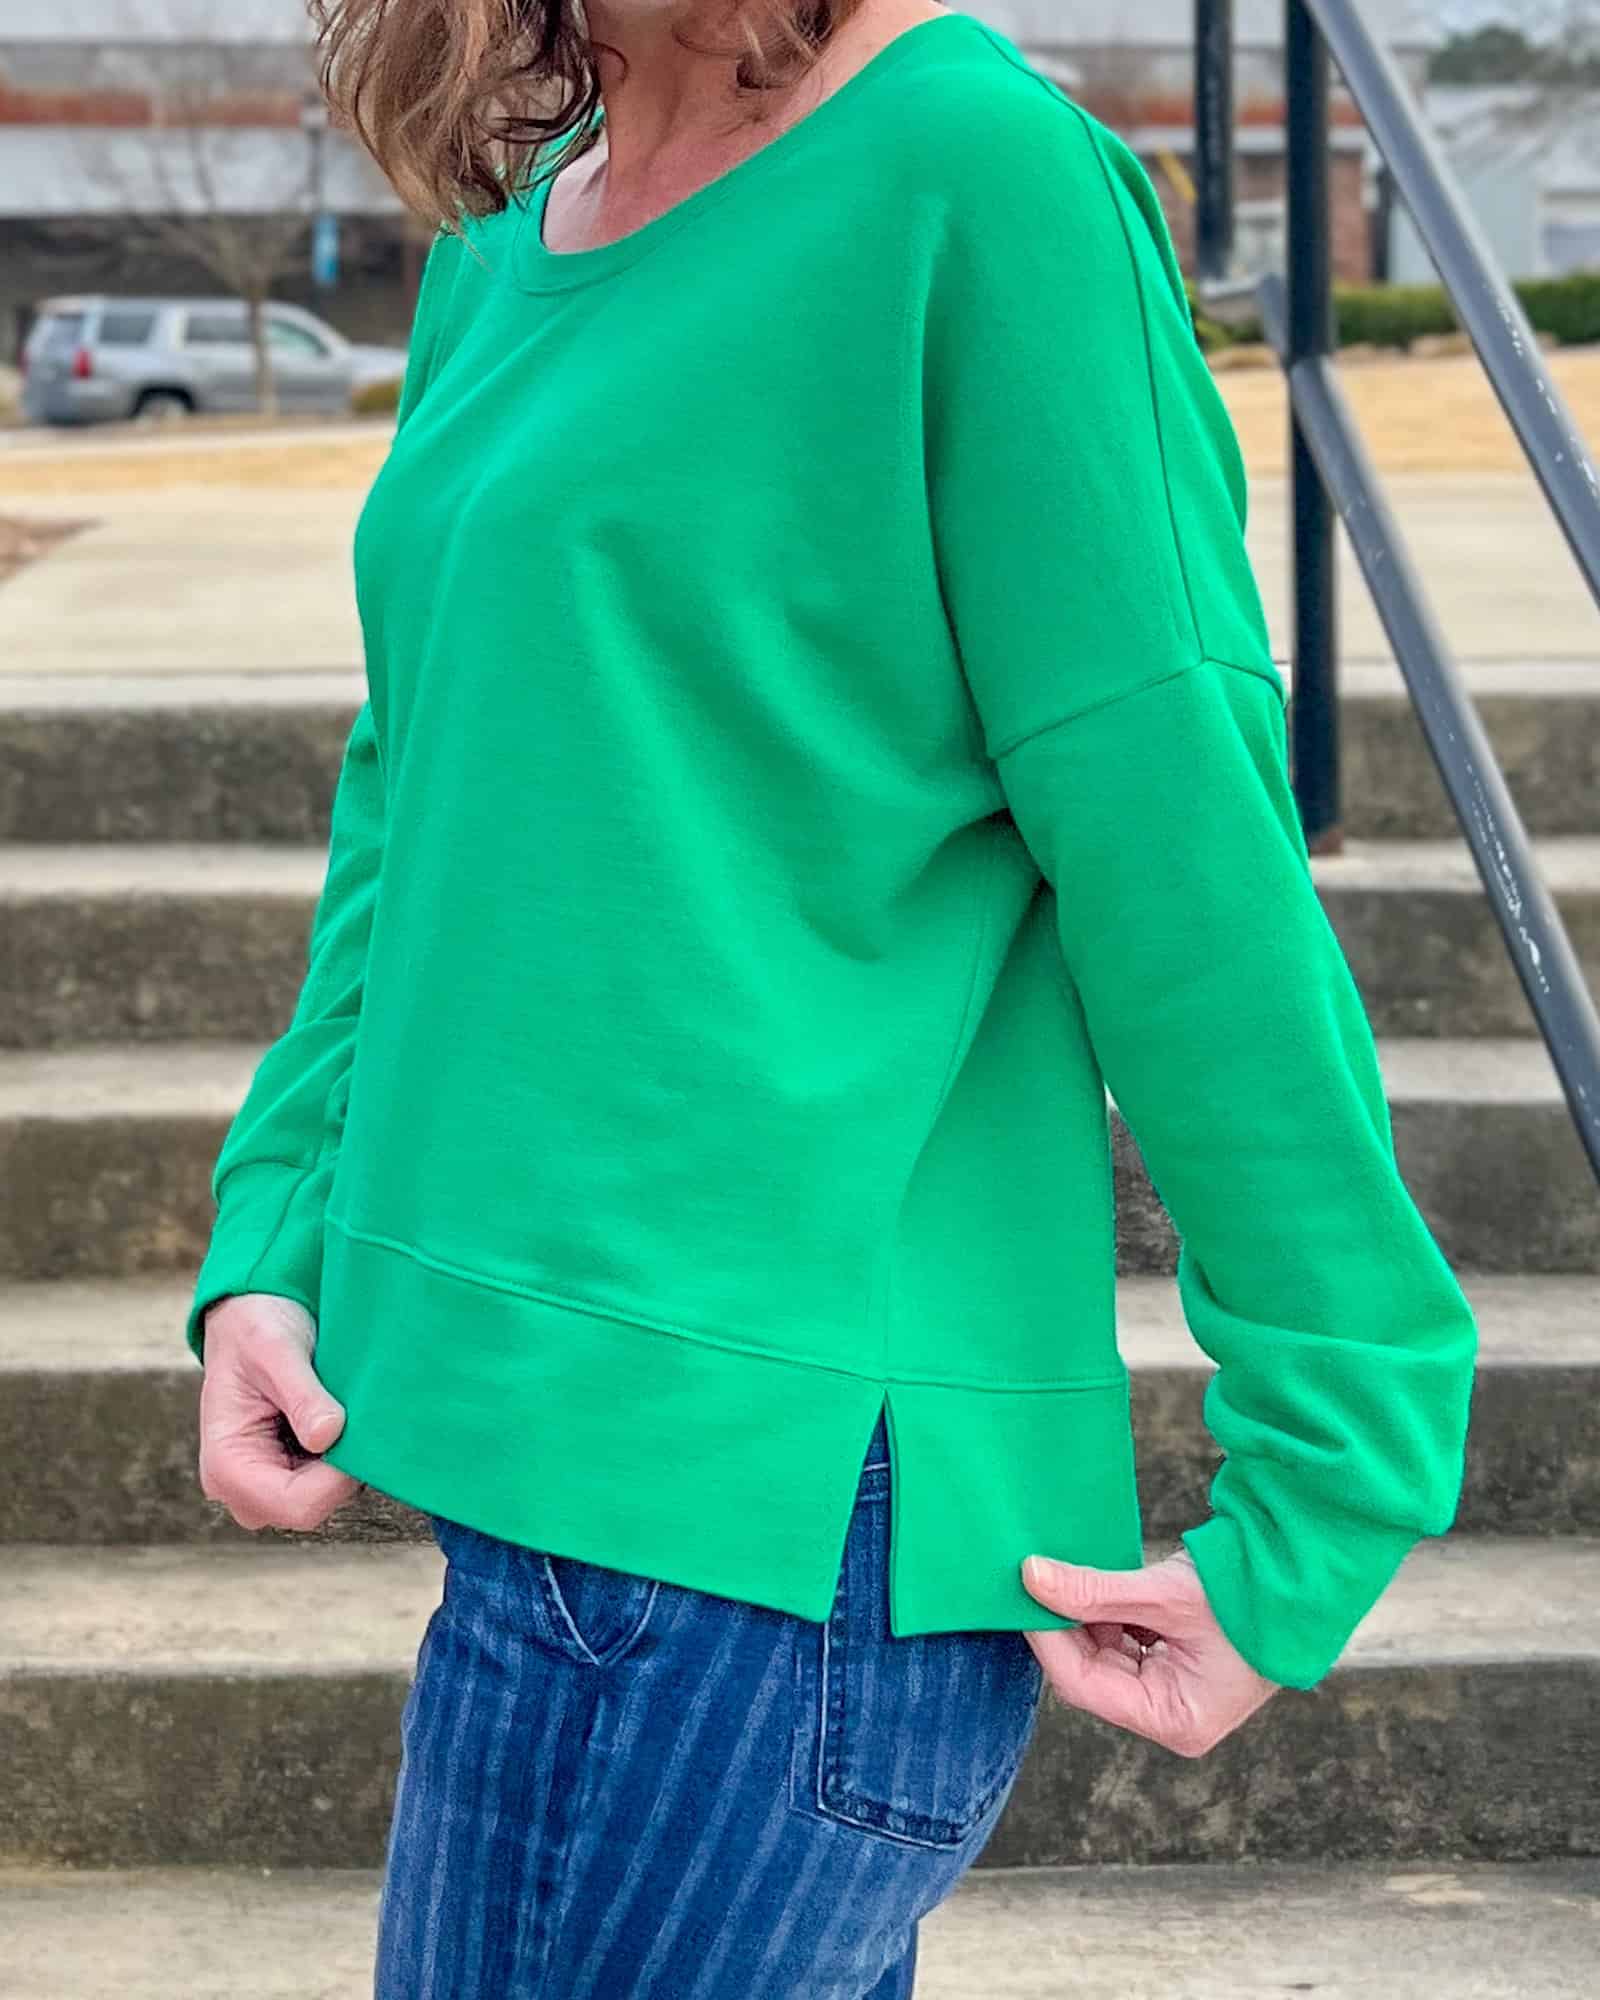
Can’t wait to see how many Sunnyside Sweaters you sew up.
xxoo,
Rachel
We are looking forward to seeing the Sunnyside Sweaters you make for yourself, your family + your clients!
Both patterns are available now and on sale (no code needed) through 11:59pm CST, March 3, 2024.
Grab your copy of the Sunnyside patterns here: Sunnyside Sweater | Sunnyside Sweater – Youth | Sunnyside Sweater – Bundle
As always, we’ve got more photos for you to use as inspiration! Head over to the Facebook group to browse our albums full of gorgeous photos, compliments of our tester team!
Sunnyside Sweater Adult Album | Sunnyside Sweater Youth Album
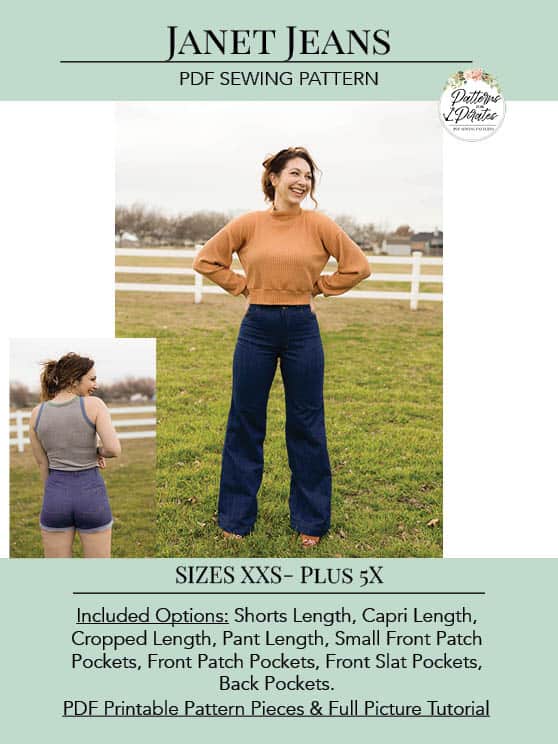
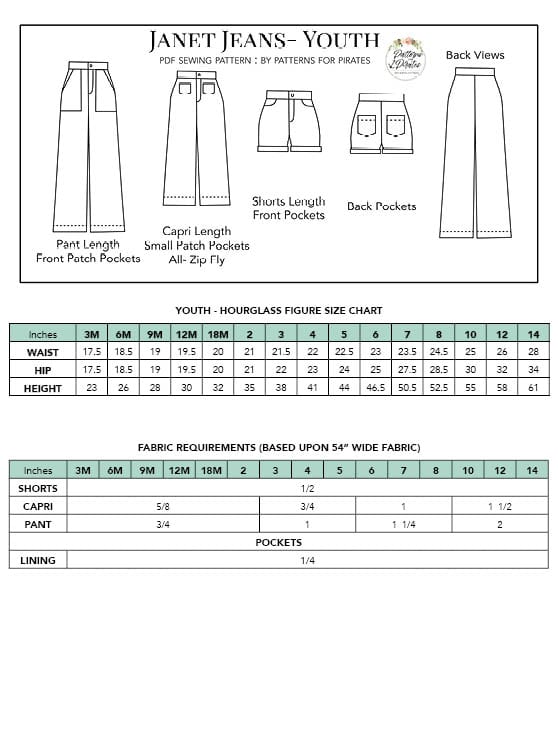
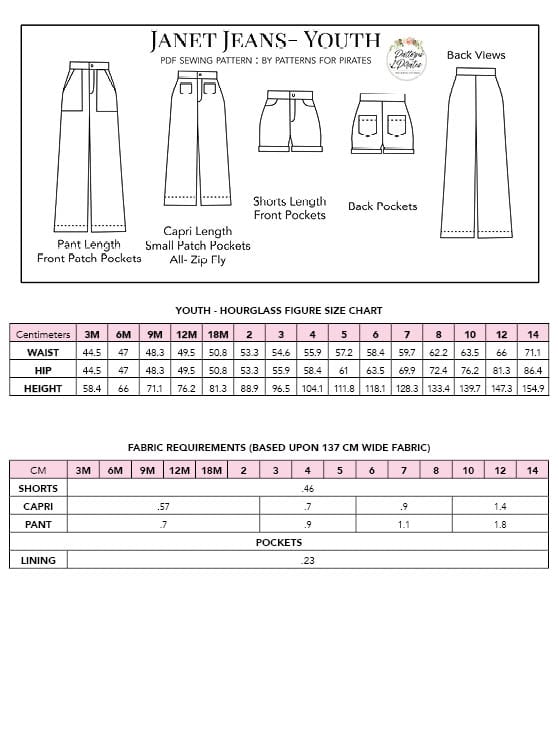
New Pattern Release :: Janet Jeans
Have you ever dreamed of making yourself the perfect pair of jeans? If so, we’ve got two words for you: Janet. Jeans.

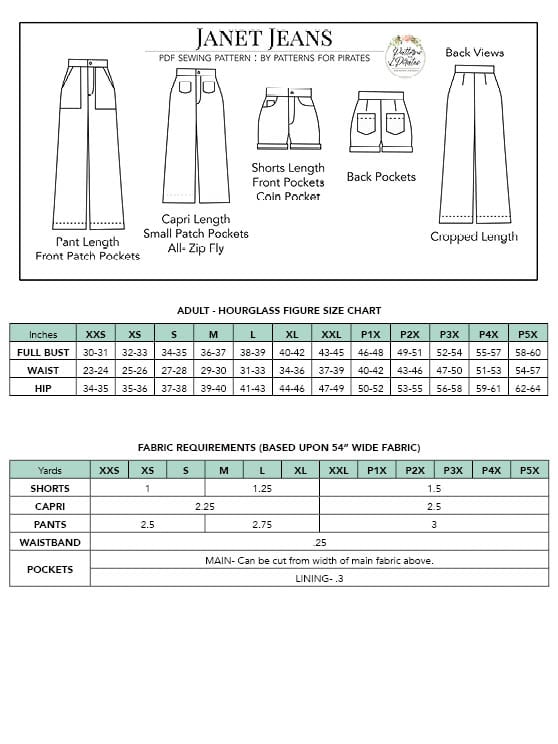
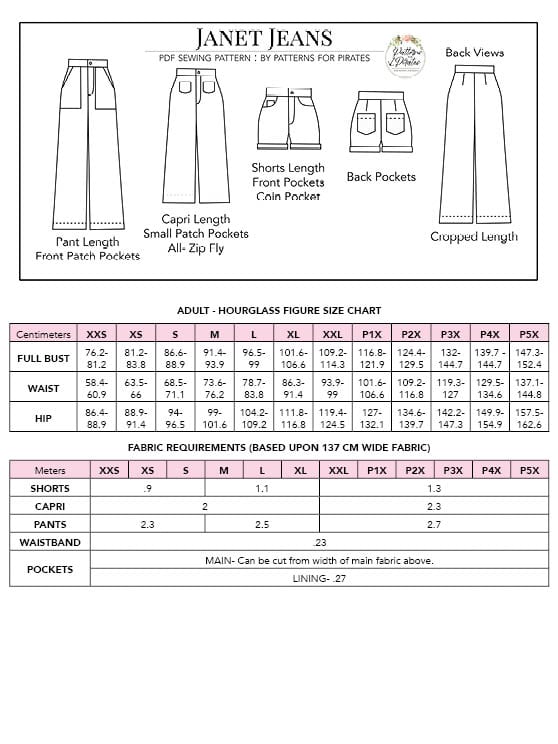
The youth sizes range from 3m – 14 and the adult sizes are for the full, newer size chart, extending from XXS – Plus 5X for the Adult Hourglass Figure.
- *Want to learn more about how to measure yourself for these pattern? We’ve got you covered with an in-depth blog HERE. And for even more helpful fun, we have a free* printable that you can use to help record your measurements as you take them.
- And in case you’re new to Patterns for Pirates and PDF patterns in general, we have a great blog full of new-user tips HERE to help you get started!
- As with all of our current releases and updates, the pdfs now include our layers feature and can be found in Letter, A4, A0 and projector sizes.
- We’ve also got an excellent planning tool for you with our Coloring Pages. It’s a resource that is updated with every new pattern addition, this pattern included!
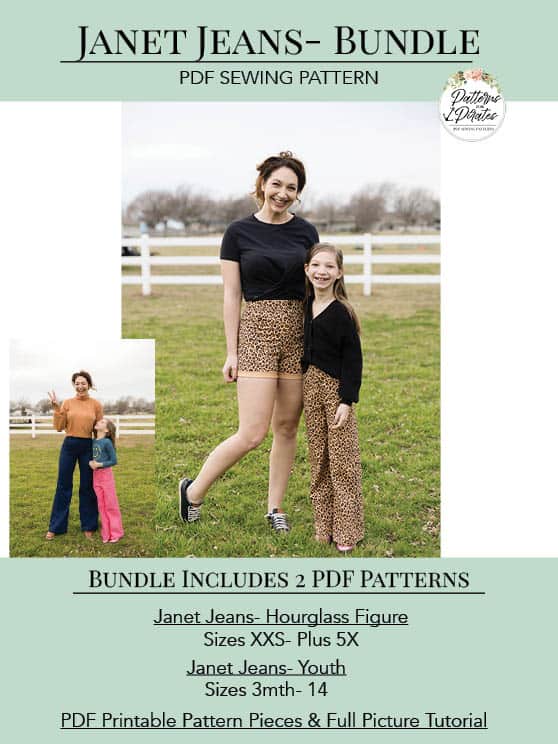
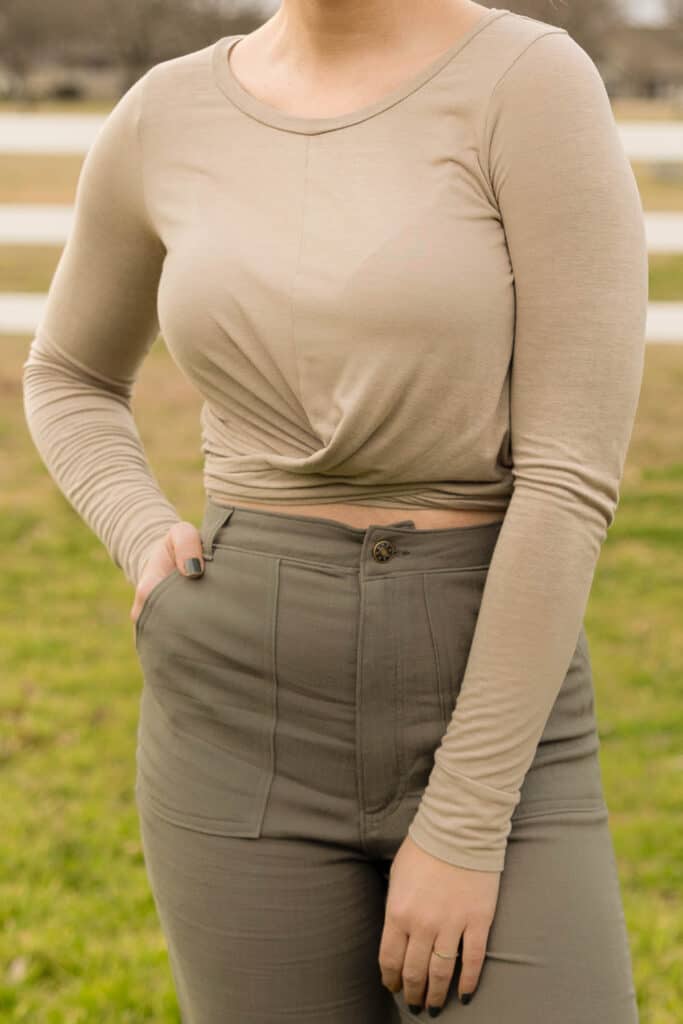
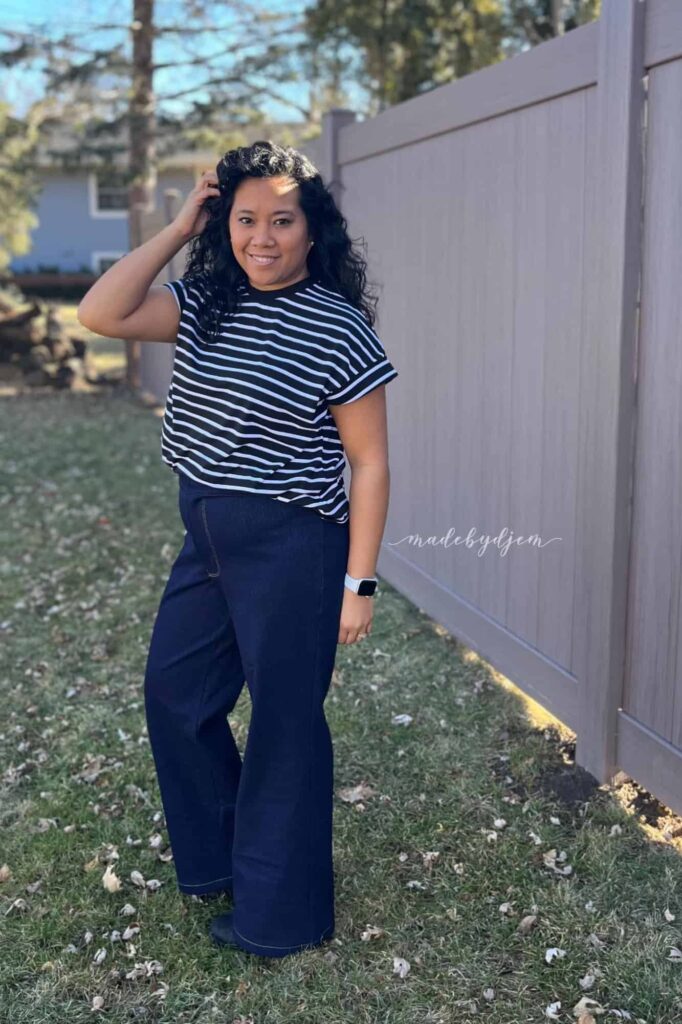
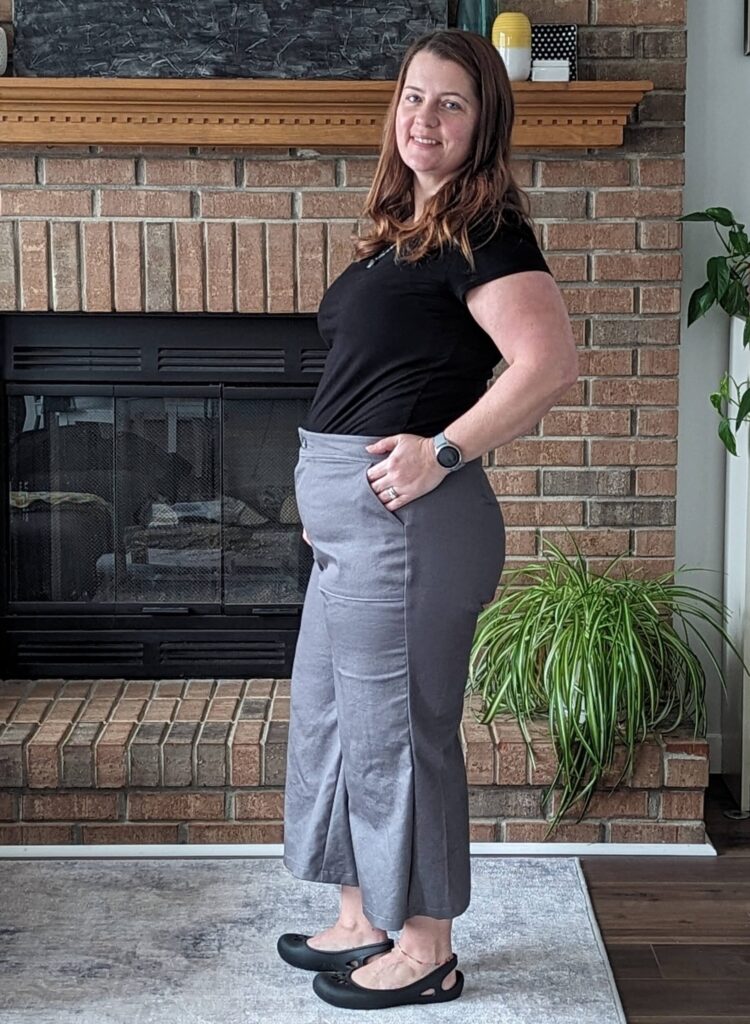
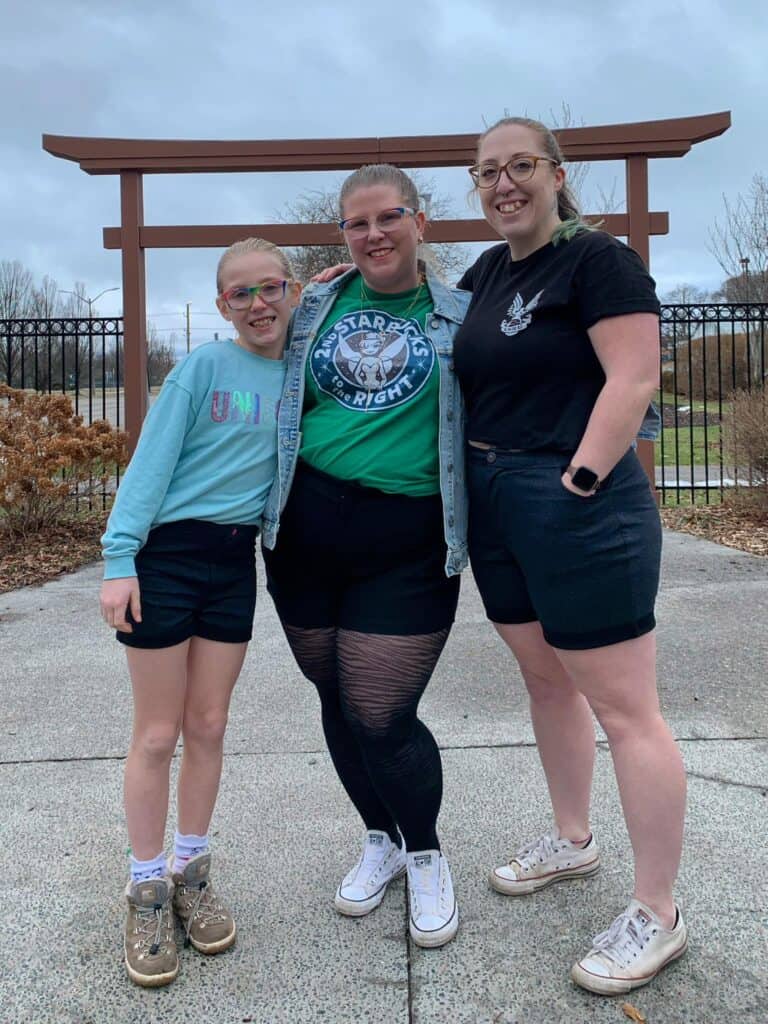
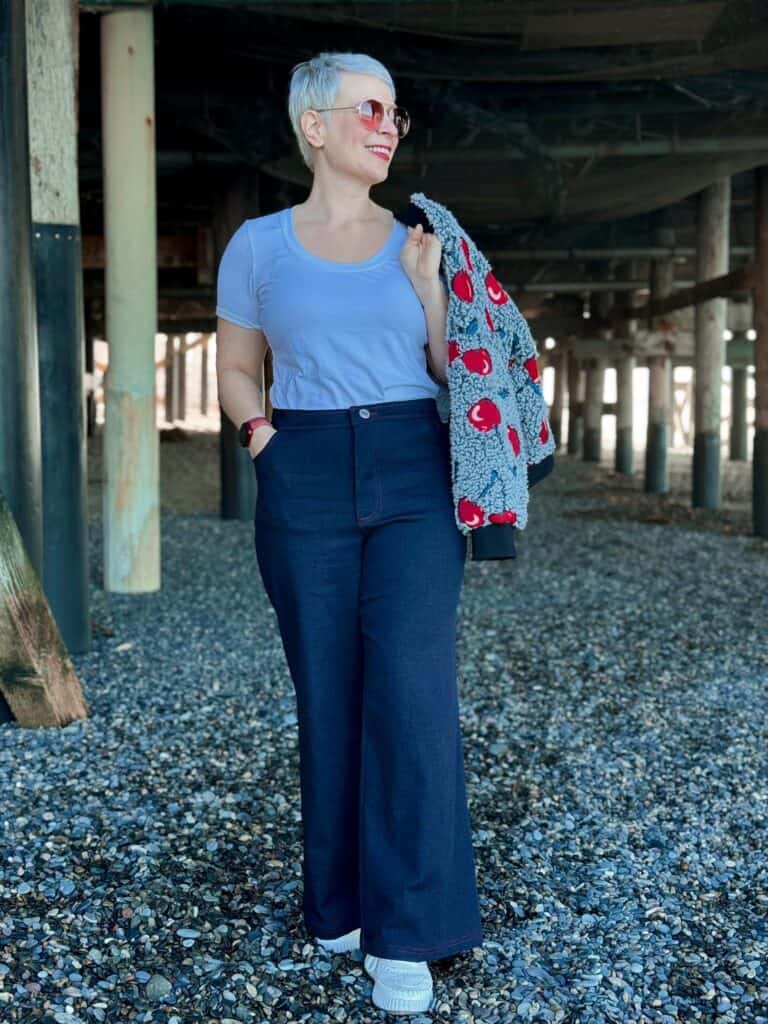
The Janet Jeans are both on trend and a classic vintage vibe all in one. A nod to Janet from Three’s Company and general 70’s aesthetic, the Janet Jeans have a snug fit from natural waist through booty then start flaring out down to the ankle giving an overall A-line silhouette. Waistband is meant to hit at natural waist, just covering up belly button. You can choose from a cuffed shorts length, capri, cropped or pant length. The back darts help make fitting from full hip to waist a little easier. The slight stretch in fabric not only makes them more comfortable, but also gives a bit more room for fitting and fluctuating sizes as well…so you can wear your memade jeans throughout the month as your body might go up and down the measuring tape a bit. The waistband is a contoured fit to make sure you don’t have gapping at the back waist, but not so snug that you’re being squeezed.
The Janet Jeans can be sewn up in most stretch wovens. You will only be limited by what you like the feel of and if it is thick enough to be comfortable with it covering your booty. With all the pocket choices you won’t have to leave behind any keys, phone, wallet, snacks, or other treasures you’d like to take with you.
Pattern options for the Janet Jeans include:
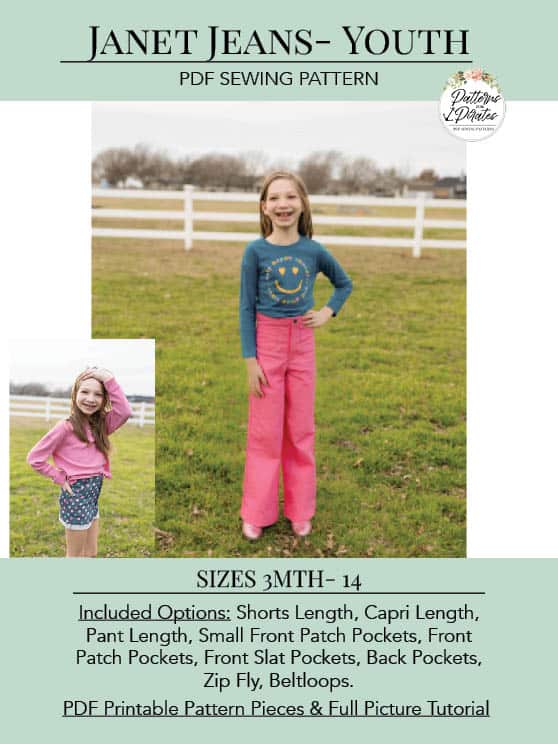
- Lengths: Shorts / Capri Length / Cropped Length / Pant Length
- Belt Loops
- Optional Pockets: Front Slat Pockets -Optional Coin Pocket / Back Pockets / Front Small Patch Pockets / Front Patch Pockets
- All Options include a Zip Fly, Back Darts, Contoured Waistband
The Janet Jeans pattern is drafted for stretch woven fabrics with at least 10% stretch.
Specific Fabric Suggestions: Stretch Denim, Stretch Twill, Stretch Linen, Stretch Corduroy, Stretch Suiting, etc
We’ve loaded in ::several:: videos, walking you through various steps of the Janet Jeans patterns! In case you needed a little hand holding with some of the construction, we’ve already got you covered! The links are all available in the pattern tutorials, or you can find them on our YouTube channel.
Let’s take a quick peek at all of the pattern options:
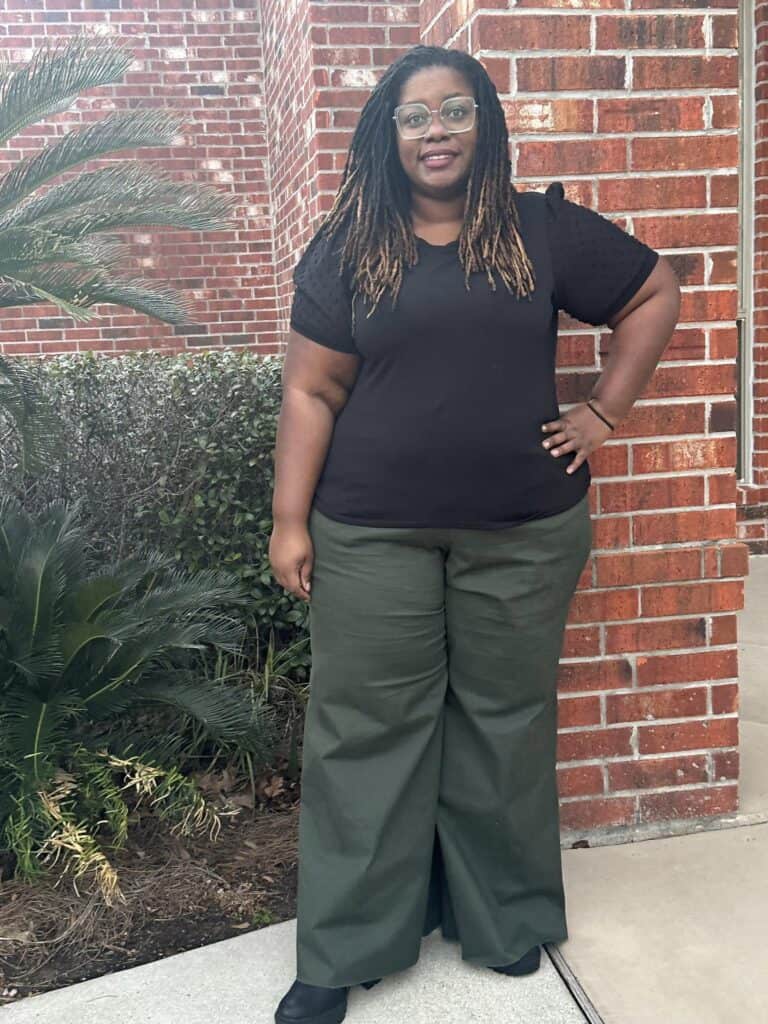
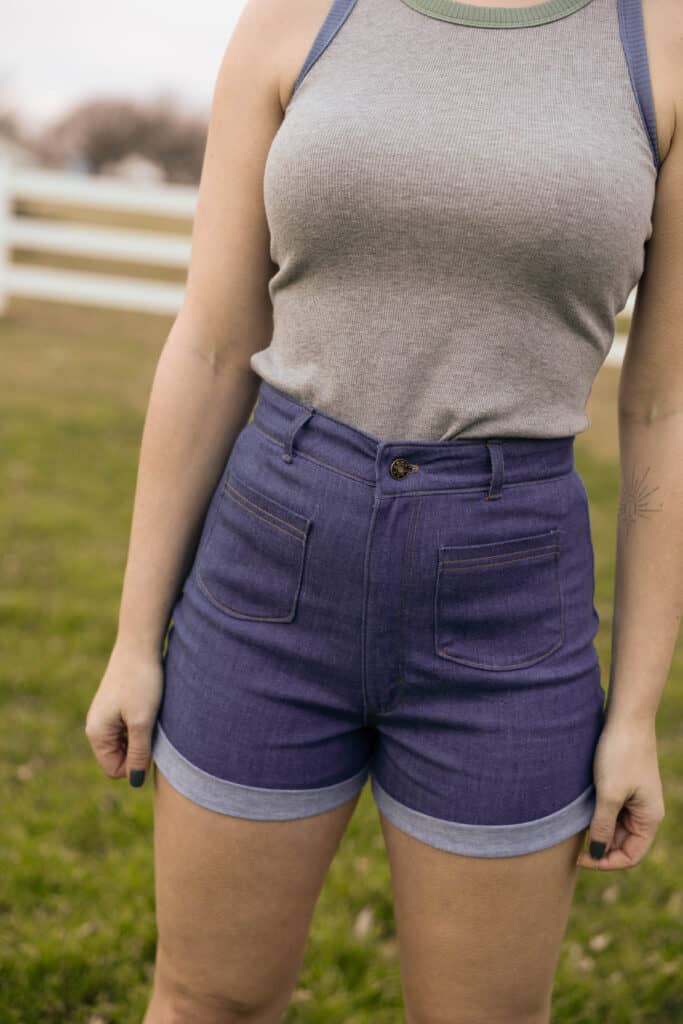
LENGTHS: SHORTS / CAPRI / CROPPED (Adult) / PANT


POCKETS: FRONT SLAT / FRONT SMALL PATCH / FRONT PATCH POCKETS / BACK POCKETS


So grab your stretch corduroy, stretch denim, stretch twill, stretch suiting and show off your new Janet Jeans!


So We are so excited to see what you sew up for yourself using the Janet Jeans patterns! It is available on sale (no code needed) through 11:59pm CST, February 18, 2024.
Find your copy of the Janet Jeans here: Janet Jeans | Janet Jeans – Youth | Janet Jeans Bundle
As always, we’ve got more photos for you to use as inspiration! Head over to the Facebook group to browse our albums full of gorgeous photos, compliments of our tester team!
Janet Jeans Adult Album | Janet Jeans Youth Album
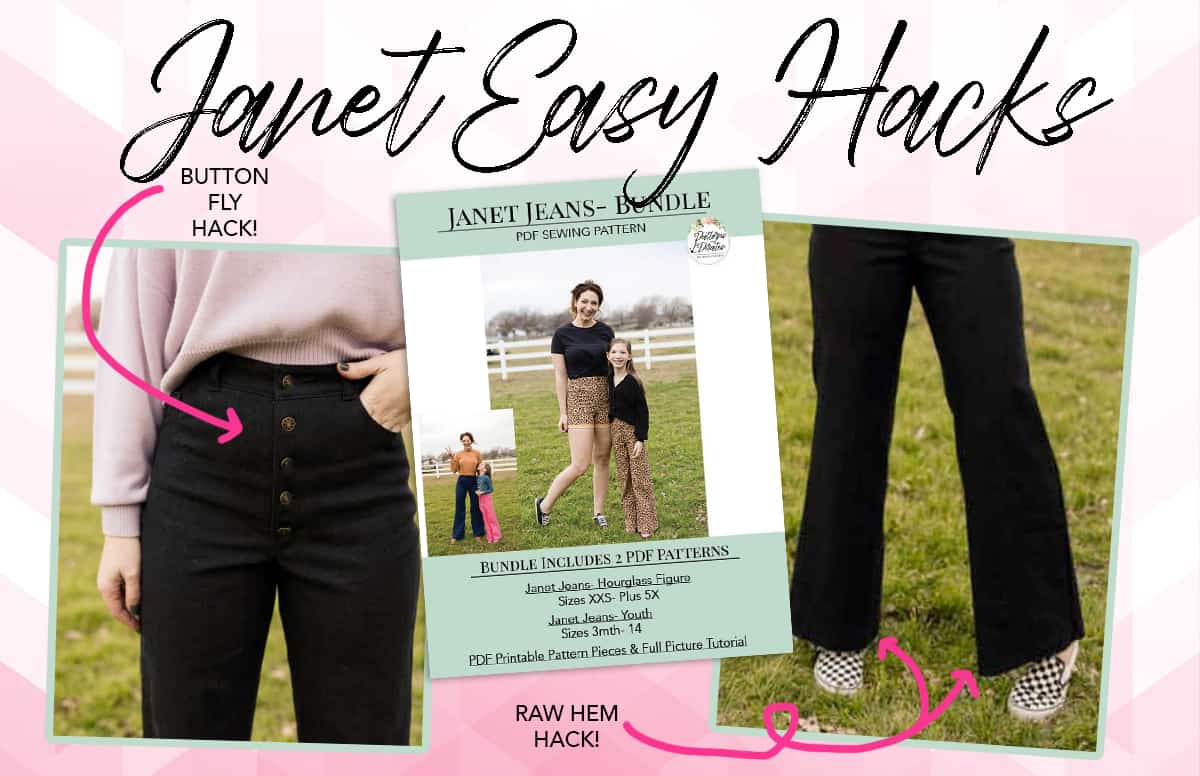
But wait, there’s more! We have an Easy Hacks blog post for the Janet Jeans pattern — helping you take that pattern a little further!
- « Previous Page
- 1
- 2
- 3
- 4
- 5
- 6
- …
- 68
- Next Page »