Protected: Fabric for Pirates :: September 2024 Reveal
New Pattern Release :: Homecoming Hoodie
We are elated to add the comfortable and versatile Homecoming Hoodie to our pattern catalog! This classic look is perfect for year round weather and the slim fit is comfortable but not sloppy.

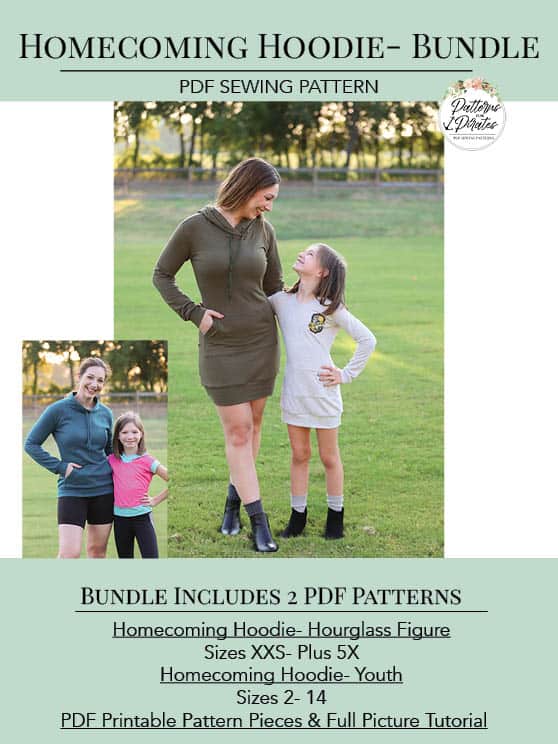
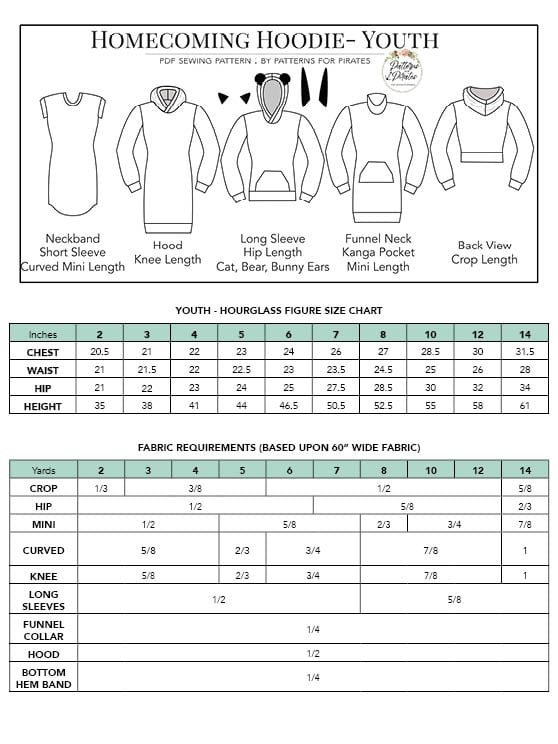
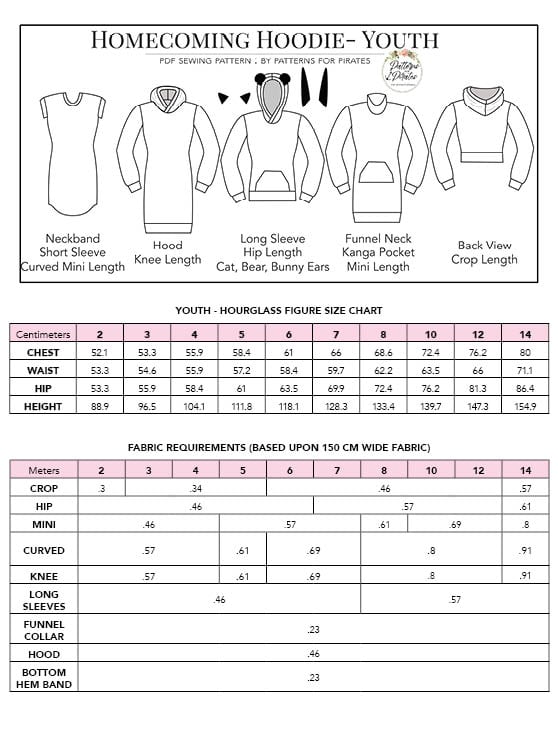
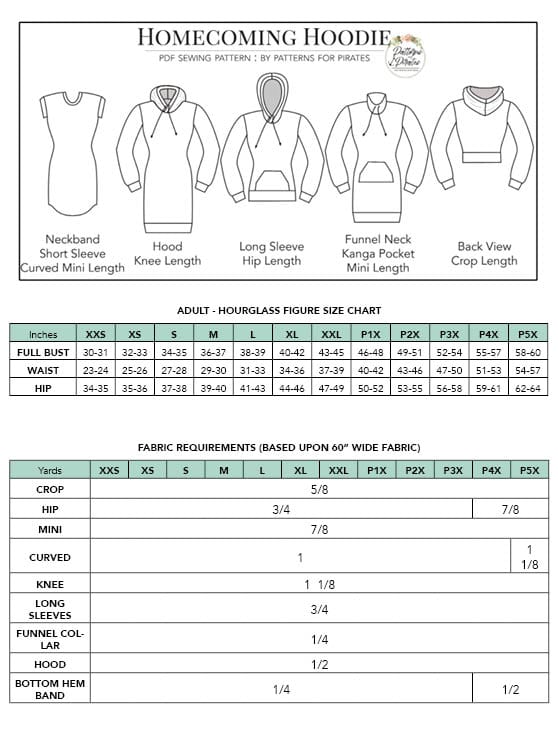
The youth sizes range from 2 – 14 and the adult sizes are XXS – Plus 5X for the Adult Hourglass Figure.
- *Want to learn more about how to measure yourself for these pattern? We’ve got you covered with an in-depth blog HERE. And for even more helpful fun, we have a free* printable that you can use to help record your measurements as you take them.
- And in case you’re new to Patterns for Pirates and PDF patterns in general, we have a great blog full of new-user tips HERE to help you get started!
- As with all of our current releases and updates, the pdfs now include our layers feature and can be found in Letter, A4, A0 and projector sizes.
- We’ve also got an excellent planning tool for you with our Coloring Pages. It’s a resource that is updated with every new pattern addition, this pattern included!
- Need a way to keep track of the P4P patterns you have? We’ve gone through all of our patterns and created an interactive PDF for you! Grab your copy HERE.
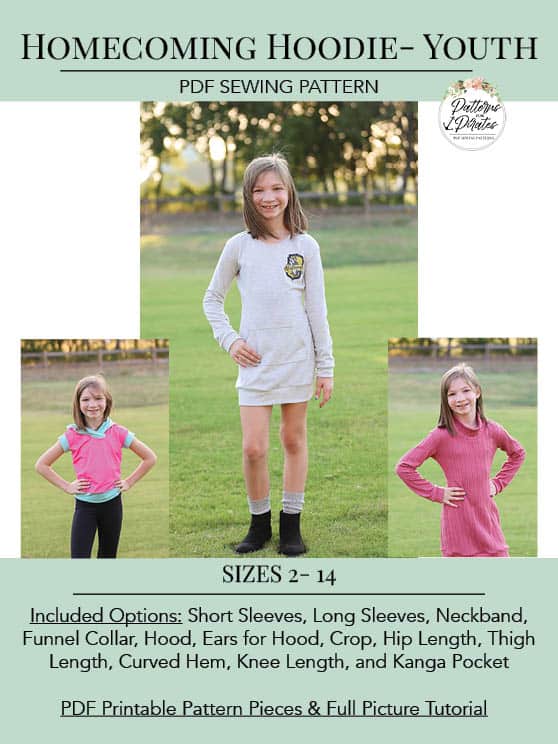
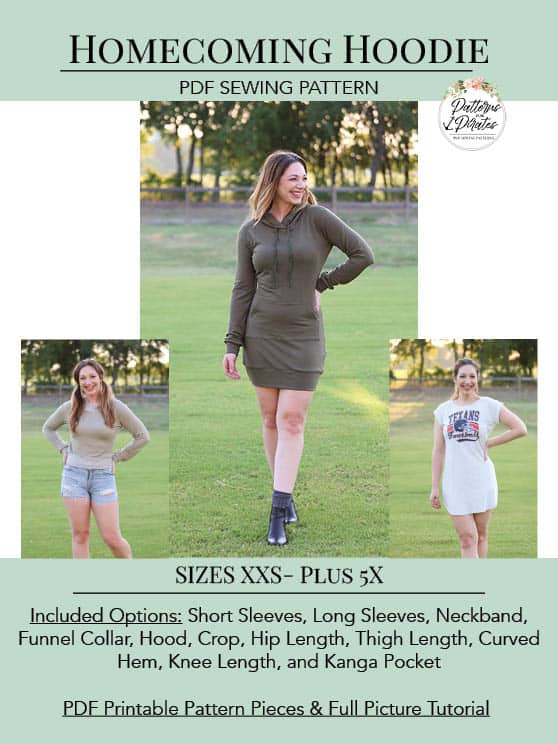
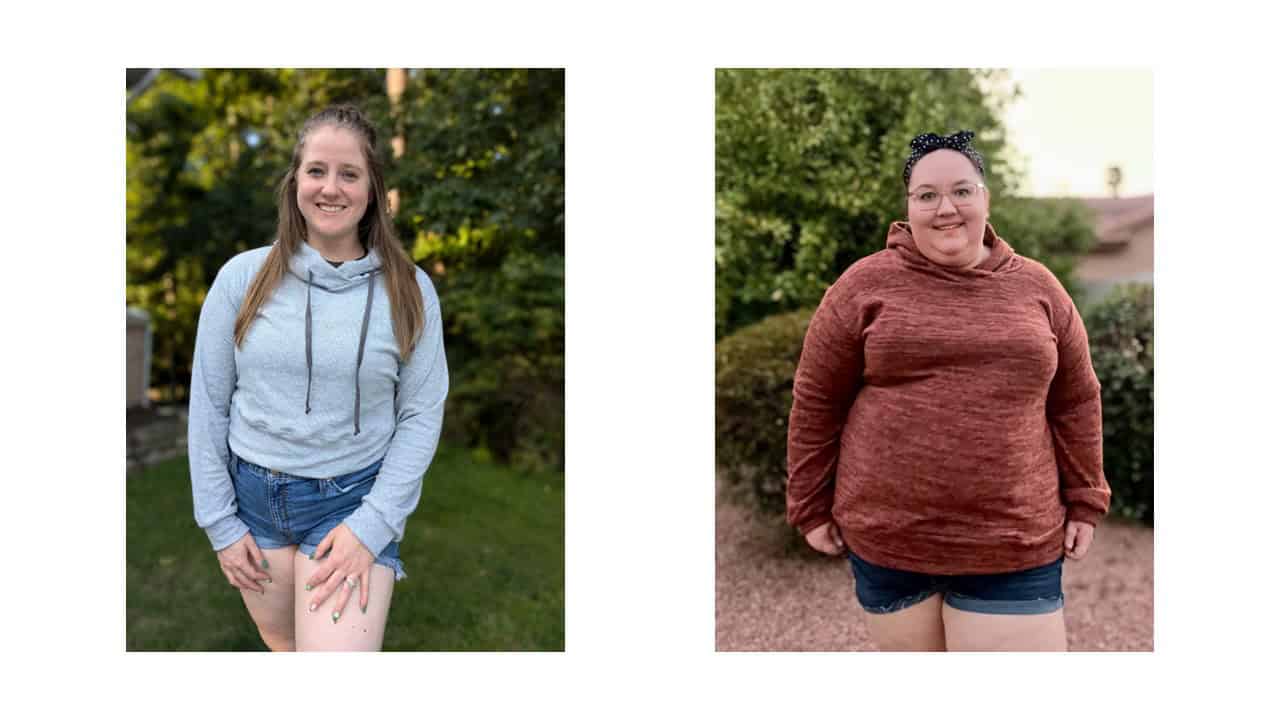
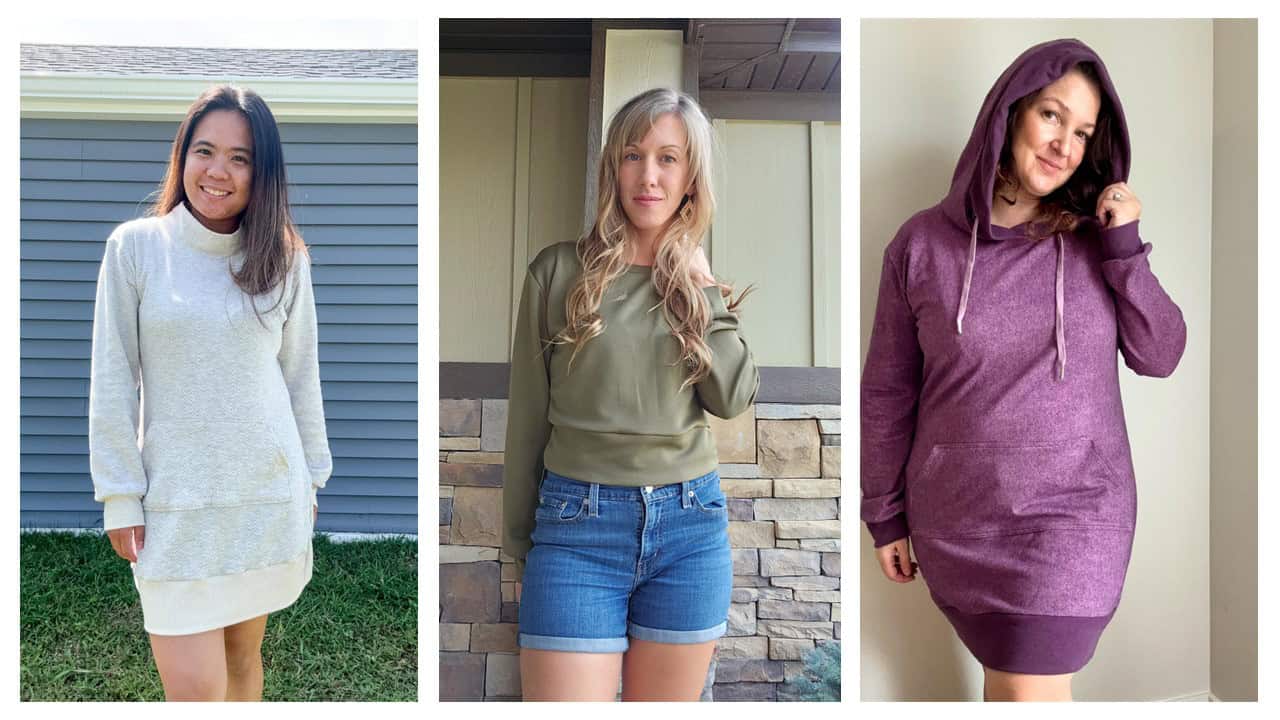
The Homecoming Hoodie is a super comfortable and classic look for everyday and your favorite spirit wear. This semi-fitted hoodie is perfect for any time of year too. You can choose from short sleeve for warmer weather and long for cool months. The short sleeves make a great athletic top, nightgown, or swim cover up. Need something warmer? Try the long sleeves with a funnel collar or hood for extra coziness. The kanga pocket is another cute detail you can add to any length excluding the crop length. The body skimmed fit allows for an array of fabric choice… if you choose a thinner, stretchy knit you will have a more relaxed fit and feel. If you opt for a thicker, more stable fabric for warmth or structure you will have a slimmer fit. Throw on your tennis and you have a comfortable, but adorable outfit for the day.
Pattern options for the Homecoming Hoodie includes:
- Necklines: Crew Neckline / Funnel Collar / Hood
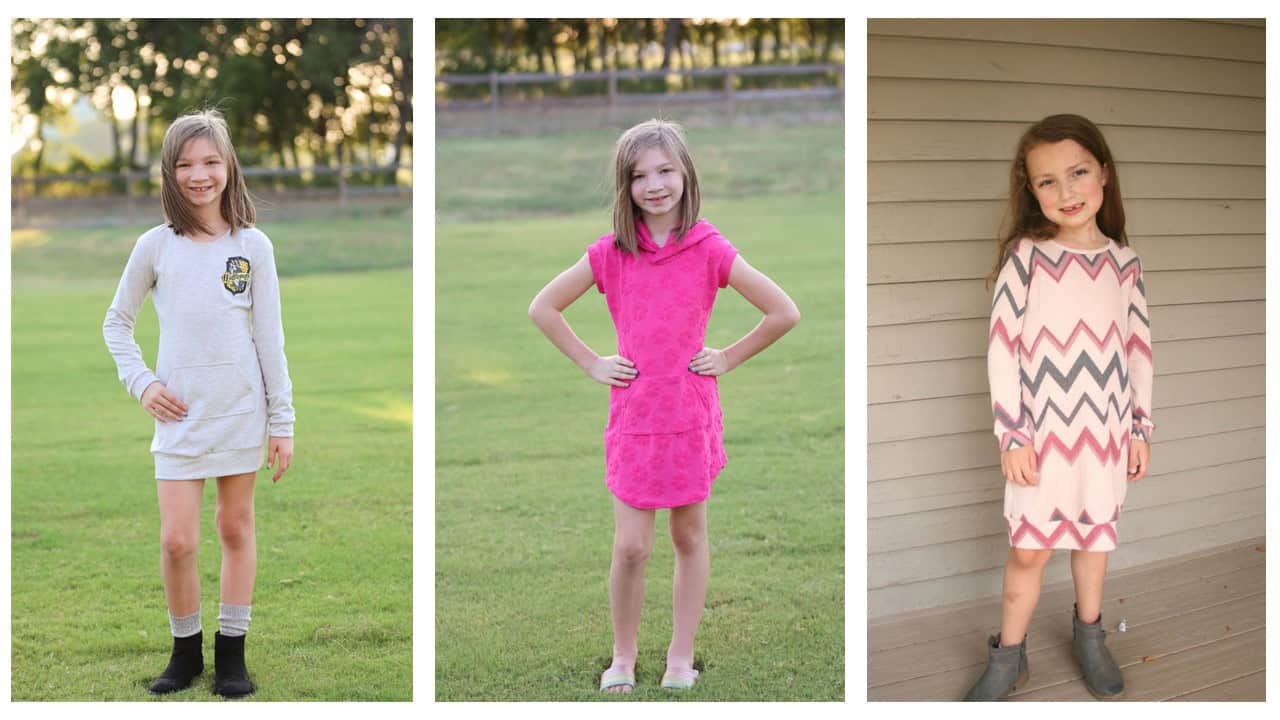
- Hem Lengths: Crop / Hip / Mini / Curved Mini / Knee
- Sleeves: Short / Long
- Optional Kanga Pocket (excluding crop length)
- All Versions Feature a Drop-Shoulder Dolman Sleeve
The Homecoming Hoodie pattern is drafted for stable stretch knits with some stretch. For a comfortable fit fabric should have around 30% or more horizontal stretch. The funnel collar does best with thicker, stable fabric so the funnel stands up.
Specific Fabric Suggestions: french terry, double knits, sweatshirt knit, athletic knit, stretch terry knits, brushed rib knits, waffle knits, sweater knits, thermal, micro fleece, etc.

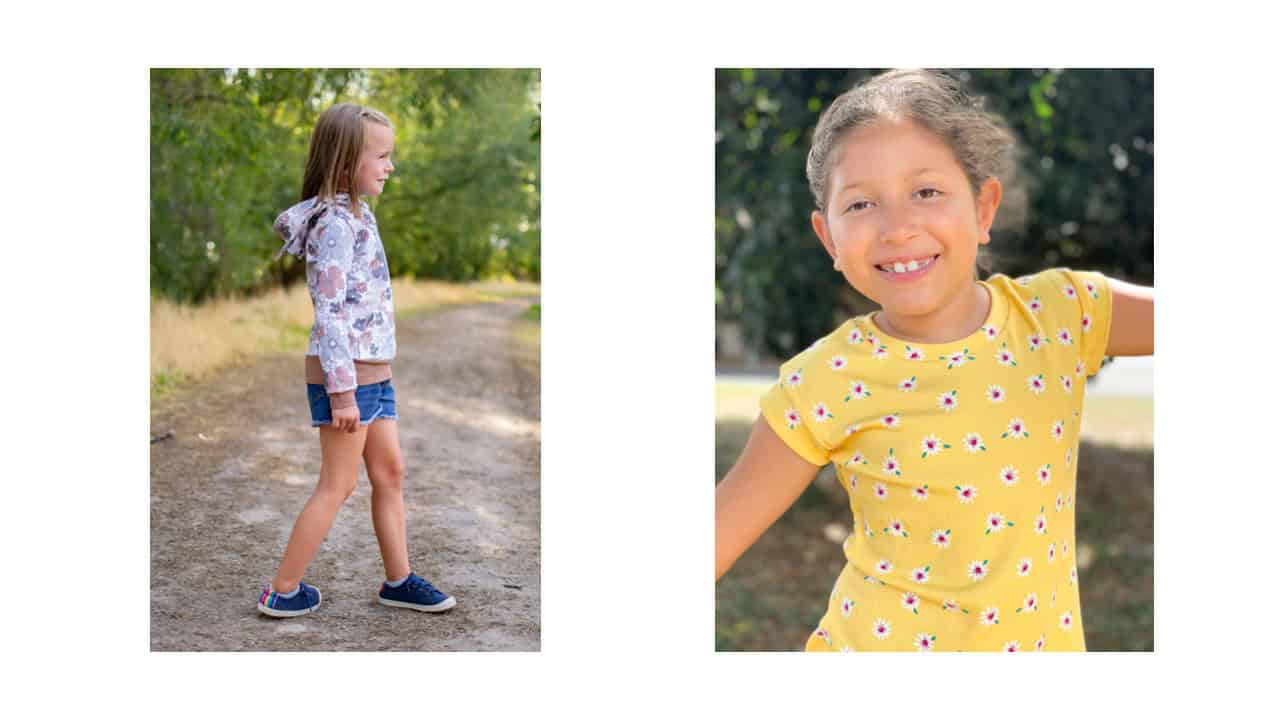
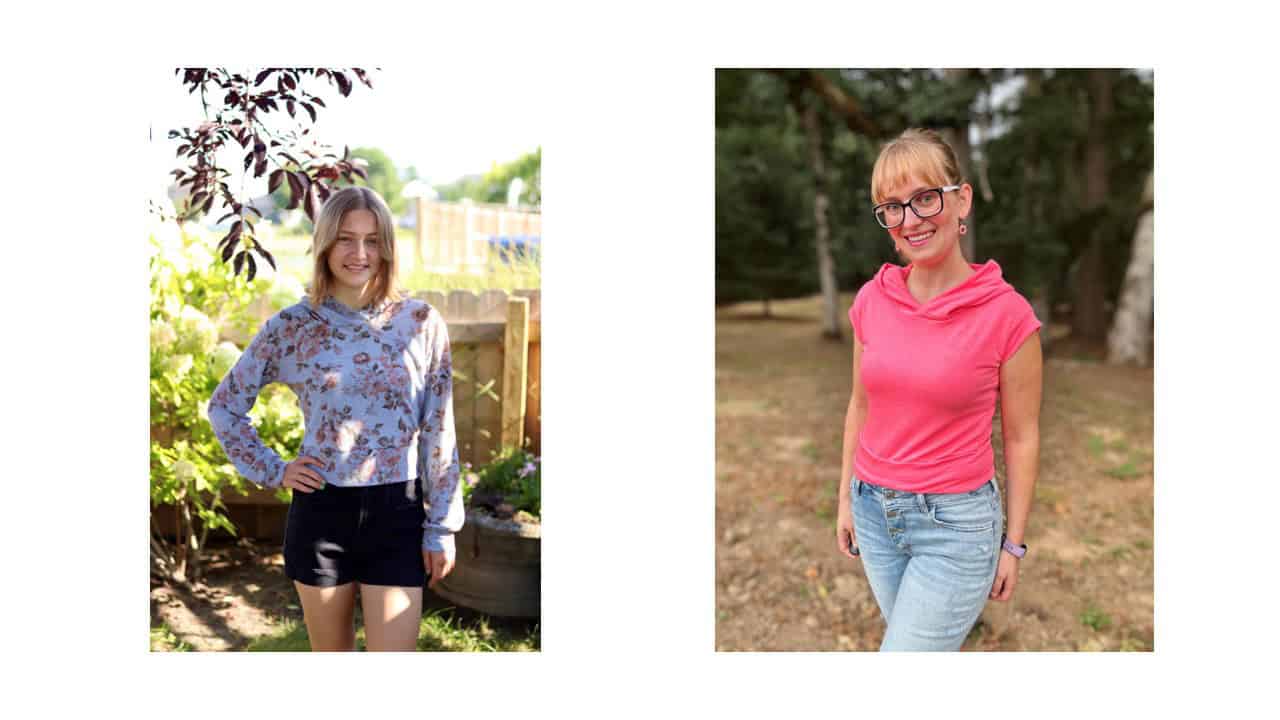
We obviously wouldn’t leave you hanging without showing you some of the different options in the patterns!
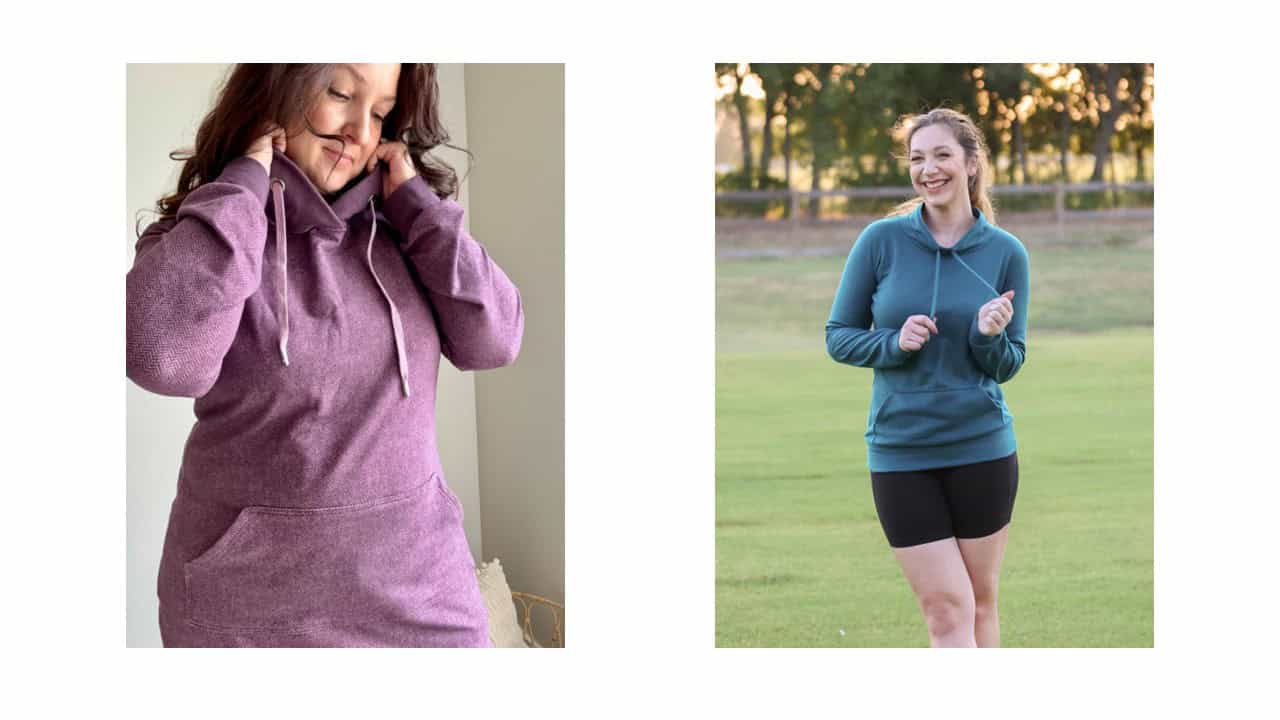
SLEEVES :: LONG / SHORT
TOP LENGTHS :: CROP / HIP

DRESS LENGTHS :: THIGH-MINI / CURVED HEM / KNEE
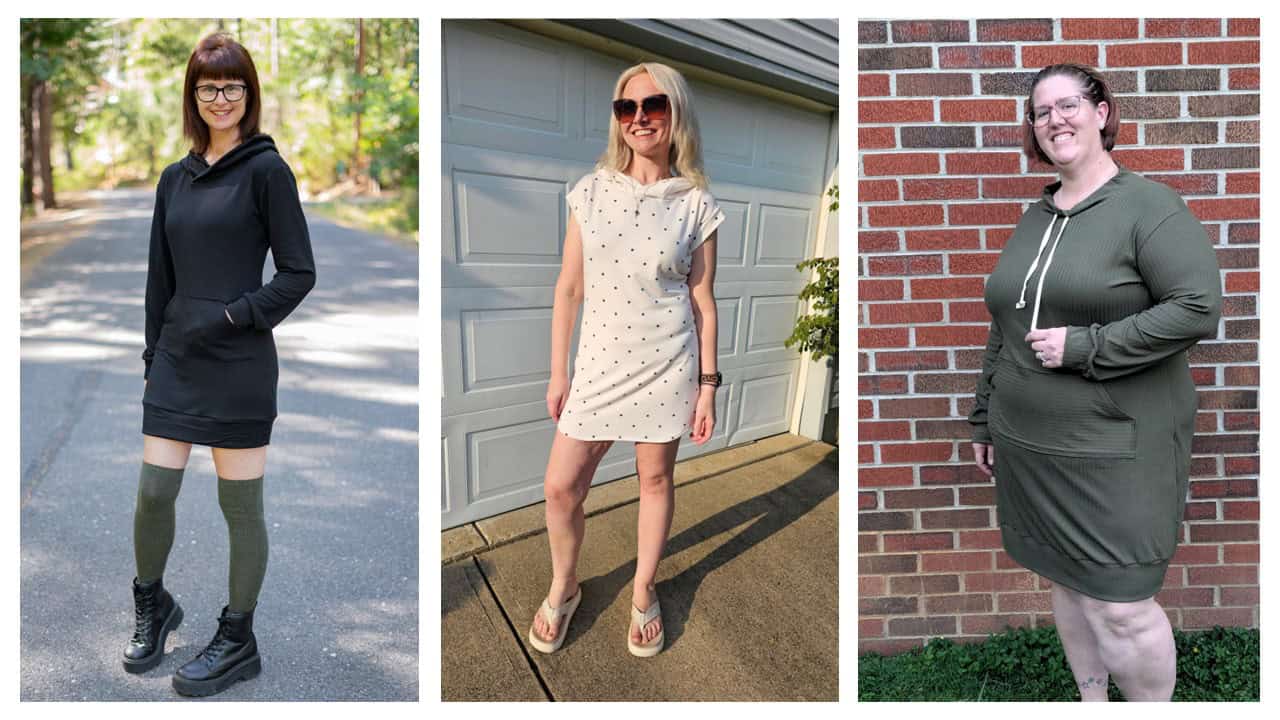
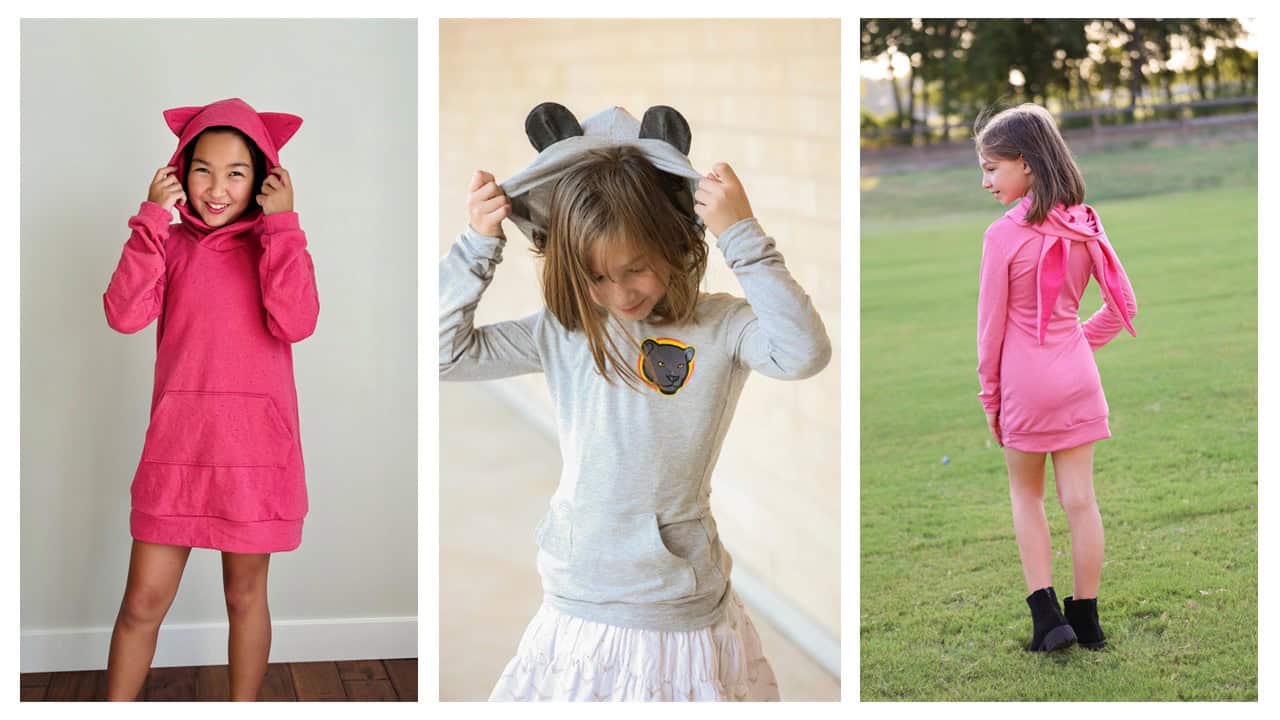
NECKLINES :: FUNNEL COLLAR / NECKBAND / HOOD
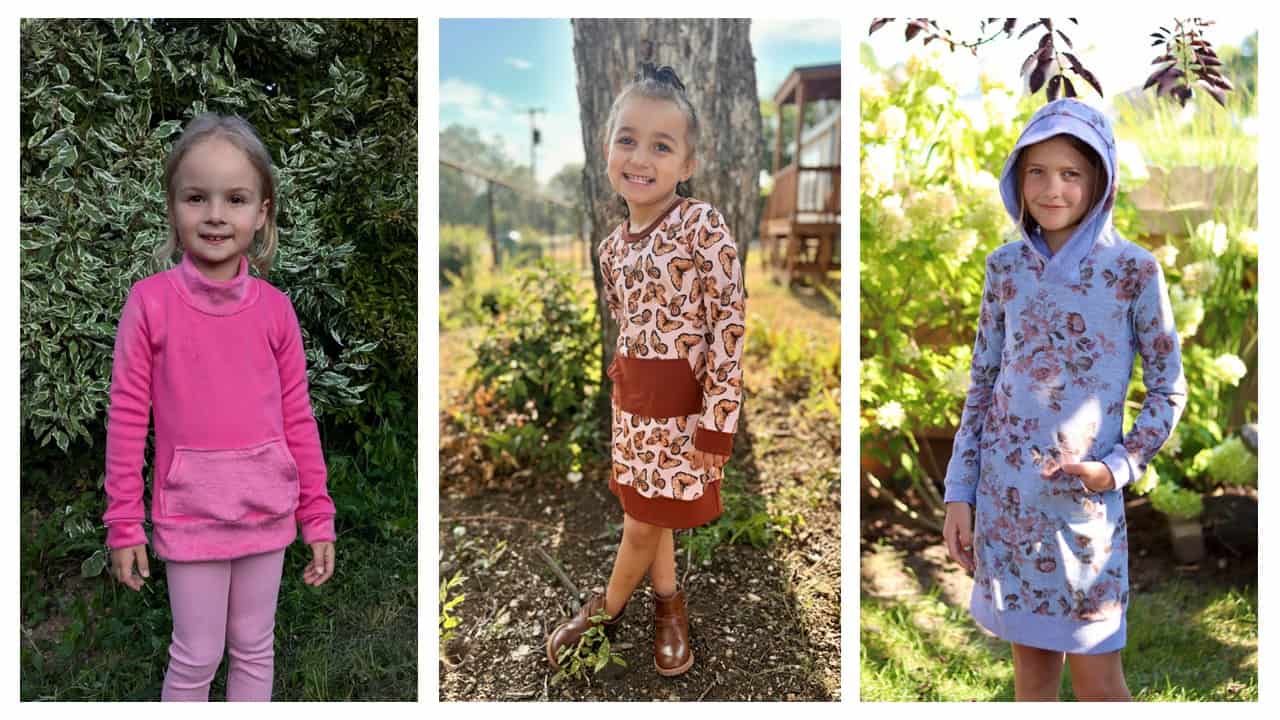
YOUTH HOOD EARS :: CAT / BEAR / BUNNY
OPTIONAL KANGA POCKET

ADULT DRAWSTRING :: HOOD / FUNNEL COLLAR
Like a sew a long video? We’ve got you!
We are so excited to see what you make with the new Homecoming Hoodie patterns! Both patterns are available now and on sale (no code needed) through 11:59pm CST, September 10, 2024.
Grab your copy of the Homecoming Hoodie patterns here: Homecoming Hoodie | Homecoming Hoodie- Youth | Homecoming Hoodie- Bundle
As always, we’ve got more photos for you to use as inspiration! Head over to the Facebook group to browse our albums full of gorgeous photos, compliments of our tester team!
Homecoming Hoodie Adult Album | Homecoming Hoodie Youth Album

New Pattern Release :: Raider Ringer Tee
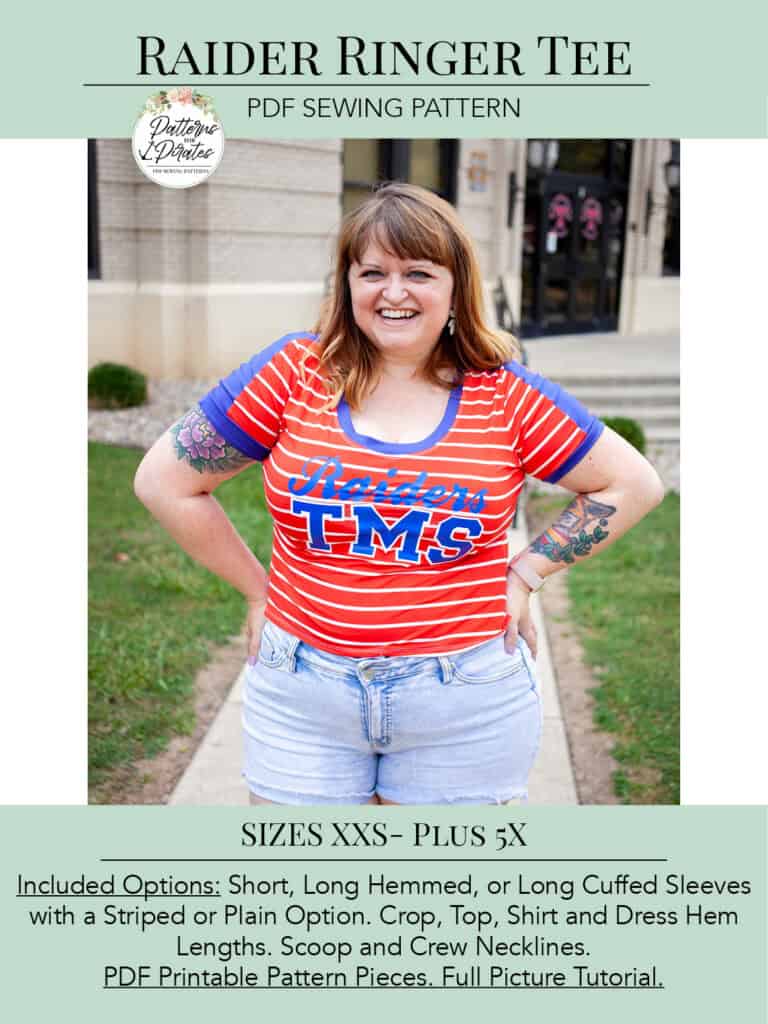
I’m beyond excited to introduce you to our newest pattern release at Patterns for Pirates—the Raider Ringer Tees! This collection is all about bringing back the fun, retro vibe of the classic Ringer tee, with a modern twist that’s perfect for every member of the family. Whether you’re a fan of vintage styles or just looking for a versatile, stylish tee to add to your handmade wardrobe, the Raider Ringer Tees have you covered.
Want to hear the best news ever? The Raider Ringer Tee patterns are designed for all four of our size charts! That’s right…it’s available in our Youth + Adult Hourglass AND Youth + Adult V Figure size charts. Woot!
- *Want to learn more about how to measure yourself for these pattern? We’ve got you covered with an in-depth blog HERE. And for even more helpful fun, we have a free* printable that you can use to help record your measurements as you take them.
- And in case you’re new to Patterns for Pirates and PDF patterns in general, we have a great blog full of new-user tips HERE to help you get started!
- As with all of our current releases and updates, the pdfs now include our layers feature and can be found in Letter, A4, A0 and projector sizes.
- We’ve also got an excellent planning tool for you with our Coloring Pages. It’s a resource that is updated with every new pattern addition, this pattern included!
What Makes the Raider Ringer Tees Special?
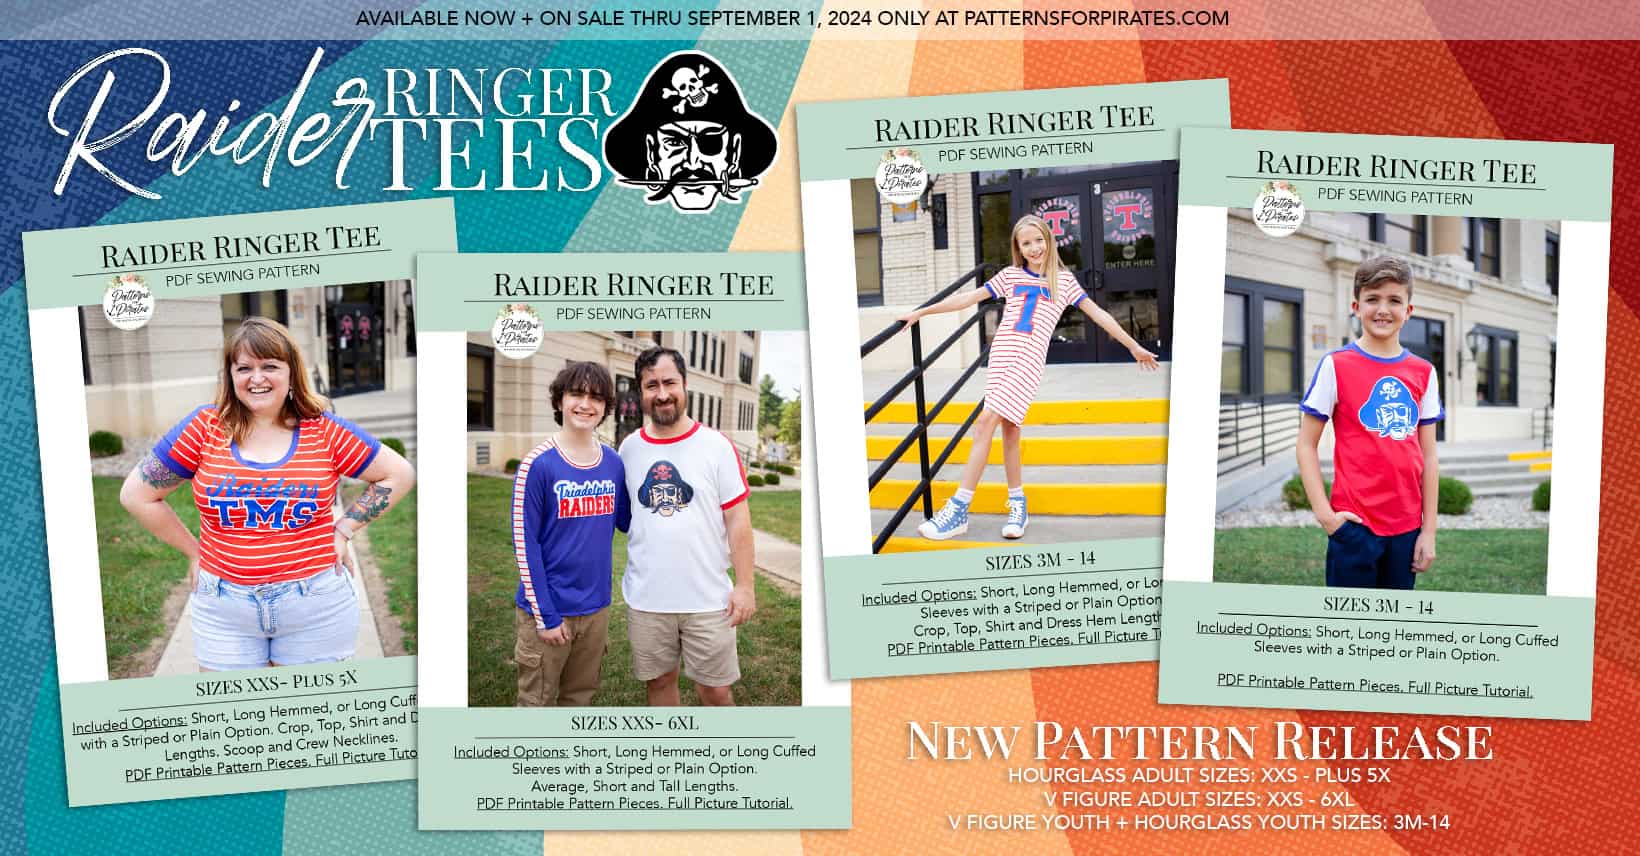
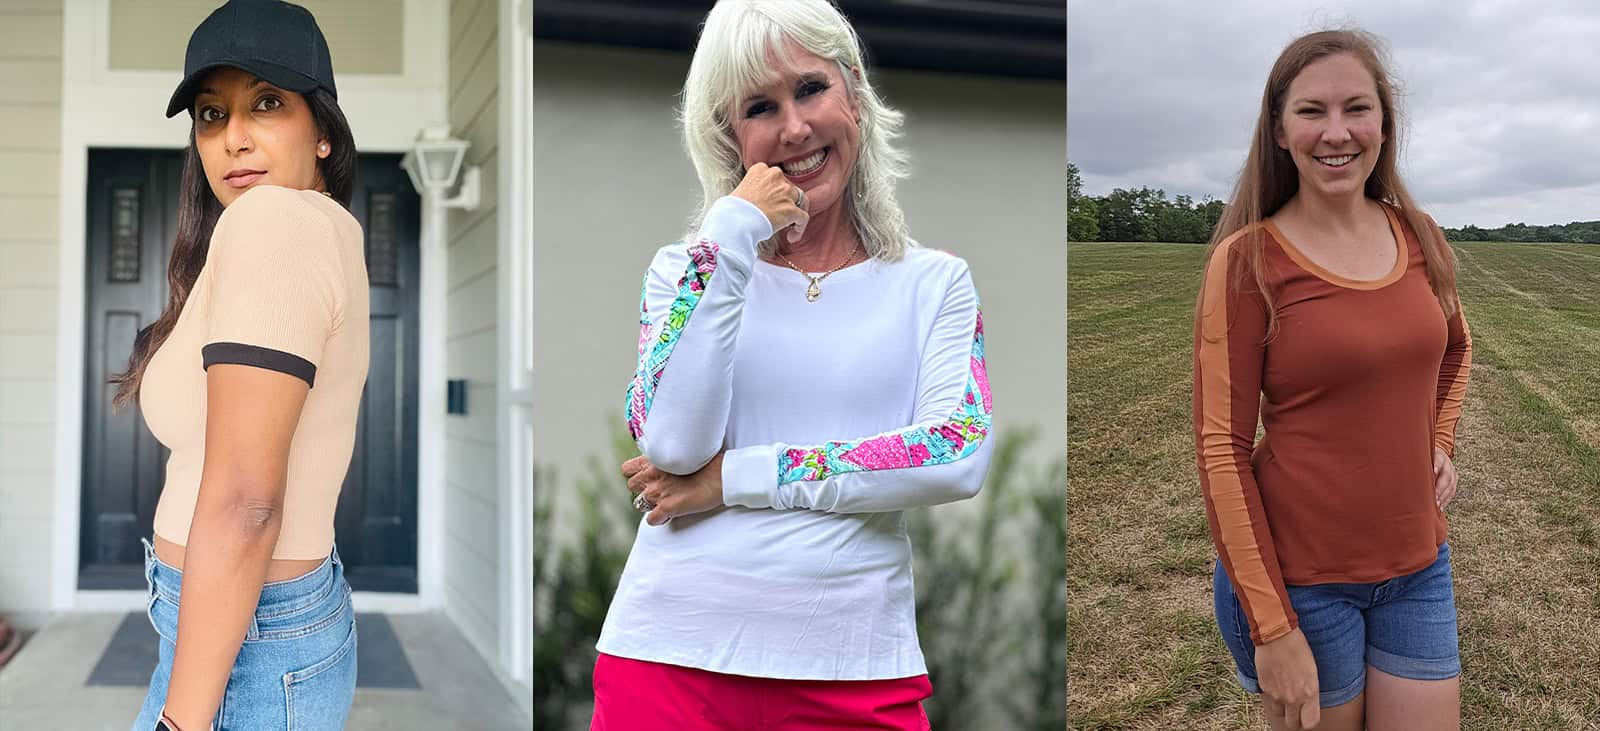
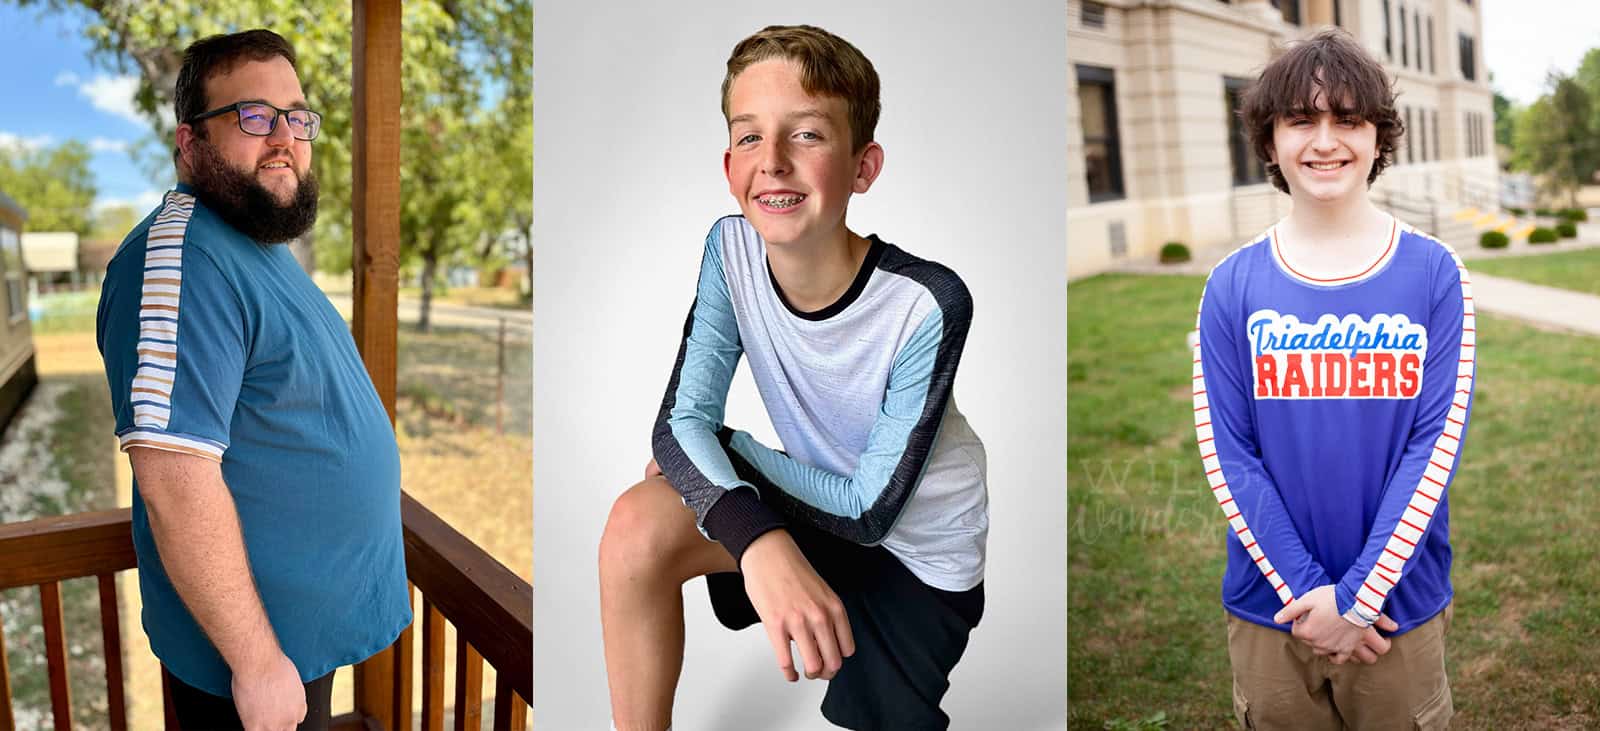
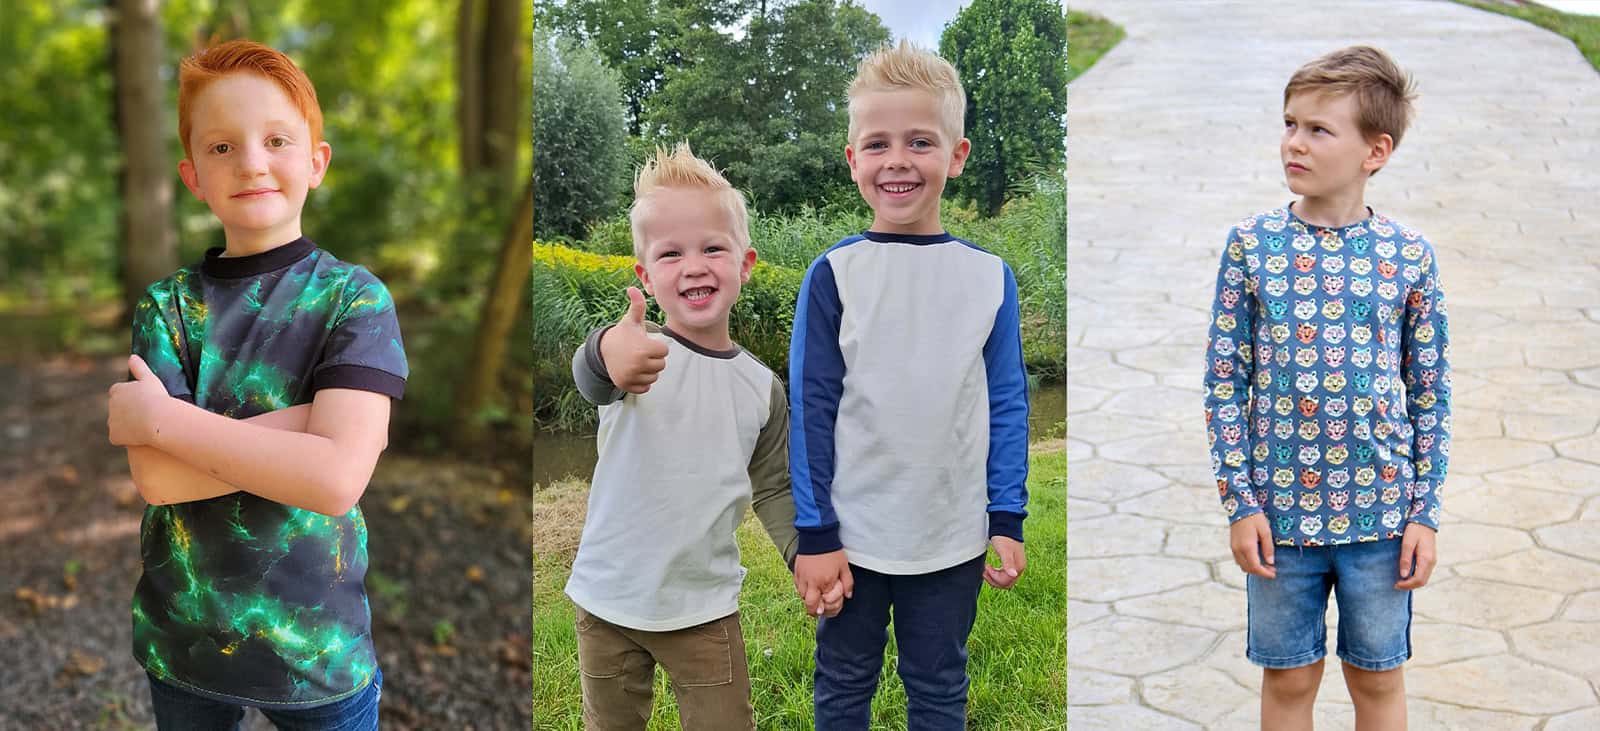
The Raider Ringer Tees are inspired by the timeless charm of the Ringer tees that were all the rage in the 60s/70s, but with a unique twist—a vertical stripe detail that runs from the neckline to the hemline on the sleeves. This eye-catching feature adds a dynamic touch to an already iconic style, making these tees a standout piece in any wardrobe.
These patterns are available in all of our size charts, ensuring a perfect fit for everyone. Here’s a quick rundown of what each version offers:
- Adult Hourglass: This version is designed with a figure-hugging fit that accentuates your curves. It comes with options for crop, top, shirt, and dress hem lengths, and an additional scoop neckline option, all in sizes XXS to Plus 5X.
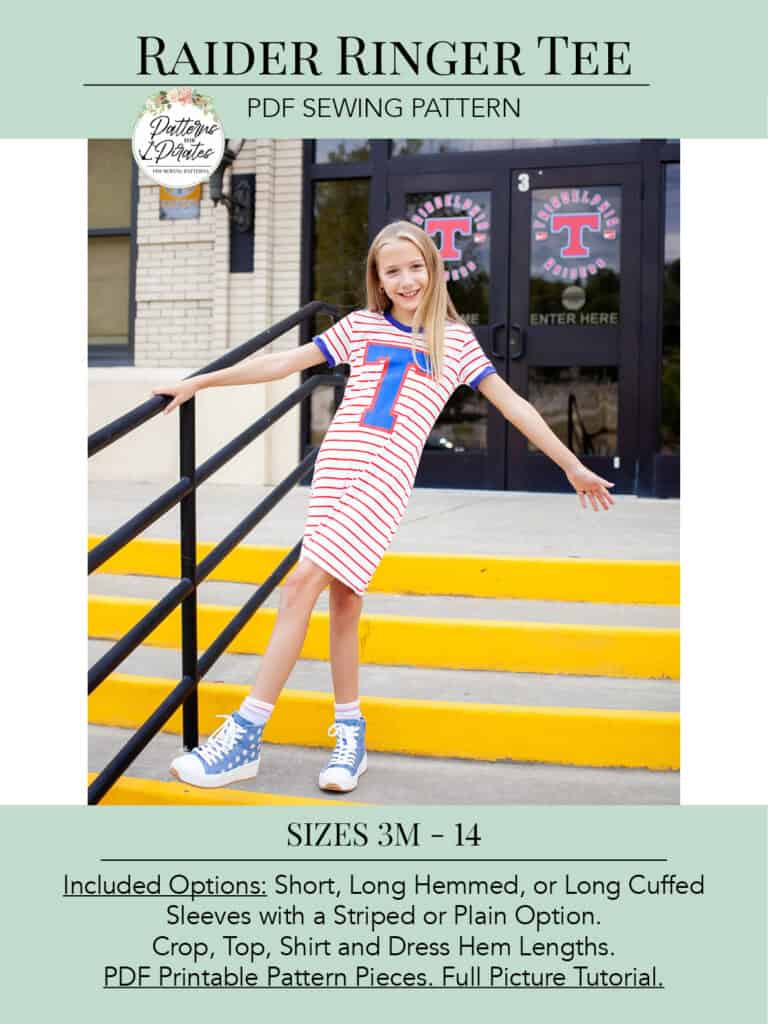
- Youth Hourglass: Perfect for the little ones, this version offers a similar body skimming fit as the adult version, with sizes ranging from 3M to 14. Choose from crop, top, shirt, and dress hem lengths to suit your child’s style.
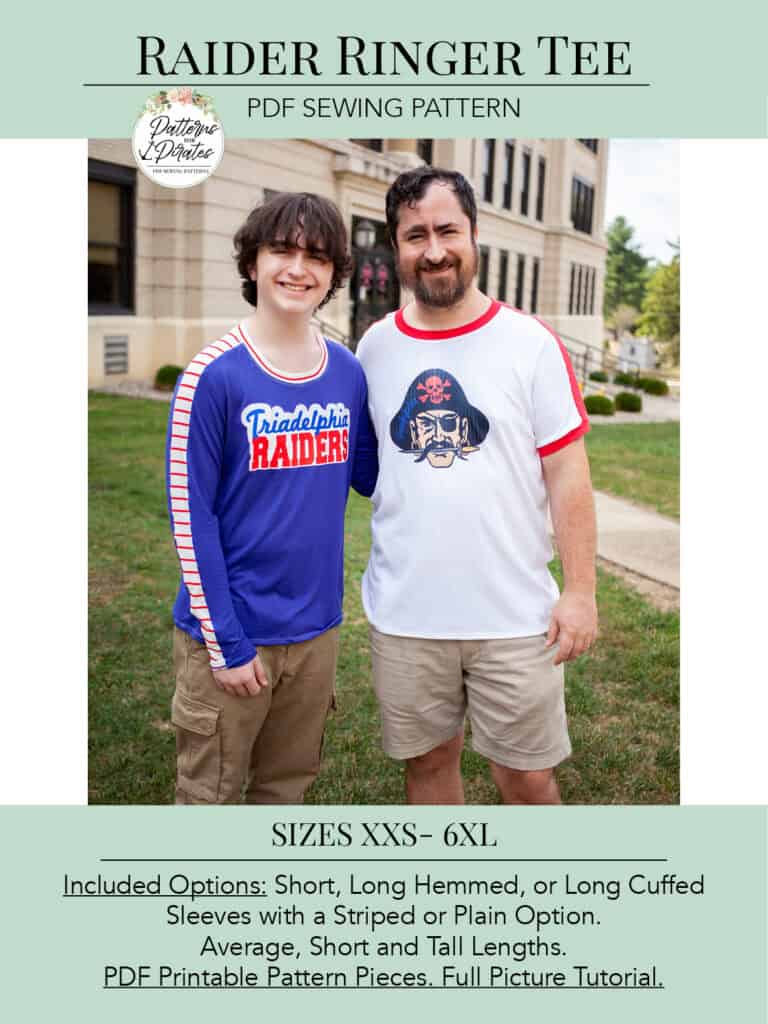
- Adult V Figure: If you prefer a more relaxed fit, the V Figure version is for you. It includes three height options—Short (5’6″), Average (5’10”), and Tall (6’2″)—and comes with classic Ringer tee details like short sleeve, long sleeve cuffed, and long sleeve hem options. Available in sizes XXS to Plus 6X.
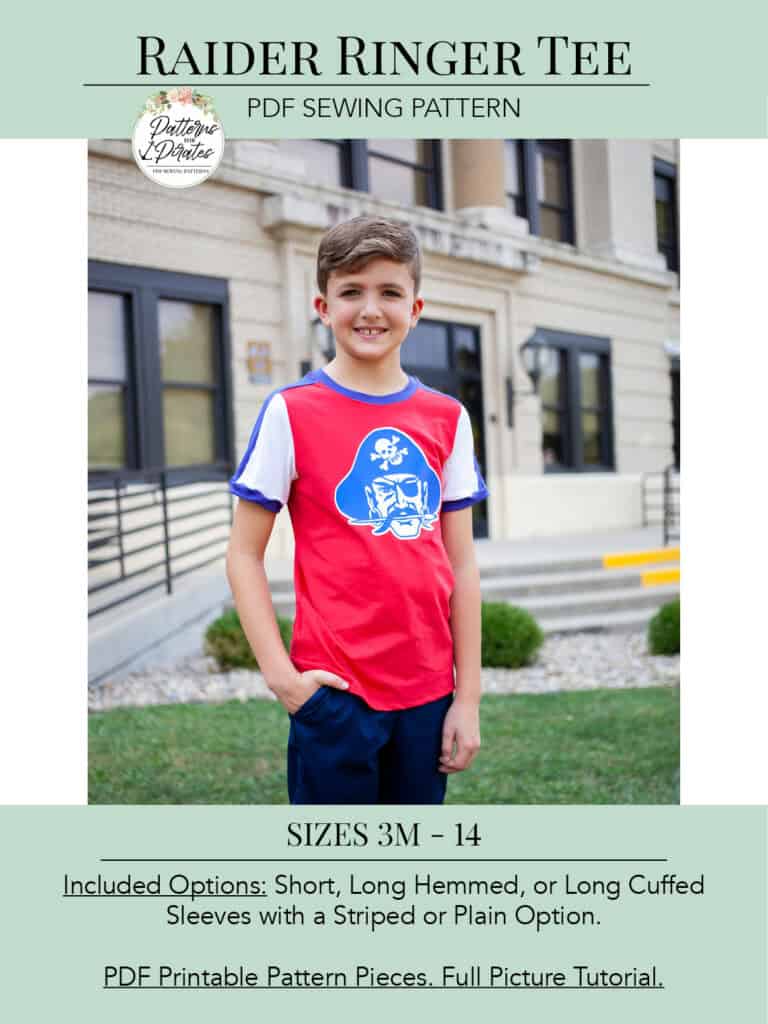
- Youth V Figure: Designed for kids who love to play and move freely, this version provides a comfortable fit with sizes ranging from 3M to 14. It’s perfect for everyday wear and offers the same sleeve options as the adult version.
The Story Behind the Name
You might be wondering, why the name Raider Ringer? Well, I (Katy…P4P designer + admin) love to draw inspiration from my home state of West Virginia when naming my patterns. This time around, I decided to honor the mascot of my husband and son’s school. Plus, how could I resist the connection between Raiders and Pirates? It was a match made in pattern-naming heaven!
Pattern Features
And now the best part! Let’s show off all of the different features + options!
SLEEVES: STRIPED or BASIC SHORT / LONG CUFFED / LONG HEMMED
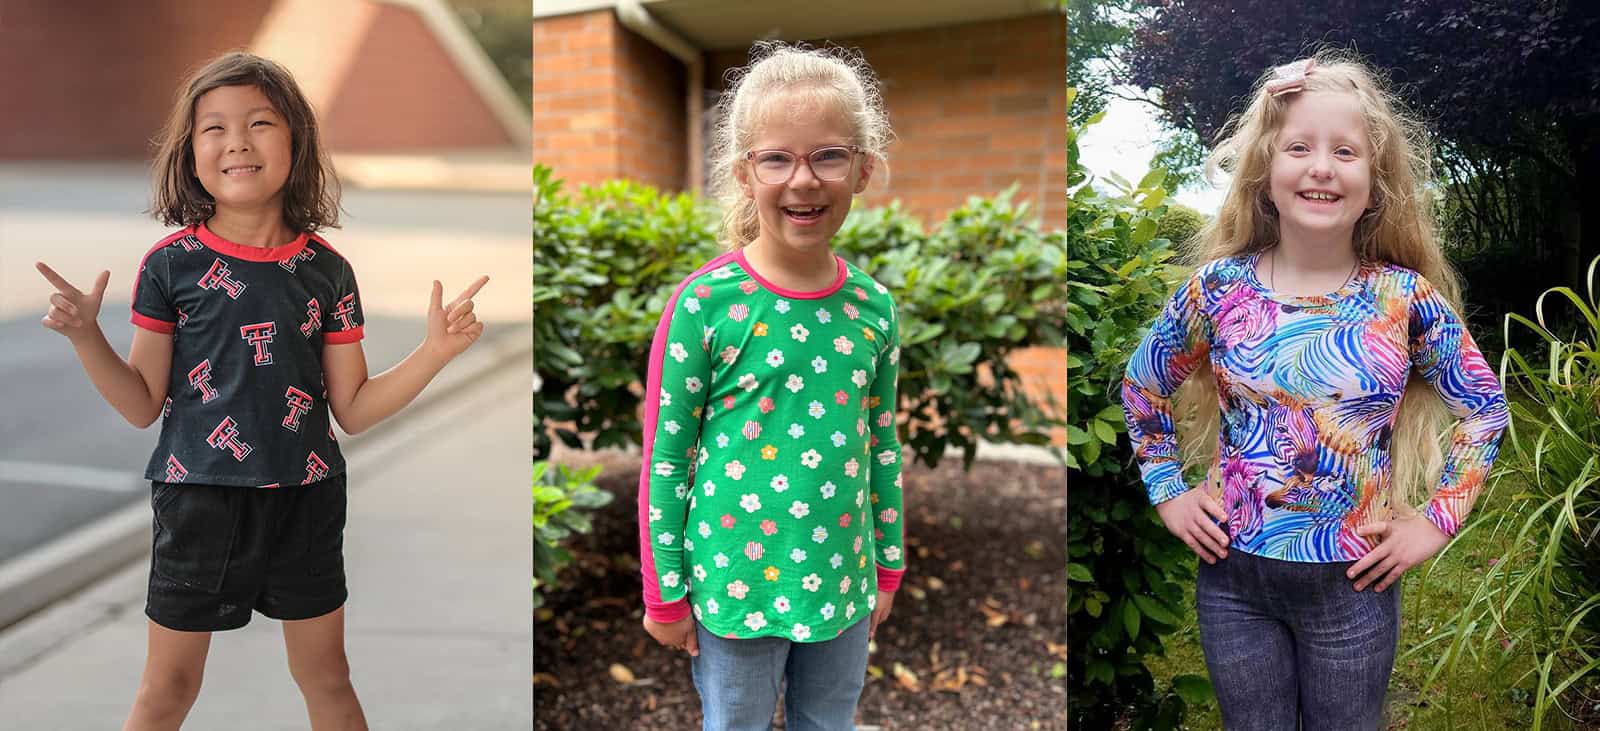
HEM LENGTHS (HOURGLASS VERSIONS): CROP / TOP / SHIRT / DRESS
Grab the Bundle and Save!
For those who want it all, we’re offering a Raider Ringer Tee Bundle, which includes all four patterns at a discounted price. This is your chance to create matching tees for the entire family, each with its own unique flair. From casual everyday wear to something a bit more dressed up, these patterns give you endless possibilities to play with style.
Join the Sew-Along!
To help you get started, I’ve also created a full sew-along video where I take you through the entire process of sewing a striped sleeve version of the Raider Ringer Tee. Whether you’re a beginner or a seasoned pro, this sew-along will guide you every step of the way, making it easy to create a beautiful, professional-looking tee.
Get Your Raider Ringer Tee Patterns Today!
The Raider Ringer Tees are available now on our website. I can’t wait to see how you all bring these patterns to life with your unique fabrics and styles. Be sure to tag us on social media using #RaiderRingerTee and #P4PFeatureMe so we can share your amazing creations!
All four of these pattern are available now and on sale (no code needed) through 11:59pm CST, September 1, 2024.
Here are some quick links to the patterns:
- Raider Ringer Tee – Hourglass Figure
- Raider Ringer Tee – V Figure
- Raider Ringer Tee – Hourglass Figure YOUTH
- Raider Ringer Tee – V Figure YOUTH
- Raider Ringer Tee – ALL PATTERN BUNDLE
As always, we’ve got more photos for you to use as inspiration! Head over to the Facebook group to browse our albums full of gorgeous photos, compliments of our tester team!
Hourglass Album | V Figure Album | Hourglass YOUTH Album | V Figure YOUTH Album
Protected: Fabric for Pirates :: August 2024 Reveal
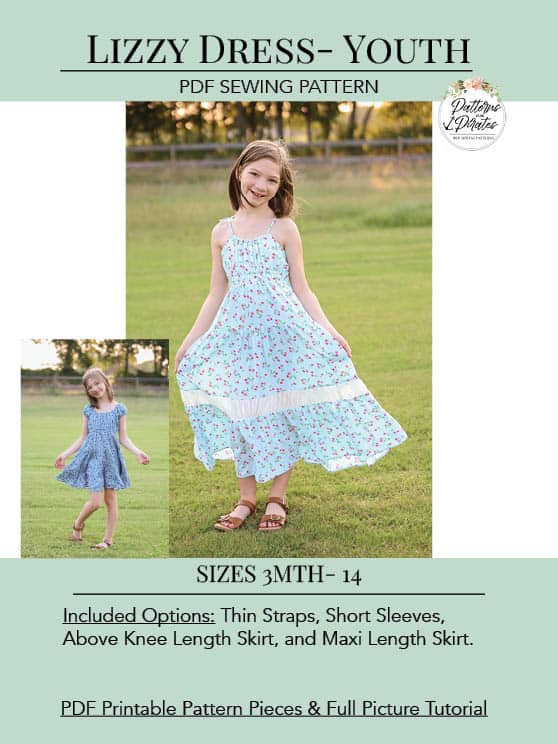
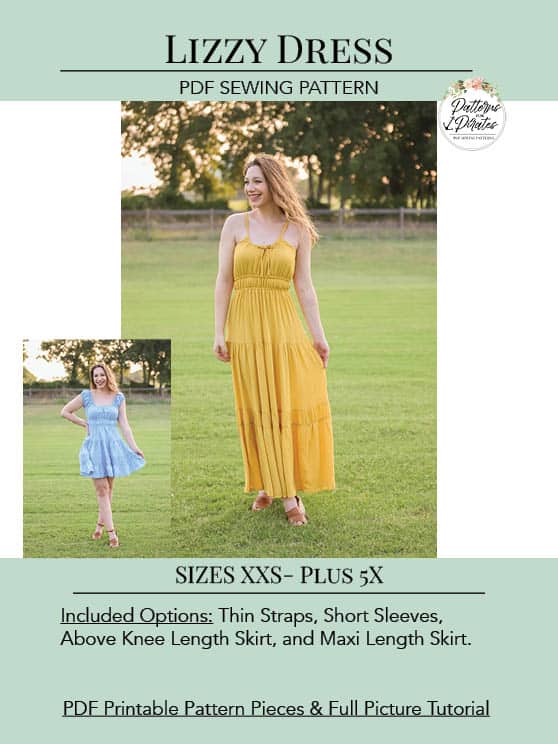
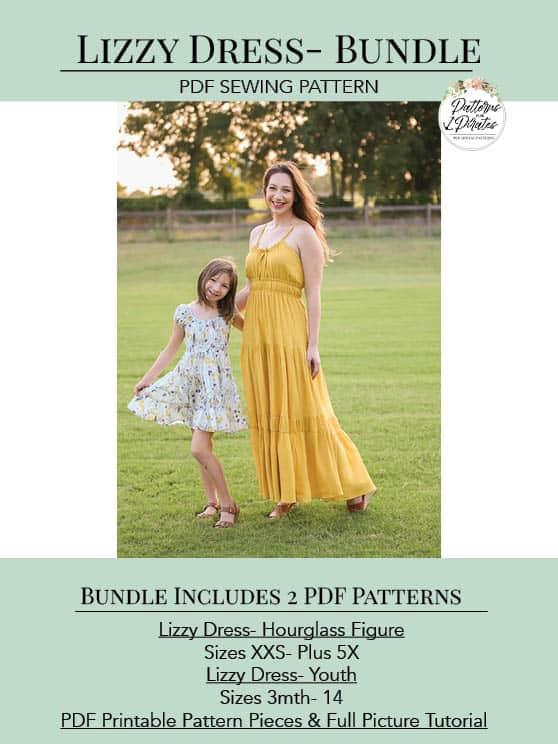
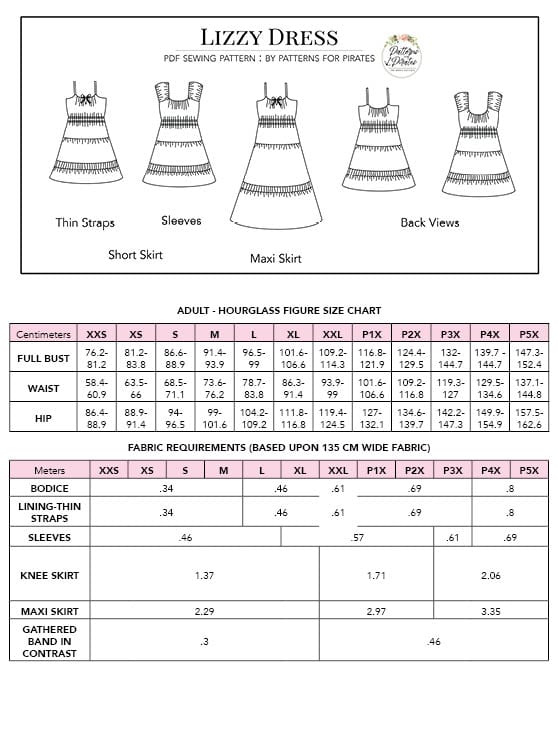
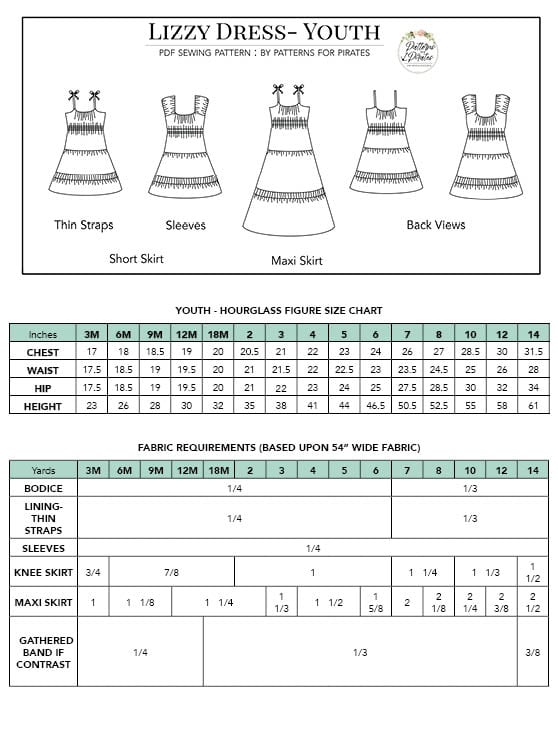
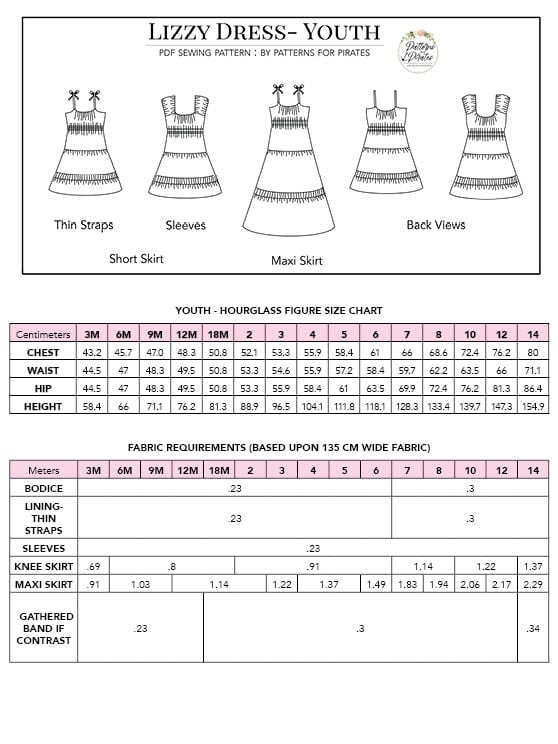
New Pattern Release :: Lizzy Dress
We are thrilled to add the elegant and versatile Lizzy Dress to our pattern catalog! With its sleek silhouette, empire waist, and gathered tiered skirt, this sundress is perfect for showcasing your favorite woven fabrics and adding a touch of playful sophistication to your wardrobe.
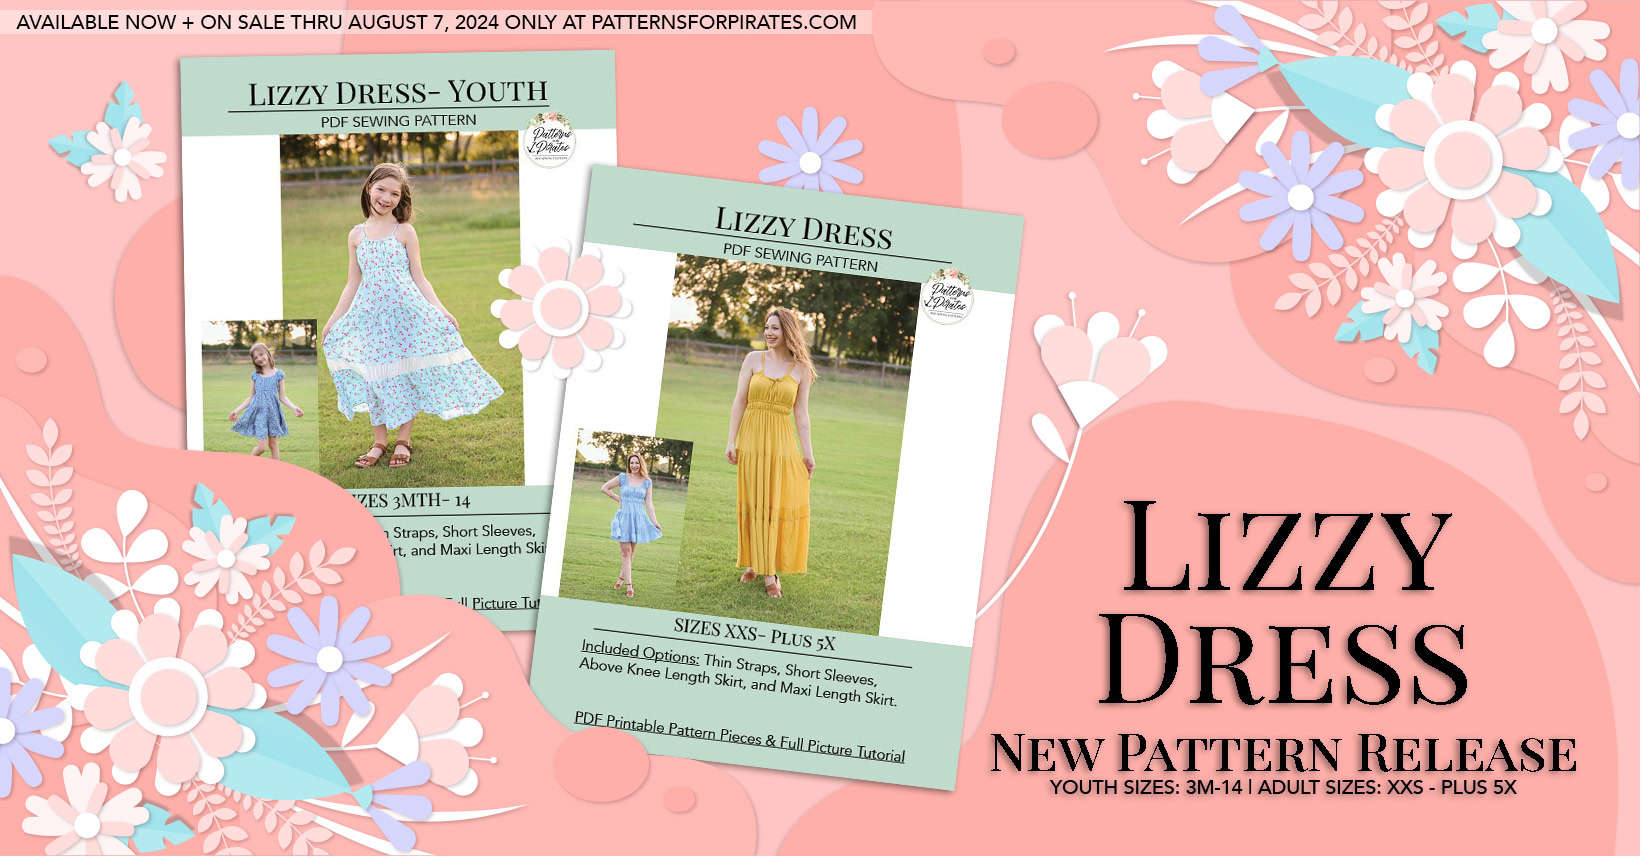
The youth sizes range from 3m – 14 and the adult sizes are for the full, newer size chart, extending from XXS – Plus 5X for the Adult Hourglass Figure.
- *Want to learn more about how to measure yourself for these pattern? We’ve got you covered with an in-depth blog HERE. And for even more helpful fun, we have a free* printable that you can use to help record your measurements as you take them.
- And in case you’re new to Patterns for Pirates and PDF patterns in general, we have a great blog full of new-user tips HERE to help you get started!
- As with all of our current releases and updates, the pdfs now include our layers feature and can be found in Letter, A4, A0 and projector sizes.
- We’ve also got an excellent planning tool for you with our Coloring Pages. It’s a resource that is updated with every new pattern addition, this pattern included!
- Need a way to keep track of the P4P patterns you have? We’ve gone through all of our patterns and created an interactive PDF for you! Grab your copy HERE.
The Lizzy Dress is a beautiful sundress designed without tricky zippers or time-consuming buttons, yet it still offers a sleek silhouette. It’s perfect for those woven, non-stretch fabrics you’ve fallen in love with but couldn’t find the right dress for—until now! Named after the beloved Lizzy/Elizabeth Bennet, this dress features an empire waist with elastic just under the bust and another a bit lower on the ribs. The gathered tiered skirt gives this dress swish, sway, and twirl, with a unique gathered back detail before the last tier to set it apart from your everyday dress.
Woven dresses can be tricky to fit, but the Lizzy Dress makes it simple with elastic and ties that adjust to your liking. This design offers an easy fit for fluctuating sizes and is perfect for maternity wear too!
Pattern options include:
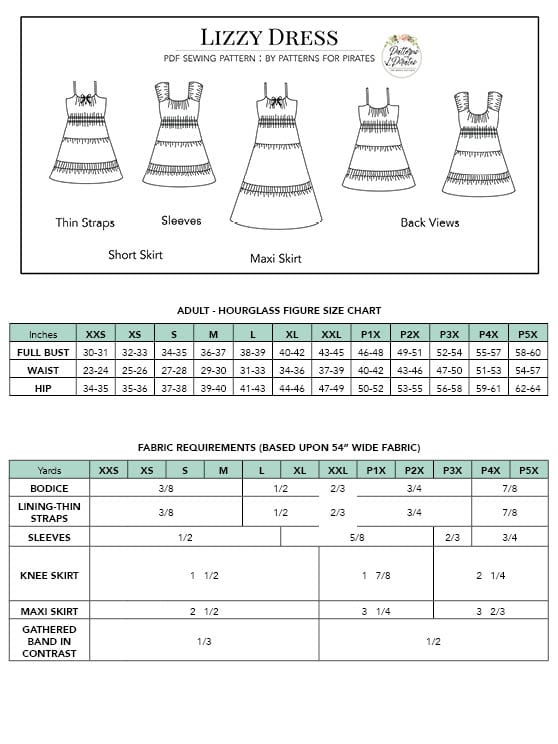
- Straps: Thin Straps / Sleeves
- Lengths: Just Above Knee / Maxi, Ankle
This pattern is drafted for non-stretch woven apparel fabrics.
Specific Fabric Suggestions: Rayon, rayon challis, voile, seersucker, georgette, poly blends, linen blends, and cotton blends. While we typically don’t recommend quilting cotton for apparel, it can be used for this dress. Just keep in mind that fabric requirements are for wider apparel fabrics.
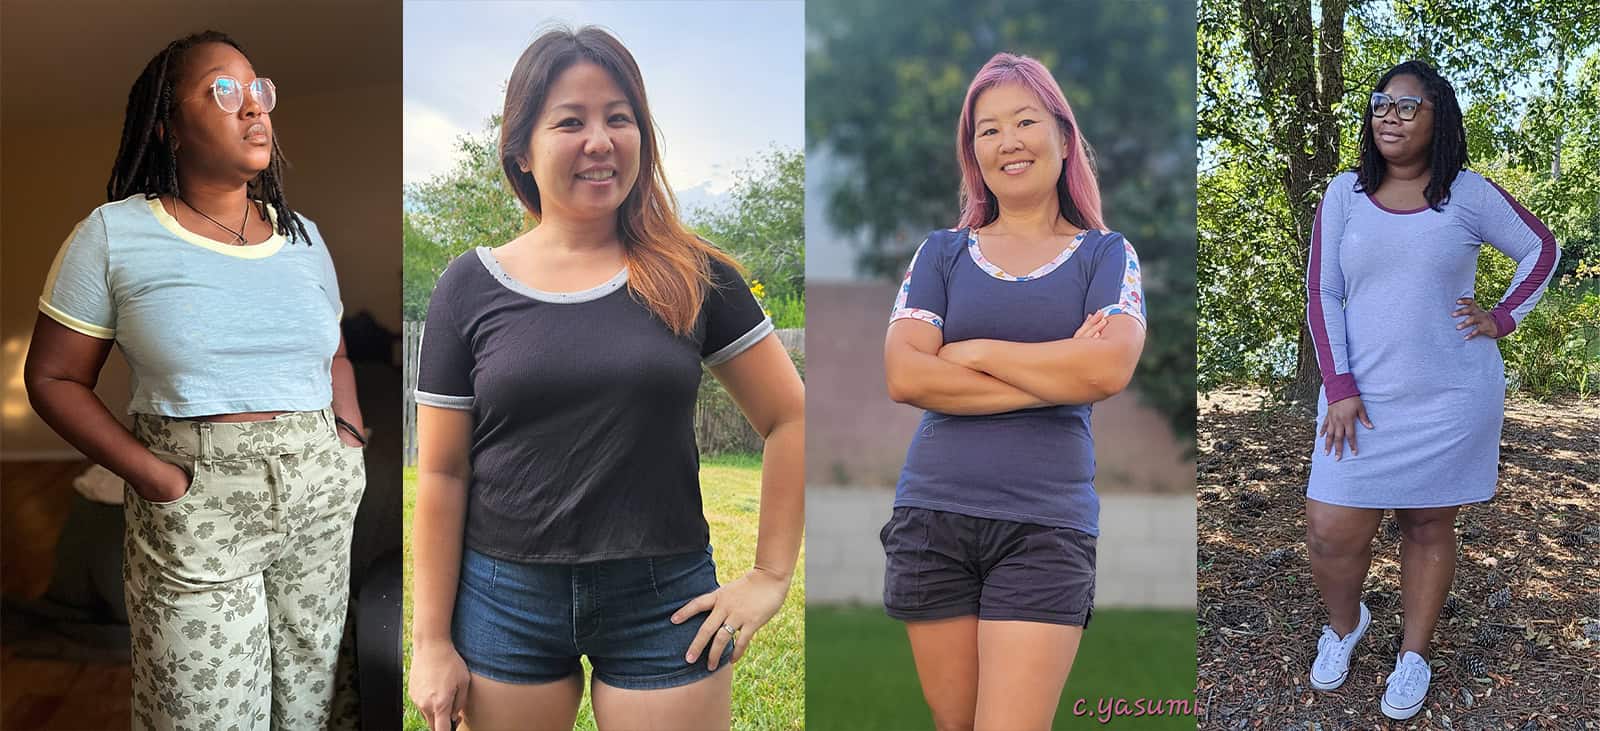
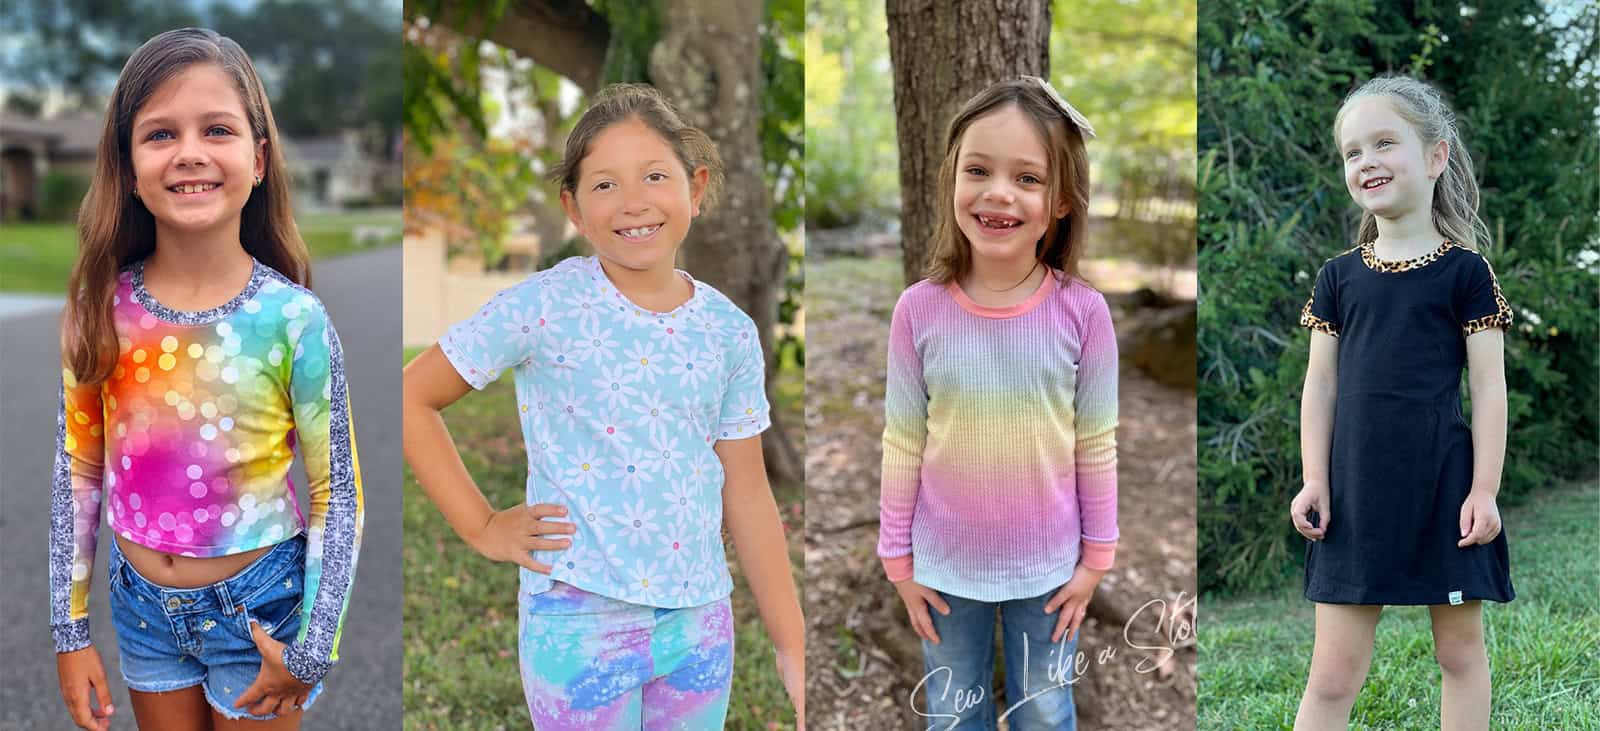
We obviously wouldn’t leave you hanging without showing you some of the different options in the patterns!
THIN STRAPS / SLEEVES
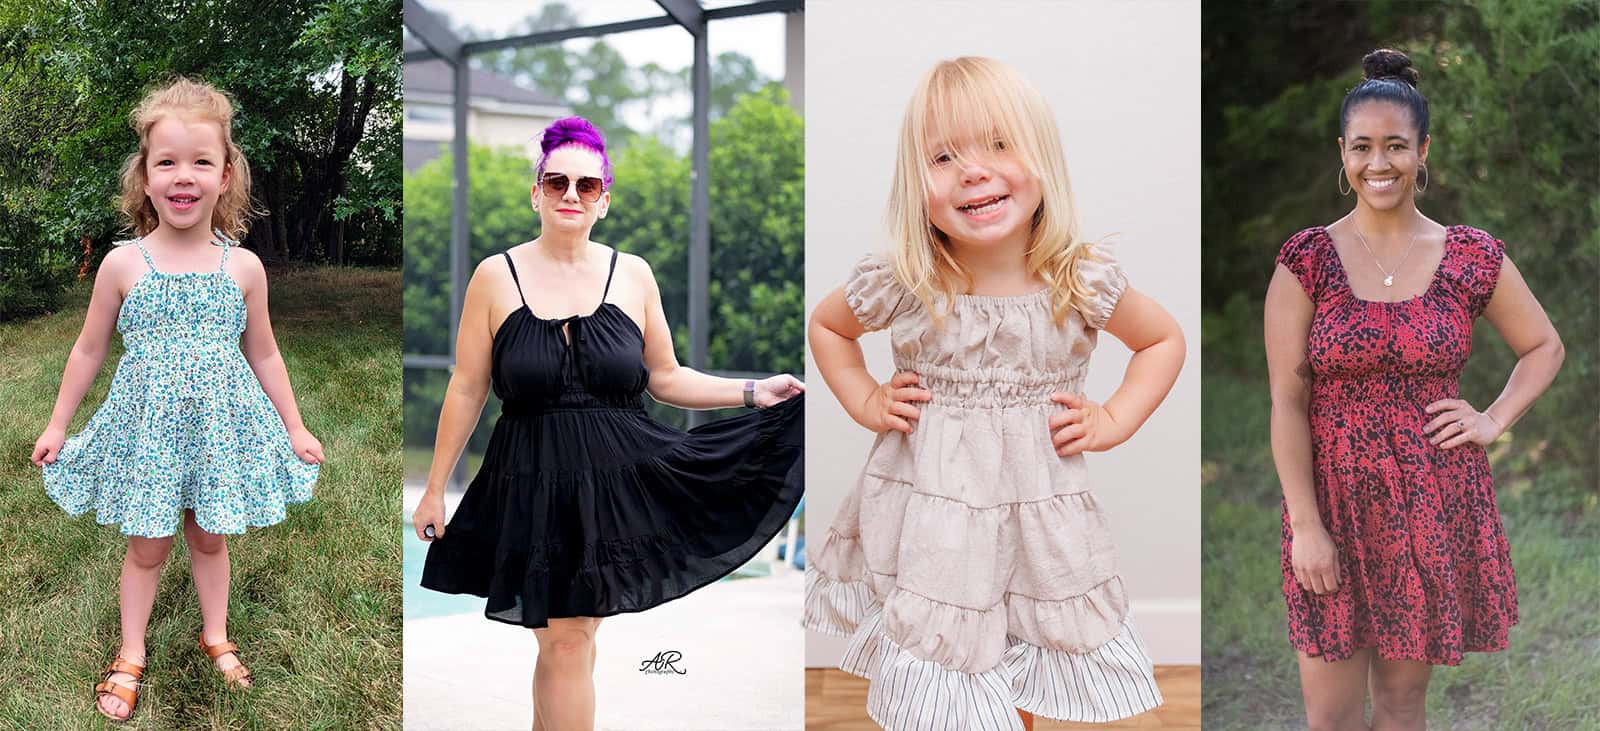
KNEE SKIRT / MAXI SKIRT
Are you choosing to sew the thin strap version of the Lizzy Dress and hoping for a little extra help with the steps? We’ve got you!
We are so excited to see what you make with the new Lizzy Dress patterns! Both patterns are available now and on sale (no code needed) through 11:59pm CST, August 7, 2024.
Grab your copy of the Lizzy patterns here: Lizzy Dress | Lizzy Dress Youth | Lizzy Dress Bundle
As always, we’ve got more photos for you to use as inspiration! Head over to the Facebook group to browse our albums full of gorgeous photos, compliments of our tester team!
Lizzy Dress Adult Album | Lizzy Dress Youth Album
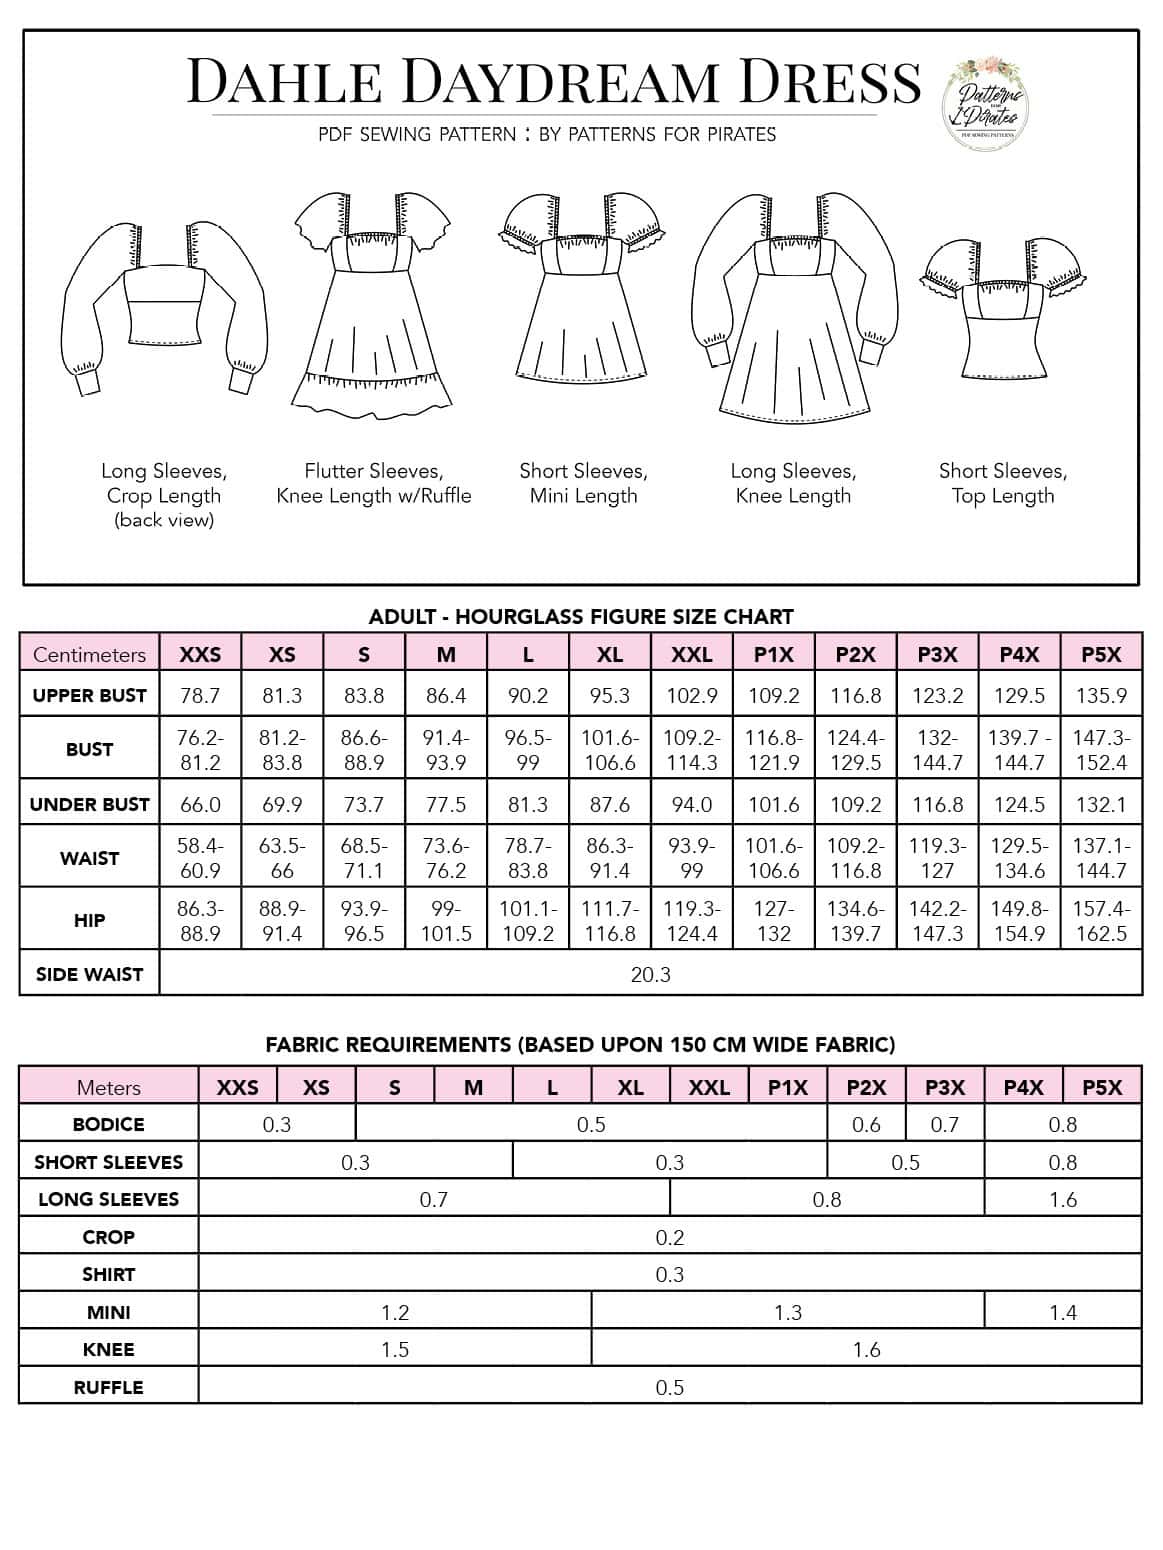
New Pattern Release :: Dahle Daydream Dress
We couldn’t be more excited to share that there’s a new pattern being added to our catalog! The Dahle Daydream Dress is, dare we say, what dreams are made of! It’s got the perfect mix of romance and sweetness, with a little side of sexy…and we can’t wait to tell you all about it. Let’s get to it!
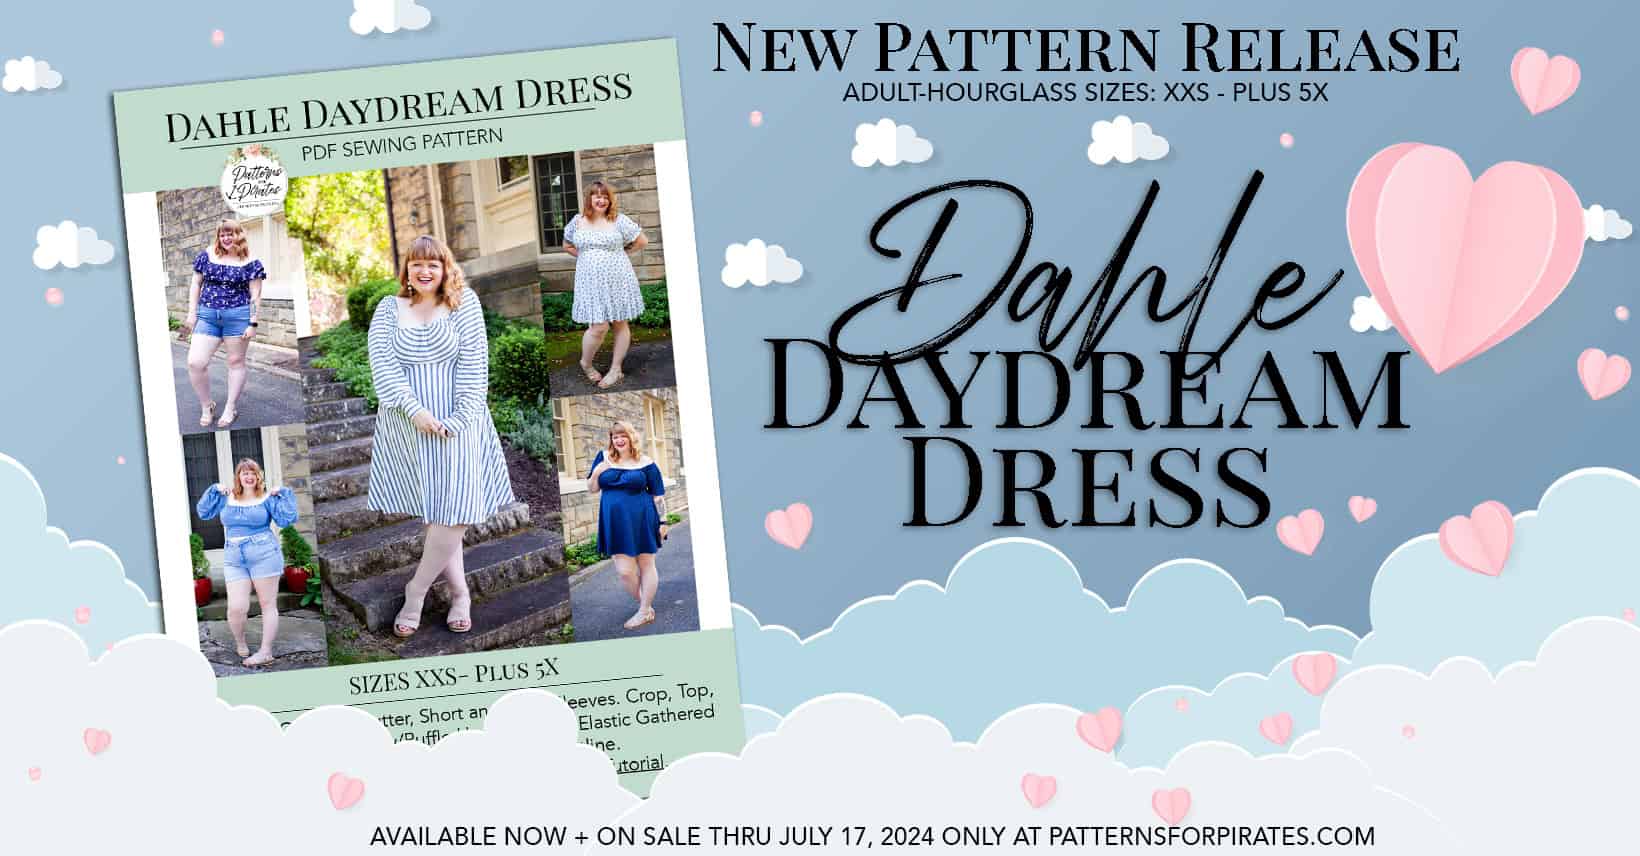
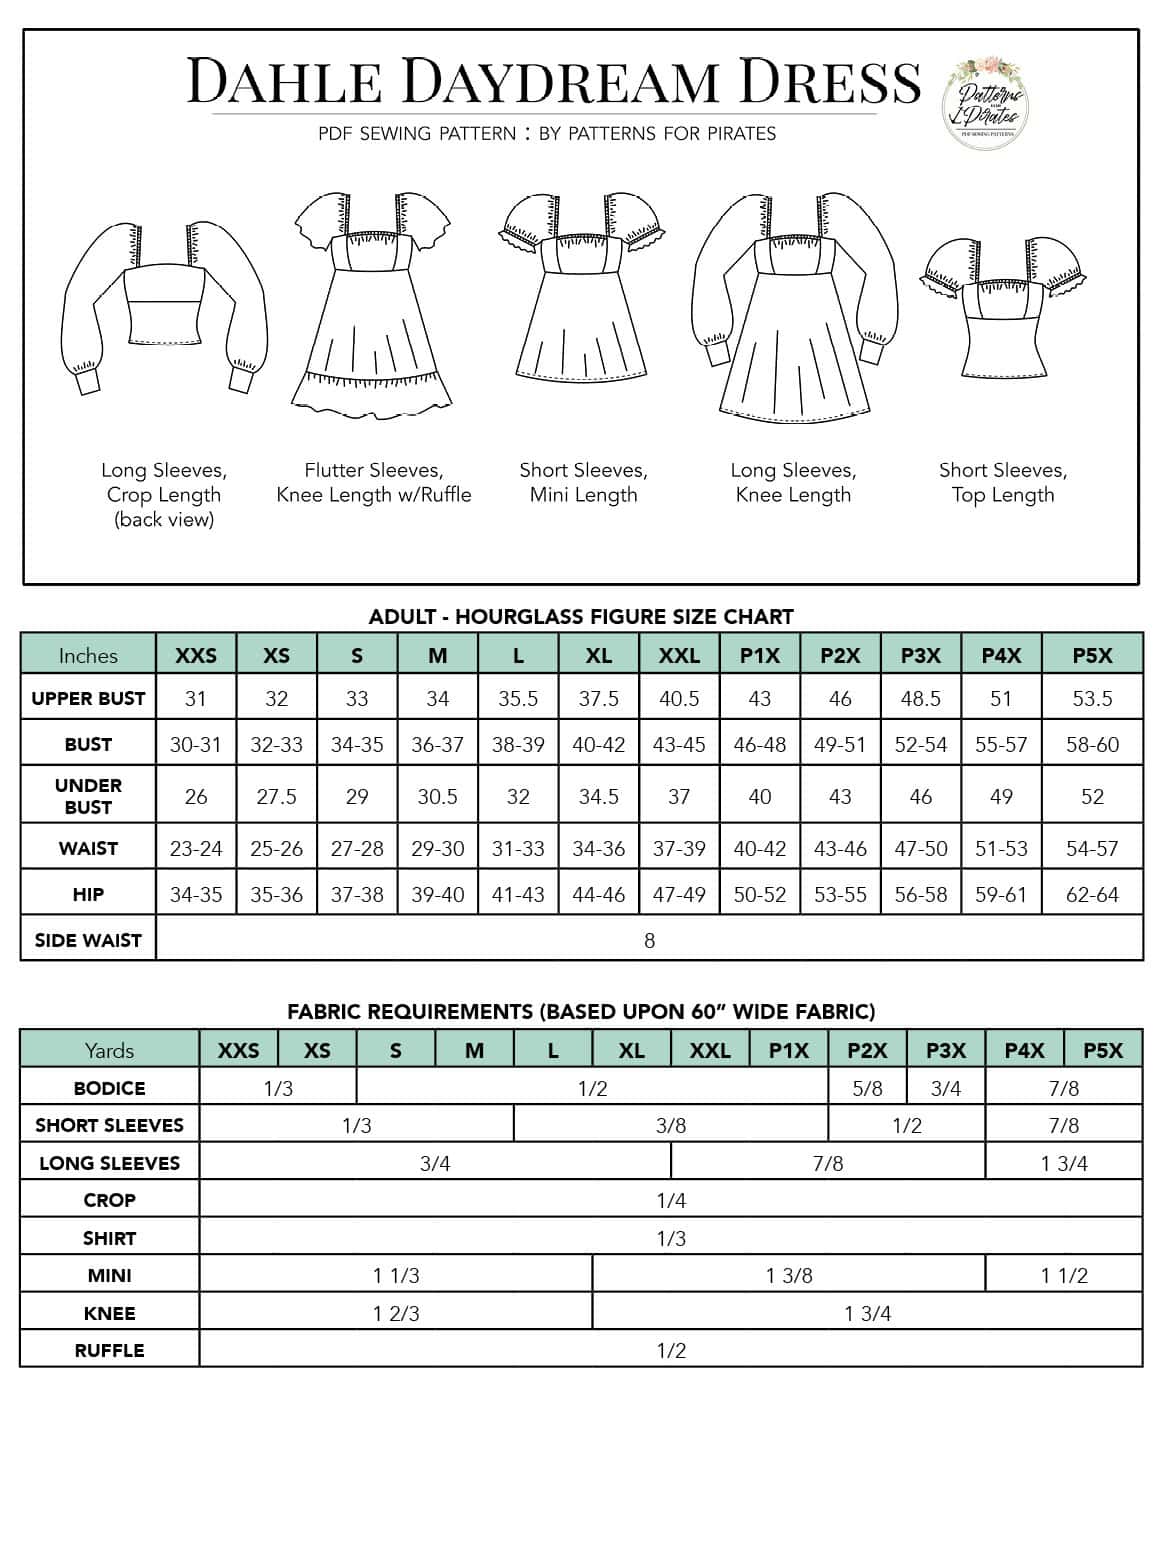
The Dahle Daydream Dress pattern is drafted to our Adult – Hourglass size chart, extending from XXS – Plus 5X.
- *Want to learn more about how to measure yourself for these pattern? We’ve got you covered with an in-depth blog HERE. And for even more helpful fun, we have a free* printable that you can use to help record your measurements as you take them.
- And in case you’re new to Patterns for Pirates and PDF patterns in general, we have a great blog full of new-user tips HERE to help you get started!
- As with all of our current releases and updates, the pdfs now include our layers feature and can be found in Letter, A4, A0 and projector sizes.
- We’ve also got an excellent planning tool for you with our Coloring Pages. It’s a resource that is updated with every new pattern addition, this pattern included!
- And to help keep track of the Patterns for Pirates patterns you have in your stash, we’ve got a handy Pattern Checklist to help keep you organized!
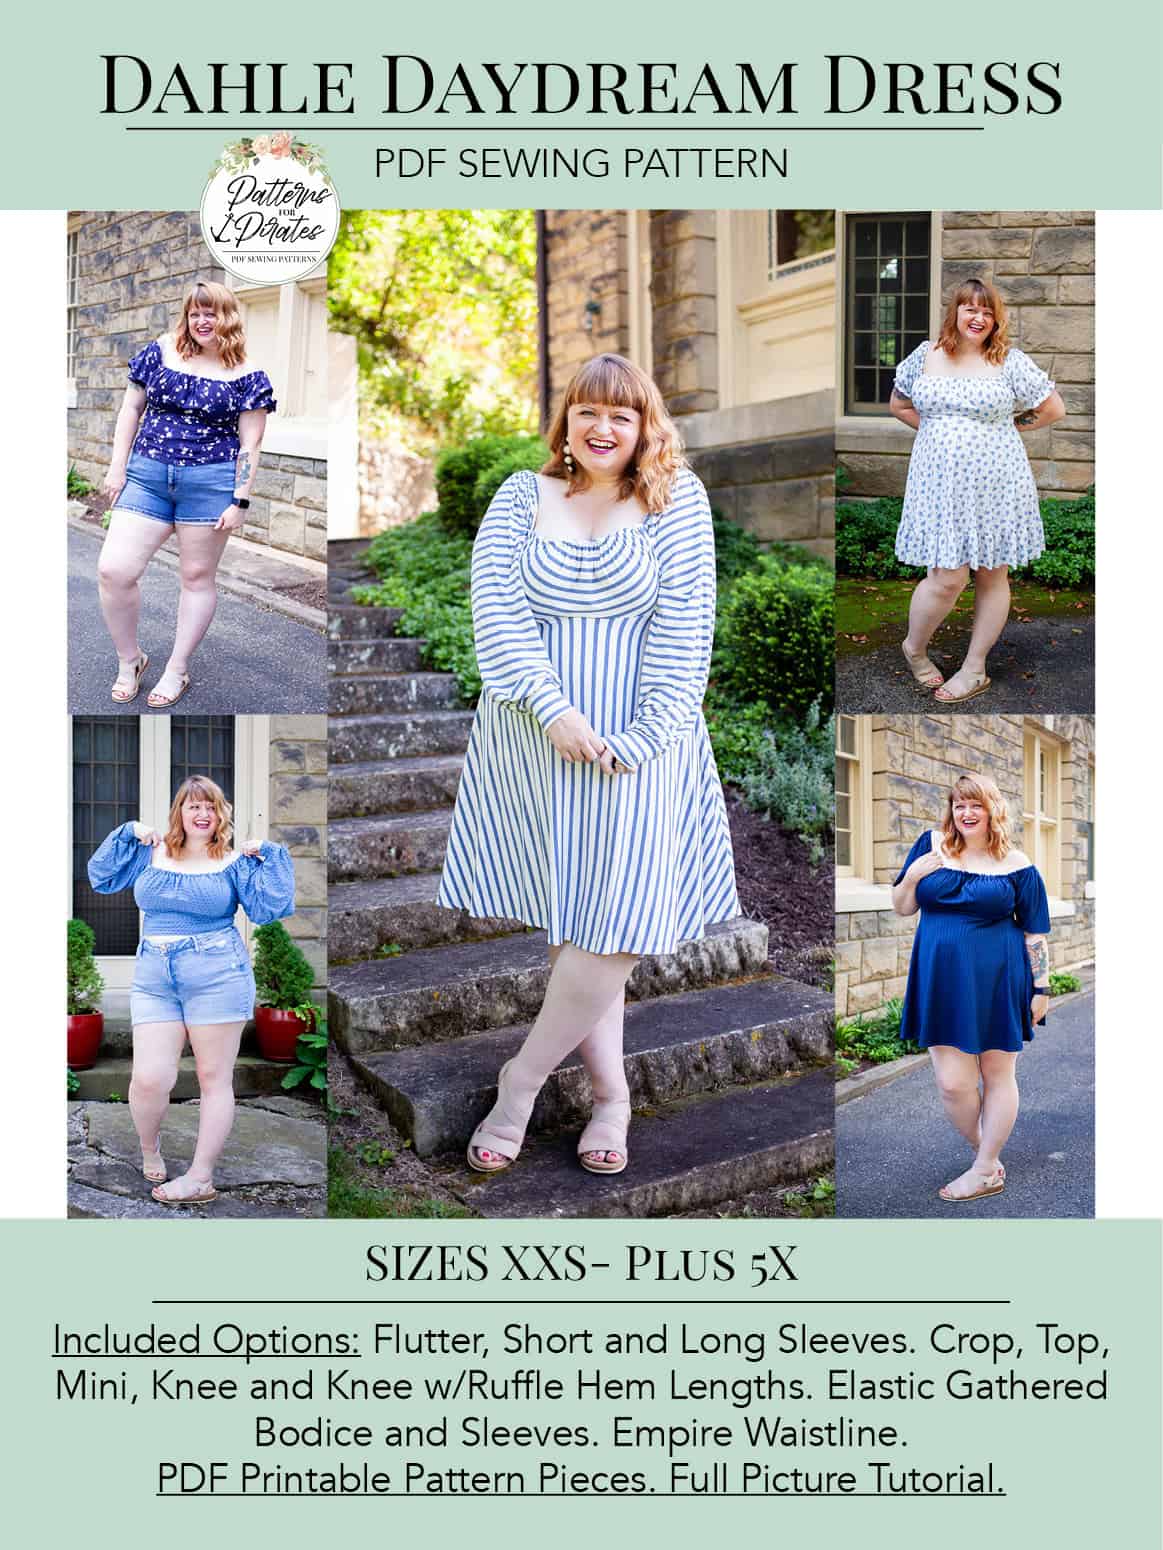
The Dahle Daydream Dress is a versatile and romantic garment that combines classic and contemporary elements. It features a charming milkmaid style bodice with an elastic channel that gathers around the bust, creating a soft, romantic look. The empire waistline sits just below the bust, giving the dress a flattering and elongated silhouette.
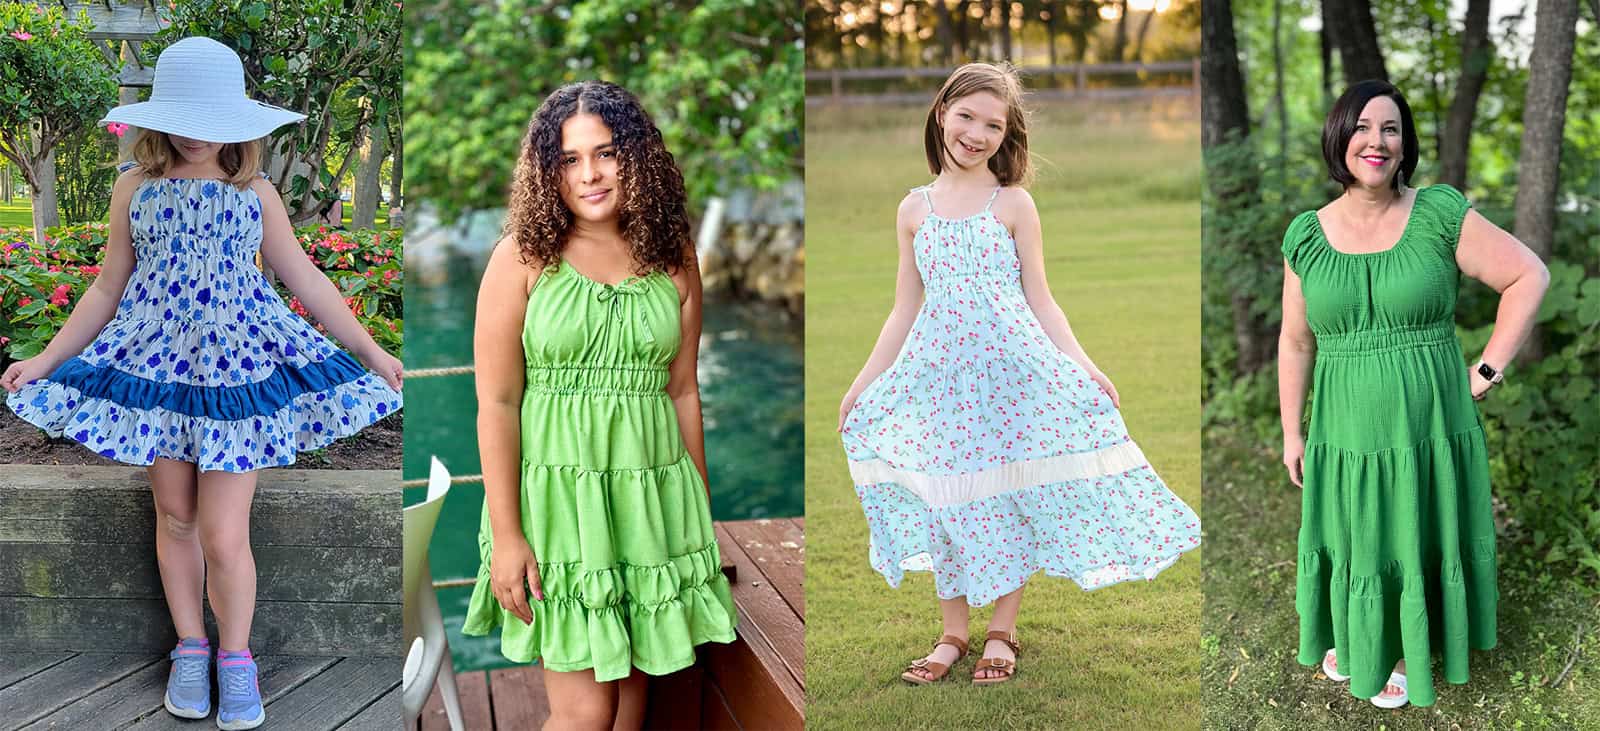
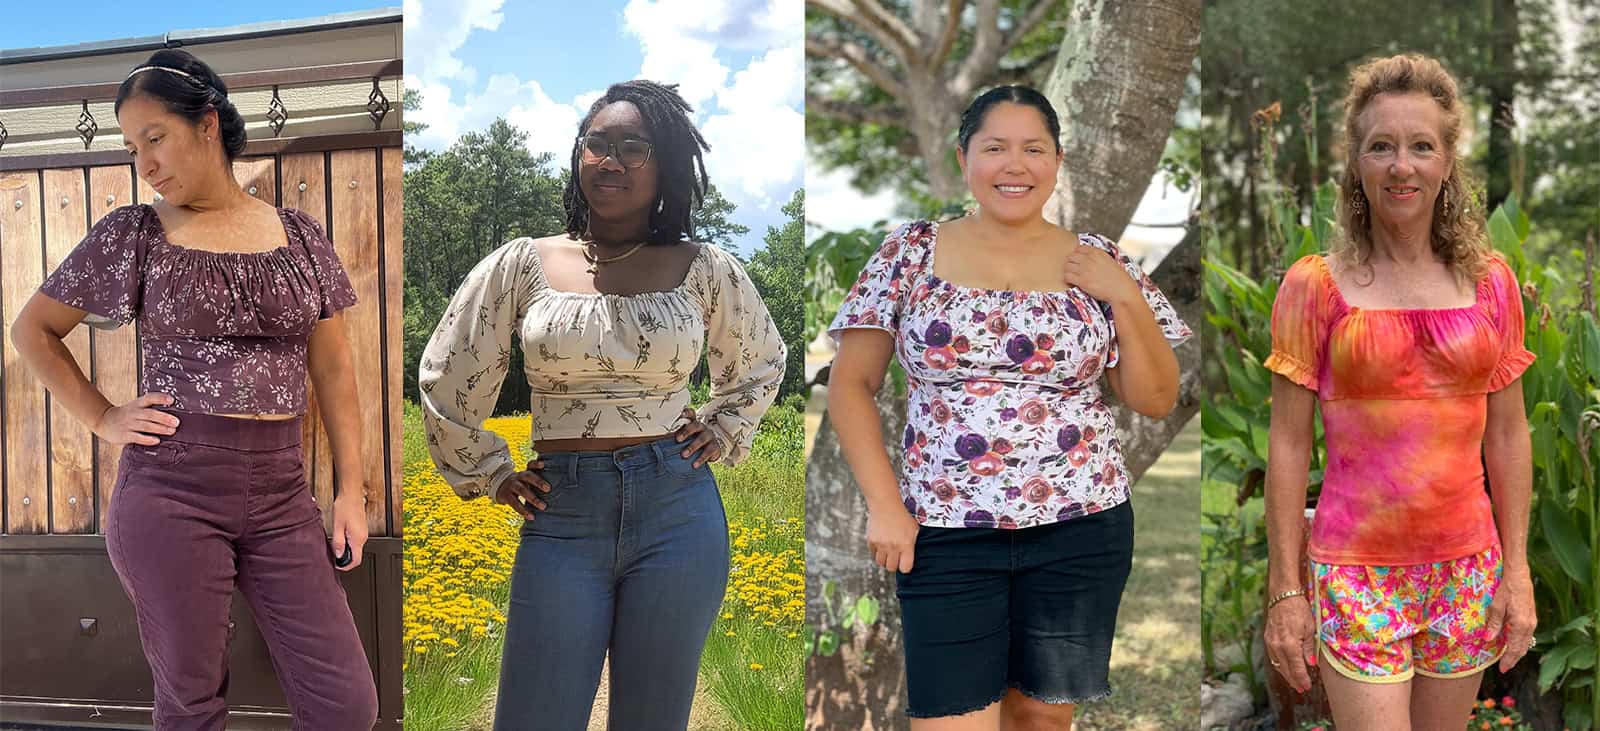
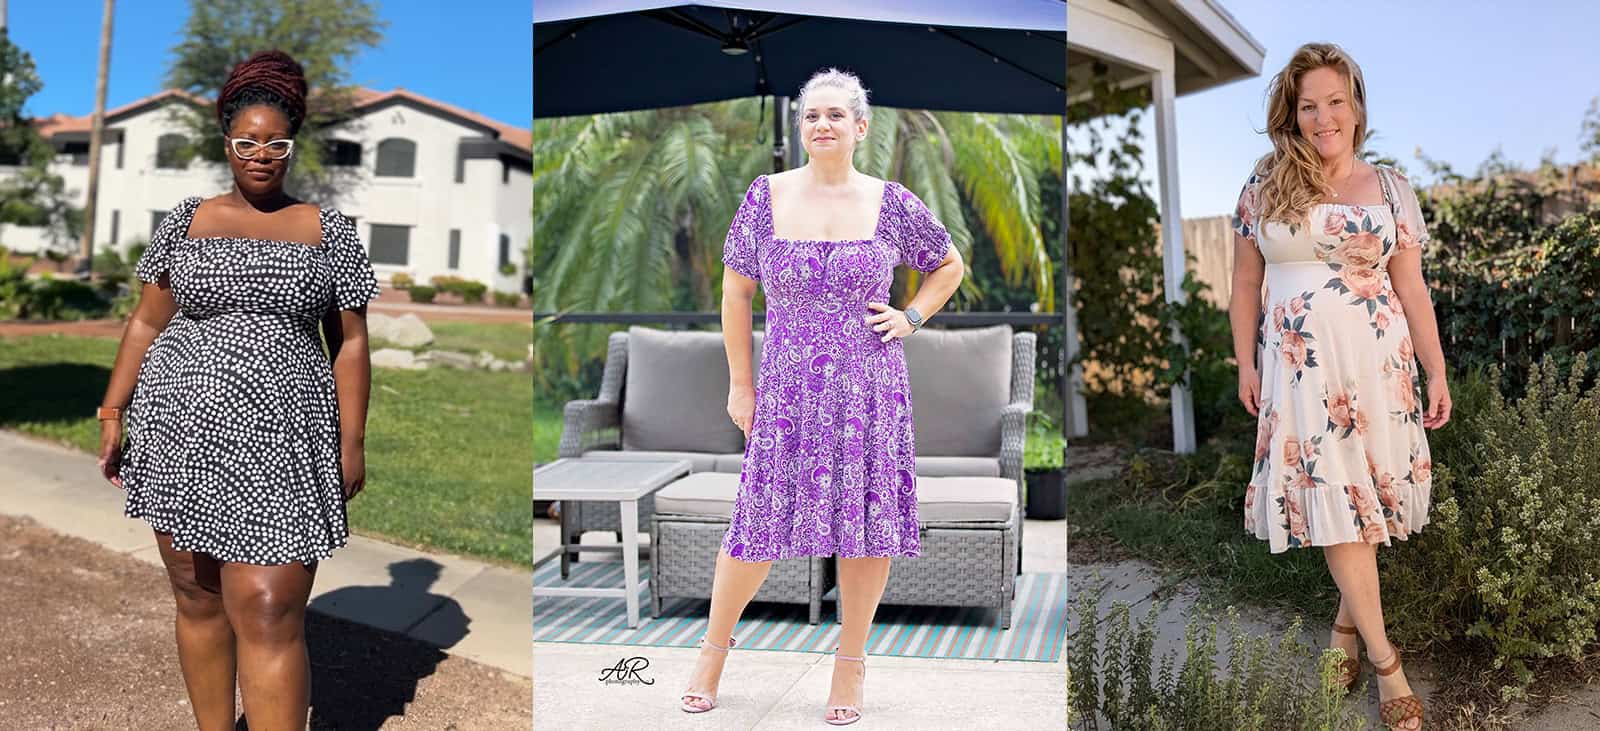
The pattern offers two shirt lengths—crop and top—providing versatility in styling. The skirt is a half-circle skirt and it comes in two lengths: a playful and flirty mini length, and a more conservative knee length, which can include an optional ruffle for added elegance. There are three sleeve options to choose from, all of which have an elastic gathered sleeve cap. The flutter sleeve gives a soft and whimsical appearance, the short sleeves are elastic hemmed for a sweet ruffled finish, and the long sleeves are a more dramatic bishop sleeve, gathered into a longer cuff.
The Dahle Daydream Dress can be adapted for various occasions, from casual daywear to more dressy events. The romantic bodice and versatile sleeve and length options make it suitable for different seasons and styles. This dress combines vintage-inspired elements with modern versatility, making it a charming addition to any wardrobe.
Pattern options for the Dahle Daydream Dress includes:
- Elastic Gathered Sleeves: Flutter / Short, elastic hemmed / Long, bishop style with cuffs
- Hem lengths: Crop / Top / Mini / Knee / Knee with Ruffle
- Milkmaid Style Bodice
- Empire Waistline
The Dahle Daydream Dress pattern is drafted for light-to-medium weight knit fabrics with at least 40% horizontal stretch and some vertical stretch. Fabrics with less vertical stretch can be used, but may end up shorter in length.
Specific Fabric Suggestions: Ribbed Knits, Cotton Spandex, Bamboo Lycra, Rayon Spandex Blends, Double Brushed Polyester, Modal Knit Blends, etc.
Additional Notions Needed: Sleeves + Bodice are gathered with 3/8″ elastic. Optional but highly recommended, clear elastic for stabilizing seams in waistline and back bodice.
And now the best part! Let’s show off all of the different features + options!
SLEEVES: FLUTTER / SHORT / LONG
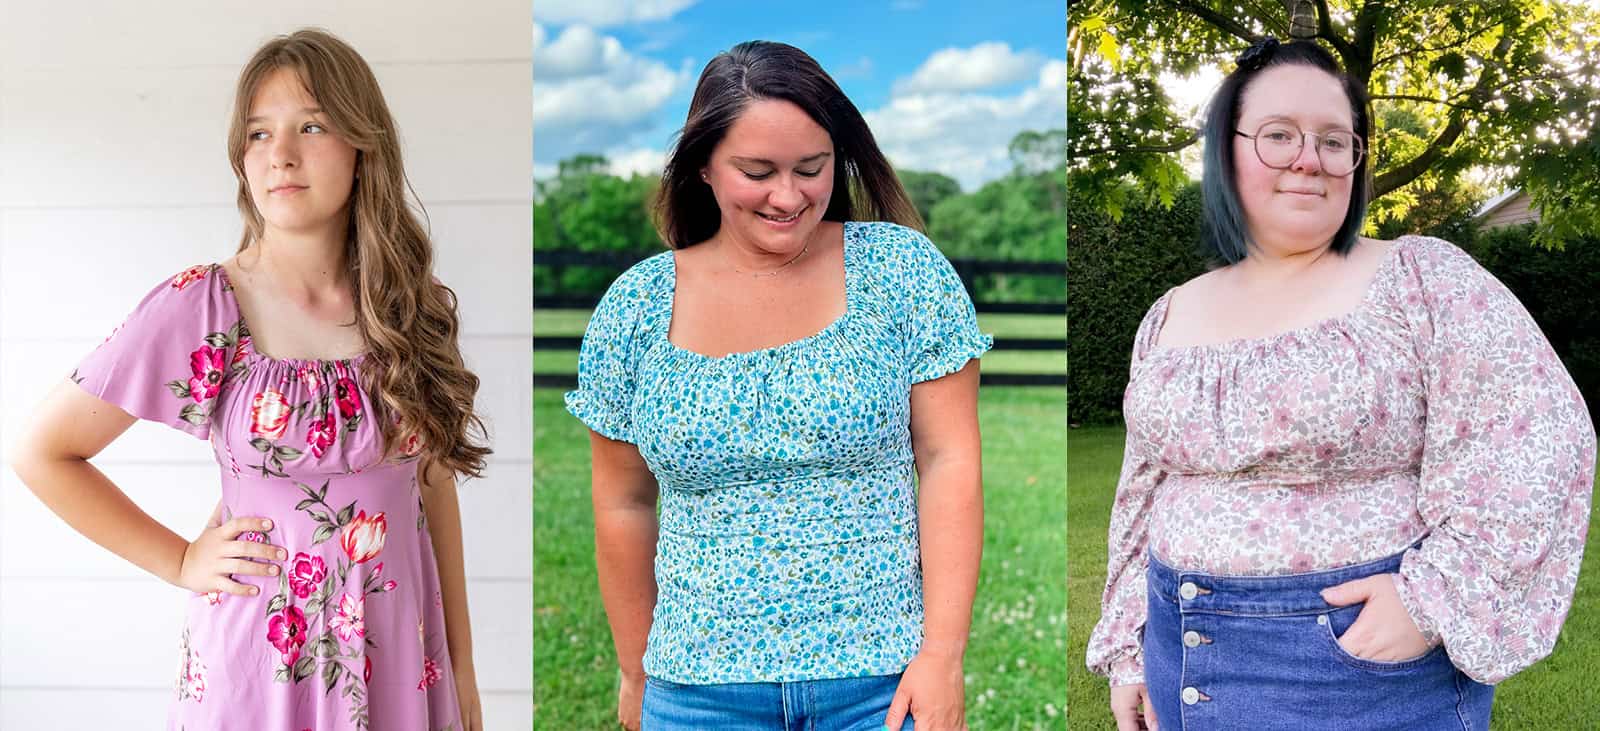
SHIRT OPTIONS: CROP / TOP
DRESS OPTIONS: MINI / KNEE / KNEE WITH RUFFLE
As with all of our patterns, the Dahle Daydream Dress includes a step-by-step, full color photo tutorial for assembly. We also included a video tutorial walking you through all of the steps, in case certain parts felt a little intimidating, or you simply prefer a video for your visuals.
We are looking forward to seeing the gorgeous Dahle Daydream Dresses that you make for yourself, your family + your clients! This pattern is available now and on sale (no code needed) through 11:59pm CST, July 14, 2024.
Grab your copy of the Dahle pattern here: Dahle Daydream Dress
As always, we’ve got more photos for you to use as inspiration! Head over to the Facebook group to browse our albums full of gorgeous photos, compliments of our tester team!
Dahle Daydream Dress Facebook Album
Protected: Fabric for Pirates :: July 2024 Reveal
Double Pattern Release :: Roller Derby Shorties + Roller Derby Bralette!
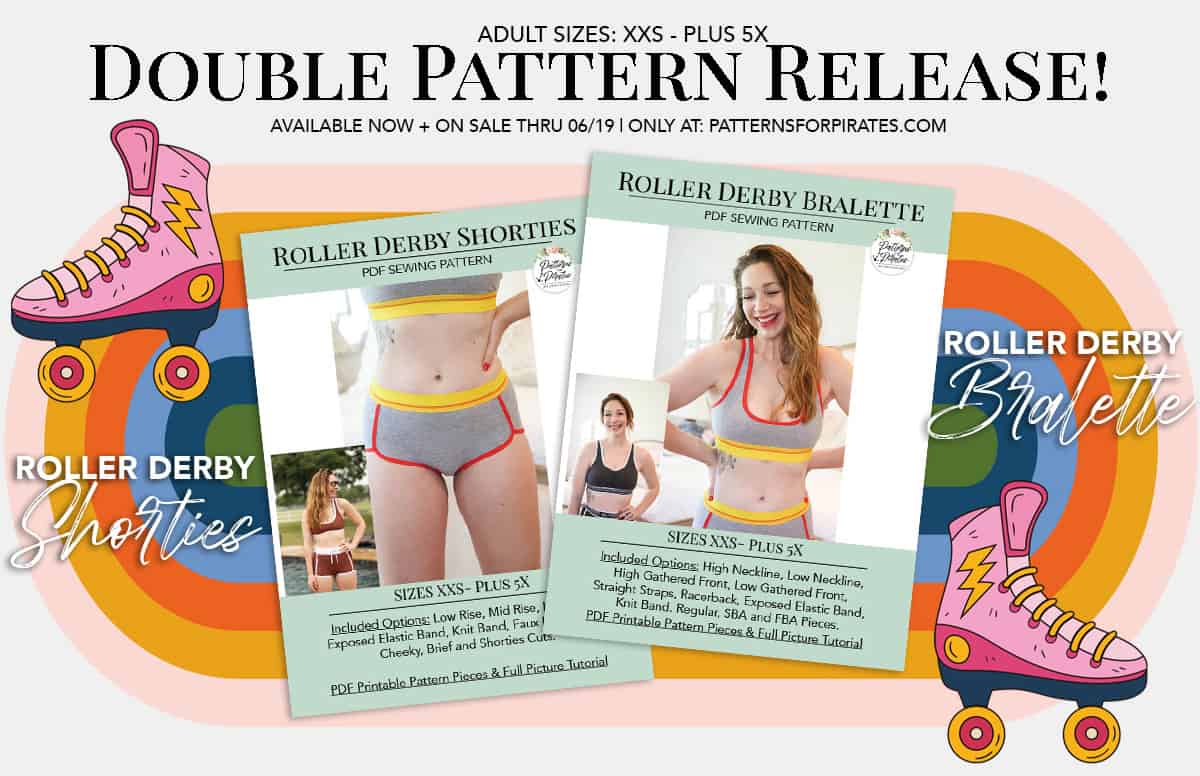
The Roller Derby Shorties and Roller Derby Bralette patterns are drafted to our Adult – Hourglass size chart, extending from XXS – Plus 5X.
- *Want to learn more about how to measure yourself for these pattern? We’ve got you covered with an in-depth blog HERE. And for even more helpful fun, we have a free* printable that you can use to help record your measurements as you take them.
- And in case you’re new to Patterns for Pirates and PDF patterns in general, we have a great blog full of new-user tips HERE to help you get started!
- As with all of our current releases and updates, the pdfs now include our layers feature and can be found in Letter, A4, A0 and projector sizes.
- We’ve also got an excellent planning tool for you with our Coloring Pages. It’s a resource that is updated with every new pattern addition, this pattern included!
- And to help keep track of the Patterns for Pirates patterns you have in your stash, we’ve got a handy Pattern Checklist to help keep you organized!
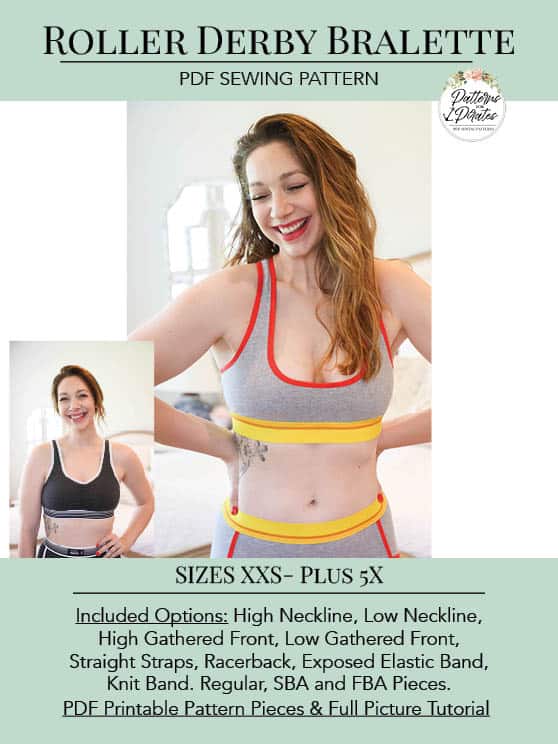
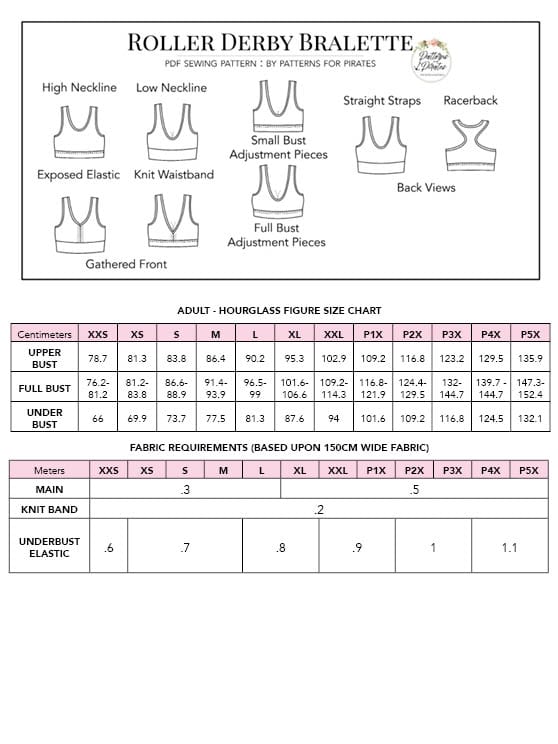
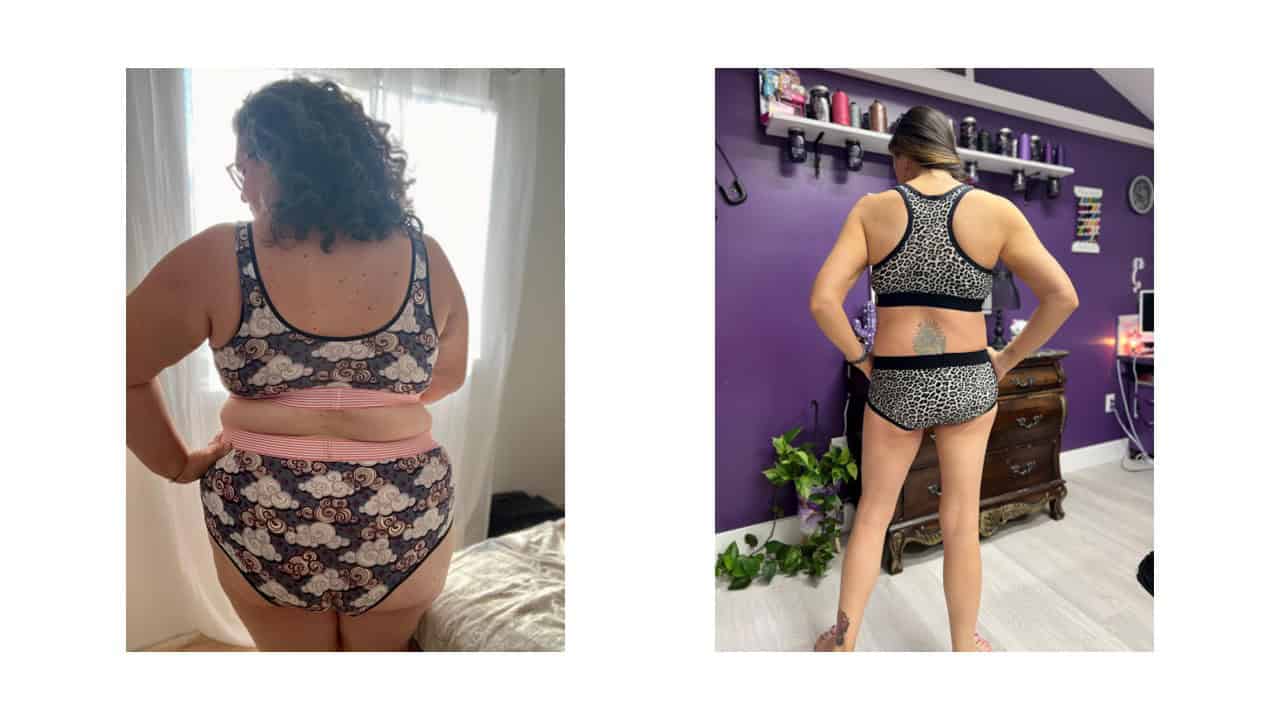
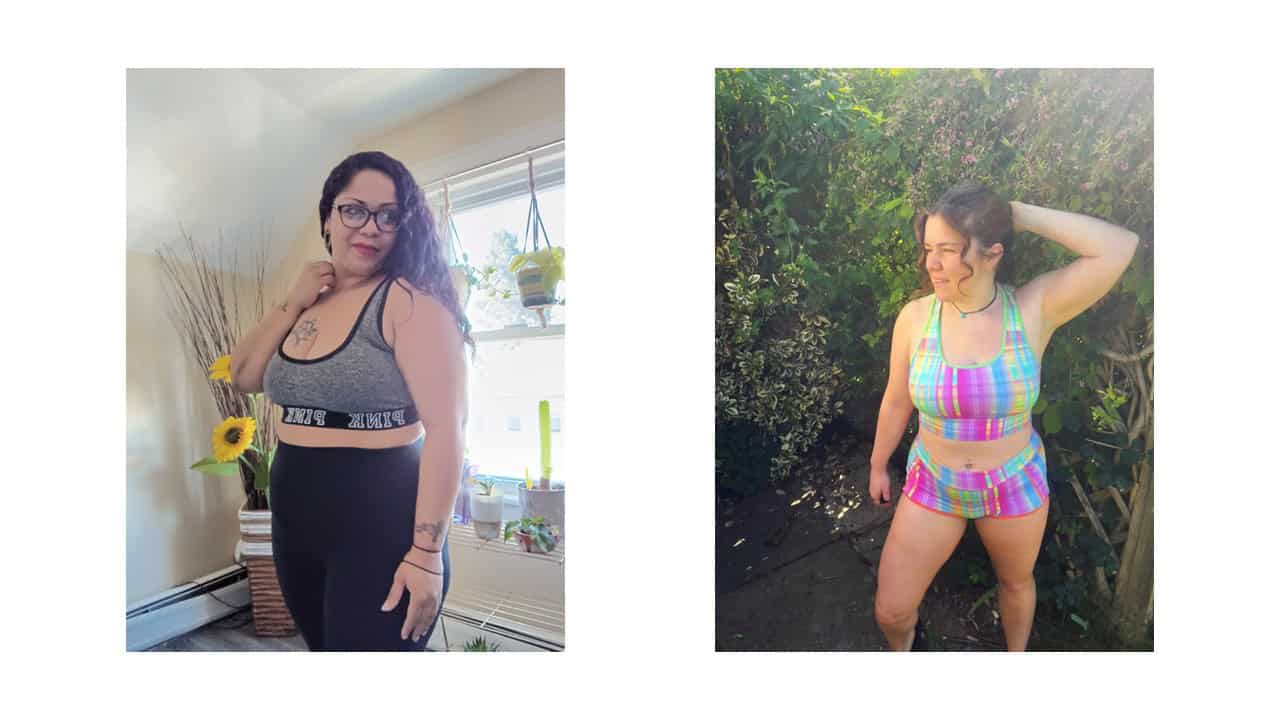
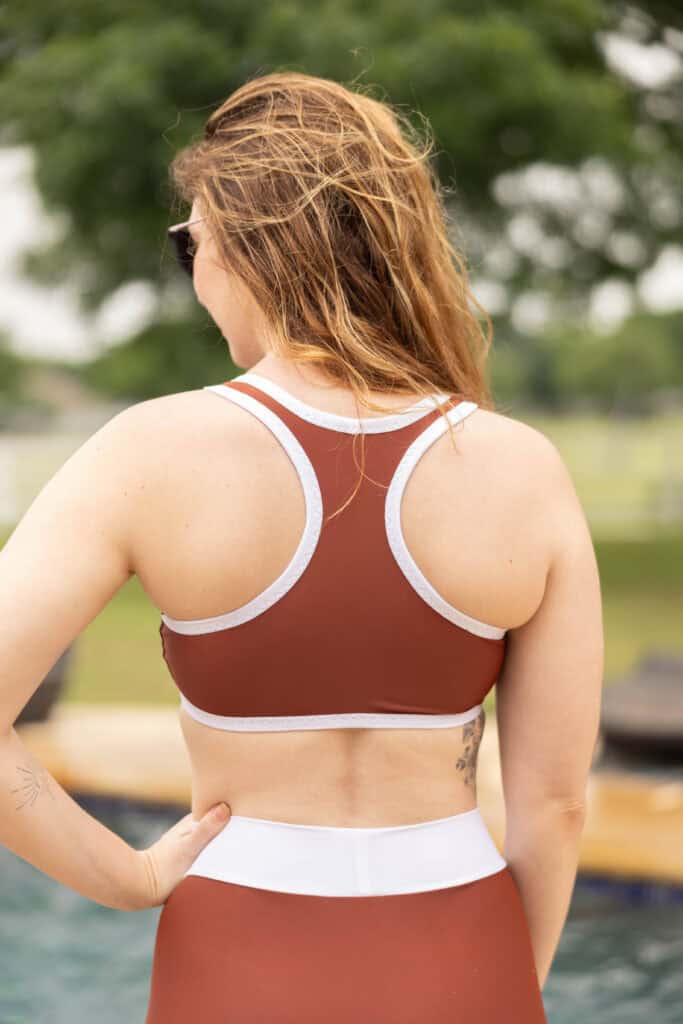
The Roller Derby Bralette is a classic, simple bralette that will have you feeling comfortable and cute at the same time. You can choose from a traditional higher neckline for a sports bra look or go for the low neckline for a more bralette style. You can also pick a plain front or gathered/ruched front. The edges are finished with fold over elastic and the front is lined, giving a beautiful finish inside and out. You can pick from exposed elastic underbust or a knit underbust band. The pieces come with our regular sizing, plus a small bust and full bust adjustment pieces if your over bust and full bust hit a size apart on our charts.
Pattern options for the Roller Derby Bralette includes:
- Necklines: High / High with Gathering / Low / Low with Gathering
- Underbust band: Exposed Elastic / Knit Band
- Front is lined
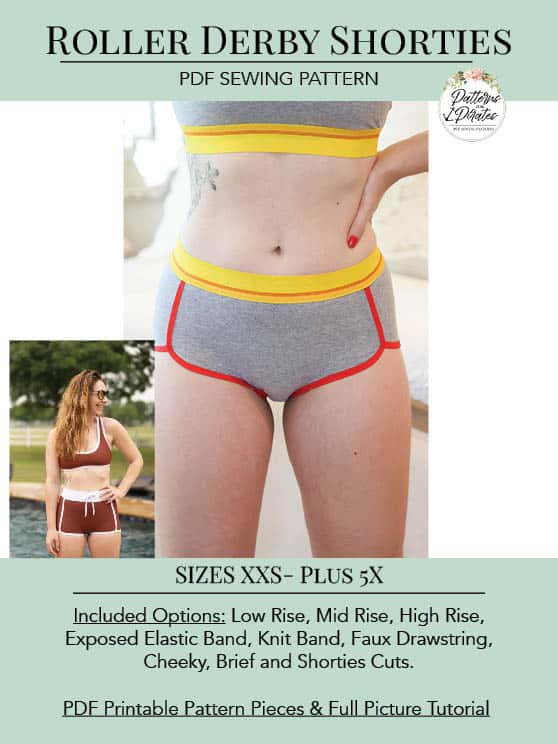
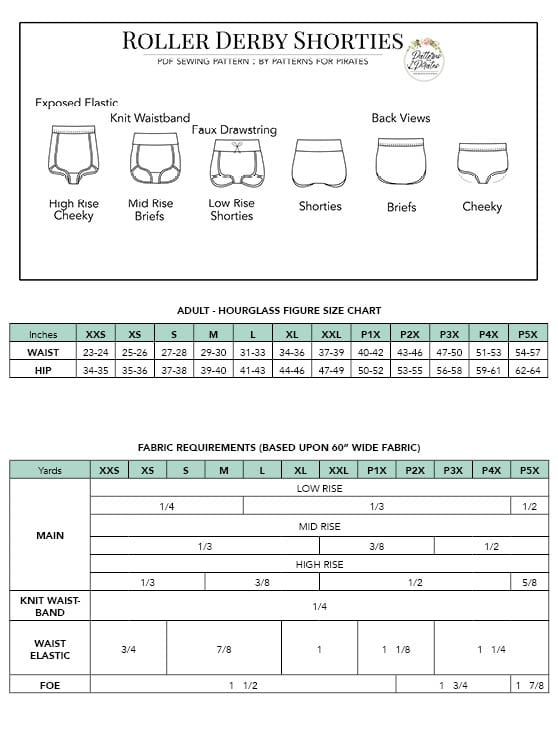
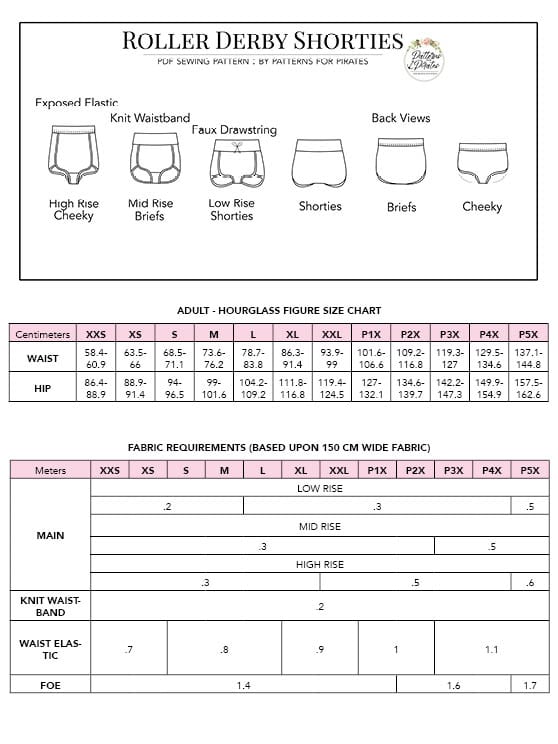
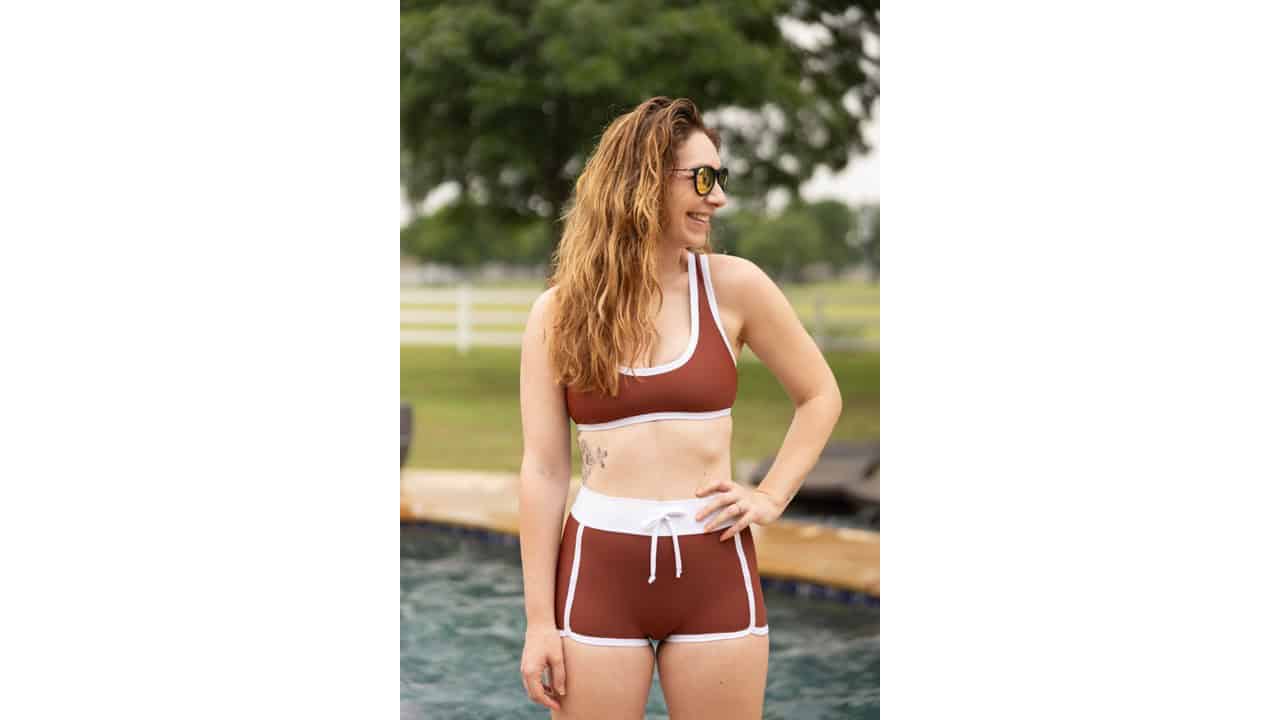
The Roller Derby Shorties are here to be cute and comfortable both lounging at home and as a swimsuit bottom. The seamless front and back are perfect for panels and the lined gusset gives comfort and a beautiful look inside and out. The edges are finished with fold over elastic and gives a super cute retro vibe. You can pick from exposed elastic or a knit waistband for your perfect look and comfort feel. You can also choose from low rise, mid rise or high rise for different looks and whatever suits you best. You can pick from cheeky cut that shows off just a little bit of your backside, brief cut that will just cover all the cheeks, or shorties which go down the thigh some. For an adorable detail you can also add a little bow/faux drawstring on the knit waistband.
Pattern options for the Roller Derby Shorties includes:
- Leg Lines: Cheeky / Brief / Shorties
- Rises: Low Rise/ Mid Rise / High Rise
- Waistband: Exposed Elastic / Knit Band
- Optional Faux Drawstring for Knit Band
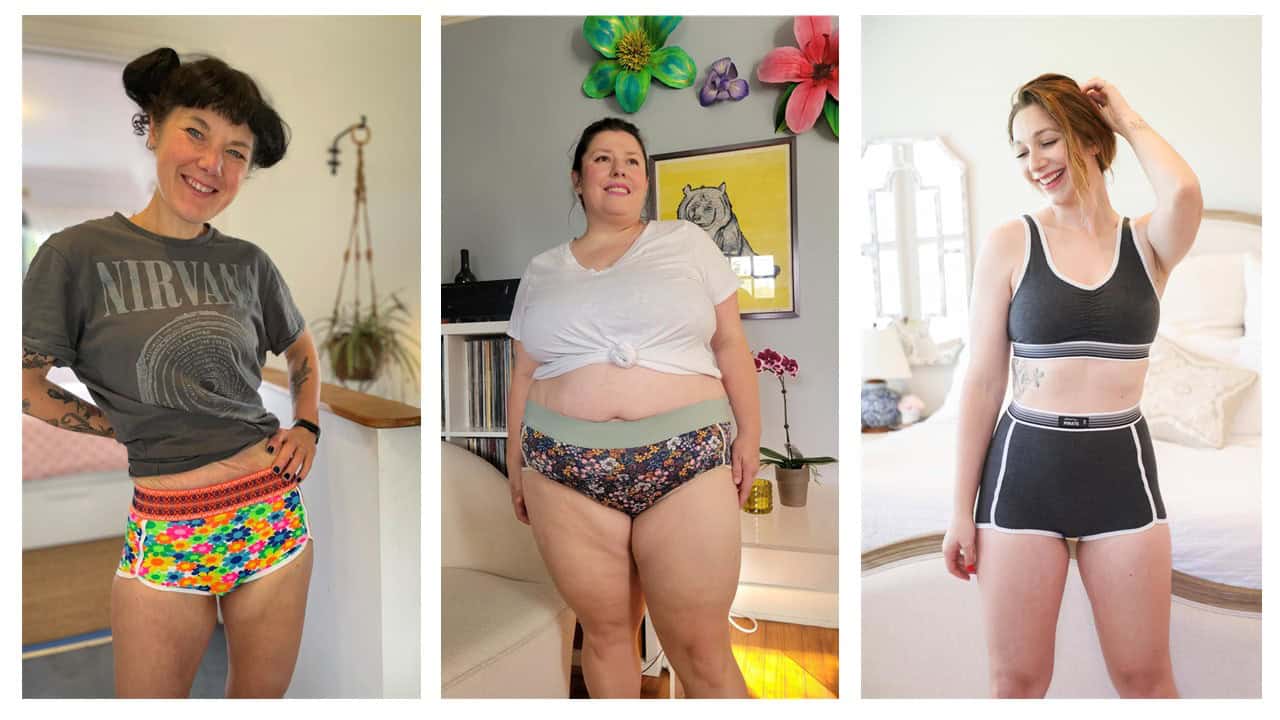
We couldn’t leave you without showing off some of the features, now could we? Let’s break down the different options we’ve included in the patterns for you!
ROLLER DERBY SHORTIES
Low / Mid / High Rise
Exposed Elastic / Knit Bands
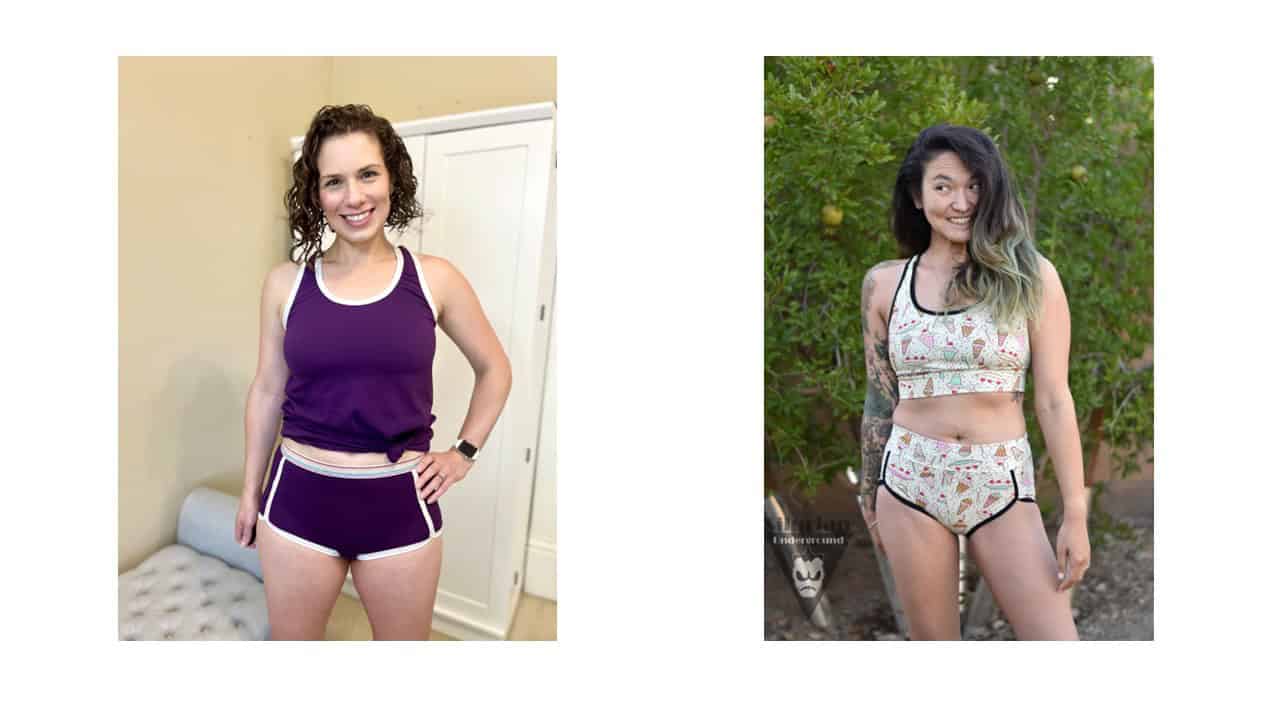
Cheeky / Brief / Shorties Leglines
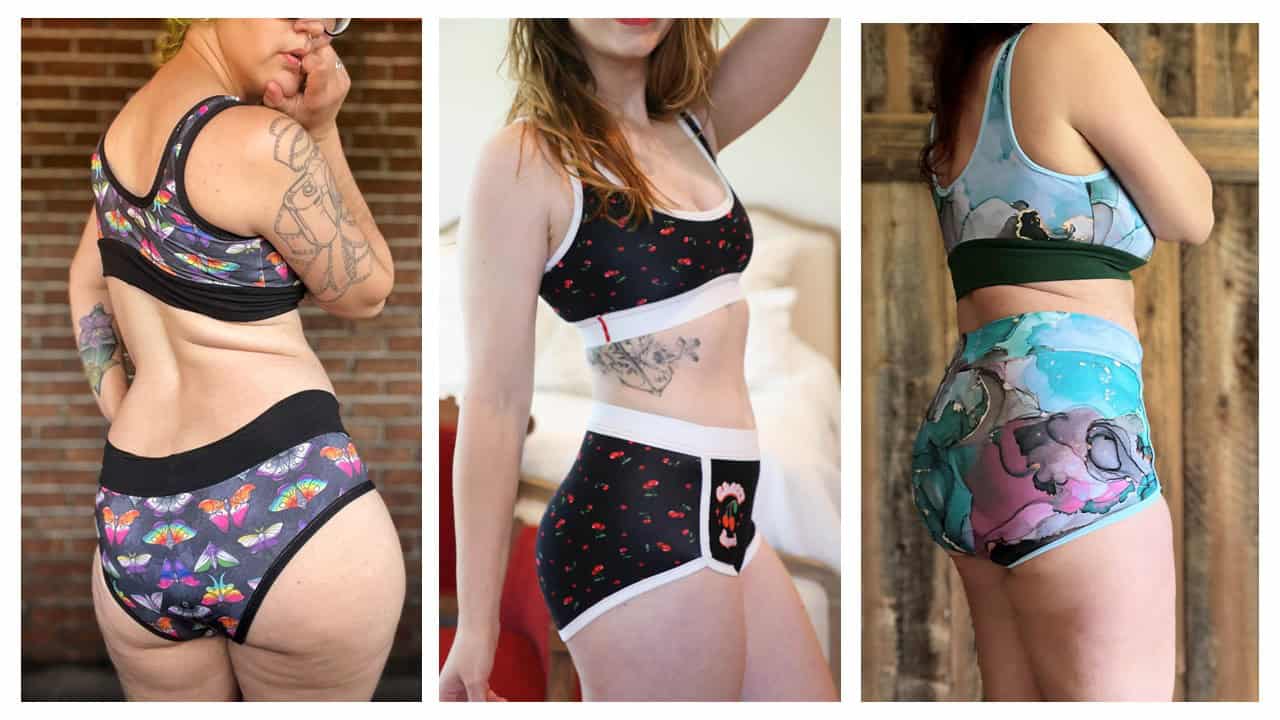
Optional Faux Drawstring
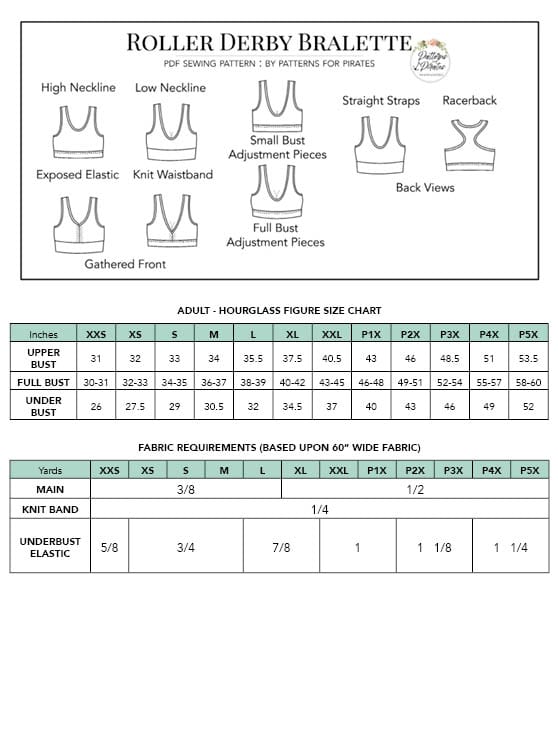
ROLLER DERBY BRALETTE
High / High Gathered / Low / Low Gathered Neckline
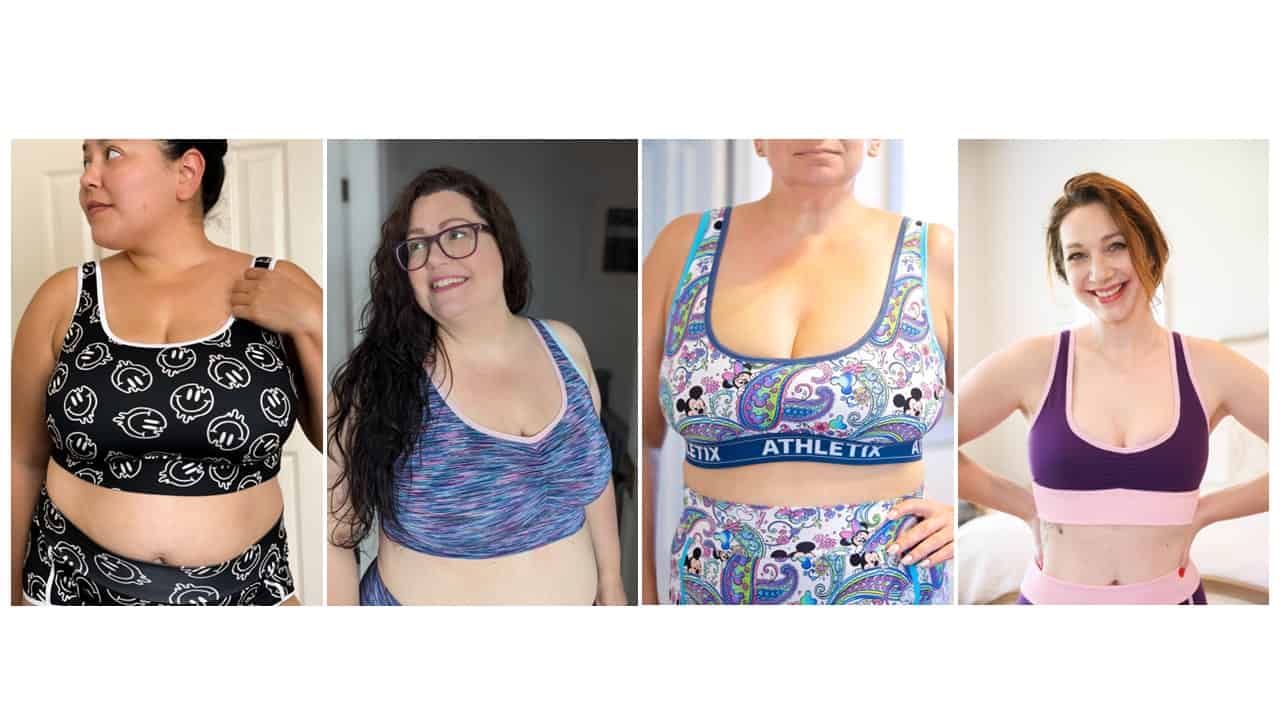
Straight / Racerback Straps
Exposed Elastic / Knit Bands
We cannot wait to see what you create for yourself using the Roller Derby patterns! They are available on sale (no code needed) through 11:59pm CST, June 19, 2024.
Ready to throw these in your cart and get to sewing? Find the patterns here:
If you ever want to purchase a bra/swim top and undies/swim bottoms together as a set you can use code: swimbundle to grab whatever top and bottom combo you love best and create your own swim/undies bundle 🙂
As always, we’ve got more photos for you to use as inspiration! Head over to the Facebook group to browse our albums full of gorgeous photos, compliments of our tester team!
Roller Derby Shorties Facebook Album | Roller Derby Bralette Facebook Album
BUT WAIT, THERE’S MORE!
Judy is sharing a super simple hack on the blog, to take the Roller Derby Bralette pattern one step further! Go check out the post by clicking the image below!
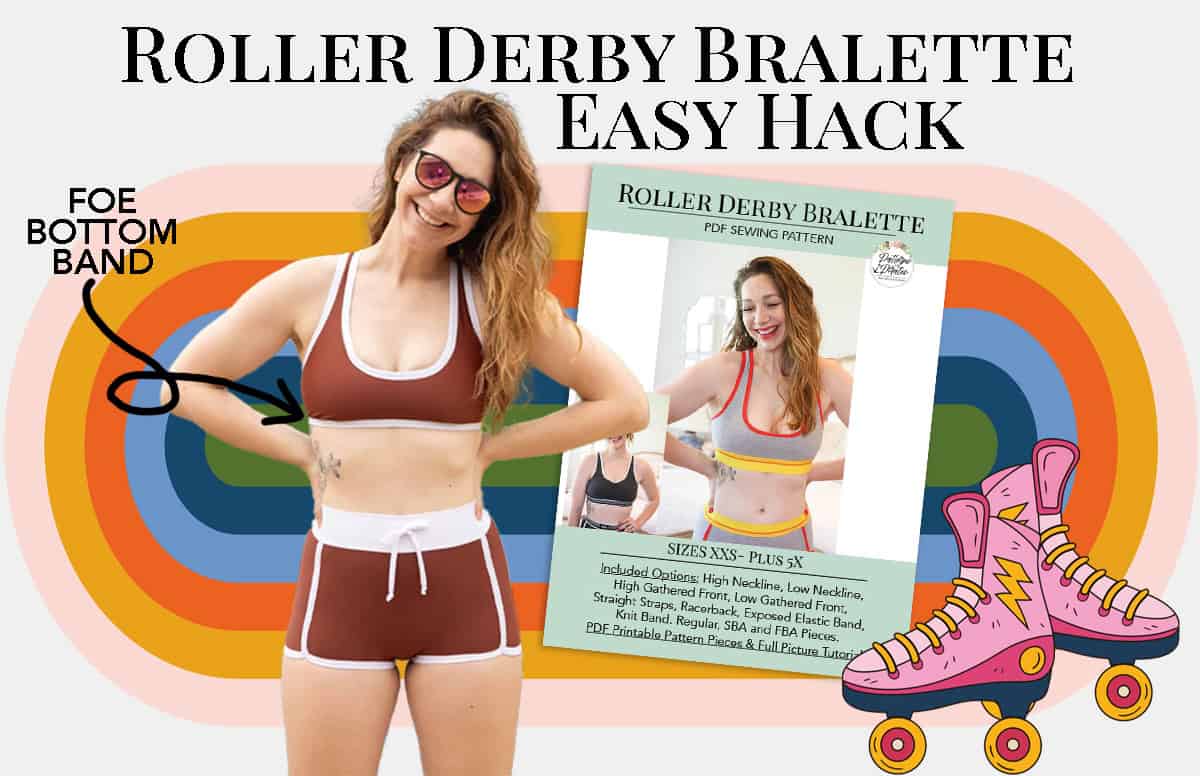
Roller Derby Bralette :: Easy Hack
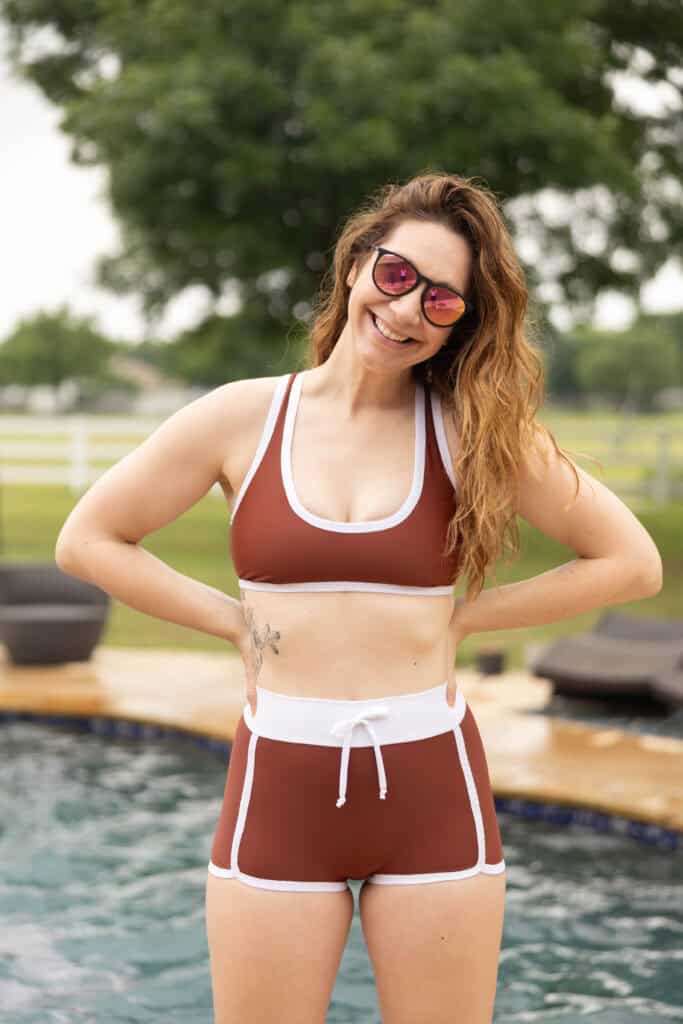
I’m here to show off a super easy hack for the new Roller Derby Bralette. I didn’t put this as an option in the main pattern because it requires a very specific type of FOE that I’ve only found at Joanns. It also will most likely only work well for smaller bust sizes.
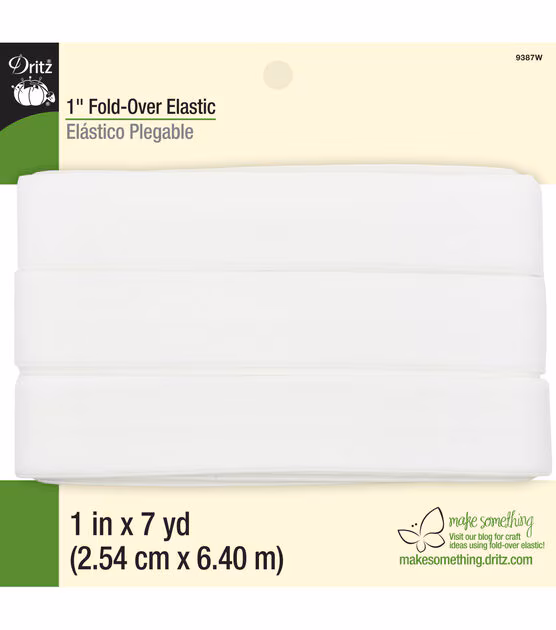
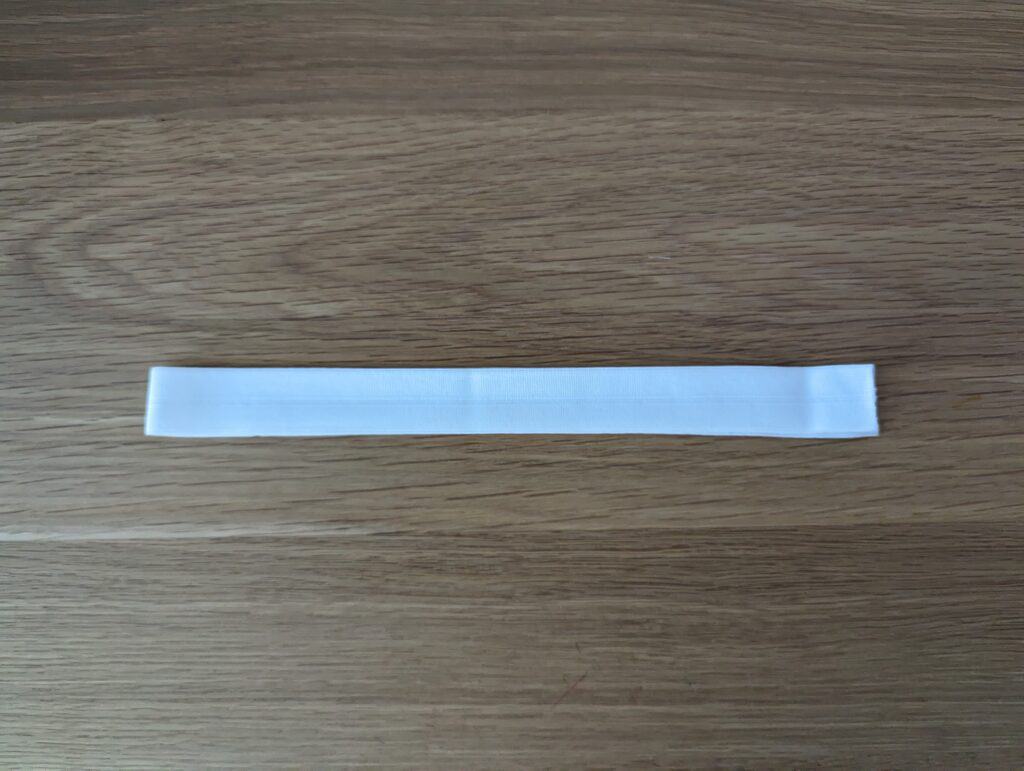
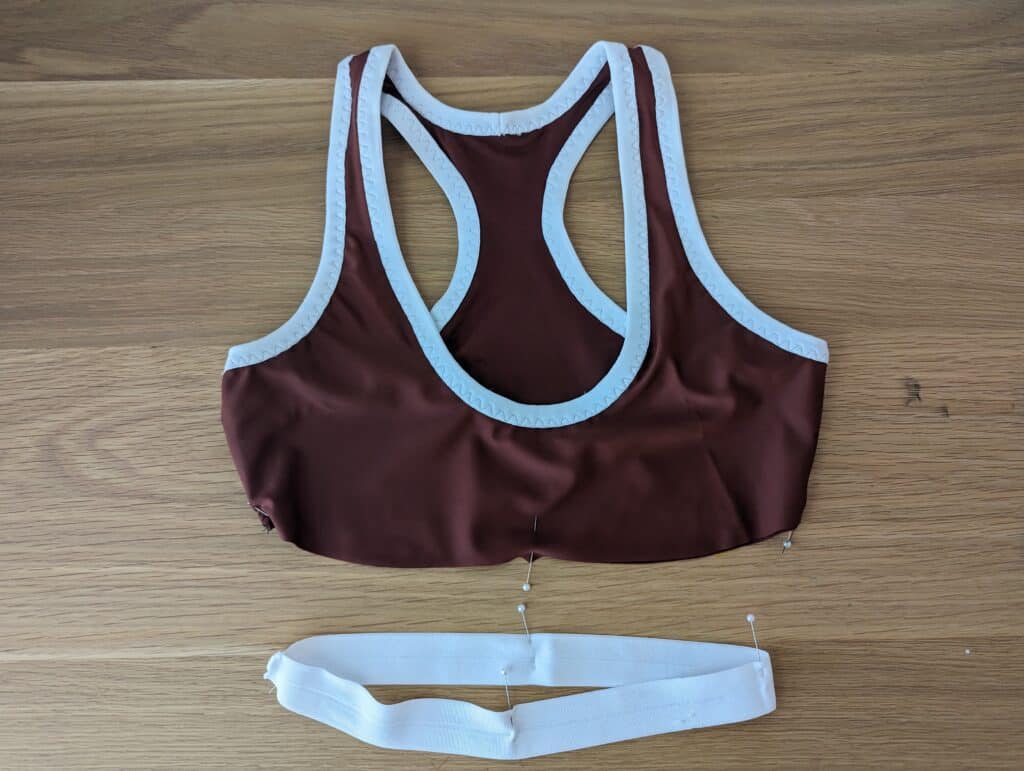
I recommend using this very thick and stable FOE from Joanns (*affiliate link). This FOE gives a lot more support for an underbust than any other FOE I’ve ever seen. Most are a thin nylon spandex, but this one is actually elastic.
I recommend using the knit band measurement and attaching the foe just like the rest of the top.
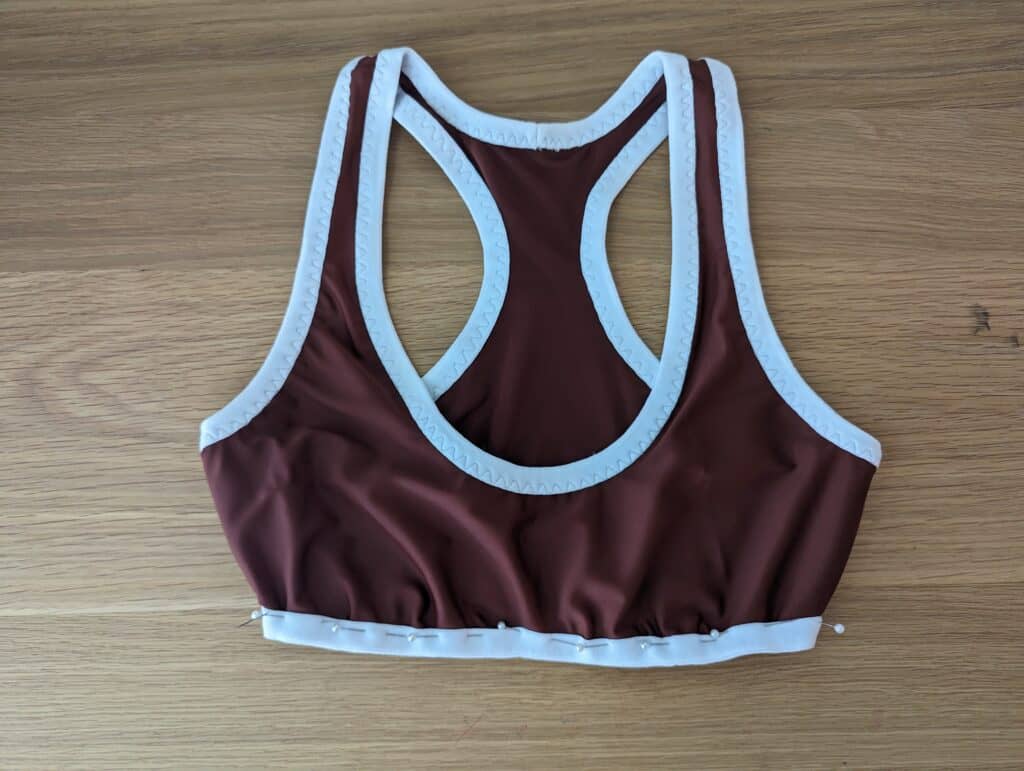
I think it’s such a cute look for a bikini top!

We cannot wait to see what you create for yourself using the Roller Derby patterns! They are available on sale (no code needed) through 11:59pm CST, June 19, 2024.
Ready to throw these in your cart and get to sewing? Find the patterns here:
If you ever want to purchase a bra/swim top and undies/swim bottoms together as a set you can use code: swimbundle to grab whatever top and bottom combo you love best and create your own swim/undies bundle 🙂
As always, we’ve got more photos for you to use as inspiration! Head over to the Facebook group to browse our albums full of gorgeous photos, compliments of our tester team!
Roller Derby Shorties Facebook Album | Roller Derby Bralette Facebook Album
- « Previous Page
- 1
- 2
- 3
- 4
- 5
- …
- 68
- Next Page »