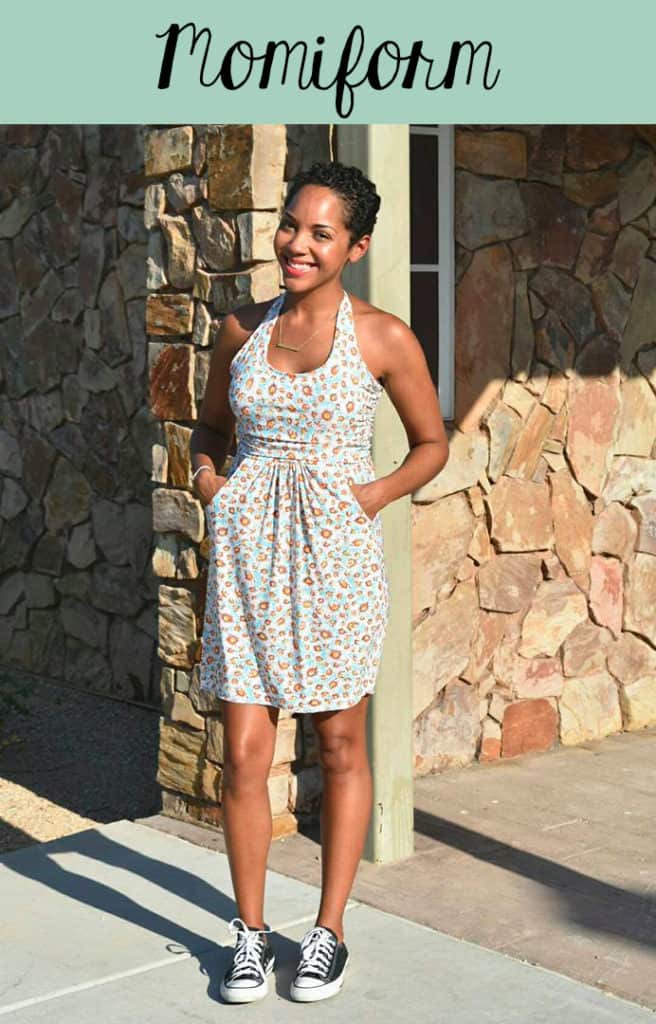
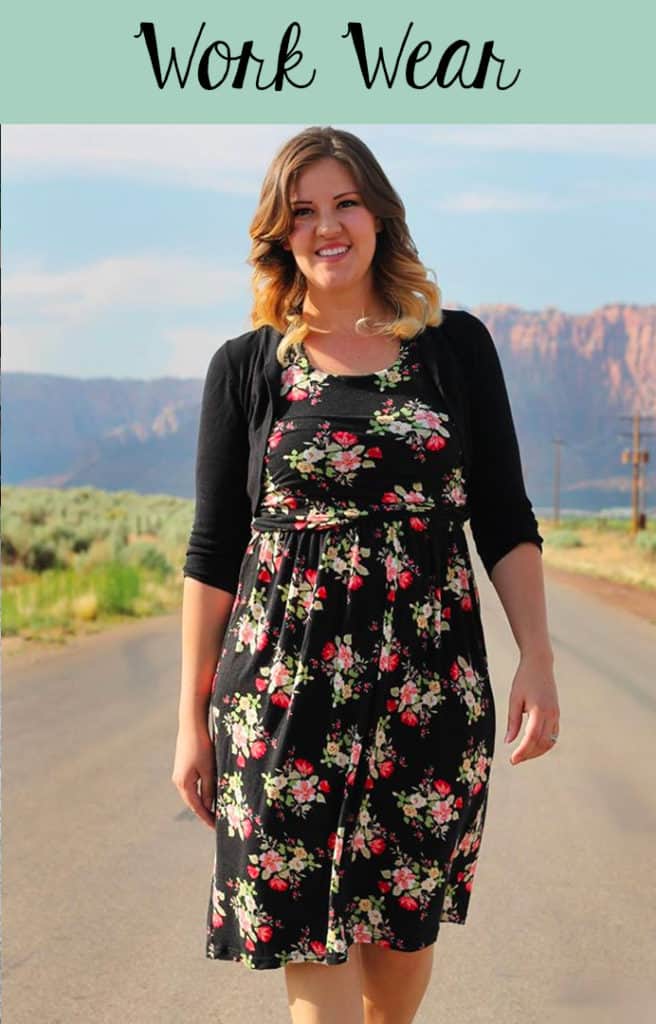
Patterns for Pirates

P4P stylish, modern, wearable patterns

  • Home
  • Blog
    • Frequently Asked Questions
    • Pattern Releases
      • Free Patterns
    • P4P University
      • Fitting
      • Sewing with Stretch, Knit Fabrics
      • Sewing with Woven Fabrics
      • Sewing Machines
    • Sew-A-Longs
    • Fabric for Pirates
    • Pattern Hacks
    • Announcement
      • Blog Tours
      • Contest/Giveaway
  • Shop
  • Bundle Discounts
  • Flash Friday
  • Gift Cards
  • My Account
  • Cart

5 TIPS for successfully hemming knits

July 28, 2016

IMG_9357

We have seen a lot of questions in the group about getting the perfect hem on your knit outfits. Most hems are sewn perpendicular to the grain and on the bias in the case of curved hems…this makes hemming sometimes appear stretched out, puckery or wavy.

I needed to sew a shirt to showcase this fabric so the first pattern that came to mind is the Women’s Henley. The only modification I did was to shorten the neckline placket so it would not interfere with the design of the fabric.listing pictures

I will give you my 5 best tips for avoiding stretched out hems (especially curved hems) and getting the perfect finish.

1. You IRON is your best friend!

Always have your iron hot and with plenty of water in the steamer. Iron your hem before your sew it, it will make hemming easier! This process is called a memory hem. Be sure to follow your pattern’s directions for the amount of fabric that needs to be folded. Pressing and steaming the seams once sewn will also remove the puckering and waviness back and make them look beautifully finished. Ironing and steaming your garment every step of the way is one of the most important parts of sewing. While steaming your hems may not fix all issues it will definitely fix most of them.

IMG_9203

Before pressing and removing excess fabric.

IMG_9210

After a good steam and press.

2. CLIPS and PINS galore!

When hemming, I clip/pin my fold over fabric almost every two inches. Having a stable seam will make sewing it a breeze. Whether you are using your coverstitch machine or your sewing machine having your fabric pinned every inch and a half or so will make your hemming experience much more pleasant. Sewing clips vs. pins is a matter of personal preference. I like sewing clips best because I find them to help me secure my hems faster than pinning used to. So, are you a “pin-er” or a “clip-ser”? 🙂 – insert pictures of the clipped hem

IMG_9197-1

3. HEMMING TAPE is magical!

Stitch Witchery or Easy Knit Tape will become your go to notions for hemming. Stitch Witchery is great for stabilizing and fusing together knit fabric. Simply lay the tape inside the memory hem and press it. This will not only fuse it but it will also give it more stability, making sewing so much smoother and hassle free. It is very important to make sure that the hemming tape you use it’s sew-able. Some no-sew tapes may leave a gooey residue that will damage your needles. Insert photo of hemming tape and photo of ironing it.

I also like to spray Best Press when I press my hems. The starch in it makes the hem more stable so it becomes easier to sew.

IMG_9193-1

Hemming tape can be transparent or opaque.

IMG_9196-1

4. Length of the STITCH and TENSION matters!

Whether you are using your sewing machine or your coverstitch machine, you must remember to adjust the stitch length and tension according to the type of fabric you use. Some coverstitch machines will adjust the tension automatically but most of them will not, so be sure to test your hemming on a scrap piece of fabric. It’s imperative that the scrap fabric you use is the same as your project. Usually hemming knits will require you to lower the tension and length the stitch. Some machines will prefer a longer stitch, some will work great with just a 3.0 length.

IMG_9199-1

If your machine will allow you to set up the stitching speed, do it!

IMG_9207-1

I tend to coverstitch at about 1/2 to 3/4 inches away from the fold so I remove the excess fabric with my applique scissors. You can use your regular scissors too, just be careful not to snip your stitches.

5. Last but not least, have PATIENCE! Go slow!

We all know that rush feeling we get when reach the hemming part of the project…one more step and then it’s ready!! Well, last thing you want is for this last step to ruin your hard work. Take a little more time and go slowly when hemming. Coverstitch machines sew pretty fast so remember to slow down and guide your fabric through.

IMG_9339-1

IMG_9211 IMG_9213-1

I hope you find my tips helpful and that you will tackle your next P4P project with more confidence. Don’t forget to post your creations in the group. Sew like a Pirate!

Filed Under: P4P University, Sewing Techniques, Sewing with Stretch, Knit Fabrics, Uncategorized 8 Comments

Pivot and Slide FBA Method`

June 22, 2016

fba header picture

We get a lot of questions about Full Bust Adjustments.  Since I draft for a true hourglass, curvy figure lots of our ladies have bigger busts. So here is a quick and easy method for knit tops if you need a FBA.

Do you need a FBA?

I see a FBA suggested A LOT in sewing groups, even though it’s not always the problem/solution for ladies (Especially for a P4P pattern that already drafts for a bigger bust.)

So, how do you know?  I began putting both upper/over bust and full bust in my measurement charts to help! (Need a refresher on these measurement terms? Here is our How to Measure Yourself post explaining them.)

If your upper bust is a size smaller than your full bust- you need a FBA.  If you don’t have those measurements on your pattern then you will have a neckline and shoulder fitting too large when choosing your size from your full bust measurement.

I do NOT advise “choosing your size based on your upper bust measurement” and doing a FBA for that many inches.  Indie patterns like mine are much more “true to size” than traditional paper patterns that tend to have a lot more ease built into them. With traditional paper patterns it is often very easy to size down 1-2 sizes on them and still have enough wearing ease.  Most indie patterns are not drafted with that much extra ease.  I draft my patterns right from that measurement chart meaning if I picked my size based on my upper bust (34.5) I would choose a size small, but I don’t need a small! Both my upper and full bust fit into a medium on the full size chart.  I do not need a small with a FBA becuase my frame/upper body isn’t a small.  It’s a medium 🙂 This is why I began adding the upper bust measurement into my patterns, to take out that guess work when I saw this recommendation quite a lot.  And while it might work well for those traditional paper patterns with more ease- I do not suggest using this method for P4P patterns-or most indie patterns in general.

Here is my size chart with both upper/over bust and full bust.

listing pictures3

Got some wrinkles on the full bust area? A FBA is NOT always the answer 🙂 There are a lot of other reasons you might have some wrinkling there!

Both raglan and dolman style sleeves will naturally have some wrinkling there. No matter who that pattern designer is, who is wearing it, fabric choice, or even gender wearing it! The drafting of these two sleeves lay flat when arms are out, which means when arms are down it naturally creates some wrinkling in the armpit area. No biggie 😉

IMG_0238 IMG_0413 IMG_9552 IMG_3842 IMG_4147 IMG_4387

Length is the armsyce is another reason one might have some gaping or pulling.  If you are shorter or taller then the height the pattern is drafted for (P4P drafts for average 5’5″), or if you happen to have a different proportion there. You might need to adjust the length of your pattern from the top of shoulder to the armpit rather than needing a FBA.   This is difficult to tell just from a picture.  It is however much easier in person to see.  If you’re not sure try pinching at the shoulder seam to take out some length if you think it might be too long.  If it is too short you will feel like the entire shoulder area is too tight and that armpit seam will be up touching your armpit too tightly.  For both it is easy to see if you try on the shirt prior to putting the sleeves in.  If it is a tank, remember the bands will pull the armysce in though.

Here my lovely tester and model has a little wrinkling because she is a bit shorter than the drafted height. She would benefit from taking just a touch of length from the armsyce.

11036978_10207178765452450_6301409831053611894_o

Here my lovely tester would benefit from the opposite, a bit more length in the armsyce.

11807358_10207360915846870_5189633883074489071_o


You might have some issues with fit through the armsyce and bust if you are wide chested/through the upper back.  You would find your upper bust measurement in a bigger size than your full bust.  You would need a Small Bust Adjustment (follow the same method just pivoting and tracing to the smaller full bust size).

Here is a gorgeous tester of mine who has begun to trace off a size larger through the neckline and shoulders and adjust down to her smaller bust. This is prior to doing so. You can see it is a bit tight across her shoulders and upper chest area. but fits well in her full bust.

12512545_10156480108785282_629169134466680487_n12669689_10156480108610282_565742808129966782_n


The last reason you might be having fit issues through the bust is not using the appropriate fabric for the top.  If your pattern suggest 50% and you sew up a cotton jersey with only 20% you might have pulling at the chest.  The opposite problem would be using a very stretchy fabric like a lightweight rayon spandex with a lot of horizontal and vertical stretch making the armsyce droop lower or even gape.

Here I am in the exact same size, but the feathers are a more stable cotton jersey with very little stretch and the grey is a rayon spandex with a ton of stretch and drape.  The armsyce is an 1-1.5″ lower in the drapey, stretchy rayon spandex.

IMG_7635 IMG_7920

One more thing I see sometimes is the drag lines from bust to waist.  This is something you will get naturally with an hourglass figure. You have a large difference from your full bust to waist.  If your shirt/dress is semi-fitted then you will see those drags pulling into that smaller measurement at the waist.  This isn’t asking for a FBA, it’s asking for a dart 🙂 But, most knit shirts don’t have darts, just curves along the side seams. You can’t get as drastic of a change from full bust to waist without a dart.  But that’s okay! It’s the nature of a semi-fitted knit top.  It doesn’t mean it is ill-fitting.  Here are some pictures showing those drag lines, but I have room for my bust and the armsyces are fitting perfectly for my frame.  My side seams aren’t pulling drastically to the front of my body on my bustline and it isn’t too tight across my back at the bustline.  I don’t need a FBA for my patterns (yay! I do need them on patterns drafted for a more rectangular figure like traditional paper patterns! Just one reason why I love drafting for a curvy figure).

IMG_7564 IMG_7753 IMG_1758 IMG_1791 IMG_1804

Okay, now if you’re still with me 😉 and you need a FBA here is my favorite, quick and easy method for a knit top. This only adds a bit of width right at the bust.  It doesn’t add length.  For most women and most knit tops this is sufficient.  If you have 2 sizes difference in your upper and full bust you might also add some length to the front center at the bust line and ease it back into the side seam (making the front center curve down). To give your bust some extra length as well.

Here is one of my favorite testers.   She has a smaller size upper bust than full bust.  Here she did not do a FBA.  You can see she has a bit of pulling pointed right to the apex of her full bust. She is your classic case of needing a FBA 🙂 Her side seam will be pulling towards the front of her body instead of laying more evenly along her side.

12109259_10156165083900790_2794494373974819072_n  12094846_10156165083630790_3745559963982436088_o


Here is the “Pivot and Slide FBA Method”:


Step 1: Choose your sizes based off the measurement chart.

z

Step 2: Pivot

fba pictures-02

Step 3: Trace

fba pictures-03

Step 4: Slide back

fba pictures-04


Now you have a new armsyce that goes wider at the bust, but the same smaller neckline/shoulder fit as the smaller size.

I hope this helps those out there needing this fit adjustment! Once you’ve got it down it really is a very quick and easy method to adding a bit more room for the ladies 🙂

Filed Under: Fitting, P4P University, Uncategorized 35 Comments

P4P University:: Grading Sizes

June 20, 2016

grading sizes

Patterns for Pirates grades to a true curvy, hourglass, 5’5″ frame.  Often times, one’s measurements may not fit within one size for bust, waist, and hip and in order to keep the intended fit of the garment, grading sizes is needed.  Is it always necessary to grade sizes? No, but depending on the fit and ease of the item, it may be worth taking the extra step to custom fit it to your measurements.  Unsure if you want to grade?  Check out the Shirt Fits Explained post and our post about Ease as they may help you decide if you are comfortable with a different fit.  For some of the looser cut tops like the Everyday Elegance and Relaxed Raglan, grading up a size for the waist is likely, not necessary as they are straight cuts from the bust down.  But a top like the Layer Me Up, that is very fitted to the body would fit the best if graded to your measurements/size.  Be sure to measure yourself prior to sewing!  Our measurements tend to fluctuate without us really noticing, so I try to measure myself every couple of weeks to be sure I am still sewing the same size my measurements put me.  Not sure where to measure? Read this: How to Measure Yourself.  Below is the size chart for reference.


Now that you have determined your size and if you’d like to grade, how do you do it? Below are a few examples of grading for a larger waist and hip size.  Any adjustments should be made to both the FRONT and BACK pieces.  Do not be discouraged if your measurements put you within different or larger sizes than ready-to-wear store-bought clothes as pattern sizing does not translate the same.  Our bodies come in all shapes and sizes, and we are all uniquely beautiful.  The beauty of sewing for oneself is the ability to create an item custom fit to you.

P4P grading sizes, pdf patterns

Still need help or have more questions about P4P patterns?  Join us over in the P4P Facebook Group and get to sharing!


Filed Under: Fitting, P4P University, Uncategorized 19 Comments

#SewLikeAPirate :: Contest Winners!

June 20, 2016

Presentation1

Remember when we posted the #SewLikeAPirate freebies?  Well, someone (me…Katy) dropped the ball and forgot to announce the winners of our contest!  So here I am, eating crow and announcing the winners a bit late.  Whoops!  Sorry to leave you all hanging in suspense.

 We decided to reward Stephanie T. for being the Speediest Pirate, and sharing her adorable rainbow sleeved shirt!

Stephanie Troemel

Our randomly selected winner was Becca N. with this darling mother/daughter combo!

Becca Neuharth

And thanks to all of our Pirate Friends for sewing along with us, and using our P4P designs for your own makes.  They were all AMAZING!  (Want to get your hands on these free designs?  Head right HERE to get your very own copy!)


Filed Under: Contest/Giveaway, Free Pattern Leave a Comment

Essential Tank- Open Back Hack

June 12, 2016

Presentation1

I’m excited to share another hack to the new Essential Tank pattern! I’ve seen this look in the popular athletic wear brands and love it! But being 5’10” means no way I can buy it off the rack, even if I wanted to splurge on the price tag 😉

So, I hacked the newest pattern in the P4P collection and I’m so in love with the result! I used a brushed polyester blend that is super soft.

listing pictures1 listing pictures3

I took the front and raise the neckline by 2″ (although the inspiration tank was probably 3″ higher I just can’t take a neckline that close!). Make sure your neckline ends at a straight angle or you will have a point when you open up your folded front.  If you have a french curve use it for a nice smooth neckline. If not, you can get it as smooth as possible.

IMG_6990

Next I cut the back. Here I cut the full piece to help demonstrate, but you can skip cutting the entire piece to save on fabric.

IMG_6993

I took my straight edge and alined it to the widest part of the racerback.  I sliced it straight from the top of the shirt to the bottom hem. (I’ll mention here I did shirt length cutline. but left it unhemmed).

IMG_6995

Then I cut another MIRROR image back piece.

I decided to leave my hem and back edges raw. If you wanted to hem, go ahead and hem those back center edges now.

Tip-I ALWAYS cut a center notch on the necklines of every shirt- they’re cut on the fold and you always need that center mark for attaching your neckband marked anyways.  It is such a quick, easy time to mark it with a notch!

With both right sides up and aligning the center, baste the overlapping sections along the neckline.  Looking back I would also advise to baste just outside the 3/8″ seam allowance as well to hold it in place while attaching the neckband. It’s such a small section that extra baste will really help keep it nice and neat.

IMG_6997

Then just sew up the shirt as the tutorial recommends, treating the back as 1 back piece.  If you make the neckline higher you will need to shorten your neckband a bit as well.  A good ratio is about 80-85% of the finished neckband plus your seam allowance.

IMG_6999 IMG_7001

And wa-lah! Now you can waer it open and loose or tie it at the bottom for a more fitted look! And a big bonus (for me anyways ;)) is that you can untie the back and it’s super nursing friendly! I already have 2 more fabrics that need to become this hack! I can see myself wearing these with some capri peglegs throughout the hot TX summer!  I have it paired with a cute Siren Swim Top I made for a sports bra!

13402172_151754171904282_974103483_n(1)

Don’t forget to share your final creations in the P4P Facebook group, tag me on Instagram, or in your favorite sewing forum! <3 I absolutely love to see your P4P creations!


Filed Under: Pattern Hacks Leave a Comment

The Essential Tank | Pattern Release!

June 9, 2016

If you’re like a ton of other women on our Facebook group, you’ve been checking the page daily…ever since Judy posted that first sneak of the new tank top pattern.  Well guess what?  The wait is over!  It’s here!

Allow me to introduce you to the newest P4P pattern: The Essential Tank.

listing pictures1

Probably one of the most appropriately named patterns in the lot, this is going to be your new essential for summer.  It’s a quick, easy, and super flattering sew.  And is jam packed full of options!

The Essential Tank is the perfect everyday tank. It is fitted at bust and semi-fitted through waist and hips.  Wondering where it stacks up against the other P4P patterns with fit?  Judy has an amazing blog that compares the fits of her patterns HERE.

listing pictures3

The pattern is drafted for sizes XXS – Plus 3X.  There are FIVE hem lengths (dress, shirt, tunic, curved and maxi), two strap types (straight and racerback), and two arm/neck finishing options (binding and traditional tshirt bands).  And on top of all of that, we have also included a  PDF layers feature for printing.  Want to learn more about how to measure yourself for this pattern?  We’ve got you covered with an in-depth blog HERE.

Go grab yourself a copy of the Essential Tank.  It will be discounted through the end of the weekend, no coupon needed.

Hoping for more inspiration?  Take a peek at all of our fabulous testers!  And if that’s not enough, head over to the Essential Tank album on Facebook for more.  Happy sewing!


Filed Under: Pattern Release 1 Comment

Essential Tank Maternity Hack | Guest Post

June 9, 2016

MATERNITY BLOG TUTORIAL: Applying the Layer Me Up Maternity Modification to Other Patterns For Pirates Patterns

Guest Blog Written by Kelly Bailey

LAYER ME UP_edited-1

Hi there! I’m Kelly and I am here to share with you my knowledge of making maternity garments; more specifically, how to apply Judy Hale’s Layer Me Up maternity modification to the rest of her other patterns. I have been a pattern tester for Judy for a while now and love it. I also run my own sewing shop Spindle & Seams and I work for the fabric shop So Sew English! If you are here I imagine you are expecting or expecting to sew for somebody who is. Congratulations! This is a step by step tutorial and I hope that after reading through this you feel much more comfortable trying your hand at maternity wear. For this tutorial you will need your pattern of choice and the Patterns for Pirates Layer Me Up Maternity pattern.

NOTE: I am 20 weeks gestation (4th baby) in all of these photos.

PHOTO 1

STEP 1: Does the pattern even require a maternity modification?

Does the pattern your thinking of making really need a maternity modification? There are several patterns out there that are maternity friendly without even trying to be and some that would turn into a mess if you tried. Two of my favorites are the Patterns for Pirates Free Spirit Tank in the curved hem and the Boundless dress in the empire waist option. The Free Spirit tank leaves lots of ease throughout the bodice and angles out wider as it approaches the bottom hemline. The Boundless dress, in an empire waist, is only fitted just under the bust and accentuates the baby belly in the most darling way! The Everyday Elegance can also be maternity friendly if you opt to make it using a knit fabric with great stretch. This one has a lot of ease throughout the bodice even without using knit fabric but definitely will fit you until the end if knit is used. Some patterns just are not meant to be altered to be maternity. There is one P4P pattern that I just wouldn’t attempt for this purpose; the Sweetheart dress and peplum. This pattern is drafted to be an “at the waist” and is very fitted from the waist up. The Sweetheart looks best in thicker, more stable knits like ponte or scuba that only provide restricted stretch and are the most fitted in a location where your belly is going to grow drastically.

So when looking at a pattern ask yourself; Does the pattern have an empire waist? Does it have an at the waist skirt/peplum? What is the ease like through the waist and hips? What patterns cannot be modified easily for maternity and which ones IMO just wouldn’t look great on me? What kinds of patterns are COMFORTABLE for maternity wear? Will I be able to wear this garment post partum to ease the transition back into non pregnancy clothes?

Here is a rough guide of the patterns I would, wouldn’t or might alter:

Patterns that don’t necessarily require maternity modifications:

  • Everyday Elegance
  • Free Spirit Tank
  • Boundless Dress

Patterns that I wouldn’t attempt to make maternity:

  • Sweetheart Dress and Peplum Top

Patterns that can be easily modified for maternity:

  • Layer Me Up
  • Pumpkin Spice Dolman
  • Sweet Tee
  • Relaxed Raglan
  • Slim Fit Raglan
  • Women’s Henley
  • Boyfriend Vneck
  • Essential Tank and Dress

BOUNDLESS DRESS_edited-1 FREE SPIRIT TANK_edited-1EVERYDAY ELEGANCE_edited-1

STEP 2: Choose your fabric content wisely. What fabrics to use for maternity and what to avoid.

Sometimes you can get away without making any maternity modifications if you use the right fabric on a pattern that has enough length to accommodate. Tunic length garments can be a great way to have a before and after baby closet staple. But most of the time you will need to make the modifications to comfortably fit until after baby is born. Here are a list of some knit fabrics to use and some to try to stay away from when sewing maternity.

Fabrics that are great for maternity use:

  • Rayon Spandex Blends (This can include french terry)
  • Polyester Spandex Blends (like ITY or brushed poly)
  • Cotton Spandex/Lycra Blends (This can include french terry)
  • Cotton Spandex Interlock Knits
  • Liverpool depending on the amount of horizontal stretch
  • Lightweight Sweater knits with lots of stretch

These fabrics all have great stretch and recovery. 4-way stretch is great but because you are adding in length to the front bodice you can easily use 2-way stretch knits as long as the horizontal stretch is pretty good.

Fabrics to try your best to steer clear of using for maternity wear:

  • 100% cotton Jersey knits or Interlock
  • 100% cotton French Terry
  • Ponte
  • Scuba
  • Nylon spandex and other athletic knit blends

These types of knits typically do not have very good overall stretch or they have what I call restricted stretch. Restricted stretch would be a fabric that has good overall stretch but is tougher to pull to get there. Similar to how some athletic knits try to hold you in as you work out. Maternity garments made with these knits may fit for a little while, but will likely not comfortably last you up until that cute little babe pops out of your full-grown belly.

Now that you have chosen a good sewing pattern and paired it with the right fabric we can move on to altering the front bodice piece of your chosen pattern. There is no need to alter any other pattern pieces. Yay!

STEP 3: Assembling and analyzing your maternity modification pattern piece and what the modifications mean.

Your Layer Me Up maternity pattern is going to give that belly some ease throughout the waist to accommodate growth width wise. It is also going to give you more length through the front bodice to completely cover your full-grown baby belly. You definitely don’t want your hand crafted top turning into an early 90’s belly shirt ¾ of the way through your pregnancy! For this tutorial you are going to need to purchase the Layer Me Up maternity mod pattern and a maternity mod friendly pattern of your choice. Now is the time to assemble both of these patterns and to cut out your sizes. Pay attention to your current bust and hip size. They may have changed since before you became pregnant. You may need to do some pattern grading because of it. See Judy’s blog post on pattern grading if this is something new to you.

PHOTO 2


STEP 4: Picking the pattern you wish to modify and lining up the maternity mod pattern correctly on top of it.

Now we are going to lay the pattern pieces on top of one another to see where we need to make modifications to our non maternity pattern. We will only be modifying the FRONT BODICE piece of the non maternity pattern. We are using the Layer Me Up maternity piece as a guide to adjust our original pattern. Line up your maternity pattern piece on top of your original pattern piece using the armpit at the reference point. The Layer Me Up mod piece should be placed a couple inches below the armpit of our front bodice piece. As you can see in this photo I have also laid the top original Layer Me Up front bodice piece to show that the reference point. If you do not own the Layer Me Up original pattern, don’t worry, just place the maternity piece a couple of inches below the armpit.

photo 3


STEP 5: Adding paper along the original patterns waist curve for tracing.

You can see from the above photo that some parts of the maternity piece fall within the bodice piece of your original pattern, but there are parts that stick out as well. We are going to do some gentle transitioning and tracing on our original pattern to accommodate. First things first, decide where you need to add your tracing paper to your original pattern. Tape that piece of paper into your original pattern like so.

PHOTO 4

Now once again lay your maternity pattern piece over the top so that we can trace the new curve.

PHOTO 5

Be sure to use some gentle grading to transition the curve from your original pattern bodice piece to the maternity pattern piece. Trace along the maternity curve. When you are finished tracing trim off the excess paper.

PHOTO 6

Here is where you can decide to use the full width of the maternity curve or to trim it down about 1/3” to be more fitted for early pregnancy. If you choose to slim it down your top may not fit all the way up to your due date.

STEP 6: Adding Length to the front bodice piece.

Analyze the pattern pieces to see how much length discrepancy there is for the hem lengths. Pick a good location on the original pattern to cut and add in more length there. I like to add the length in at the shortest hem length on the original pattern. Once again, we are going to lay the Layer Me Up maternity piece on top of your original pattern piece.

PHOTO 7

As you can see from the above photo there is several inches of difference between the hem lengths. For this part of the tutorial I am going to illustrate how to add in the length necessary for rouching. Take measure of the difference.

PHOTO 8PHOTO 9

Take note of this measurement and then cut your original pattern piece at the shortest hem length. On this particular pattern, this falls at the curved hem.

PHOTO 10

Add in your blank paper here and tape your original pattern pieces to the blank sheet being sure to only add the measured difference back into the original pattern. Trace a smooth transition line and trim off excess paper on the sides.

PHOTO 11

Now once again lay the Layer Me Up maternity pattern piece on top of your now altered original pattern and be sure that your hem lengths now line up with one another.

PHOTO 12

STEP 7: Transfer over the elastic sewing markings.

Line up the two pattern pieces and from the Layer Me Up maternity add on pattern and transfer the triangle elastic markings to your now altered original pattern.

PHOTO 13

Wallah! You now have altered your original front bodice pattern piece to be maternity! 

STEP 8: Check out your new maternity pattern.

It’s super easy from here! Cut out your altered front bodice piece from your fabric and follow the LMU Maternity mod instructions as written. Make any adjustments through the bodice as necessary for a better fit for you! Again, you do not need to modify any other pieces from your pattern to make it maternity. I highly suggest trying on your top or dress BEFORE you attach the binding or hem in order easily make any necessary adjustments.

ESSENTIAL DRESS_edited-1ESSENTIAL TANK_edited-1


Filed Under: Pattern Hacks 3 Comments

20K Celebration : A Pirate Pencil Skirt!

May 25, 2016

Is today the best day ever or what?  The Patterns for Pirates Facebook Group just hit TWENTY THOUSAND fans!  That’s 20K women (and men!) who are learning, supporting, and sewing along with each other on a daily basis.  That’s so amazing!

13256412_10102686577129783_6823916064658558011_n

To celebrate, and to thank you all for being the best pirate seamstresses ever, we are releasing a new pattern.  AND (hint hint) if you’re a member of the Facebook group, there is a special discount code just for you for this pattern. (Please remember this is a thank you to group members.  So if you would like to share, please direct them to joining the group and not share the code 🙂 )

Now let’s talk about the new pattern: The Pirate Pencil Skirt.  It’s so fast, easy, and flattering on all body types that you’ll be sewing up a ton of them for yourself before summer is over.  Trust us.

Slide1

The pattern is drafted for sizes XXS – Plus 3X.  There are three lengths and two waist rises included in the pattern, as well as the new PDF layers feature for printing.  Want to learn more about how to measure yourself for this pattern?  We’ve got you covered with an in-depth blog HERE.

listing pictures

Pick up your copy of the Pirate Pencil Skirt: HERE (And don’t forget to head to the group for the discount code! We keep ALL current sale and promo codes in the COMMENTS of the PINNED POST! 🙂 )

Here are a few images from our fabulous testers for the Pirate Pencil Skirt.  Take a peek through for some styling inspiration!  Need more?  Head over to the Facebook album to see the rest!


Filed Under: Free Pattern, Pattern Release 14 Comments

#SewLikeAPirate :: Freebies and a Contest!

May 23, 2016

Who doesn’t love a good graphic tee?  We sure do!
P4P girl Katy has created four FREE designs to help transition you into a full blown pirate sewist.  Are you ready?

noevil 13268127_10102683251304763_664552423215925727_osewlikeawind in sails

You can go pick up your copy of these designs right HERE.

Don’t own a die cutting machine like a Silhouette or Cricut?  No sweat!  We have included two extra file types (PNG and PDF) that will allow you to work with the designs however you’d like.

— Go old school and use an iron on transfer paper and your at-home printer.
— Use Heat Transfer Vinyl and your die cutter.
— Try your hand at Freezer Paper Stenciling.  (Dana from Made Everyday has a great tutorial HERE.)

But wait, there’s more!  We wanted to create a friendly pirate-y competition with this new release.

Between today and Saturday, June 4, sew up a Patterns for Pirates shirt and apply one of these fab new designs.  Share your photo with us on Instagram or in our Facebook group and use the tag #SewLikeAPirate We will pick our favorite and the winner will win a free P4P pattern of choice AND be featured on this blog.

What are you waiting for?  Get to sewing!

Filed Under: Contest/Giveaway, Free Pattern 6 Comments

Different Fabric, Different Fit!

May 22, 2016

Fabric choice can really make or break a garment.  Not just the color or pattern, but the kind of fabric you use.

I remember begging my mom to sew a pattern intended for knits with a woven, or a flowy top with ponte roma… of course she would try to explain that it wouldn’t work, but the begging continued!

It’s not until you use the WRONG fabric that you really understand using a fabric other than what is suggested in a pattern that you’re going to alter the final outcome.  It will fit and look different than intended.  I almost feel like it’s a right of passage to make a few mistakes with fabric choice to really understand how important it can be! But, I will try to help you out before you make those mistakes 😉

There are TONS of fabric types out there… I mean A LOT… too many for most seamstresses to remember.  But if you can familiarize yourself with what the fabric will look like made up (how it will drape and fit) then you can really help yourself when picking fabrics for a project.  Feeling fabric for the amount of stretch, thickness and drape will help you pair it with the right pattern.  Once you get to know the fabrics you like, you can more easily order them online for a bigger variety.

fabric choice

I have sewn up the exact same pattern in the same size, modeled on the same body to help show how different weights and fabric types can affect the fit and look of a garment.

I sewed up a ton of the new P4P release, the Sweet Tee, because it is such an easy, quick sew and has a semi-fitted silhouette so it can take a wide range of stretch and be wearable. So, here we go!

I will start with the fabrics with the most drape.  Drape is a term meaning how the fabric falls to the body when worn.  Fabrics with soft drape will be fluid and drape towards your body.  Think looser fits.  They will fall beautifully, and still show off your curves without needing to be tight at all. This is my FAVORITE kind of fabric for myself.  I love a little looser fit with a drapey fabric.  It means I can feel comfortable (not sucking in all day ;)) with a looser fit, but still not look sloppy or like I’m wearing baggy clothes- I still want to show my curves a little to be flattering. But, this is a very personal preference of course! My sister prefers more stable knits for her tees usually.  Think about what shirts/garments you like and how that fabric feels and drapes and it will help you understand what you prefer!

Slub Jersey.  One of my favorites to work with, it doesn’t have a ton of stretch (which makes cutting and assembling a bit easier), but has drape because it is thin and lightweight. It is light and airy to wear, but doesn’t cling and show off every lump and bump. Another fabric that fits in here would be a lightweight poly/cotton jersey blend :).

IMG_9451 IMG_9485 IMG_9507


Very thin sweater knit on beige and a lightweight rayon spandex on back.  You can see on both these that they drape under my bust towards my body/waist showing off curves. The loose-ness around the hips doesn’t look flared, but just relaxed.  Both are a little harder to work with during cutting and assembling.  The very thin sweater knit usually needs some extra support in the seams baring any weight (like shoulder seams).  You can use a clear elastic to reinforce them so they don’t stretch out with wear.  The rayon spandex blends are one of my all time favorites as well- I used to want my mom to make me every thing in it 😉 .  It has a slinkier feel because it has such a soft drape and can be difficult to fold on grain and cut without some movement. Rayon blends are also notorious for being “clingy”, because they drape so much they also tend to show lumps and bumps you might now want to show. So, I tend to pick rayon blends for a looser fit I know has plenty of room to not cling. Or a tight fit I know will be showing off everything anyways.

IMG_4091 IMG_4137


Tissue Jersey on front and rayon spandex blend on back. The tissue jersey is a bit of mix, it is not at stretchy and fluid as the others, but so lightweight that is still has some good drape. But the very thin fabric also showed my bra line a bit in front there as well, so you take the good with the bad sometimes with the thin stuff ;).  I like the light airy feel of tissue jersey living in a hot climate.

IMG_4015 IMG_4036IMG_4037

ITY Knit– Ity knit is a poly blend that is knitted to have a smooth face, soft drape and lots of stretch. It’s commonly used in RTW for maxi dress and skirts b/c its flows so nicely. It tends to not be as “clingy” as a rayon blend and usually a little thicker weights (although all fabrics can be found in different weights).  I like an Ity knit, especially for a nicer look.  When I taught kinder and wore more professional attire Ity was a great, comfortable fabric that looks a bit dressed up even with a simple tee silhouette.

IMG_4772 IMG_4774 IMG_4777


On to the sweater knits! I love a sweater knit for fall, winter and even early spring! Most sweater knits have good drape, especially light to medium weight sweater knits. They tend to be thicker than a rayon spandex and might do better if you’re worried about the thin fabric showing/clinging to any lumps/bumps/bra lines.

This is a very light weight sweater knit with almost an open weave.  Again, a tad see through, I will wear this one with a cami under after seeing the pictures ;).  But the looser weave also feels a little looser in fit, so putting on a cami under doesn’t make it feel too tight for me.

IMG_4185 IMG_4162 IMG_4180


Light weight hacci sweater knit. Again, you can see it drapes under the bust towards the waist for a flattering silheoutte.  This sweater knit is plenty thick for me to not worry about having to wear a layer under as well and a bit more comfortable that it doeesn’t show quite as much detail on lumps and bumps too.

IMG_3911 IMG_3896 IMG_3884


Medium weight sweater knit. This is a super soft ribbed sweater knit- It has tons of stretch and drape.  As you can see it looks a bit looser because it has so much stretch and drape.  I love this for a cozy sweater-I can’t wait to wear it in the fall (here in the hot south we’re already way past sweater weather!)  Even though it is a thicker weight it does show my bra lines b/c it’s so drapey.

IMG_4373 IMG_4387 IMG_4405


Medium weight sweater knit. This feels like an acrylic blend (it was bought from a LA detash page- so I’m guessing on content) so it has a little more body to it and doesn’t drape quite as well as the other sweater knits.  It also feels a little tighter, because it doesn’t have quite as much stretch as the others. You can see it still drapes on my deeper curves (like my sway back) but goes more straight down from my bust rather then draping under.

IMG_4482 IMG_4489 IMG_4491


Onto more stable knits 🙂

Cotton Spandex/Cotton Lycra.  Lycra is a name brand of spandex, so they are essentially the same fabric (much like tissue is to kleenex). This has good stretch and recovery with the spandex in it, but has much more body.  Meaning it will not drape towards your body, but stick out more stiff and hold it’s own shape.  I prefer to use cotton spandex on tighter fits, since there is no need for drape.  I find it not very flattering on a looser fit because it doesn’t drape under bust as well and will feel a bit tighter due to the thicker, more stable feel.  A lot of seamstress love this fabric because it is easy to find in great prints and a wide variety of colors, as well as a bit easier to work with because it is thicker.  And I love it for youth, but not for myself.  If we can all gang up on the knit companies to print their amazing customs on fabric with more drape I’ll sign the petitions 😉 I just can’t feel great in most cotton spandex shirts. I didn’t even hem this one because I knew it would quickly be cut up into something for baby girl! With that said, my sister likes a cotton spandex tee because she doesn’t like her fabric to drape to her waistline/under her bust. She prefers the more stable knit. Again, all personal prefence and learning to pair it with the right pattern for yourself!

IMG_4316 IMG_4323 IMG_4344


Stretch French Terry.  This is a medium weight french terry with good horizontal stretch.  French terry is a very popular fabric right now, and I share the love of it! But when using french terry you need to be aware that it doesn’t have great drape.  As you can see, it doesn’t fall under the bust to the body, but straight down. And my sway back pooling is much more obvious. It feels tighter on as well even though it has some stretch because it is thicker.  Now there are some with rayon in the blend which helps give it drape.  But most french terrys are much more stable on the knit spectrum and do better as something that needs a thicker, more stable fabric like pants, shorts, jackets, sweatshirts, etc… I added a cowl on this one for a fall/winter look since french terry is a thicker, warmer fabric.

IMG_4289 IMG_4298 IMG_4300


Liverpool.  This is also a very popular fabric right now. It is a poly spandex blend with high horizontal stretch and a texture on the right side. It has a feeling close to scuba/techno/neoprene. It is a more stable knit without much drape.  This is better suited for something that needs stretch and stability, like a tighter dress, pencil skirt, ect.  It does not have good drape, as you can see it goes straight down from my bust instead of falling toward my body under towards my waist.  It also makes the tiny “wings” on the dolman very bulky/poofy.  I was sad to cut into this gorgeous liverpool for this example, because I knew it wasn’t a great match for this pattern-but for the good blog post I did it!!! I hopefully still have enough for something that does work well with it! It is also all polyester, so it doesn’t breathe well. So, for me in TX I can only handle a thick poly knit during winter months.

IMG_4724 IMG_4730 IMG_4738

Ponte Roma would also belong in this high stretch, but more stable category.   It is a poly, rayon, spandex blend and is great for the same things: tighter dresses, pencil skirts, pants, etc.

Pictures coming soon!

Cotton Jersey.  This is a thinner cotton jersey.  It doesn’t have a lot of stretch or recovery since there is no spandex in it.  It doesn’t have great drape.  This is thinner cotton jersey so it has a touch of drape just because it is thin, but anything medium weight is considered more a “t-shirt jersey” without much drape or stretch at all (think traditional t-shirts).  I like this best for boys and men.  I don’t love drape on a man usually, they’re shirts are cut straight and they are meant to hang pretty straight as well (Unless they have some amzing abs to show off 😉 ).  For myself though I don’t love cotton jersey, but I do use it for a traditional t-shirt style from time to time.  Notice is looks and feels tighter because it has very little stretch.  it also sticks out from bust and booty instead of draping towards body.  I have a sway back, which I didn’t alter for here (you can see the pooling of fabric on my lower back) and it is much more obvious in a stable knit then a soft, drapey knit.  So if you’re still learning to perfectly alter for your body shape more stable knits are less forgiving to those alterations you may need, including full bust adjustments.  I do have some tees in a jersey I love though, I like to pair it with something only semi-fitted throughout the whole body so it doesn’t feel too tight on my chest and doesn’t miss the drape on a looser area.

IMG_4420 IMG_4461

From top- the more stretch and drape the looser and more flowy it will look – to the bottom–the more stable and less stretch will be more stiff and tighter feeling garment.  Keeping this general rule in your mind when pairing fabric to patterns will help you decide what will give you the best look and fit!

This isn’t even close to all the fabric choices that are out there, but I tried to include the most popular knits I see in the shops and being asked about in the P4P group on a daily basis!  I hope it helps you when picking fabric to pair with a pattern for the perfect look and outcome!

And remember that practice makes perfect- so if you make a few garments with the wrong fabric choice, use it as a great learning experience and know you’re a better/more knowledgeable seamstress after that mistake 😉


Filed Under: Fitting, P4P University, Uncategorized 27 Comments

  • « Previous Page
  • 1
  • …
  • 60
  • 61
  • 62
  • 63
  • 64
  • …
  • 67
  • Next Page »

Featured Patterns

  • Mae Top - Bundle Mae Top - Bundle $20.00 Original price was: $20.00.$18.00Current price is: $18.00.
  • Mae Bottom - Bundle Mae Bottom - Bundle $20.00 Original price was: $20.00.$18.00Current price is: $18.00.
  • Loosey Goosey - Bundle Loosey Goosey - Bundle $20.00
  • Bacall Bodysuit Bacall Bodysuit $12.00
  • Privacy Policy
  • Refund Policy
  • Affliliate Program
  • Contact Us
  • About

Copyright © 2025 Patterns for Pirates

Copyright © 2025 · Genesis Framework · WordPress · Log in