Patterns for Pirates

P4P stylish, modern, wearable patterns

  • Home
  • Blog
    • Frequently Asked Questions
    • Pattern Releases
      • Free Patterns
    • P4P University
      • Fitting
      • Sewing with Stretch, Knit Fabrics
      • Sewing with Woven Fabrics
      • Sewing Machines
    • Sew-A-Longs
    • Fabric for Pirates
    • Pattern Hacks
    • Announcement
      • Blog Tours
      • Contest/Giveaway
  • Shop
  • Bundle Discounts
  • Gift Cards
  • My Account
  • Cart

How to Measure Yourself

February 8, 2016


how to measure yourself by patterns for pirates

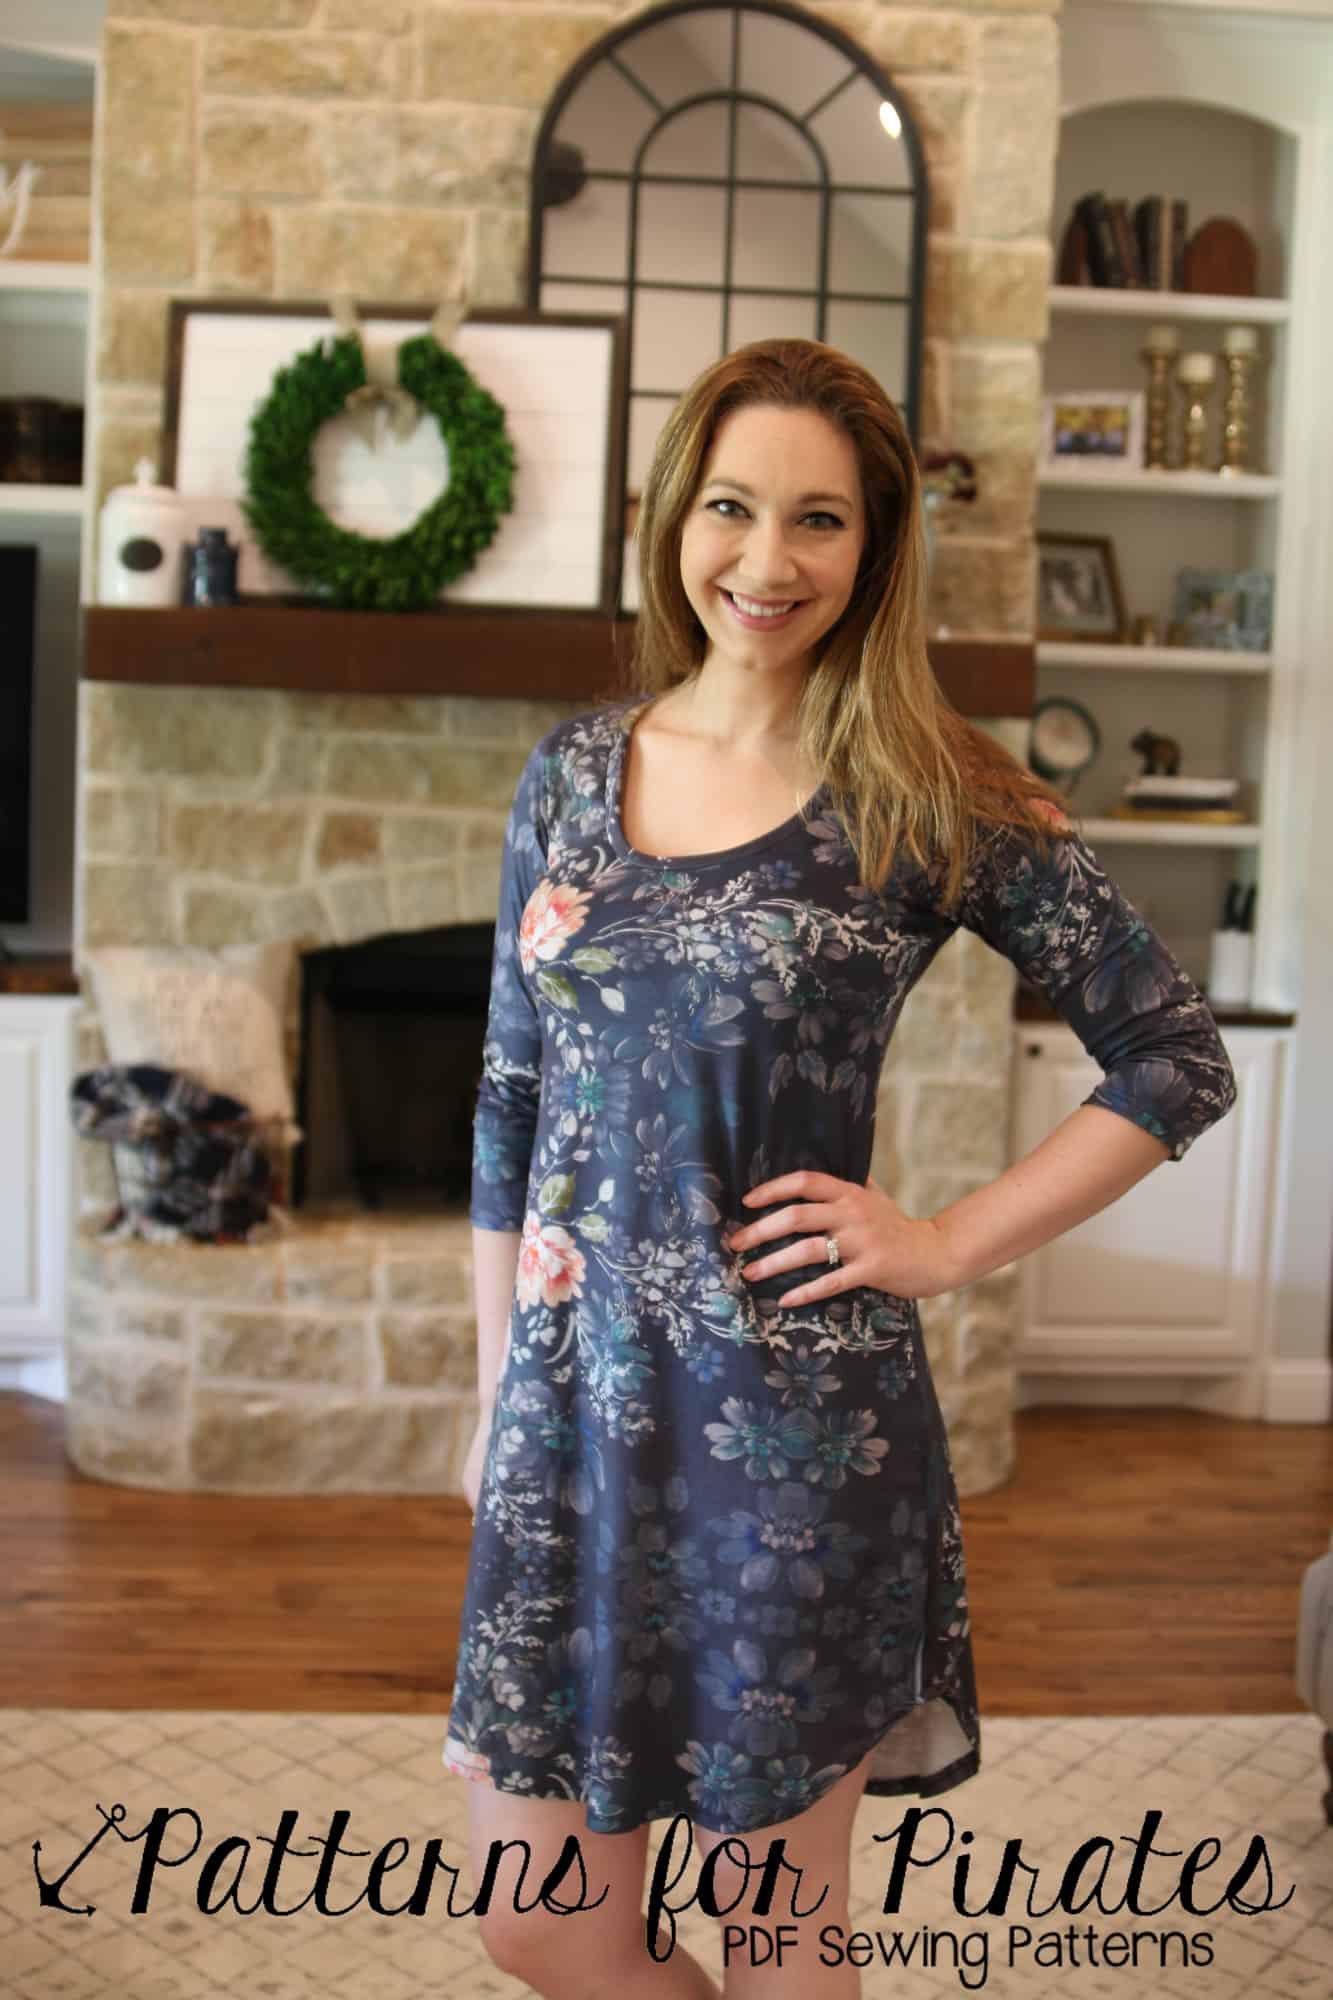
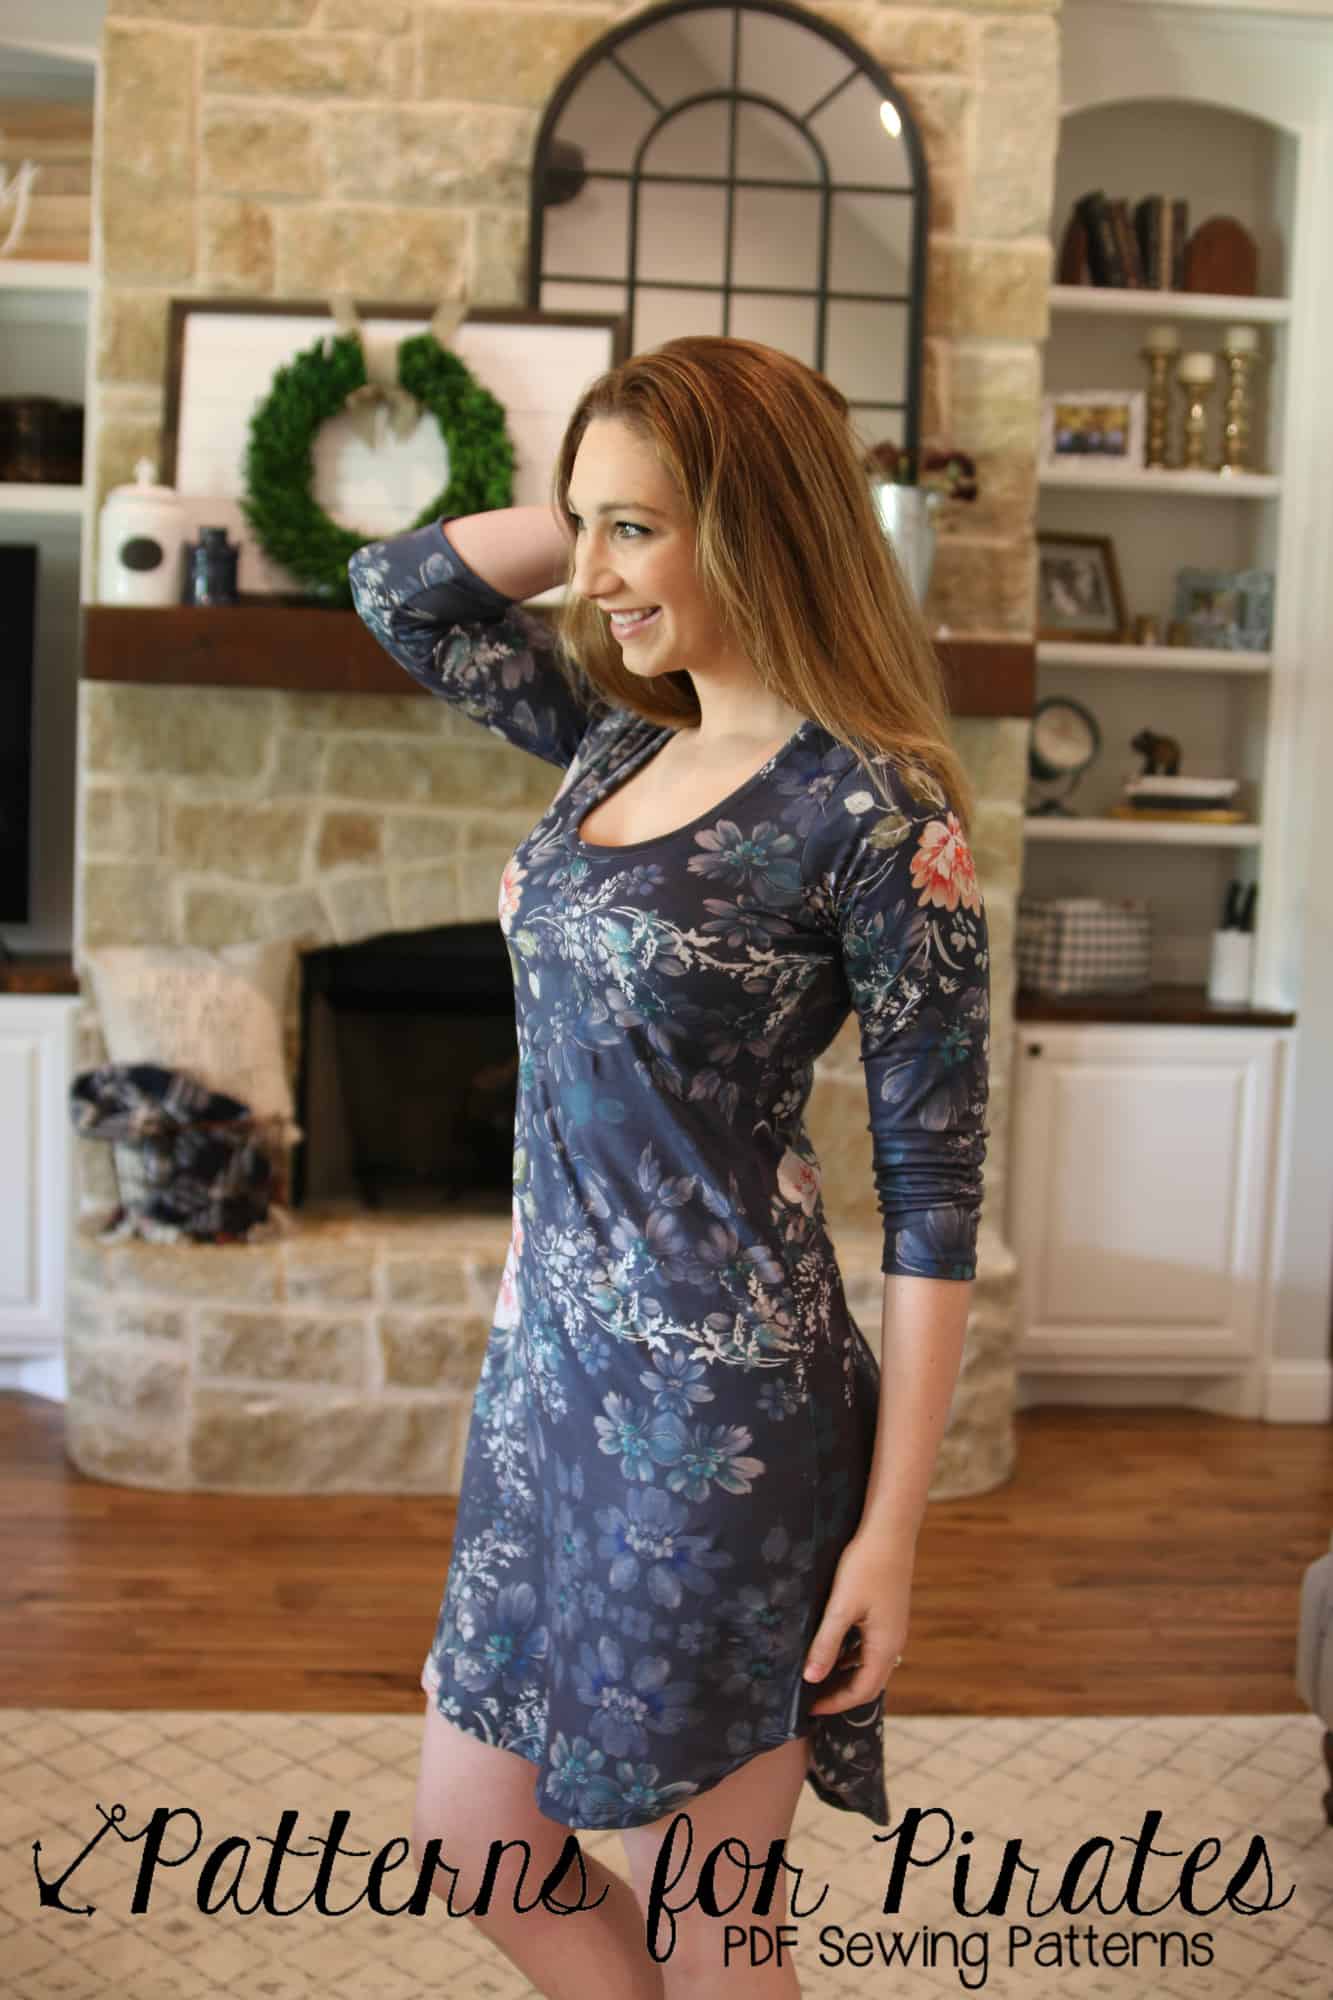
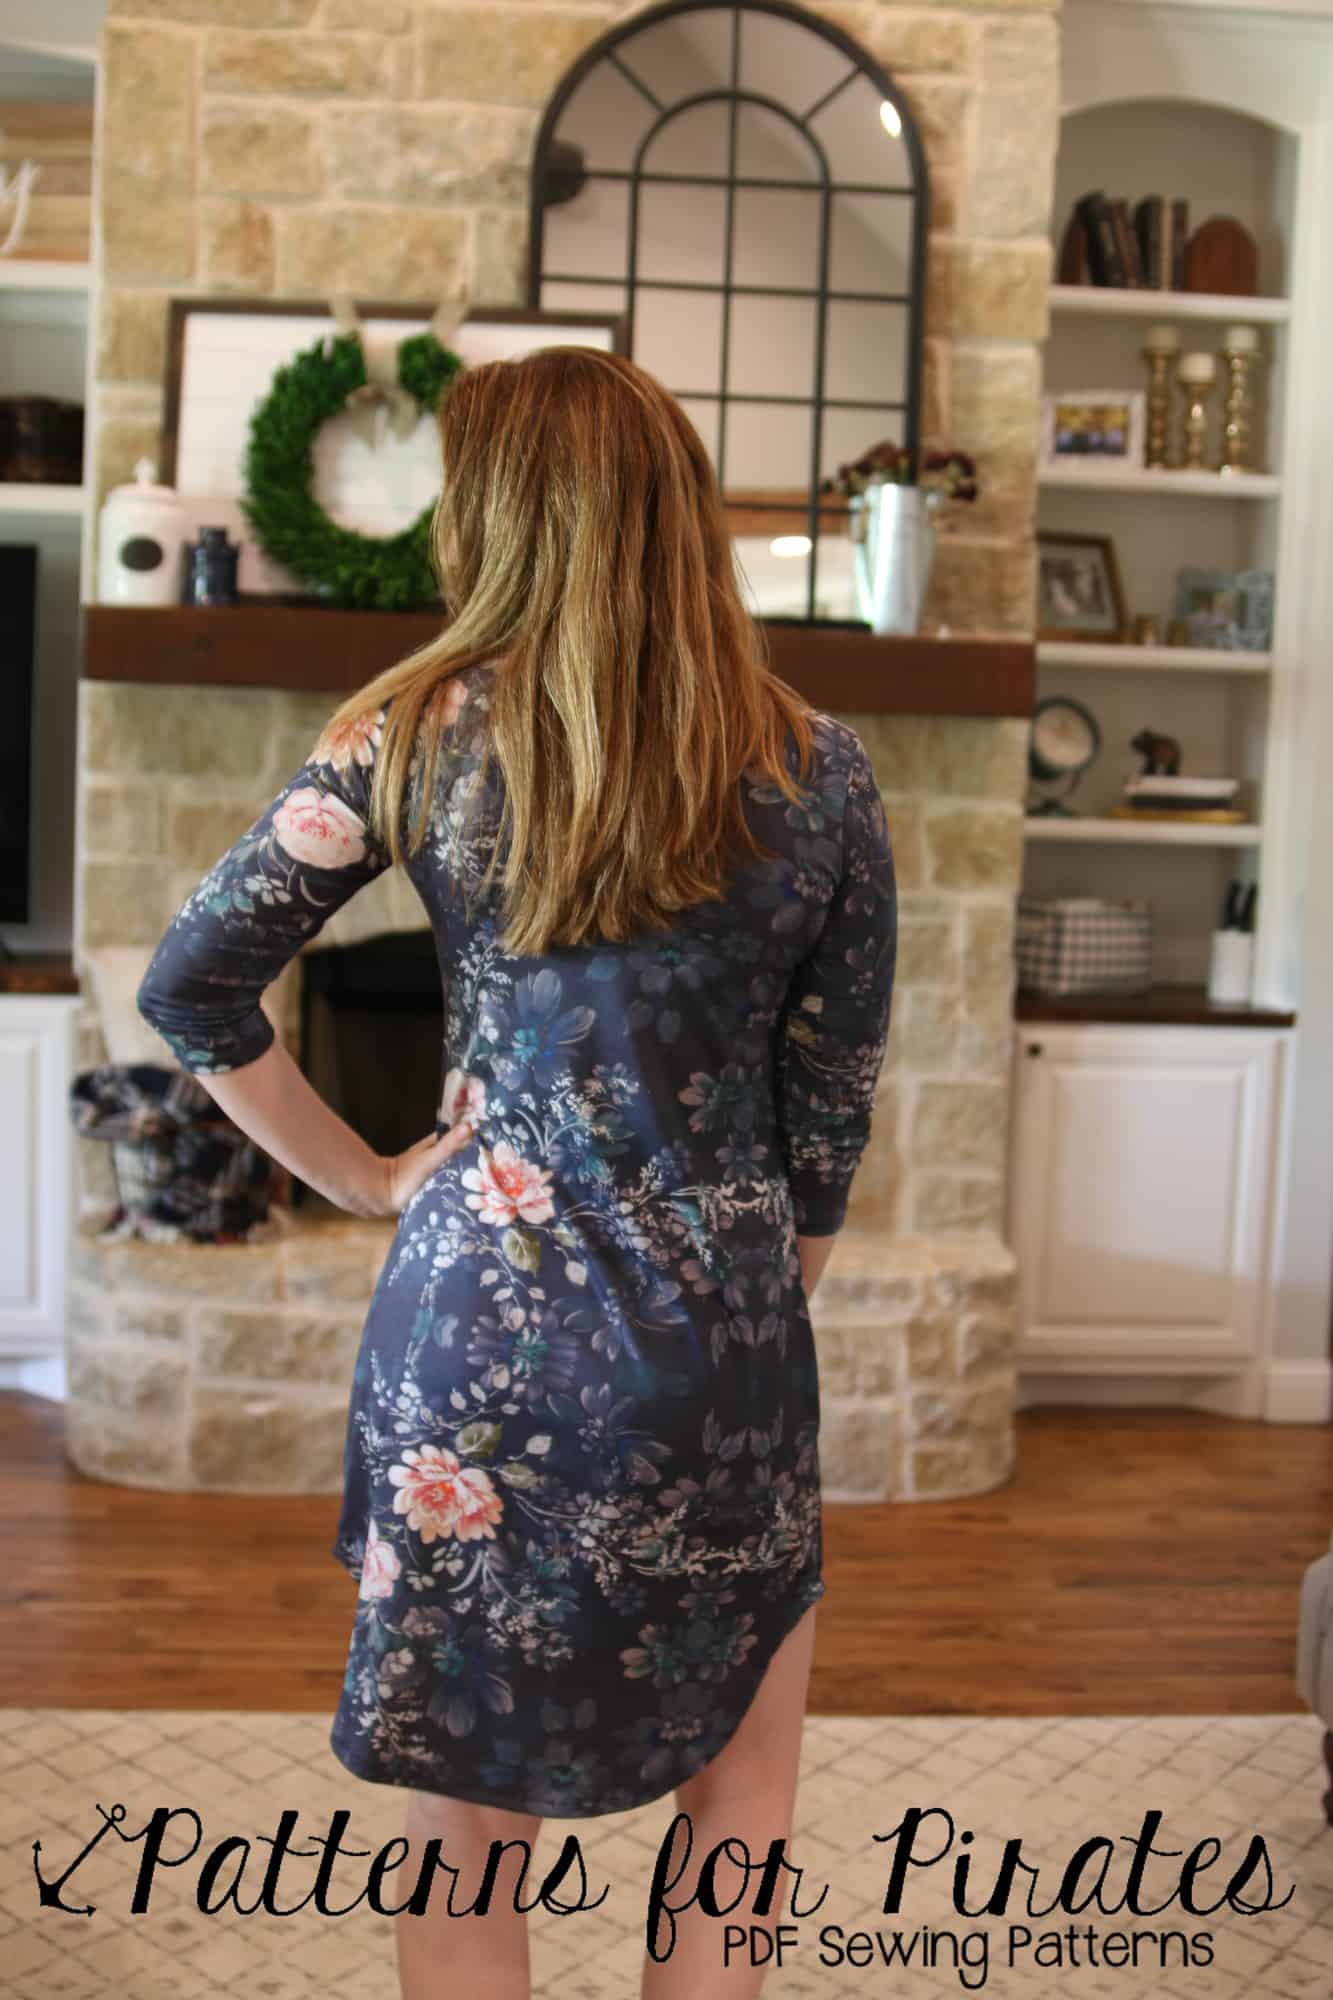
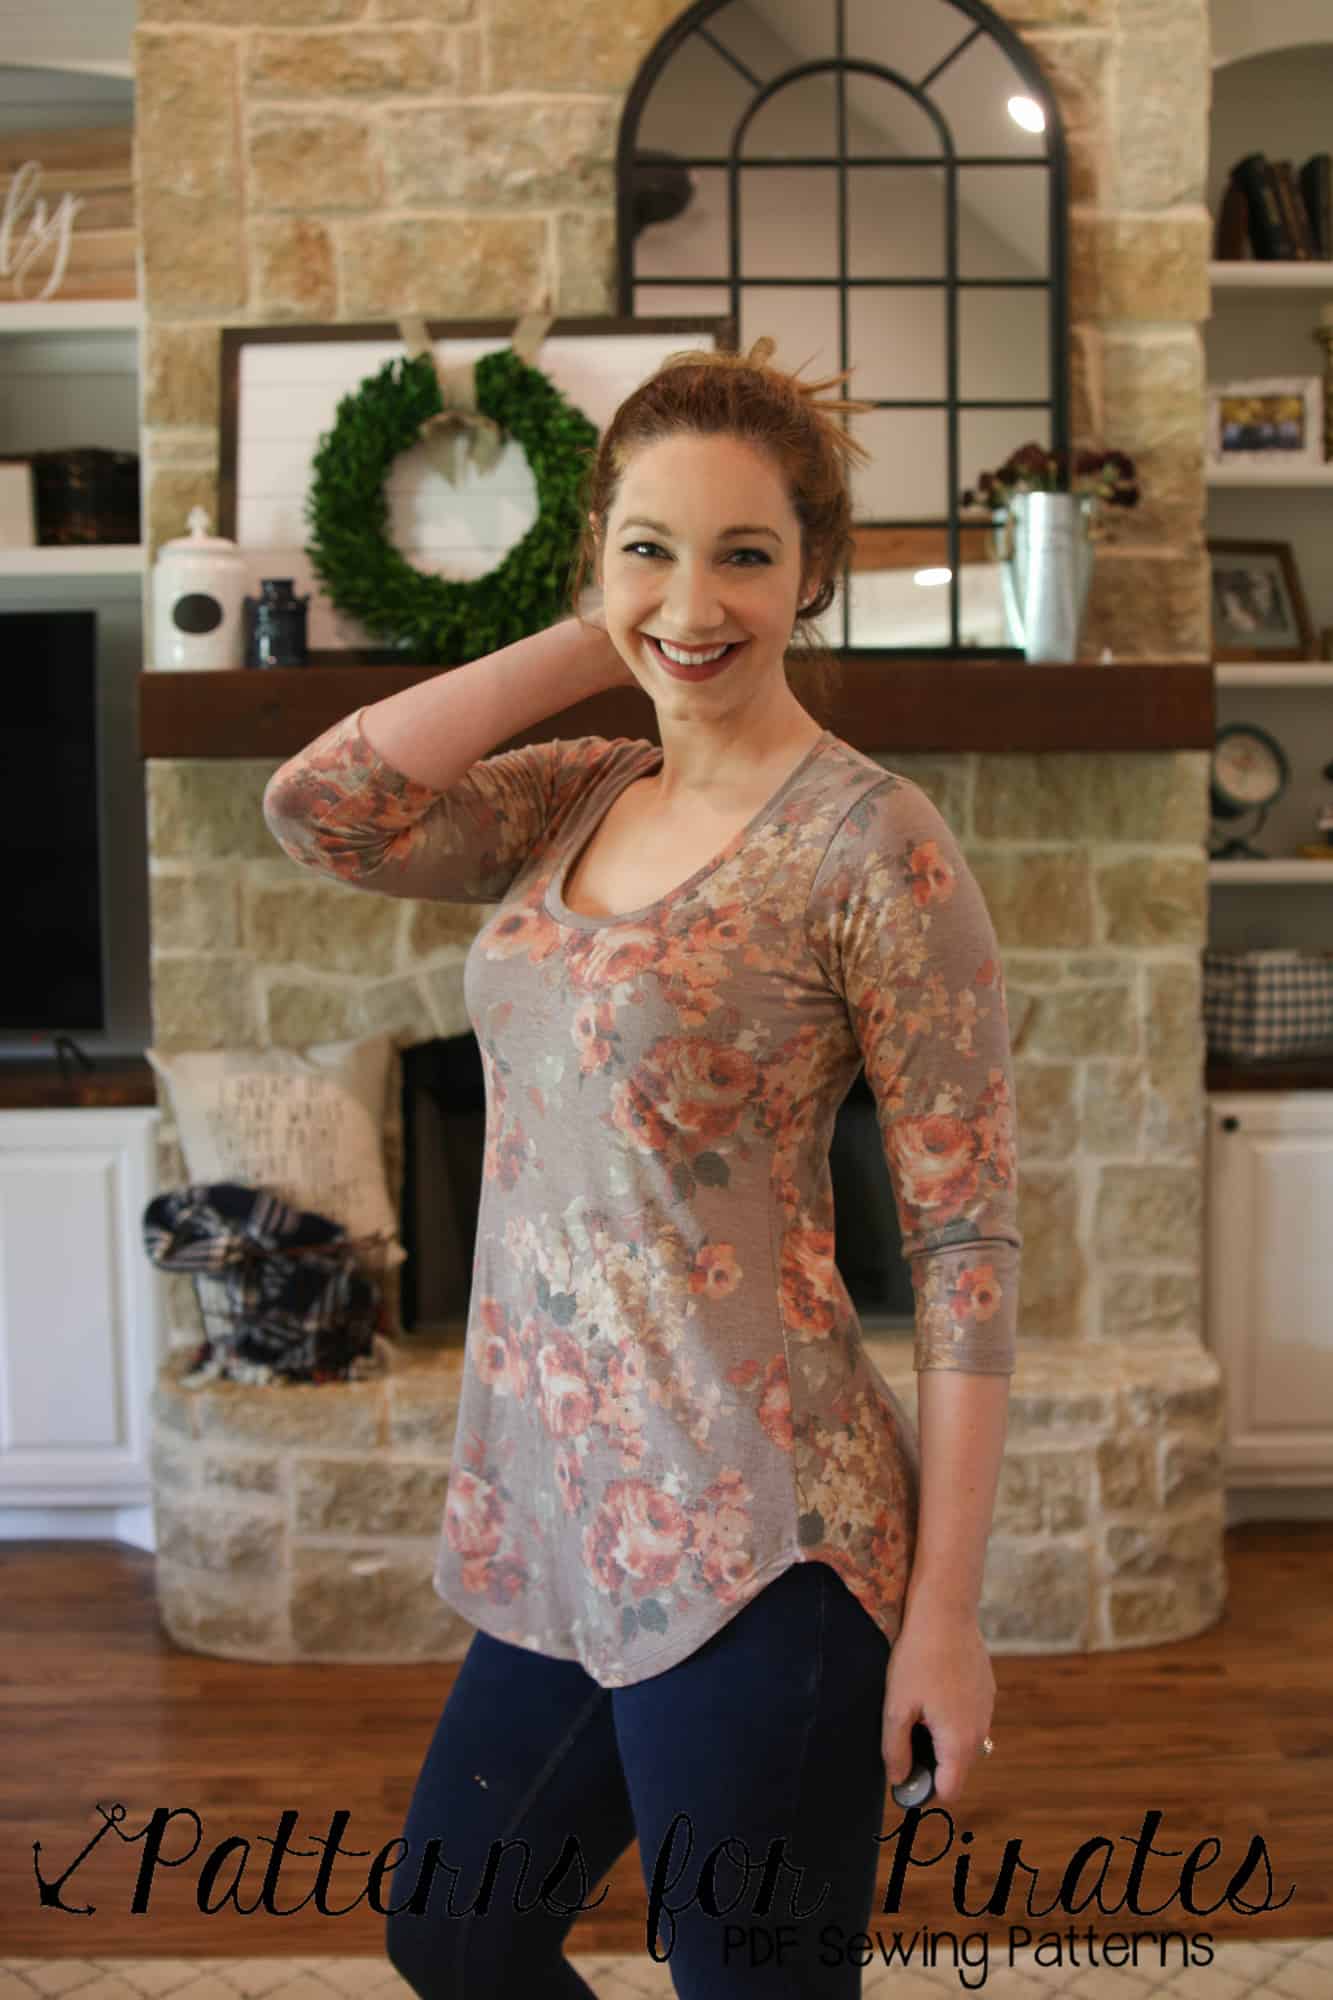
One of the most important things in sewing for yourself is to get accurate measurements! It is also much harder than it sounds.  I had my sister take a few quick pictures of me measuring so I could explain and give a few tips.

I took my pictures in a tight tank.  I recommend taking your measurements in a thin/tight shirt or even just in the bra you are going to normally wear. (This is especially important if you are going to be making a more formal garment and plan on wearing a different bra for it- think strapless, push up, etc).

I HIGHLY recommend measuring in front of a mirror! This helps you really see where you are measuring and if you are holding it evenly around your body.  It can mean a big difference!

On all measurements breath normally! Most people want to take a big breathe in and then take them— no need! Patterns are drafted with ease to breathe and move normally 🙂 So breathe in and out, then measure. You want to hold the tape snug to your body, but not squeezing.


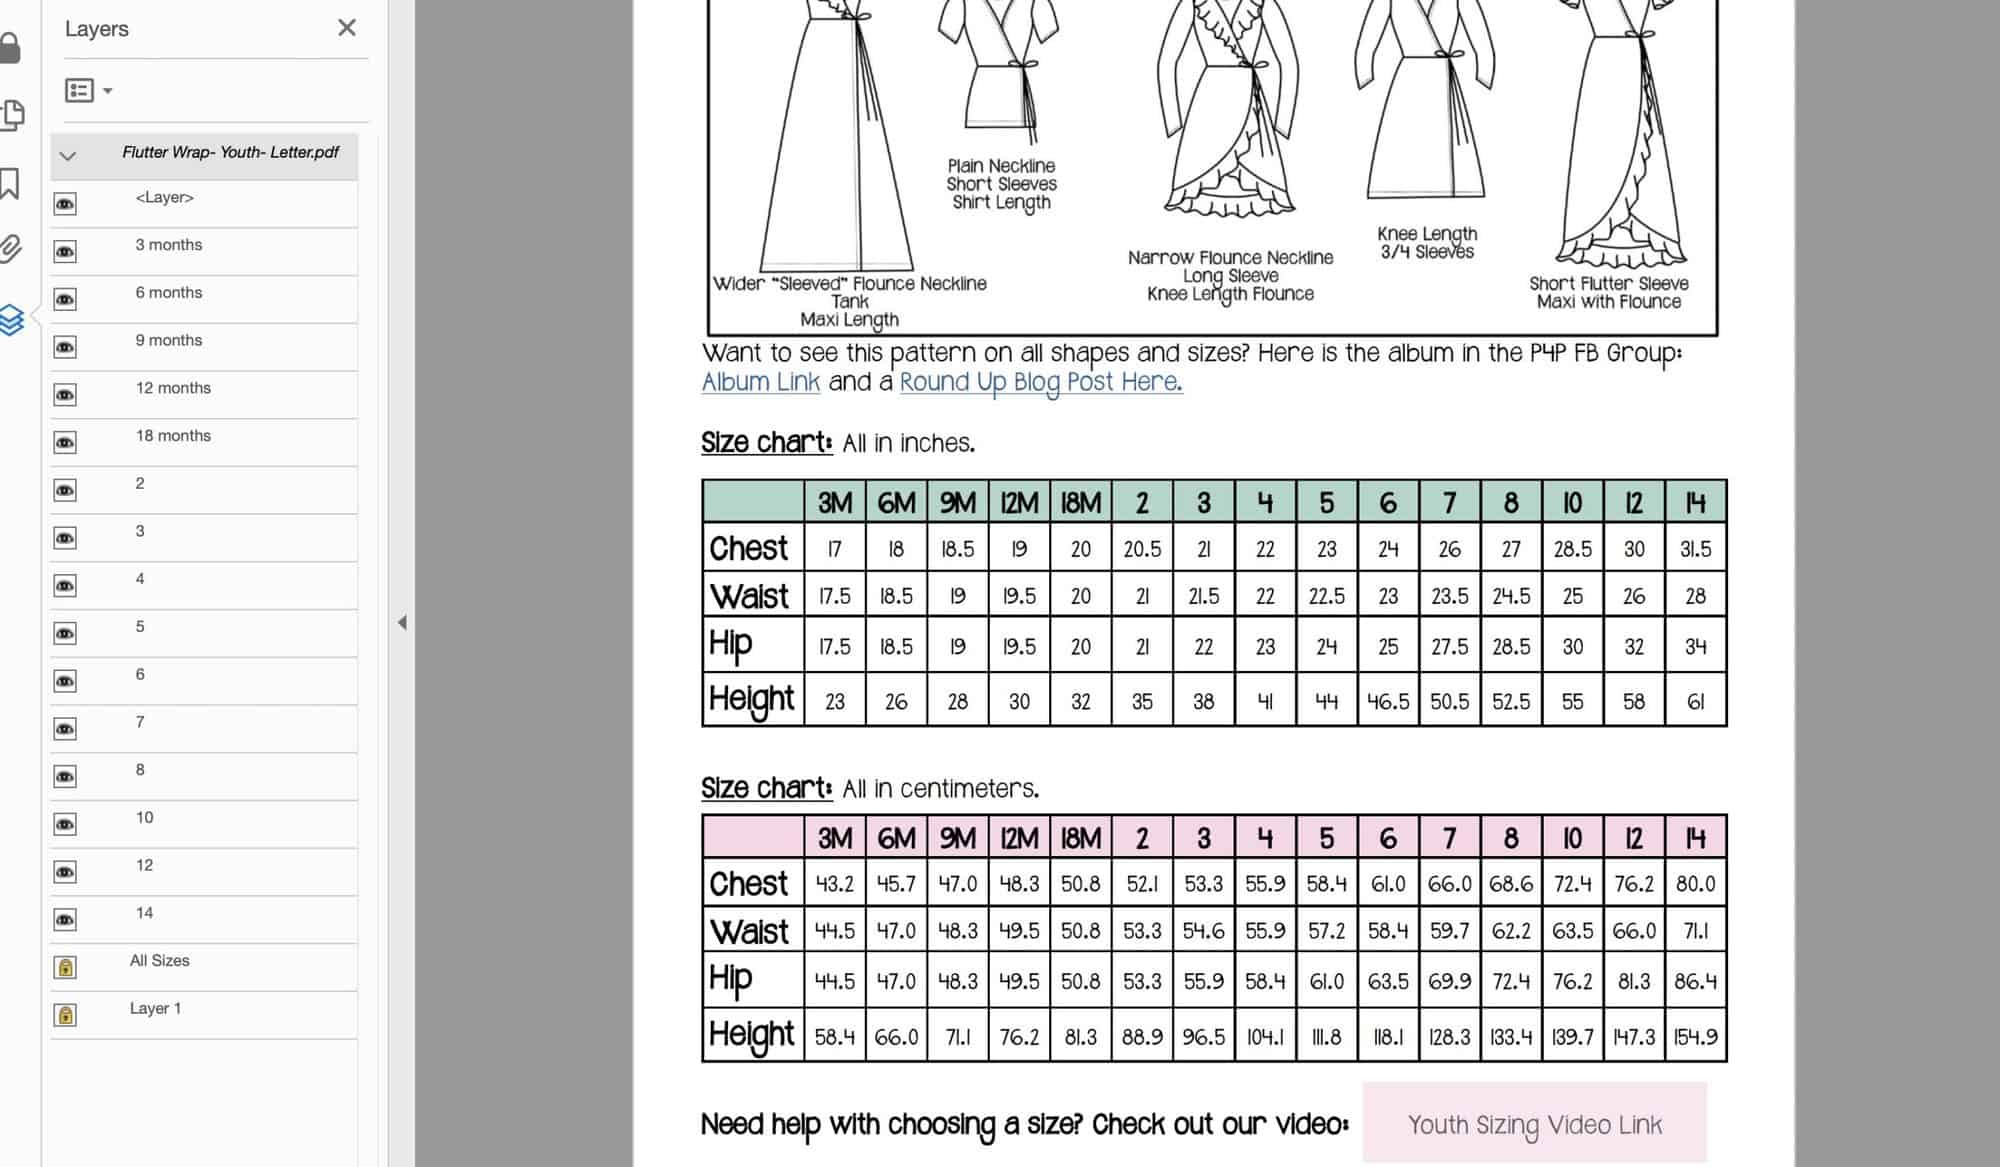
Here are some common measurements needed for a pattern:

Bust— Full bust is around the fullest/biggest part of your bust.  You want the tape as even horizontally as possible.

IMG_7952

Over Bust– This is taken around upper back, under arms and over your bust.

IMG_7954 IMG_7956

Under Bust– This is taken directly under your bust around back. Try to keep your tape as even horizontally as possible.

IMG_7957

High Hip– This is taken around  your hip bones (this is where I like to wear my pants 😉 and most youth patterns are drafted to hit)

IMG_7964

Hip– This is a deceiving name.  It is measured around your fullest/biggest part, which is usually your booty. Most definitely my booty is my biggest part 😉  Try to keep your tape as even horizontally as possible (a mirror really helps on this one!)

IMG_7966 IMG_7967

Waist– This is your natural waistline.  Contrary to most belief, it is NOT your belly button or where you wear your pants (even though you might like high waisted pants).  It is taken at the smallest part of your mid section.  if you don’t have a very defined natural waist there is a very easy way to find it.

Take any kind of stretch trim, fold over elastic, thin elastic, even a strip of knit will work, and tie it snuggly around your mid section.  Now MOVE around, bend walk around, sit down, it will naturally settle on  your smallest part.

This is your natural waist 🙂

IMG_7969  IMG_8011

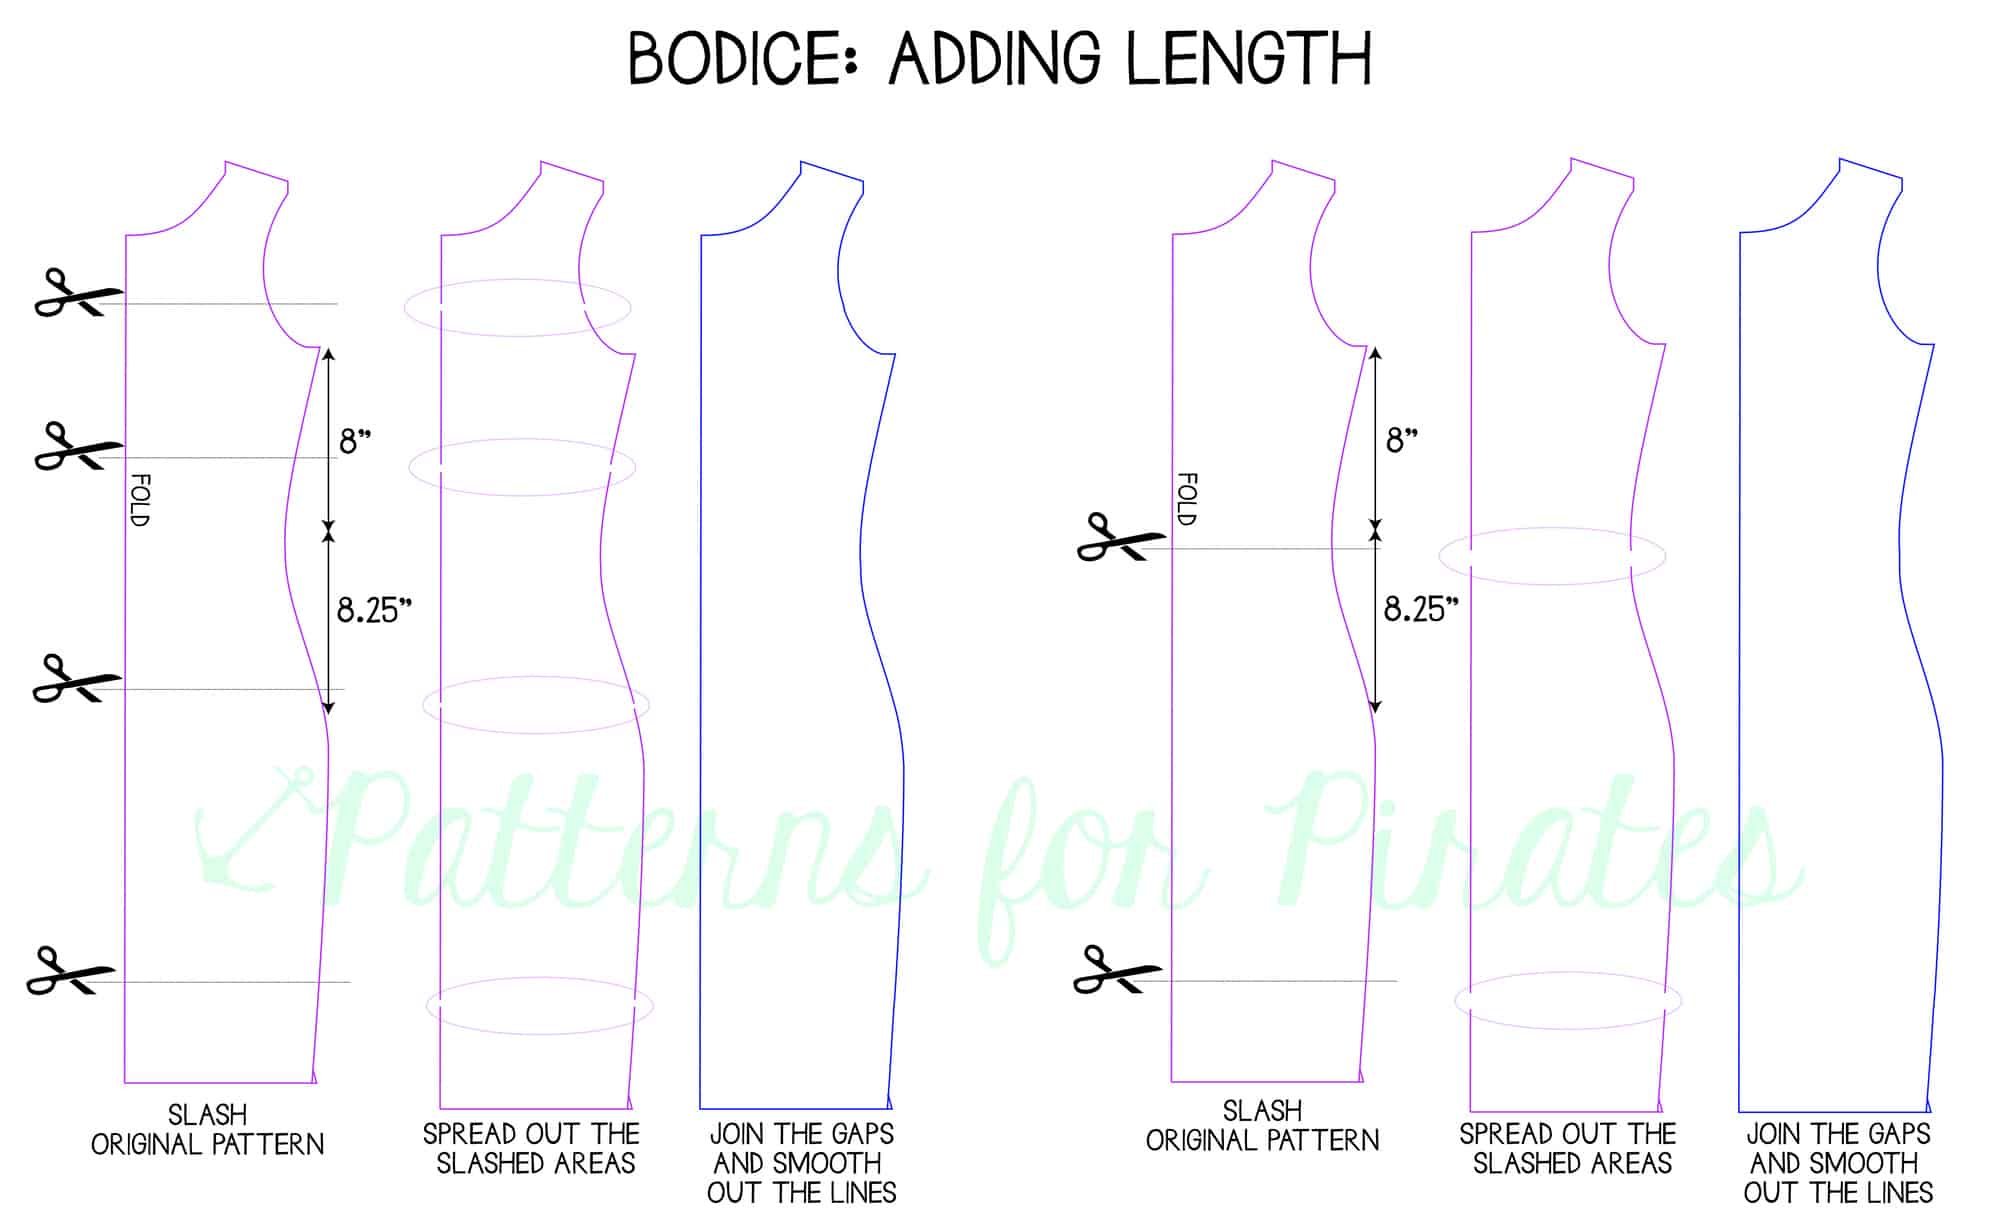
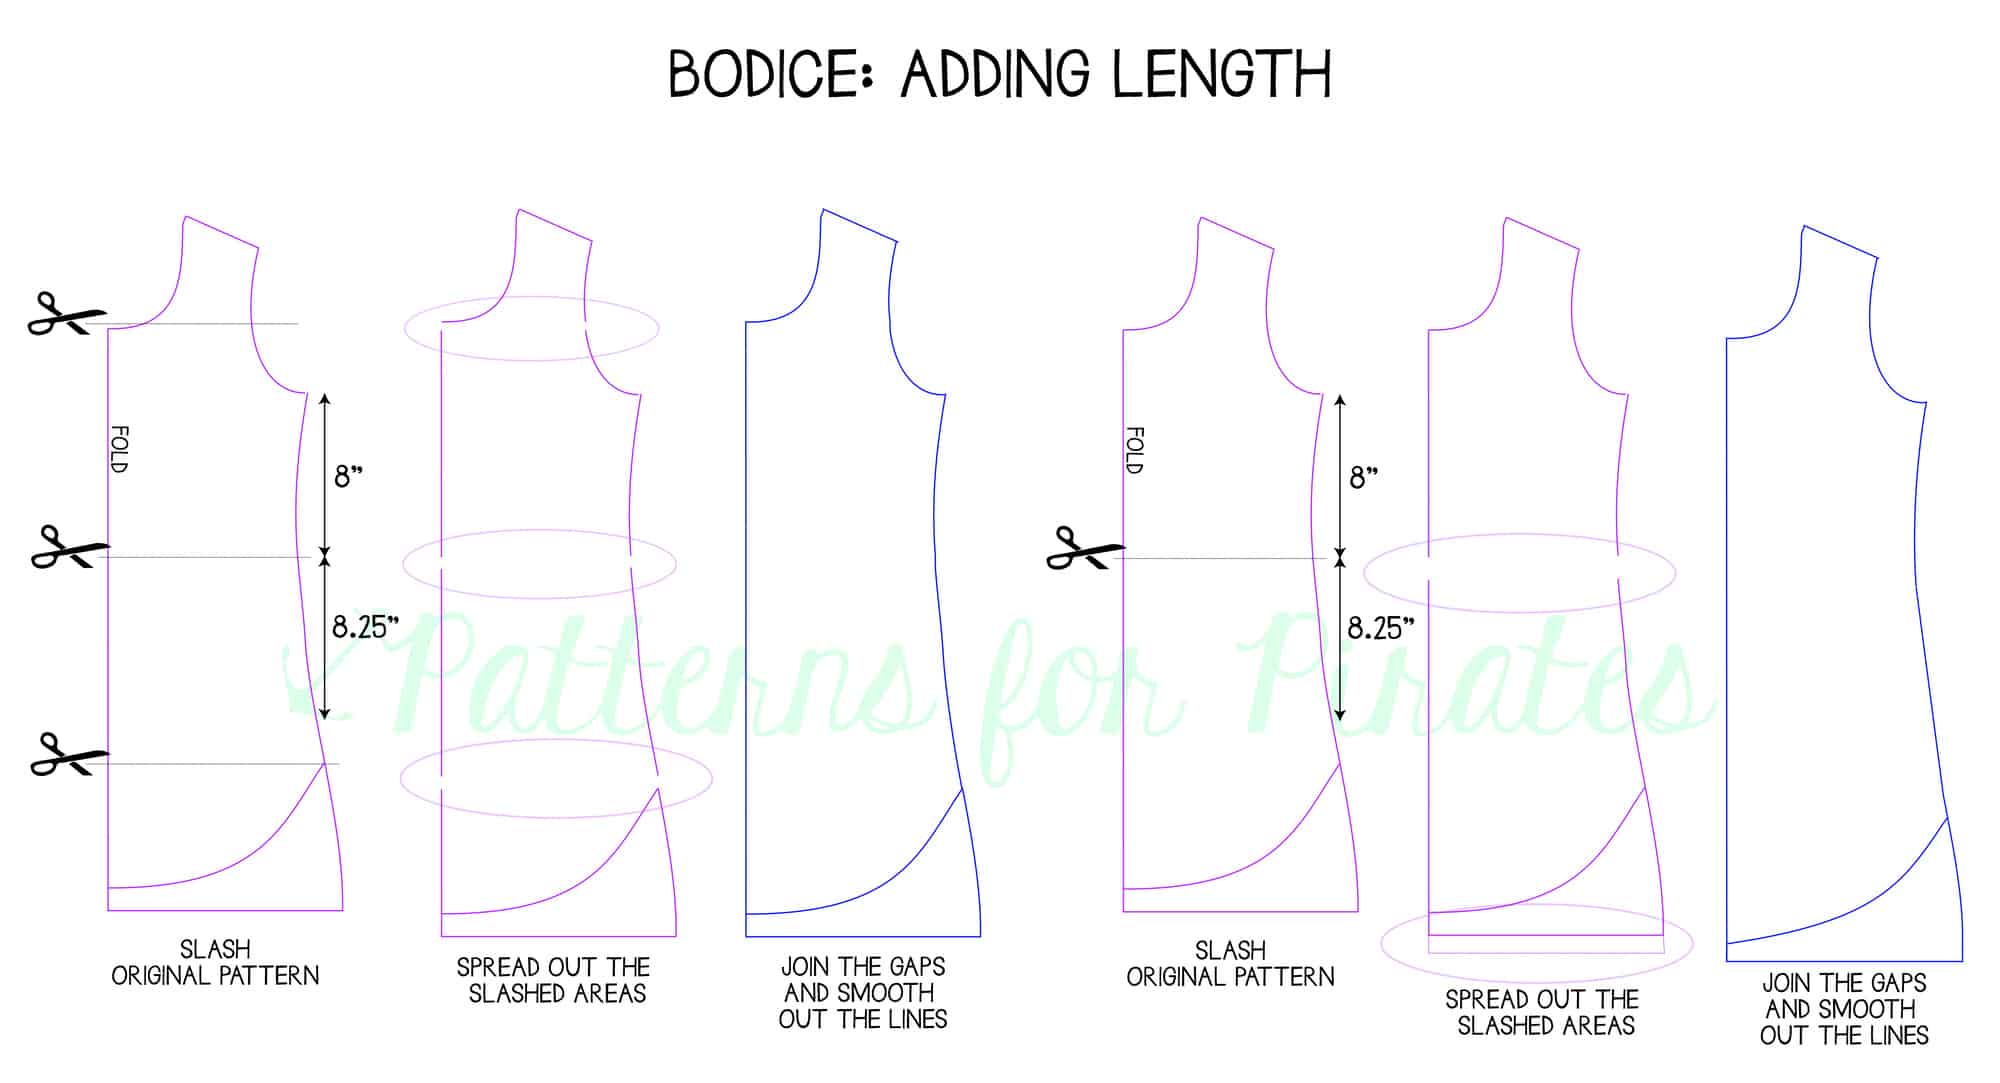
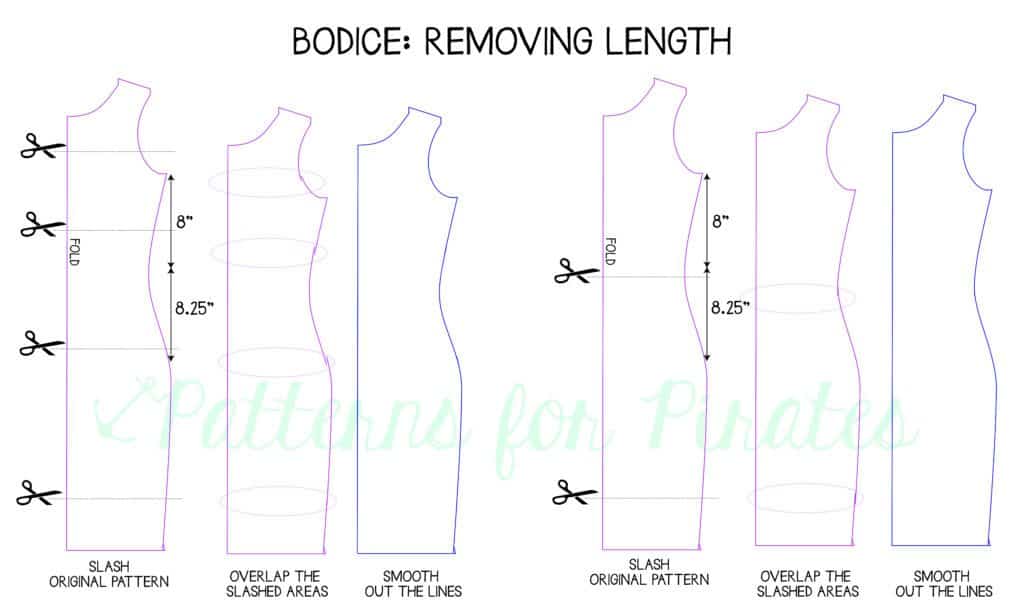
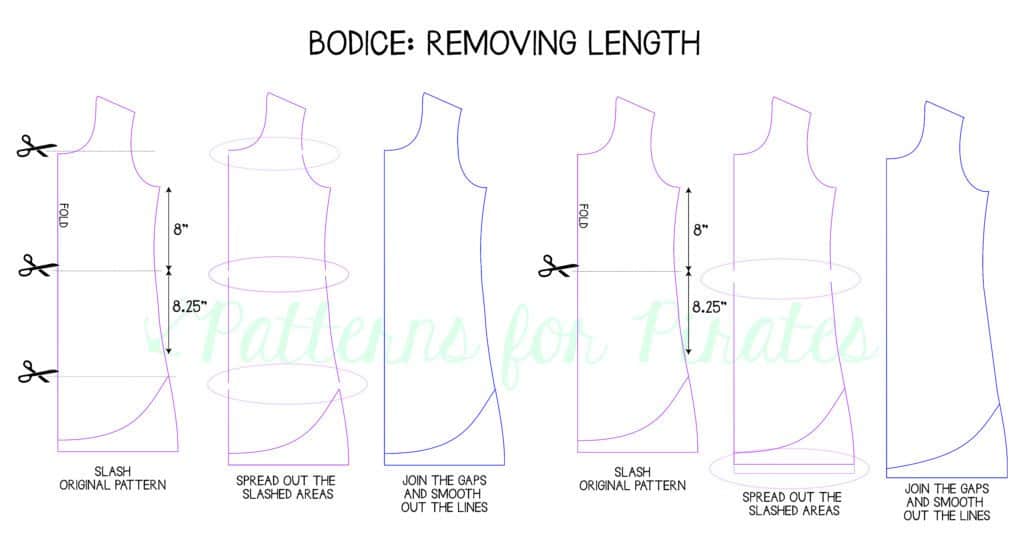
Side Waist Length– Taken from your armpit vertically down to your natural waist.  This measurement is vital in any pattern that should hit as your natural waist like the Sweetheart Dress or Boundless Knit Dress.  Making sure this measurement is accurate will give you the most flattering fit.  If the seam doesn’t hit you at that smallest point then you’re not using it to your advantage 😉

You can see here mine is about 8.75″.  For reference the avg is 8″.  I’m 5’10” :).

IMG_8008

*Updated* I had a few more questions about the side waist length.  So I’ve added a couple more pictures— THIS is how much I LOVE my group, I’m willing to put up pictures in my sports bra 4 months after I had a baby!!!! They are cropped very well 😉

Start with your arms DOWN. You want your tape to start where your crease naturally lies— not all the up to your arm.  Think where you’d like your shirt to be (if it’s all the way up as tight as possible then it is uncomfortable and you can’t move your arms around).

This was such a hard picture to get! But here are the best we could get to explain… yes, I taped the tape to myself lol!!!

IMG_8167IMG_8157 IMG_8159

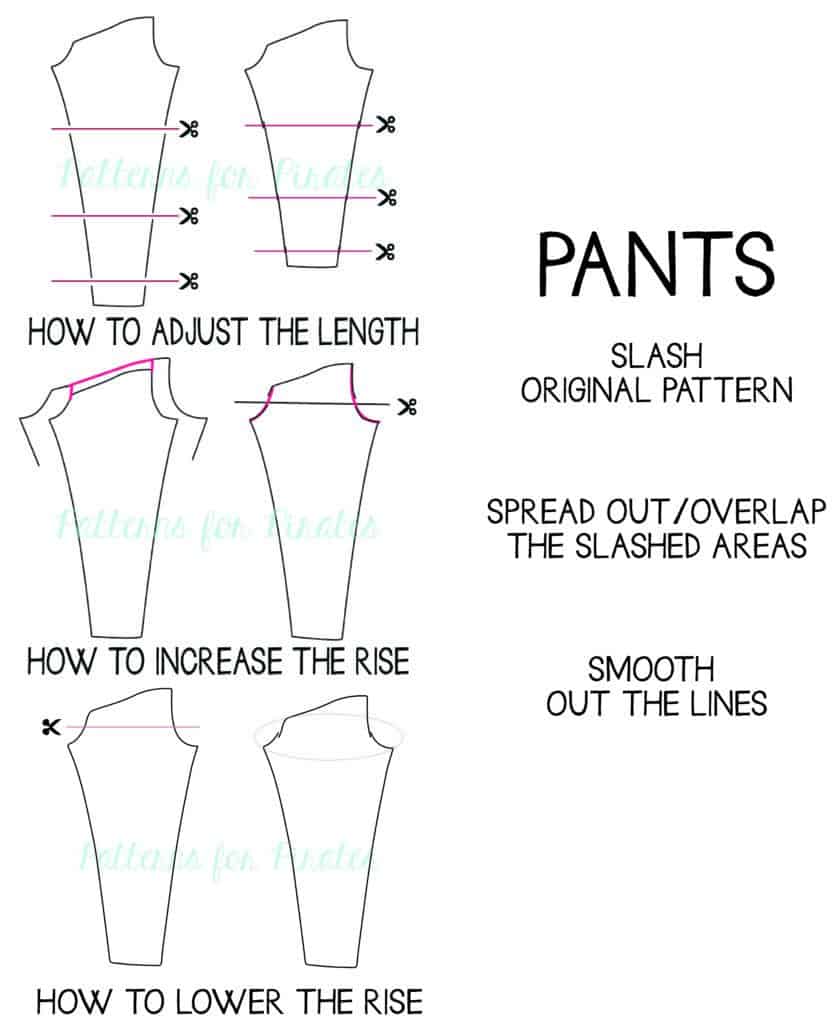
Thigh- Taken around thigh close to crotch, keeping the measuring tape flat horizontally around.

13091958_10100478273624567_4302024944200204478_n

Total Crotch Length- Taken from back center natural waist, under booty, through legs, and up to center front natural waist.  You will want the tape pulled taut.  The easiest way I think is to tape the center back and then pull through front and read at the front.  These are measured with tight, high waisted yoga pants here:

13082514_10100478273534747_8944216357528044133_n13015562_10100478273554707_4080644557401189276_n

Inseam- Taken from crotch to where you’d like hem of pants. Notice the close up of my ankle here.  The difference between ankle height (for skinny leg options like Peg Legs and SOS pants) and a floor length is 3″ on me! That’s a big difference!

IMG_8175 IMG_8179

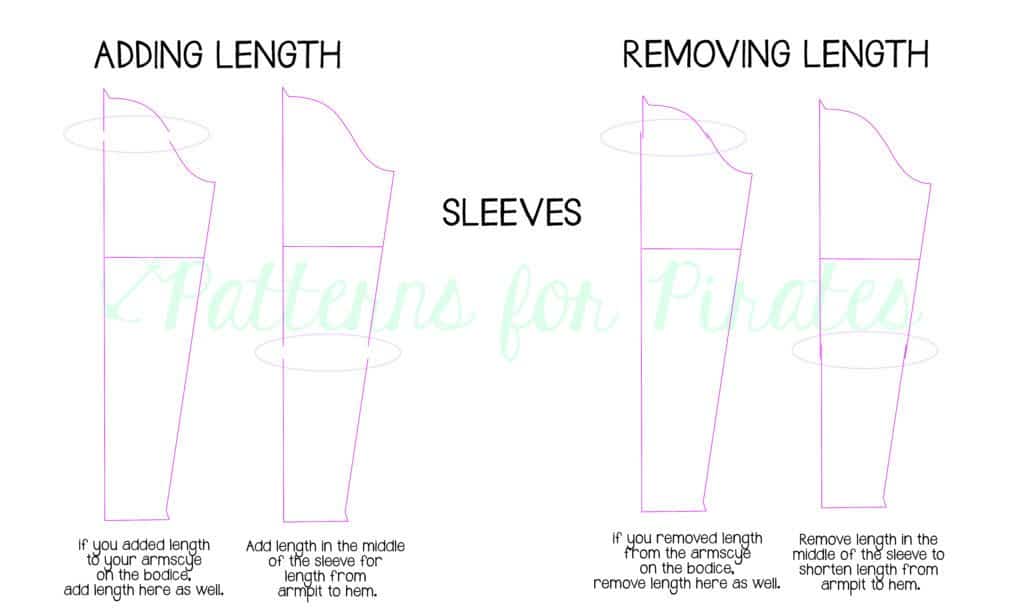
Arm length-from armpit to hem of shirt.  Most P4P patterns are meant to hit at the base of thumb, so past the wrist.  It’s just a personal preference of mine– so if you prefer the traditional wrist length here is where you’d want to measure against the finished measurement in the pattern.


IMG_8213

Finished lengths- I will use “inside shoulder to hem” on some shirts and “armpit to hem” on others depending on which is easiest to measure on that particular pattern. Here are both:

IMG_8196

IMG_8205

Take your time measuring yourself to ensure great fit! It will make a big difference in how happy you are with the outcome!

Filed Under: Fitting, P4P University 107 Comments

P4P Shirt fits Explained

December 13, 2015

I get asked a lot how the different P4P shirt pattterns compare fit wise.

So to help those visual people (most of us sewing/creative types are!), I created a little line drawing with the hourglass figure in each shirt.

Remember, P4P is designed for an hourglass figure; so if you have a different body type you will have a different fit unless you follow your measurements and grade between the sizes you are.

Also, “hips” are the widest part of you- usually your booty.  So while looking at the line drawings, remember that the widest part is really the booty!

Here is the quick line drawing:


And for more quick overview here I am in every P4P shirt.  I was a solid medium at the time of all pictures unless noted.

Layer Me Up: Tight fit through arms and body meant to be layered under other garments. (Size Medium)

Favorite Fabrics: Knits with lots of stretch (70% more are my favorite) cotton spandex, rayon spandex, and liverpool knit.

IMG_6198 IMG_6266 IMG_6316 IMG_6367 IMG_6393 IMG_6442

Cross my Heart Cami: Fitted through bust and a closefit through waist and hips. This is a medium here.

Favorite Fabrics: Cotton spandex, rayon spandex, jerseys, poly blends, ity, brushed poly and ribbed knit all work well.


The Basic Tee: Fitted through bust and a semi-fit through waist and close at hips. This is a small/medium here.

Favorite Fabrics: Jerseys, tri-blends, double brushed poly, rayon spandex, cotton spandex, poly blends, ity, ribbed knit, sweater knits all work well.

Essential Tank: Fitted through bust and a close semi-fit through waist and hips. This is a medium here.

Favorite Fabrics: Jerseys, rayon spandex, cotton spandex, poly blends, ity and ribbed knit all work well.

13350380_10102709342906983_688272442041579391_o 13418399_10102709342323153_7161703305455901606_o 13411710_10102709342253293_9173902032219237424_o 13418529_10102709341839123_247796028914714387_o 13392179_10102709340891023_5609753226814510102_o 13416881_10102709339658493_6711765543316495162_o

Women’s Henley: Fitted through bust and semi-fitted through waist and hips. (I don’t have many of these since it was drafted and released when I was pregnant 🙂 I made a medium here, but my bust and waist were bigger right after baby girl arrived!)

Favorite Fabrics: thermals, medium weight sweater knits, cotton jerseys, and rayon spandex.

SAMSUNG CAMERA PICTURES


Boyfriend V Neck: Semi-fitted through bust, waist and hips. (Size Medium)

Favorite Fabrics: I like to use a cotton jersey, interlock, medium weight sweater knit for a more fitted look.  For a looser/slub feel I go for rayon spandex.

10511668_10100213568490777_3346501466436650626_o IMG_8828 IMG_8834IMG_8812IMG_8890

Slim Fit Raglan: Fitted at bust and arms, semi-fitted at waist and hips.

Favorite Fabrics: Medium weight sweater knit, rayon spandex blends, cotton spandex, stretch french terry, slub jersey.

IMG_0393 IMG_0287 IMG_0278 IMG_0238 IMG_0231 IMG_0216  IMG_0183 IMG_0175 IMG_0173 IMG_0149 IMG_0135


Women’s Raglan: Loose fit through bust and waist, semi-fitted at hips- straight cut. Loose on arms. (Size Medium)

Favorite Fabrics: More stable knits like french terry, sweatshirt, fleece, interlock, and ponte roma.

1 (14)1 (4)1 (13)1 (28)1 (34)IMG_88011 (2)(PS- I have a light pink undershirt under the lace one! I didn’t realize that was a mistake until after the pictures! lol)

Favorite Tee: this is fitted at bust and semi-fitted through waist and hip. The side vent hem can give you even more relaxed fit through hip.

Favorite Fabics: You have a pretty wide range of knits you can use on this shirt.  I prefer a flowly, drapey knit for the curved hem option like rayon spandex, modal, poly jerseys, ITY.  For the banded hem option I love something with a little more structure like a rayon french terry and poly jerseys. The side vent hem can use either of these and look great.  For the dress length I prefer something more structured again like double brushed poly, cotton spandex, rayon french terry.

Sweet Tee: this is a slimmed dolman with very small “bat wings” under the arms.  It is fitted at bust and semi-fitted through waist and hips.

Favorite Fabics: light to medium weight knits, although it has very small “bat wings” I still strongly prefer a soft drape for any dolman so that your “wings” aren’t puffy 😉  I used tissue jersey, slub jersey, light and medium weight sweater knits, and rayon spandex for my favorites.

IMG_3884 IMG_3896 IMG_3911 IMG_4015 IMG_4036 IMG_4091 IMG_4137 IMG_4162 IMG_4180 IMG_4185 IMG_9451 IMG_9485 IMG_9507


Tulip Tee: this is a boxy, relaxed fit dolman.  Semi-fitted at bust and hip, but a straighter cut through waist.  Although it’s not straight, it is still very loose through waist. The plain option will feel and fit tighter at the waist and hip than the tulip option, which will naturally swing open for a looser feel.

Favorite Fabics: light to medium weight knits. I prefer a soft drape for any dolman so that your “wings” aren’t puffy 😉  I used mostly rayon/modal/ blends for mine personally.  I love it in a soft sweater knit for fall/winter as well.  You could use a slub knit, poly blend, triblend, ITY all as well.


Pumpkin Spice Dolman: oversized/loose fit through upper arms, bust and waist.  Semi-fitted on hips. Tight fit on lower arms. (Medium in the navy/grey and Large in the others- I hit those measurements at the time of sewing/pictures :))

Favorite Fabrics: I like fabric with good drape for this one.  Rayon spandex blends, sweater knits (both medium and lighter work), thinner slub jerseys, french terry with rayon in the blend, and ity.


IMG_3440 IMG_3467 IMG_3493IMG_0447IMG_0418IMG_0417IMG_0407


Free Spirit Tank: Fitted at bust, drastic a-line out to give loose fit through waist and hips. (Size Medium)

Favorite Fabrics: I like fabric with good stretch and drape for this one.  Rayon spandex blends, sweater knits and thinner slub jersey.

20151123_15042420115_10100313906851897_8805792748950944668_n 11051762_10100313891198267_4156963260416149925_o 11169614_10100313891921817_5868655417849932999_o 11187817_10100313901737147_4232944970819534637_o 11212671_10100313892365927_3793099993655718393_o 11218719_10100313910180227_7456640702411835535_n 


Sporty Piko: A very loose, straight cut from the short sleeve juncture.  It is loose throughout the body with relaxed sleeves as well.

Favorite Fabrics: It really depends on the look you’re wanting for this one! I love a french terry for the hoodie options, but for an everyday tee it must have a very soft drape.  You can use various fabrics depending on how boxy you want the shirt to appear- the more stable the fabric the boxier it will look worn.

Brunch Blouse: Fitted at bust, curves in only a touch at waist, loose on hips.

Favorite Fabrics: Rayon challis, crepe, anything with a softer drape.


Everyday Elegance: Loose fit through bust and waist- straight cut to hips. (Size Medium)

Favorite Fabrics: I like fabrics with lots of drape for this one like peach skin, chiffon, rayon challis.

10679813_10100211573383987_4958949390945241951_o 1961948_10100211572959837_2864287625354337808_o 2 (6) 2 (2) 1 (10) 1 (2)

Filed Under: Announcement, Fitting, P4P University 19 Comments

Tips and Tricks of Up-cycling

December 2, 2015

I love to up-cycle! With a little boy I can find boyish knits, stripes and even character prints so much easier and more affordable buying a men’s T-shirt then the $30/yd euro knit… Which I’m constantly drooling over!  I also love the heathered T-shirt knit, which is harder to find in a fabric store and very easily found in RTW (Ready to wear). I love to use my husband and my old shirts as well… It’s even more special handmade with an already sentimental shirt! So here are some tips and tricks I’ve learned… 1- Buy bigger… Why not? If an XS and XXXL are the same price get more fabric 🙂 2- If it has a picture on it make sure it will fit on your smaller size you are creating.  This one can be difficult if you’re buying large men’s shirts BC they are proportionally much bigger pictures/words/designs on the chest. Here is one I BARELY SQUEEZED on his little chest, but then when it is on some wraps around to the sides, so really I should’ve waited until he was a few sizes bigger!

IMG_6361 IMG_6374

3- Use the hem! I don’t have a cover stitch machine… Yet 🙂 and although I love my double needle using the existing hem saves time and looks nice and professional already!  All  you have to do is account for the hem- Most my patterns are 1″ so here I am cutting with my pattern piece 1″ below my fabric to make up for the fact that I will not be turning up and hemming.

IMG_7303

4- Cut you RTW items down the seams, this give you nice flat pieces to last your pattern pieces out on. If there isn’t a side seam, then I don’t cut… but anywhere there are seams I go ahead and cut because you will not be able to use the area.  I also cut the sleeves, again along the seam and use them if I can!  Here is a shirt and shorts cut and ready to use:

IMG_6437IMG_7300   5- If you’re using a shirt with a design, fold with the DESIGN centered… You’d think RTW is all centered nicely on that shirt… Until you fold it at the side seams and realize it’s not!! Often they’re off centered! 6- If you don’t have ribbed knit to match for the neckline you can use theirs…especially if you have a much larger size (men’s xxl down to a toddler size). Here are a couple of some up-cycles I’ve done: Patterns for Pirates Buccaneer BBall Shorts:

IMG_7317IMG_7294IMG_7304IMG_7333IMG_7340

Matey Muscle Tank:

IMG_0348IMG_6490-2

Wingman Shirt: The grey was from a heathered grey t-shirt… the Batman logo was appliqued on my sewing machine 🙂

IMG_9070

Deep Sea V-Neck:

Copy of IMG_6577

Cole’s Creations ‘Buttercup Dress:

20140521_141909

Women’s Raglan:

listing pictures2

Filed Under: Sewing Techniques, Uncategorized 1 Comment

Tips on sewing with silky fabrics

July 24, 2015

I have two patterns that I suggest using a lightweight woven with a very soft drape (Everyday Elegance Top and the Summer Cover Up).  I often get asked for “tips and tricks” to working with this kinds of fabrics!  So, here is a compiled list of a few tips I have for working with slippery wovens like chiffon, peach skin, rayon, satin, challis, ect.

I think the most difficult part of sewing something up in this fabric is the cutting.  I almost always use pattern weights like these:

But with any kind of slippery fabric they’re a MUST! If you don’t have any, use any kind of paper weight, heavy object that isn’t too tall.  The silver paper weights are from this Etsy Shop if you’re looking to buy.  She has several options in her shop, I prefer the shorter version to be able to get my scissors closer to them! The pink were hand-me-downs from my mama <3.

Some specialty wovens are harder then others– if you’re cutting anything that needs to be precise (collar piece) then I recommend only cutting ONE layer at a time.  With something as loose and forgiving as the kimono though, I don’t personally bother with it. 🙂

So, lets get started sewing! I recommend using a nice, new, sharp needle for these.  

I also like to tighten my stitch length down one notch to keep away from puckers.

When sewing my BIGGEST TIP is to not OVERWORK the fabric.  Although it is a non-stretch woven they will get “wonky” and pull out of shape if you do.  Don’t pull or “man-handle” the fabric to make anything match! If your pieces aren’t lining up perfectly it is almost always a cutting mistake (remember I said that was the most difficult part!).  

The good thing is most clothing made from these drapey fabrics are loose fitting and forgiving :).  Trim and let it go 😉

After I sew, I PRESS.  It takes a little more time, but it makes your end product much more professional.

French seams:

I had a lot of questions about using french seams.  I don’t tend to care what the inside of my clothes look like a TON.  But for nicer items in specialty wovens french seams would be nice.  Here is my quick how to:

You will place your pieces WRONG side together and make the first stitch. For my patterns with 1/2″ seam allowances I do the first stitch at 1/4″.  Then trim it to 1/8″.  I press the seam on both the wrong and right sides of the garment flat, then fold at the seam and press again.

Now with RIGHT sides together and first seam pressed inside stitch again at 1/4″ from fold/seamline.  This should enclose your raw edge from the first seam allowance and put you at your 1/2″ seam allowance total for the seam.

Again press from wrong and right sides of garment.  I tend to always press to the back.  You can top-stitch here if you prefer.  I do lengthen my stitch length back out to 3 for top-stitching.  Press again 🙂 Do you see an important trend in this? lol!

Hemming:

My prefered way to hem is to serge the edge—- I loosen my tension a tad to fight the puckering.

Then I press the serged edge over twice for a nice even narrow hem. Okay, most the time I don’t press…but you SHOULD press, I can hear my mom telling me to take my time and press every time I don’t 😉 

Now I DO press after EVERY TIME! I see a lot of seamstresses complain their hems are “wonky” on specialty wovens, two things cause this- over working your fabric/pulling it as you sew and not pressing! A good press after can really change the way your hem looks!

I got asked to show how to hem without a serger; so here is how I hemmed without a serger.  I pressed WITH LOTS OF STARTCH (don’t be scared to use some or lots 😉 ) a 1/2″ to wrong side.

Then I opened the 1/2″ hem and folded the raw edge to the fold line.  This creates a 1/4″ narrow hem fold. Press again.

Tada! You can sew with specialty wovens! The biggest tips are: cut carefully, don’t pull your fabric as you sew and press, press and press again 🙂

Filed Under: P4P University, Sewing with Woven Fabrics, Uncategorized 2 Comments

Tips and Tricks on How to Up-Cycle Jeans/Denim

June 13, 2015

Making jeans can be a little intimidating for some… and we’ve already had a post here about making jeans look more like store bought jeans with details like top-stitching thread and distressing.

But, a really easy way to get your jeans looking professional is to use an old pair that an adult is throwing/giving away! This means a lot less work for you distressing and top-stitching if you’re smart about laying out your pattern pieces! So here it goes…my tips on using pre-existing jeans:

1- Making a few cuts along the seams can really make cutting your pieces much easier! I like to cut along the inside legs/crotch, cut off the waistband and beltloops, and the back pockets.

IMG_9003IMG_9001 IMG_9004

2- Be cautious about distressed/washed jeans and laying out your pattern pieces… meaning, if your jeans have a very obvious fade/wash/distress pattern on them then you need to make sure you like where it will be placed and that it will match when you sew up your jeans. For this pair, I wanted the distressed area of the original jeans, so I laid my patterns around that.  Notice that my two pieces are very close to the same area horizontally, and that the back yoke is placed above the back piece.  All of this will ensure that the distressing and wash look natural on my finished jeans.

IMG_7758

You can also use the original hem line if you prefer to get that instead. Remember to account for hem allowance. I did that with this pair, because my jeans didn’t have a very noticeable distressing.

IMG_9000

Use the back pockets when cutting your new pockets, Remember to account for the hem allowance at the top.

IMG_9005

If you’d like to use the waistband and belt loops you can…. but warning, unpicking those belt loop stiches is not fun 😉

If you pattern calls for elastic in the waistband, like my Cpt. Comfort Jeans, then you will have to cut a slit on the wrong side of the waistband to slip your elastic through- I just use a wide zigzag to mend the slit after (I hide the zigzag stitches behind a belt loop!).  Make sure when overlapping that you line up your jeans button and button hole, you can see here on mine they overlapped much more then the pattern called for.  Then you will tack down the bottom of the belt loops 🙂

IMG_9006IMG_9012IMG_9213

3- Now that you have your pieces cut you will continue to sew them just like the pattern calls for  matching the store bought top-stitching thread as best you can. And although they have a wash and distressing, I STILL distress along the way! That way my finished jeans will have the distressing where store bought jeans do, like along pocket lines.

IMG_7260 IMG_9009

IMG_9010

Now you have a great fitting (no plumbers crack!) pair of jeans that cost you nothing but the thread and time <3 and plus they look amazing!

IMG_9218   IMG_9422IMG_9403

Filed Under: Pattern Hacks, Sewing Techniques, Sewing with Woven Fabrics, Uncategorized 1 Comment

How to Sew “ready to wear” looking Jeans/Denim

June 13, 2015

Jeans can be an intimidating sewing task, but they really aren’t that difficult and it is so great to have well fitting jeans for you or your little ones! No more plumbers crack when bending down!!!!! 😉

IMG_9403

With my recent release of the Cpt. Comfort Jeans I wanted to post about how to distress your new denim to look more like ready to wear jeans! I personally LOVE the distressed look! Although a super clean dark denim can look nice as a “dressy” pair of jeans like here:

_DSC4859

But for everyday, I just love the little distressed look… something about looking like Daddy gets me every time with my little guy!

So, lets get started on those great store bought look jeans!

You really MUST use a top-stitching thread for all your top-stiching if you want store bought look… I scoffed at my Mom the first time she told me it was a must… BUT she was right, like always!!

IMG_7260

You will use this heavier/thicker weight top-stitching thread in the top only and for top-stitching only. You will use regular thread in the bobbin and for all seams sewing the jeans together– yep, you have to rethread a lot ;). But it is absolutely worth it if you want ready to wear looking jeans! I promise!

You will also NEED a bigger needle designed for heavy weight fabric like denim or you will be breaking needles on those thick belt loops!… here is a single and double needle:

IMG_7259

Now, I only have one machine, so there is A LOT of switching threads and needles if I use the double needle. So, I will often just sew two lines with my single needle instead of switching to my double needle 😉

Now for the distressing, you will need some sandpaper! To be honest, I’m not sure the BEST kind of sandpaper to use… I asked my husband if he had some and used whatever he handed me 😉 Here is a shot of the kind I happen to use!

IMG_9008

The trick to distressing your denim is to do at WHILE you’re sewing the jeans! If you try to do it before it’s hard to gauge where the distressing needs to be. If you do if after you’ve top-stitched them then you will be breaking your top-stitching threads (ask me how I know that one 😉 ) see left top pocket with it’s broken threads :/ oops!

IMG_9422

So, I suggest sewing the jeans together with your normal thread, then distressing with sandpaper before you top-stitch. Here is my patch pocket sewn, turned right sides out, and distressed along the edges (and any other places I fancied at the moment). Then I top-stitched.

IMG_9010

Some areas are harder to distress before topstitching like back pockets, belt loops, any piece that you are top-stitching closed or onto the jean.  But I still follow the same steps.  I just fold and press, distress, then top-stitch onto the back piece.

IMG_8998

So have fun with a little distressing or A LOT! lol! I like a lot 😉 I end up with a mound of blue fuzz all my sewing room by the time I’m done!

Last is the button! I love to use “real” jeans buttons- and honestly, I always have been lucky enough to take them from my loving mother’s stash! But they are very easy to put on, just line up the two parts and hammer away! Yep, you’ll have sandpaper and a hammer in your sewing room for jeans!!

I’ve always used snaps, which are very common on ready to wear for younger children 🙂

IMG_9000 IMG_9218 IMG_9245

Filed Under: Fitting, Frequently Asked Questions, Sewing Techniques, Uncategorized 3 Comments

How to do a Full Booty Adjustment

June 13, 2015

n my post about the Greenstyle Taylor Shorts I made myself here … I mentioned I did a “full butt adjustment”.. well because I have a FULL butt 😉

IMG_0749 IMG_1308

Well apparently the apple didn’t fall far from the tree… because when I went to measure my LO for some cute Winter Wear Aviator pants, I shared about them here in this post …  his measurements all hit a size 2… but THAT BUM was a size 5! UH-OH! ha ha ha ha… so I flat measured the bum area to see how much ease the pattern had… I decided he did need more room then the size 3 had… so I went to work doing a full butt adjustment for my not quite 2 year old…I thought kids were easier to sew for?????

IMG_6900 IMG_6928

I had lots of inquires about a more detailed blog post, so I thought I would share his… it is the same on any size pattern 🙂

It is a really quick and simple adjustment!

Take your back piece and splice it across where the roundest part of their/your booty is.  usually about mid rise on younger/athletic builds 🙂 You will want to leave the seam allowance! Here is a picture of his:

IMG_6879

Now when you go to cut, you will spread out the back rise however much you need to add for the bum… I added about 1/2″ to my LO’s after flat measuring and comparing to his measurements.

Then you will need to “true up” the sides… since you’re adding length into the rise it wont match perfectly anymore, neither will the outer leg seam… Here is where you can customize your fit even more…

IMG_6880

For my Little Guy who still has a baby figure I didn’t want to loose ANY width on the waist or high hip… so when I “trued up” the outer leg I took the outer edge and added slightly straightening the line up.

When I adjust for myself, I have a small high hip and waist… so I don’t mind taking the inner angle and loosing some width up there.

(Looking back I should’ve taken another picture with a chalk line describing these… I will add those when I need to adjust a pattern for myself, or my little one!!)

I hope this helps those blessed with big bums! 😉

Filed Under: Fitting, Uncategorized 3 Comments

P4P University: Petite and Tall Fitting Adjustments

June 13, 2015

So… I’m tall… I mean… I’m TALLLLL 🙂

5’10” no shoes ha ha ha See me towering over my tiny mom?

10271502_10101467547479973_2882136477492759705_n

It makes finding RTW clothes a CHALLENGE to say the least… yes, I can pay an arm and a leg for “talls” but I want young trendy clothes!! So making my wardrobe is so rewarding for me!

Here are some tips for adding, or taking away length to a pattern for an adult… I’ve already posted how I like to do it for children here. But this method doesn’t work well for adult patterns because all the sizes are made to fit an average height adult– for women, most patterns are drafted to 5’5″. The “rule of thumb” is to add/take away 1/2″ for every 1″ that you are “off” the avg height drafted for. For example, at 5’10” there is a 5″ difference so I would need to add 2.5″ throughout the pattern.  If I were 5’1″ then I would remove 2″ of length since there is a 4″ difference.

Just like children’s patterns I DO NOT recommend only adding to the bottom hemline… it will make the overall garment longer… but it will not give you a great fit. If you are shorter or taller you need to add/take away length throughout the whole pattern!

Knit patterns are much more forgiving in fit… with that being said, the four places I recommend adjusting are: at the shoulder/armscye… just under the bust line… and just under the waistline… and at the bottom hemline.

Adding throughout the pattern helps keep the bust, waist, and hip where they actually hit you 🙂 P4P uses a standard side waist length of 8″ and a waist to hip length of 8.25″ (not sure where to measure? check out our post here.) so if you know your specific length measurements between those points, you will want to add/remove the exact amount in those areas.

I have made myself enough clothing to know how much I need to add to MOST patterns designed for average height– I add about 2 1/8″ to every shirt I make myself… 2 5/8″ to tunics…I even know how much I like in each spot– shoulders a scant 1/8-1/4″, chest and waist area 3/4-1″, and bottom hem 1/2-1″.

The shoulder/armscye can be done a couple ways– I like to take a smaller seam allowance there to add some length…   You can also splice your pattern straight across where the armsyce is and spread your pattern… I only add about 1/8-1/4″ to mine, but that tiny difference makes SUCH A HUGE difference in how a shirt fits me!

For the chest and waist, you can only do with overlap patterns like mine, I simply untapped it, and moved them down, adding what I needed, and retaped that section.

Or you can (with any pattern)… splice it straight across and measure what you’d like to add.

Shortening is the same method, you would just be overlapping instead of adding.


Now all you need to do it cut out and “true up” the sides… since you’re adding or taking away length the sides will not line up perfectly… you will just match them up and straighten them out with your new length.

Repeat process for the other pattern pieces 🙂


Pants, like our Peg Legs, Mama Bear Joggers or Linen Loungers should also be shortened or lengthened throughout.  Each of the patterns included a finished inseam length.  Measure your inseam and compare to the pattern to make your length adjustments.


Ta-Da!!!! Now you have shirts and pants that will FIT you! ALL over! 🙂


Filed Under: Fitting, P4P University, Sewing Techniques, Uncategorized 30 Comments

How to Mash Sizes for a Custom Fit!

June 13, 2015

Do you have a tall skinny minny? Or a little one who needs a bigger width then their height? This is a simple easy route to mashing sizes for children to get a better fit! No more just adding to the hem!! If your child needs length they need it throughout the whole garment, not just the hem! And vice versa if your child is shorter they need it shortened throughout the whole garment.

So here is the quick guide. You will take their overall height and match that to the size chart of your pattern… for this example I’m going to be using my niece who is 44″ tall- which matches my size 5.  Her chest and waist match a size 4. So I will be using the width of a 4 and the length of the 5 on every pattern piece!

**I’m going to note in here too that going more then 2 sizes is very hard to keep the proportion and shape of the pattern.

Here is a picture where I highlighted the size 4 and 5 (Size 4 in yellow and size 5 in orange). I don’t typically do this, but I did to help illustrate 🙂

IMG_5433

And here I drew in black to show how I followed the size 4 width overall on the piece and the size 5 length.  See how I made the armhole the size 5 length, and neck hole… these are places where your little ones fit will drastically improve with this method!

IMG_5435

And again, here is the sleeve with a 4 width and 5 length. Make sure you keep EVERY piece the same length/width and your pattern will fit together beautifully 🙂

IMG_5436

Coming from a very tall girl- if your little one needs added length they will be so much more comfortable with that longer armhole/neckhole/bodice!! I can hardly wear shirts that I don’t add that 1/8-1/4″ at my armhole… even though it seems like such a small adjustment it makes such a BIG difference in my fit! 🙂

This method can also be used with a shorter length to width— I used to do this for my little one when he was younger– he is big for age so he was in toddler sizing with a baby figure! He needed a much bigger around then his height and it worked wonderful for him!

Now go create that perfect custom fit!! 🙂


Filed Under: Fitting, Frequently Asked Questions, P4P University 6 Comments

  • « Previous Page
  • 1
  • …
  • 3
  • 4
  • 5

Newest Patterns

  • Uptown Joggers - Youth $10.00 $8.50
  • Uptown Joggers $12.00 $10.50
  • Uptown Joggers - Bundle $20.00 $18.00
  • Notch Top & Dress $12.00
  • Notch Top & Dress - Youth $10.00
  • Privacy Policy
  • Refund Policy
  • Affliliate Program
  • Contact Us
  • About

Copyright © 2023 Patterns for Pirates

Copyright © 2023 · Genesis Framework · WordPress · Log in