Patterns for Pirates

P4P stylish, modern, wearable patterns

  • Home
  • Blog
    • Frequently Asked Questions
    • Pattern Releases
      • Free Patterns
    • P4P University
      • Fitting
      • Sewing with Stretch, Knit Fabrics
      • Sewing with Woven Fabrics
      • Sewing Machines
    • Sew-A-Longs
    • Fabric for Pirates
    • Pattern Hacks
    • Announcement
      • Blog Tours
      • Contest/Giveaway
  • Shop
  • Bundle Discounts
  • Flash Friday
  • Gift Cards
  • My Account
  • Cart

Sew it, Win it, Build it- A Chance to Win a Sewing Room Make-Over from P4P

October 11, 2016

I’m so excited to announce that we’ve hit another milestone in our P4P Facebook Group of 30,000 members!  I’m so very honored to have so many ladies interested in P4P it makes my heart (and maybe my eyes) swell!!

slide3

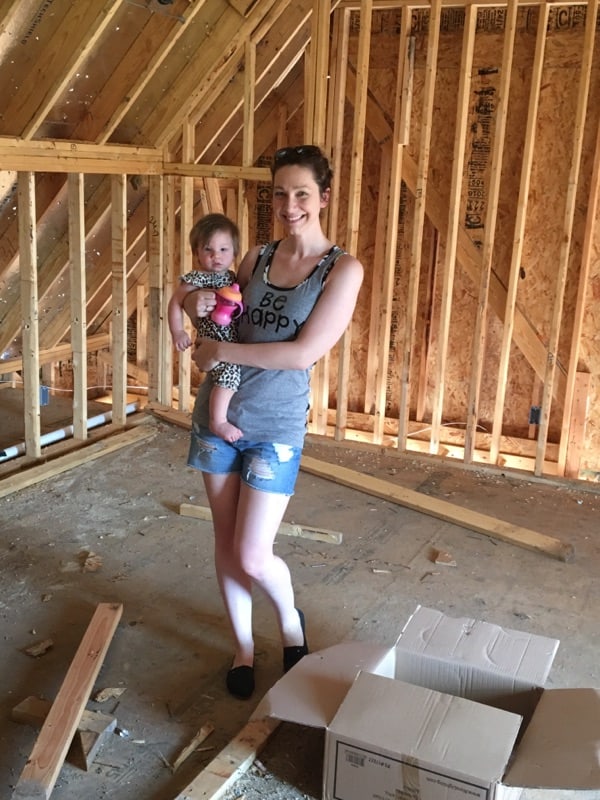
I brainstormed on how we should celebrate for a LONG time!  In the past we’ve done free patterns for group members, big giveaways, sales… but I kept thinking about how much fun I was having planning and designing my new sewing room at our new house we’re in the process of building.  Here I am in my soon-to-be new sewing space!

14183971_10102883630937373_5359873050865180300_n

I get giddy every time I think about that new bigger space! So I came up with the idea to give away a new sewing room for one lucky member!

slide1

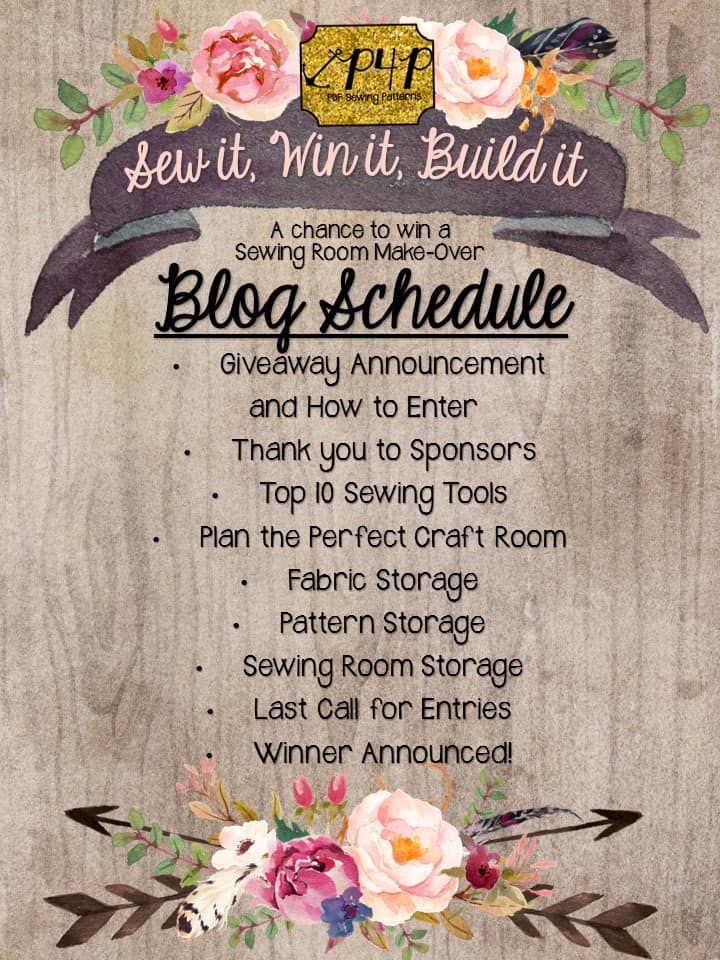
What is included in a Sewing Room Makeover?

We all thought long and hard about what we love in our current sewing rooms (and what we’d love to upgrade in them if we had the opportunity) and here is what we thought you needed for a brand new or upgraded sewing room!

slide4

We included an Ikea gift card to help furnish the space. I’m planning on doing a big U shape for my machines in my new room from Ikea! I will share some more on how I planned my room as well to help you!

We also included a Joann’s gift card to help get those supplies like scissors, good lighting, notions, and whatever else you may be missing that don’t have those extra funds for!  Don’t worry if that sounds a little daunting to pick out- we will be sharing some of our favorite things this week during the contest to help you plan and pick!

We added a Hobby Lobby gift card so you can pick up some cute decor for your new space as well! Grab one of those signs, clock, mirror and jazz up the place 🙂

We will be sending a few things straight from Amazon to the winner to help fill out your new room!  How about a great new printer and ink? Need some paper? I love this extra large Alvin Cutting Mat I’ve been eyeing for my room and I can’t wait to get a new iron too!  And of course a brand new machine- a Brother 420, which is what I sew on! You will LOVE that automatic cutter ladies!! (*These are affiliate links*)

Last, but not least, is an ample fabric stash for your room! Thanks to all of our wonderful sponsors, which we will be highlighting with links to their shops this week, we have a HUGE stash for your new room. So make sure you get some great storage pieces from Ikea!

Speaking of storage, we will be sharing some of our favorite sewing storage tips this week as well to help get those sewing rooms organized and tidy… well, as best we can, creative minds can be messy right ladies? 😉

****Note**** With a prize this large, P4P will need a W9 filled out by winner prior to prizes being sent. Winner must claim prize on taxes per US law.  International winner will have to remit up to a 30% tax withholding of prize winnings and subject to US tax/treaty agreements.

So, are you ready to enter? Here is how:

slide6


A few rules to highlight:

The item sewn up and shared must be a P4P pattern.

You need to sew it up as is, with only fit changes (so no hacks or mods ladies).  Adding embellishments is great, just no major changes.

Your picture must be in your current sewing space showing off where you sew currently.

Share your pictures on one or all of the social media networks for more chances to win with hashtag #P4PSewWinBuild — it must be EXACT to come up in our search for the winner!

Let us know what P4P pattern you sewed up and what you’re most looking forward to winning or changing about your sewing space!

You can share as many sews as you can for more chances to win–but ALL items/images shared must be sewn AFTER the giveaway starts 10/11/2016! Any older sews will be disqualified from winning the grand prize. Last entries accepted will be Sunday 10/23/2016 at Midnight US Central Time.

Since you might need to grab a new pattern to get motivated we have a SITE WIDE SALE through the end of the giveaway! This will be the last site wide sale this year so grab them up while you can 😉 !! Sale ends Sunday 10/23/2016 at Midnight US Central Time.

Winner will be random lottery winner! So everyone has a chance from a beginner who might be sewing their first P4P to a seasoned apparel seamstress!

30kcouponcode

We will have a few more posts throughout the week to keep reminding you to sew up your P4P contest entries AND to help you plan your new sewing room or your sewing space makeover!

schedule

Filed Under: Announcement, Contest/Giveaway 49 Comments

P4P Raglan Week: Adding Stripe Accent

September 25, 2016

We’re rounding out the end of #RaglanWeek and I’m excited to share another way you can add some flare to your raglans!

I love the sporty look for my little guy since he is so active!  Adding a simple stripe accent to raglan sleeves is such an easy, cute, sporty look!


raglan-week-day7


Here is how you can add them to your raglans!

img_9596

img_9622

Decide how thick you would like your stripes.  Cut your stripe of knit fabric double that for the length and as wide as your sleeves where you will be adding the stripe.

Example: I wanted my stripes just a bit over 1″- so I cut my strip 2.5″ and the width matching the sleeve width.

img_9422

Press the strips in half lengthwise and create a crease. Please excuse my ironing board… I swear taking pictures of it makes it look 1000X dirtier than it looks in person!

img_9424

Press bottom raw edge up to center crease.

img_9425

Press top raw edge down to center crease.

img_9426

I used a fabric pen to mark a straight line across my sleeve.  Since they’re both knit fabrics you can find your self ever so slightly off easily, so I’d highly recommend this for a flawless stripe!


Pin your stripes carefully along your marked line or lines if you’re doing multiple stripes.  I did 2 on each sleeve for mine. You can also use a wash away hem tape to hold them in place while you stitch.  I recommend not doing this with your baby in the room— or you MIGHT sew the stripes onto the back piece of the shirt rather than the sleeve 😉 OOPS!!

img_9429

img_9439

Edge stitch along the top and bottom fold of your stripes.  I used my single chainstitch on my coverstitch for mine- you will want a stretch stitch since we’re working with knits.

img_9445


Complete the shirt as the tutorial directs you— only noting to align your stripes carefully along the sleeve seam when you stitch up your sleeve and side seam.

img_9636

I also added a little number 4 since Little Guy is about to turn 4 next week.

img_9614

He also picked out the pirate theme lining for the hood for a little pop of “coolness” 😉 .

img_9617

His Jolly Roger is a size up from his width measurement in a thick and cozy sweatshirt fleece.  I kept the length what he measures on the chart, this is the banded shirt length, long sleeve with cuffs and regular hood from the new Jolly Roger Add on Pack.

img_9656img_9665 img_9663

He’s not much for modeling for Mama!

But, we were both so happy with his new hoodie he has already requested another one!

If you’ve added some fun stripes to the sleeves of your raglan during P4P Raglan week, we would love for you to share it with us!  Head over to the Facebook Group or share on Instagram.  And be sure to use the tag#P4PRaglanWeek so we can find you!

Curious about what else has been happening during our raglan-loving week of fun?

Just take a look at our schedule!

Monday, September 19:Jolly Roger Raglan Pattern Update + Jolly Roger Add-On Pack Pattern Release

Tuesday, September 20:JRR Woven Fabric Hack

Wednesday, September 21: JRR Animal Faces Add-On

Thursday, September 22: Contrast Band Hack for Kangaroo Pockets

Friday, September 23:Women’s Keyhole / Scoopback Raglan Hack

Saturday, September 24:Off-The-Shoulder Raglan Hack

Sunday, September 25: Adding Stripes to Your Raglan Sleeves

We’ve had such a blast seeing everyone’s raglans this week! We will be picking a winner from those who shared with hashtag #P4PRaglanWeek! Tonight is the last chance to pick up any of the P4P Raglans on sale- though midnight US CST.

Filed Under: Frequently Asked Questions, Sew-A-Long 1 Comment

Timeless Hacks

September 13, 2016


We are so excited to share the Timeless Tunic with you guys that we couldn’t help but share just a few easy mods you can do to have even more fun with this new woven pattern!

timeless-tunic-pattern-hacks


First up is the Crop Length: This is a super easy mod that is great for pairing with high-waisted bottoms.


img_3002img_2943

img_2987


Cut bodice pieces and skip the 2 skirt pieces.  Sew up the bodice following the tutorial like normal.  When you’re at the point of attaching the skirt you will instead create a casing with just the bottom edge of the bodice (just like the 3/4 and long sleeve options).

img_9407

Fold up the bottom raw edge 1/2″ to wrong side, and again another 1/2″ hiding raw edge.

img_9409

Edge stitch along top fold, leaving about 1.5″ un-stitched.  Feed your waist elastic in, around and out of the casing using a safety pin or other tool.

img_9410

Stitch elastic ends together using a wide zigzag (Make sure not to flip or twist your elastic as you’re guiding it through and stitching into a circle).

img_9414

Pull elastic all the way into the casing.  Stitch remaining 1.5″ closed.

img_9416

Wah-Lah!

img_9418

Now you have an adorable crop length that you can pair with your favorite high-waisted bottoms and not have to worry about tucking i in and getting any lumps and bumps from the bottom. I paired mine with the Pirate Pencil Skirt in the high waist and midi length option.

img_2948

img_2980


Split Sleeve and Curved Dress Hemline by Angela.

cover2

A big fashion trend that I’ve been seeing recently is a pretty split sleeve and the new Timeless Tunic and dress is the perfect pattern to easily add a split sleeve.  I’m also a big fan of a curved hem, so I’m also going to show you how to add the curved hem to the dress length.  Let’s get started!

First thing we are going to do is draw a line from the shoulder seam directly down the middle all the way down to the bottom of our sleeve piece.  This is going to be our extra cut line to create 4 pieces.  Now, if you’re lazy like me, you can just cut your sleeve out as normal and then cut down the center line that you created right thru your pattern and fabric. Make sure you don’t forget your notches!! It’s really easy to make a mistake without those notches as you will now have 4 sleeve pieces.  Next you’re are going to need to create your binding strips. To do this, I just measured that line we created on the pattern to determine how long the binding needs to be and I added a inch extra just to be safe.  As we are binding a straight piece you don’t have to worry about cutting your binding on the bias.  I just cut mine the length of my piece by 1.5 inches wide.

img_54241

Next you’re going to press your binding just like you would any other binding or bias tape. Fold in half lengthwise and press and then press the edges into the center.

img_54341

You’re going to pin the right side of the binding to the wrong side of your sleeve and sew in the first pressed line which is a 3/8″ seam.

img_54381

Once you have sewn the seam, press the seam allowance up towards the binding and then fold your binding down and repin so that the fold on your binding meets the seam line.  I like to pull mine just slightly over the seam so that when you edge stitch you don’t see the seam underneath.  You will then edge stitch your binding down.  You are going to do this on all 4 of your sleeve pieces.

img_54391img_54401


Time to sew the sleeves on! Easy peesy- you just match the top of your binding to the top center of your sleeve and make sure that your sleeve binding are right against each other.  Make double sure that your notches match here too, ask me how I know!  Now you will continue constructing as shown.  When you get to your sleeve casings you can sew your casing flat and insert your elastic.  I then sewed the elastic together to form your circle and then pull your casing over the elastic so you can’t see it.

img_54471img_54481 img_54501


On to the curved hem! This is super simple too.  I started by tracing off the tunic curve on the front skirt and then lined up the curve to the side seam so that the bottom of the curve was at the bottom of of the dress length and traced it on. You will need to extend your line just a tad at the center as the dress is aline so it doesn’t match on both edges. (This is going to make your dress length a bit shorter on the sides so if you are worried about that add a little length) I then cut my new curved hem.  For the back you want to also trace off your tunic curved hem but as it is a different curve then the front you want to make sure that your side seams are going to match.  The back hem will dip a bit lower then the dress length so you will need to tape some paper onto the bottom of your back piece so that you can trace your curve easily.  I found the easiest way to get your hems to match was to take your front piece and place it on your back piece, matching the side seams and mark where your front curve starts on the back piece and then place you back curve on that mark and trace.  Cut your new hem line and continue constructing as normal.

img_54201img_54211img_54231img_54311

img_55401

img_55361

Hope you enjoyed these easy hacks and please share your creations in the Patterns for Pirates Facebook group, we love seeing what you make!


V Neck Modification by Alex.

IMG_1214

The much anticipated woven tunic and dress is finally here! The Timeless Tunic includes 3 sleeve lengths, a sleeveless option and two hem lengths. So why not add a V-neckline to the mix? 😉 I am a very big fan of V-necklines, I find them flattering on all sizes and shapes so today I will show you how I hacked the Timeless Tunic to get a V-neck look.

First of all print your pattern in the size needed, grab a ruler, a marker and some paper because we’ll do some light drafting. Ready?

IMG_1180

Tape your pattern as per the instructions and set aside the front facing. We will  draft another front facing shortly. Grab the front bodice piece and mark 3 inches. You can do less or more depending on how deep you’d like the cleavage. For my example I lowered the neckline about 3 inches. Once you mark that point on the center fold line, draw a straight line from where the neckline begins to curve to your marked point. Cut along the line and discard the little pieces.

TIP: If you prefer to save the original front bodice piece, then just fold along the marked line and tuck the little piece under the pattern. This way you can re-use this pattern for the regular curved neckline again simply by unfolding it.

IMG_1181-1

Now that you have your front bodice piece ready, all we have to do is draft the front bodice facing. My V-neck Timeless dress is the sleeve option so you’ll see the sleeve facing throughout this tutorial. You can use the same suggestions and draft the sleeveless front facing option, too. Grab the original front facing, lay it over the front bodice and mark the shoulder width on it.

IMG_1184

Now lay a piece of paper (preferably  tracing paper but good ole printer paper will do, too, as you can see) over the V-neck front bodice. Trace the shoulder and the V-neckline on the paper. Mark about 2.75 inches down where the fold line will be. Using a French Curve (or drawing very slowly), draw a curve from the outer shoulder point to the bottom point of the center fold. That’s it! You’ve now drafted a new V-neck front facing.

IMG_1185 IMG_1187-1

Cut the fabric (and interfacing) using the V-neck bodice and the new V-neck front facing you just created. The rest of the pattern pieces and elastic will remain the same as the original pattern.

IMG_1189

Sew your dress or tunic following the pattern’s directions. When sewing the bodice to the facing around the neckline, I prefer to start from the V point, sew around the neckline and end at the V point where I started. If you start at the shoulder seam, make sure to pivot when you get to the V point of the neckline.

IMG_1194-1

TIP: When you snip the seam allowance around the neckline, don’t forget to cut a little V piece at the pointed spot. It will make your neckline lay nice and flat once you press it.

IMG_1195

Finish sewing the tunic or dress as per the pattern tutorial. Now you have your very own Timeless Tunic with a V-neckline. As always, I can’t wait to see your creations in the group . Sew like a pirate!


Sheer Overlay by Nicole

img_6704

There are some gorgeous woven fabrics available but some may be a little too sheer to wear sans under-layer or finish the neck and armholes with the facings method found in the pattern.  With a couple of easy changes, you can use fabrics like chiffon or lace.  I chose to use a chiffon and left my sleeves sheer but needed the extra coverage in the bodice and skirt.

Once you decide on your fabrics (that’s the hard part, right? 😉 ) you will cut the following:

(1) Main fabric bodice – front and back, (1) Main fabric skirt – front and back, (1) lining – front and back, (1) lining skirt – front and back ( I shortened the hem by 1″ as I used a rolled hem on the edges and did not want it to peek out the bottom edge)  (1) front and back facing (2) main fabric sleeve mirror image.  Note: Lightweight woven fabrics like chiffon are delicate.  When ironing the fusible interfacing, proceed with caution and use a pressing cloth.

img_6603 img_6606

For assembly of the bodice, you will treat your front and back as one piece.  Place main fabric and lining right sides up (wrong side of main fabric touching right side of lining) and baste along the edges or using a washable basting spray to keep the two layers together.  Construct main bodice as shown in pattern.

img_6608

For the skirt, I did not want them attached at the side seam so I stitched the side seams of both the main fabric and lining separately, creating two skirts.  Slip your lining skirt inside your main fabric with right sides out (wrong side of main fabric touching right side of lining).  I serged my two skirt together at the top edge to make attaching them to the bodice a little easier.  Continue construction as shown in the pattern.

img_6612  P4P Timeless Tunic PDF Pattern Sheer Overlay


Easy enough….right?! The constructions doesn’t change any and should not be any more difficult to put together.  Working with slinky fabrics is the hard part but with a little patience you’ll get through it in no time.

P4P Timeless Tunic PDF Pattern Sheer Overlay P4P Timeless Tunic PDF Pattern Sheer Overlay


Make it in knit!

We all love the quick and ease of sewing up a knit, right?! You can sew this pattern in a knit with no modifying! Here is Alex’s in a rayon spandex with no modifications other than about 1.5″ added to skirt length for a personal preference on skirt length.  She kept the dart and facings as is in the pattern exactly and sewed her size on the measurement chart.  With knits you can have less wearing ease and be comfortable, so you could size down if you wanted a more fitted look compared to the woven option.  She looks fabulous and she didn’t have to iron it 😉 lol!

14310375_10153881465478317_8390996610783788831_o 14231855_10153881465828317_6125367821420674475_o

Filed Under: Pattern Hacks 2 Comments

Timeless Tunic and Tiny Timeless-Pattern Release!!

September 13, 2016

I’m asked for more patterns drafted for non-stretch woven fabrics all the time! And although my heart will always sing for those quick knits 😉 I do love a nice woven top or dress too!

So without further ado, let me introduce the Timeless Tunic and the youth version the Tiny Timeless (because Baby Girl needs to match Mama sometimes)!  We also have them bundled together for a discount in the Timeless Bundle!   All will be on sale through Sunday 9/18/2016 US Central Time Zone.

new-release

listing-pictures-bundle

I love a softer drape for my own tops.  I feel like the drape gives a more flattering silhouette.  Personal favorites are rayon challis, crepe, peachskin, poly chiffon and voile.  But, I drafted it so that you can get away with using a stiffer woven like a chambray or flannel without loosing too much of the glamour!  Now you will have a great, timeless pattern that allows you to use up that gorgeous woven fabric you’ve been hoarding for that “perfect pattern”!  (ah ah ahhhhhhhhhh…)

14324626_10157531259405599_1898415430425264769_o

Both include the same options:

Tank– Perfect for warmer weather or for a nice layering piece. I loved to wear a nice silky tank under a cardigan!

14242301_10210716022718957_378574312330514505_o14241659_10100199813559177_5606052251135658841_o14125490_10207570896533783_6302897511345138404_o

Short Sleeve– A bit more coverage, but still great for warmer weather and layering!

14184470_10206952209069922_8833346384594323059_n14241581_10102547913260398_7254487766094641562_o14242208_10210571073896937_805838614165298697_o

3/4 Sleeve– A great transition length that you can wear year round.

14249950_10154503698239666_7646869345079131584_o14352546_10210567848103560_4851958667013892215_o14206059_10157281958945562_7297118569733716242_o

Long Sleeve- Take this length into the colder months no problem! A lot of our testers loved the longer sleeve paired with a cozy flannel!

14242334_10104325619441019_6908037680625653308_o14125531_10157496754100599_3483788795218596629_oimg_3072

Top/Shirt Length- Cute, comfy, and easy to wear!

14324611_10153780722145841_3662509677212397532_o14238084_10153700243027016_1014006267670653907_n

Curved Tunic Length- My personal favorite 🙂 It’s flattering and has some coverage but still looks trendy and put together. Younger girls love that curved tunic for pairing with skinnies or leggings!

img_279114231138_10153769419810841_3613078633363806887_o14290074_10153768368870841_553585620824454842_o

Dress Length- Meant to hit about 2″ above knee (a super flattering length on all shapes) you can make it casual everyday or sew it up in a nicer fabric and pair with heels to dress it up!

14258341_10207132892821807_6136906350317382751_o14207652_10157496740100599_2033111073842957631_oimg_2624

So, just how versatile is this pattern? It can really be styled up or down so many ways you could wear this anywhere!

This is such a classic look you can make it a casual, everyday/play look:

14249963_10154503755929666_9129185631609573782_o14231413_10207876129193547_6674605127882798680_o14205954_10210512674724260_4397482894494798683_o

Maybe a casual date, girls meet up, or shopping day:

14207814_10154300057696539_8237162624284821183_o14203258_10208929354683616_2720049744373384192_n14207750_10210551066636768_7037204826372407243_o

Use something a bit nicer and you have a great office or work wear attire staple. Send your littles in it for school ceremonies or picture day:

14231234_10153612253591735_8839325507524326519_o14232033_10208995061987559_5269068041149513619_o14188314_721772925249_1691406524578386645_o

It’s the perfect style for a shower or party! Perfect for those adorable border prints as well!

14196081_10153869020893317_5082474374666622486_o14291746_10100703800196229_1962536080284580740_n14249724_1066496020113465_6724777699018234887_o

You can even do a great silky fabric and make a more formal version:

14222301_10154394234975185_4863718361316041852_n14206175_10103253572656169_8892717186004317338_o14207838_10154332104716539_4627475586566883372_o

Warning though, doing this dress in a fabulous silky leopard print can really make you feel glamourous!! This little one had some great modeling poses in her fancy dress!! Don’t we all love to feel beautiful! <3 <3 <3

14311451_10154332105296539_2865024478159272751_o

I hope you enjoy this new pattern as much as we all do!

The Timeless Tunic and Tiny Timeless will be a great weapon to pull out when you or your little one find that perfect woven fabric!

img_9056

Filed Under: Pattern Release, Uncategorized 2 Comments

Sunshine Dress- A Mash made in heaven

July 28, 2016

mashes

Some patterns are a mash made in heaven 😉

Here are some of our favorite mashes with the new Sunshine Dress pattern!

adding sleeves promo pic

Adding sleeves is an easy hack! You will need your Sunshine Dress bodice pieces and  a bodice and sleeve from another pattern you like.  Here I used the Layer Me Up Shirt, because I thought the tight fit sleeve would look great with this bodice.

You will trace the shoulder and armsyce of the sleeved shirt (Layer Me Up here) onto the bodice of the Sunshine Dress.  Aline your shoulders and trace your new armsyce (in yellow).

adding sleeves 1 adding sleeves 2

Cut out the sleeves from the Layer Me Up Pattern in whatever length you’d like and attach in the flat after attaching neckband on Sunshine.

Sew down side seams and along sleeves layering the Sunshine the same as the original tutorial.

IMG_7740

Now you just need to finish your sleeves. You can hem or band according to the Layer Me Up tutorial.

Wah-lah… now you can take your Sunshine Dress into the colder seasons easily!

IMG_8567-2


sweetheart

Here is a super simple mash! Nothing but taking the skirt of the Sweetheart Dress and attaching it to the Sunshine bodice! Easy, peasy, lemon squeezey!

13700985_10154366193649666_8034708204045006946_o 13710656_10154366193669666_7520341654172218256_o 13717360_10154366193644666_4270184735177396283_o


boundless

Did you see the SUNSHINE dress that just released? The dress not only featured 3 bodices but the skirt is perfect for a mash up with other P4P patterns. In the blog today I’ll show you how I made myself a Boundless dress with a Sunshine skirt.

Start by printing and cutting the Boundless top according to your measurements. Use the waist cut line and not the empire one. If you use the empire cut line your sunshine skirt pockets will be too high on your torso. If you like the sleeveless look be sure to add lining too. For my dress I preferred to add short sleeves and not line the bodice. My dress is 100% cotton lycra (95%/5%) so it’s pretty thick. Plus this 100 degrees weather we’ve been having would not work well with a lined top. Am I right? ☺

IMG_9629

For the Sunshine skirt I used the above knee cut chart. The length is very similar to the Boundless knee length so the look would not change. I don’t know about you but I am a big fan of pockets…inseam pockets, outside pockets, welt pockets….you name it…I love it! So when it came time to make the Sunshine skirt the choice was obvious, I cut my pockets with a coordinating fabric so they pop.

Sew your bodice according to the pattern and your choice of style (sleeveless, short sleeve, long sleeve etc). Since I did not line my bodice I just hemmed my neckline with ½ inch fold. Remember the tips I gave you in my last blog?  Pin,pin, pin and iron your fabric and you will have a perfectly looking neckline for your unlined bodice.

IMG_9630

When making your Sunshine skirt, be sure to follow the instruction in the Sunshine pattern. I like to use the elastic gathering method shown in the Boundless pattern but if you add pockets to the Sunshine skirt then that would not work well. You want to avoid gathering your pockets so just use gathering stitches.

IMG_9631
If you did not add pockets to the skirt then the elastic gathering method will work great for this skirt too. Once you gathered the skirt to fit the width of your bodice you can go ahead and attached the two.

Tadah! You now have your very own Boundless/Sunshine dress perfect for year round wear. I hope to many, many Sunshine dresses and Sunshine mash-up dresses in the group (insert link) so be sure to show them off. Sew like a Pirate!


IMG_9654

IMG_9644

Filed Under: Pattern Hacks 11 Comments

Sunshine Dress- Hacks

July 28, 2016

hacks

You know we love to show you how to take your P4P patterns that are filled with options and stretch them even further!

Here are a few easy hacks to the newest P4P pattern the Sunshine Dress!

IMG_36084

Hello there! For those who don’t know me, my name is Erinn and I have a confession to share with you… I love dresses! Ok, truth: I love them September through June when I have to wear “real clothes” for my job as a teacher and not live in my comfy summertime clothes! So when the Sunshine Dress came out, the first thing I thought of was, “How can I make this work for a teacher?”. I absolutely love the cross-over bodice, but knew I would need to wear a cami under it for work, which would just mean more laundry (another confession: I hate laundry!). So, I give to you my friends- the modesty panel! It provides you with the extra coverage of a cami, minus the bulk of layering (again, not to mention the extra laundry of one more shirt- isn’t that reason enough to make one?).

IMG_3571

What You’ll Need:

  • Partially finished cross-over bodice (Complete through attaching the neckband)
  • Pattern piece for Strapless liner (front only)
  • Coordinating fabric

Creating Modesty Panel

Modpattern2First up, you will need to create your modesty panel. To do this, you will need to make a few quick changes to the strapless liner piece. Cut along the armscye line that would have be used for the halter version. Next, remove 1” from the bottom of the pattern- there is already a lot of layers once the skirt is attached, so this will allow you to reduce some of “extra bulk”- nobody wants that!

Cut out your modesty panel using your new pattern piece as well as the binding for the top of panel. For the binding, you will want to cut a strip that is 2” wide and long enough to go across the top of panel.
panel3

Fold binding in half and iron, then attach to the top of the panel- make sure to stretch slightly as you attach. Trim the excess binding to align with your armscye.  Press seam down.

Attaching Modesty Panelattaching2

You should have your cross-over bodice finished through attaching the neckband. Layer pieces in order according to pattern, then place the modesty panel as the top layer. Pin in place (no one will judge how many you use- that’s a lot of layers to keep in place!). Run a basting stitch down both sides- be careful on armscye, making sure to not baste all three layers together. Check the fit/placement of your panel and once everything looks good, sew your side seams together.

IMG_3584Voila! You have now created your modesty panel. All that’s left to do is attach the armbands and skirt, then enjoy your Sunshine dress… with a little added coverage.


Bodice with No Ruching:


no ruchingThis is a SUPER simple hack! All you need is your Sunshine pattern, no measurements, no guessing and just one quick change! For halter and strapless instead of cutting 1 main fabric bodice (front and back) simply cut out 2 lining pieces front and back.

IMG_7743

Assemble exactly the same skipping the ruching steps in the tutorial. Done! For cross over bodice just cut out 2 under/not gathered front pieces, making sure to make them mirror image. Skip ruching steps and assemble normally. 🙂 Was that the easiest hack or what?!?! Now you have 3 more bodice choices with this already option packed pattern!

IMG_8683-2


Making a separate skirt from the Sunshine pattern: 

Maxi skirts are all the rage right now and with this simple hack, you can use the Sunshine Dress Skirt portion to create your own.  (of course it works great for the other lengths too!)


13717335_10154373393944666_3392408374222849681_o


Cut 1 waistband and 2 skirt panels. Construct the skirt in the same manner as the tutorial.  Instead of attaching to a bodice, you will attach to the waistband.  To create your waistband, sew short ends together, creating a circle then fold in half with wrong sides together.  Find the 1/4 points of both the waistband and skirt and match skirt side seams to the waistband.   I like to gather my skirt while it is pinned to the waistband to help ensure even gathers along each of the 1/4 points.   Your skirt will be gathered to the same width as the waistband.  Stitch with 1/2″ seam allowance.  Pull basting threads.  All finished!


Sunshine Skirt waistband P$PP4P Sunshine Skirt Hack

Filed Under: Pattern Hacks 2 Comments

Pivot and Slide FBA Method`

June 22, 2016

fba header picture

We get a lot of questions about Full Bust Adjustments.  Since I draft for a true hourglass, curvy figure lots of our ladies have bigger busts. So here is a quick and easy method for knit tops if you need a FBA.

Do you need a FBA?

I see a FBA suggested A LOT in sewing groups, even though it’s not always the problem/solution for ladies (Especially for a P4P pattern that already drafts for a bigger bust.)

So, how do you know?  I began putting both upper/over bust and full bust in my measurement charts to help! (Need a refresher on these measurement terms? Here is our How to Measure Yourself post explaining them.)

If your upper bust is a size smaller than your full bust- you need a FBA.  If you don’t have those measurements on your pattern then you will have a neckline and shoulder fitting too large when choosing your size from your full bust measurement.

I do NOT advise “choosing your size based on your upper bust measurement” and doing a FBA for that many inches.  Indie patterns like mine are much more “true to size” than traditional paper patterns that tend to have a lot more ease built into them. With traditional paper patterns it is often very easy to size down 1-2 sizes on them and still have enough wearing ease.  Most indie patterns are not drafted with that much extra ease.  I draft my patterns right from that measurement chart meaning if I picked my size based on my upper bust (34.5) I would choose a size small, but I don’t need a small! Both my upper and full bust fit into a medium on the full size chart.  I do not need a small with a FBA becuase my frame/upper body isn’t a small.  It’s a medium 🙂 This is why I began adding the upper bust measurement into my patterns, to take out that guess work when I saw this recommendation quite a lot.  And while it might work well for those traditional paper patterns with more ease- I do not suggest using this method for P4P patterns-or most indie patterns in general.

Here is my size chart with both upper/over bust and full bust.

listing pictures3

Got some wrinkles on the full bust area? A FBA is NOT always the answer 🙂 There are a lot of other reasons you might have some wrinkling there!

Both raglan and dolman style sleeves will naturally have some wrinkling there. No matter who that pattern designer is, who is wearing it, fabric choice, or even gender wearing it! The drafting of these two sleeves lay flat when arms are out, which means when arms are down it naturally creates some wrinkling in the armpit area. No biggie 😉

IMG_0238 IMG_0413 IMG_9552 IMG_3842 IMG_4147 IMG_4387

Length is the armsyce is another reason one might have some gaping or pulling.  If you are shorter or taller then the height the pattern is drafted for (P4P drafts for average 5’5″), or if you happen to have a different proportion there. You might need to adjust the length of your pattern from the top of shoulder to the armpit rather than needing a FBA.   This is difficult to tell just from a picture.  It is however much easier in person to see.  If you’re not sure try pinching at the shoulder seam to take out some length if you think it might be too long.  If it is too short you will feel like the entire shoulder area is too tight and that armpit seam will be up touching your armpit too tightly.  For both it is easy to see if you try on the shirt prior to putting the sleeves in.  If it is a tank, remember the bands will pull the armysce in though.

Here my lovely tester and model has a little wrinkling because she is a bit shorter than the drafted height. She would benefit from taking just a touch of length from the armsyce.

11036978_10207178765452450_6301409831053611894_o

Here my lovely tester would benefit from the opposite, a bit more length in the armsyce.

11807358_10207360915846870_5189633883074489071_o


You might have some issues with fit through the armsyce and bust if you are wide chested/through the upper back.  You would find your upper bust measurement in a bigger size than your full bust.  You would need a Small Bust Adjustment (follow the same method just pivoting and tracing to the smaller full bust size).

Here is a gorgeous tester of mine who has begun to trace off a size larger through the neckline and shoulders and adjust down to her smaller bust. This is prior to doing so. You can see it is a bit tight across her shoulders and upper chest area. but fits well in her full bust.

12512545_10156480108785282_629169134466680487_n12669689_10156480108610282_565742808129966782_n


The last reason you might be having fit issues through the bust is not using the appropriate fabric for the top.  If your pattern suggest 50% and you sew up a cotton jersey with only 20% you might have pulling at the chest.  The opposite problem would be using a very stretchy fabric like a lightweight rayon spandex with a lot of horizontal and vertical stretch making the armsyce droop lower or even gape.

Here I am in the exact same size, but the feathers are a more stable cotton jersey with very little stretch and the grey is a rayon spandex with a ton of stretch and drape.  The armsyce is an 1-1.5″ lower in the drapey, stretchy rayon spandex.

IMG_7635 IMG_7920

One more thing I see sometimes is the drag lines from bust to waist.  This is something you will get naturally with an hourglass figure. You have a large difference from your full bust to waist.  If your shirt/dress is semi-fitted then you will see those drags pulling into that smaller measurement at the waist.  This isn’t asking for a FBA, it’s asking for a dart 🙂 But, most knit shirts don’t have darts, just curves along the side seams. You can’t get as drastic of a change from full bust to waist without a dart.  But that’s okay! It’s the nature of a semi-fitted knit top.  It doesn’t mean it is ill-fitting.  Here are some pictures showing those drag lines, but I have room for my bust and the armsyces are fitting perfectly for my frame.  My side seams aren’t pulling drastically to the front of my body on my bustline and it isn’t too tight across my back at the bustline.  I don’t need a FBA for my patterns (yay! I do need them on patterns drafted for a more rectangular figure like traditional paper patterns! Just one reason why I love drafting for a curvy figure).

IMG_7564 IMG_7753 IMG_1758 IMG_1791 IMG_1804

Okay, now if you’re still with me 😉 and you need a FBA here is my favorite, quick and easy method for a knit top. This only adds a bit of width right at the bust.  It doesn’t add length.  For most women and most knit tops this is sufficient.  If you have 2 sizes difference in your upper and full bust you might also add some length to the front center at the bust line and ease it back into the side seam (making the front center curve down). To give your bust some extra length as well.

Here is one of my favorite testers.   She has a smaller size upper bust than full bust.  Here she did not do a FBA.  You can see she has a bit of pulling pointed right to the apex of her full bust. She is your classic case of needing a FBA 🙂 Her side seam will be pulling towards the front of her body instead of laying more evenly along her side.

12109259_10156165083900790_2794494373974819072_n  12094846_10156165083630790_3745559963982436088_o


Here is the “Pivot and Slide FBA Method”:


Step 1: Choose your sizes based off the measurement chart.

z

Step 2: Pivot

fba pictures-02

Step 3: Trace

fba pictures-03

Step 4: Slide back

fba pictures-04


Now you have a new armsyce that goes wider at the bust, but the same smaller neckline/shoulder fit as the smaller size.

I hope this helps those out there needing this fit adjustment! Once you’ve got it down it really is a very quick and easy method to adding a bit more room for the ladies 🙂

Filed Under: Fitting, P4P University, Uncategorized 35 Comments

Essential Tank- Open Back Hack

June 12, 2016

Presentation1

I’m excited to share another hack to the new Essential Tank pattern! I’ve seen this look in the popular athletic wear brands and love it! But being 5’10” means no way I can buy it off the rack, even if I wanted to splurge on the price tag 😉

So, I hacked the newest pattern in the P4P collection and I’m so in love with the result! I used a brushed polyester blend that is super soft.

listing pictures1 listing pictures3

I took the front and raise the neckline by 2″ (although the inspiration tank was probably 3″ higher I just can’t take a neckline that close!). Make sure your neckline ends at a straight angle or you will have a point when you open up your folded front.  If you have a french curve use it for a nice smooth neckline. If not, you can get it as smooth as possible.

IMG_6990

Next I cut the back. Here I cut the full piece to help demonstrate, but you can skip cutting the entire piece to save on fabric.

IMG_6993

I took my straight edge and alined it to the widest part of the racerback.  I sliced it straight from the top of the shirt to the bottom hem. (I’ll mention here I did shirt length cutline. but left it unhemmed).

IMG_6995

Then I cut another MIRROR image back piece.

I decided to leave my hem and back edges raw. If you wanted to hem, go ahead and hem those back center edges now.

Tip-I ALWAYS cut a center notch on the necklines of every shirt- they’re cut on the fold and you always need that center mark for attaching your neckband marked anyways.  It is such a quick, easy time to mark it with a notch!

With both right sides up and aligning the center, baste the overlapping sections along the neckline.  Looking back I would also advise to baste just outside the 3/8″ seam allowance as well to hold it in place while attaching the neckband. It’s such a small section that extra baste will really help keep it nice and neat.

IMG_6997

Then just sew up the shirt as the tutorial recommends, treating the back as 1 back piece.  If you make the neckline higher you will need to shorten your neckband a bit as well.  A good ratio is about 80-85% of the finished neckband plus your seam allowance.

IMG_6999 IMG_7001

And wa-lah! Now you can waer it open and loose or tie it at the bottom for a more fitted look! And a big bonus (for me anyways ;)) is that you can untie the back and it’s super nursing friendly! I already have 2 more fabrics that need to become this hack! I can see myself wearing these with some capri peglegs throughout the hot TX summer!  I have it paired with a cute Siren Swim Top I made for a sports bra!

13402172_151754171904282_974103483_n(1)

Don’t forget to share your final creations in the P4P Facebook group, tag me on Instagram, or in your favorite sewing forum! <3 I absolutely love to see your P4P creations!


Filed Under: Pattern Hacks Leave a Comment

Different Fabric, Different Fit!

May 22, 2016

Fabric choice can really make or break a garment.  Not just the color or pattern, but the kind of fabric you use.

I remember begging my mom to sew a pattern intended for knits with a woven, or a flowy top with ponte roma… of course she would try to explain that it wouldn’t work, but the begging continued!

It’s not until you use the WRONG fabric that you really understand using a fabric other than what is suggested in a pattern that you’re going to alter the final outcome.  It will fit and look different than intended.  I almost feel like it’s a right of passage to make a few mistakes with fabric choice to really understand how important it can be! But, I will try to help you out before you make those mistakes 😉

There are TONS of fabric types out there… I mean A LOT… too many for most seamstresses to remember.  But if you can familiarize yourself with what the fabric will look like made up (how it will drape and fit) then you can really help yourself when picking fabrics for a project.  Feeling fabric for the amount of stretch, thickness and drape will help you pair it with the right pattern.  Once you get to know the fabrics you like, you can more easily order them online for a bigger variety.

fabric choice

I have sewn up the exact same pattern in the same size, modeled on the same body to help show how different weights and fabric types can affect the fit and look of a garment.

I sewed up a ton of the new P4P release, the Sweet Tee, because it is such an easy, quick sew and has a semi-fitted silhouette so it can take a wide range of stretch and be wearable. So, here we go!

I will start with the fabrics with the most drape.  Drape is a term meaning how the fabric falls to the body when worn.  Fabrics with soft drape will be fluid and drape towards your body.  Think looser fits.  They will fall beautifully, and still show off your curves without needing to be tight at all. This is my FAVORITE kind of fabric for myself.  I love a little looser fit with a drapey fabric.  It means I can feel comfortable (not sucking in all day ;)) with a looser fit, but still not look sloppy or like I’m wearing baggy clothes- I still want to show my curves a little to be flattering. But, this is a very personal preference of course! My sister prefers more stable knits for her tees usually.  Think about what shirts/garments you like and how that fabric feels and drapes and it will help you understand what you prefer!

Slub Jersey.  One of my favorites to work with, it doesn’t have a ton of stretch (which makes cutting and assembling a bit easier), but has drape because it is thin and lightweight. It is light and airy to wear, but doesn’t cling and show off every lump and bump. Another fabric that fits in here would be a lightweight poly/cotton jersey blend :).

IMG_9451 IMG_9485 IMG_9507


Very thin sweater knit on beige and a lightweight rayon spandex on back.  You can see on both these that they drape under my bust towards my body/waist showing off curves. The loose-ness around the hips doesn’t look flared, but just relaxed.  Both are a little harder to work with during cutting and assembling.  The very thin sweater knit usually needs some extra support in the seams baring any weight (like shoulder seams).  You can use a clear elastic to reinforce them so they don’t stretch out with wear.  The rayon spandex blends are one of my all time favorites as well- I used to want my mom to make me every thing in it 😉 .  It has a slinkier feel because it has such a soft drape and can be difficult to fold on grain and cut without some movement. Rayon blends are also notorious for being “clingy”, because they drape so much they also tend to show lumps and bumps you might now want to show. So, I tend to pick rayon blends for a looser fit I know has plenty of room to not cling. Or a tight fit I know will be showing off everything anyways.

IMG_4091 IMG_4137


Tissue Jersey on front and rayon spandex blend on back. The tissue jersey is a bit of mix, it is not at stretchy and fluid as the others, but so lightweight that is still has some good drape. But the very thin fabric also showed my bra line a bit in front there as well, so you take the good with the bad sometimes with the thin stuff ;).  I like the light airy feel of tissue jersey living in a hot climate.

IMG_4015 IMG_4036IMG_4037

ITY Knit– Ity knit is a poly blend that is knitted to have a smooth face, soft drape and lots of stretch. It’s commonly used in RTW for maxi dress and skirts b/c its flows so nicely. It tends to not be as “clingy” as a rayon blend and usually a little thicker weights (although all fabrics can be found in different weights).  I like an Ity knit, especially for a nicer look.  When I taught kinder and wore more professional attire Ity was a great, comfortable fabric that looks a bit dressed up even with a simple tee silhouette.

IMG_4772 IMG_4774 IMG_4777


On to the sweater knits! I love a sweater knit for fall, winter and even early spring! Most sweater knits have good drape, especially light to medium weight sweater knits. They tend to be thicker than a rayon spandex and might do better if you’re worried about the thin fabric showing/clinging to any lumps/bumps/bra lines.

This is a very light weight sweater knit with almost an open weave.  Again, a tad see through, I will wear this one with a cami under after seeing the pictures ;).  But the looser weave also feels a little looser in fit, so putting on a cami under doesn’t make it feel too tight for me.

IMG_4185 IMG_4162 IMG_4180


Light weight hacci sweater knit. Again, you can see it drapes under the bust towards the waist for a flattering silheoutte.  This sweater knit is plenty thick for me to not worry about having to wear a layer under as well and a bit more comfortable that it doeesn’t show quite as much detail on lumps and bumps too.

IMG_3911 IMG_3896 IMG_3884


Medium weight sweater knit. This is a super soft ribbed sweater knit- It has tons of stretch and drape.  As you can see it looks a bit looser because it has so much stretch and drape.  I love this for a cozy sweater-I can’t wait to wear it in the fall (here in the hot south we’re already way past sweater weather!)  Even though it is a thicker weight it does show my bra lines b/c it’s so drapey.

IMG_4373 IMG_4387 IMG_4405


Medium weight sweater knit. This feels like an acrylic blend (it was bought from a LA detash page- so I’m guessing on content) so it has a little more body to it and doesn’t drape quite as well as the other sweater knits.  It also feels a little tighter, because it doesn’t have quite as much stretch as the others. You can see it still drapes on my deeper curves (like my sway back) but goes more straight down from my bust rather then draping under.

IMG_4482 IMG_4489 IMG_4491


Onto more stable knits 🙂

Cotton Spandex/Cotton Lycra.  Lycra is a name brand of spandex, so they are essentially the same fabric (much like tissue is to kleenex). This has good stretch and recovery with the spandex in it, but has much more body.  Meaning it will not drape towards your body, but stick out more stiff and hold it’s own shape.  I prefer to use cotton spandex on tighter fits, since there is no need for drape.  I find it not very flattering on a looser fit because it doesn’t drape under bust as well and will feel a bit tighter due to the thicker, more stable feel.  A lot of seamstress love this fabric because it is easy to find in great prints and a wide variety of colors, as well as a bit easier to work with because it is thicker.  And I love it for youth, but not for myself.  If we can all gang up on the knit companies to print their amazing customs on fabric with more drape I’ll sign the petitions 😉 I just can’t feel great in most cotton spandex shirts. I didn’t even hem this one because I knew it would quickly be cut up into something for baby girl! With that said, my sister likes a cotton spandex tee because she doesn’t like her fabric to drape to her waistline/under her bust. She prefers the more stable knit. Again, all personal prefence and learning to pair it with the right pattern for yourself!

IMG_4316 IMG_4323 IMG_4344


Stretch French Terry.  This is a medium weight french terry with good horizontal stretch.  French terry is a very popular fabric right now, and I share the love of it! But when using french terry you need to be aware that it doesn’t have great drape.  As you can see, it doesn’t fall under the bust to the body, but straight down. And my sway back pooling is much more obvious. It feels tighter on as well even though it has some stretch because it is thicker.  Now there are some with rayon in the blend which helps give it drape.  But most french terrys are much more stable on the knit spectrum and do better as something that needs a thicker, more stable fabric like pants, shorts, jackets, sweatshirts, etc… I added a cowl on this one for a fall/winter look since french terry is a thicker, warmer fabric.

IMG_4289 IMG_4298 IMG_4300


Liverpool.  This is also a very popular fabric right now. It is a poly spandex blend with high horizontal stretch and a texture on the right side. It has a feeling close to scuba/techno/neoprene. It is a more stable knit without much drape.  This is better suited for something that needs stretch and stability, like a tighter dress, pencil skirt, ect.  It does not have good drape, as you can see it goes straight down from my bust instead of falling toward my body under towards my waist.  It also makes the tiny “wings” on the dolman very bulky/poofy.  I was sad to cut into this gorgeous liverpool for this example, because I knew it wasn’t a great match for this pattern-but for the good blog post I did it!!! I hopefully still have enough for something that does work well with it! It is also all polyester, so it doesn’t breathe well. So, for me in TX I can only handle a thick poly knit during winter months.

IMG_4724 IMG_4730 IMG_4738

Ponte Roma would also belong in this high stretch, but more stable category.   It is a poly, rayon, spandex blend and is great for the same things: tighter dresses, pencil skirts, pants, etc.

Pictures coming soon!

Cotton Jersey.  This is a thinner cotton jersey.  It doesn’t have a lot of stretch or recovery since there is no spandex in it.  It doesn’t have great drape.  This is thinner cotton jersey so it has a touch of drape just because it is thin, but anything medium weight is considered more a “t-shirt jersey” without much drape or stretch at all (think traditional t-shirts).  I like this best for boys and men.  I don’t love drape on a man usually, they’re shirts are cut straight and they are meant to hang pretty straight as well (Unless they have some amzing abs to show off 😉 ).  For myself though I don’t love cotton jersey, but I do use it for a traditional t-shirt style from time to time.  Notice is looks and feels tighter because it has very little stretch.  it also sticks out from bust and booty instead of draping towards body.  I have a sway back, which I didn’t alter for here (you can see the pooling of fabric on my lower back) and it is much more obvious in a stable knit then a soft, drapey knit.  So if you’re still learning to perfectly alter for your body shape more stable knits are less forgiving to those alterations you may need, including full bust adjustments.  I do have some tees in a jersey I love though, I like to pair it with something only semi-fitted throughout the whole body so it doesn’t feel too tight on my chest and doesn’t miss the drape on a looser area.

IMG_4420 IMG_4461

From top- the more stretch and drape the looser and more flowy it will look – to the bottom–the more stable and less stretch will be more stiff and tighter feeling garment.  Keeping this general rule in your mind when pairing fabric to patterns will help you decide what will give you the best look and fit!

This isn’t even close to all the fabric choices that are out there, but I tried to include the most popular knits I see in the shops and being asked about in the P4P group on a daily basis!  I hope it helps you when picking fabric to pair with a pattern for the perfect look and outcome!

And remember that practice makes perfect- so if you make a few garments with the wrong fabric choice, use it as a great learning experience and know you’re a better/more knowledgeable seamstress after that mistake 😉


Filed Under: Fitting, P4P University, Uncategorized 27 Comments

Siren and Hello Sailor Hacks

April 25, 2016

swim hacks

We couldn’t help ourselves to a few hacks to the new Siren Swim Top and Hello Sailor Swim Bottoms during testing!  We loved them so much we decided to share a few of our favorite quick and easy mods.

The Double Strap Hack: (My favorite! I couldn’t stop using this one 😉    )

IMG_1473IMG_1412 P4P PDF Patterns Siren Swim Top double crossover strap

This one is super simple and quick! You have 4 straps per cutting instructions.  Instead of sewing them right sides together to create 2 straps, we sewed each strap folded in half width-wise down the long edge.

IMG_6678

Turn right sides out.

IMG_6680

And place both side by side on the top pick ups.

IMG_6683

IMG_6684

The Double, Straight and Cross Strap Hack:

IMG_1126

Then we had even more fun doing one set of straight straps and one set of criss-cross straps… cute right?!?!? Just baste and double check you have them all placed correctly before finalizing the stitching! I slipped swim elastic inside this navy/white top straps for more support.  It also keeps the straps in place and hold their shape (not get folded or wrinkled up).

IMG_1089


Fringe Hack:

The only change during construction is that I did not sew the flounce into the side seam.

IMG_6761

Once the top was compete I began in the center and used my rotary blade and clear quiting ruler to cut 1/4″ strips up to the seam line.  I continued all across the top, keeping my slits straight. I wont lie though, it was REALLY late and I was tired… I threw the ruler aside and went at it all crazy!

IMG_6762 IMG_6763

I went back with scissors and clipped all the way up through the pick ups (I couldn’t get my roatary up that far without cutting through the main top pieces. IMG_6764 IMG_6767

It was crazy windy on our picture day with my cousin (isn’t she the cutest?!?!) so we only caught a few where the fringe wasn’t wildly blowing around! You could do the slits as small as your patience allows for and you could also tug them a bit to let the knit curl to hide some imperfections too! It’s a fun, flirty mod! I hope you don’t mind the other watermark on her pictures, my amazing sister took these photos and edited for me :).

IMG_1249 IMG_1315


Double Flounce Hack:

Creating the double flounce is as simple as cutting 2 of the front and back flounce pieces.  I just kind of eyeballed  how much shorter I wanted the top layer flounce but ended up cutting about 1.5″ off the front and 1″ off the back. Depending on your size, you could also use a smaller size length as a guide.   Be sure to keep the side seams the same length on both the front and back flounce of the layer you cut.  For construction, I basted the two layers together to help keep them together as it is a little trickier to stitch 5 layers of fabric.

P4P Siren Swim Top Double Flounce Hack


HELLO SAILOR BOTTOMS

Piping Detail Hack:

This adds a bit of visual interest to those paneled options! Just cut strips at least as long as your seam where your front center and front side panels meet. The width is a personal preference, but you will need double what you’d like your finished width, plus double the seam allowance (3/4″).  I choose 1/4″ finished width for mine, so I cut a strip 1 1/4″ wide.

IMG_6724

Fold strip width-wise and place right sides together matching raw edges along seam where front center and side panel meet.

IMG_6727

Then place side panel on top and stitch with normal 3/8″ seam allowance. (You will be stitching through 4 layers of fabric)

IMG_6728

I choose to top-stitch mine down along the folded edge.

IMG_6731

I love the little, simple detail!

IMG_1032


Separate Skirt Cover Up Hack:

I created a separate skirt for my cousin to use as a cover up! I just cut 1 extra waistband than the pattern calls for and sewed it to the skirt just like the waistband (folded with right sides together along the top raw edge.)

Now she can slip on the skirt when she’s walking around and take it off when she’s ready to really go swimming 🙂

IMG_1241

IMG_1309


One-Piece Hack:

For some, a two piece suit is not their style, so we hacked the Siren Swim Top and Hello Sailor to create an on trend one piece. You will construct your top and bottom as in the tutorial but will not attach your bottom band of the top or the waistband of the bottoms.  I chose to keep the bottom band of the top for extra support, but you can omit if you choose.  We will be connecting the top and bottom with a connector piece so you do not need the waistband of the bottoms.  Try on your top and bottom.  p4p pdf patterns siren swim top hello sailor one piece hack

To determine the length of the connector piece, measure the distance between the raw edge of your top and the top edge of your bottoms at center front and center back.  You may need to find someone to help you with the back ;). Add double the seam allowance (0.75″)  My gap was about 3″ so the length of my connector piece was 3.75″.  I used the waistband measurement for the width of the band as I wanted it to be held tight there.   Note: if your hip is much wider than your under-bust and waist, it will be difficult to pull up over your hips so you may need to shimmy it on!


Connecting the top and bottom is the same construction as the bottom band and waistband but you will be using the connector piece instead.  Stitch short ends of the connector piece and bottom band.  On the bottom band only, fold with wrong sides together.

p4p pdf patterns siren swim top hello sailor one piece hack


Matching raw edges and wrong side facing up, slip bottom band over connector piece.  You should have 3 layers of fabric.  Mark in 1/4s and with right sides together, match raw edges of the connector piece to the Siren Top.  Stitch.  Flip open and press seam down.


p4p PDF patterns Siren Top and Hello Sailor One Piece Hack


Turn your Hello Sailor bottoms inside out. Matching raw edges of the connector piece, with right sides together, slip your Siren Top inside the bottom. Be sure to match the front of your top with the front of your bottoms. Stitch.


P4P PDF patterns Siren Swim Top Hello Sailor One Piece Hack P4P PDF patterns Siren Swim Top Hello Sailor One Piece Hack


Filed Under: Pattern Hacks 12 Comments

  • « Previous Page
  • 1
  • …
  • 8
  • 9
  • 10
  • 11
  • 12
  • 13
  • Next Page »

connect with me

  • Email
  • Facebook
  • Instagram
  • Pinterest
  • YouTube
Privacy & Cookies: This site uses cookies. By continuing to use this website, you agree to their use.

To find out more, including how to control cookies, see here: Cookie Policy
  • Privacy Policy
  • Refund Policy
  • Contact Us
  • About

Copyright © 2026 Patterns for Pirates

Copyright © 2026 · Genesis Framework · WordPress · Log in