Patterns for Pirates

P4P stylish, modern, wearable patterns

  • Home
  • Blog
    • Frequently Asked Questions
    • Pattern Releases
      • Free Patterns
    • P4P University
      • Fitting
      • Sewing with Stretch, Knit Fabrics
      • Sewing with Woven Fabrics
      • Sewing Machines
    • Sew-A-Longs
    • Fabric for Pirates
    • Pattern Hacks
    • Announcement
      • Blog Tours
      • Contest/Giveaway
  • Shop
  • Bundle Discounts
  • Flash Friday
  • Gift Cards
  • My Account
  • Cart

Basics of Sewing Swim

April 25, 2016

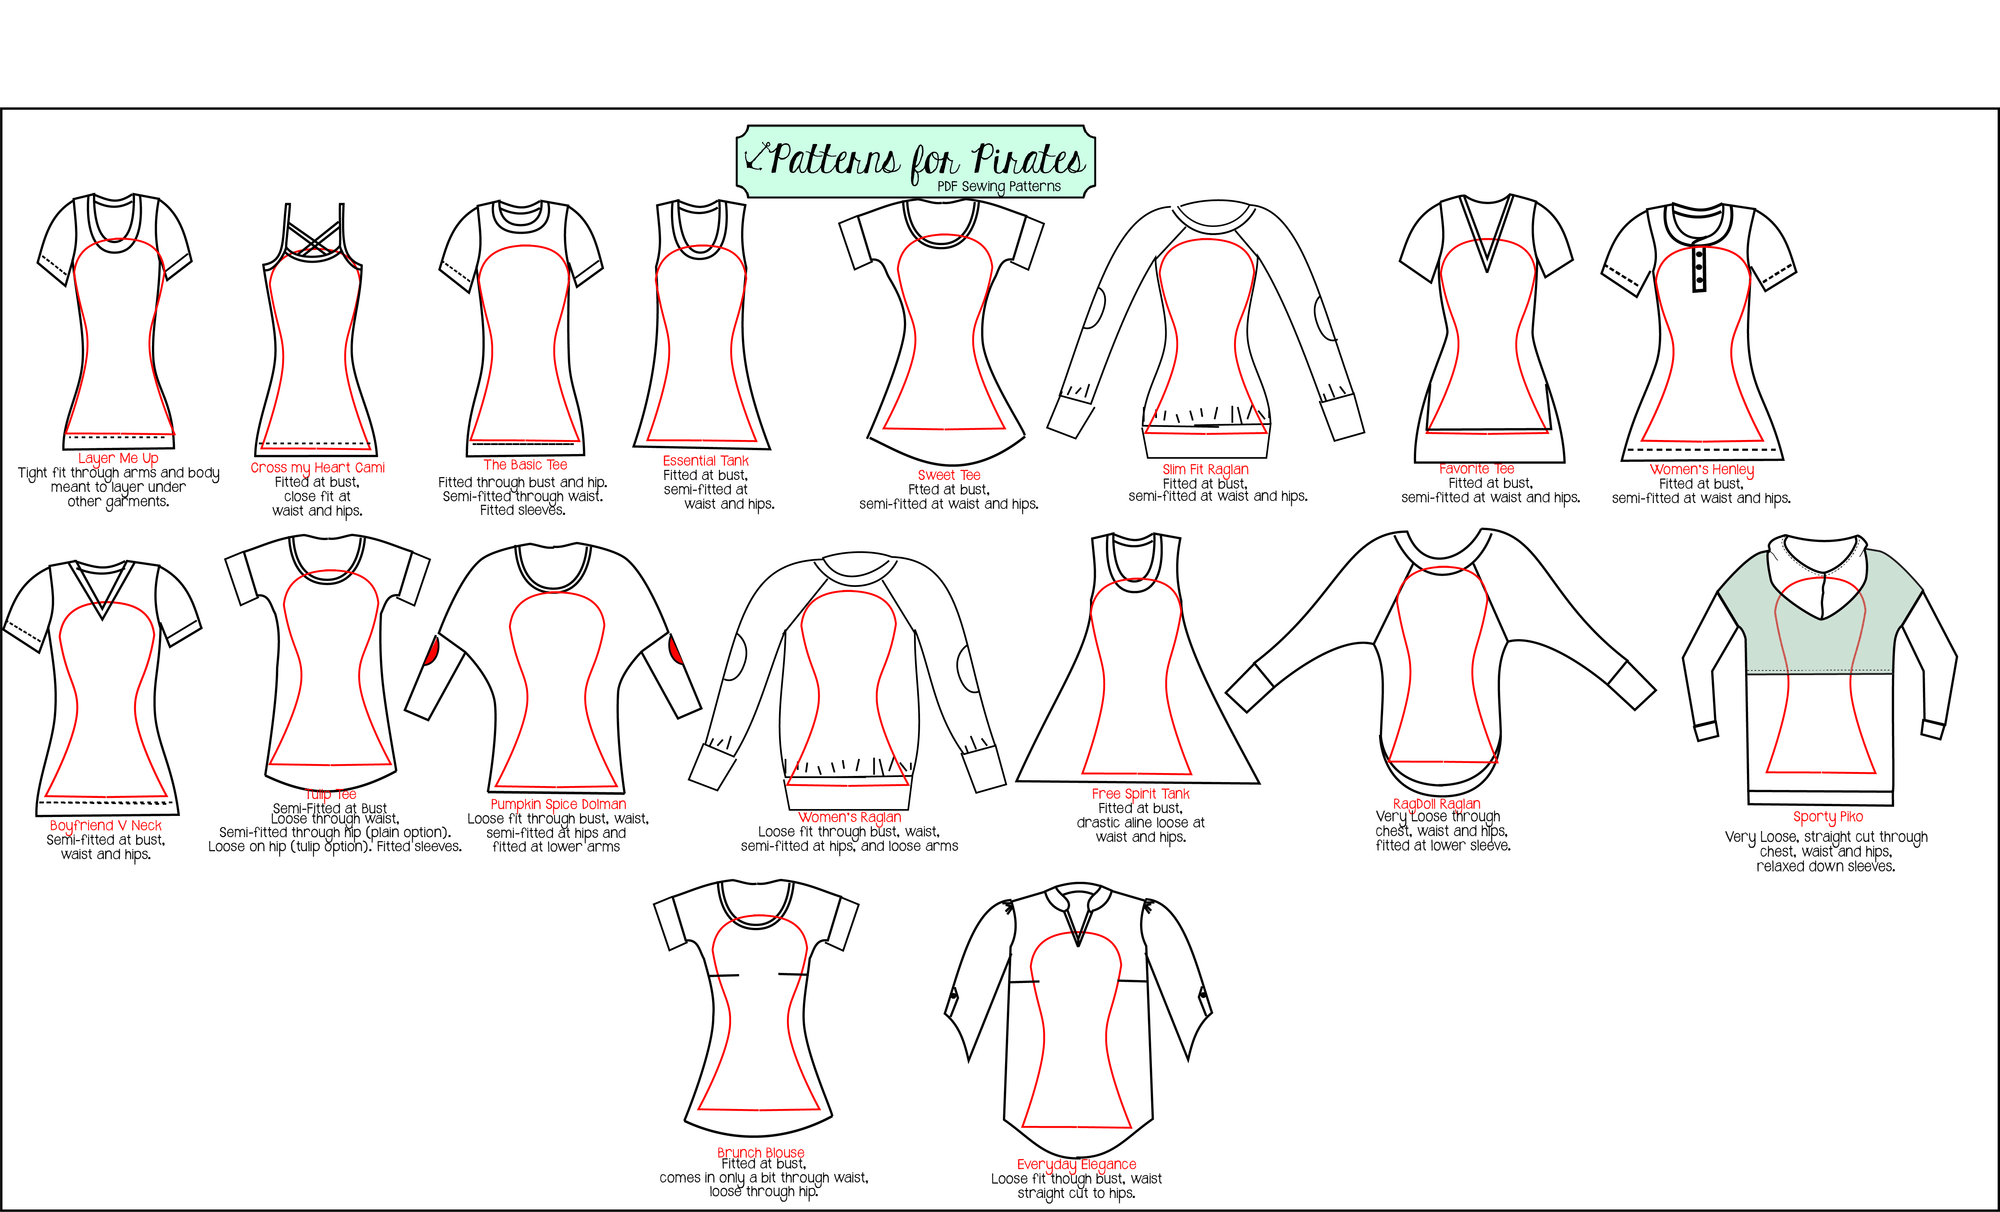
As I’m approaching my very first swimsuit pattern release, I realize there will be a lot of questions about sewing swim!

So here are some bullet points you’ll need to know before you jump into your first suit! 🙂

swim

Common Questions:

  • What type of fabric do you need? 
    • Nylon Spandex is the traditional swim knit. There are also some polyester spandex blends that are capable of with standing the chlorine and can hold up to the activity.
    • My favorite suit I made was out of supplex, a nylon spandex.  I almost always use a nylon spandex rather than the poly blends, it’s just my personal preference.
    • Just like all fabric types you will have a wide range of quality.  Great swim knit can be a breeze to work with, while cheaper/thinner/slinkier swim knit can really test your patience ;). If you’re sewing swimwear for the first time, I’d recommend buying a good quality swim knit even if you’re nervous.  It is much easier to work with!
    • How can you tell if it will be easy or more difficult to work with online? Watch the weight- steer clear of lightweight, drapey descriptions and try to stick with medium weight knits.
    • Lining- You can use a swim lining or just self line with more swim knit.  The self lined suit will most likely fit and feel a bit tighter because usually your swim knit is a bit more stable than the swim lining.
  • Do I need special thread?
    • Nope 🙂 You can use standard poly thread like always.
    • You can use a stretch thread in your loopers or bobbin for more stretch. I’ve done both and haven’t ever had issues with threads popping, but I recommend it if you’re planning on getting tons of wear and being very athletic in it.  (I highly recommend it for youth- they wear them more often, are more active and they often get passed down to other kids throughout the years.)
  • What is the best stitch?
    • You can use your serger or your favorite stretch stitch.
    • When using my machine I usually use the lightening stitch or regular zigzag stitch. I use my coverstitch as well for finishing hems.
    • I baste with a stretch stitch as well, you can technically baste with a traditional long straight stitch, but if you don’t pull  your basting stitches you will hear those threads pop when you try on/wear…which can be scary ;).
    • stretch stitches
  • What kind of needle should I use?
    • You need to use a stretch needle. These are best when sewing fabric with high spandex content.
  • What other notions will I need?
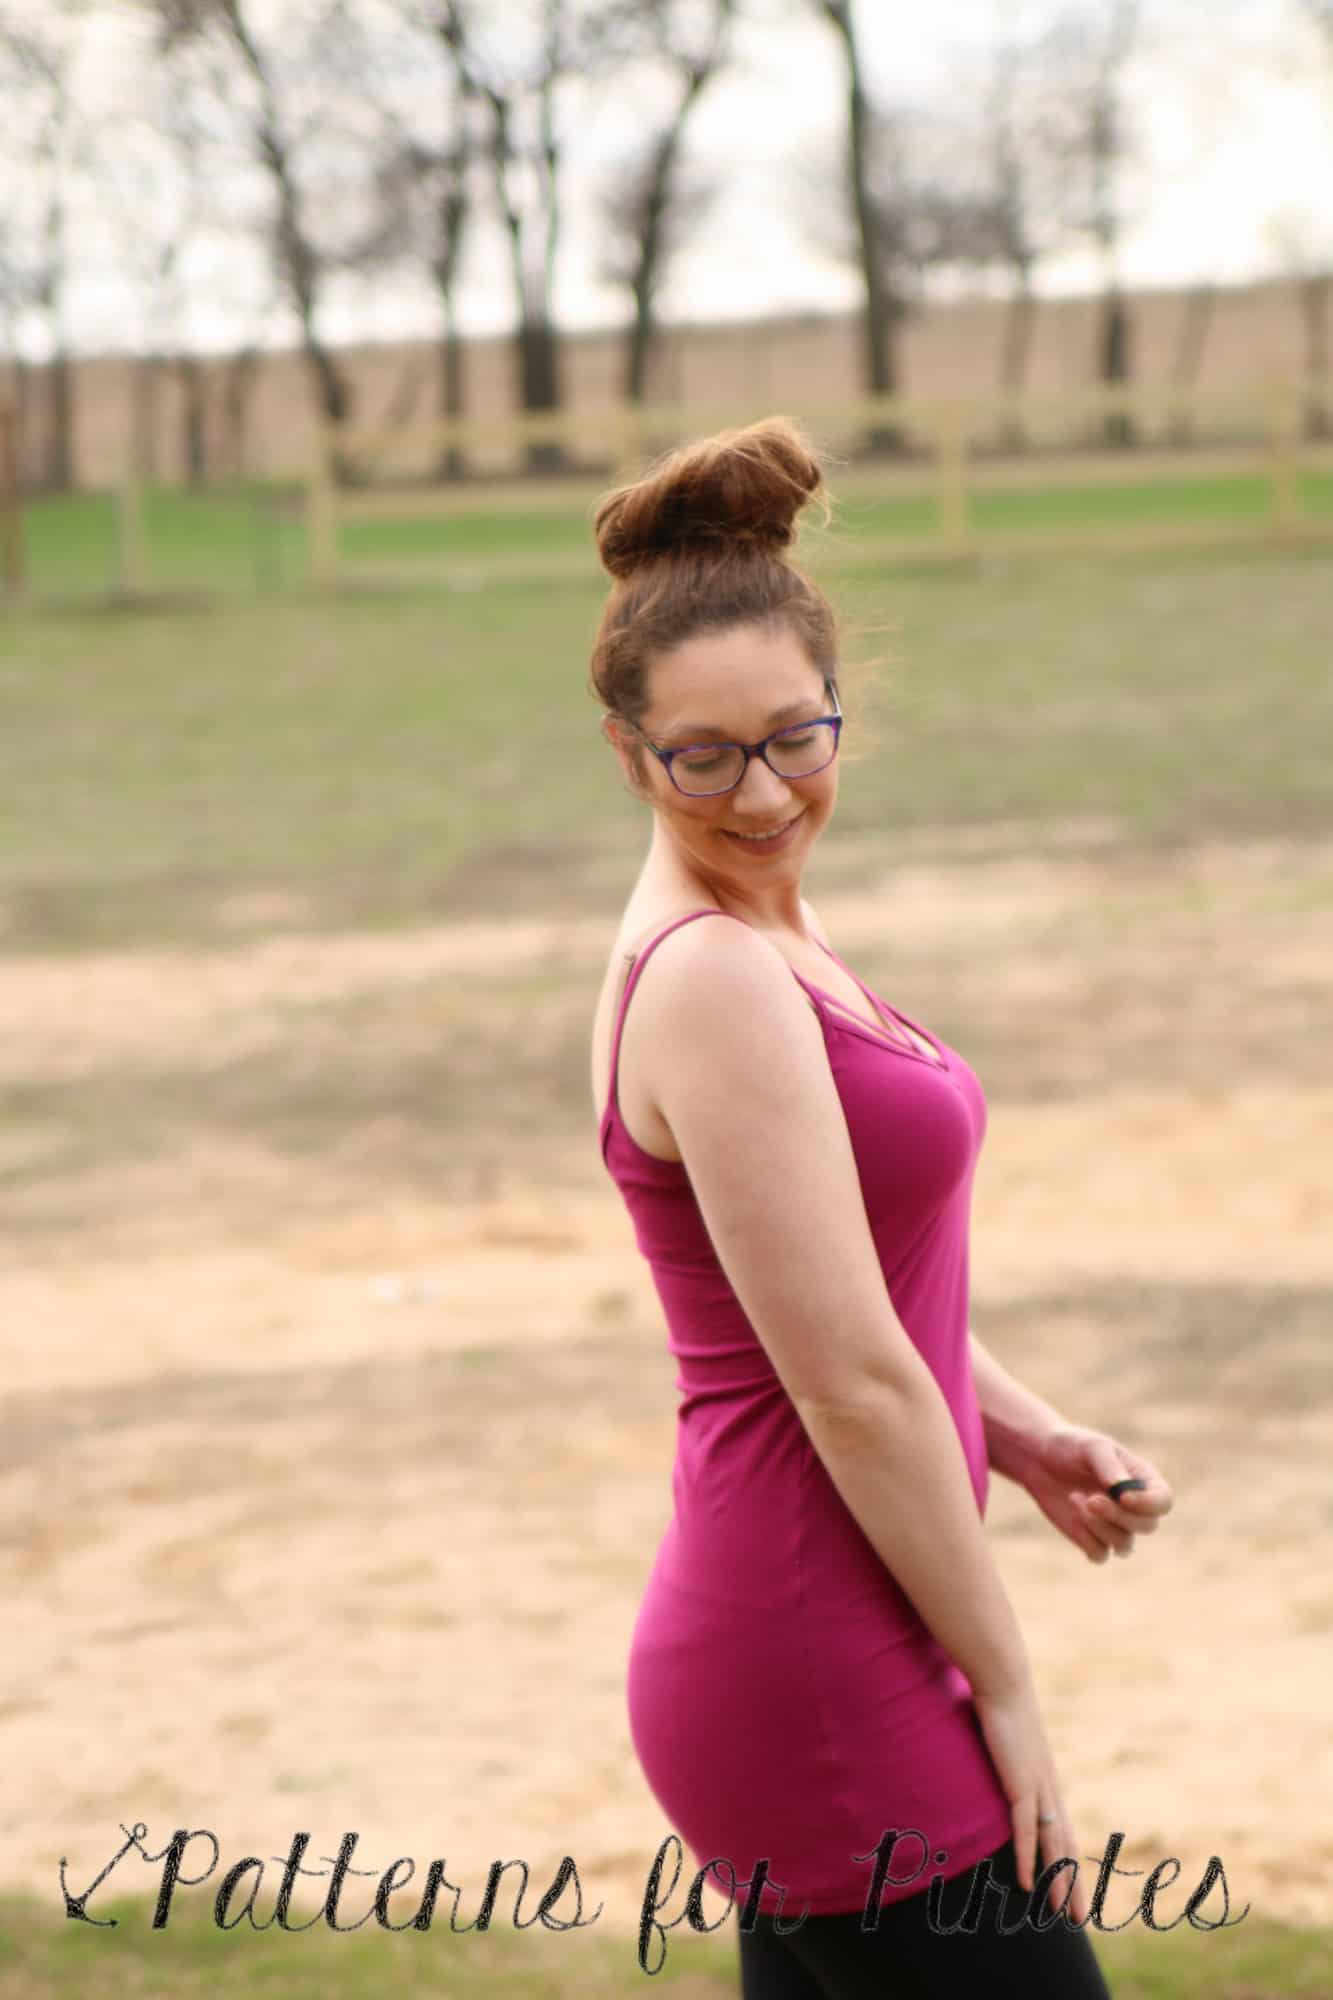
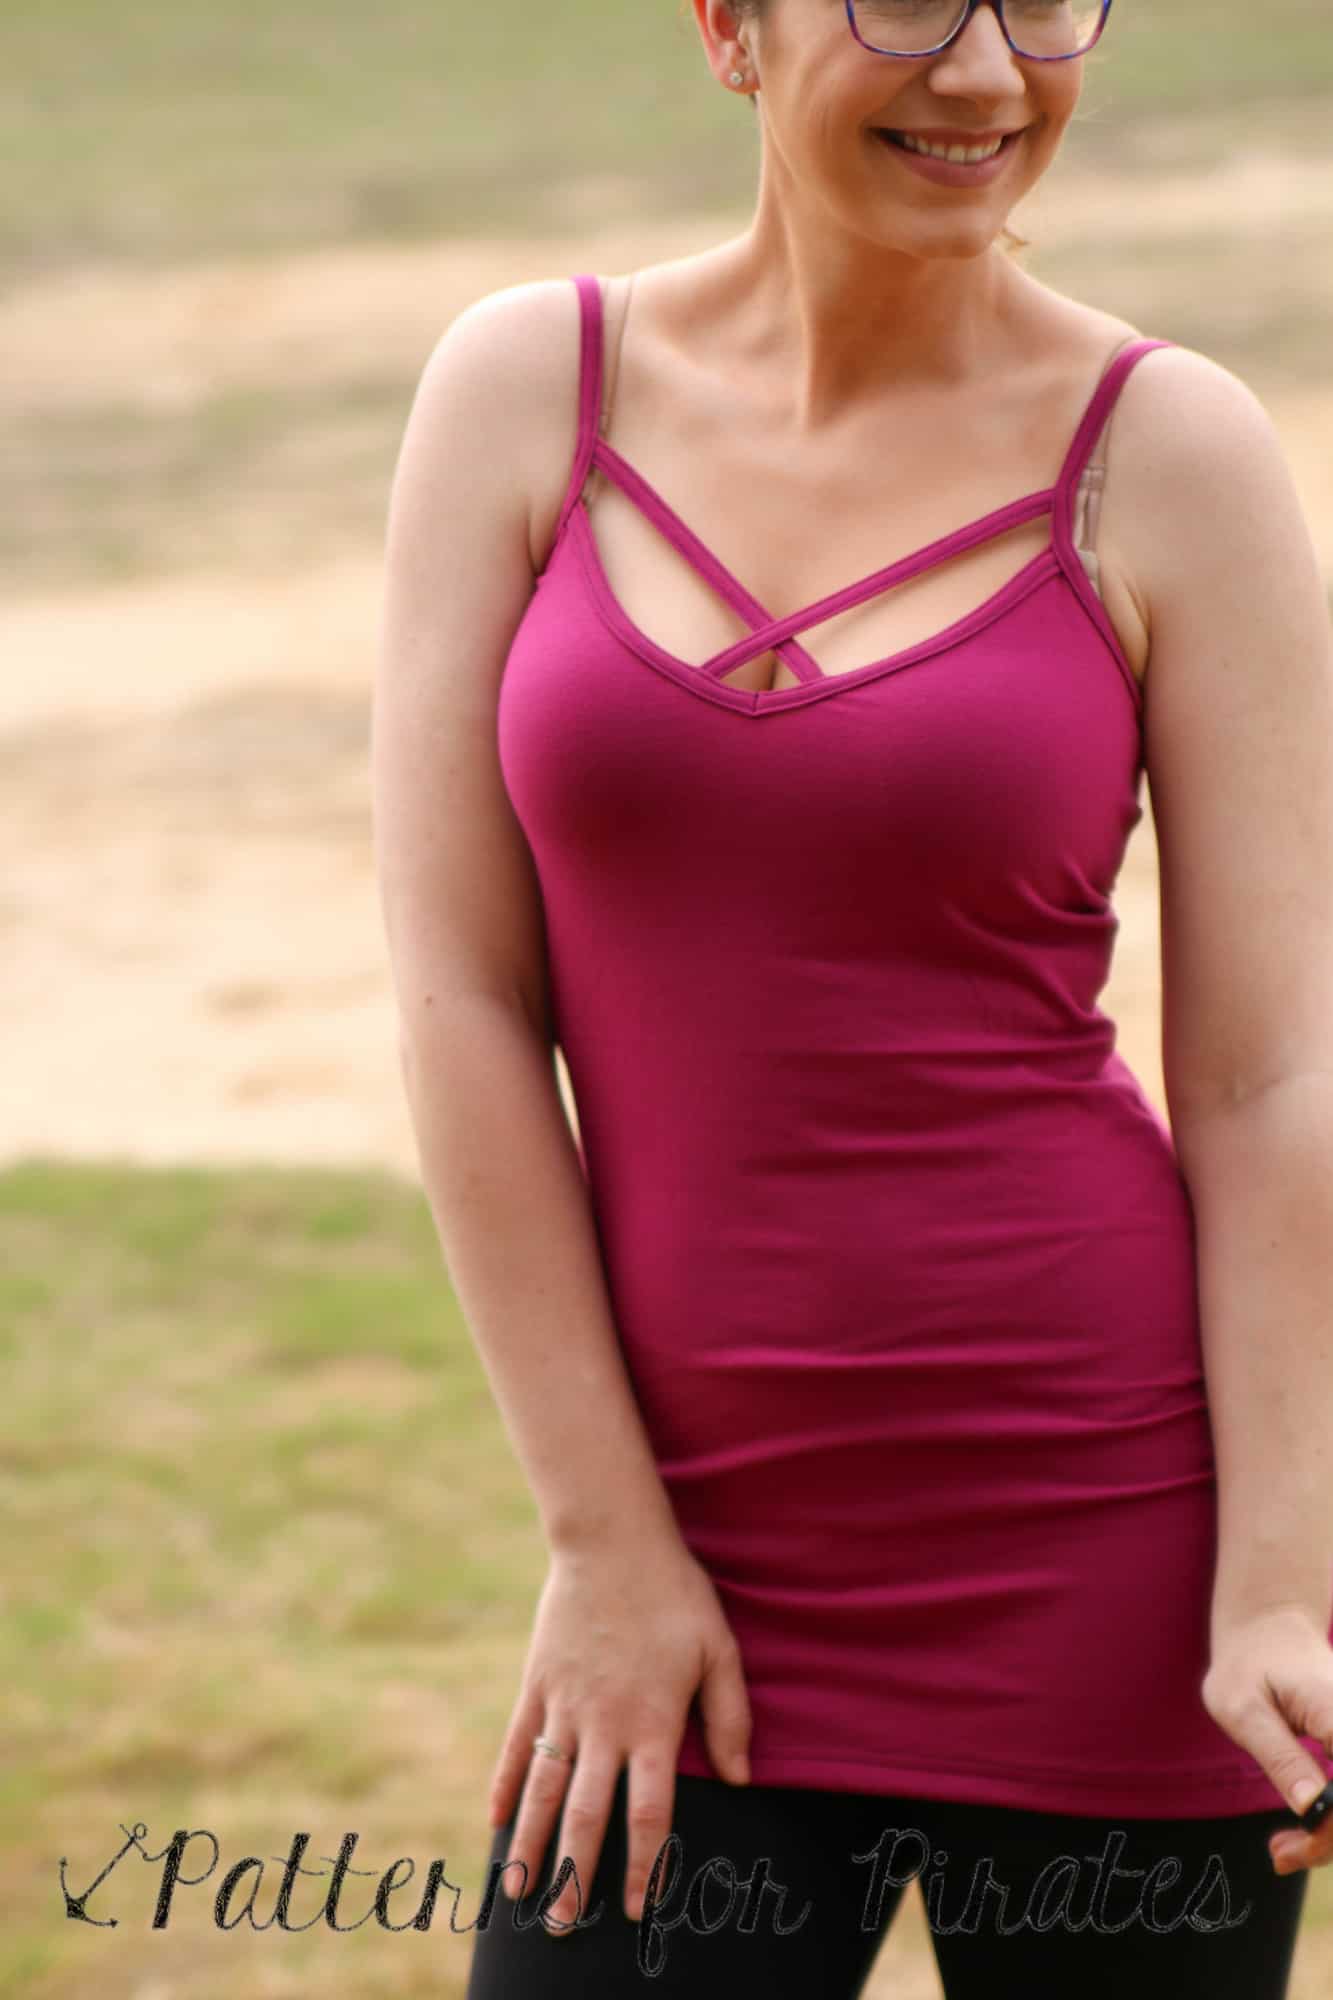
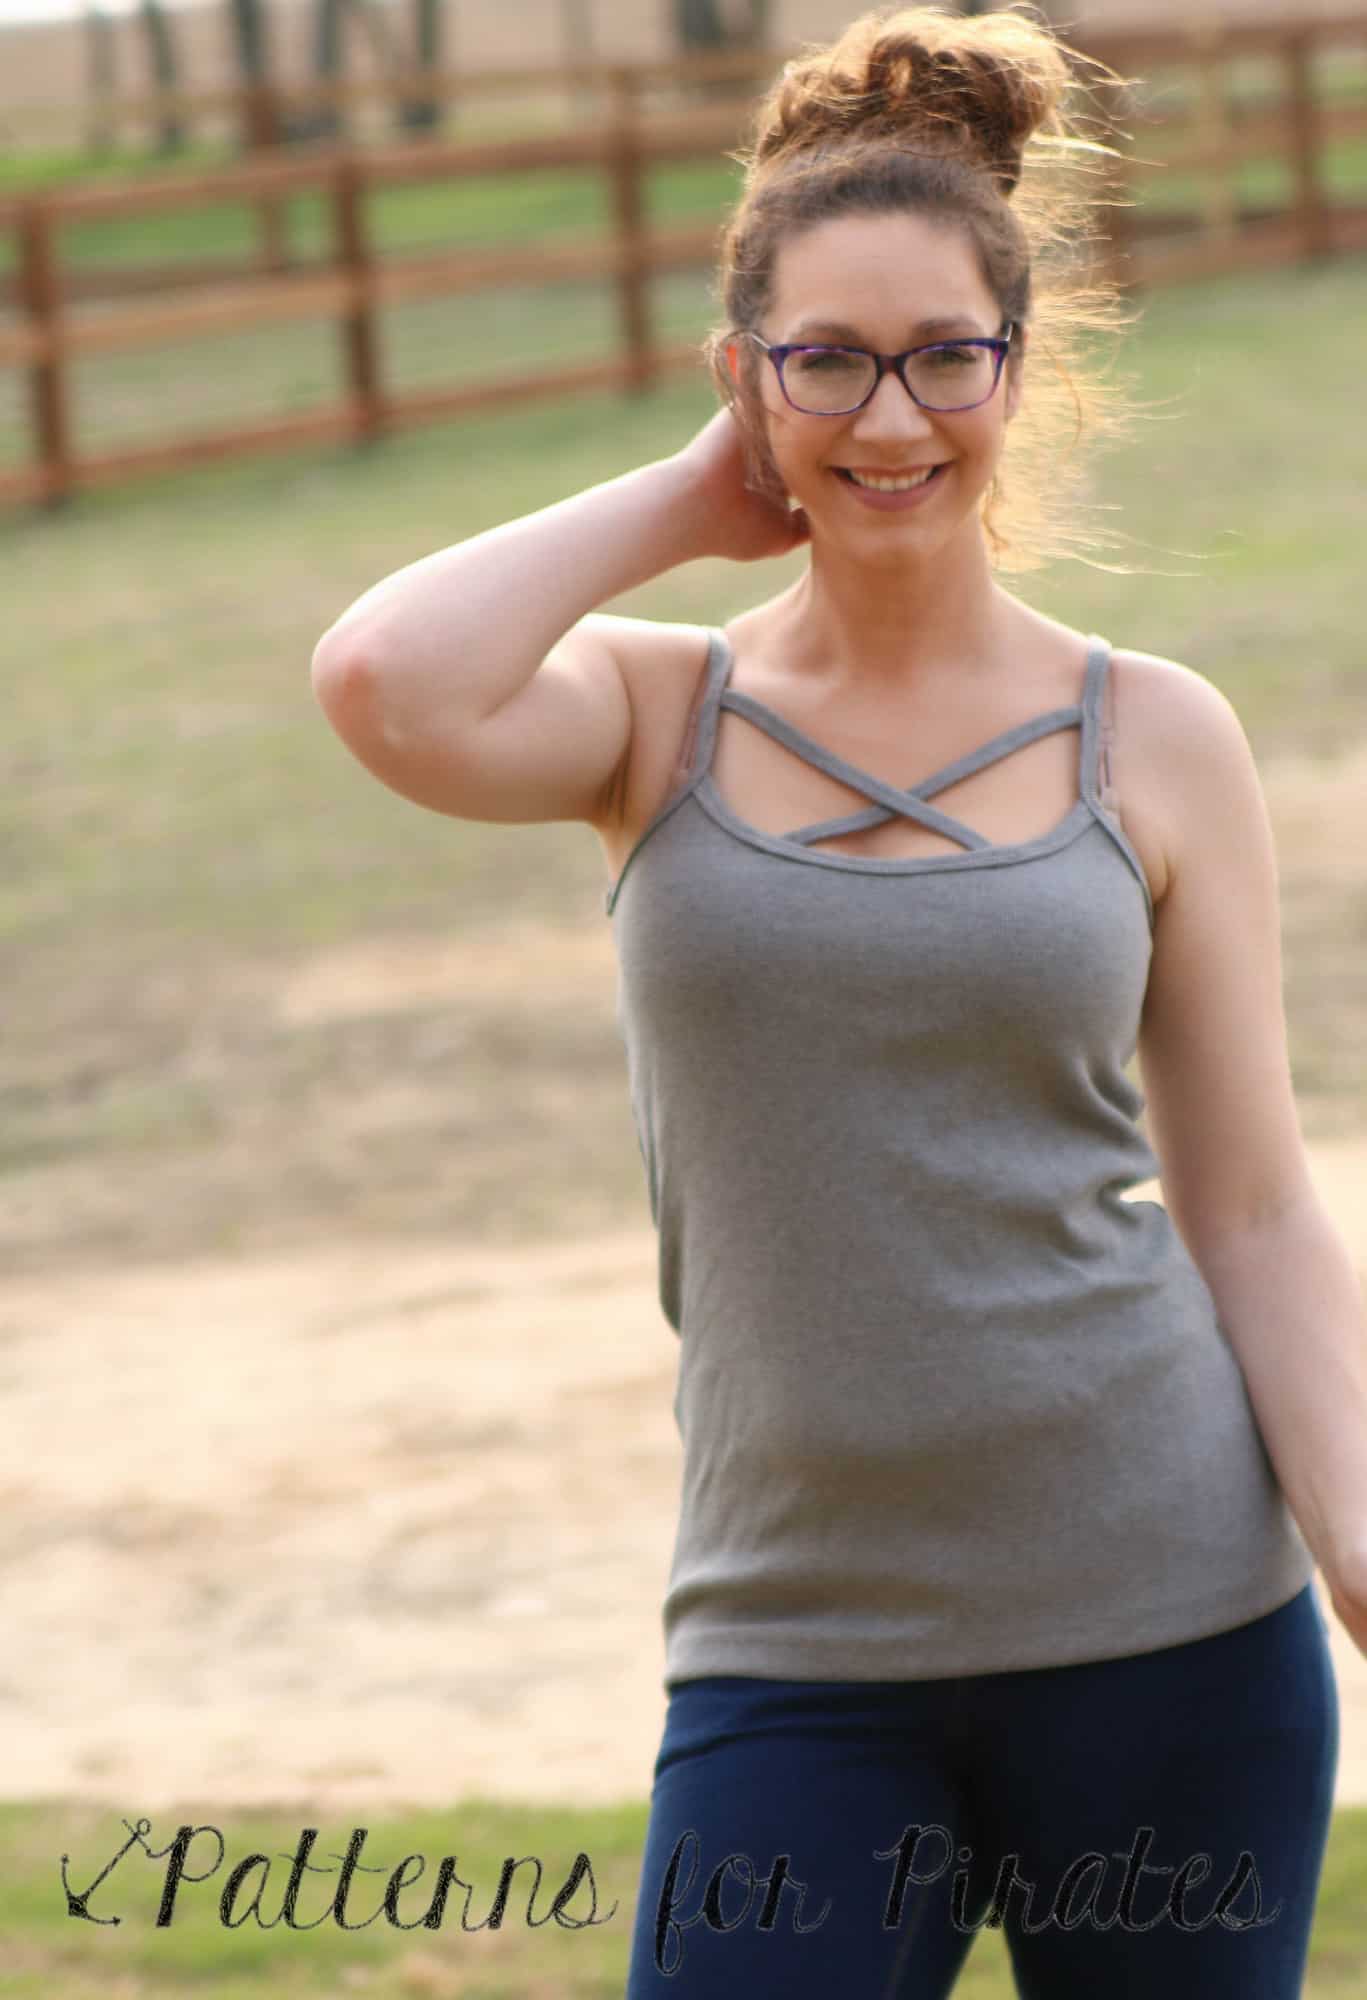
    • You will need a SWIM elastic.  Even if you are using the top as a sports bra, I still recommend using the swim elastic.  It has more stretch then regular elastic and will withstand the wear and tear much better.
    • I highly prefer the cotton swim elastic to the clear plastic kind. It is so much easier to work with and softer.
    • IMG_0010
    • Don’t let the elastic scare  you!
    • And don’t skip it! I know a lot of ladies will use bands on swim in place of elastic, but I don’t recommend it.  Elastic keeps it shape always- wet or dry.  Swim fabric on the other hand gets heavier and stretches out when wet (and depending on quality can stretch enough that it is loose while swimming.) So, if you don’t ever want to loose your bottoms or have to constantly tug back in place don’t skip the elastic!!
    • Here is a little video of me putting in some swim elastic to help!

  • How can I make sure the top is supportive enough to hold me up?
    • Follow the tutorial and use all the suggestions to add more support.  If you skip any, you might regret it if you’re looking to be very active or have a larger bust to hold up.
    • Power mesh- this is an inner lining mesh spandex that you can use to add more support to a suit. It stretches less than swim knits, so it will hold in your body better on that section you place it. I only recommend using it in some of the suit and for adults only.  I like to use it on the front of both the top and bottoms.  If you have a smaller bust, you most likely will not want it in the top.  It is something that will “smoosh” you like a minimizer.  There are varying degrees/quality of power mesh as well. You can get looser and stronger depending on how much activity and “smoosh” you’d prefer in your suit.  There is also “power net” which is an even tighter mesh.  Use this one with caution as you might need to go up a size to accommodate the amount of stretch.
    • Swim cups- I used a sew in swim cup in almost all of my suits and sports bras too.  I like the tighter feel (the cups don’t stretch like swim knit- so it will feel and be tighter across the chest if you sew them in.) and the thicker layer of coverage for my bust.  I HIGHLY prefer the soft cups.  I find the molded cups to be really unforgiving in perfect fit (lets just say the D/DD was no where NEAR fitting my D cup bust… I was really channeling the Madonna cone look :/ ) and are much more difficult to get placed perfectly and to sew in nicely and neatly.  For larger then a D/DD cup you’re really only getting some coverage for the “important part”.  You will need to slip your lining on  (I recommend wearing a bra/sports bra) to get a good placement and make sure it’s covering that important part, pin in place, and sew in.
    • Remember you’re looking for your sewing cup size- which is the difference between your upper and full bust (NOT under and full bust).  You don’t want your cups oversized.  They will take up too much of your top and you will loose too much stretch that you need for a good fit.
    • IMG_0081
    • I also have an option for adding boning to the side seams, my other sister Megan loves this one! You’ll just need lightweight boning:
    • IMG_6694
  • Where can you get these supplies?
    • Here is a Note on my sister’s (the swim suit sewing queeen ;)) FB page with tons of suppliers:
      • https://www.facebook.com/notes/coles-creations/buying-swimsuit-fabric/10150740266823620
  • How tight should it be?
    • Traditional swimsuit fit has negative ease, meaning the finished measurement of the suit will be smaller then your body.  It will have to stretch to get on.  Suits are generally 20-25% negative ease.  Some athletic ones (think Speedo, Nike, etc) have 30% for more intense work out/swimming needs.  Don’t size up if you plan on swimming at all in it, you will need that negative ease to keep the suit in place when wet.  If you are at the lower end of your size range you might even need to take a bigger seam allowance to make it snug enough (this will depend on quality of swim knit as well, the super stretchy thinner fabric will mean you will need it tighter).
    • The elastic around the edges of the suit are there to help keep everything in place as well.  It might “squeeze” you a bit when not wet, but again you will want that very snug to make sure your suit isn’t shifting while you’re swimming.

Have FUN sewing and swimming!  

IMG_1335 IMG_092913040907_10103939304773709_3823376724495832161_o IMG_099613041099_10154119162434666_7968371201553453968_o (1)

Filed Under: P4P University, Pattern Release, Sewing with Stretch, Knit Fabrics, Uncategorized 15 Comments

Exposed Seams Boutique Look Hack

March 8, 2016

I’ve seen the boutique french terry raglan with exposed seams countless times in the group, pinterest, and other sewing boards over the past couple years! I made one about a year ago, but never wrote up a blog about how to get the look.  We’re still asked for it all the time, so I did another one while we’re updating the Women’s Raglan to include the extended plus sizes and new features our newest P4P patterns have, like layers. It’s looser fit is perfect for french terry, which is what the boutique ones are always made of and gives the same “slouchy” looser fit.header

Overall, it is a really basic “hack”.  But, I’m going to have to beg forgiveness for the photos! Apparently I did not check my photos as I was taking them and they are not great quality!  Hopefully you can enjoy my Peter Pan-esque comedic shadow in them!

You will cut out your pieces exactly the same as a normal raglan for the main shirt.  If you want to add the cowl with unfinished bottom edge you will cut 2 like the pattern states, but NOT on the fold.  You could still cut on the fold to keep the fullness and just not sew in the bottom edge as well.  Depending on how thick your fabric is and how big you want your cowl.  I easily get claustrophobic with things around my neck, so one layer not on the fold was an easy decision for me ;).

SAMSUNG CAMERA PICTURES

When assembling the sleeves to the bodice front and back you will put WRONG sides together and stitch with your sewing machine using your favorite stretch stitch.

SAMSUNG CAMERA PICTURES

Trim the notches and smooth out your seam allowance.

SAMSUNG CAMERA PICTURES

Press seams out.  You could top-stitch here if you preferred, but I left it open and free 😉 I thought it went with the look better.

SAMSUNG CAMERA PICTURESSAMSUNG CAMERA PICTURES

Sew down side seams with right sides together, like you would normally.

SAMSUNG CAMERA PICTURES

I added the inseam pocket option from the Add on Pack as well (I can’t seem to make a tunic length without this option anymore!).  I went with hemming the front to the right side to show the wrong side there as well.

SAMSUNG CAMERA PICTURES


IMG_9031

For my hems I left them all raw and allowed them to roll up towards the front to show the wrong sides there too.

SAMSUNG CAMERA PICTURES

I attached the cowl the same way as the tutorial states, but only attaching one raw edge of the cowl to the neckline instead of two.

SAMSUNG CAMERA PICTURESSAMSUNG CAMERA PICTURES

IMG_9048

Done! Now you have a lovely boutique look that was such an easy sew and hack!

IMG_9025  IMG_9042 I

Filed Under: Pattern Hacks, Sewing Techniques, Uncategorized 1 Comment

15K Member Celebration!!

February 24, 2016

I’m pretty sure we blinked and the Patterns for Pirates Facebook Group welcomed it’s 15,000th member.  And then we blinked a few more times and we’re closer to the 16K mark at this point!  It’s been amazing being surrounded by a bunch of women (and some men too!) who love sewing, supporting each other, and the patterns that we’ve put out over the last few years.

We wanted to thank you for being so awesome.  And what better way to do that than by having an AMAZING giveaway?

12687867_10102520555009443_3987517031139904711_n

Get ready to drool, you guys.  ONE lucky winner will walk away with a crazy amount of prizes.

This wouldn’t be possible without our fabulous sponsors:

Girl Charlee | Sincerely Rylee Fabric Shop | Knitpop | Zenith & Quasar Fabric | Pink Zeppelin Fabrics | KNITorious Fabric | Fabric Stache | Sweet N’ Charmed | The Fabric Snob | Craftsy | PurpleSeamstress | Raspberry Creek | Fabric Snob | Rikki Prints | Edge Custom Apparel and Accessories | Handmade Escapade | Fabric Worm | My Vinyl Direct

12728959_10102520555019423_3214329718776747699_n

And on top of it all, P4P is sponsoring by giving away a Silhouette Cameo.  Now you can sew up your favorite Patterns for Pirates designs and put some awesome HTV designs on them yourself.  No longer will you envy everyone else’s graphic tees…because you can create your very own!

12711113_10102520555368723_2512737393670057854_o 12688027_10102520555044373_4781542453339271836_n

Be sure to enter into the giveaway and don’t forget to leave our sponsors some love!  Good luck!

a Rafflecopter giveawa
y

Filed Under: Contest/Giveaway 34 Comments

Have you signed up for our Newsletters?

February 9, 2016

Don’t miss out on any news from P4P by signing up for our monthly Newsletter!

We send one at the end of every month to keep you guys up to date on what we’re working on.

newsletes

We will also be sending out SALES through them, so if you’re ready to never miss out on a P4P sale then make sure you sign up today!

Here is a screenshot of where to subscribe on the Home Page on a desktop view:

newsletter sign up

And mobile view:

newsletter sign up mobile

You will receive an email verifying subscription, so check those junk/spam folders for it if you don’t see it right away!


And to give everyone a heads up! Our next site wide sale will be announced through the newsletter!

So make sure you sign up today!

If you have already signed up, but haven’t seen a newsletter make sure to search your junk/spam folder and send it to your inbox!

newsletter

newsletters

Filed Under: Announcement 9 Comments

How to Measure Yourself

February 8, 2016


how to measure yourself by patterns for pirates

One of the most important things in sewing for yourself is to get accurate measurements! It is also much harder than it sounds.  I had my sister take a few quick pictures of me measuring so I could explain and give a few tips.

I took my pictures in a tight tank.  I recommend taking your measurements in a thin/tight shirt or even just in the bra you are going to normally wear. (This is especially important if you are going to be making a more formal garment and plan on wearing a different bra for it- think strapless, push up, etc).

I HIGHLY recommend measuring in front of a mirror! This helps you really see where you are measuring and if you are holding it evenly around your body.  It can mean a big difference!

On all measurements breath normally! Most people want to take a big breathe in and then take them— no need! Patterns are drafted with ease to breathe and move normally 🙂 So breathe in and out, then measure. You want to hold the tape snug to your body, but not squeezing.


Here are some common measurements needed for a pattern:

Bust— Full bust is around the fullest/biggest part of your bust.  You want the tape as even horizontally as possible.

IMG_7952

Over Bust– This is taken around upper back, under arms and over your bust.

IMG_7954 IMG_7956

Under Bust– This is taken directly under your bust around back. Try to keep your tape as even horizontally as possible.

IMG_7957

High Hip– This is taken around  your hip bones (this is where I like to wear my pants 😉 and most youth patterns are drafted to hit)

IMG_7964

Hip– This is a deceiving name.  It is measured around your fullest/biggest part, which is usually your booty. Most definitely my booty is my biggest part 😉  Try to keep your tape as even horizontally as possible (a mirror really helps on this one!)

IMG_7966 IMG_7967

Waist– This is your natural waistline.  Contrary to most belief, it is NOT your belly button or where you wear your pants (even though you might like high waisted pants).  It is taken at the smallest part of your mid section.  if you don’t have a very defined natural waist there is a very easy way to find it.

Take any kind of stretch trim, fold over elastic, thin elastic, even a strip of knit will work, and tie it snuggly around your mid section.  Now MOVE around, bend walk around, sit down, it will naturally settle on  your smallest part.

This is your natural waist 🙂

IMG_7969  IMG_8011

Side Waist Length– Taken from your armpit vertically down to your natural waist.  This measurement is vital in any pattern that should hit as your natural waist like the Sweetheart Dress or Boundless Knit Dress.  Making sure this measurement is accurate will give you the most flattering fit.  If the seam doesn’t hit you at that smallest point then you’re not using it to your advantage 😉

You can see here mine is about 8.75″.  For reference the avg is 8″.  I’m 5’10” :).

IMG_8008

*Updated* I had a few more questions about the side waist length.  So I’ve added a couple more pictures— THIS is how much I LOVE my group, I’m willing to put up pictures in my sports bra 4 months after I had a baby!!!! They are cropped very well 😉

Start with your arms DOWN. You want your tape to start where your crease naturally lies— not all the up to your arm.  Think where you’d like your shirt to be (if it’s all the way up as tight as possible then it is uncomfortable and you can’t move your arms around).

This was such a hard picture to get! But here are the best we could get to explain… yes, I taped the tape to myself lol!!!

IMG_8167IMG_8157 IMG_8159

Thigh- Taken around thigh close to crotch, keeping the measuring tape flat horizontally around.

13091958_10100478273624567_4302024944200204478_n

Total Crotch Length- Taken from back center natural waist, under booty, through legs, and up to center front natural waist.  You will want the tape pulled taut.  The easiest way I think is to tape the center back and then pull through front and read at the front.  These are measured with tight, high waisted yoga pants here:

13082514_10100478273534747_8944216357528044133_n13015562_10100478273554707_4080644557401189276_n

Inseam- Taken from crotch to where you’d like hem of pants. Notice the close up of my ankle here.  The difference between ankle height (for skinny leg options like Peg Legs and SOS pants) and a floor length is 3″ on me! That’s a big difference!

IMG_8175 IMG_8179

Arm length-from armpit to hem of shirt.  Most P4P patterns are meant to hit at the base of thumb, so past the wrist.  It’s just a personal preference of mine– so if you prefer the traditional wrist length here is where you’d want to measure against the finished measurement in the pattern.


IMG_8213

Finished lengths- I will use “inside shoulder to hem” on some shirts and “armpit to hem” on others depending on which is easiest to measure on that particular pattern. Here are both:

IMG_8196

IMG_8205

Take your time measuring yourself to ensure great fit! It will make a big difference in how happy you are with the outcome!

Filed Under: Fitting, P4P University 112 Comments

How to use the new Layers feature

January 9, 2016

header

Patterns for Pirates has added a brand new feature to their newest upcoming patterns! The Layers Feature! This means you can choose to print one size, a couple, or all of them if you’d like.  They will still be the “No Trim” style.

Here is a few screenshots to help you use the new feature.

As always, you will need to open and print your PDF from Adobe PDF Reader (a free download if you don’t have it yet).

This is what your screen should look like viewing the PDF pattern pieces:

Patterns for Pirates how to print layered pdf sewing patterns using adobe (3)

Patterns for Pirates how to print layered pdf sewing patterns using adobe (1)

Patterns for Pirates how to print layered pdf sewing patterns using adobe (2)

Patterns for Pirates how to print layered pdf sewing patterns using adobe (4)

Now you can print just the sizes you need and save some ink and time tracing off your size! 🙂

As requested, here is our on-going list of patterns that have the layers feature (These are also the patterns that include the A0 Copy Shop File Size):

Freebies:

  • Pirate Pencil Skirt
  • Peg Legs
  • Peg Legs- Add Ons
  • Peg Legs- Maternity Add On
  • Tulip Tee
  • Tiny Tulip- Youth
  • Wee Lap Tee
  • Petite Pegs
  • Teeny Beanie
  • Walk the Plank- Adult
  • Walk the Plank- Youth

Youth:

  • Jolly Roger Raglan
  • Jolly Roger Add-On Pack
  • Sugar Pie Dolman
  • Spice Cake Dolman
  • Me Hearties Dress + Peplum
  • Yo Ho Henley
  • Tiny Timeless
  • Baby Bear Joggers
  • Fav Tee
  • Butterfly Cardigan
  • Heart Breaker Cami
  • Little Loungers
  • Sweet Bow Dress
  • SOS Knit Pants- Youth
  • So Classic Sundress- Youth
  • Go To Jacket- Youth
  • Cpt. Mack’s Cardigan

Womens

  • Slim Fit Raglan
  • Relaxed Raglan
  • Raglan Add-On Pack – for women
  • Sweet Tee Dolman
  • Pumpkin Spice Dolman
  • Sweetheart Dress + Peplum
  • Siren Swim Top
  • Hello Sailor Swim Bottoms
  • Layer Me Up Shirt
  • Women’s Henley
  • Essential Tank
  • Sunshine Dress
  • Free Spirit Tank
  • Women’s Henley
  • Timeless Tunic
  • Mama Bear Joggers
  • Carefree Cardigan
  • Granpda Cardigan
  • Summer Kimono
  • Cocoon Cardigan
  • Cross my Heart Cami
  • Favortie Tee
  • Linen Loungers
  • SOS Knit Pants
  • So Classic Sundress
  • Go To Jacket- Womens
  • Ragdoll Raglan

Mens:

  • Go To Jacket- Mens
  • Papa Bear Joggers
  • Men’s Henley

Filed Under: Frequently Asked Questions 70 Comments

Carefree with added Button

December 22, 2015

I’ve seen a lot of draped front cardigans with the big wooden buttons on Pinterest and in the Boutiques…and of course I thought, “I can do that!” So the Carefree Cardigan Big Button Modification was born!

carefree cardigan add big button tutorial

The Carefree Cardigan is perfect for the look.

carefree cardigan patterns for pirates drape front cardigan tutorial

I choose the neckband only option, cuffed long sleeve, and choose to leave the front and bottom raw.

I’ve been making a ton of Carefrees after Baby Girl made her arrival… it is such a nice baby wearing cardigan that I feel cute in and can wrap us both up in when it’s windy or cold.  I can also use it nursing her so easily without worrying about bringing another cover or getting anything on or ready when she’s ready to nurse! So, I thought I’d make TWO buttonhole placements… one for normal wear that just pulls the cardigan closed at the neckline… and a second for when I’m wearing Baby Girl and need the neckline open much more.

carefree-cardigan-button2carefree-cardigan-button1
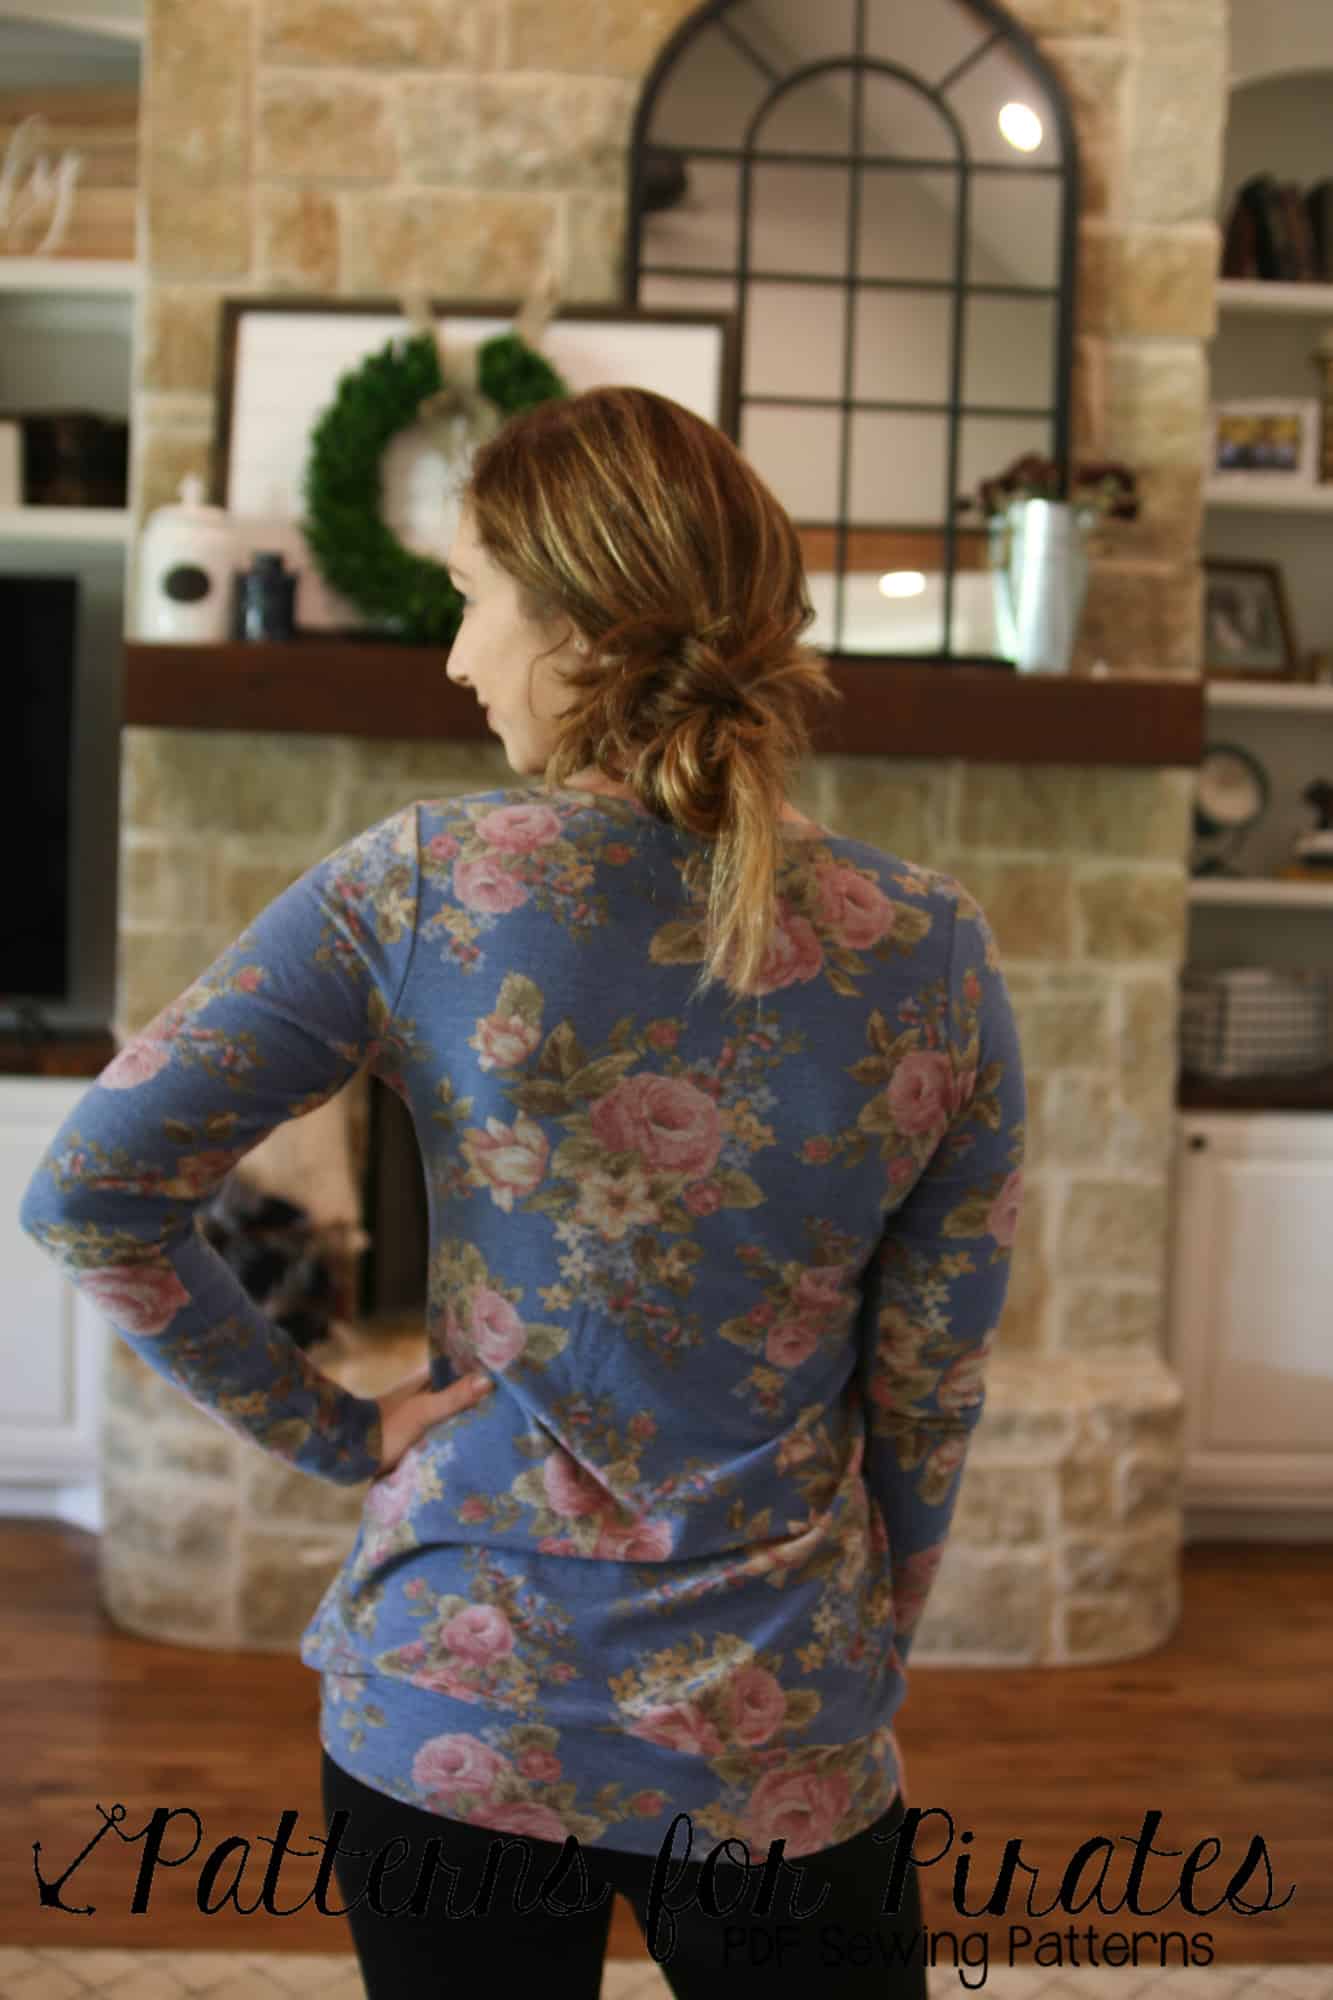
I sewed up my entire cardigan exactly as normal. Then tried it on both with Baby Girl on me and without and marked where I would like the cardigan to close.  Of course, Little Guy had to come photobomb a few shots ;).

SAMSUNG CAMERA PICTURES

I placed my button down a bit away from my neck, because I happen to be one of those people who can’t stand anything tight up against their neck (you will never see a turtle neck from this designer ;)).

carefree cardigan patterns for pirates drape front cardigan tutorial

So now I needed to create the buttonholes, which is a bit different then usual because I wanted the GIANT buttons that are so popular right now and my sewing machine can’t fit a button near that big on my automatic buttonhole foot.  SOOOO, I made my own buttonhole with 2 different size zigzag stitches.

First I marked my button placement and how big I need the buttonhole to be.

SAMSUNG CAMERA PICTURES

Then I sewed a very narrow rectangle that would be my buttonhole.  I turned my zigzag length down very low to 1, so that it was a tight stitch.

For the top and bottom of my rectangle I used a wide 5 zigzag and for the sides I used a narrow 2.  I simple freehanded it.

SAMSUNG CAMERA PICTURES

SAMSUNG CAMERA PICTURES

I used matching navy thread, so I knew if it wasn’t exactly perfect that no one would be able to see.  Actually, the thread matched so close it was REALLY difficult to get a picture of the buttonhole!

SAMSUNG CAMERA PICTURES

Then I used my seam ripper to very carefully rip a line inside the narrow rectangle/buttonhole.

SAMSUNG CAMERA PICTURES

I created a second buttonhole for my baby wearing, looser option.

Wa-lah! Now I have a great on trend cardigan that was quick and easy that I can button up with or without Baby Girl! 🙂

carefree cardigan patterns for pirates drape front cardigan tutorialcarefree cardigan patterns for pirates drape front cardigan tutorial


Filed Under: Pattern Hacks 7 Comments

P4P Shirt fits Explained

December 13, 2015

I get asked a lot how the different P4P shirt pattterns compare fit wise.

So to help those visual people (most of us sewing/creative types are!), I created a little line drawing with the hourglass figure in each shirt.

Remember, P4P is designed for an hourglass figure; so if you have a different body type you will have a different fit unless you follow your measurements and grade between the sizes you are.

Also, “hips” are the widest part of you- usually your booty.  So while looking at the line drawings, remember that the widest part is really the booty!

Here is the quick line drawing:


And for more quick overview here I am in every P4P shirt.  I was a solid medium at the time of all pictures unless noted.

Layer Me Up: Tight fit through arms and body meant to be layered under other garments. (Size Medium)

Favorite Fabrics: Knits with lots of stretch (70% more are my favorite) cotton spandex, rayon spandex, and liverpool knit.

IMG_6198 IMG_6266 IMG_6316 IMG_6367 IMG_6393 IMG_6442

Cross my Heart Cami: Fitted through bust and a closefit through waist and hips. This is a medium here.

Favorite Fabrics: Cotton spandex, rayon spandex, jerseys, poly blends, ity, brushed poly and ribbed knit all work well.


The Basic Tee: Fitted through bust and a semi-fit through waist and close at hips. This is a small/medium here.

Favorite Fabrics: Jerseys, tri-blends, double brushed poly, rayon spandex, cotton spandex, poly blends, ity, ribbed knit, sweater knits all work well.

Essential Tank: Fitted through bust and a close semi-fit through waist and hips. This is a medium here.

Favorite Fabrics: Jerseys, rayon spandex, cotton spandex, poly blends, ity and ribbed knit all work well.

13350380_10102709342906983_688272442041579391_o 13418399_10102709342323153_7161703305455901606_o 13411710_10102709342253293_9173902032219237424_o 13418529_10102709341839123_247796028914714387_o 13392179_10102709340891023_5609753226814510102_o 13416881_10102709339658493_6711765543316495162_o

Women’s Henley: Fitted through bust and semi-fitted through waist and hips. (I don’t have many of these since it was drafted and released when I was pregnant 🙂 I made a medium here, but my bust and waist were bigger right after baby girl arrived!)

Favorite Fabrics: thermals, medium weight sweater knits, cotton jerseys, and rayon spandex.

SAMSUNG CAMERA PICTURES


Boyfriend V Neck: Semi-fitted through bust, waist and hips. (Size Medium)

Favorite Fabrics: I like to use a cotton jersey, interlock, medium weight sweater knit for a more fitted look.  For a looser/slub feel I go for rayon spandex.

10511668_10100213568490777_3346501466436650626_o IMG_8828 IMG_8834IMG_8812IMG_8890

Slim Fit Raglan: Fitted at bust and arms, semi-fitted at waist and hips.

Favorite Fabrics: Medium weight sweater knit, rayon spandex blends, cotton spandex, stretch french terry, slub jersey.

IMG_0393 IMG_0287 IMG_0278 IMG_0238 IMG_0231 IMG_0216  IMG_0183 IMG_0175 IMG_0173 IMG_0149 IMG_0135


Women’s Raglan: Loose fit through bust and waist, semi-fitted at hips- straight cut. Loose on arms. (Size Medium)

Favorite Fabrics: More stable knits like french terry, sweatshirt, fleece, interlock, and ponte roma.

1 (14)1 (4)1 (13)1 (28)1 (34)IMG_88011 (2)(PS- I have a light pink undershirt under the lace one! I didn’t realize that was a mistake until after the pictures! lol)

Favorite Tee: this is fitted at bust and semi-fitted through waist and hip. The side vent hem can give you even more relaxed fit through hip.

Favorite Fabics: You have a pretty wide range of knits you can use on this shirt.  I prefer a flowly, drapey knit for the curved hem option like rayon spandex, modal, poly jerseys, ITY.  For the banded hem option I love something with a little more structure like a rayon french terry and poly jerseys. The side vent hem can use either of these and look great.  For the dress length I prefer something more structured again like double brushed poly, cotton spandex, rayon french terry.

Sweet Tee: this is a slimmed dolman with very small “bat wings” under the arms.  It is fitted at bust and semi-fitted through waist and hips.

Favorite Fabics: light to medium weight knits, although it has very small “bat wings” I still strongly prefer a soft drape for any dolman so that your “wings” aren’t puffy 😉  I used tissue jersey, slub jersey, light and medium weight sweater knits, and rayon spandex for my favorites.

IMG_3884 IMG_3896 IMG_3911 IMG_4015 IMG_4036 IMG_4091 IMG_4137 IMG_4162 IMG_4180 IMG_4185 IMG_9451 IMG_9485 IMG_9507


Tulip Tee: this is a boxy, relaxed fit dolman.  Semi-fitted at bust and hip, but a straighter cut through waist.  Although it’s not straight, it is still very loose through waist. The plain option will feel and fit tighter at the waist and hip than the tulip option, which will naturally swing open for a looser feel.

Favorite Fabics: light to medium weight knits. I prefer a soft drape for any dolman so that your “wings” aren’t puffy 😉  I used mostly rayon/modal/ blends for mine personally.  I love it in a soft sweater knit for fall/winter as well.  You could use a slub knit, poly blend, triblend, ITY all as well.


Pumpkin Spice Dolman: oversized/loose fit through upper arms, bust and waist.  Semi-fitted on hips. Tight fit on lower arms. (Medium in the navy/grey and Large in the others- I hit those measurements at the time of sewing/pictures :))

Favorite Fabrics: I like fabric with good drape for this one.  Rayon spandex blends, sweater knits (both medium and lighter work), thinner slub jerseys, french terry with rayon in the blend, and ity.


IMG_3440 IMG_3467 IMG_3493IMG_0447IMG_0418IMG_0417IMG_0407


Free Spirit Tank: Fitted at bust, drastic a-line out to give loose fit through waist and hips. (Size Medium)

Favorite Fabrics: I like fabric with good stretch and drape for this one.  Rayon spandex blends, sweater knits and thinner slub jersey.

20151123_15042420115_10100313906851897_8805792748950944668_n 11051762_10100313891198267_4156963260416149925_o 11169614_10100313891921817_5868655417849932999_o 11187817_10100313901737147_4232944970819534637_o 11212671_10100313892365927_3793099993655718393_o 11218719_10100313910180227_7456640702411835535_n 


Sporty Piko: A very loose, straight cut from the short sleeve juncture.  It is loose throughout the body with relaxed sleeves as well.

Favorite Fabrics: It really depends on the look you’re wanting for this one! I love a french terry for the hoodie options, but for an everyday tee it must have a very soft drape.  You can use various fabrics depending on how boxy you want the shirt to appear- the more stable the fabric the boxier it will look worn.

Brunch Blouse: Fitted at bust, curves in only a touch at waist, loose on hips.

Favorite Fabrics: Rayon challis, crepe, anything with a softer drape.


Everyday Elegance: Loose fit through bust and waist- straight cut to hips. (Size Medium)

Favorite Fabrics: I like fabrics with lots of drape for this one like peach skin, chiffon, rayon challis.

10679813_10100211573383987_4958949390945241951_o 1961948_10100211572959837_2864287625354337808_o 2 (6) 2 (2) 1 (10) 1 (2)

Filed Under: Announcement, Fitting, P4P University 19 Comments

Tips and Tricks of Up-cycling

December 2, 2015

I love to up-cycle! With a little boy I can find boyish knits, stripes and even character prints so much easier and more affordable buying a men’s T-shirt then the $30/yd euro knit… Which I’m constantly drooling over!  I also love the heathered T-shirt knit, which is harder to find in a fabric store and very easily found in RTW (Ready to wear). I love to use my husband and my old shirts as well… It’s even more special handmade with an already sentimental shirt! So here are some tips and tricks I’ve learned… 1- Buy bigger… Why not? If an XS and XXXL are the same price get more fabric 🙂 2- If it has a picture on it make sure it will fit on your smaller size you are creating.  This one can be difficult if you’re buying large men’s shirts BC they are proportionally much bigger pictures/words/designs on the chest. Here is one I BARELY SQUEEZED on his little chest, but then when it is on some wraps around to the sides, so really I should’ve waited until he was a few sizes bigger!

IMG_6361 IMG_6374

3- Use the hem! I don’t have a cover stitch machine… Yet 🙂 and although I love my double needle using the existing hem saves time and looks nice and professional already!  All  you have to do is account for the hem- Most my patterns are 1″ so here I am cutting with my pattern piece 1″ below my fabric to make up for the fact that I will not be turning up and hemming.

IMG_7303

4- Cut you RTW items down the seams, this give you nice flat pieces to last your pattern pieces out on. If there isn’t a side seam, then I don’t cut… but anywhere there are seams I go ahead and cut because you will not be able to use the area.  I also cut the sleeves, again along the seam and use them if I can!  Here is a shirt and shorts cut and ready to use:

IMG_6437IMG_7300   5- If you’re using a shirt with a design, fold with the DESIGN centered… You’d think RTW is all centered nicely on that shirt… Until you fold it at the side seams and realize it’s not!! Often they’re off centered! 6- If you don’t have ribbed knit to match for the neckline you can use theirs…especially if you have a much larger size (men’s xxl down to a toddler size). Here are a couple of some up-cycles I’ve done: Patterns for Pirates Buccaneer BBall Shorts:

IMG_7317IMG_7294IMG_7304IMG_7333IMG_7340

Matey Muscle Tank:

IMG_0348IMG_6490-2

Wingman Shirt: The grey was from a heathered grey t-shirt… the Batman logo was appliqued on my sewing machine 🙂

IMG_9070

Deep Sea V-Neck:

Copy of IMG_6577

Cole’s Creations ‘Buttercup Dress:

20140521_141909

Women’s Raglan:

listing pictures2

Filed Under: Sewing Techniques, Uncategorized 1 Comment

FST/LMU Mash Nursing Hack

November 25, 2015

20151123_15051720151123_150313

I love the FST and LMU mash for after baby.  It makes me feel stylish, put together and comfortable! The loose aline look hides any left over baby belly and the tighter top doesn’t feel you leaving frumpy.

For this hack I essentially did a double layer body.  I can lift up the top layer and have the bottom layer covering my back/belly during nursing. And it looks like a perfectly “normal” everyday shirt! 🙂

20151123_150449

I made mine completely doubled because we are going into winter here and I didn’t mind the added warmth.  If I was making this for spring or summer months I would probably tinker with a faux double layer for the back piece.

I cut 2 front and back pieces.

SAMSUNG CAMERA PICTURES

Then took 1 front piece to modify for the under layer.  I measured on myself from the neckline to under my bust (I did happen to have on the same shirt, so I didn’t even need to guess where the neckline hit ;)). Then I transferred that measurement to the front center and curved up to the armpit.

SAMSUNG CAMERA PICTURES

SAMSUNG CAMERA PICTURES

Since the FST flares out under the bust it was a little loose there.  So I added a thin elastic to the raw edge.  I just held the elastic taute (not tight) on my body from seam to seam (again, I happen to be wearing this shirt, so there was no guessing!). This way the two layers would have the same finish length–without the elastic holding up the center it would droop lower then the top layer.  As well as not worry about holding it up while nursing–bonus :).

SAMSUNG CAMERA PICTURES

I choose to put my elastic on the right side of my under layer, because I didn’t want to feel it against my skin.  But you can put it on the wrong side so that it is hidden when you nurse– whatever you prefer! You will need to stretch the elastic to fit the curve.  I serged mine on, but any stretch stitch will work! It will line up right at the armpit.

SAMSUNG CAMERA PICTURES

I sewed the shoulder seams and sleeves on like normal.  Then when going down the side seams I kept the main body layers seperate (so you can lift the top layer freely).  It is a bit tricky right at the armpit, but just go slowly  and remember you wont be showing anyone the inside of your armpit seam! 😉

SAMSUNG CAMERA PICTURES

SAMSUNG CAMERA PICTURES

SAMSUNG CAMERA PICTURES

Now for hemming, I choose to hem the top layer completely normal with a 1″ allowance.

For the under layer I choose to add a pretty lace trim to stick out longer then the top layer.  I wanted the seam hidden, so I trimmed off 1″ from the bottom.

SAMSUNG CAMERA PICTURES

I serged my lace on right sides together trimming off about 1/2″ of both shirt and lace (the top of the lace that was blank).

SAMSUNG CAMERA PICTURES

Then flipped up and top-stitched (I didn’t want that seam flipping and showing through the dainty lace trim!).  So, I trimmed 1″ and took off another 1/2″.  This means my seam on the under layer should be 1/2″ above the hemmed edge of my top layer and the lace will peek out below.

SAMSUNG CAMERA PICTURES

SAMSUNG CAMERA PICTURES


I attached the neckband normally catching both layers on the back piece and top layer of the front piece.

SAMSUNG CAMERA PICTURES

SAMSUNG CAMERA PICTURES


Tada! I love my new warm winter nursing friendly shirt! It screams fashionable and not I’m nursing! 🙂 When you’re done nursing you can still wear it as is… or cut out the under layer!

20151123_150424


Filed Under: Pattern Hacks, Uncategorized 9 Comments

  • « Previous Page
  • 1
  • …
  • 9
  • 10
  • 11
  • 12
  • 13
  • Next Page »

connect with me

  • Email
  • Facebook
  • Instagram
  • Pinterest
  • YouTube
Privacy & Cookies: This site uses cookies. By continuing to use this website, you agree to their use.

To find out more, including how to control cookies, see here: Cookie Policy
  • Privacy Policy
  • Refund Policy
  • Contact Us
  • About

Copyright © 2026 Patterns for Pirates

Copyright © 2026 · Genesis Framework · WordPress · Log in