Patterns for Pirates

P4P stylish, modern, wearable patterns

  • Home
  • Blog
    • Frequently Asked Questions
    • Pattern Releases
      • Free Patterns
    • P4P University
      • Fitting
      • Sewing with Stretch, Knit Fabrics
      • Sewing with Woven Fabrics
      • Sewing Machines
    • Sew-A-Longs
    • Fabric for Pirates
    • Pattern Hacks
    • Announcement
      • Blog Tours
      • Contest/Giveaway
  • Shop
  • Bundle Discounts
  • Gift Cards
  • My Account
  • Cart

2018 Holiday Freebies :: Avast, A Vest!

December 6, 2018

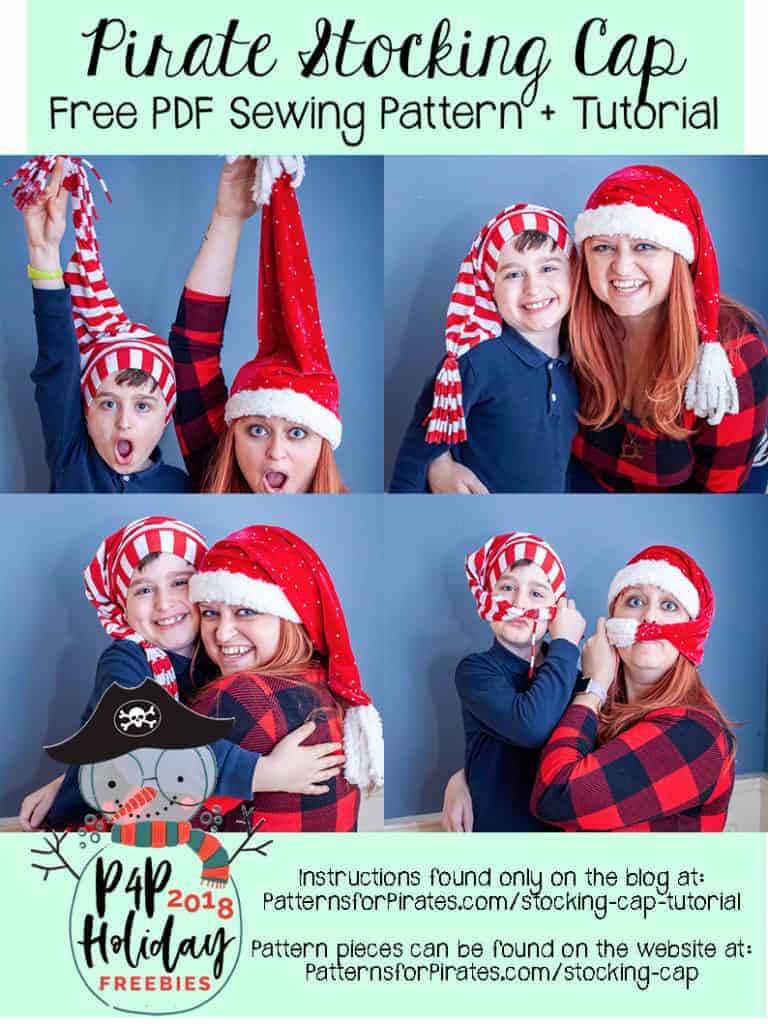
Can you believe that we are on our fifth and final day of freebies?  I hope you’ve enjoyed this past week as much as I have!

Today’s freebie is fun, quick and easy!  Think of it as a your vest friend.  (See what I did there?!)  Allow me officially shout out: Avast, A Vest!

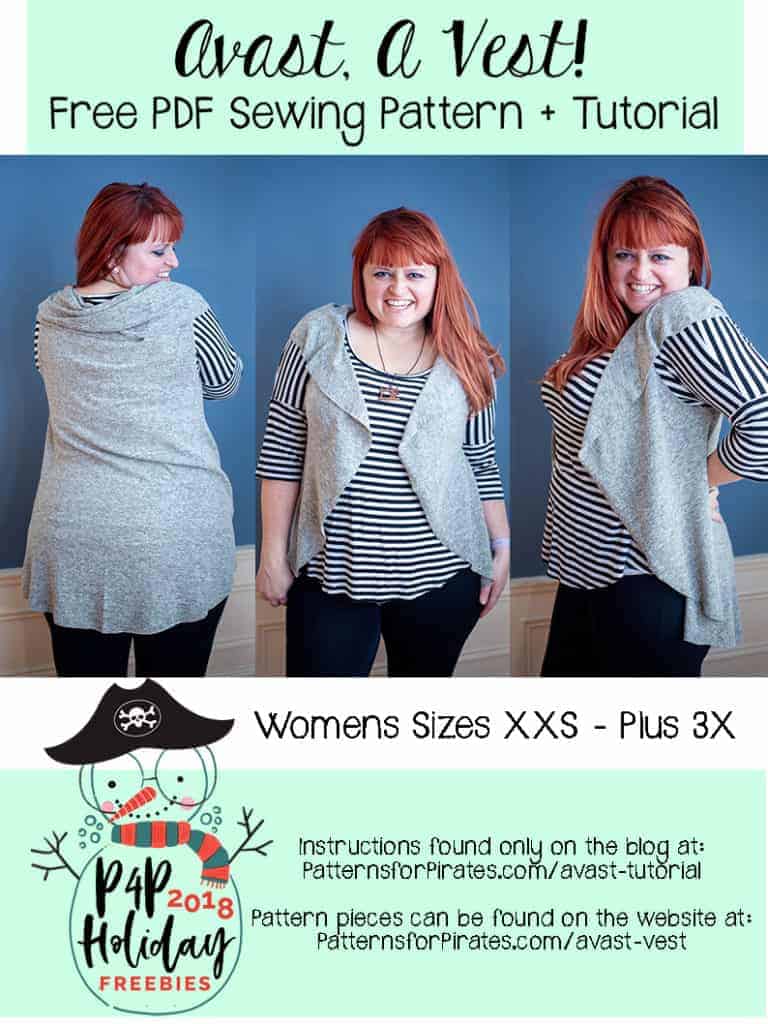
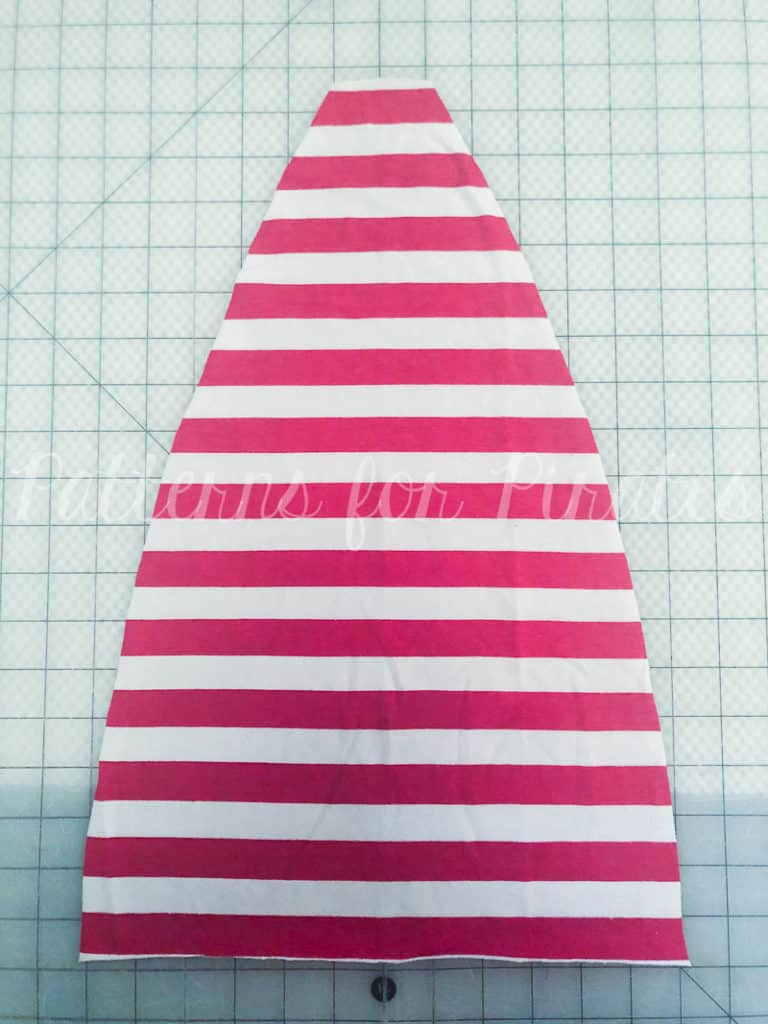
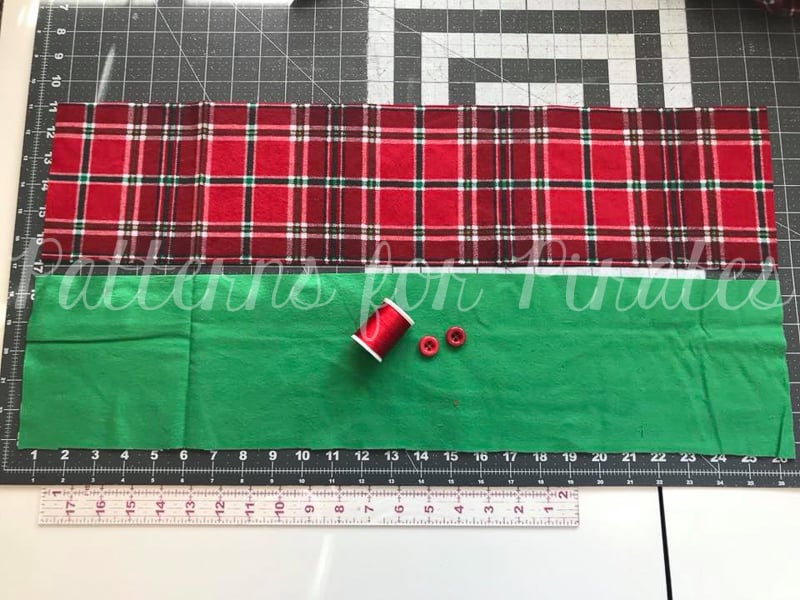
Fabric Requirements: 1-1/2 yards of a medium weight, double sided fabrics.  Favorites: brushed hacci, jersey knit, french terry, dbp.

GRAB YOUR COPY OF THE AVAST! A VEST PATTERN HERE!

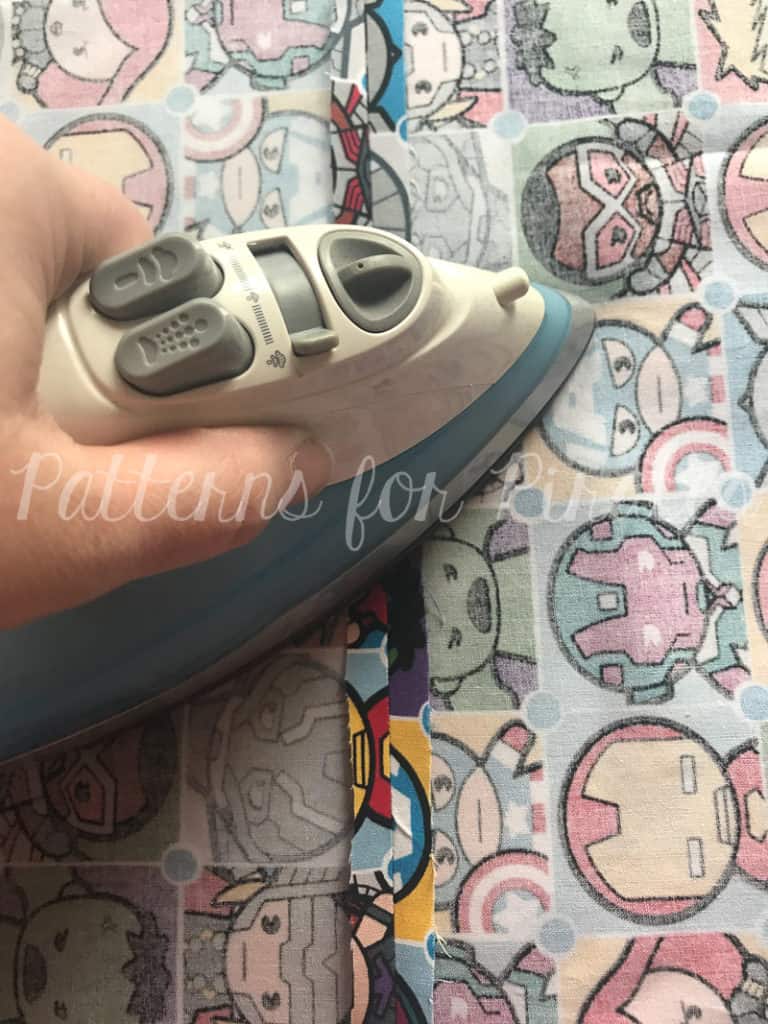
Why double sided?  Because of the way this vest is worn, the top is folded back and reveals the backside of the fabric.  We wanted this pattern to be as simple of a layering piece as possible.  But if you’re not loving the raw edges and backside of your fabric, cut two pieces, sew them together around the entire outer edge (right sides together, turn through one of the arm openings, and complete the rest of the tutorial that way!

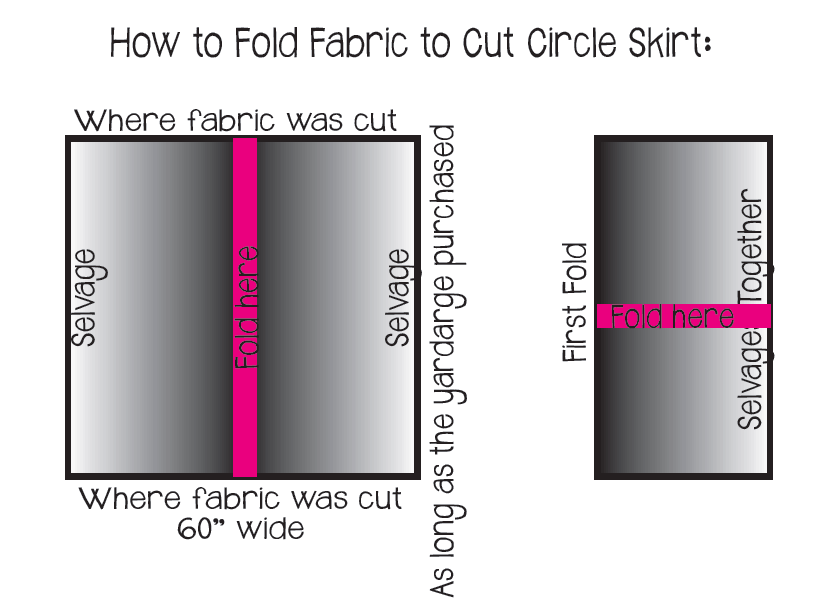
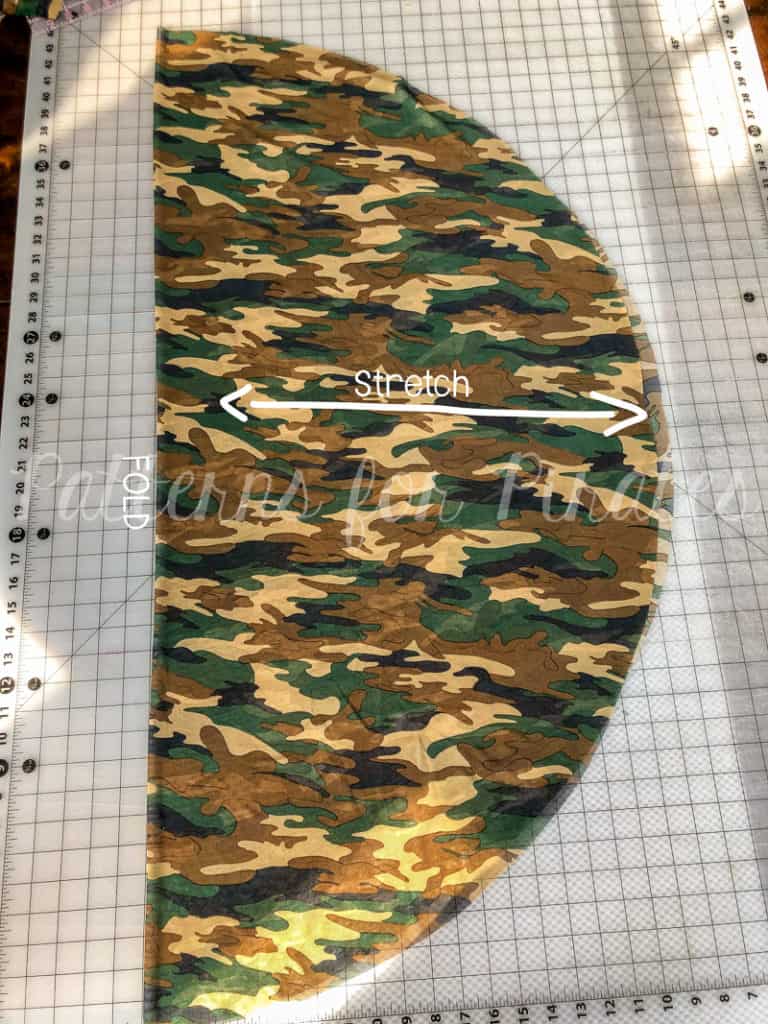
If you need help folding your fabric to prepare for cutting, it’s just like a circle skirt!

———

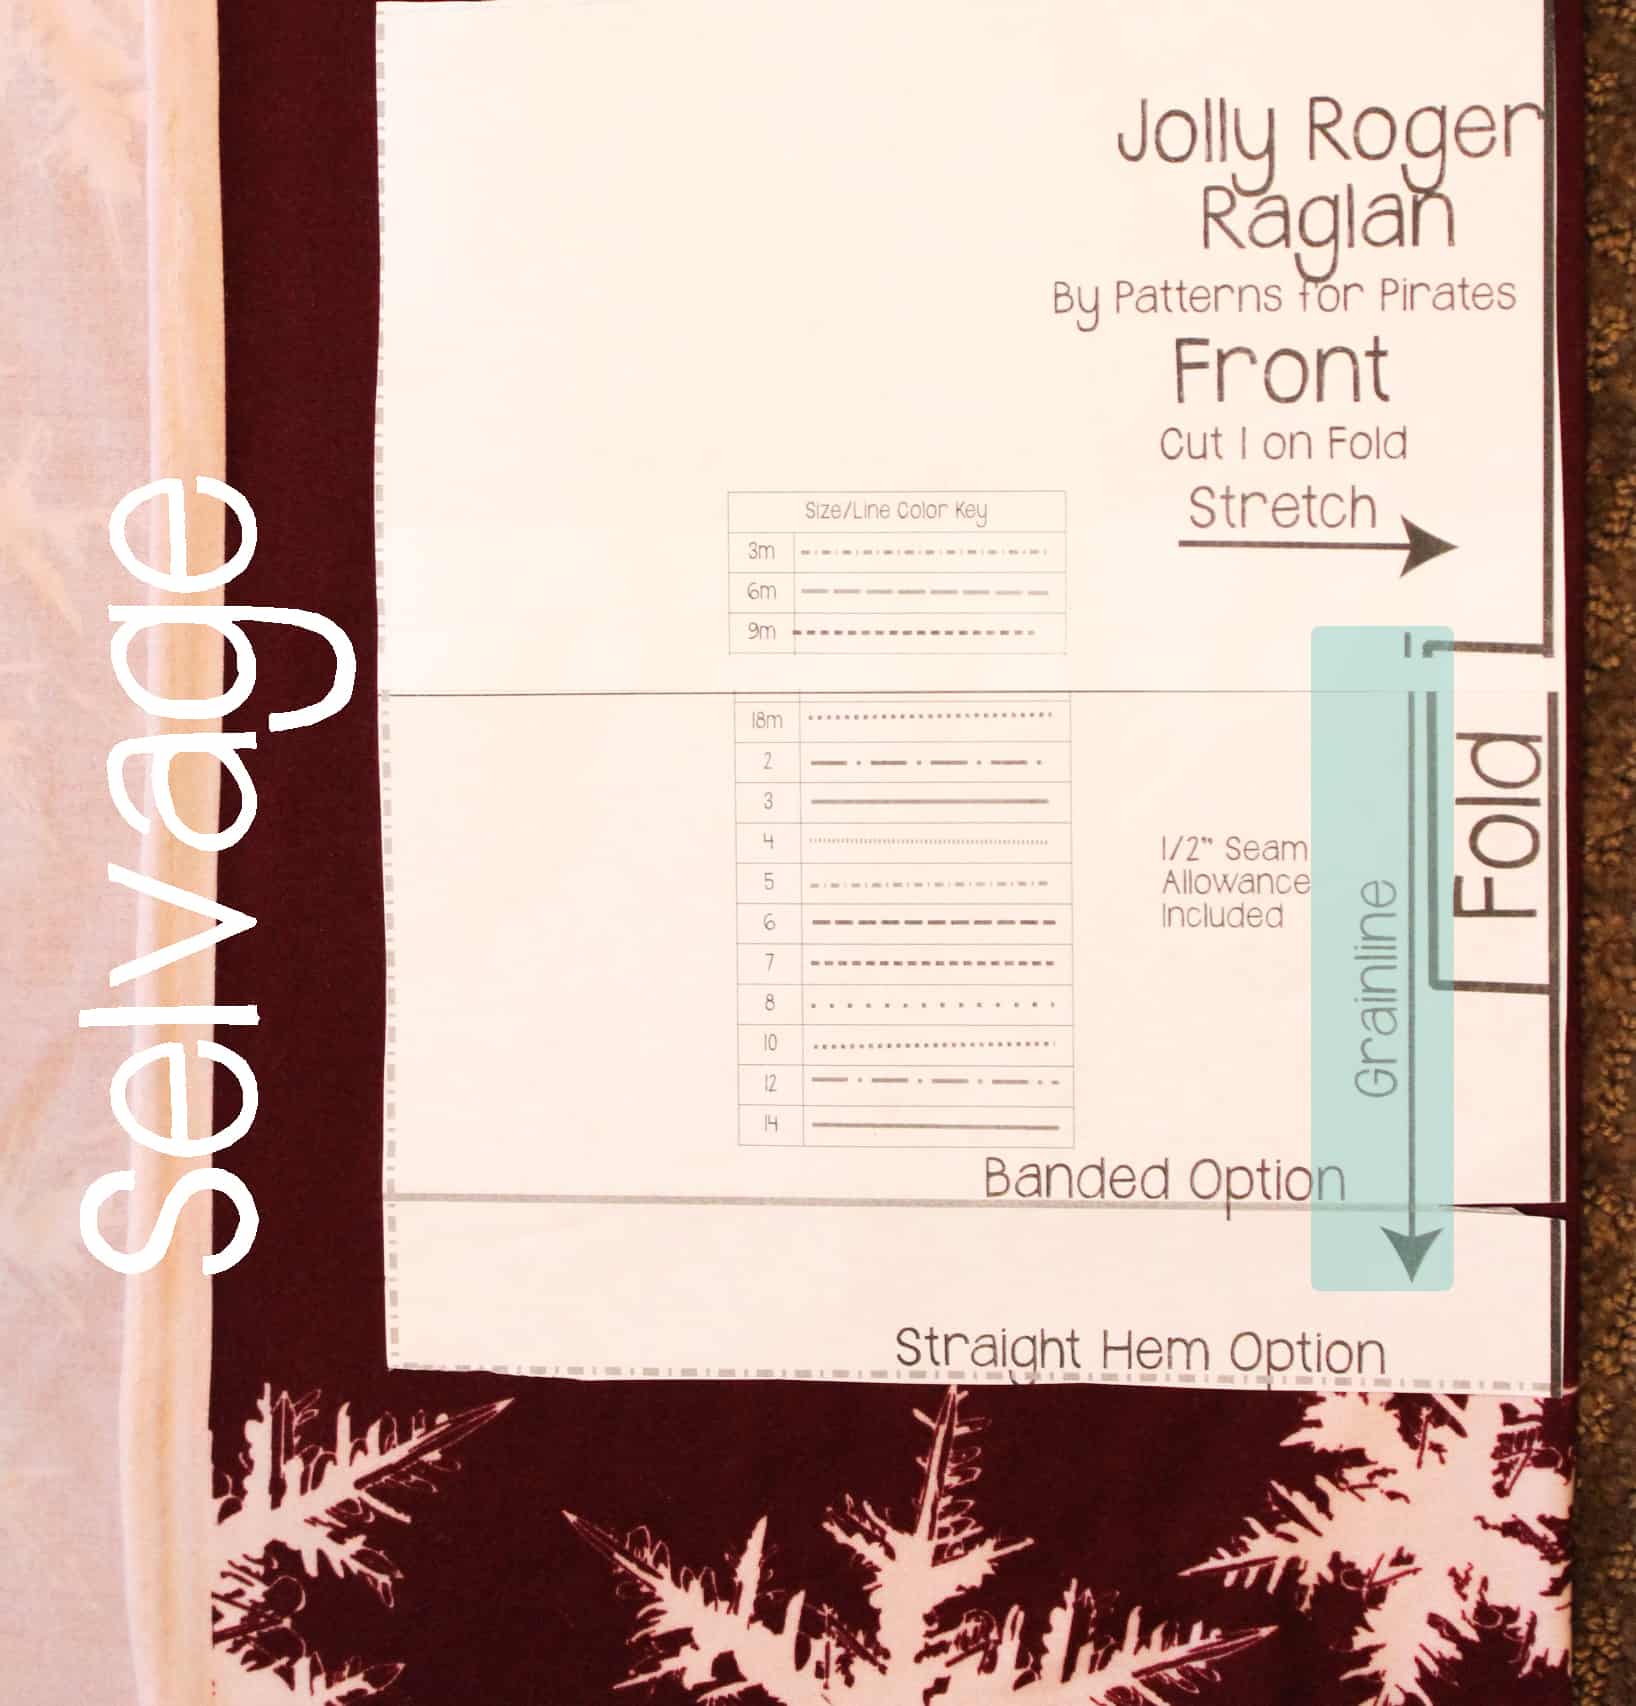
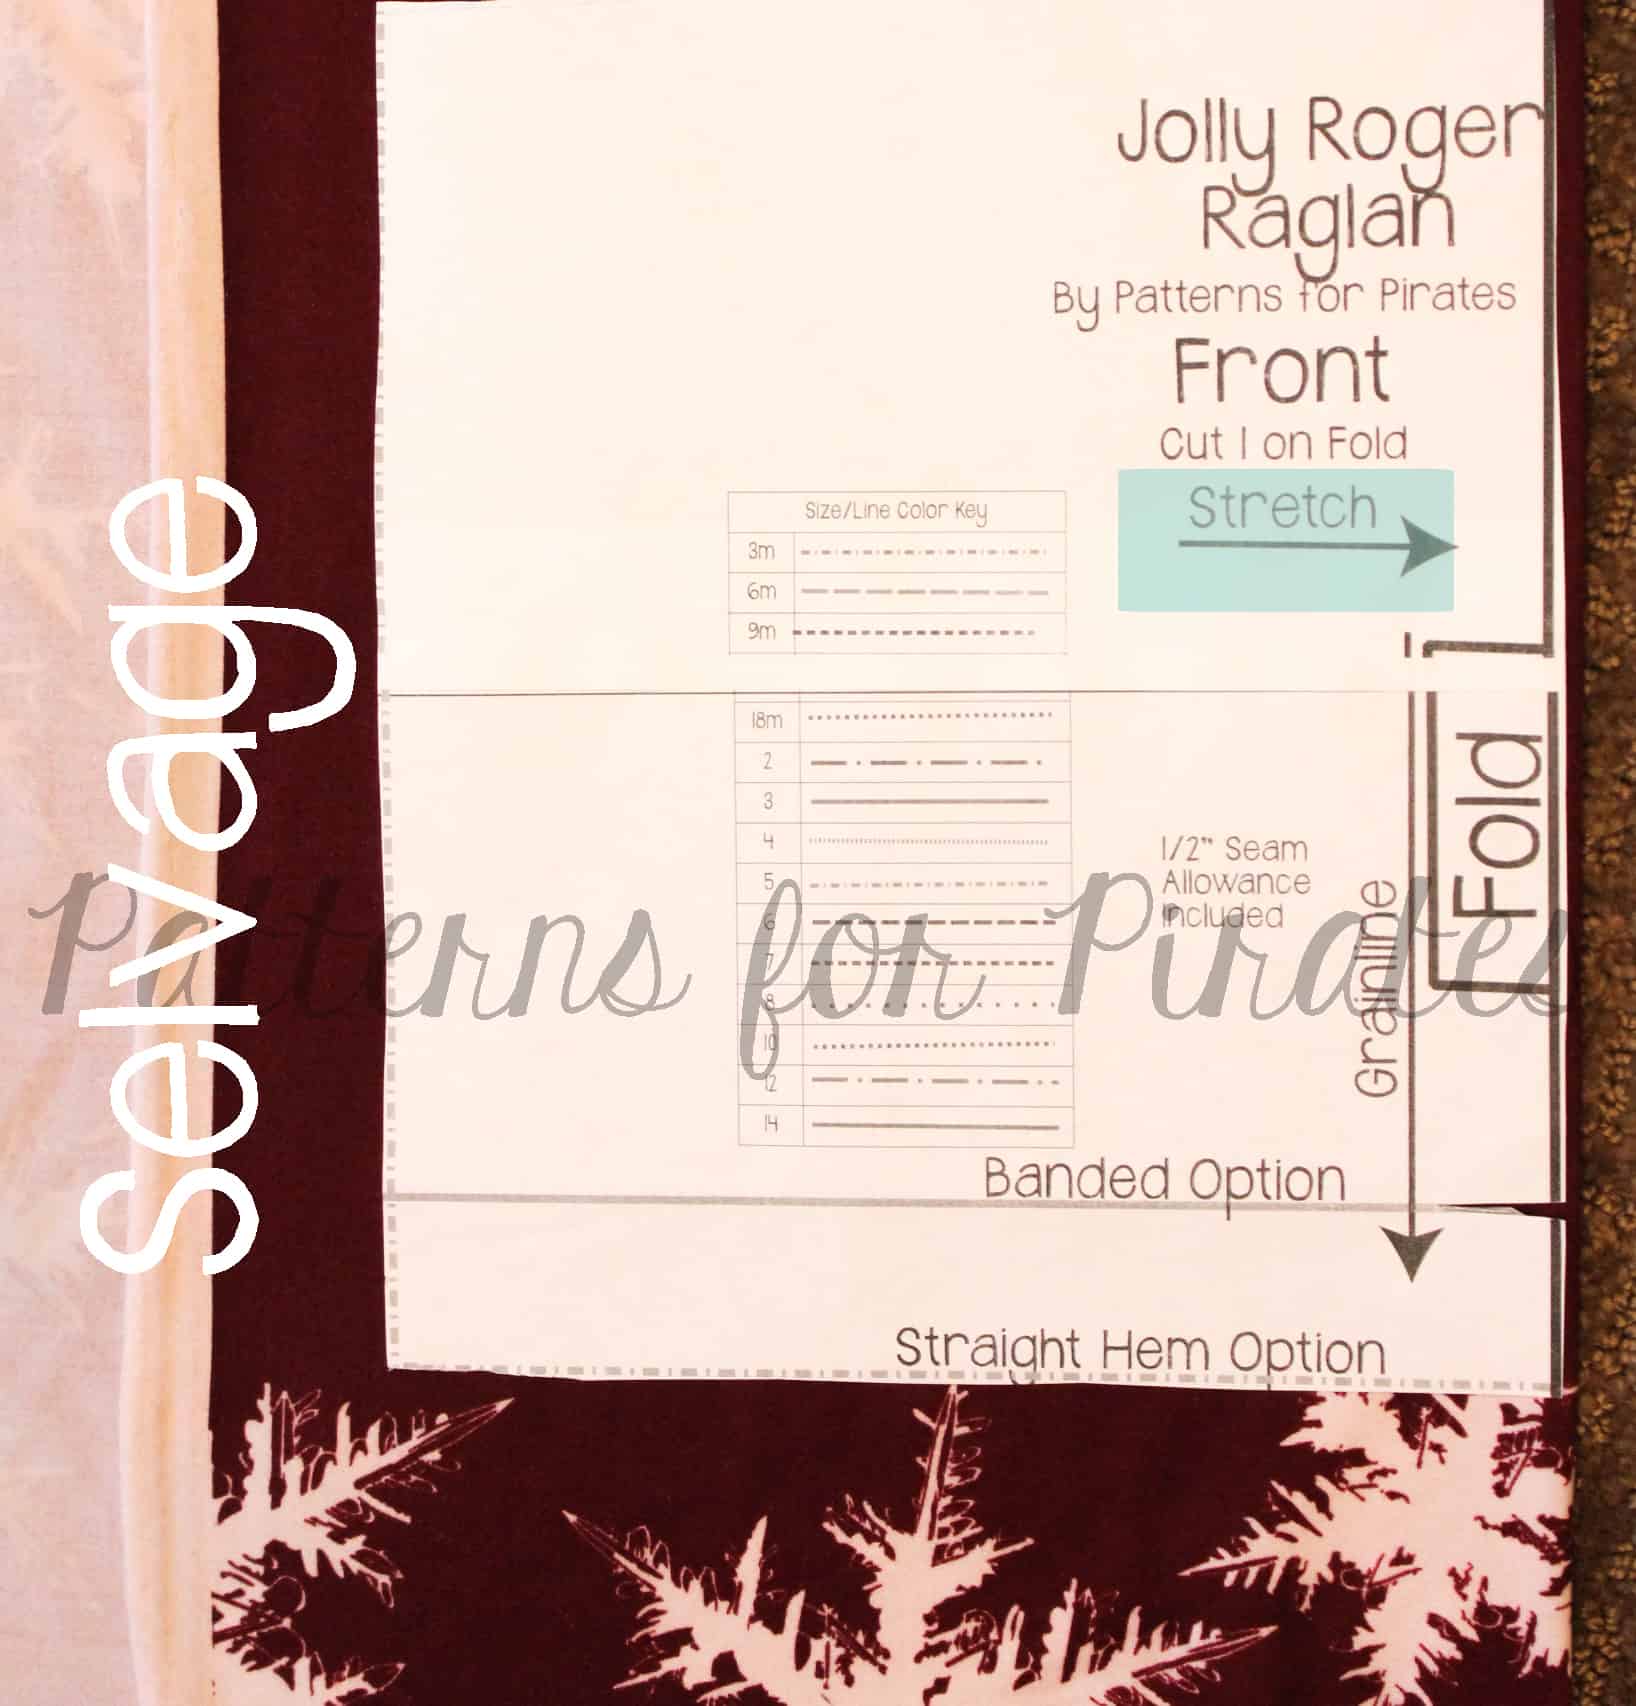
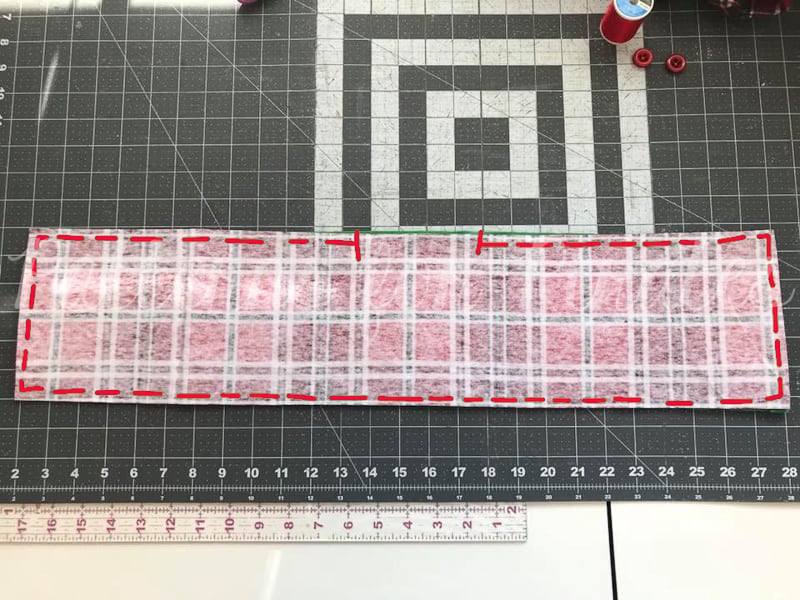
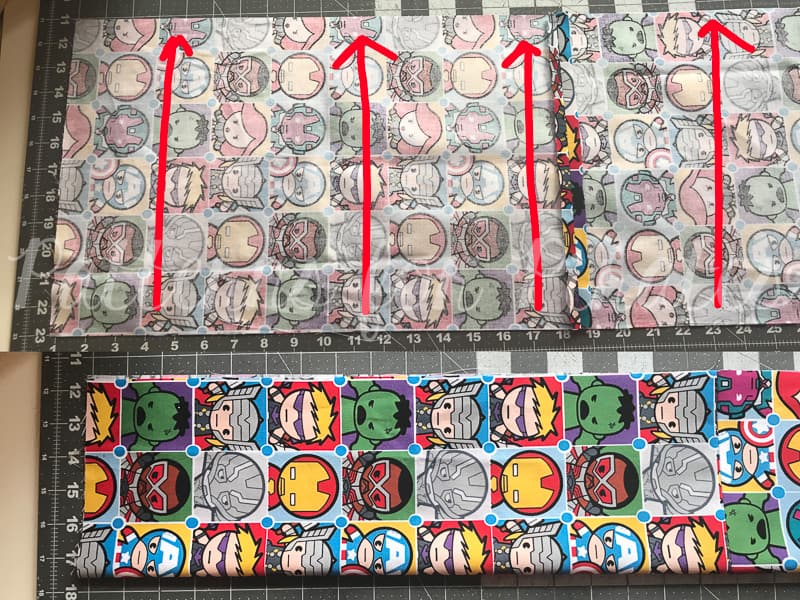
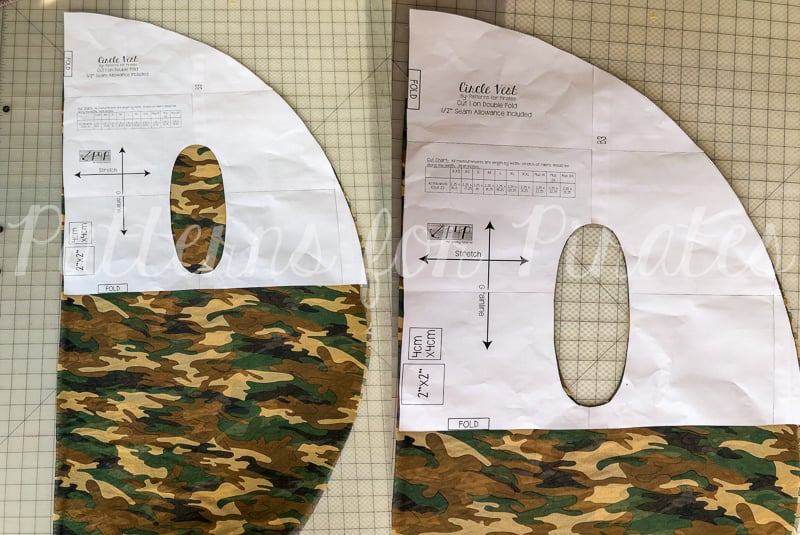
Cut your pattern piece, making sure to fold selvedge to selvege and then top to bottom before cutting. **DO NOT cut your arm openings yet, or you will end up with four armholes. 😉

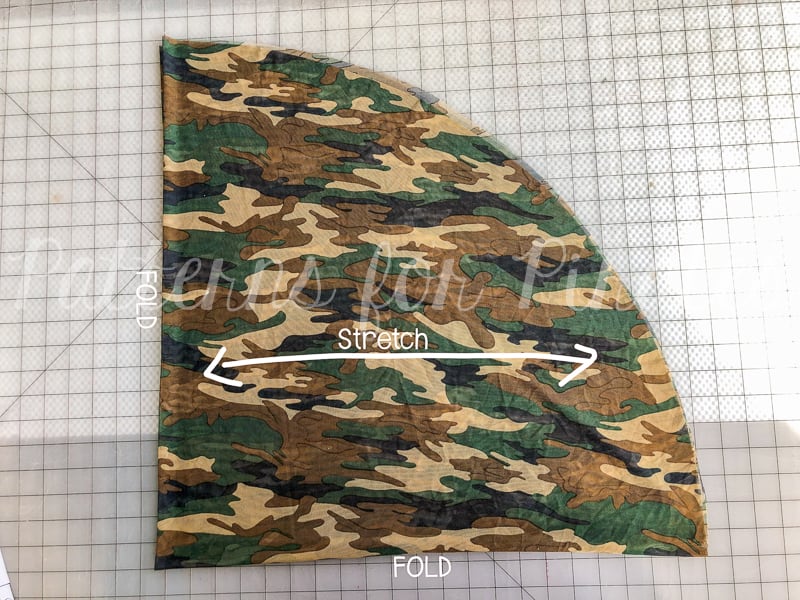
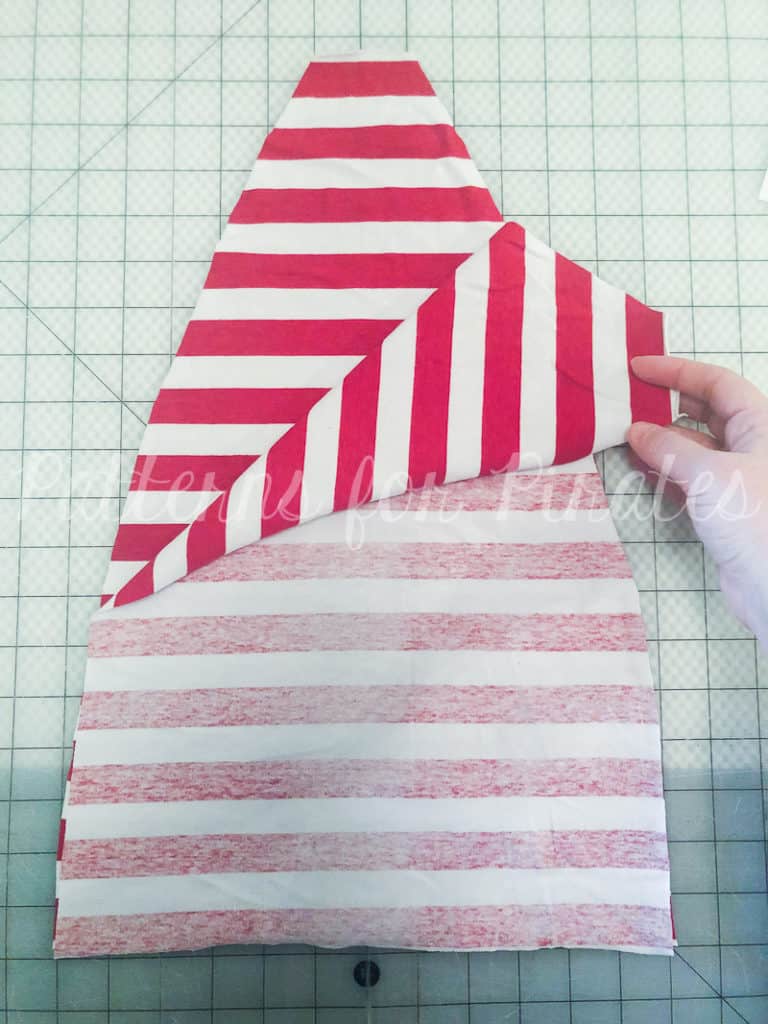
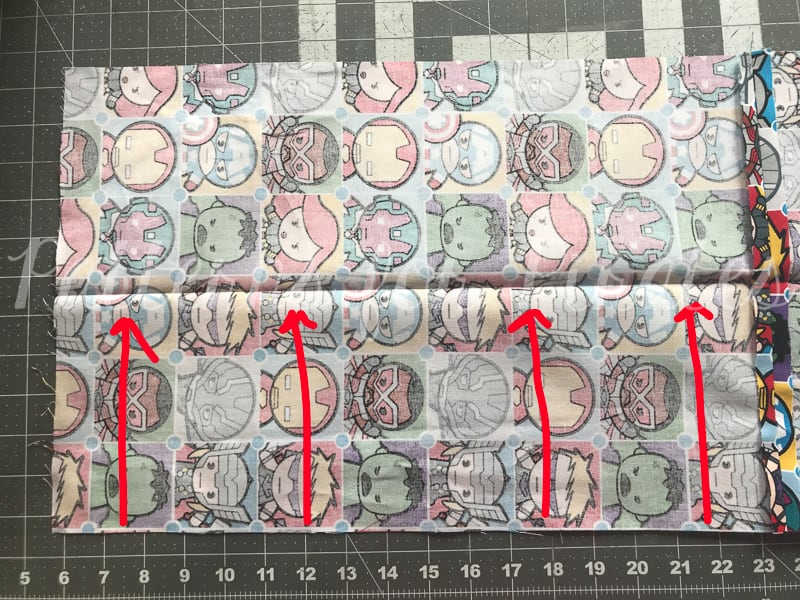
Open up your fabric piece, leaving it still folded in half along with the stretch going horizontally.

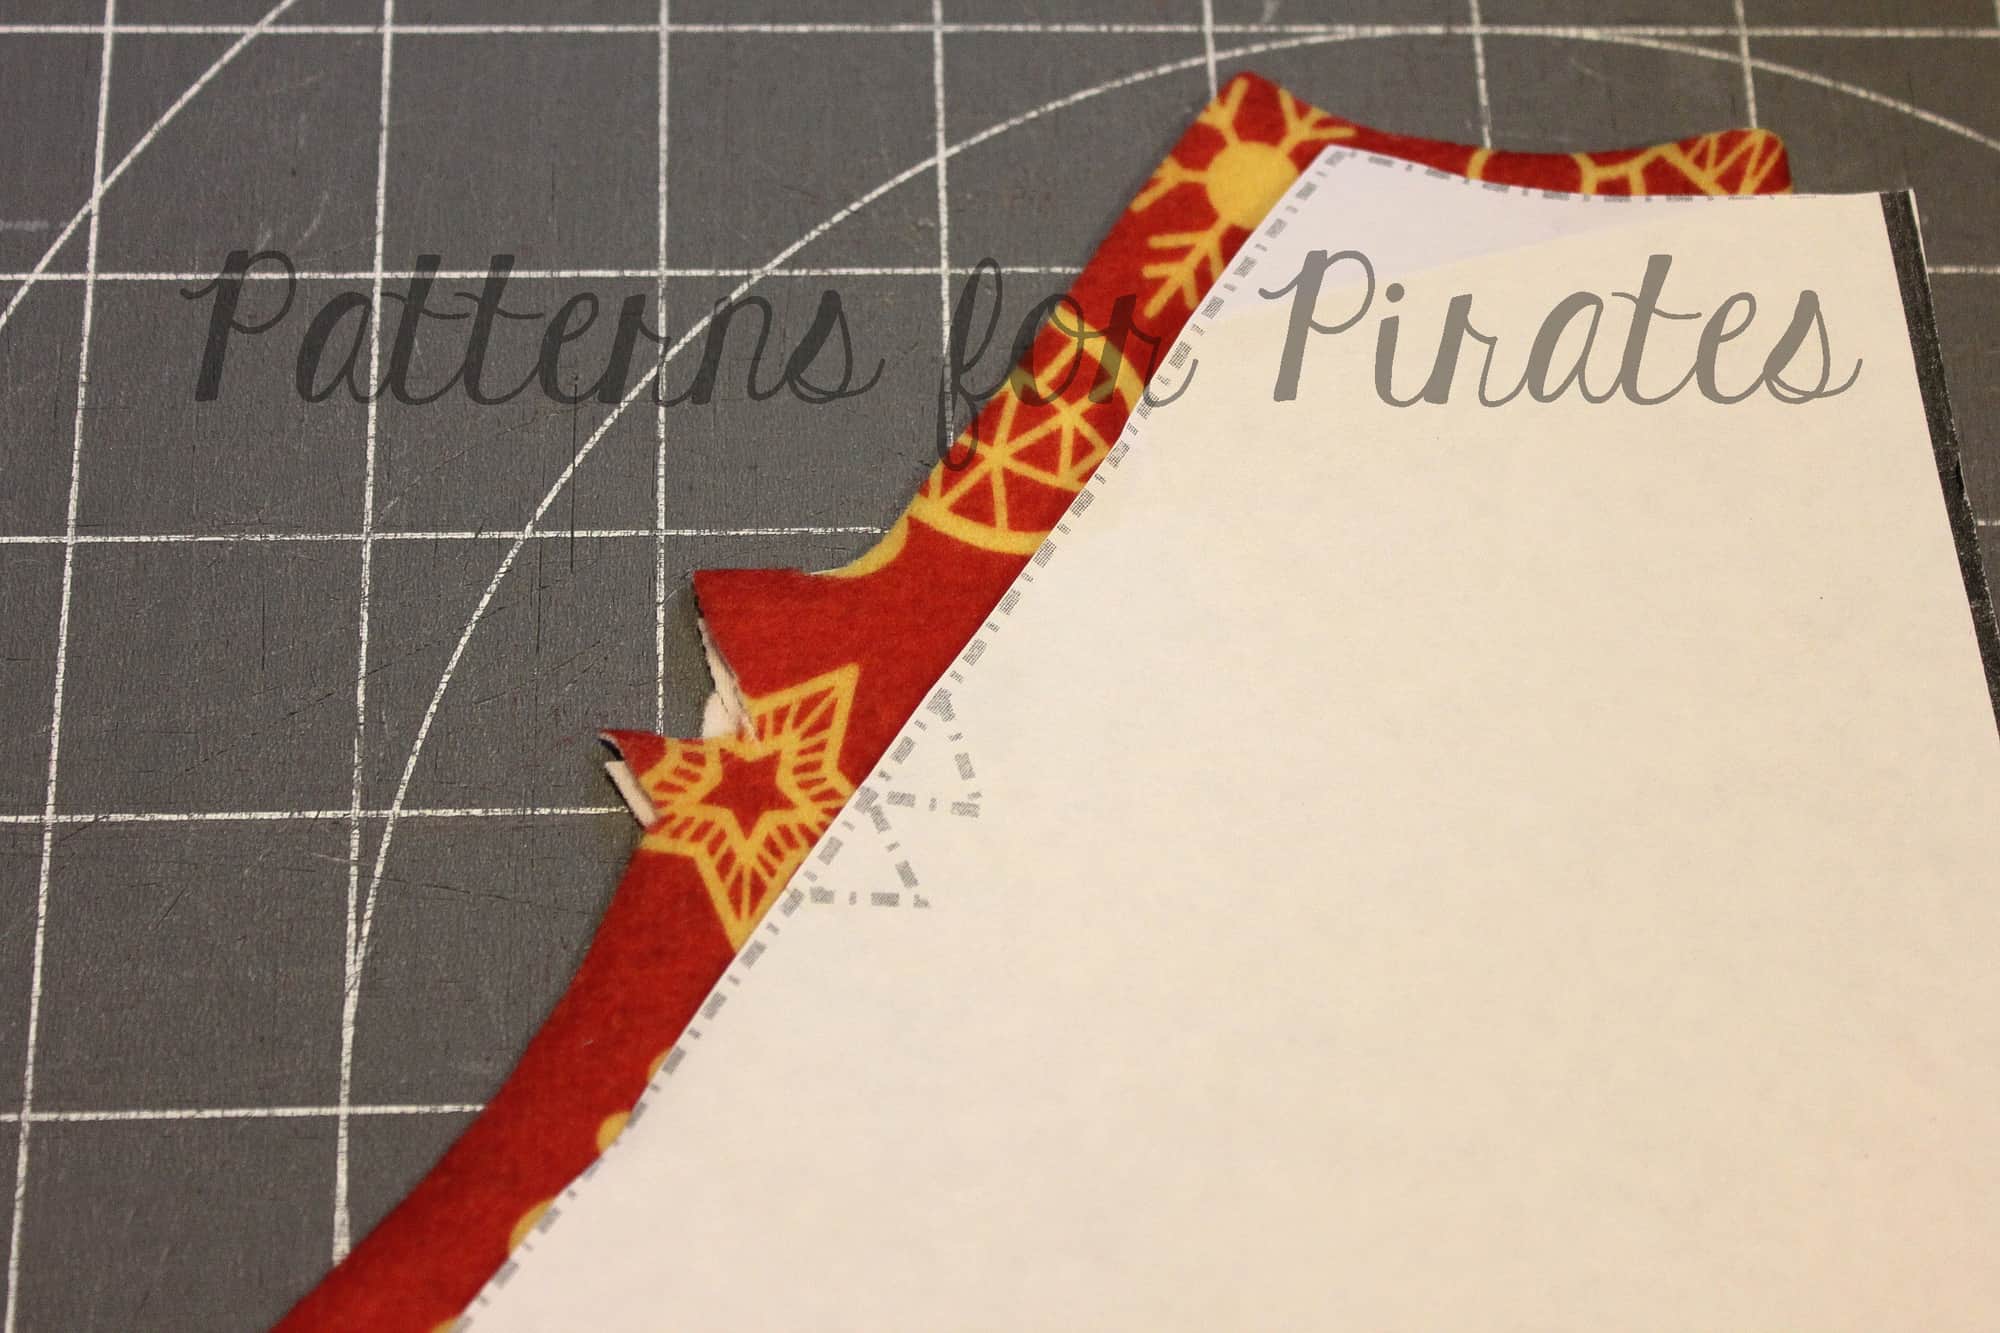
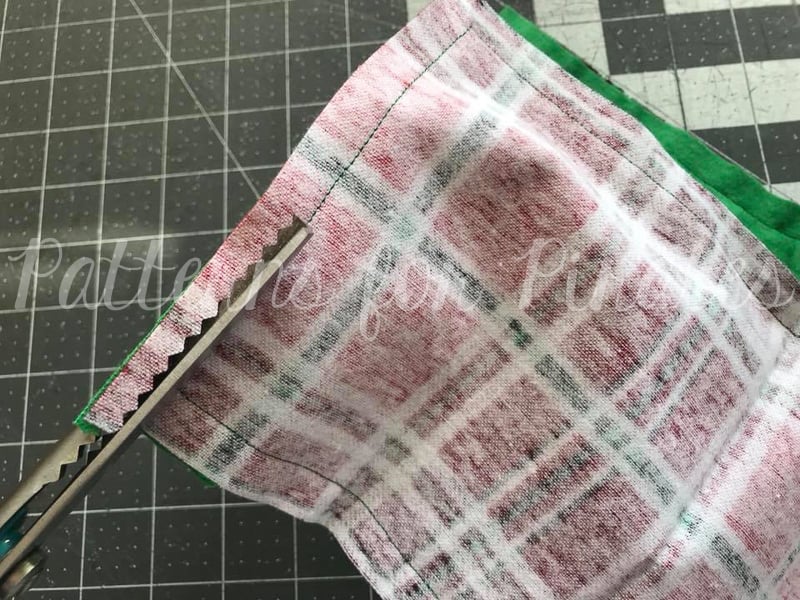
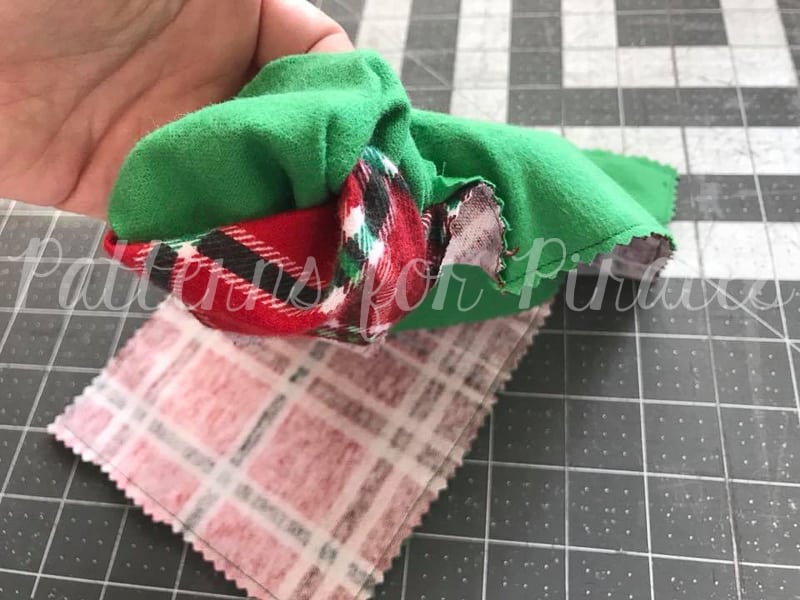
Grab your pattern piece, realign it along the top, and cut our your arm openings.

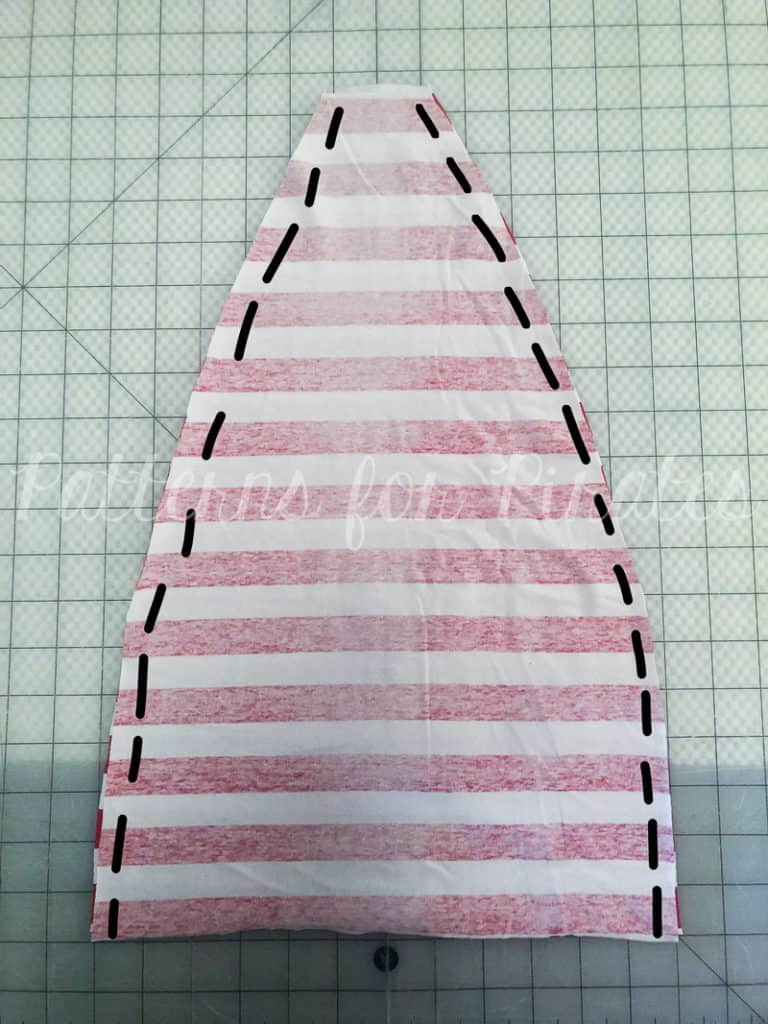
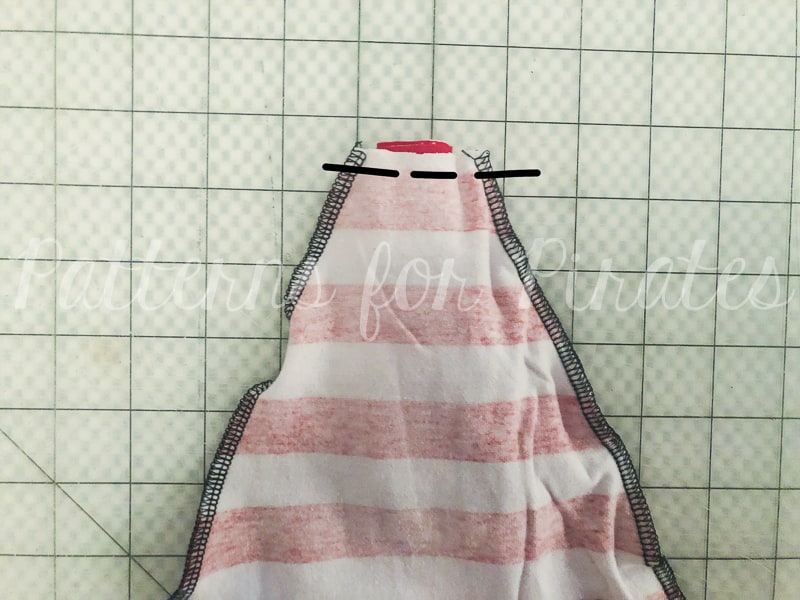
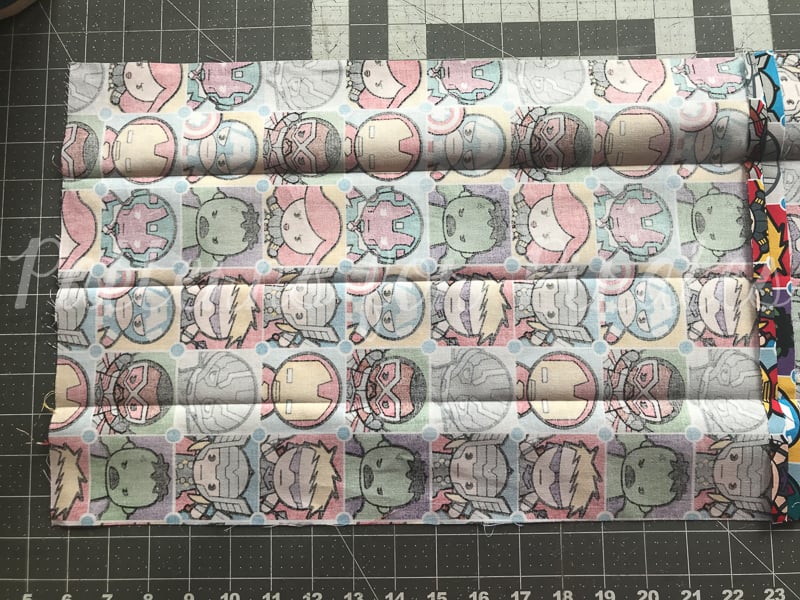
Use the pattern guides to mark the middle points of the top and bottom of both arm openings.

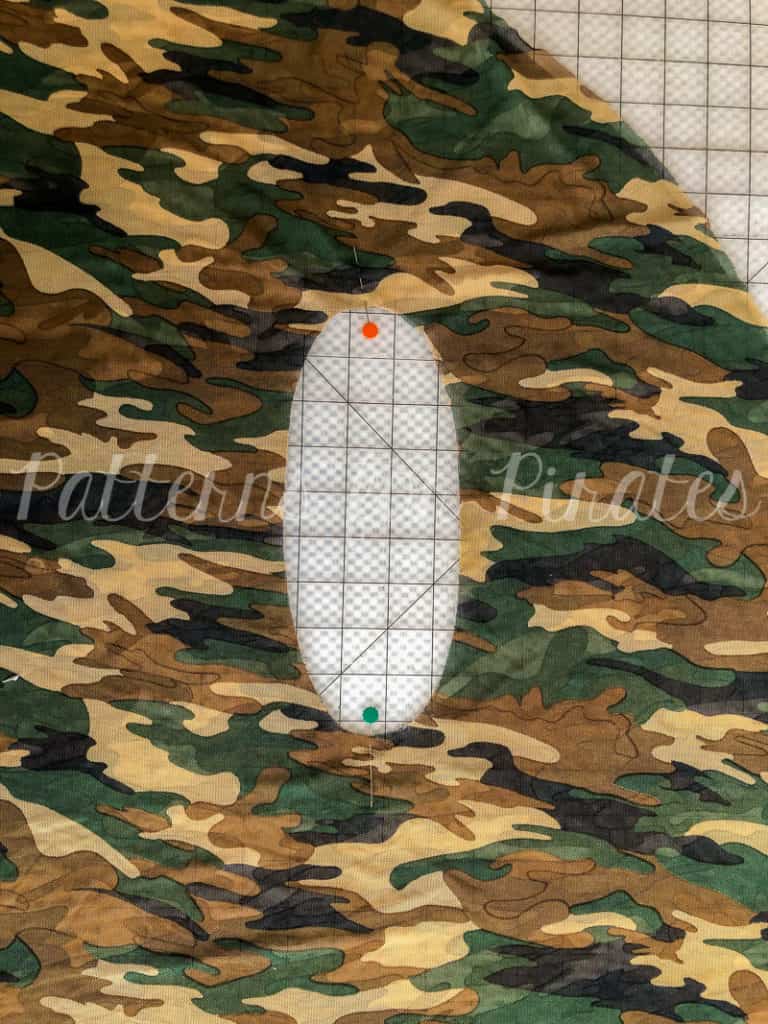
Fold the arm opening, to meet the pins you just placed together and mark the other quarter points of the opening.

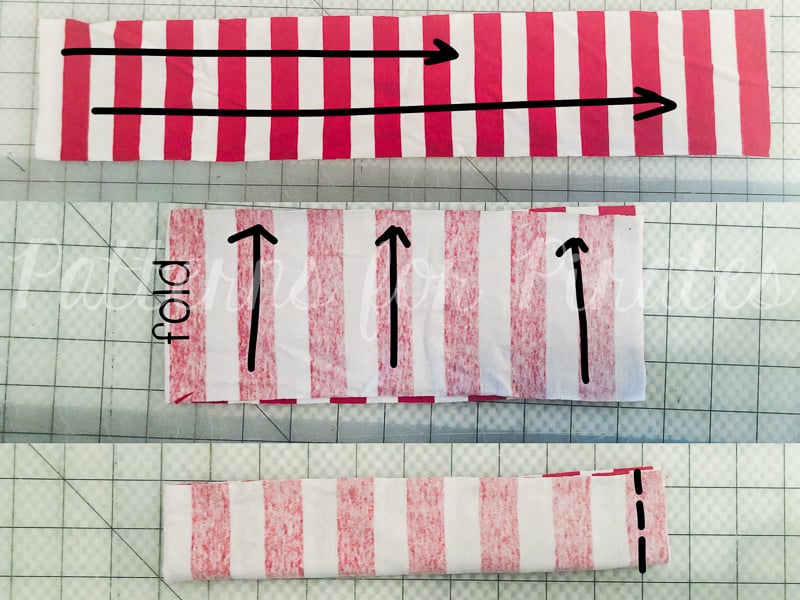
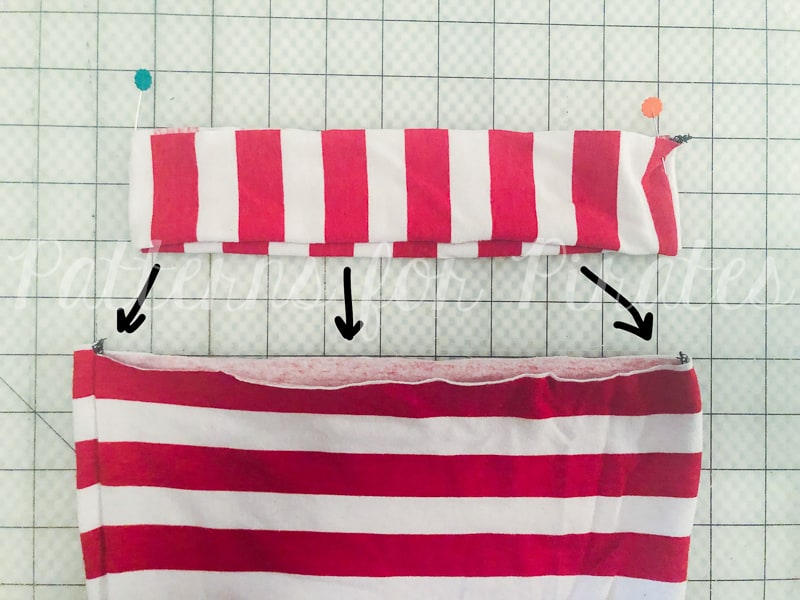
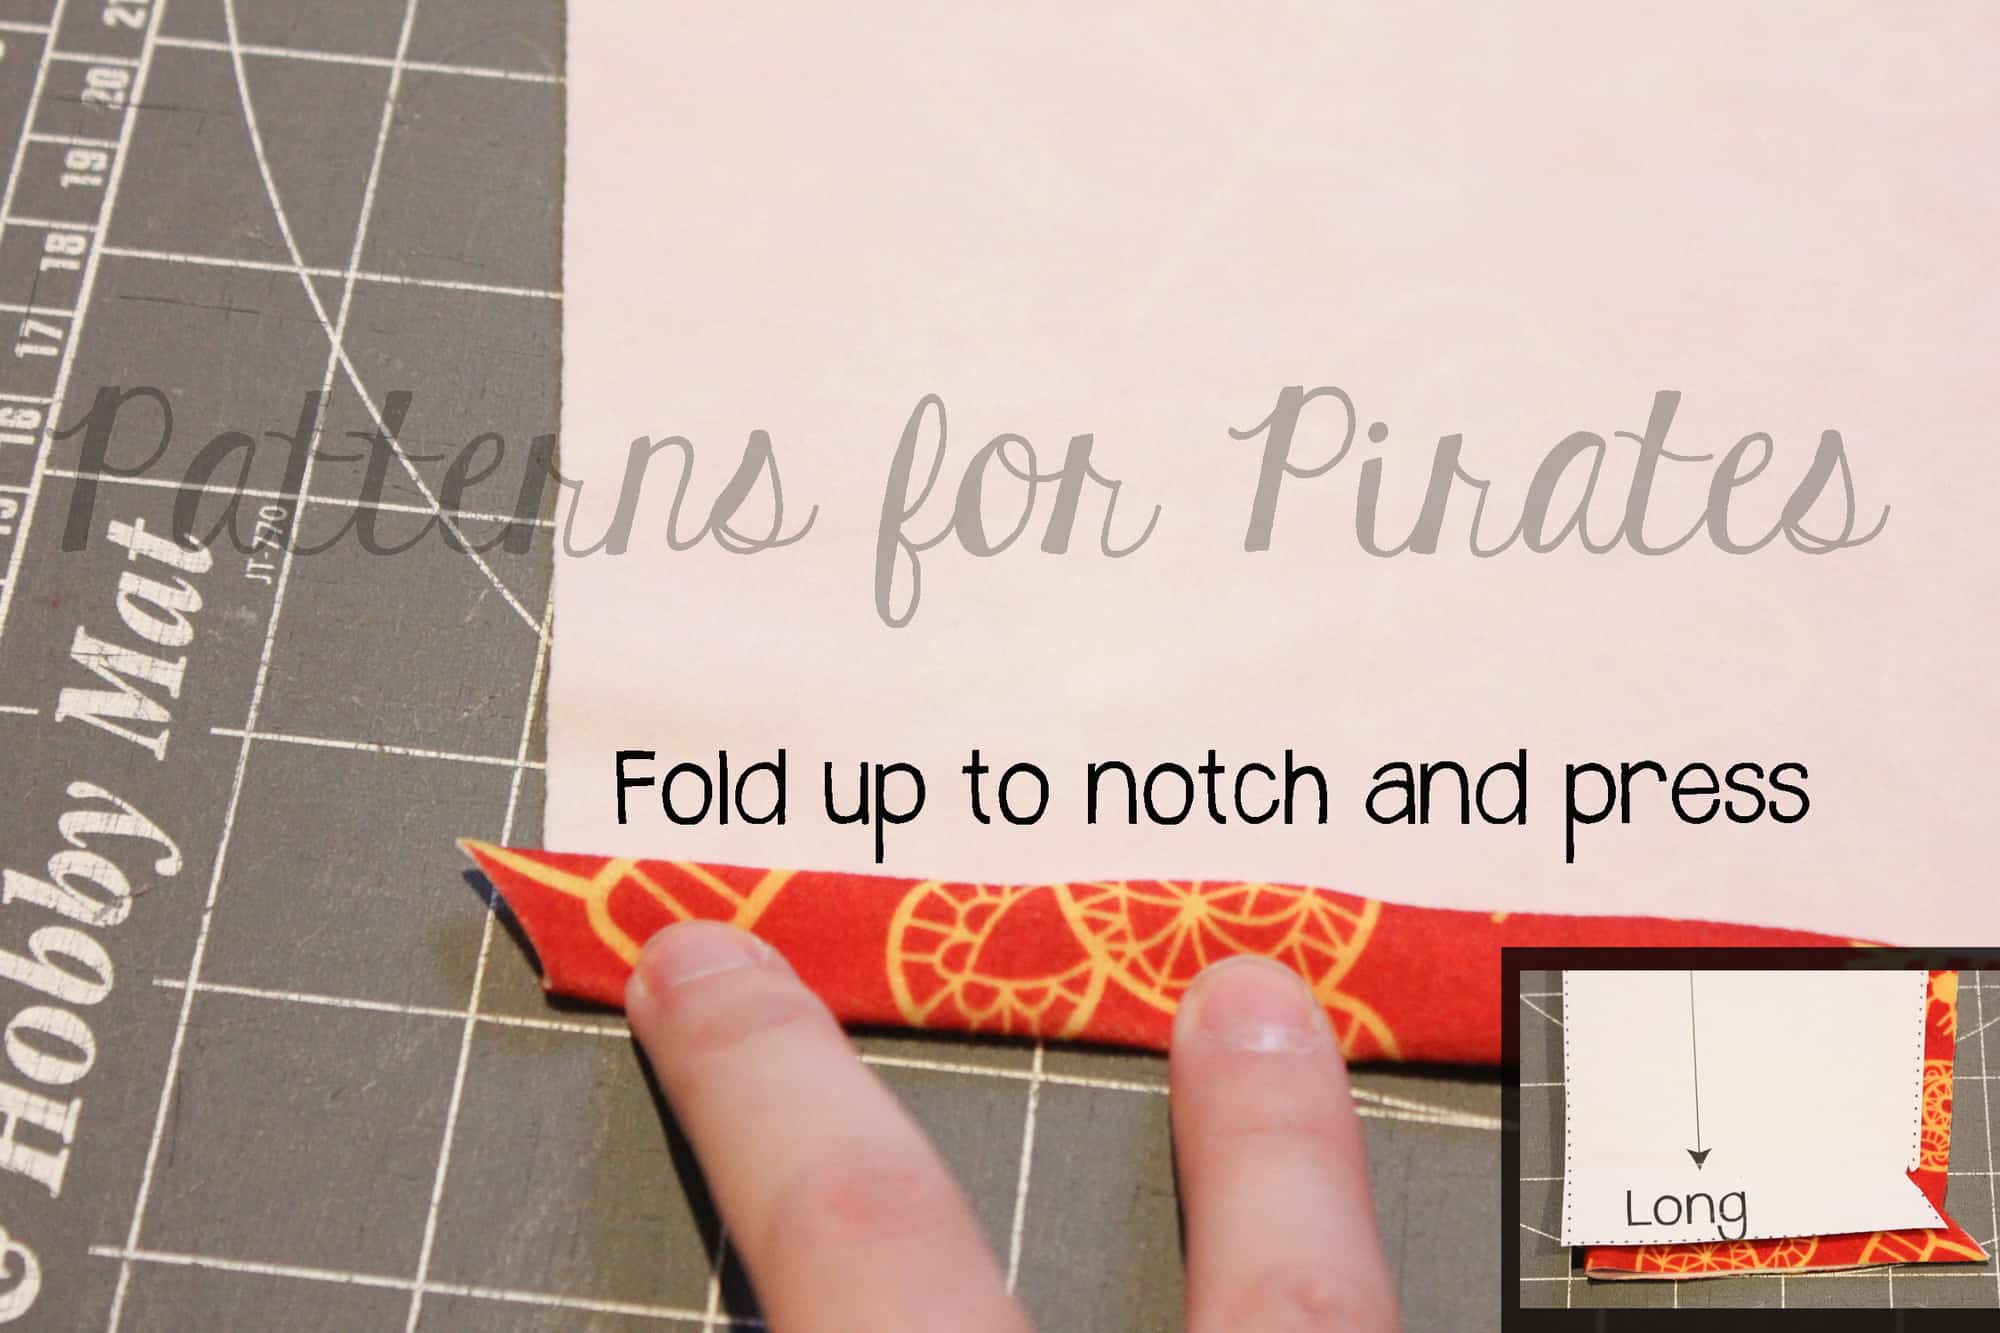
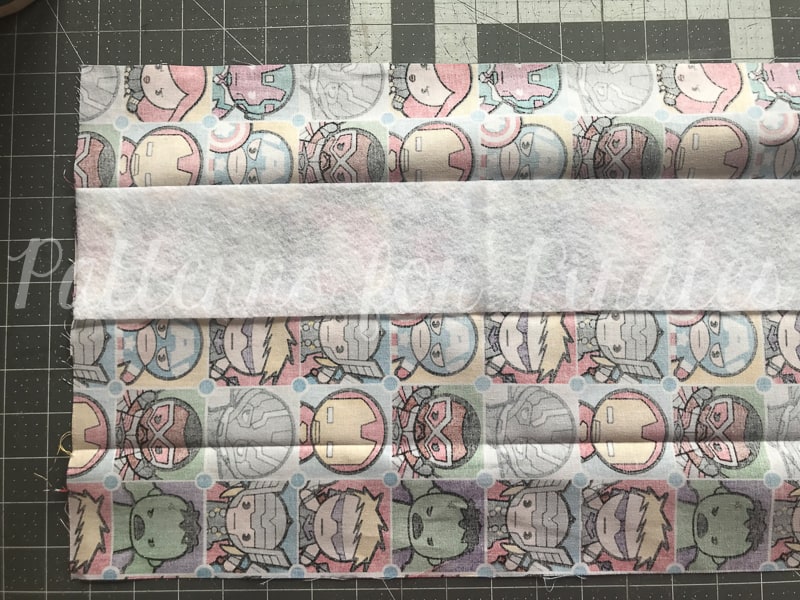
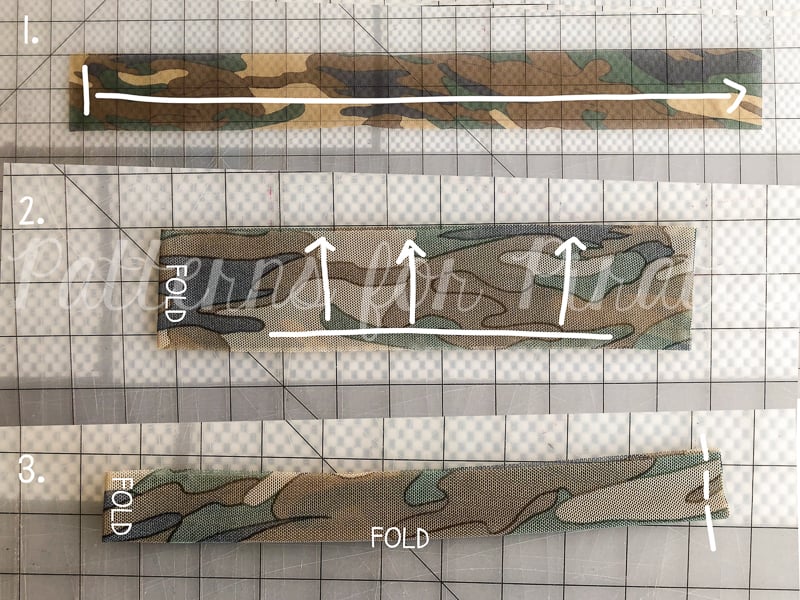
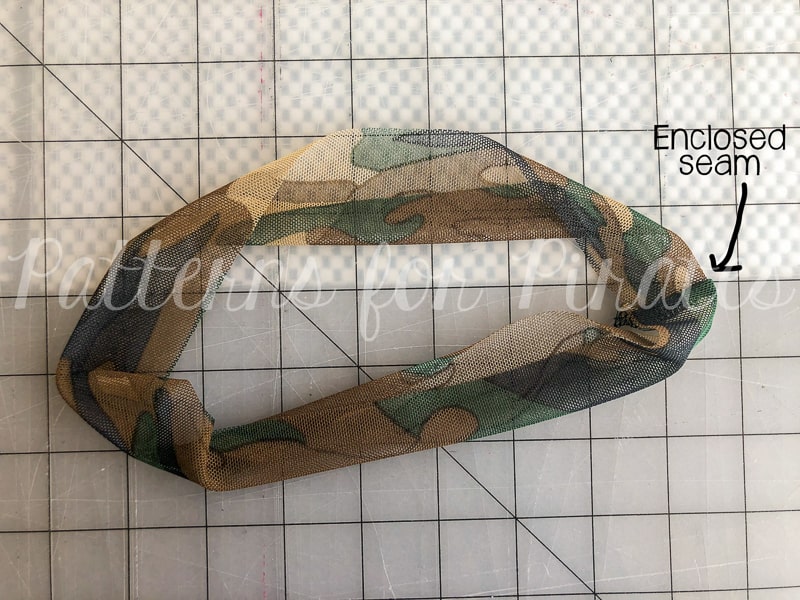
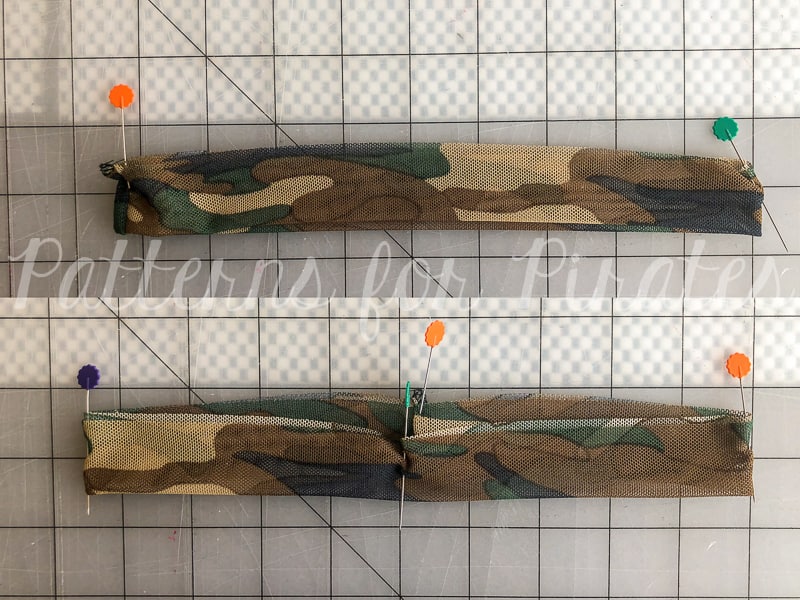
1. Fold your armband piece, right sides together, meeting the short ends together.
2. Now meeting the long ends together, fold in half again.
3. Using 1/2″ seam allowance, sew short raw edges (you will be sewing through four layers).

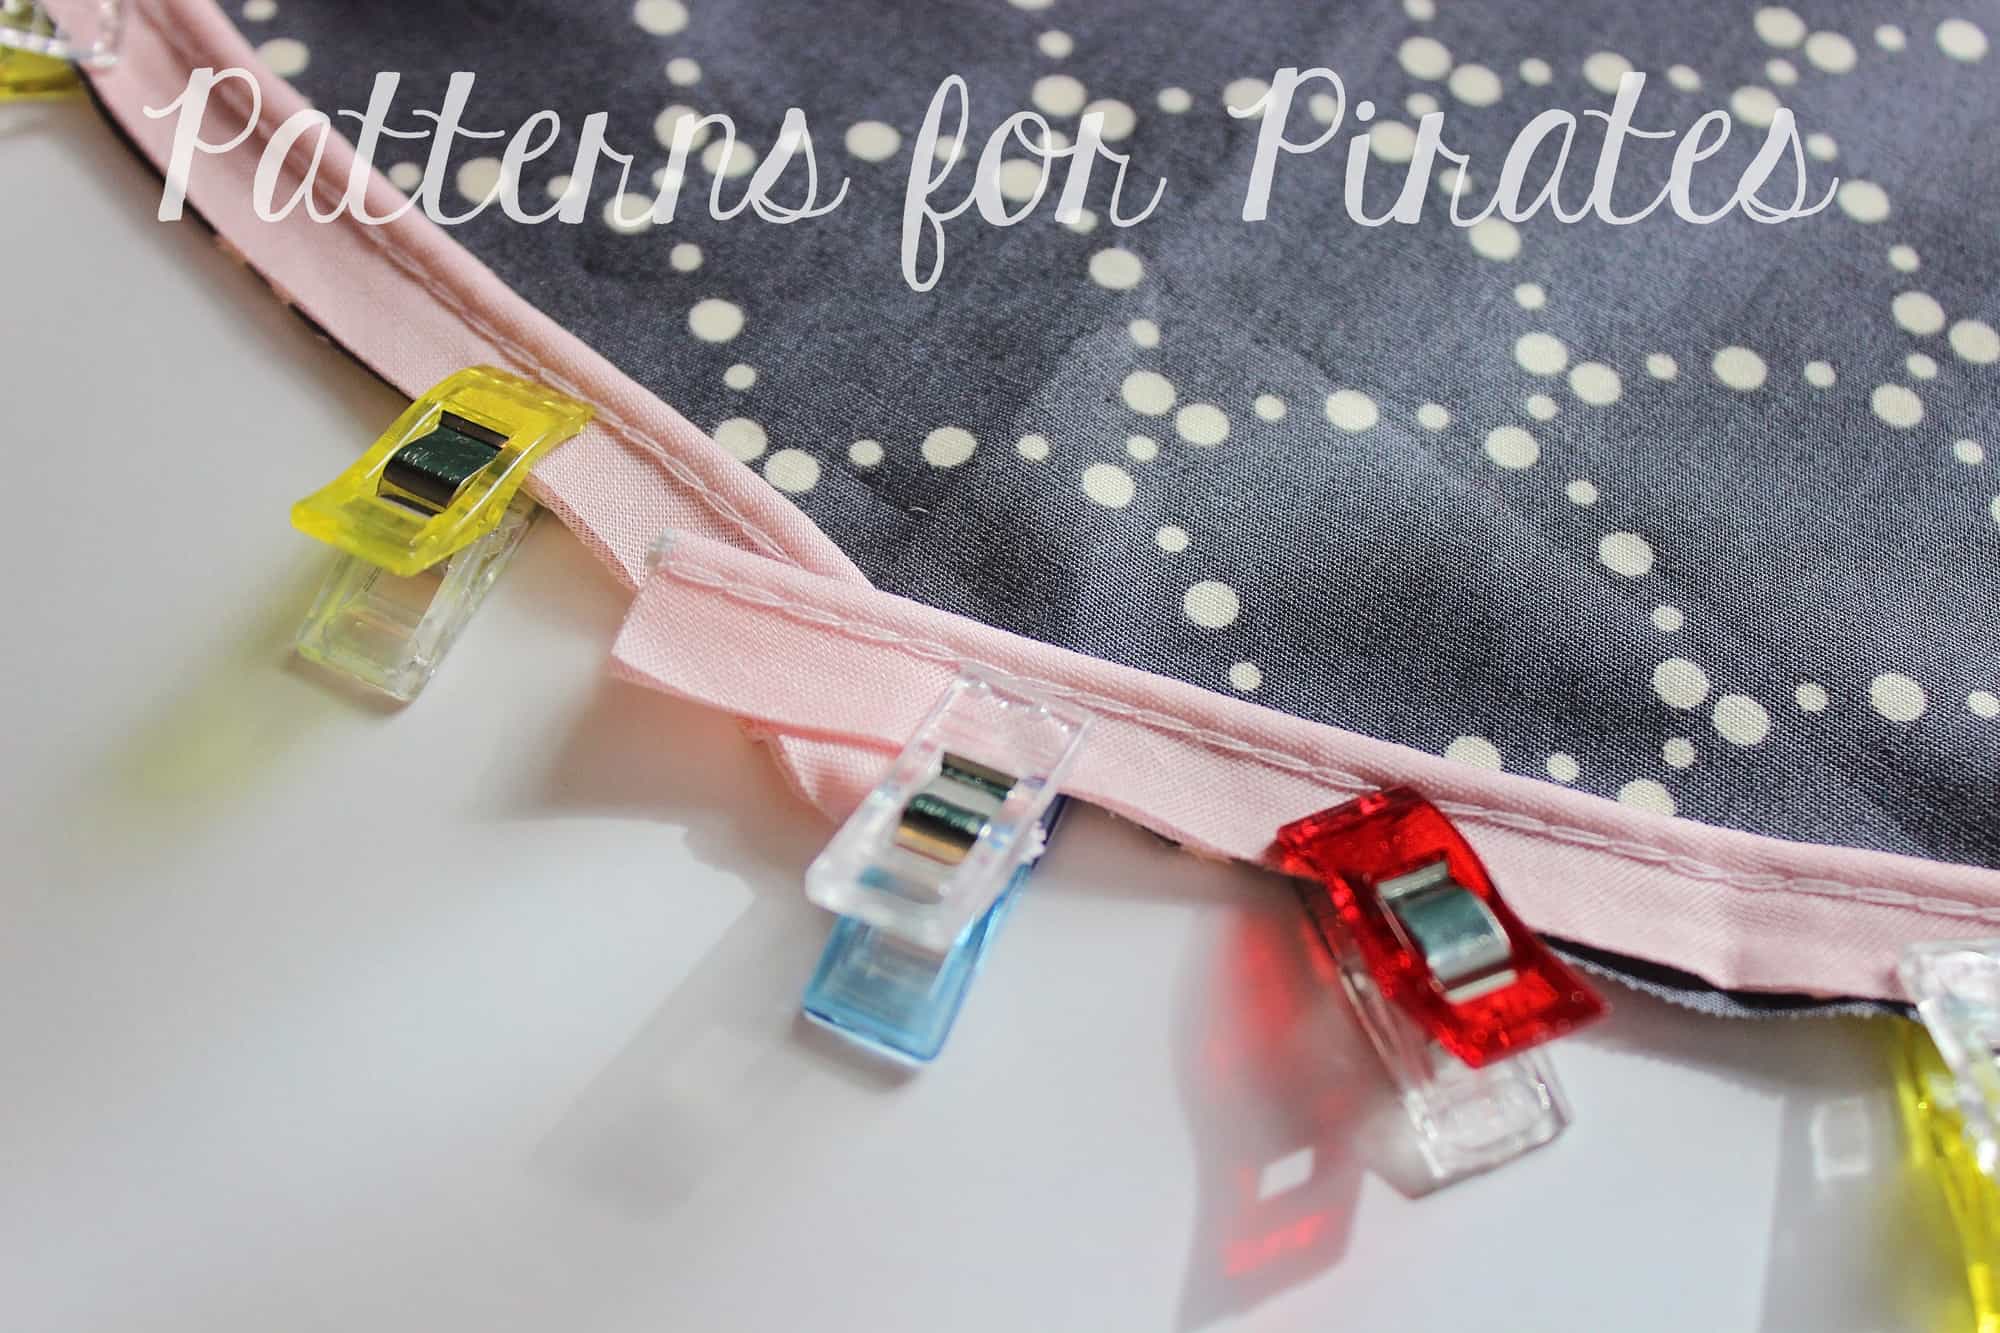
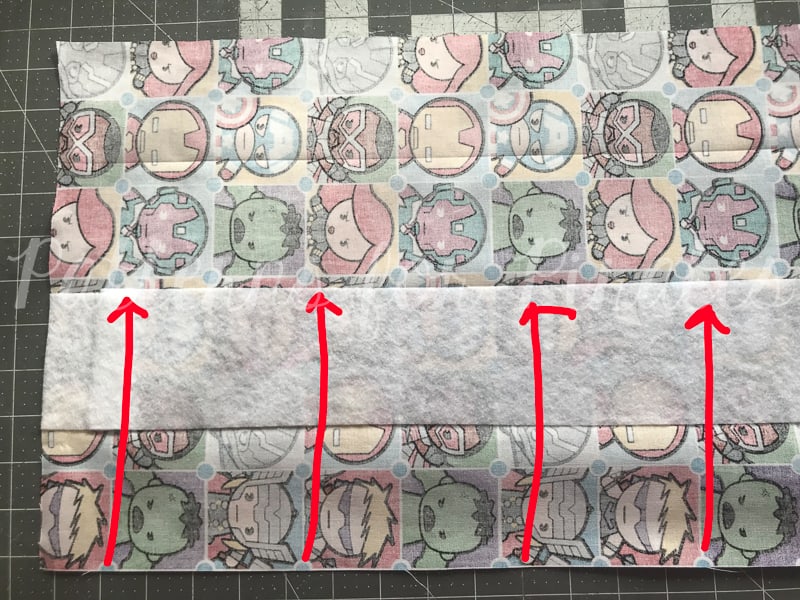
Flip open your armband, enclosing the seam cleanly in the middle. Repeat for other armband.

Mark quarter points of raw edges of armbands.

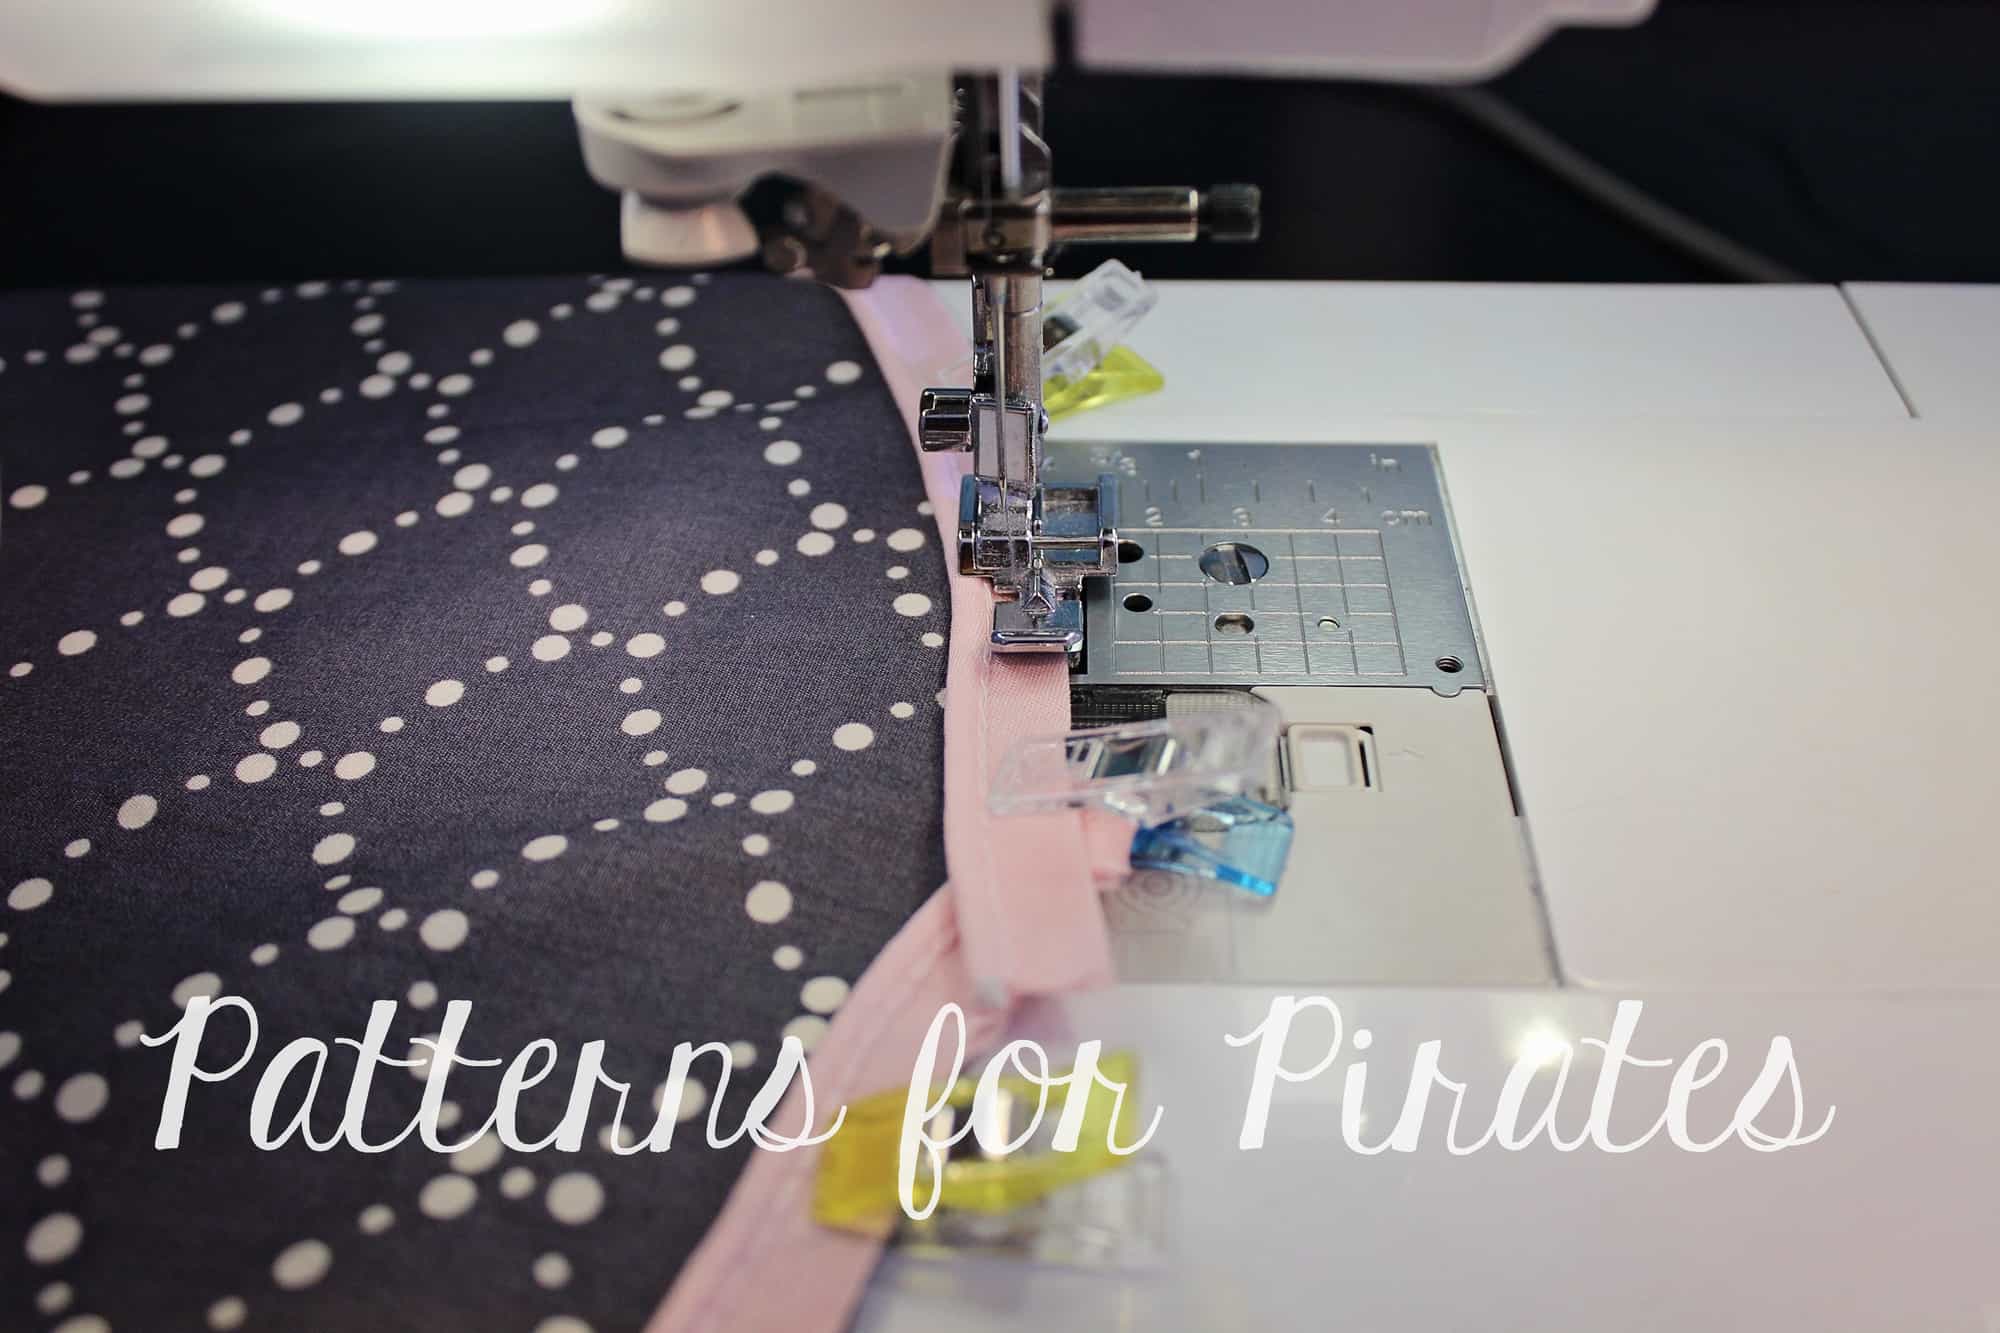
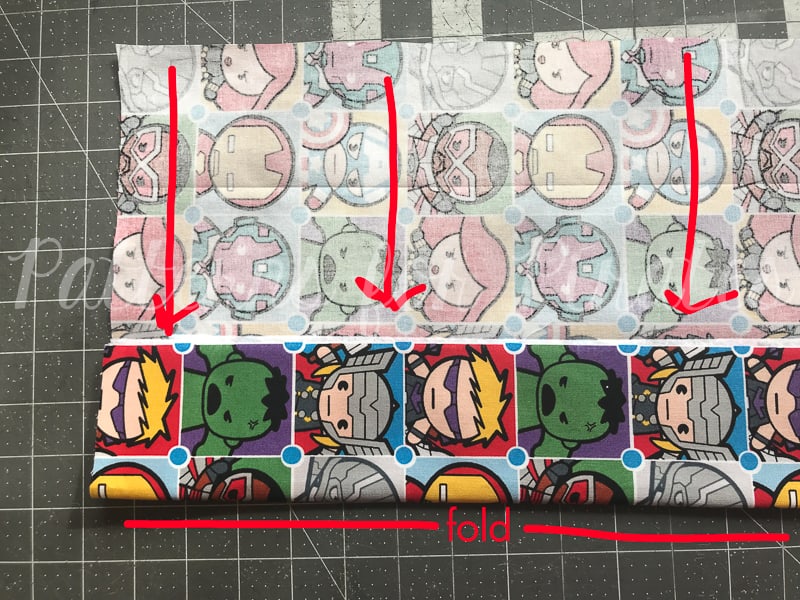
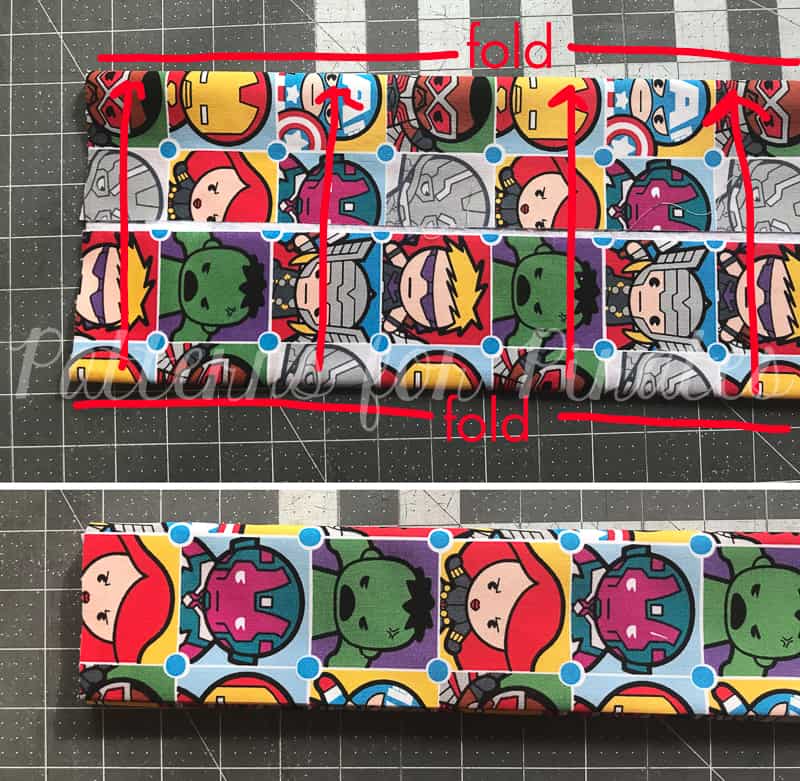
Slide the armband inside the bodice, aligning the raw edges and matching the quarter-marked points. Note: The armbands are slightly smaller than the bodice opening.

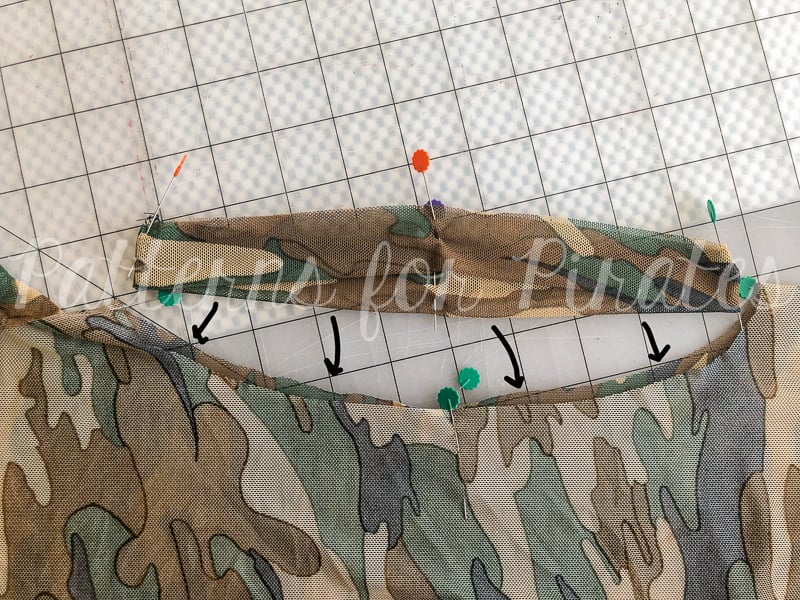
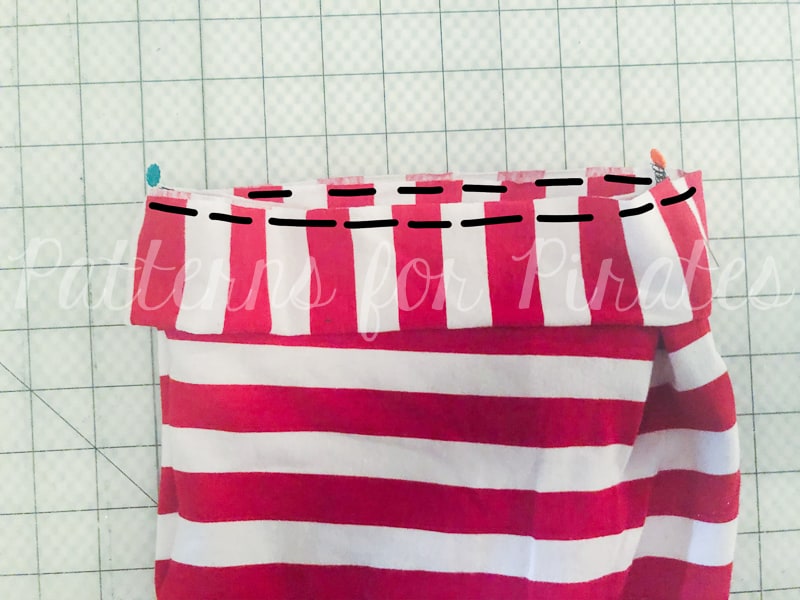
Stitch, using 1/2″ seam allowance. Repeat with second armband.

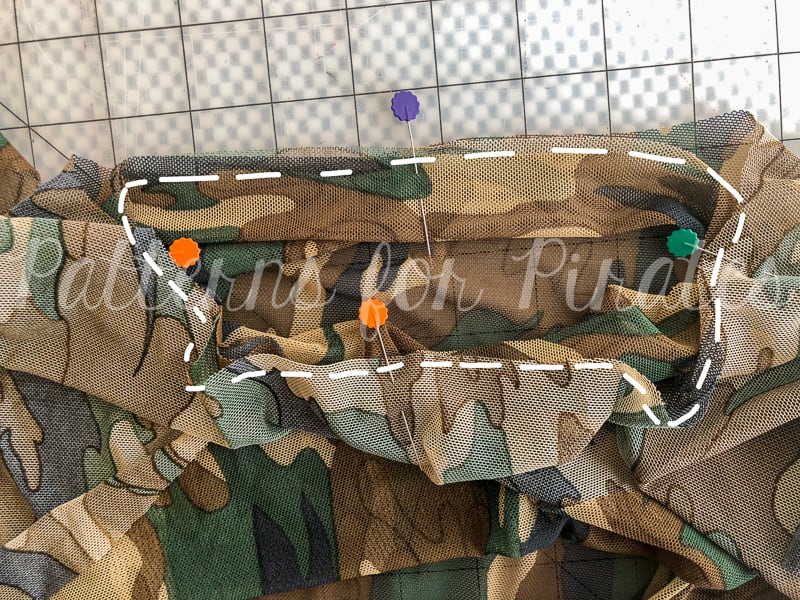
Open it up and throw it on as your new favorite layering piece!  You’re welcome to finish the edges if you’d like, but this was meant to be a more flowy, open vest.

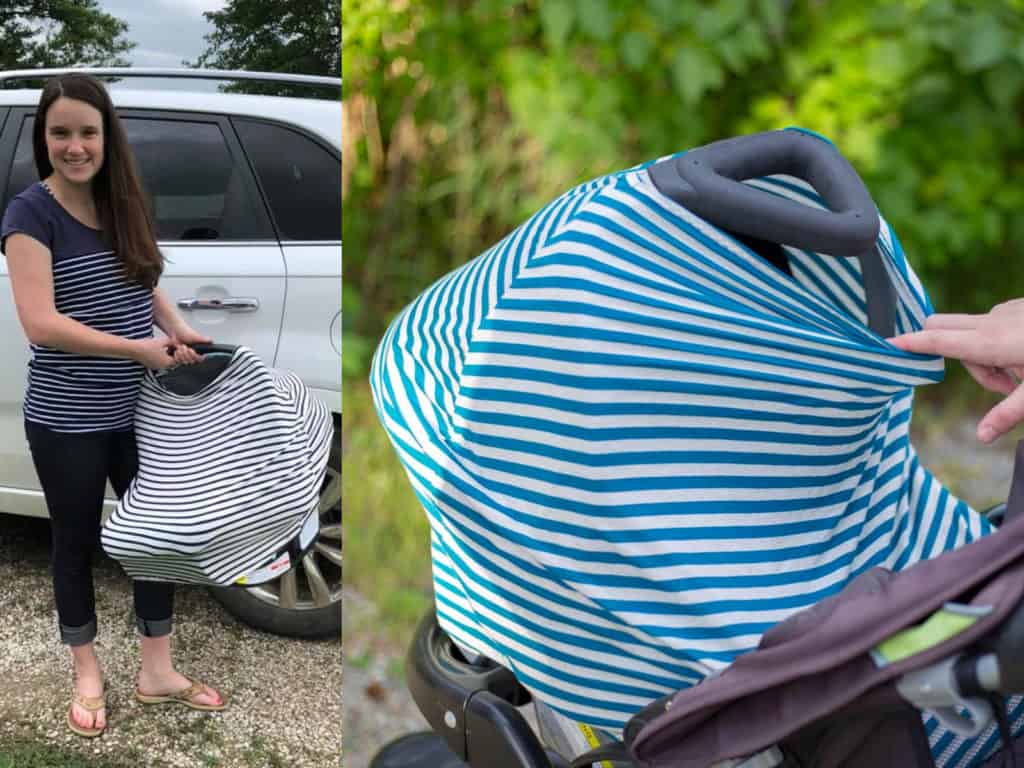
Here are a couple of photos from our holiday tester group:

Also be sure to head over the Patterns for Pirates Facebook Group and share what you’ve made with your new designs!

Happy Holidays, Pirates!

Filed Under: Free Pattern, Pattern Release 9 Comments

2018 Holiday Freebies :: Pirate Stocking Cap

December 4, 2018

On our THIRD day of freebies this holiday season, I thought it was time to bring to you a new hat pattern.  Did you know that I (Katy) started in the handmade selling world with crocheted hats?  Putting things on people’s heads apparently is my “thing” and it can be your thing too!

Today’s pattern is a super quick and easy one.  Perfect for scrap busting.  And even more perfect for people who like fun hats.

This stocking cap pattern comes in four sizes, which should cover the heads of the majority of your family!

XSmall (fits 17″ – 18″ head circumference) – Toddler
Small (fits 19″ – 20″ head circumference) – Child
Medium (fits 21″ – 22″ head circumference) – Teen/Adult
Large (fits 23″ – 24″ head circumference) – Adult

Grab your free pattern pieces here. If you need help putting the pattern together, pop over to the First Time Users Tips page or ask in our facebook group .

Recommended fabrics: Ponte, sweater knits, liverpool, brushed poly, rayon blends, tshirt knits, upcycled sweaters, etc.   Anything with a decent amount of drape to it works best, otherwise the “slouch” won’t happen as well.  I suggest washing your fabric before you begin to pre-shrink & help prevent color bleeding in the future.
Cuff piece: Any knits with at least a 20% stretch.

Instructions:

Lay one main hat piece, right side up.

Lay the second main piece on top, right sides together.

Using 1/2″ seam allowance, sew around the two outer edges.

With your fringe piece face down, start rolling it — wrong sides together.

You want this piece to be as close to 1/2″ wide as possible. Baste the top together.

Slide the fringe piece inside the main hat. Make sure to tuck all of the fringe edges inside, so you don’t catch them.

Stitch along the raw edges, using 1/2″ allowance. (You might find this step easier to do with your sewing machine, as it can generally handle a thicker amount of fabric than your serger.)

1. Fold your band piece, right sides together, meeting the short ends together.
2. Now meeting the long ends together, folding in half again.
3. Using 1/2″ seam allowance, sew short raw edges (you will be sewing through four layers).

Flip open your band, enclosing the seam cleanly in the middle. Mark the half points of the band.

Slide the band over the hat body, aligning the raw edges and matching the half-marked points. Note: The band is slightly smaller than the hat body.

Stretching the band only, stitch through all three layers of raw edges.

You’re finished!!  So easy, right??

In case you needed it, here is some inspiration from our fabulous group of testers:

As always, we love when you share what you’ve made with us.  Head over to the Patterns for Pirates Facebook group and show off the fabulous Pirate Stocking Caps you’ve managed to make from our freebie pattern!

Filed Under: Free Pattern, Pattern Release 2 Comments

FREE Tulip Tee Pattern + 100k Sale-A-Bration Day 5!

September 14, 2018

Welcome back to our fourth day of the 100K Sale-A-Bration, pirates!

In case you missed the announcement or the freebies that have been released so far, here they are!
100K Sale-A-Bration + Grand Prize Giveaway | Free Convertible Cover Pattern | Free Mom/Girl Power Cut Files | Free Tiny Tulip Tee Pattern

Did you really think we’d make an adorable tee pattern for the girls and not one for women too?  Obviously the ladies needed a Tulip Tee too and today’s free pattern is just that!  Whoop whoop!

The Tulip Tee is a beginner knit pattern in a simple dolman style.  The tulip front and back options are so fun and on trend and it can be a perfect staple for anyone’s wardrobe!   It includes four bodice styles (tulip front, tulip back, tshirt hem and banded hem), 3 sleeve lengths (short, 3/4 and long), and covers womens sizes XXS – Plus 3X!  This top is a looser fitting tee.  The tulip options will give it a little more swing and feel looser than the plain option.  A fabric with good drape is recommended, for the tulip options especially, so the curves drape down to the body rather than tenting outwards.  (Favorite fabric picks would be rayon / modal / bamboo spandex blends, triblends, ITY, sweater knits, and rayon blend french terry.)  The top is a shirt length that hits toward the lower part of the booty in the back, and mid rise on the front.  It’s the perfect length for shorts, or to lengthen around an inch if you plan on pairing it with leggings.  The tulip curves hit right at the waistband of a high-rise bottom (jeans or leggings), but is easy to lengthen to your preference!

It’s also a perfect top for nursing mommas….which is why we also included a nursing under layer that gives coverage for nursing mamas while still looking stylish and feeling comfortable.

**Want to learn more about how to measure yourself / your little one for this pattern?  We’ve got you covered with an in-depth blog HERE.  And in case you’re new to Patterns for Pirates and PDF patterns in general, we have a great blog full of new user tips HERE to help you get started!  And, as with all of our current releases and updates, the pdfs now include our layers feature and can be found in Letter, A4 and A0 sizes.

Let’s take a quick peek at the options!

TULIP FRONT

TULIP BACK

TSHIRT HEM

BANDED HEM

NURSING UNDER LAYER

If that’s not enough, we have a Facebook album full of tester images for more inspiration!  (And if you wait a couple of days, we have a post coming out that is full of pattern hacks to help take this freebie even further!)

Go grab your copy of the Women’s Tulip Tee now!

Also be sure to head over the Patterns for Pirates Facebook Group and enter yourself into today’s daily drawing for the 100K Sale-A-Bration

Happy Sewing, Pirates!

Filed Under: Contest/Giveaway, Free Pattern, Uncategorized 2 Comments

FREE Tiny Tulip Tee Pattern + 100k Sale-A-Bration Day 4!

September 13, 2018

Welcome back to our fourth day of the 100K Sale-A-Bration, pirates!

In case you missed the announcement or the freebies that have been released so far, here they are!
100K Sale-A-Bration + Grand Prize Giveaway | Free Convertible Cover Pattern | Free Mom/Girl Power Cut Files 

Today is another fun one because we are giving you a FREE (!!) girl’s tee sewing pattern!  Let’s welcome the Tiny Tulip pattern to our P4P family!

The Tiny Tulip tee is a beginner knit pattern in a simple dolman style.  The tulip front and back options are so fun and on trend and it can be a perfect staple for anyone’s wardrobe!   It includes four bodice styles (tulip front, tulip back, tshirt hem and banded hem), 3 sleeve lengths (short, 3/4 and long), and covers sizes 3M – 14!  This top is a looser fitting tee.  The tulip options will give it a little more swing and feel looser than the plain option.  A fabric with good drape is recommended, for the tulip options especially, so the curves drape down to the body rather than tenting outwards.  (Favorite fabric picks would be rayon / modal / bamboo spandex blends, triblends, ITY, sweater knits, and rayon blend french terry.)  The top is a shirt length that hits toward the lower part of the booty in the back, and mid rise on the front.  It’s the perfect length for shorts, or to lengthen around an inch if you plan on pairing it with leggings.  The tulip curves hit right at the waistband of a high-rise bottom (jeans or leggings), but is easy to lengthen to your preference!

**Want to learn more about how to measure yourself / your little one for this pattern?  We’ve got you covered with an in-depth blog HERE.  And in case you’re new to Patterns for Pirates and PDF patterns in general, we have a great blog full of new user tips HERE to help you get started!  And, as with all of our current releases and updates, the pdfs now include our layers feature and can be found in Letter, A4 and A0 sizes.

Let’s take a quick peek at the options!

TULIP FRONT

TULIP BACK

TSHIRT HEM

BANDED HEM

If that’s not enough, we have a Facebook album full of tester images for more inspiration!  (And if you wait a couple of days, we have a post coming out that is full of pattern hacks to help take this freebie even further!)

Go grab your copy of the Tiny Tulip Tee now!

Also be sure to head over the Patterns for Pirates Facebook Group and enter yourself into today’s daily drawing for the 100K Sale-A-Bration

Happy Sewing, Pirates!

Filed Under: Contest/Giveaway, Free Pattern, Pattern Release 6 Comments

FREE Convertible Cover Pattern + 100k Sale-A-Bration Day 2!

September 11, 2018

EEP!  Are you guys ready for the second day of our 100K Sale-A-Bration?!?!

If you missed what the party is all about, go read all about the giveaway, sale, and the pure appreciation/joy/excitement surrounding this big milestone HERE.

As we all know, the owner, designer and fearless leader behind Patterns for Pirates is Judy Hale.  P4P is such a big part of her life, and you can tell that she brings a lot of personal experiences and interests into her designs.  When we celebrated our 75K Milestone (which feels just like yesterday), our freebies were themed around the wee baby that was still growing inside of her belly.  Judy’s nesting for her third child ended with her designing and sharing the Wee Lap Tee, Petite Pegs, Teeny Beanie and Burp Cloth.

This time around, the baby boy is here and our freebies are a little more focused on the daily needs of the Momma!  It’s time to introduce you to the Convertible Cover Pattern!

The Convertible Cover is multifunctional, 4-in-1 cover that is so easy to make, and even easier to fit into your daily routine!  You can use it as a cover for infant car seats, nursing, high chairs, and shopping carts.

You must use a breathable, lightweight fabric with a high stretch.  The fabric content is vital.  Natural fabrics that breathe are needed to keep baby safe and at a safe temperature while in use (ie: rayon spandex, modal, bamboo spandex and lightweight cotton spandex.)

**We care about the safety of your child!  Always remove cover from your child’s infant car seat before placing it into a vehicle and never leave your child covered while unattended. It is important to monitor your baby to ensure they do not overheat in warm climates or during the hot summer months. Keep the cover away from any heat source.   Please use recommended breathable fabrics, and always remove cover before placing baby into vehicle. If gifting the cover please give safety guidelines to the recipient.

Let’s take a peek at all of the ways it can be used, shall we?

INFANT CAR SEAT COVER

NURSING COVER

HIGH CHAIR COVER

SHOPPING CART COVER

What are you waiting for?

Go grab your copy of the Convertible Cover now!

Also be sure to head over the Patterns for Pirates Facebook Group and enter yourself into today’s daily drawing for the 100K Sale-A-Bration

Happy Sewing, Pirates!

Filed Under: Contest/Giveaway, Free Pattern, Pattern Release 1 Comment

Set Sail Hat :: New FREEBIE Pattern Release + Extras!

May 22, 2018

I am super-duper excited to be sharing the newest addition to the P4P pattern lineup: the Set Sail Hat.

Get ready for the quickest, cutest sew ever, my friends!  Because this hat takes minimal amounts of fabric and gives you maximum results.  And it’s reversible!  So you are practically getting two hats for the sewing efforts of one.  Perfect, am I right?

Did I forget to mention the best part??!!  It’s FREE!

The Set Sail Hat is drafted for head circumferences ranging from 18″ to 25″.  It has a three-piece cap that curves beautifully to your head, and comes ready with three brim sizes: 2″, 4″, and the ever-fabulous 7″.  To keep those brims extra sturdy, we do recommend stabilizing them with a medium-to-firm weight interfacing (we love Pellon 809!) so make sure to pick some up next time you go shopping at your local fabric store.

Here’s a quick peek at the AH-MAZING hats that our testers created!

This slideshow requires JavaScript.

But wait!  There’s more!  We’ve been seeing “wordy” sun hats all over the place the last couple of seasons and we wanted to help you make your own.

Packaged as SVG and PNG files, you can download these phrases (which are already curved specifically for the brim of both the 4″ and 7″ hats):

  • Vacay Vibes
  • Sup, Beaches?
  • Seas the Day
  • Resting Beach Face
  • Pirate Maiden
  • Hello Sunshine
  • Do Not Disturb
  • Champagne Please
  • Boss Babe
  • Beer Me
  • Beach Please

You can find those freebies as a quick download here: Set Sail Hat Phrases


Easy Hack: Adding Piping

It’s not part of the original pattern instructions, but we wanted to help you with a quick tutorial on the blog.  We’ve got an easy little detail addition that makes a big impact.  We are talking about PIPING…good old fashion store bought piping. Don’t get us wrong, if you feel adventurous and want to make your own, go for it! However, our personal preference is the ease of ready made piping 🙂

We’ll be adding piping to the brim of the hat. The 4″ brim takes a little less than a package of piping. If you chose to add this detail to the 7″ brim you will need two packs of piping. You will not have to make any changes to the pattern, simply cut your pieces as you normally would.

Pin or use clips to attach the piping to the outer circumference of one of the brims, lining or main. Chose what would be the back of the hat and overlap the piping there.

The key to successfully sewing piping is using your zipper foot. So, switch your regular foot to the zipper foot and sew the piping to the brim.

All you have left to to now is sew the hat as per the tutorial and enjoy your awesome new make!

Remember to use the zipper foot when topstitching the outer edge of the brim.

What are you waiting for?  Go grab your copy of the Set Sail Hat!  It’s always free and always fabulous!

Need some style inspiration?  Check out our Facebook Album full of amazing images from our testers.

Happy Sewing, Pirates!

Filed Under: Free Pattern, Pattern Release 7 Comments

Petite Pegs – easy cuffs hack

January 24, 2018

How adorable are the new Petite Pegs? So much cuteness in such a small package. If you haven’t downloaded your FREE copy, do that here. Today on the blog I wanted to show you how to add cuffs to the Petite pegs.

We will start by shortening the length of the Petite Pegs by 1″. To do that simply grab a ruler and draw a line 1 inch above the ankle cut line. This will be your new pegs ankle length. Cut the two mirrored legs using this new cut line.

You will now be cutting the cuffs. I did the math for you so just follow the cutting chart below. Remember to cut two cuffs, one for each leg.


*If you babywear a lot you might find it helpful to double the cuff length.  This way the long cuff can be folded down over the heel. It’s a popular way to wear pants when you’re babywearing because otherwise the pant legs hike up and then the baby ankles stick out.

Sew the Petite Pegs as per the tutorial. Grab your little cuffs and fold them to create a memory hem. Press and steam.

Sew the cuffs to create a loop and fold them. Take a moment to look over the tips I gave you in the Knit Cuffs 101 blog. They will definitely come in handy when attaching these itty bitty cuffs to the little pegs.

Attach the cuffs to the leg opening with your serger or the sewing machine following a 1/2″ seam allowance. Make sure you match the cuffs’ side seams to the leggings inseam. Stretch the cuff to fit the leg opening.

When attaching the cuffs you can place your serger foot on the outside of the leg (as pictured above) or inside the leg (as pictured below). You will be working with a pretty small loop so go slow!

Tadah! There you have it, Petite Pegs with cuffs! I can’t wait to see your little creations!

Note: You may find it easier to attach the flat cuff to the leg instead of sewing the inseams and the cuff in a loop. You can certainly do that, you will be sewing the inseam after you attach the cuffs. You can read about some ways to finish your serger seam here.

Filed Under: Free Pattern, Pattern Hacks, Pattern Release, Uncategorized 4 Comments

Pattern Markings 101

December 19, 2017

Many moons ago, I can remember calling my mom in a panic. I had printed out my first pattern for a garment, assembled it, and then just stared at all of the markings! Even though I’d sewn quilts for years before, this was my first attempt at making clothes and the pattern looked like a map in which I had no clue how to follow. After my “what did I get myself into” talk with her, she slowly walked me through each question I had and now after all these years we’ve come full circle and I’m making clothes for her!

Like many people, you will probably experience (or already have!) the “What have I done?” moment in sewing and question why you started a project to begin with. Have no fear! We’re here to help. We decided it was time to break that map down for you and help you learn how to navigate through the amazing world of garment sewing. In this post, you’ll find a description of all the key terms and symbols you might expect to see when starting your sewing adventures! So let’s get those patterns printed, assembled and let the fun begin! (If you’re staring at all of those pages you’ve just printed- don’t worry there either! Click here for our First Time User Tips, which includes how to assemble patterns).

Grainline

The grainline tells you which direction the grain of your fabric should run. The grainline will run parallel between the selvages, or finished edges of your fabric. There are usually printer markings, contrasting trims, solid colors, etc found on the selvage. Typically, your grainline will have the less amount of stretch in knit fabric. A few weeks ago, Roberta shared some details and information about grainlines, why they’re important, and much more. You can check that out here. 

Stretch

The stretch of your fabric will run perpendicular to the grainline/selvage and will be the direction with the most stretch. As you can see in the picture below, the stretch is running the opposite way as the grainline. It is extremely important to have the right direction of stretch when it comes to the fit of your garment. The stretch will go around your body for most pattern pieces and is accounted for when the ease of a pattern is drafted (read more about ease here). For example, if a pattern is drafted with negative ease (finished measurements are smaller than your body) and you have the stretch going in the wrong direction, chances are, it won’t fit.

Fold

If a pattern piece is symmetrical on both sides, you will notice the center with a “FOLD” marking. This is commonly found on pieces such as the bodice, back, or sleeve in which both the left and right sides have the same appearance. You will want to fold your fabric wide enough for your pattern piece and align this marking to the fold of the fabric. To help conserve fabric, I like to fold it just wide enough for the pattern piece (shown above). A common error can be to fold the fabric exactly down the middle, leaving wasted material.

Notches

You might have noticed small triangles on some pattern pieces. These notches serve several different purposes. One of the purposes is to help distinguish the back from the front. For example, something like a raglan style top can easily get mixed up when assembling. These notches will help keep the front  with the front and back with the back. The second purpose is to help with alignment. By matching these notches up, your pieces will be in the correct position.

TIP: I always cut my notches out rather than in as to avoid accidentally cutting too far into the seam allowance.

Hem Gauge

You will typically find a hem gauge on both the sleeves and bottom edges. This is usually a triangular shape that notches out. It will mark the correct allowance for your hem. This is particularly useful when creating a memory hem. All you will need to do is fold your fabric up to this notch, press and unfold. Once you’ve sewn the seams, you will still have your pressed fold in place with the correct seam allowance.


Cut Chart

Most Patterns for Pirates patterns will include a cut chart. The cut chart is typically found within the first few pages of the tutorial and will give measurements for any rectangular pieces. For example, items like neckbands, cuffs, waistbands and elastic would all be found here. Some designers will included these as actual pattern pieces, however by providing a cut chart, you are able to save on both paper and ink. When cutting these pieces, I find it easiest to do so using a quilters ruler and rotary cutter.

Hopefully these tips help! Remember that we are always here to help, especially in our Facebook group. If you’re not a already a member, be sure to join so that you can ask questions and share all of your amazing Patterns for Pirates creations!

~ Erinn

Filed Under: Frequently Asked Questions, P4P University, Sewing Techniques, Uncategorized 2 Comments

2017 Holiday Freebies: Easy Button Cowl

December 8, 2017

I’m back to gift you the final item for our 2017 Holiday Freebies!  Have you had fun with us so far this week?

In case you’ve missed the last four days, go take a look: Slouchy Headwarmer / Emoji Pillows / Clothing Size Tags / Camera Strap

On the last day of our freebies, we are sharing how to make this super cute, quick, and easy Button Cowl.  We’ve even got two ways for you to wear it.  Are you ready?  Let’s get to it!


Materials needed:

  • 2 – 26″ wide x 6″ long pieces of fabric (can be flannel, fleece, sweatshirt fabric, etc. Really anything will work, but obviously the cozier the better.)
  • 2 buttons / snaps
  • Coordinating thread

With fabrics right sides together, stitch around entire outside using 1/2″ seam allowance. Leave 3″ opening for turning.

Trim away bulk, making sure not to snip through seams.

Turn right-sides-out, through the opening.

Tuck in your seam allowance, press.

Top stitch along entire outer edge, making sure to catch your opening in there.

There are two ways you can add buttons/snaps to the cowl to create different ways to wear them.  I created an easy diagram to help you with placement for your buttons and button holes, depending on the style you’re wanting for your cowl.

Here’s a quick peek at what some of our testers made for themselves with this pattern:

As always, we would love if you shared your creations with us!  Head over to the Patterns for Pirates Facebook Group and show us what you made!  Happy Holidays, friends!

Filed Under: Free Pattern 5 Comments

2017 Holiday Freebies: DIY Camera Strap

December 7, 2017

What?  We are on day four of the 2017 Holiday Freebies already?  I hope you’re having as much fun as I am!  If you need to back and review the past three days, I can wait!

Here are some links: Slouchy Headwarmer / Emoji Pillows / Clothing Size Tags

Now that we’ve covered that, let’s get to today’s free pattern!  Sewing and photography seem to go hand-in-hand more often, because we want to share what we’ve made with our sewing community!  Why not sew yourself a sweet little strap to wear while you’re using that camera of yours?  It’s super easy to do and way more fun than using what came with your camera originally.  Let’s get to it!

Prep your pieces, you will need:

  • Pattern Piece for Vinyl Ends
  • 36″ L x 12″ W Quilting Cotton
  • 2 – 12″ cuts of nylon webbing (1/2″ or 3/8″ both work) — I used THIS
  • 2 – 1/2″ or 3/8″ sliding adjusters — I used THESE black versions as well as THESE fun colored ones!
  • 36 L x 3″ W Fusible Fleece Interfacing
  • Small scraps of Vinyl/Pleather

**If you can’t find the nylon webbing / sliding adjusters in your local fabric store, a quick trick is to buy a small dog collar from the dollar store.  They tend to have the right width strap, and usually include the adjuster on it as well.

Important: The ends of nylon wedding need to be heat sealed to prevent fraying.  Make sure to do this before sewing it to your strap pieces!

**If your fabric is directional, you will want to cut two pieces for your strap and then stitch them together. Cut two 18.5″ x 12″ pieces from your quilting cotton.

For directional fabric, place your pieces right sides together, and sew along the short edge, using 1/2″ seam allowance.

Press open your seam.

For all straps: Fold your main fabric wrong sides together, meeting the long edges to one another. Press.

Open up your piece and fold one of the raw edges toward the middle crease you just made.

Repeat with the second raw edge. Press.

If you open your piece, you’ll now have 3 creases, spread evenly across four total sections.

On one of the middle sections, following the directions provided by the manufacturer, iron your fusible fleece to your strap piece.

We will be refolding the strap in the same method as before. Take one of the raw edges and fold it toward the middle crease.

Repeat with other raw edge.

Fold along middle crease, meeting both folded edges. All of your raw edges will be fully enclosed now.

Press, press, press.

I like to clip/pin my outer edges together, to make sure they’ll align properly when I go to stitch them. Straight stitch along the entire edge you just pinned, getting as close to the edge as you can.

This part is up to you, and how fancy you want to get with your quilting. I like to run an edge stitch along the other long edge. And then three even lines across the rest of the strap. You can stitch as much or as little as you’d like!

Take your nylon strap and overlap it 1.5″ from the edge of your strap, aligning it directly in the center of the strap.

Pin and repeat for the opposite end.

Using a wide zig zag stitch, secure your nylon strap to the end.

For the vinyl pieces, I recommend to only cut one actual piece — and to have an oversized rectangle for the other. It’s easier than trying to get them to line up perfectly. Especially since vinyl can be fussy to topstitch.

I like to run a line of fabric glue at the top of the vinyl backside. It helps keep it in place when sewing.

Two inches up from the bottom of your strap piece, lay out one of the vinyl pieces. The vinyl should be slightly wider than your strap.

Flip over your strap.

Throw another line of glue on the edge of your vinyl square.

Place it 2″ up from the bottom of your strap.

Flip your piece back over and stitch your vinyl on. This is the path I take and it allows for a continuous stitch. You can take whatever path you want. 😉

I HIGHLY recommend using a teflon foot for this. Vinyl can be a huge brat. I know they carry them at JoAnn Fabrics, or you can snag one on Amazon.

Finished stitches.

Trim the vinyl to match your other pieces.

Be careful not to cut off your nylon strap. Just tuck it out of the way when you’re trimming.

Take your slider.

Slide it onto your strap.

Put the cord in from the bottom-up on your camera.

Give yourself a little slack.

Run the cord back through the bottom and secure the strap to your camera. Easy peasy!


I am SO EXCITED to see your new, stylin’ camera straps!  I’ve been using my me-made strap for years now (so has my hubby) and we get compliments on it all the time.  I’m betting you will too!  Please, if you do make one for yourself, share it with us in the Patterns for Pirates Facebook Group!

**Also, as a quick note, there are some affiliate links scattered within this post.  I make a small commission for purchases made through those links, but I only link products that I’ve used and actually recommend myself.

Filed Under: Free Pattern 2 Comments

  • « Previous Page
  • 1
  • 2
  • 3
  • Next Page »

Newest Patterns

  • Uptown Joggers - Youth $10.00 $8.50
  • Uptown Joggers $12.00 $10.50
  • Uptown Joggers - Bundle $20.00 $18.00
  • Notch Top & Dress $12.00
  • Notch Top & Dress - Youth $10.00
  • Privacy Policy
  • Refund Policy
  • Affliliate Program
  • Contact Us
  • About

Copyright © 2023 Patterns for Pirates

Copyright © 2023 · Genesis Framework · WordPress · Log in