2020, A Year in Review

This year was definitely a strange one…but you don’t need me telling you that. Let’s keep it light by recapping all of the fun things that happened in our teeny, tiny Patterns for Pirates corner of the world. I haven’t always done recaps, but it’s fun for me (and I hope for you too) to see just what we did during the year! So without further ado… here is what P4P accomplished during 2020:
We added 10 new patterns to the shop (20 if you count the youth and adult as separate patterns!):
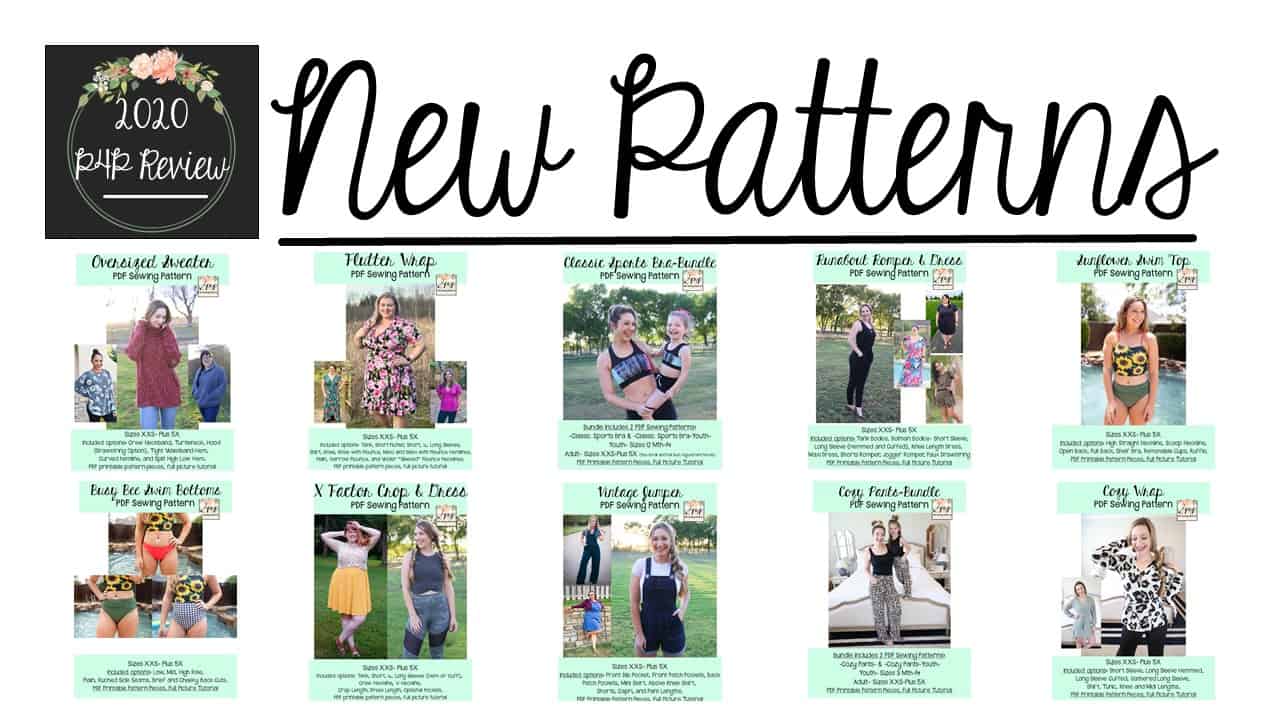
In order of release:
- Oversized Sweater + Youth Oversized Sweater
- Flutter Wrap Top and Dress + Youth Flutter Wrap Top and Dress
- Classic Sports Bra + Youth Classic Sports Bra
- Runabout Romper and Dress + Youth Runabout Romper and Dress
- Sunflower Swim Top + Youth Sunflower Swim Top
- Busy Bee Swim Bottoms + Youth Busy Bee Swim Bottoms
- X-Factor Crop and Dress + Youth X-Factor Crop and Dress
- Vintage Jumper and Youth Vintage Jumper
- Cozy Pants and Cozy Wrap + Youth Cozy Pants and Youth Cozy Wrap
I truly love each and every pattern we put out this year! (I might even be wearing some Cozy Pants and Cozy Wrap as I’m typing up this very blog post.)
We did some extra Free patterns this year because we felt like more people could use some smiles throughout this rougher year. So, here are all the freebies we released!
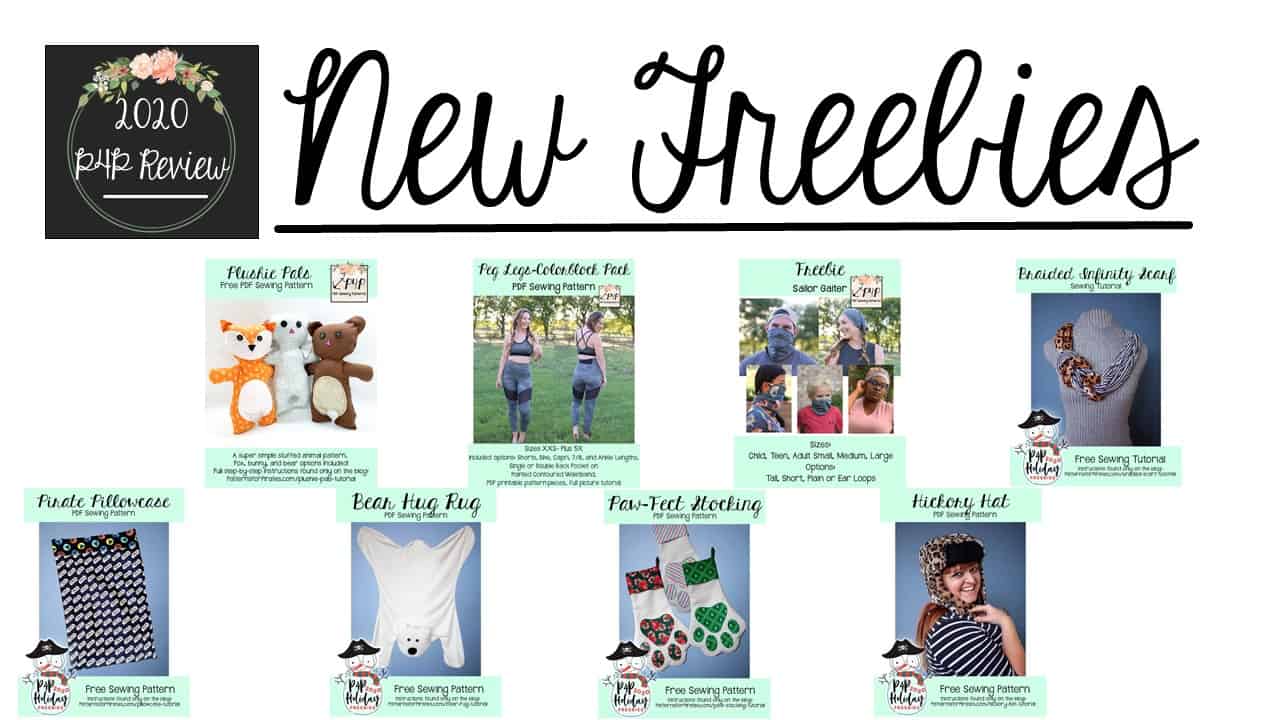
In order of release:
- Plushie Pals,
- Peg Legs- Colorblock Pack,
- Sailor Gaitor,
- Braided Infinity Scarf,
- Pirate Pillowcase,
- Bear Hug Rug,
- Paw-Fect Stocking,
- Hickory Hat.

We also made an announcement about how our free downloads are handled. Starting 1/1/2021 when you check out with a freebie it will stay in your download section for 30 days. After 30 days it will expire. You can either download it to your own device or go through the checkout process again if you need to reprint in the future and didn’t save it. The freebies will always remain free and will always be there if you don’t want to save them to your own device/cloud/etc.
What else did we do this year? How about some special events we held…
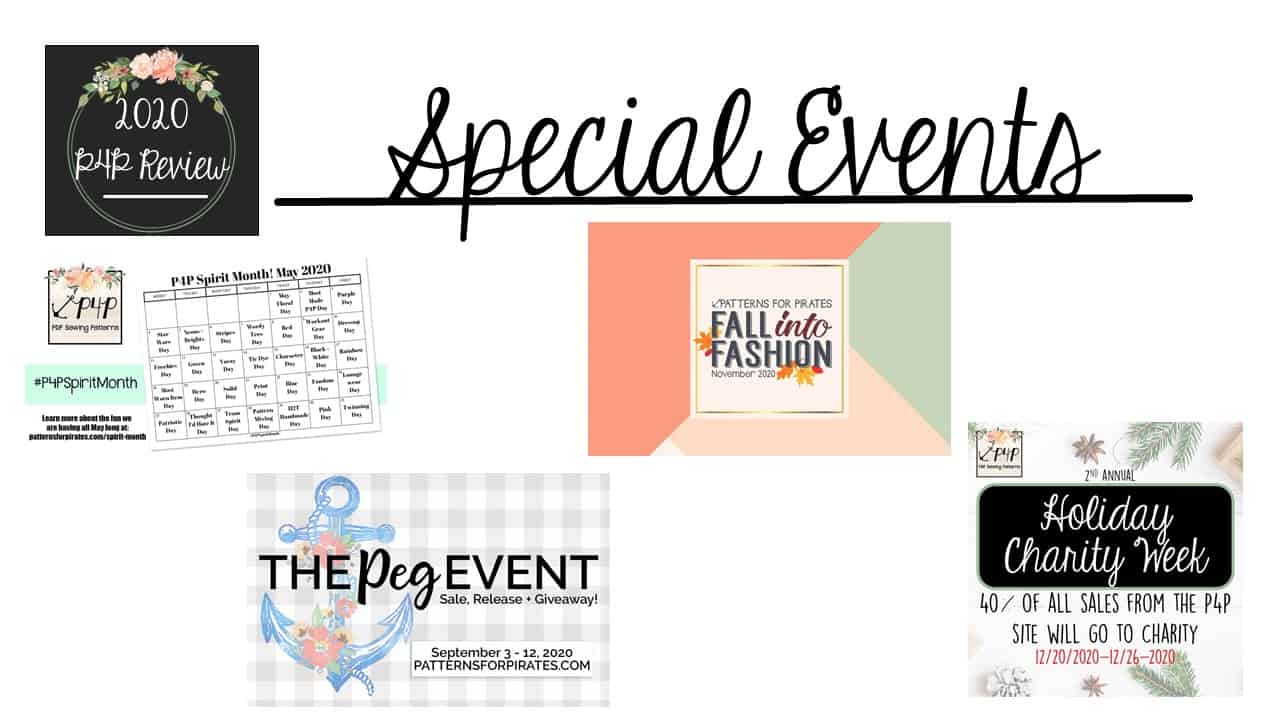
Or what Sew A Longs we put on?
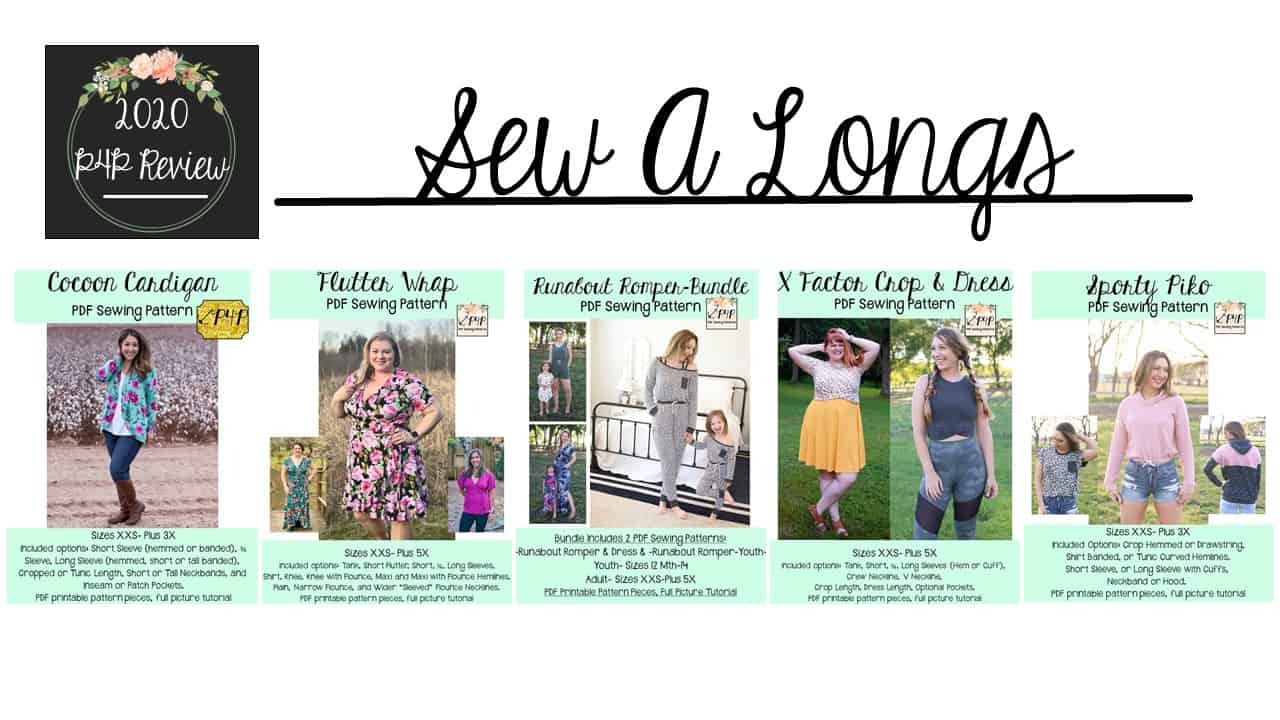 You can find each Sew A Long on our blog and as a playlist on our YouTube Channel:
- Cocoon Cardigan Blog – Cocoon Cardigan YouTube
- Flutter Wrap Blog – Flutter Wrap YouTube
- Runabout Romper Blog , Runabout Romper YouTube
- X Factor Blog , X Factor YouTube
- Sporty Piko Blog – Sporty Piko YouTube
I always love to see what the most popular patterns are through the year as well!
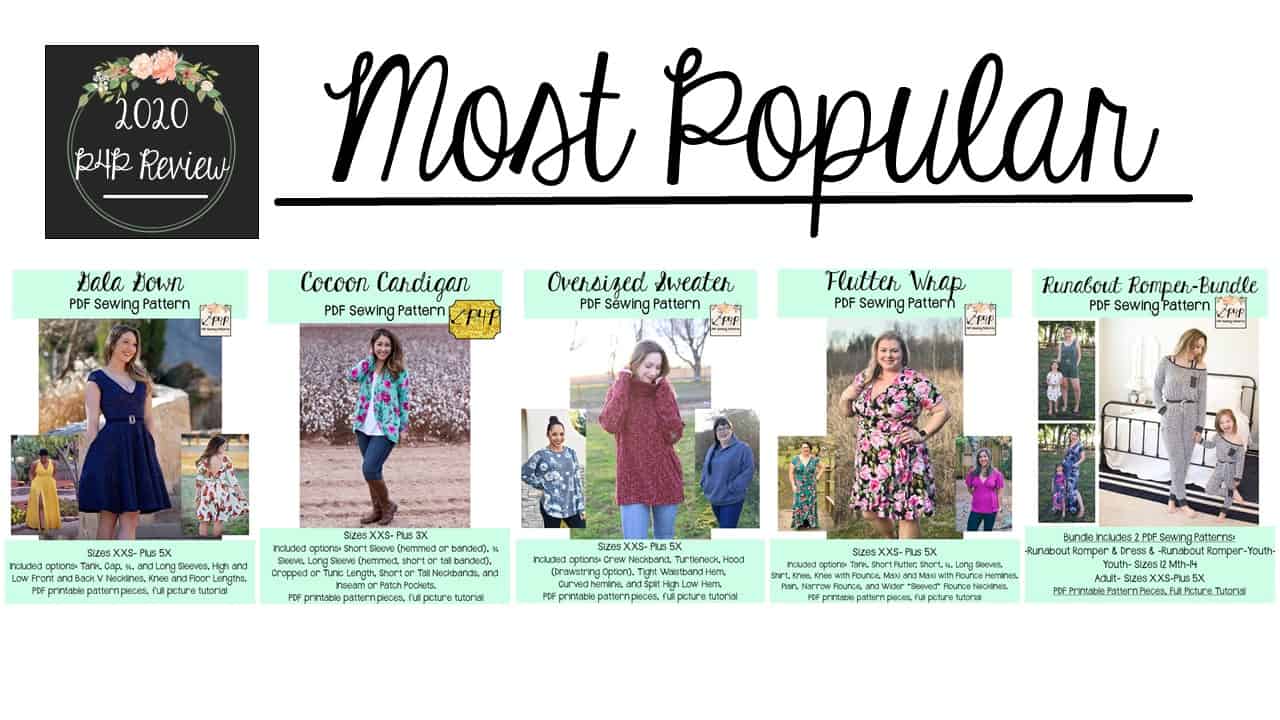 In order of popularity:
- Gala Gown (Dec 2019),
- Cocoon Cardigan (Jan 2017),
- Oversized Sweater (Jan 2020),
- Flutter Wrap Top and Dress (March 2020)
- Runabout Romper- Bundle (May 2020).
It looks the Pirate Community as whole likes to be equal parts glamorous and comfy… exactly how I feel too!
Let’s look at the most popular freebies this year!

Here are some links in case you want to snag these favorite freebies for yourself:
And our most popular YouTube Videos while we’re at it! We worked hard trying to add more videos into Patterns for Pirates this year, I hope you enjoyed the added videos!
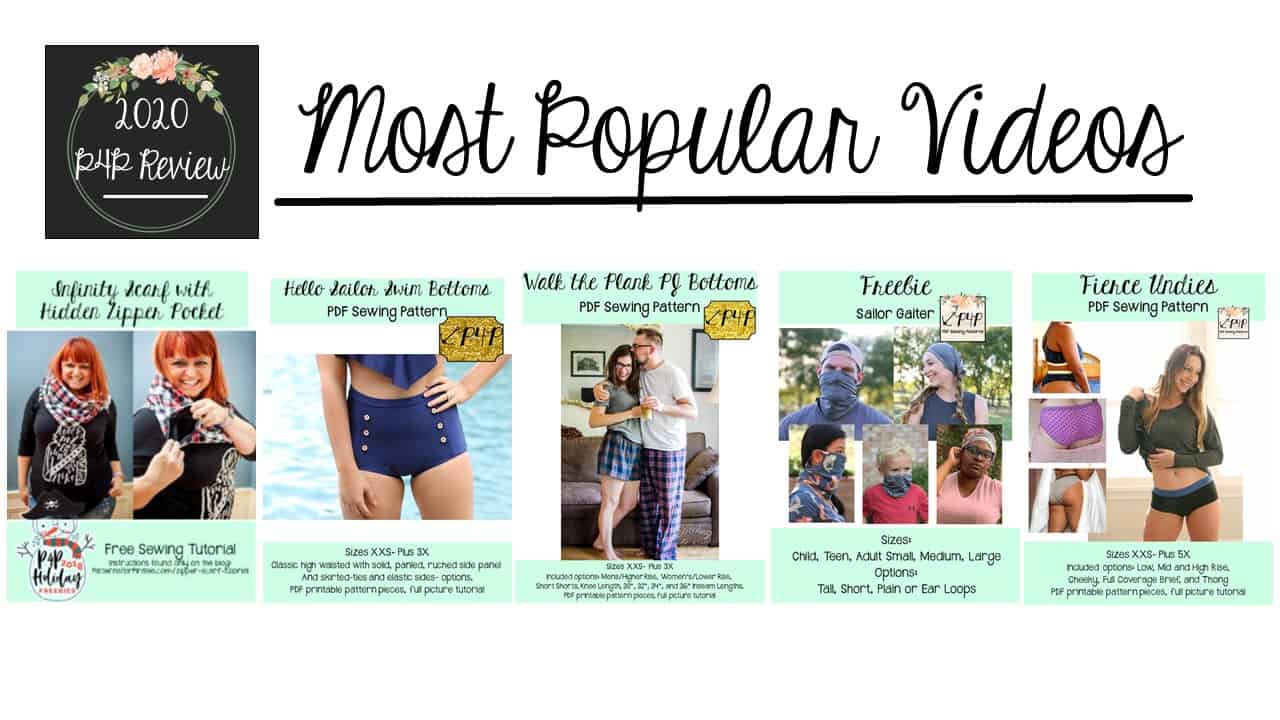 I was surprised to not see the Infinity Scarf with Hidden Zipper Pocket in the top freebies, but since it is on the blog and not downloaded that is probably why! You don’t need to “checkout” or download any pattern pieces to make one up. 😉
We work hard on all social media fronts to make Patterns for Pirates easy for you to find and enjoy. Here are some social media highlights from this year:
Our blog is run mostly by the wonderful Alex- you know her from our Sew A Longs! But we also have a team of contributors who help up write up blogs… together we managed to put out 6 more P4P University blog posts…these are great beginner blogs answering the questions we see asked the most frequently in the P4P FB group! So, if you ever have a basic sewing question hop onto the P4P blog and use that search… we are working on having the answers for you!
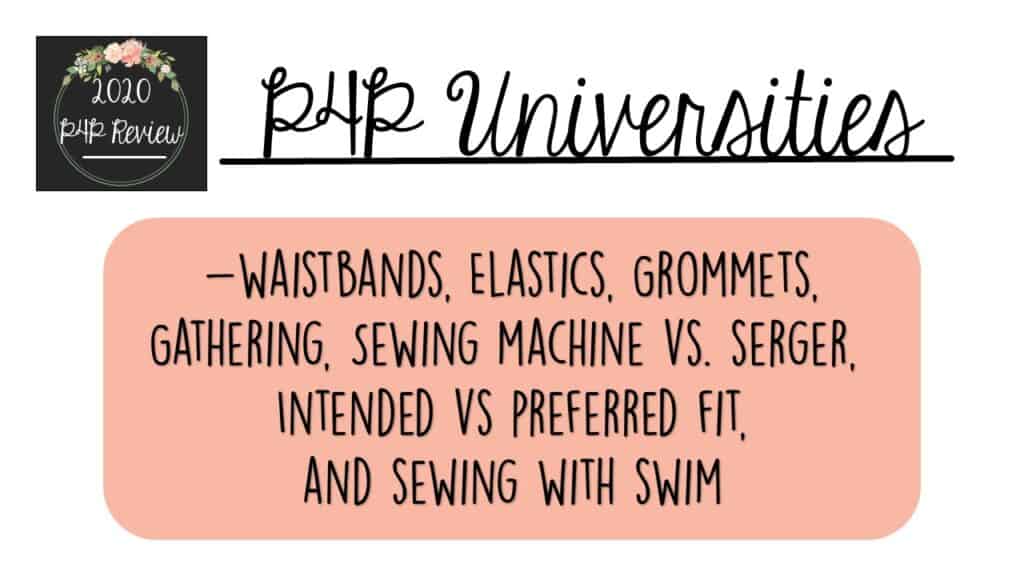
P4P University added this year: Waistbands , Elastics , Grommets , Easy Gathering Methods, Sewing Machine vs. Serger , Intended vs. Preferred Fit , and Sewing with Swim . You can also find all the P4P University blogs rounded up in the FB Group Album!
Here are a few more highlights from the different Social Media outlets we use to keep you in the loop! If you follow me on each one you will notice I use them all slightly differently. I tend to share more selfies, in the moment/candid pictures and sneak peeks on my Instagram. I use the Facebook Group and Page to announce new patterns, sales, etc. I use the Blog to keep all details from everything from new patterns, sales, how tos, hacks, etc. The YouTube channel of course has all our videos from sew a longs, P4P universities, and tutorial videos as well.

Thank you to all the new followers, members, etc and for everyone who was here already and stayed with us! I appreciate each and every single one of the follows, members, subscribers, etc!
I’m excited to see what 2021 will bring for Patterns for Pirates as well- I wish you all a Happy New Year!

2nd Annual Holiday Charity Week – 2020

I began an annual tradition last year of giving a large portion of profits from the week of Christmas to a charity. It makes my heart full to be able to reach out a helping hand, with the assistance of the Patterns for Pirates community. I just hope that our donations will allow a little extra support for those who need it.
We’ve opted to support the same charities that were benefactors last year. They may change in the future but for this year at least, they will remain the same.
I will be donating to both Action Against Hunger and a local North Texas Food Bank. With the hardships that 2020 has brought upon everyone, so many more families need help getting enough food on the table and I hope this week will help get more food to more tables in need both here locally for area and across the world with Action Against Hunger.


You do not need to do anything special for your purchase to count toward the funds being donated during charity week. 40% of every single pattern purchase during this time frame will be donated automatically. *Note- the Fabric for Pirates Fabric Subscriptions transactions will not go through until the 1st of the month, which means even if you sign up during this week the transaction will not apply to this charity week.
If you’ve been eyeing any patterns for your stash, now is the perfect time to grab it and help make our donation amounts even bigger!
Thank you and Happy Holidays,
Judy
P4P University – Sewing with Swim
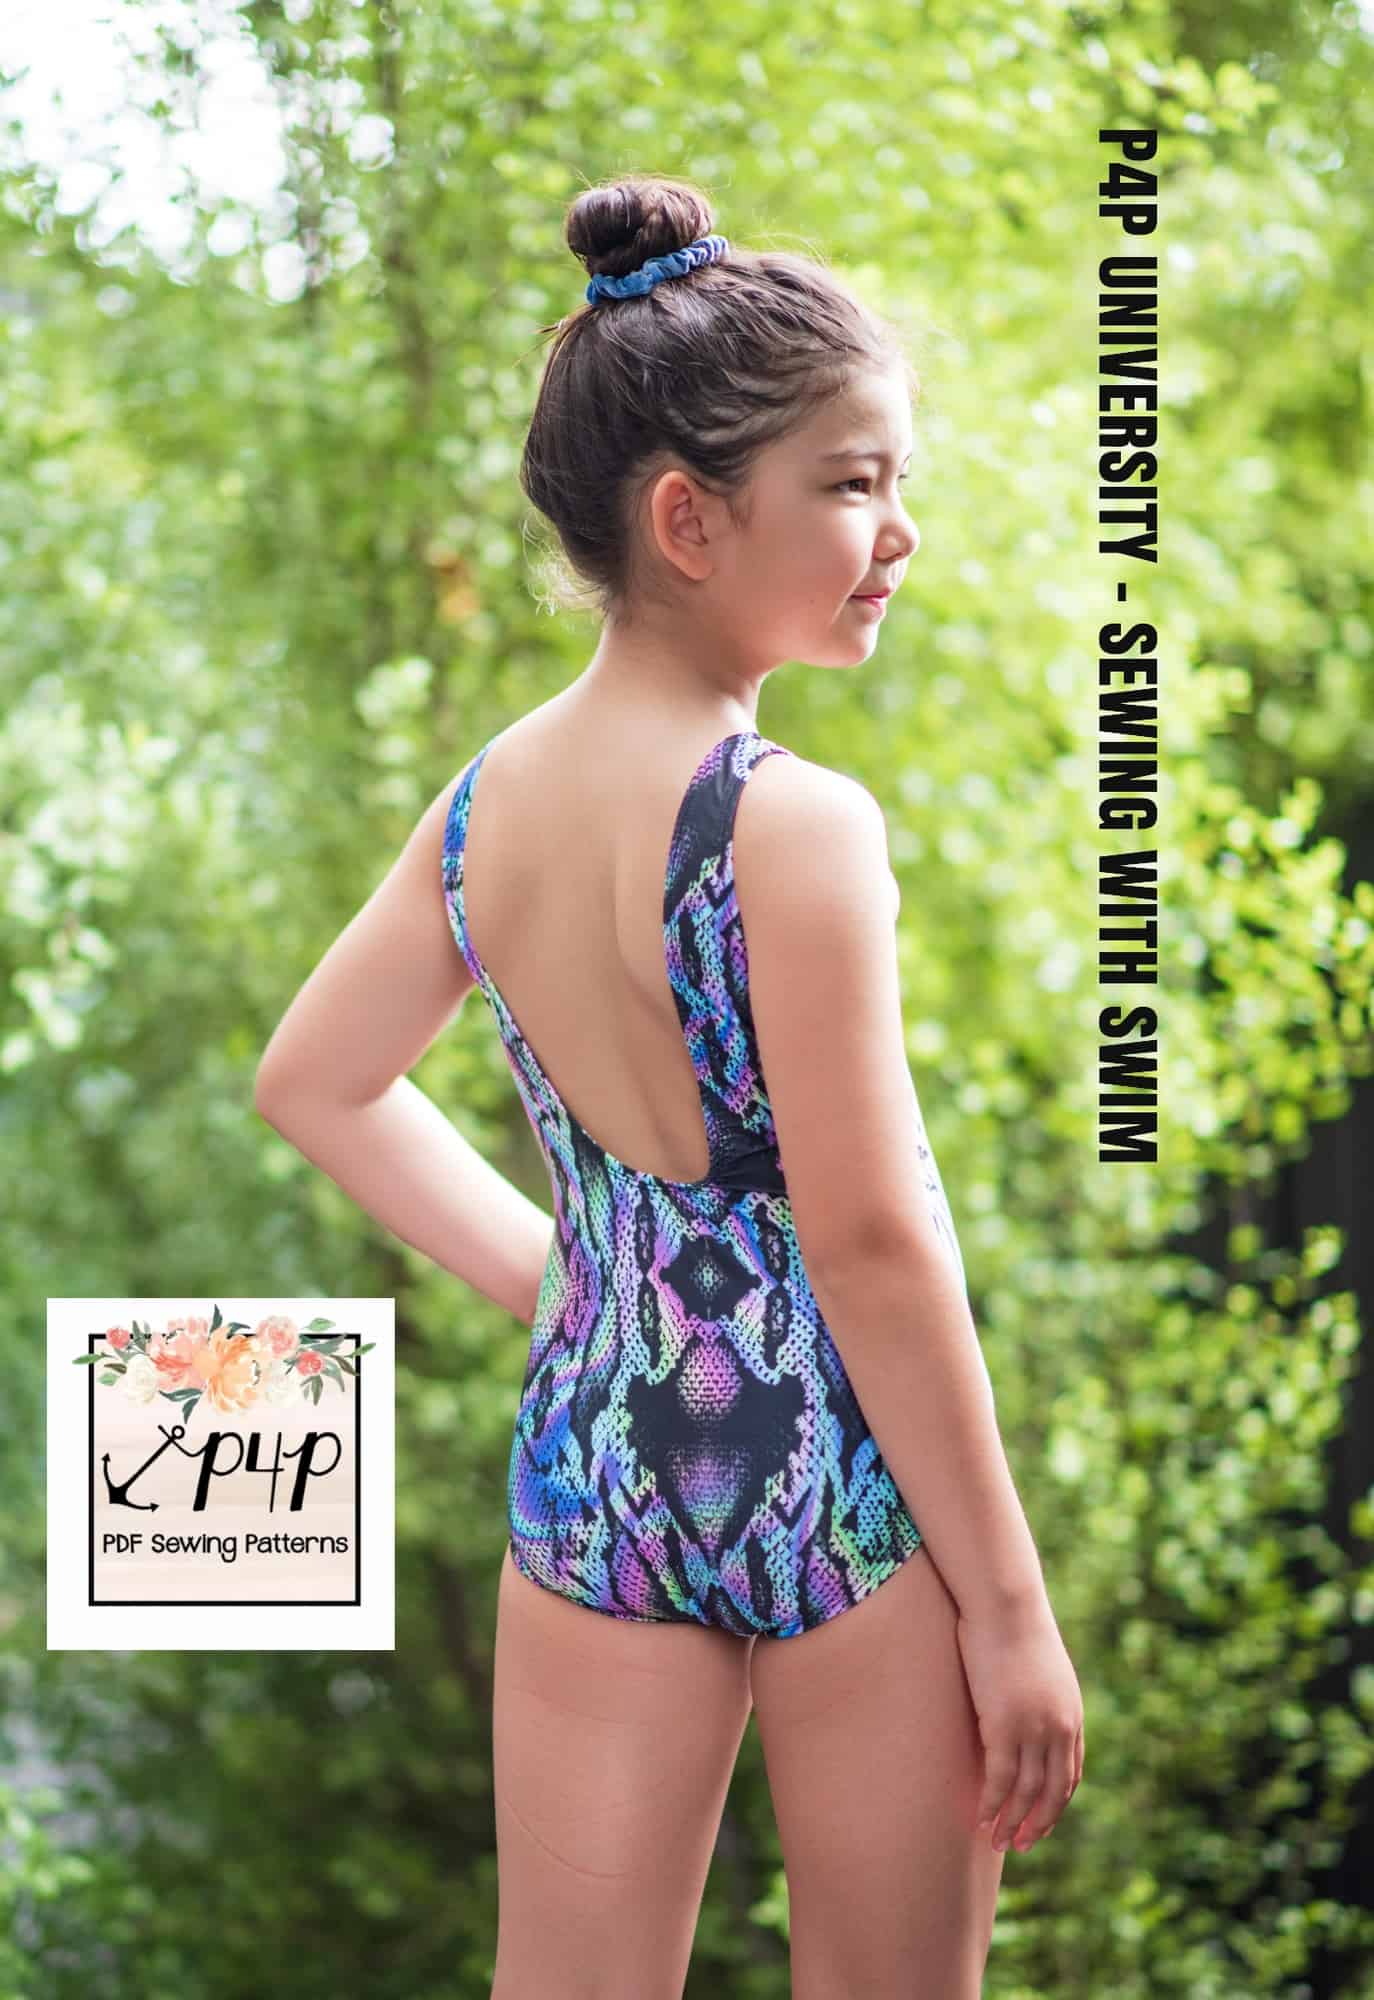
Hi, I’m Katy and I sew and blog for Patterns for Pirates. This post is all about sewing with swim fabrics. I first started sewing with swim fabric about five years ago, but I will admit that sewing swim spandex scared me and I did not think I would be able to do it! However, I am going to let you in on a secret, if you can sew with knit fabric you are going to be able sew with swim fabric! Swim spandex is now my favourite fabric to sew with. Making swimwear for both myself and my girls is such a satisfying experience.
Patterns for Pirates has great swimsuits patterns available with my favourite being the minute maillot. The fit is lovely and that low back option is super cute! And it is a quick sew too! I think it is a great pattern for starting out sewing with swim fabrics.
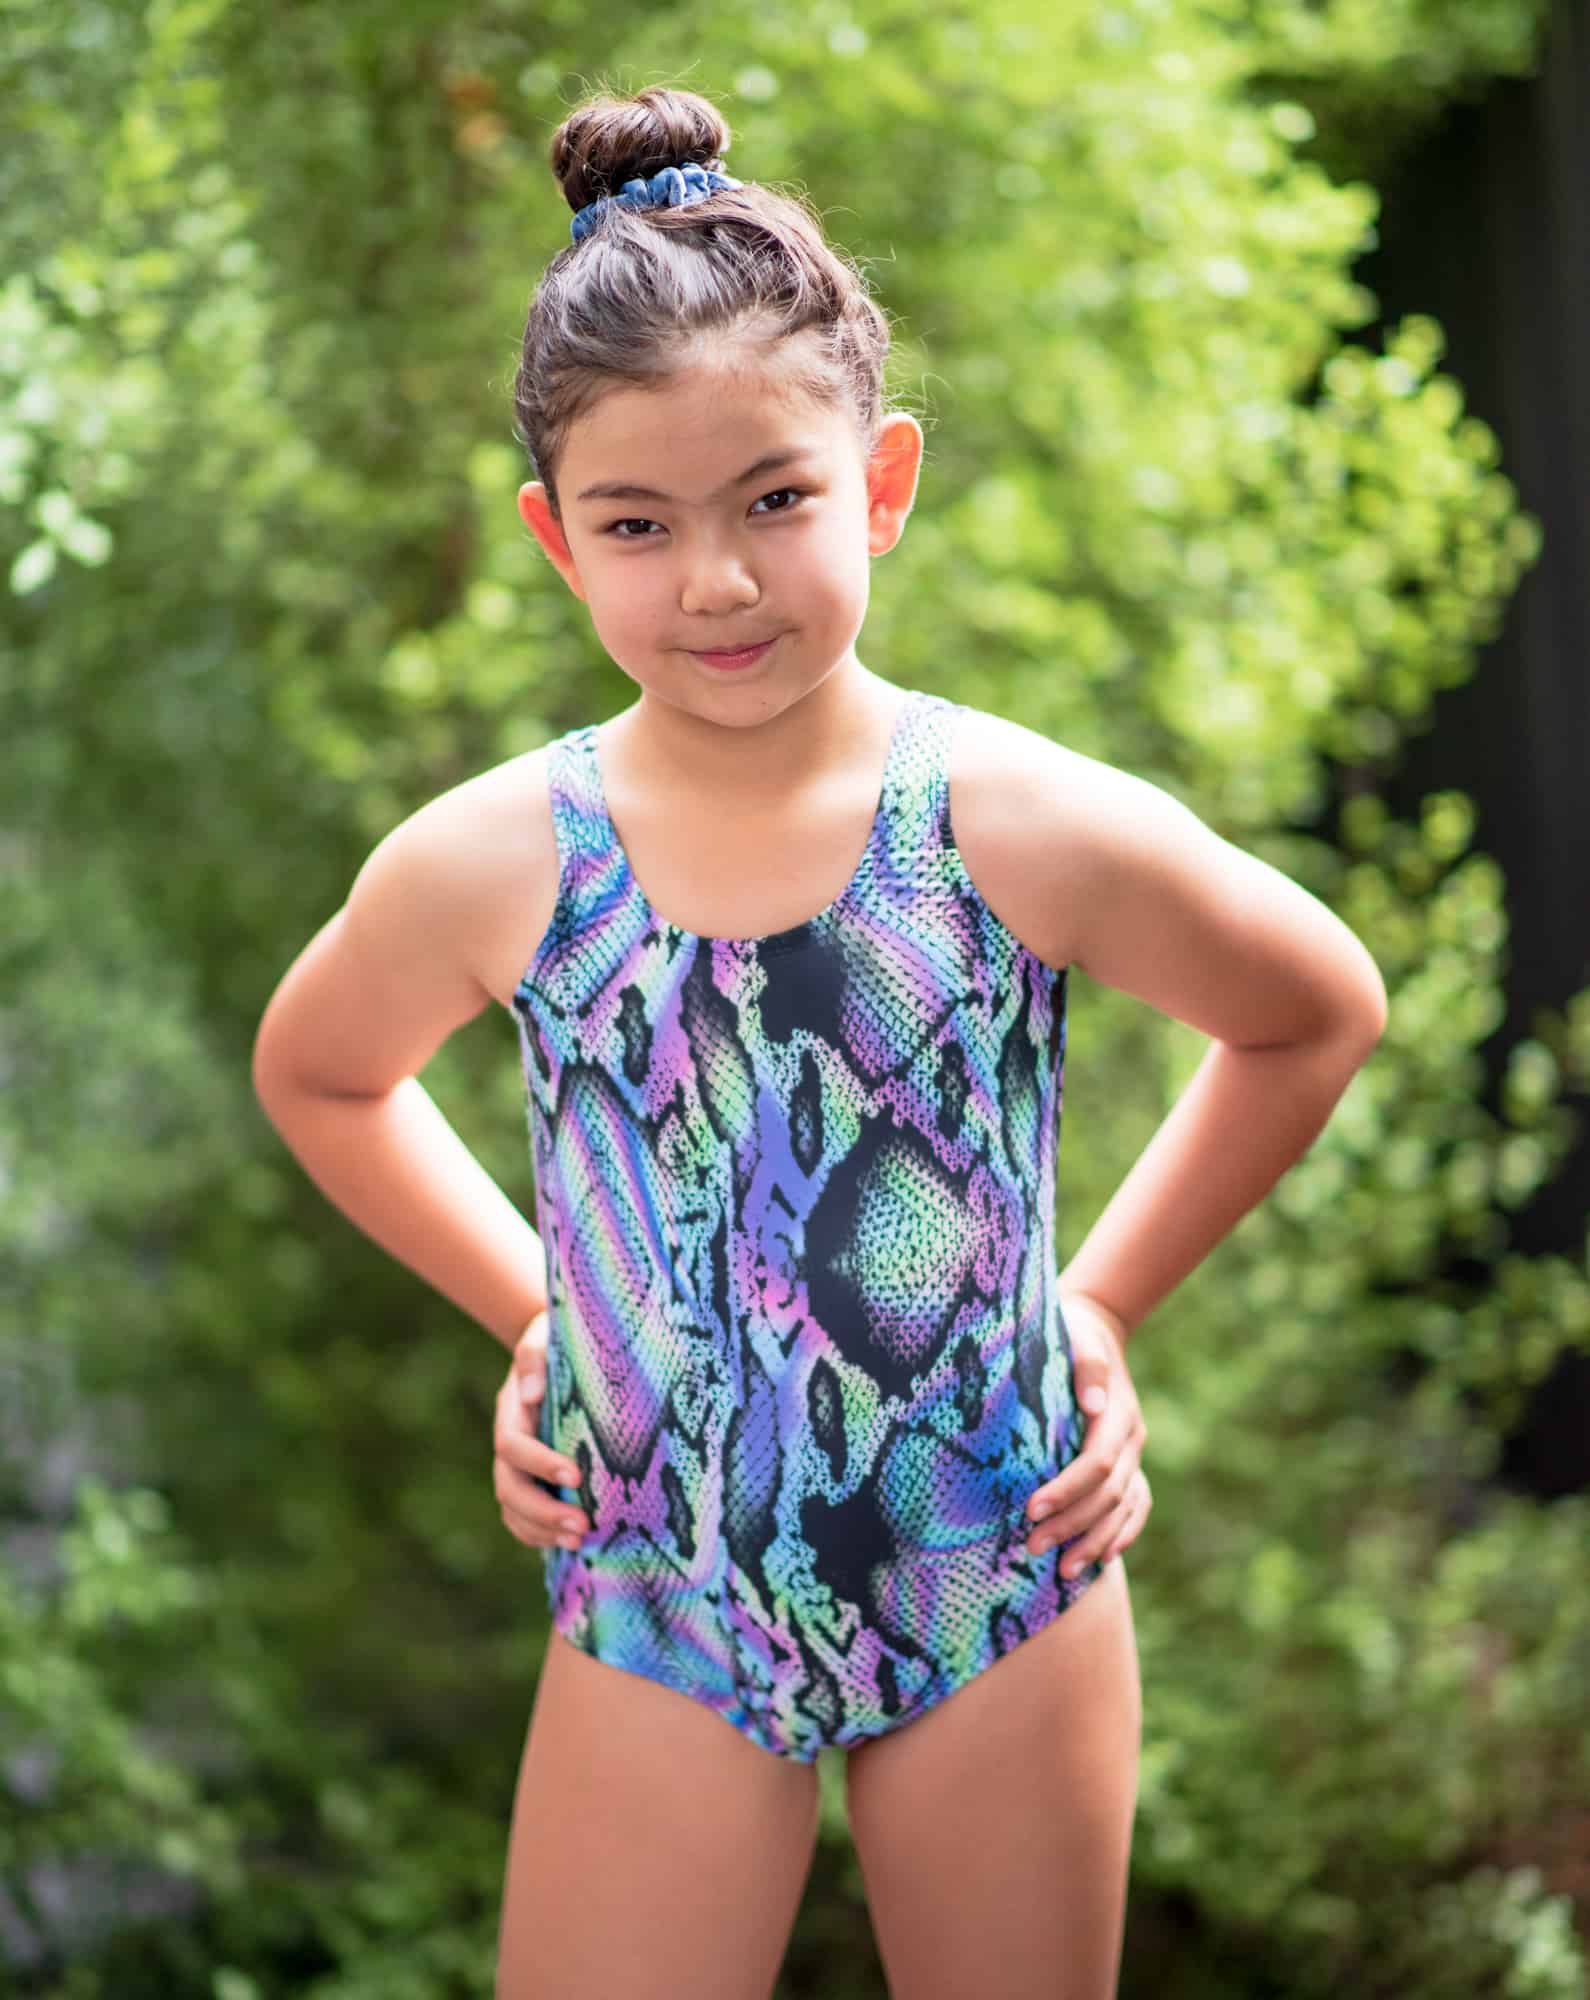
I actually use swim spandex for many other p4p sews, such as the sweetheart dress, gala gown, wiggle dress, hepburn top and dress, twist back top, pencil skirt, flutter wrap dress, fierce bra and peg legs to name a few.

Hepburn top (cropped and band added) and peg legs in performance swim spandex
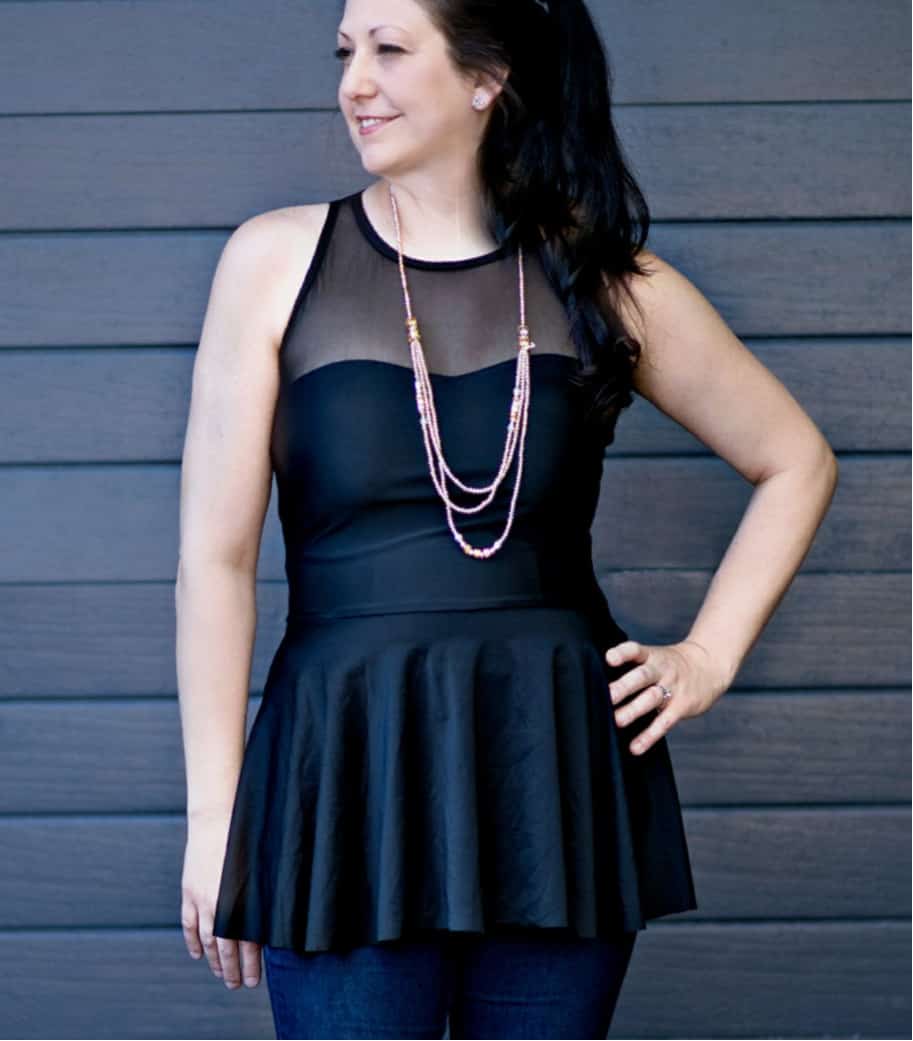
Sweetheart peplum top in swim spandex and mesh
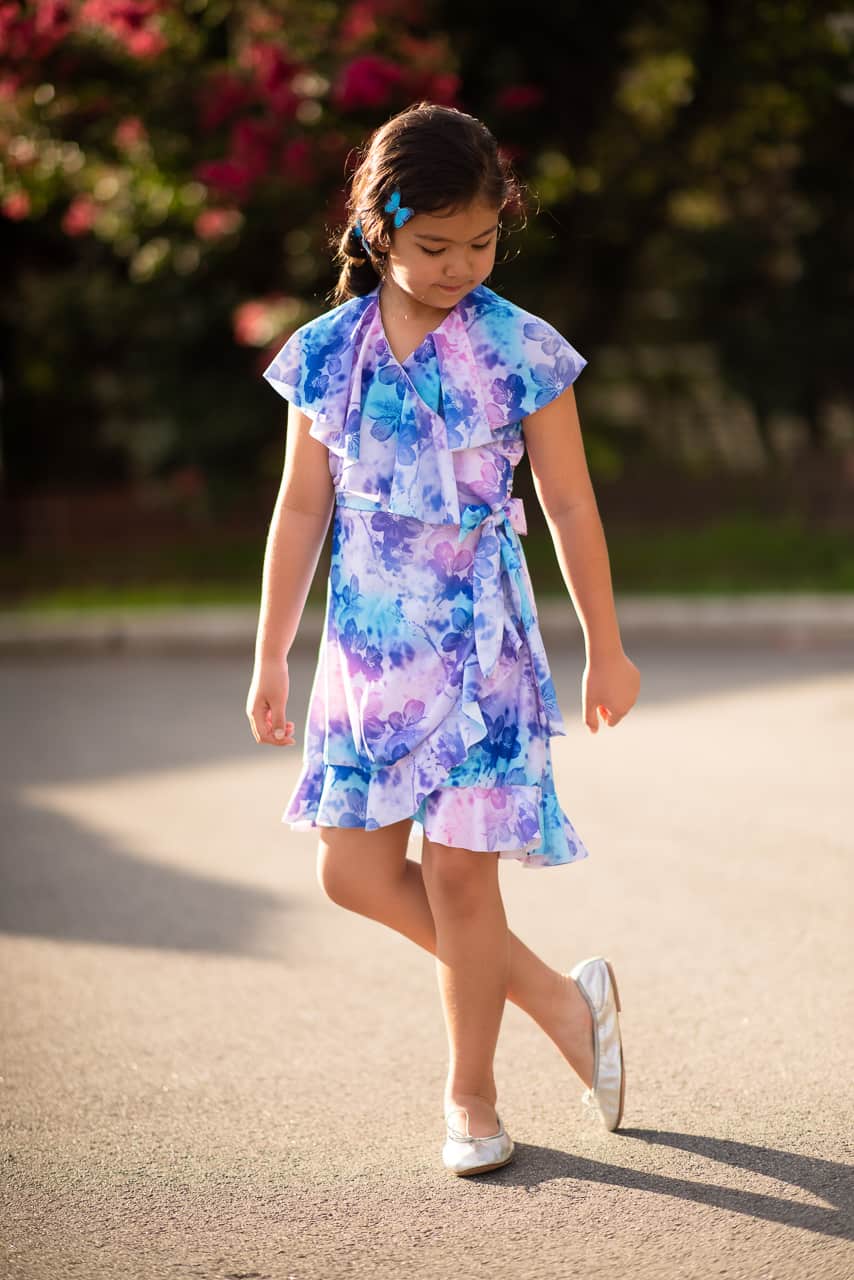
Flutter wrap dress in swim spandex
There are a lot of things to consider when choosing swim spandex:
- The quality of the fabric makes a big difference to your project. The better the quality of the swim spandex, the easier it is to sew with; it will also mean your garment will wash and wear for longer too.
- It is best for your swim fabric to have four-way stretch. This means the fabric is able to be stretched both horizontally and vertically which helps to make a comfortable and well fitted swimsuit.
- Swim fabrics should be made of 100% man-made fibres such as polyester or nylon with a significant amount of spandex (10-20%). Polyester swim fabric will hold its shape better over time and I find it easier to sew with too.
- Check if the print looks distorted when stretched on the body
- Check how see through the fabric might become when stretched or wet.
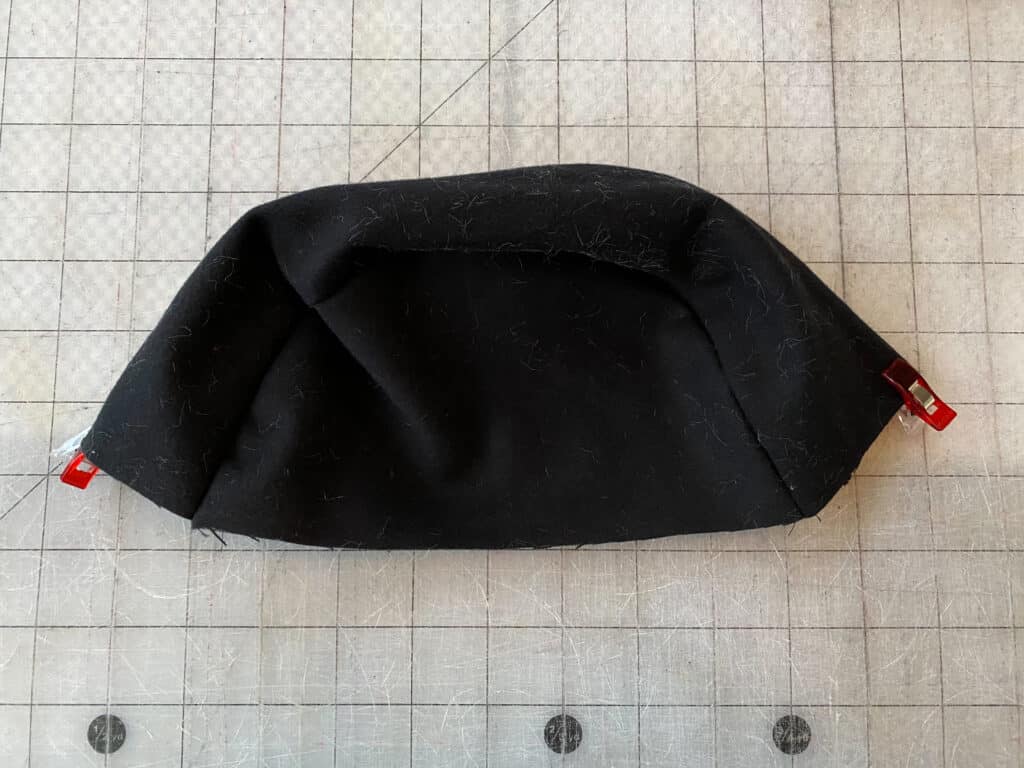
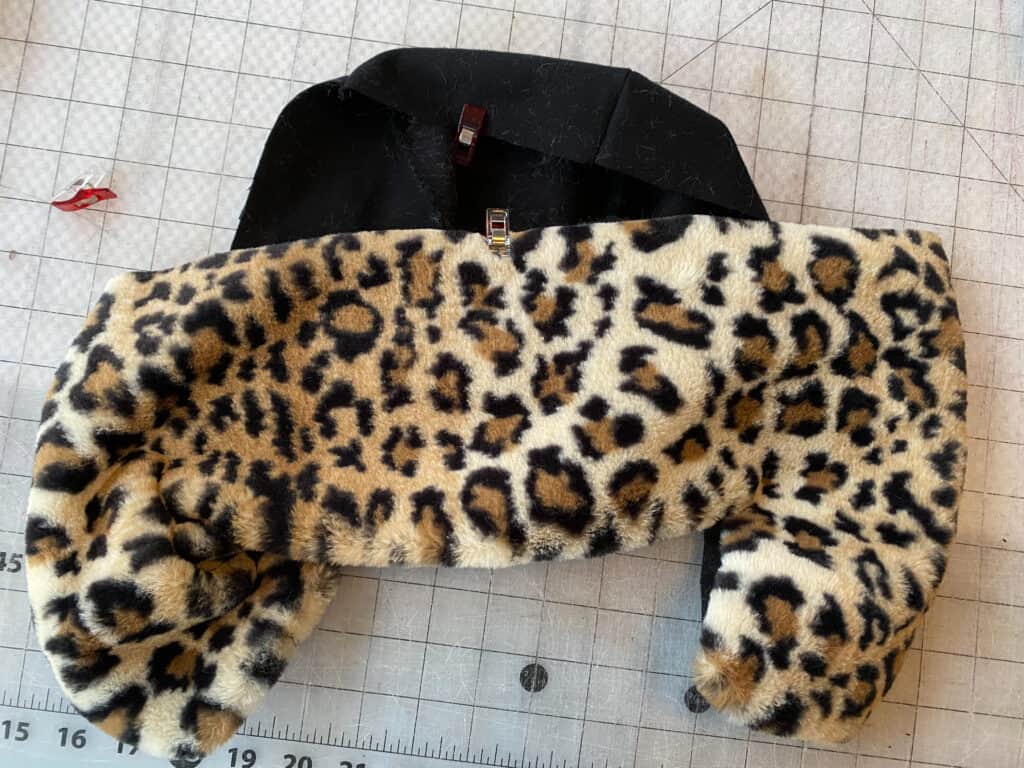
- I find it preferable to use a specific swim lining instead of the main swim fabric as the lining. I find it more comfortable to wear and easier to sew. Lining creates stability in the swimsuit and can smooth the body or allow better coverage on light coloured fabrics. Using lining can allow you to enclose seams too.
- Choosing elastic for sewing swimsuits is also something to consider. Elastic needs to be able to withstand water, chlorine, salt and sun. Swim elastic is my preference because if I am going to the trouble of making a custom swimsuit I want the elastic to last. Rubber or clear elastic can also be used but I find it doesn’t last as well and can be trickier to sew with. But it does allow for less bulky seams. Pop over to a blog written by the lovely Dana to find out about elastics 101.
Swim fabrics require a special needle in your sewing machine. You can use a ballpoint needle, but I recommend a stretch needle for sewing seams and attaching elastic. Using one means less trouble with skipped stitches.
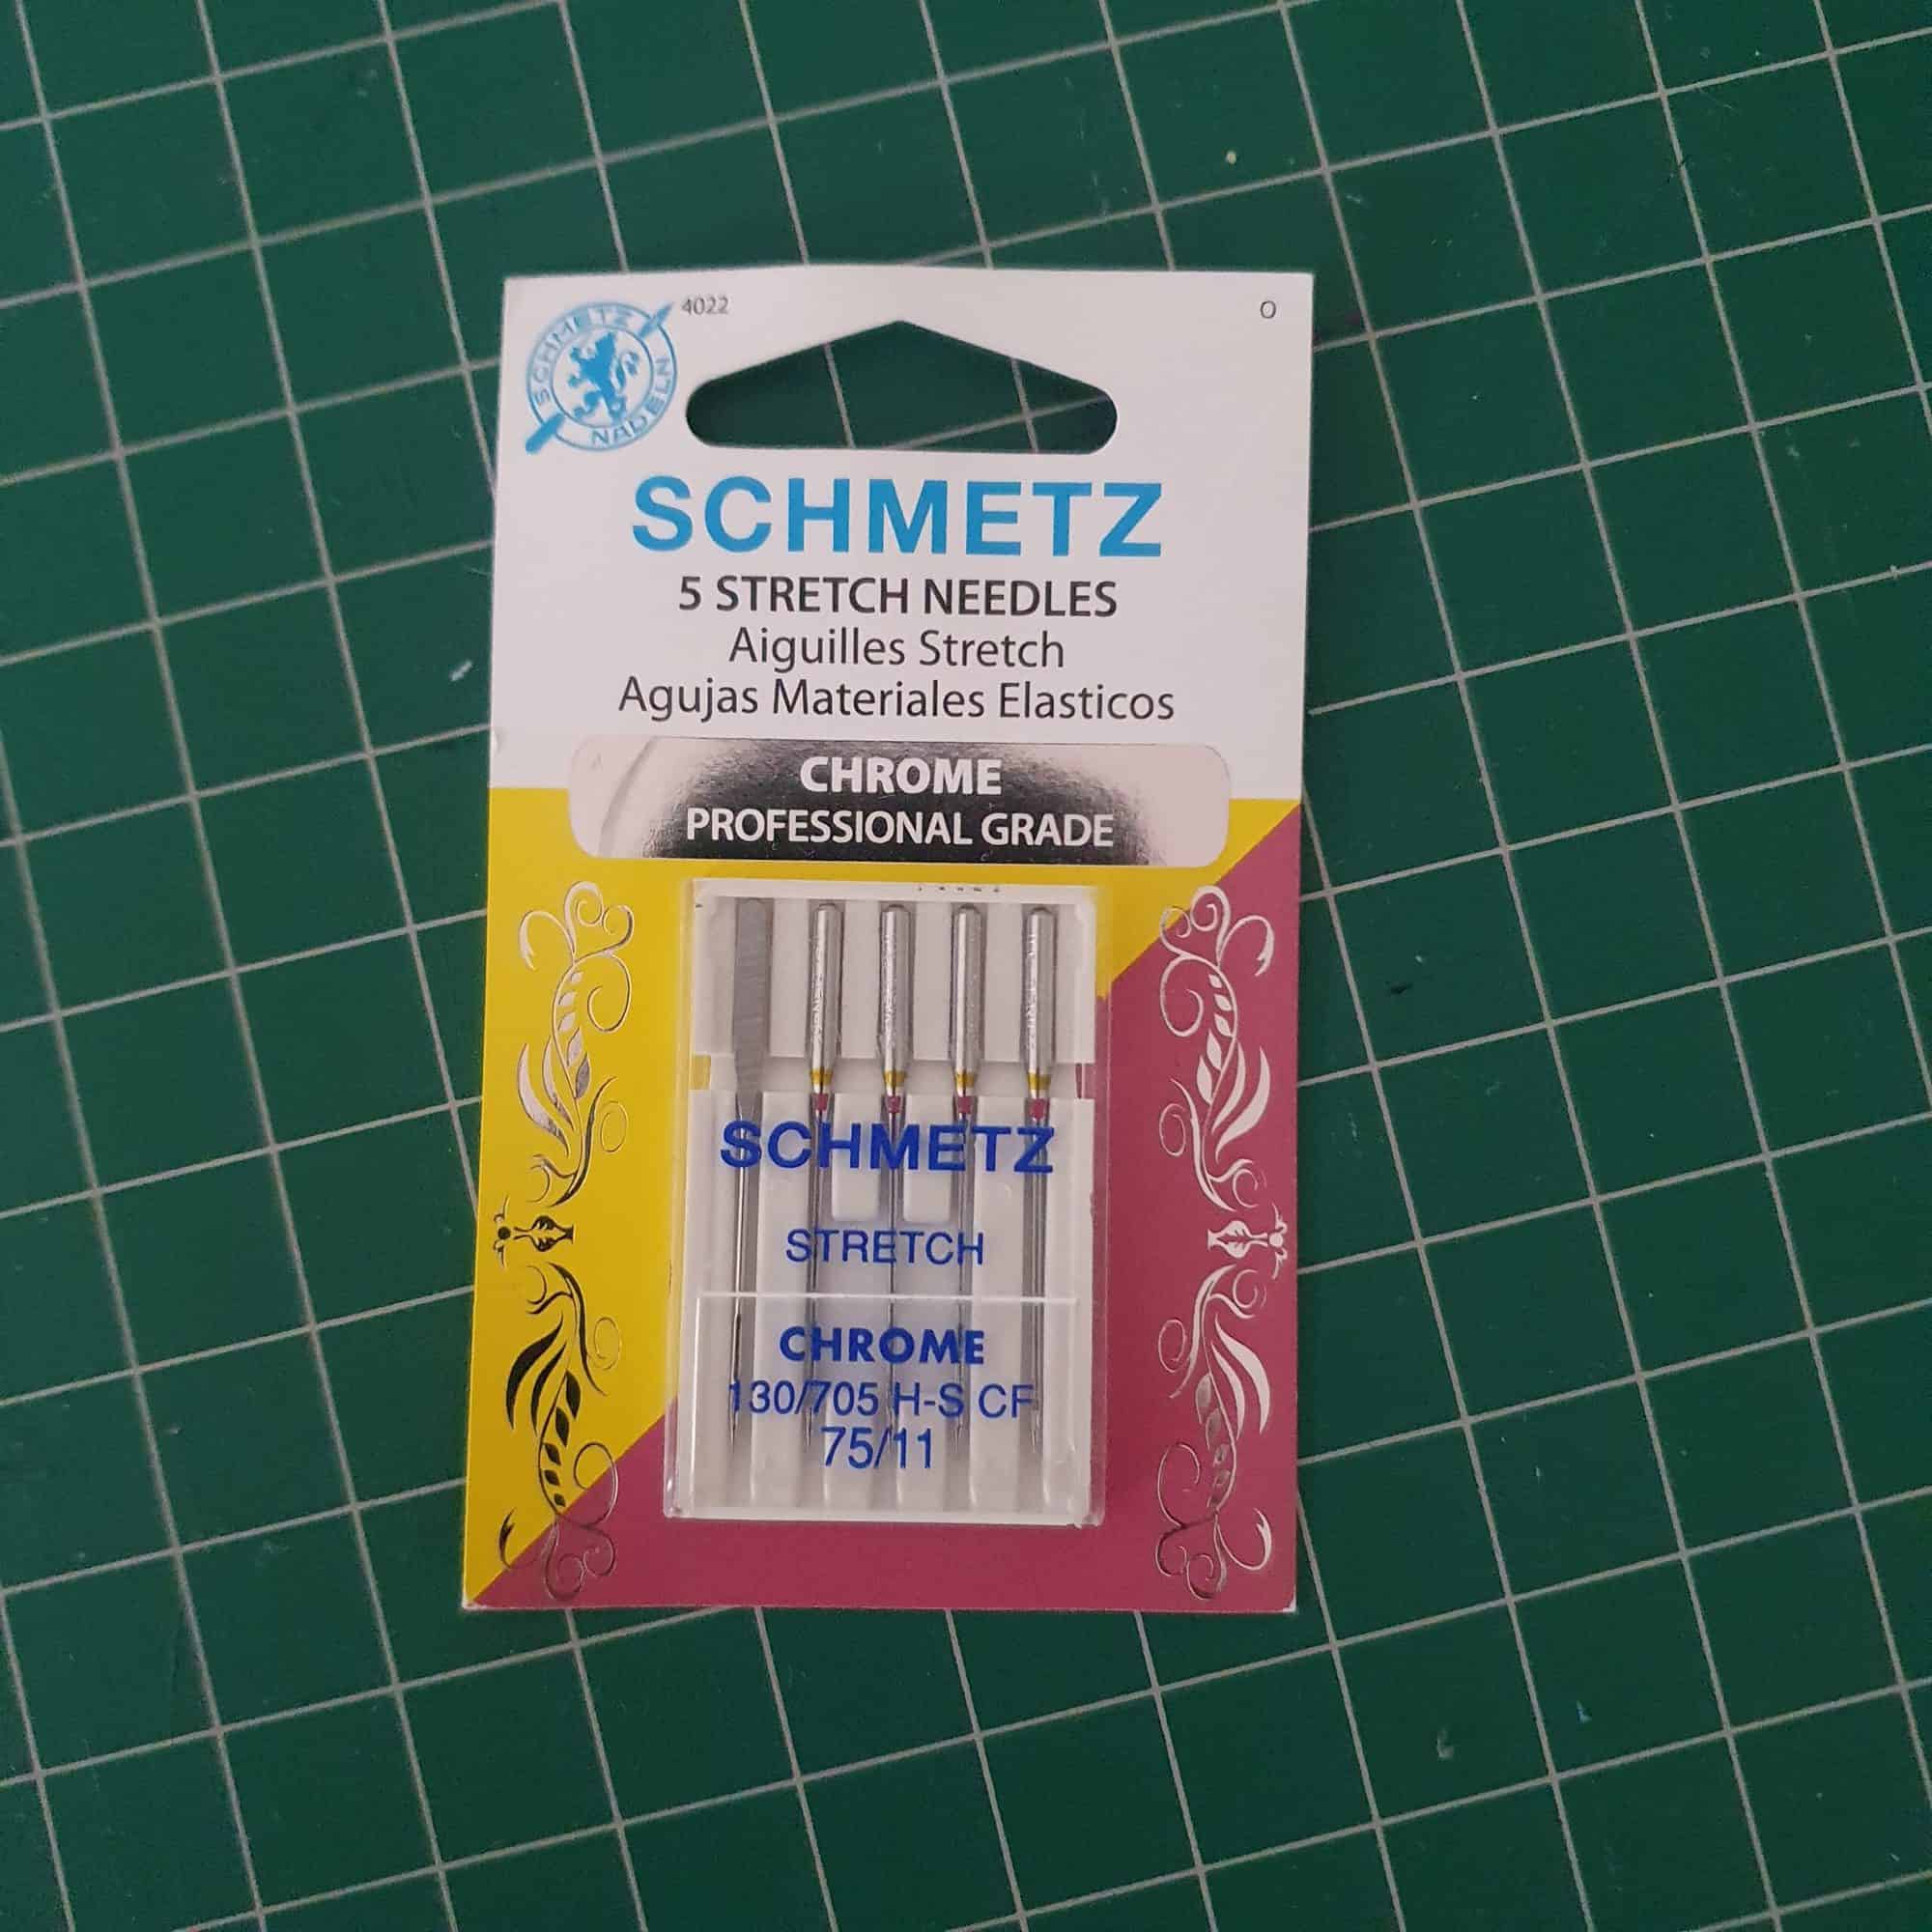
Example of the stretch sewing needles I use
When deciding what finishing stitch to use to topstitch elastics down or hemming swim fabric it is personal choice.
If you are lucky enough to have a cover-stitch machine for finishing your swimsuit that is ideal, but never fear because a stretch twin needle in your sewing machine will give similar professional finish too. It is also quite common to use a zigzag stitch or triple zigzag stitch for topstitching on swim fabric (see photo below showing stitch examples).
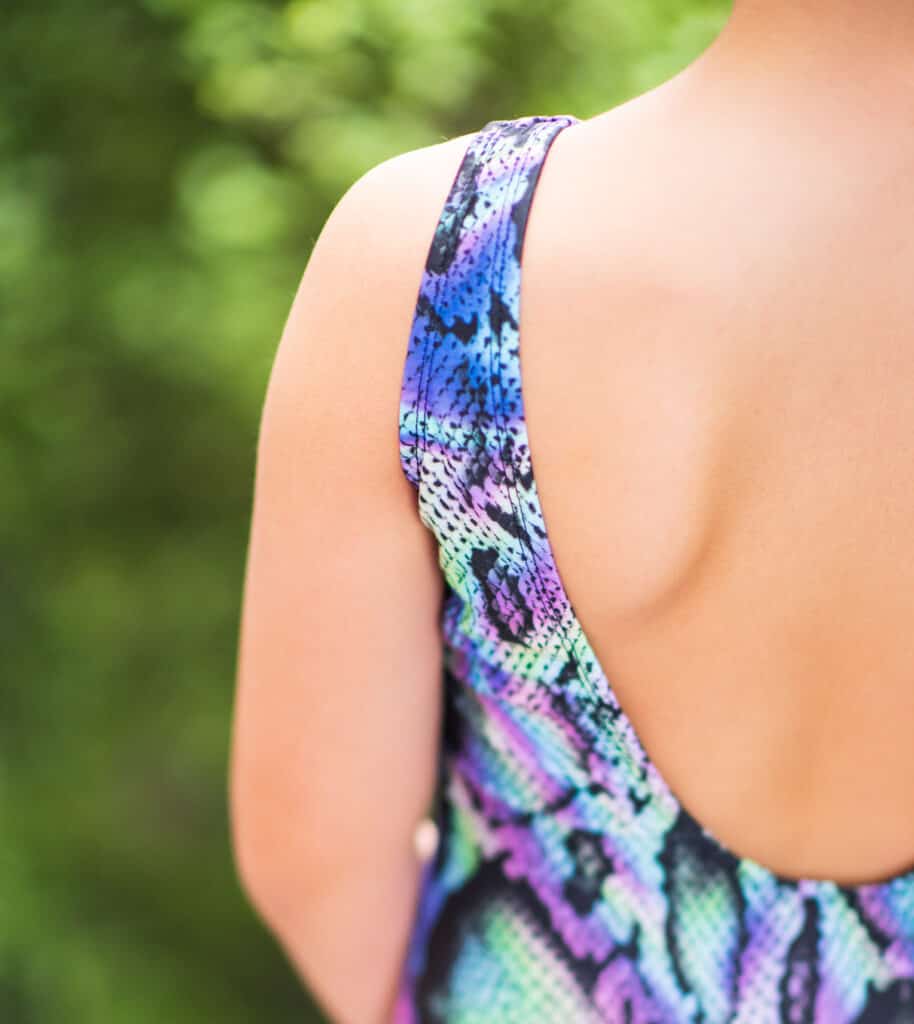
The minute maillot swimsuit showing how top-stitching the elastic down on swimsuits looks using either a coverstitch machine or a stretch twin needle
Polyester thread is ideal for sewing with swim because it is not weakened by chlorine or salt water. Again quality of the thread does make a difference to the longevity of your swimsuit.
Cutting swim fabric can be tricky because it can be slippery. I like to use pattern weights because it helps to keep the fabric in place and a rotary cutter because it gives neat, crisp and accurate edges. Before cutting, I recommend that you place your fabric right side up. When doing this, take note of where the pattern will lie on the body and how it looks next to other prints. This will help to avoid an unfortunate print placement.
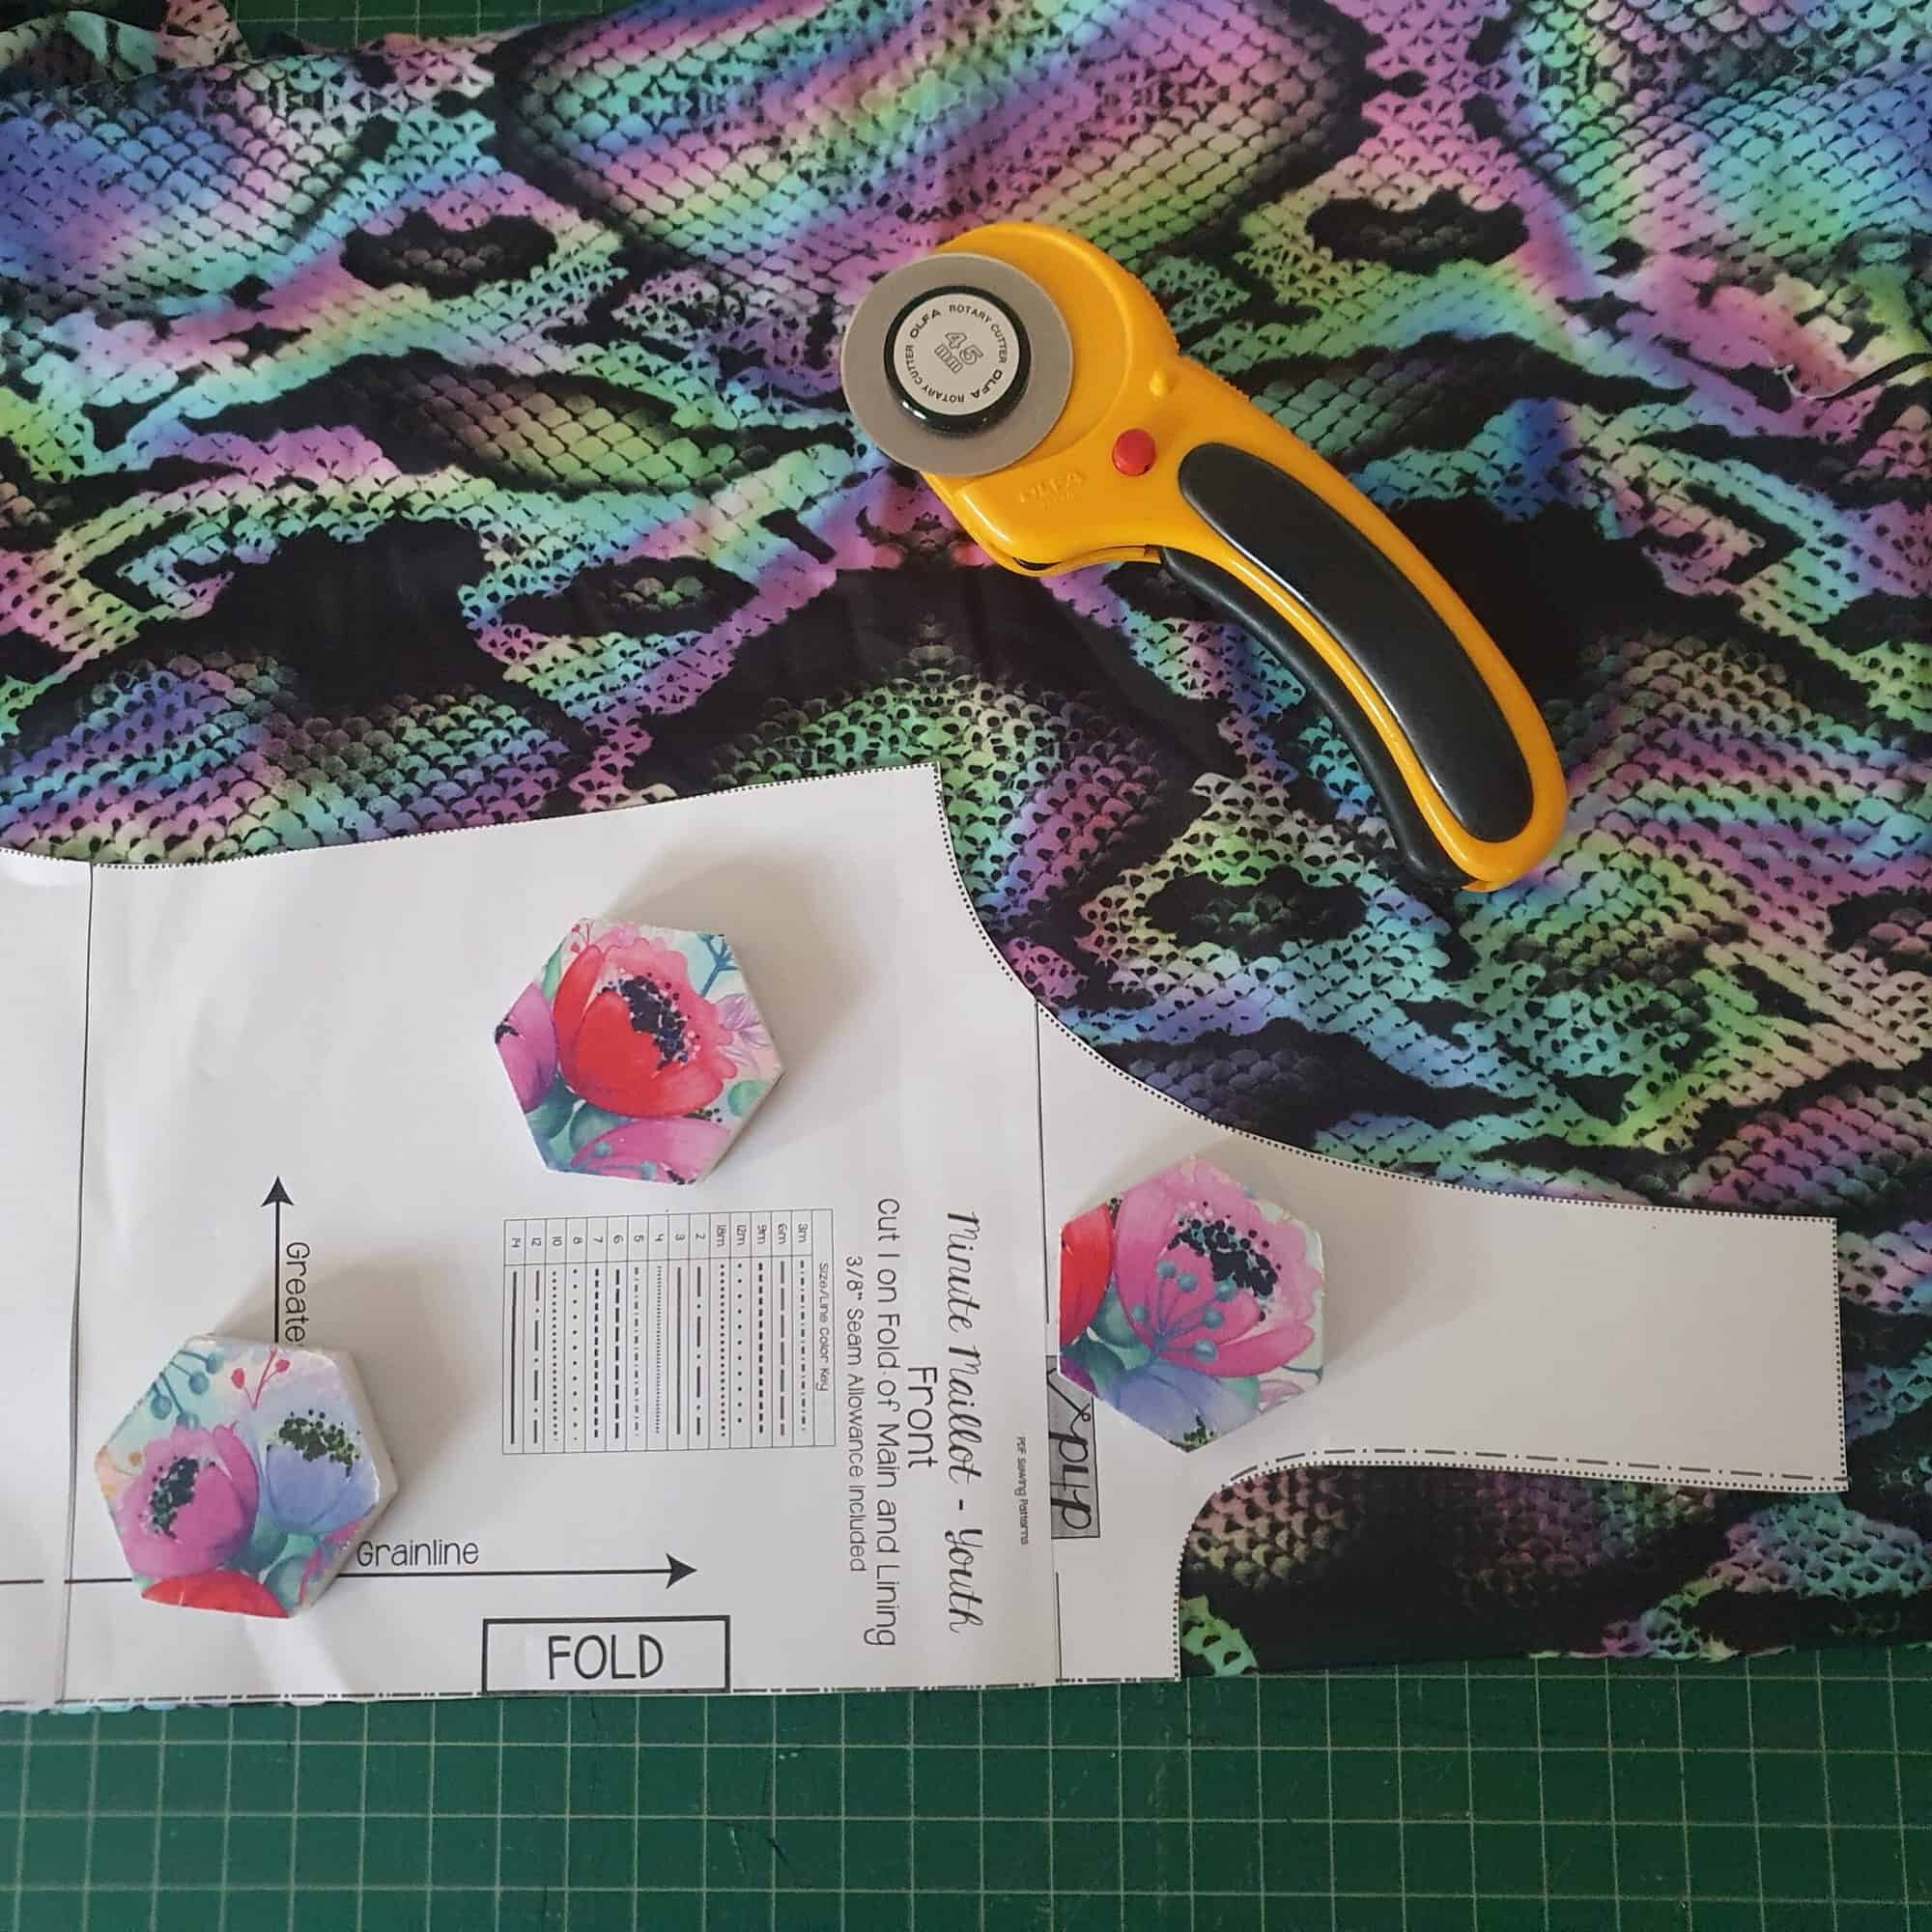
My cutting set up – fabric right side up, pattern weights and rotary cutter
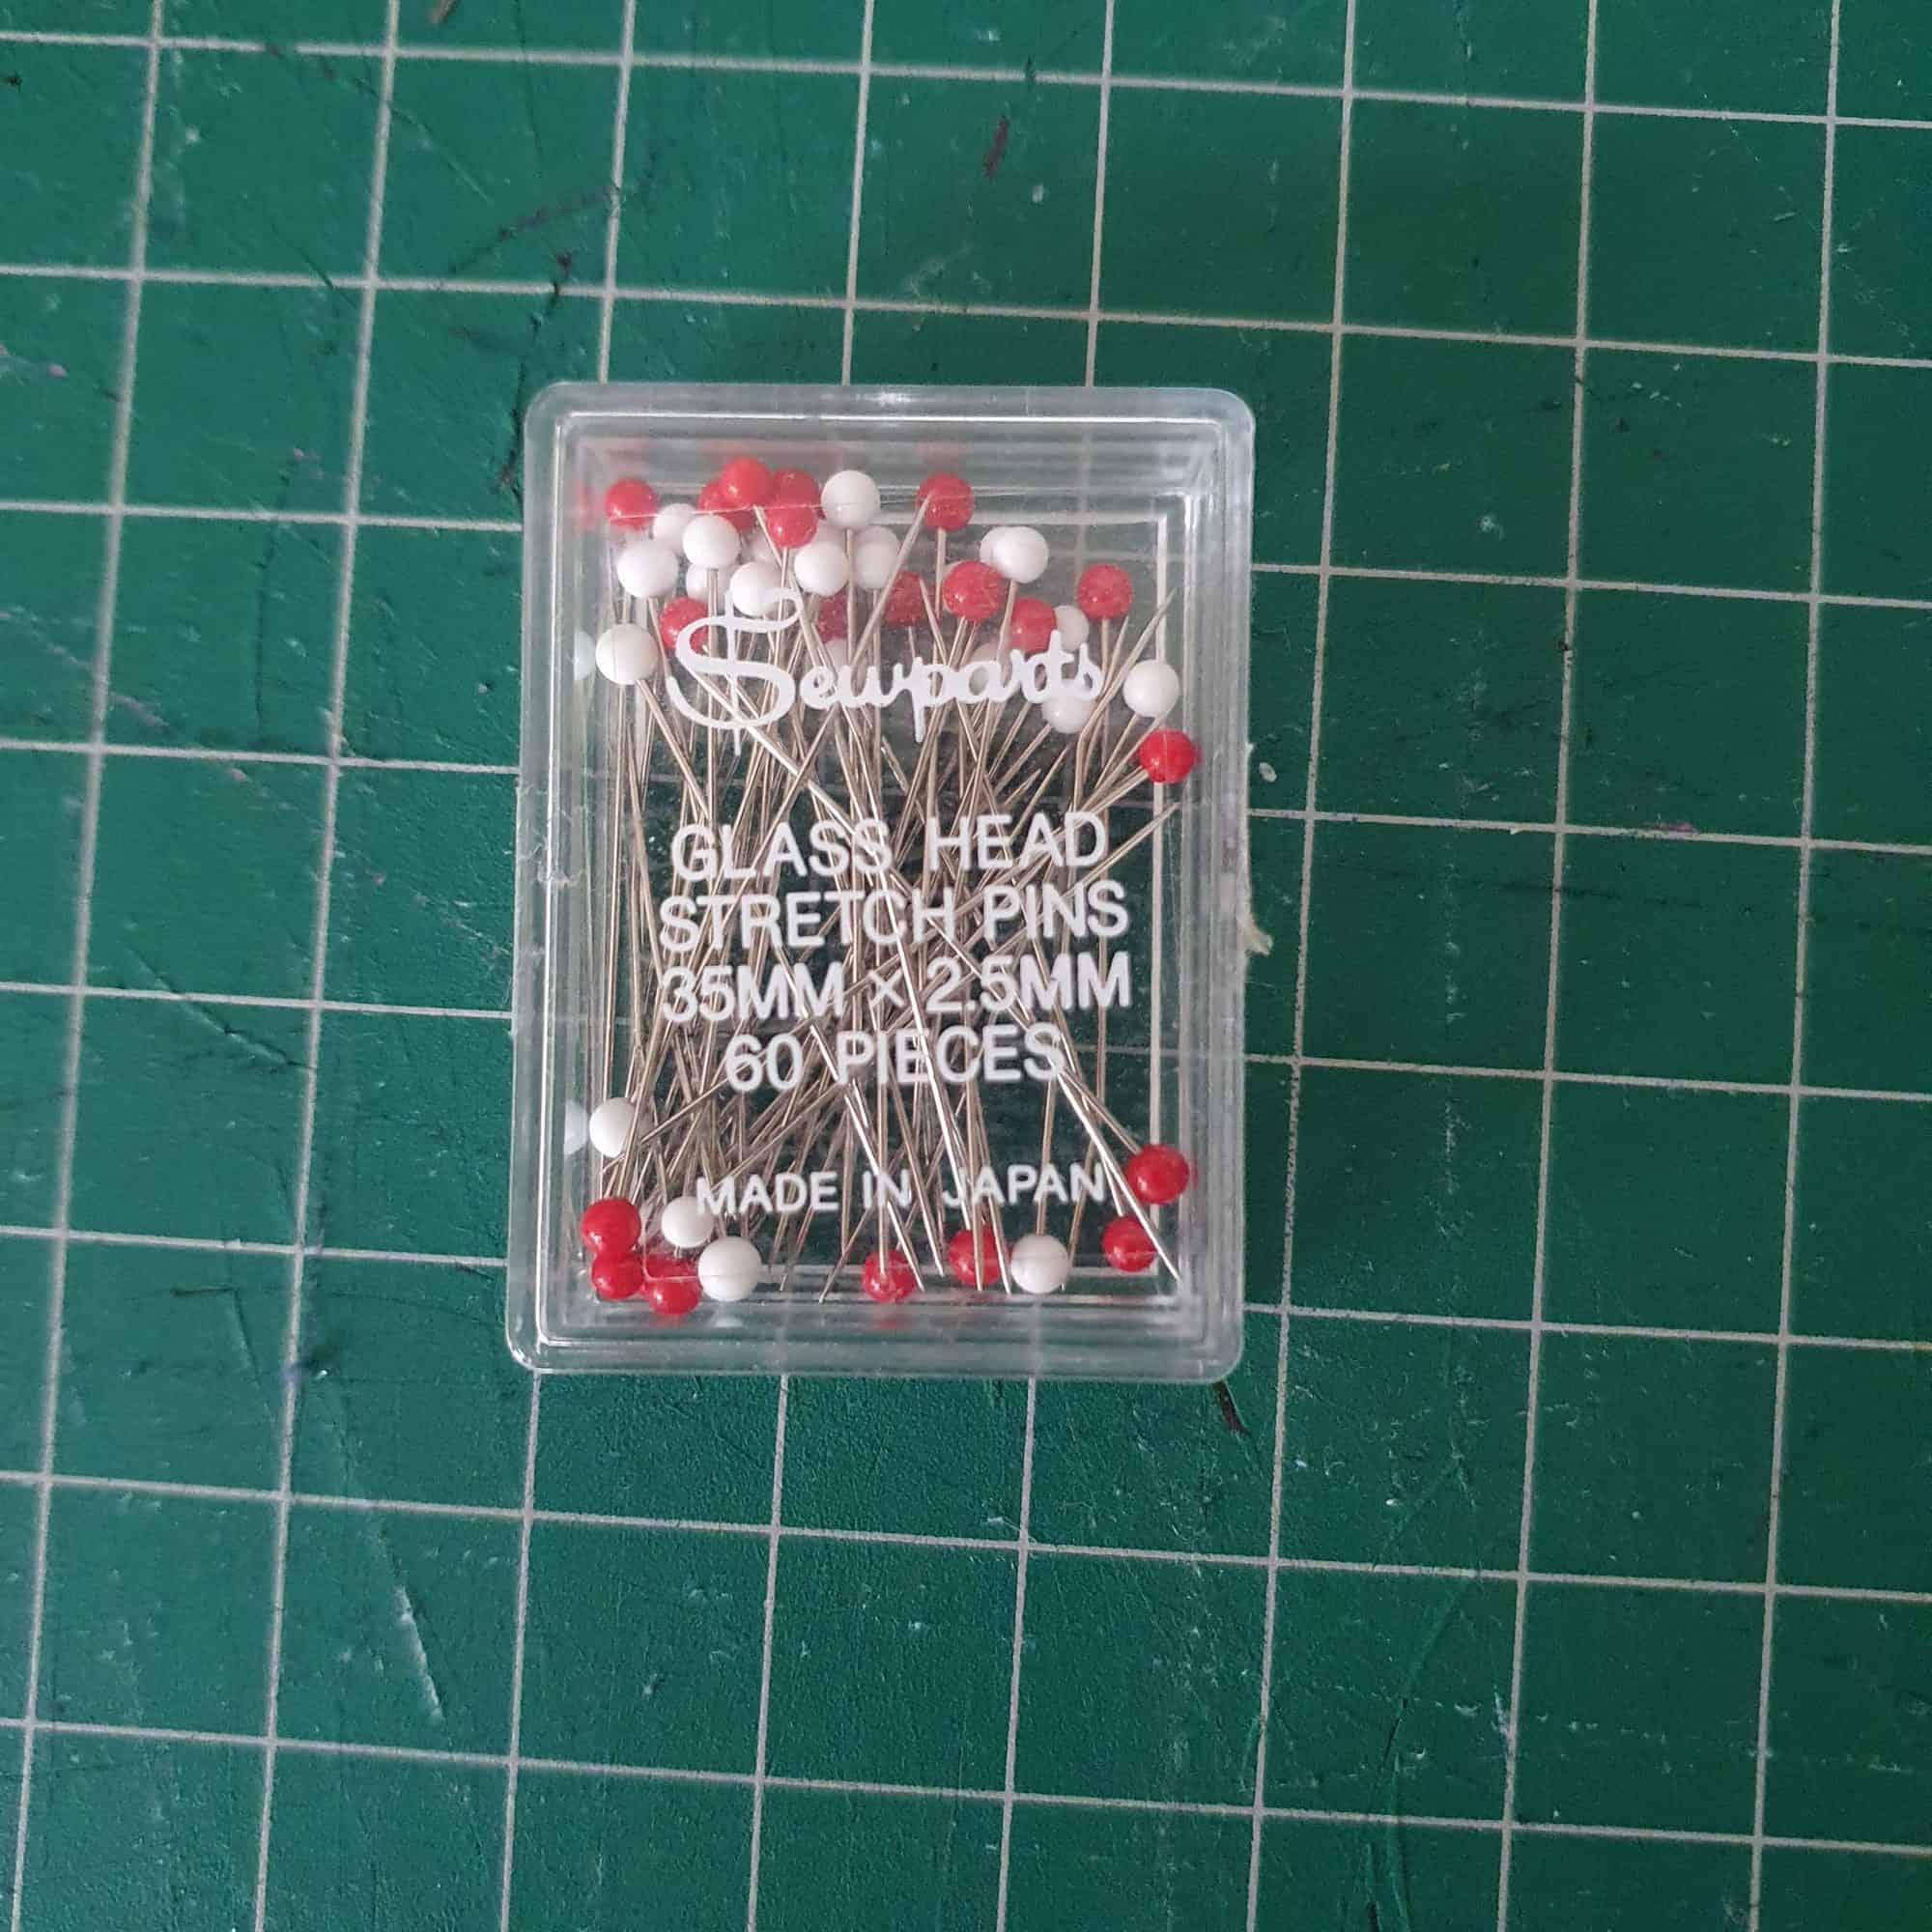
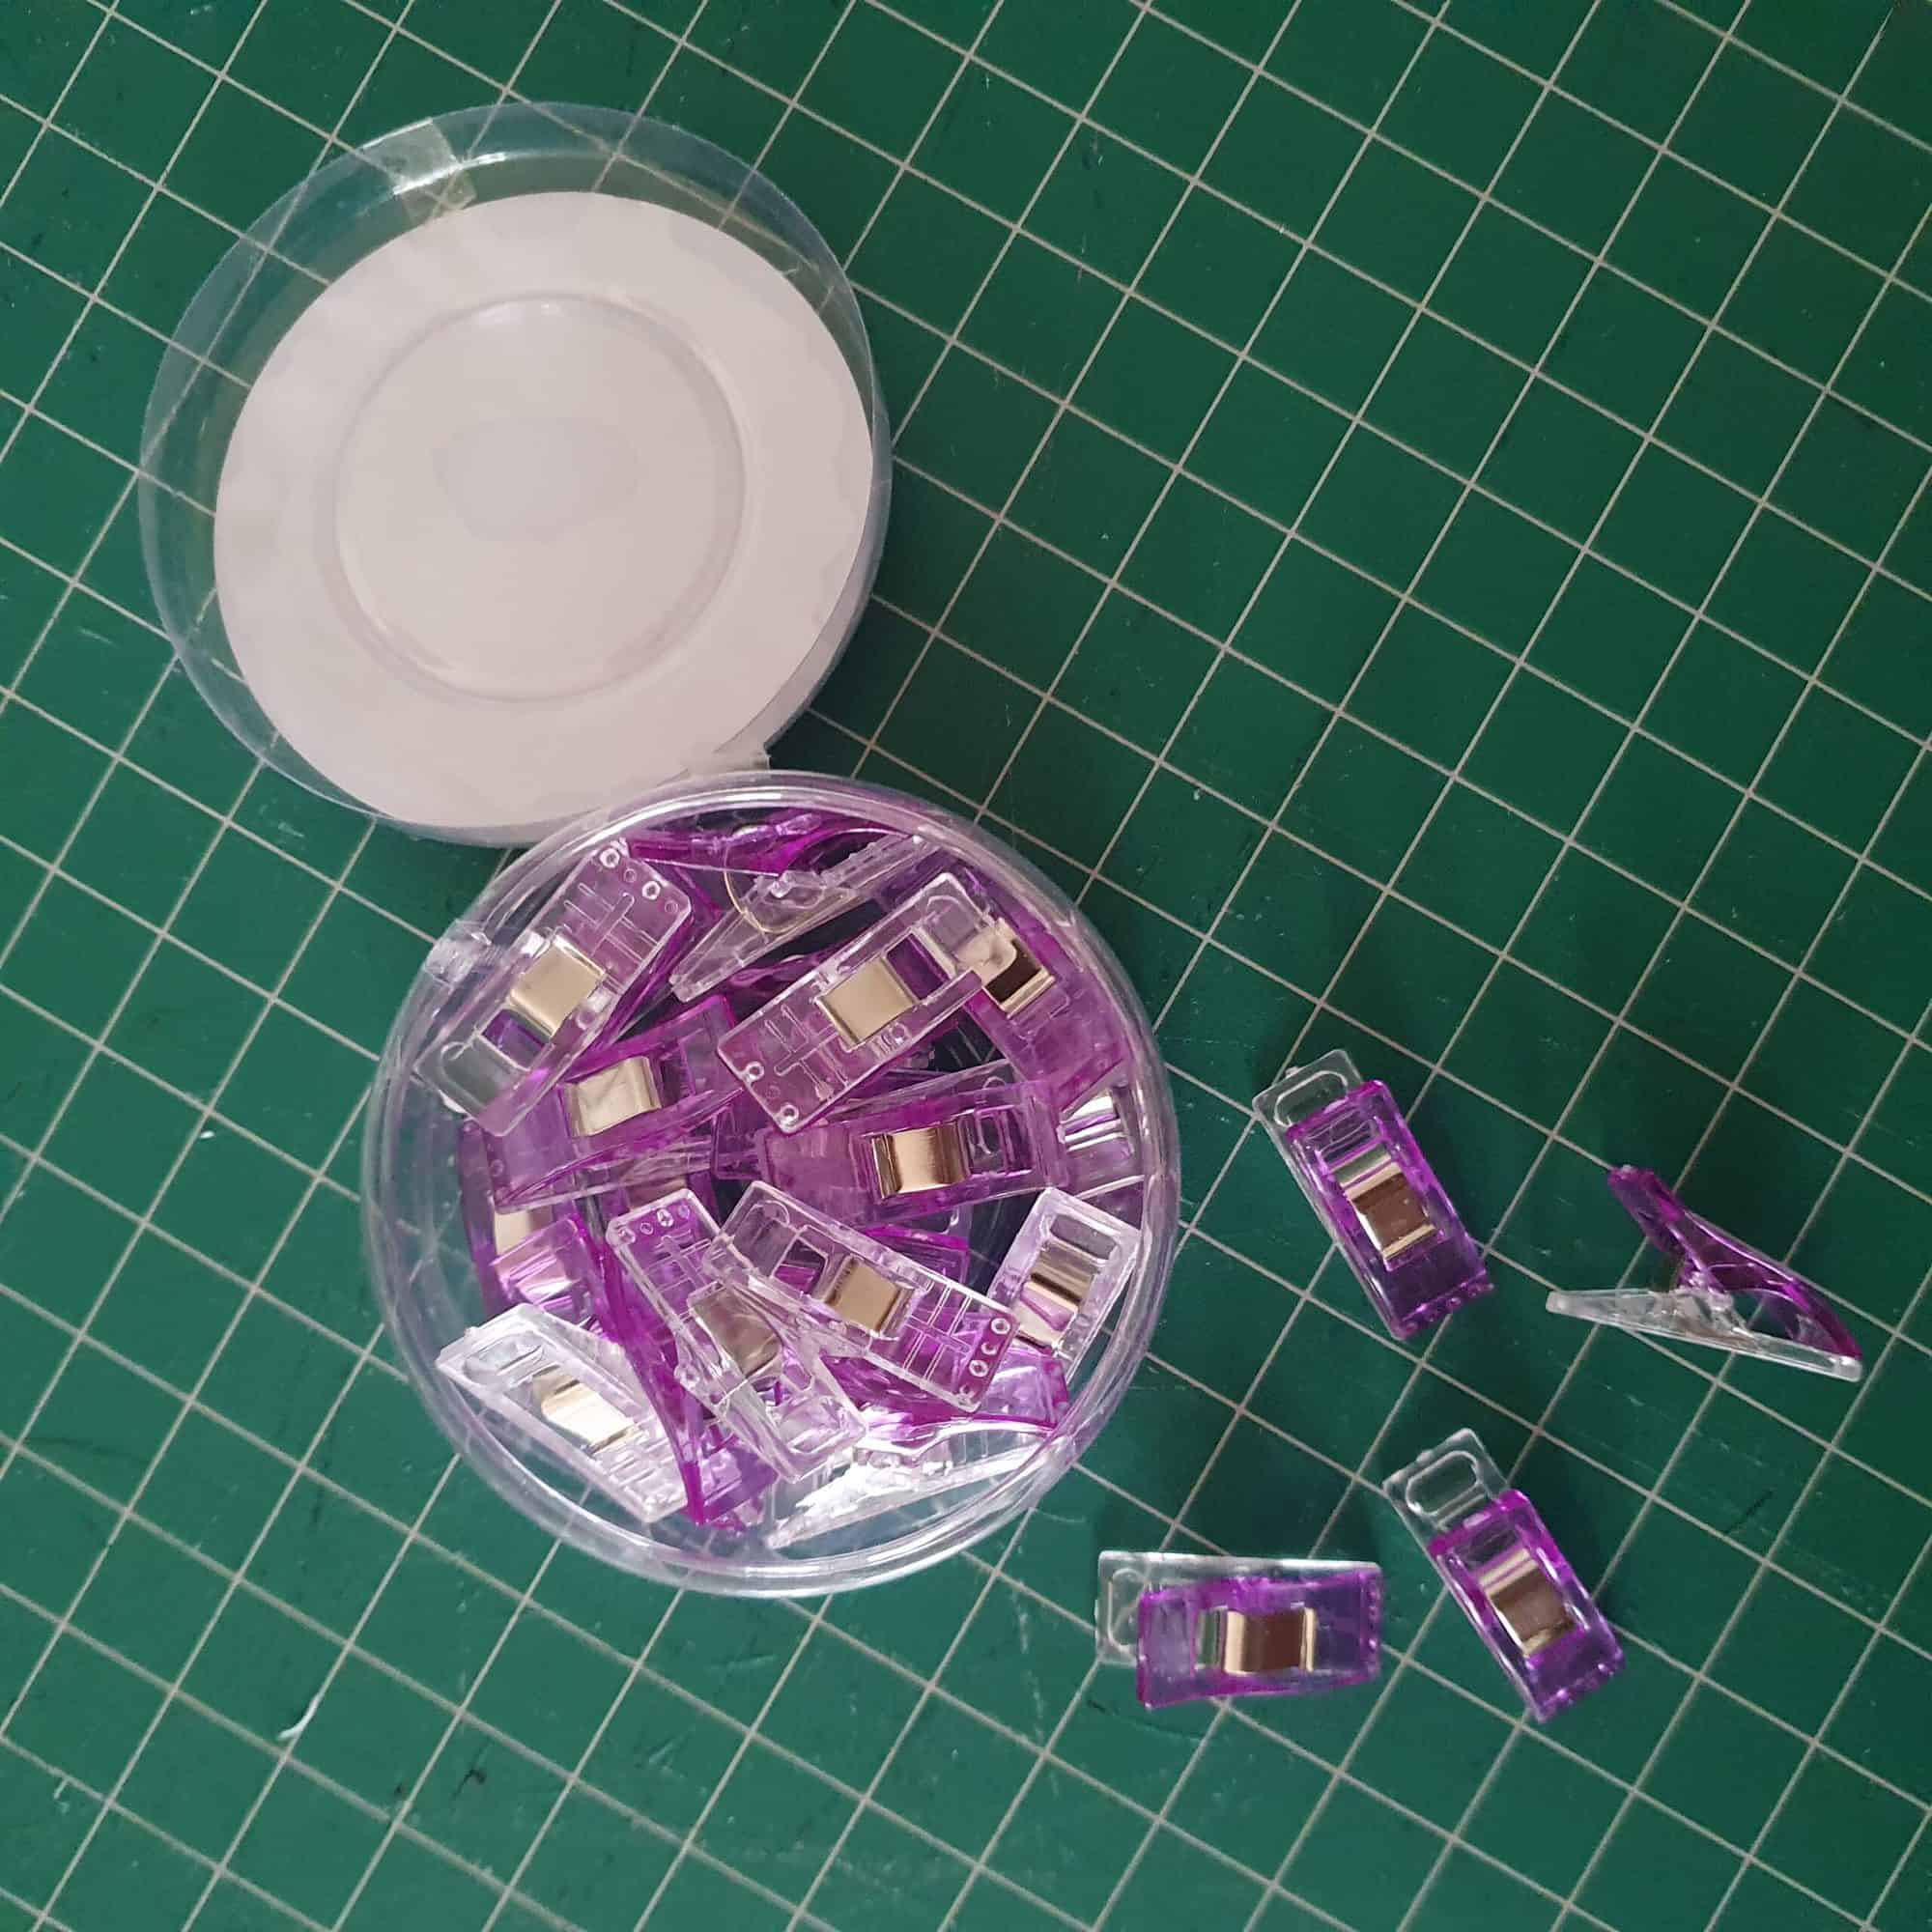
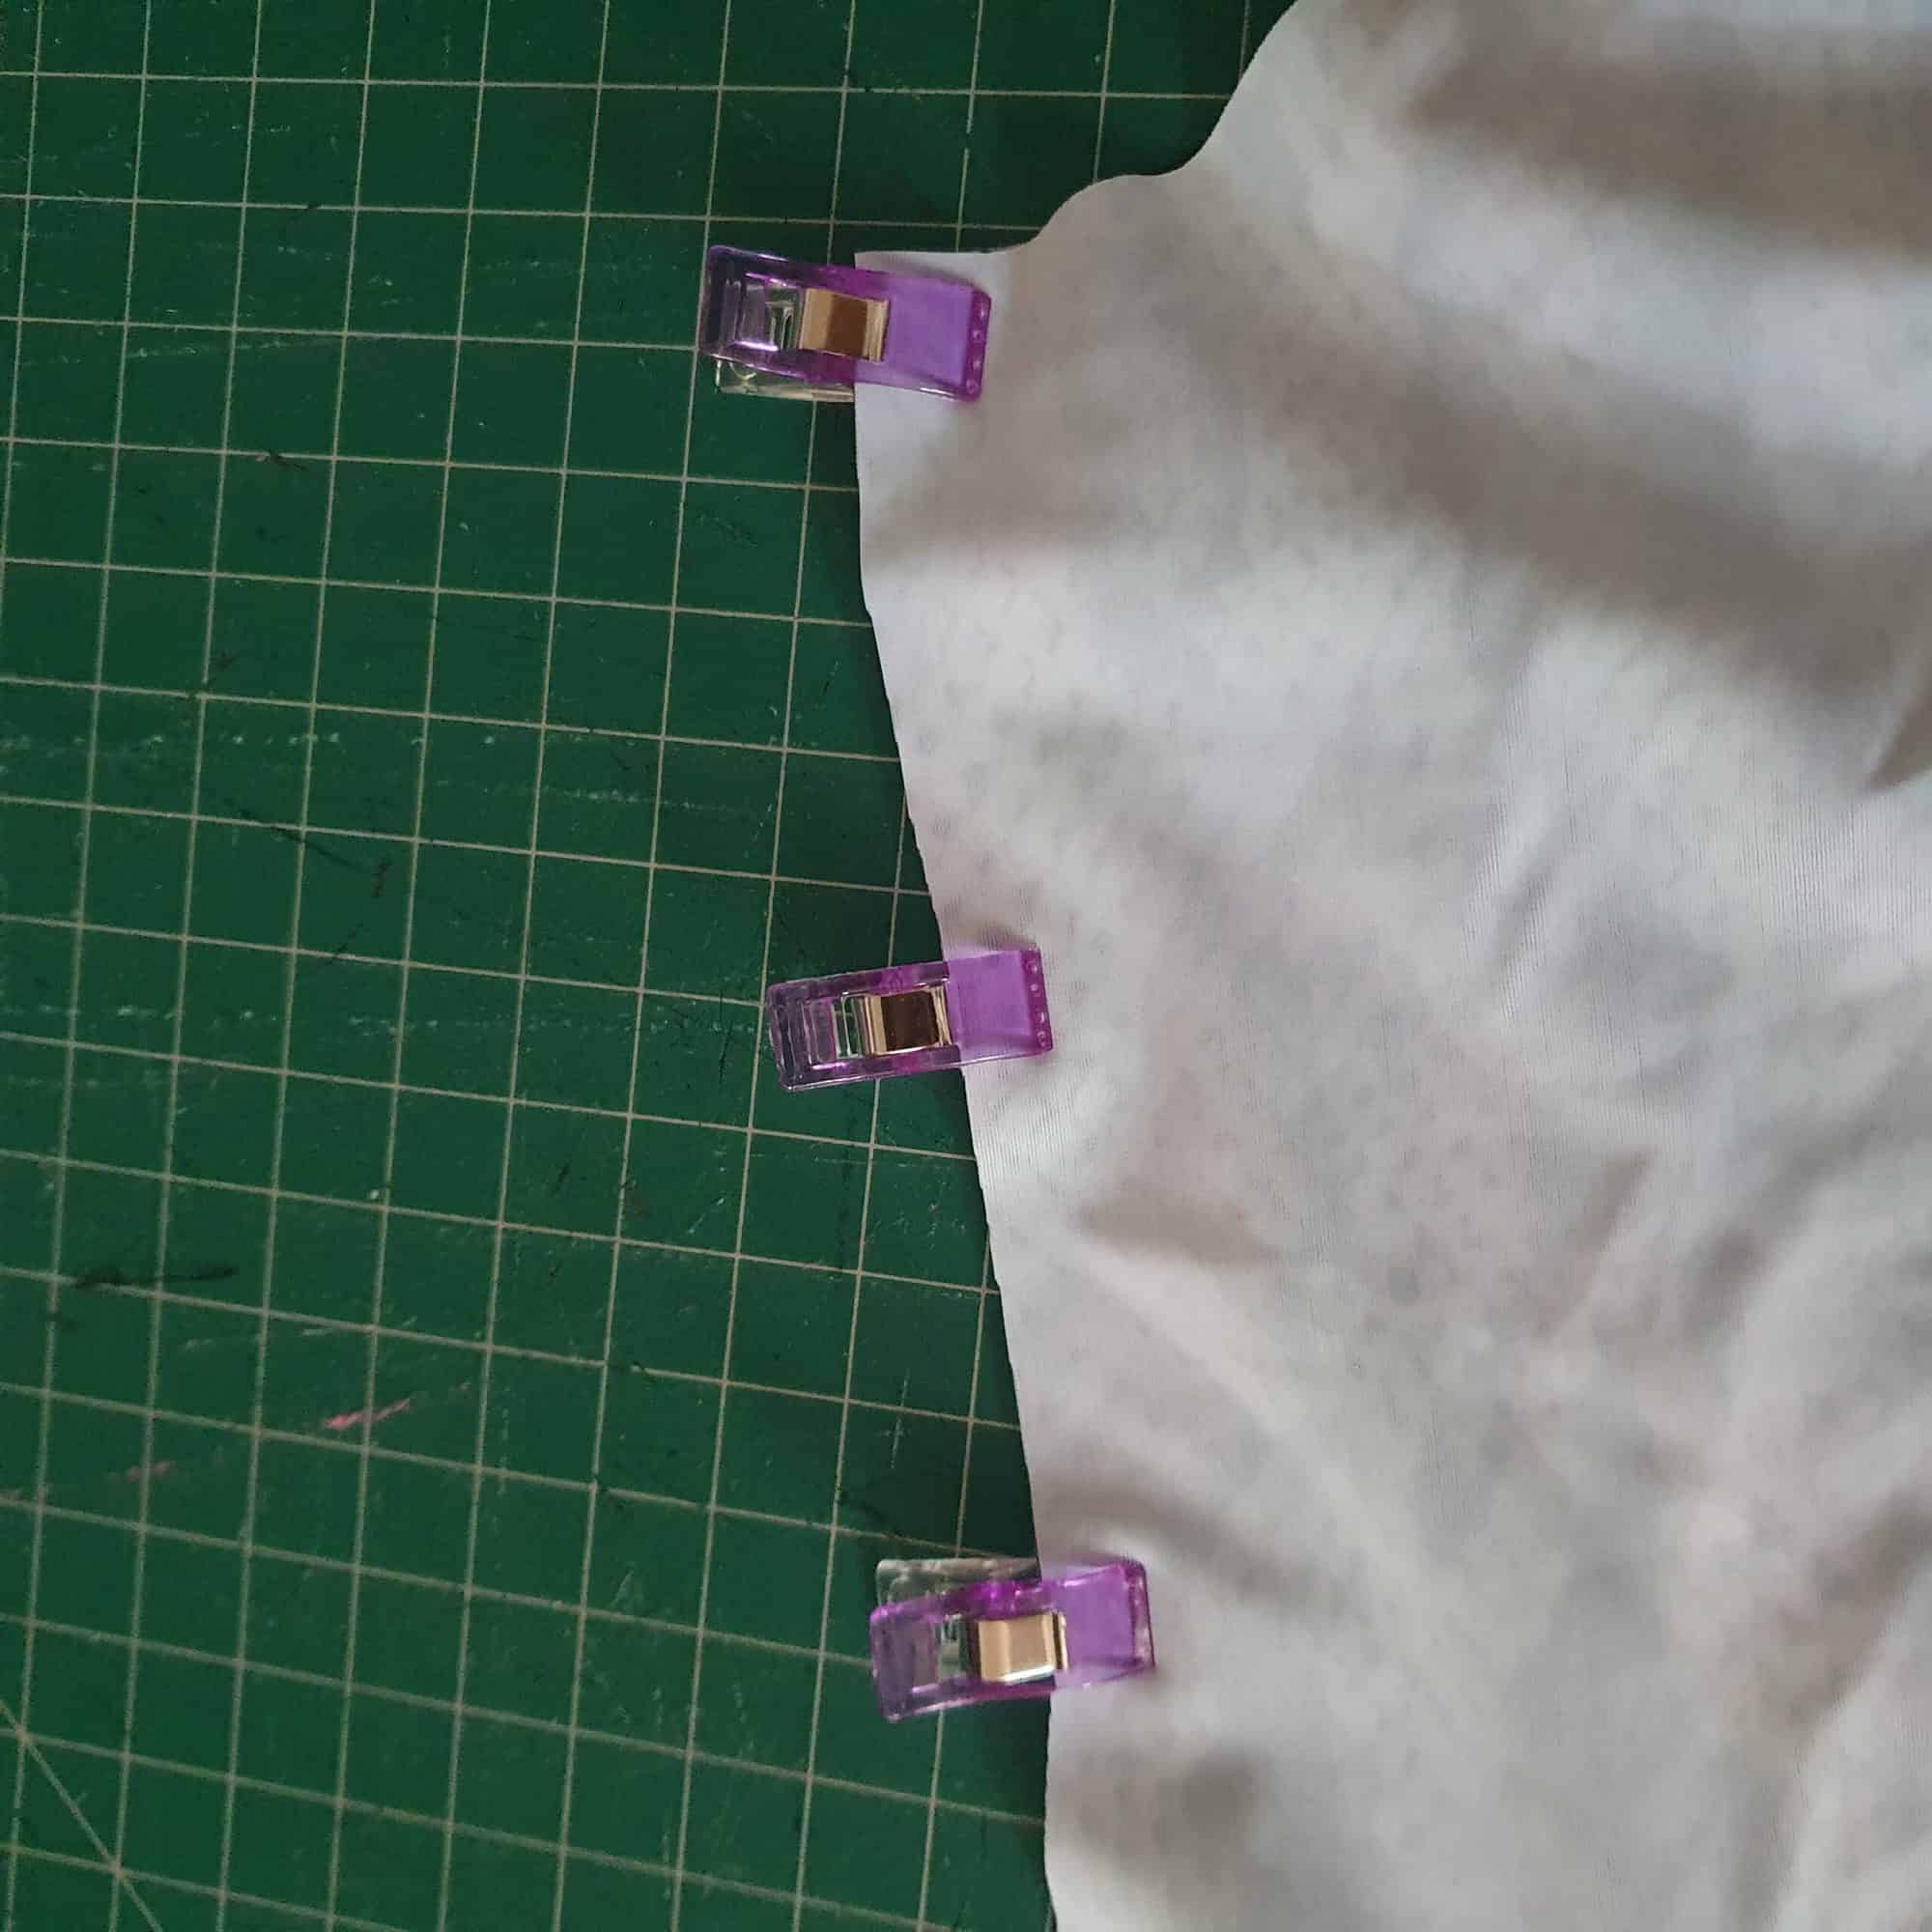
If you like to use pins, make sure to choose fine ballpoint pins to avoid damaging the elastic fibres in the fabric and leaving holes in it. Clips are also another good choice when sewing swim as they are more gentle on the fabric and hold the fabrics in place well too. Whether you choose to use pins or clips is up to you.
When you are sewing with swim for the first time, I recommend using lots of pins or clips. It helps keep the fabric in place and stops it slipping when sewing. If you are really having trouble getting the swim fabric to cooperate sometimes using a basting stitch can help hold things in place and it is easily removed should you make a mistake. Once basted, you can stitch the seam more easily and remove the basting stitch at the end.

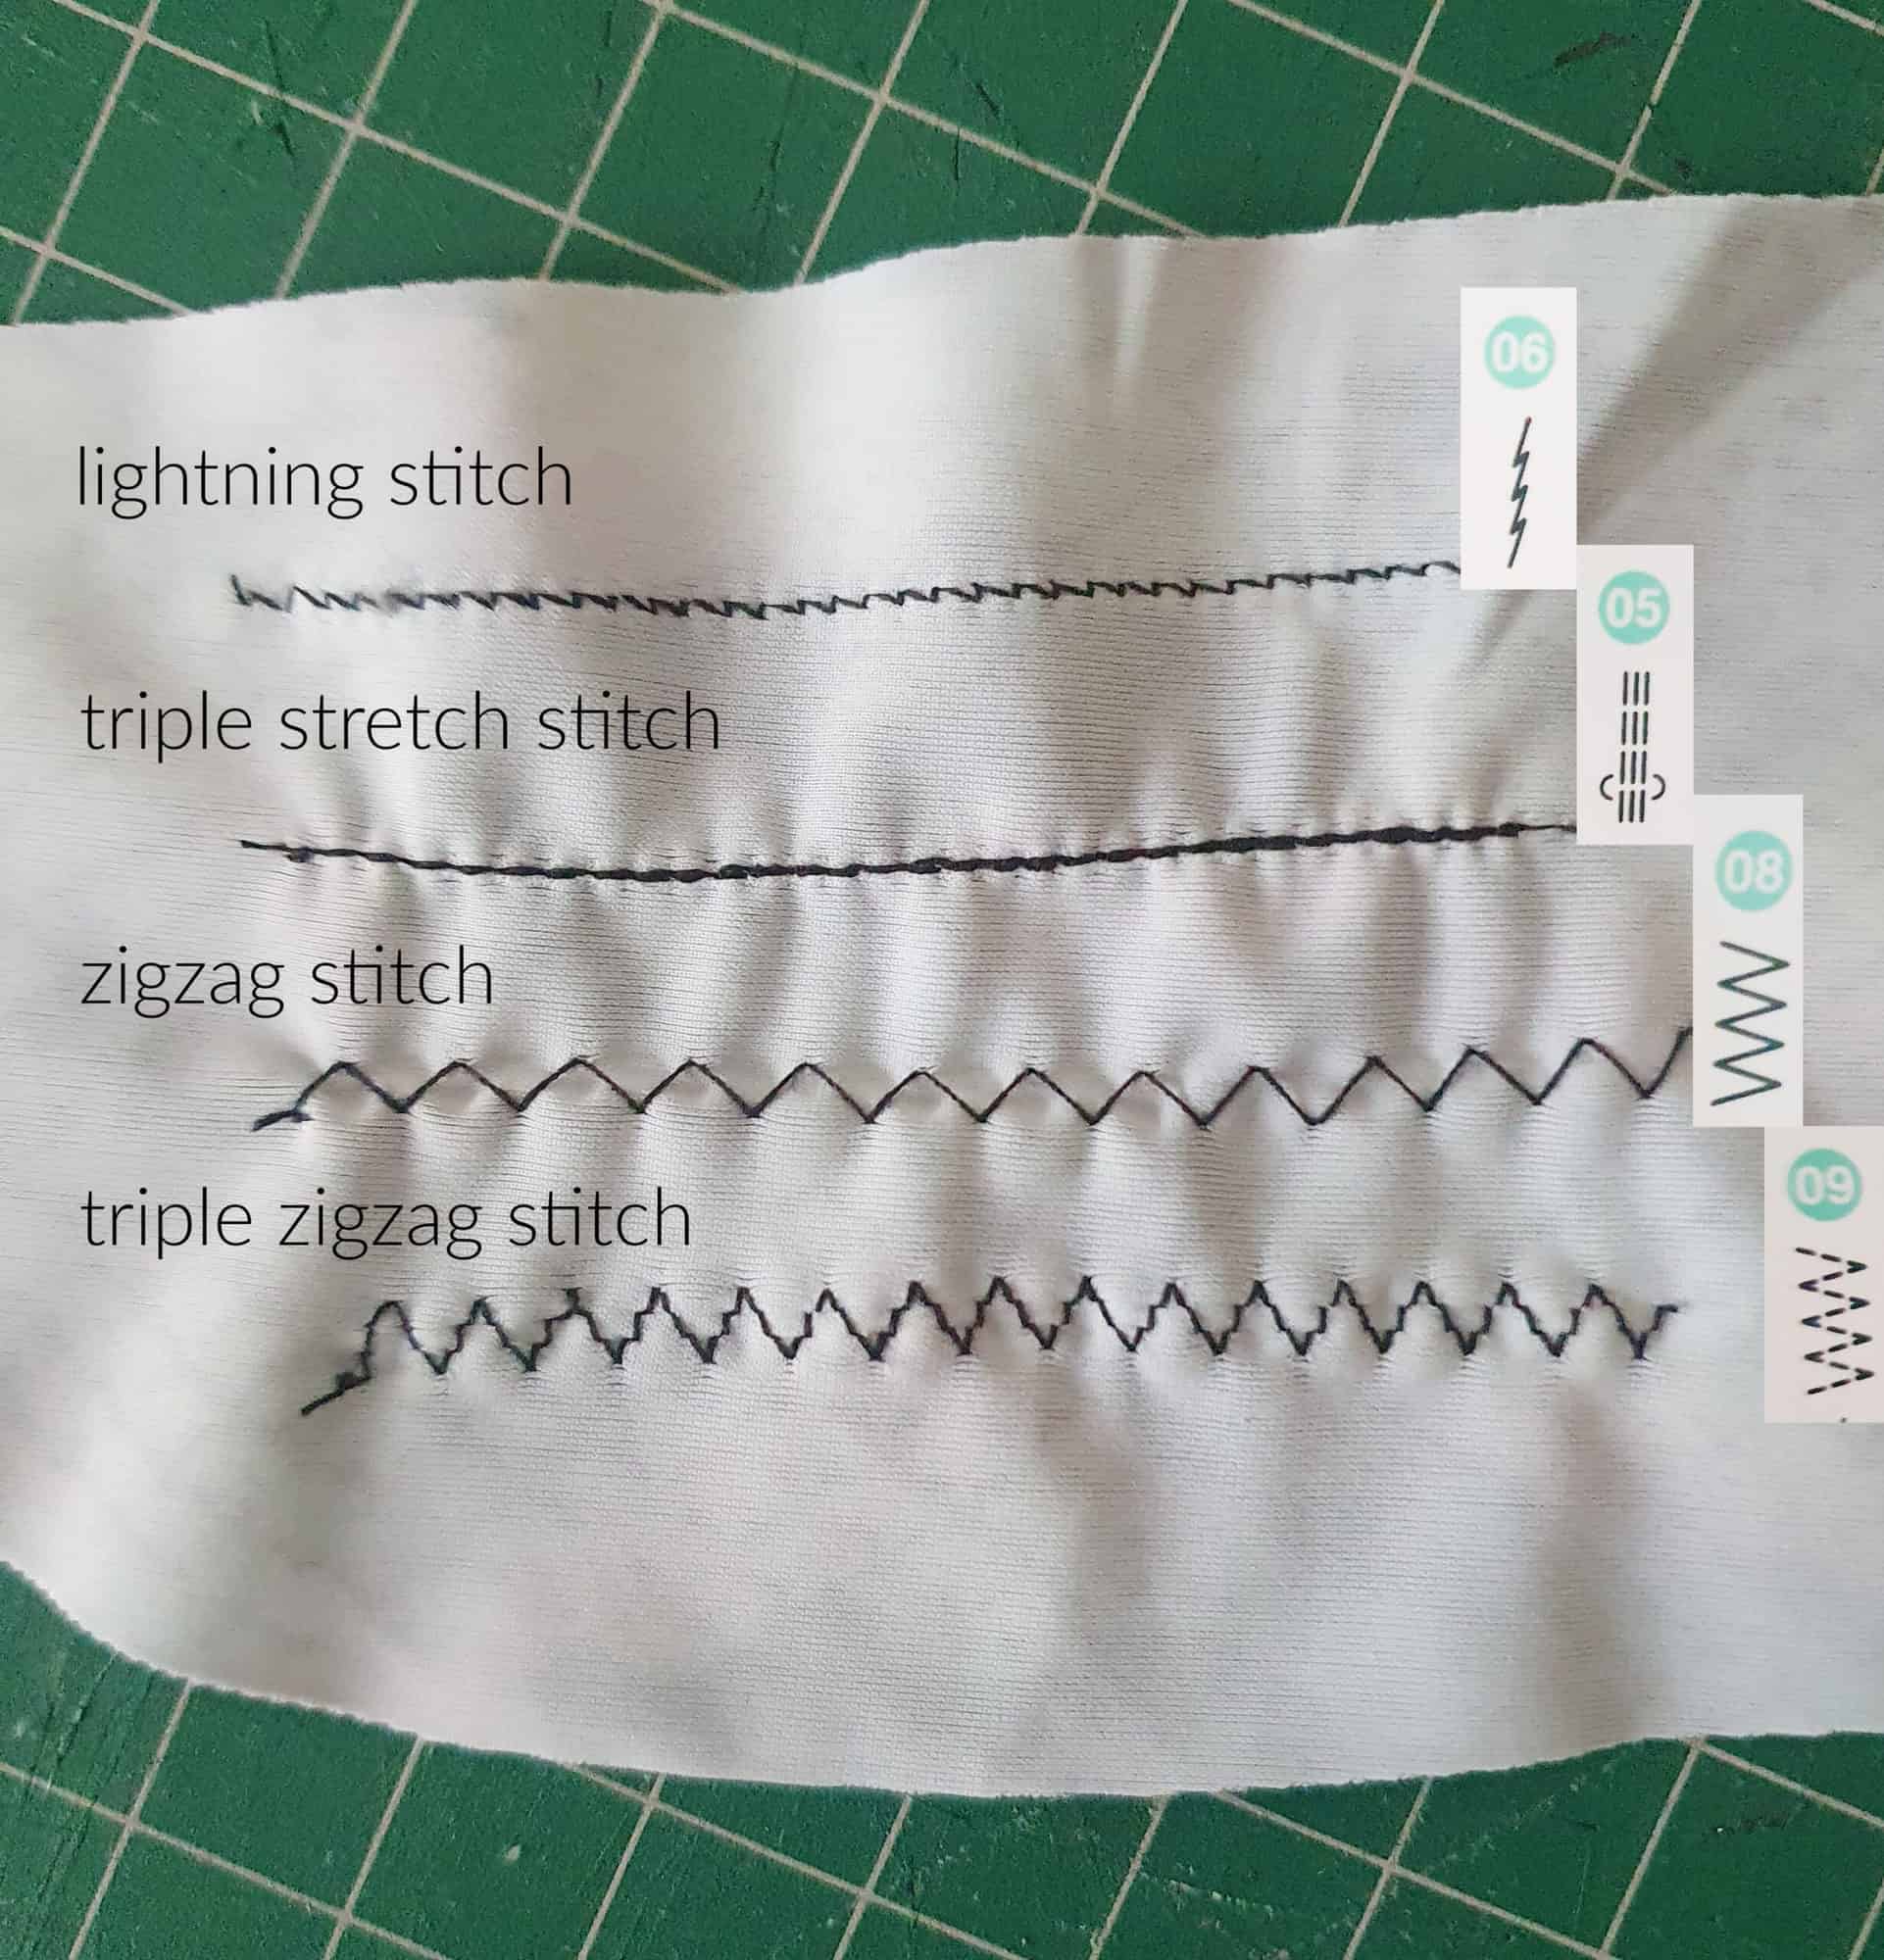
When sewing swim, I use a combination of my sewing machine, overlocker (serger) and cover-stitch machines. However, if you only have a sewing machine it is still totally achievable to make a handmade custom swimsuit. Swimsuits are designed with negative ease which means the pattern is slightly smaller than your measurements, so it fits firmly on the body and stretches to it. This means you need to use a stitch that has stretch to it, like a small zigzag, lightning stitch or triple stretch stitch.
These are examples below of some common stretch stitches I use on my sewing machine when sewing with swim fabric. Always use a piece of swim fabric scrap to test your chosen stitch; then stretch the sample to make sure it will be durable.
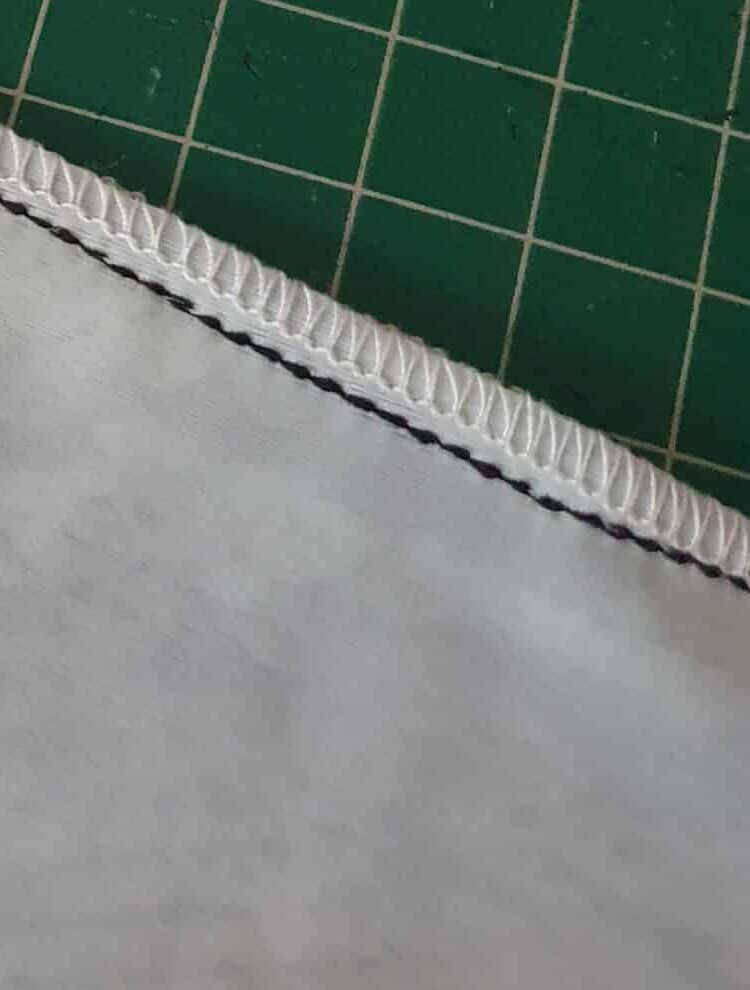
The ideal machine choice to sew seams together for swim is an overlocker (serger), so if you have one, I recommend you sew with it. However, my preferred technique for sewing seams together with swim fabric is to start with a triple stretch stitch. I like this stitch because it is strong (my girls can be rough on their swimsuits), but it is slower to sew. I then trim the seam allowance to ¼” and finish the seam with a 3-thread overlocking stitch. You can also use a 4-thread overlocking stitch to finish your seams if you prefer. Just make sure to get the tension correct otherwise your seams make not hold together well.
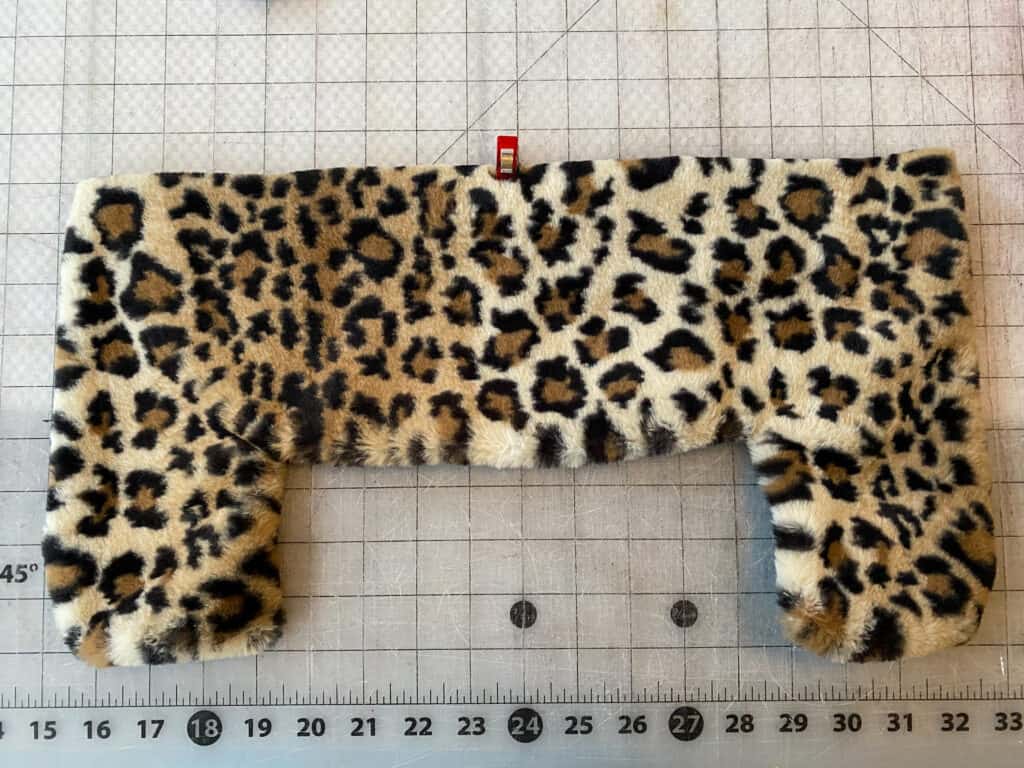
I love to use swim fabrics for making clothes, because it has a beautiful drape to it and it sits beautifully over the body too. Some people might find wearing clothes made from swim fabrics a little warmer in Summer, so I recommend making the pattern design feature to be sleeveless and with an unlined bodice if possible. Using swim spandex for peg legs is my absolute favourite thing to sew. It feels amazing to wear and smooths the body nicely too.
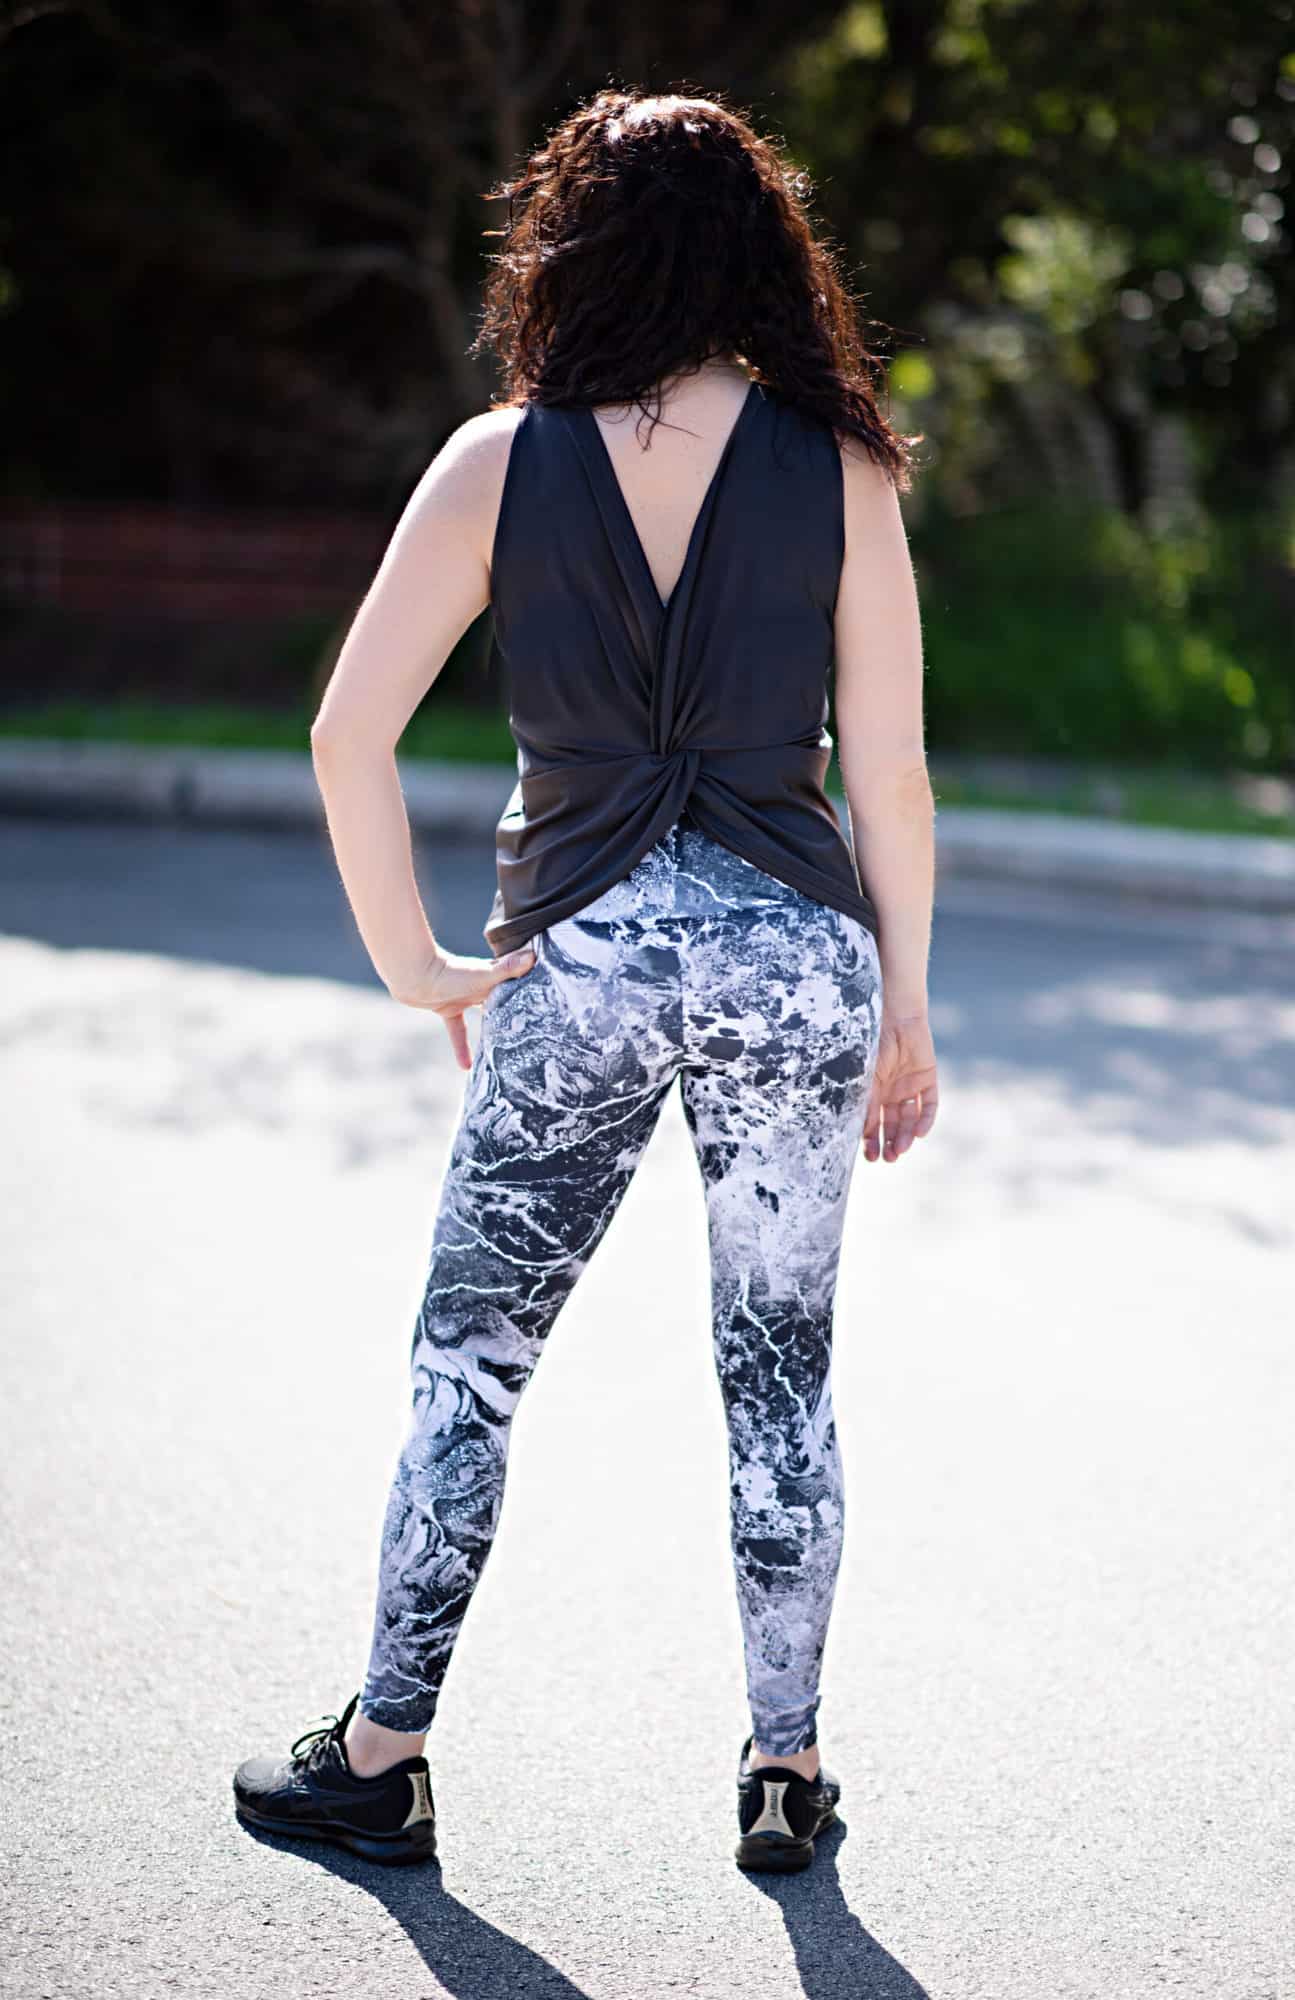
Peg Legs with Twist Back Top both in swim spandex
I hope you dive in and start sewing with swim. I know you are going to love it as much as I do. As with anything, all it takes is a little practice.
Happy Sewing
Katy x
Protected: Fabric for Pirates :: December 2020 Reveal
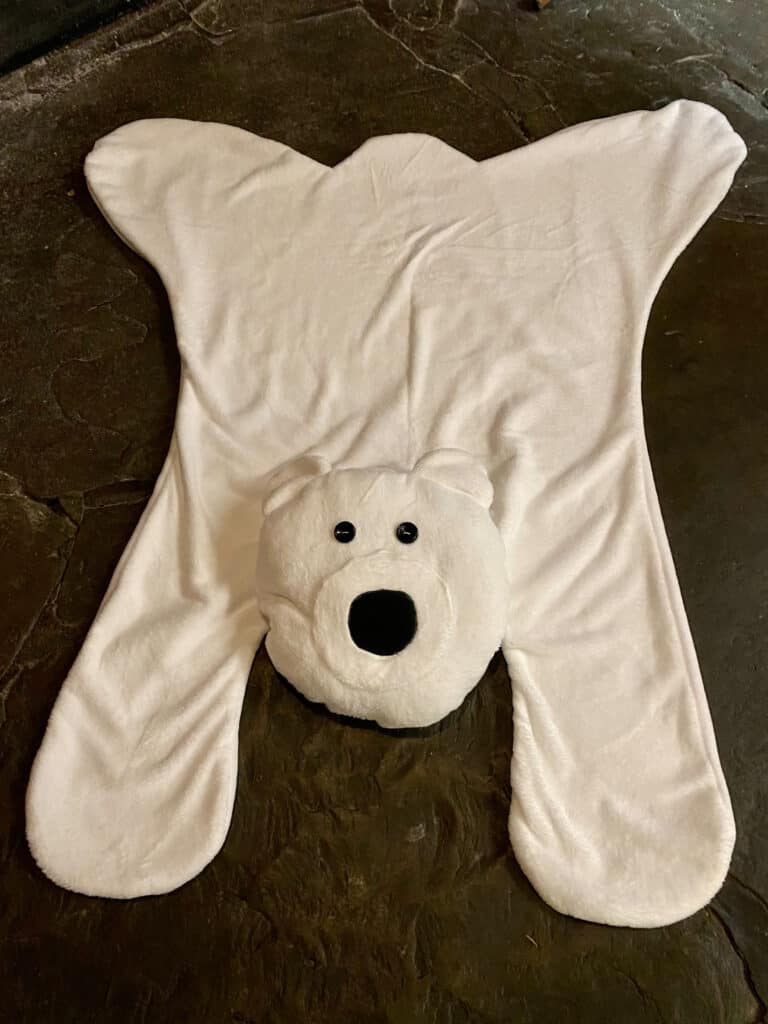
2020 Holiday Freebies :: Bear Hug Rug Tutorial
Happy Holidays, Pirate Friends! We are excitedly back for another year and another round of holiday freebies to share with you! Over the years, we’ve compiled different tutorials and patterns that we think would make *perfect* gifts for your friends and family. Curious about what we’ve already released in the way of holiday freebies? Head right here to see all of them: Holiday Freebies Roundup.
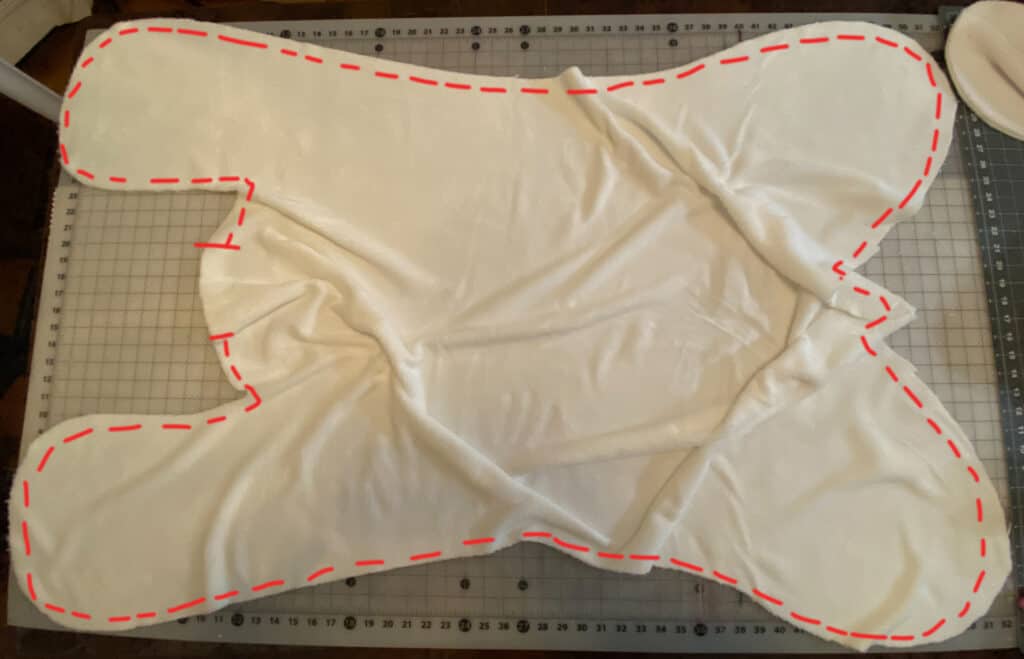
Today, we are bringing you the: Bear Hug Rug!
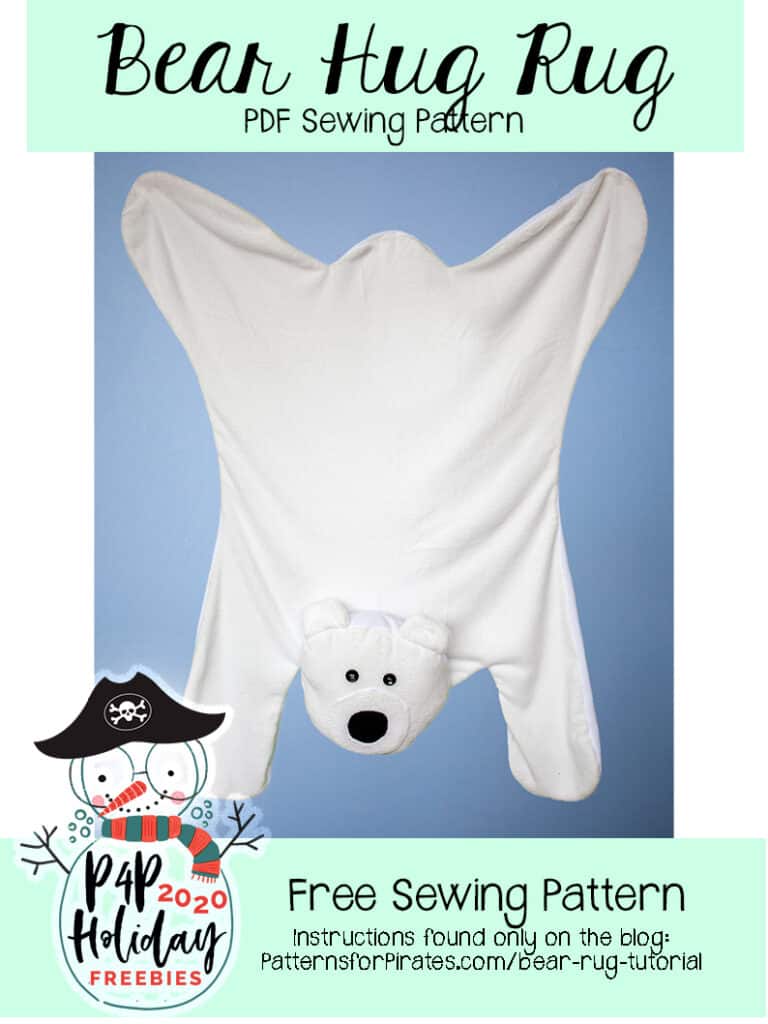
The Bear Hug Rug is pretty much a giant stuffed animal, with function. It can be used as a rug on the floor, while relaxing or reading a book. It can be used as a blanket with a big ole’ head for cuddling up with. Or it can be used as a giant stuffed animal, ready to be loved.
The pattern construction is super simple and the results are so fun. We hope you love it!
Supplies Needed:
- Bear Hug Rug pattern pieces
- Fabric Requirements: Fleece / Minky / Faux Fur, etc, 54″ wide
- 2 Yards Main
- 2 Yards Lining
- Fiberfill (for head)
- Scraps of fabric for facial features
- Buttons / Embroidery Thread for Eyes
TUTORIAL
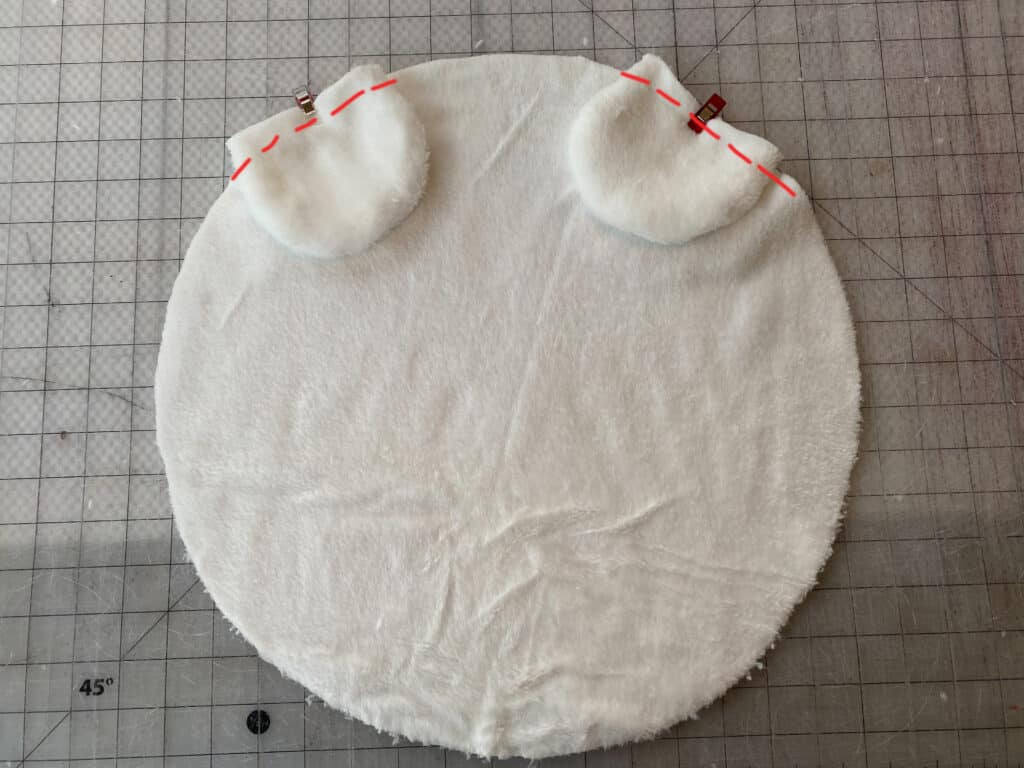
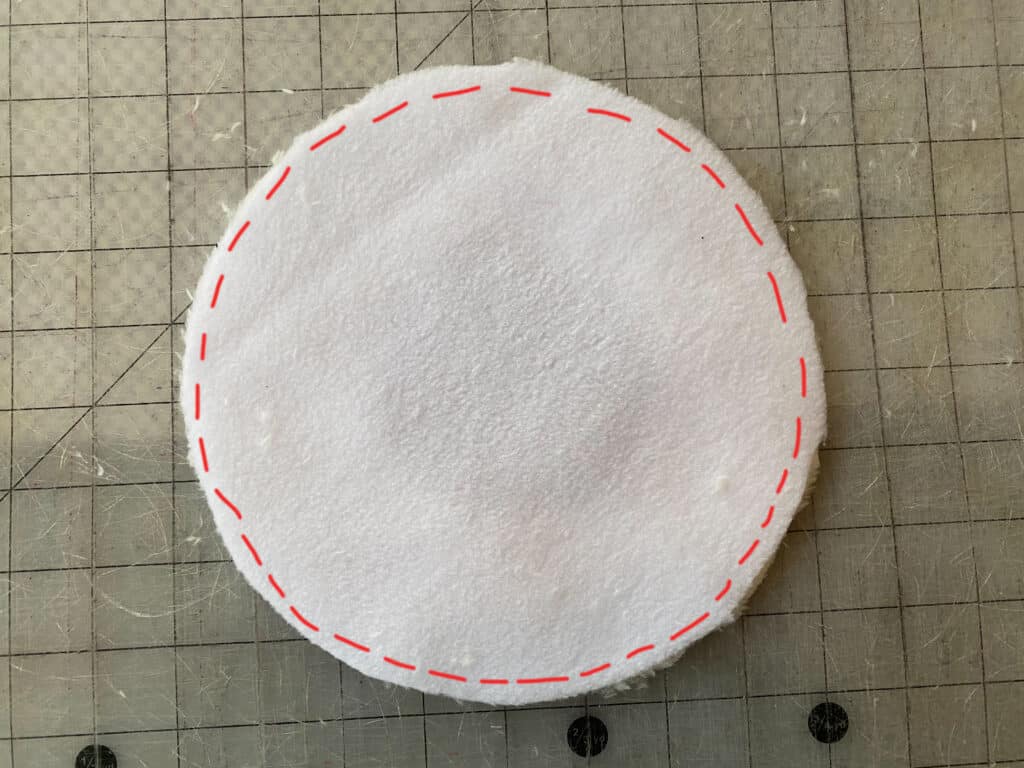
Place 2 ear pieces, right sides together.
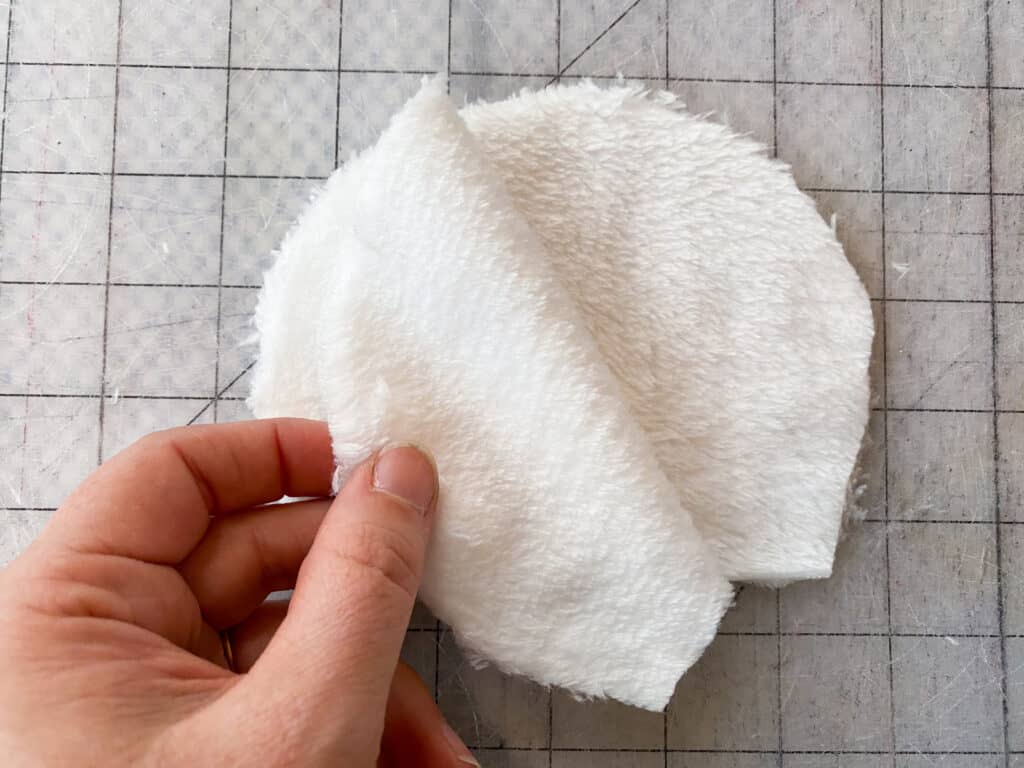
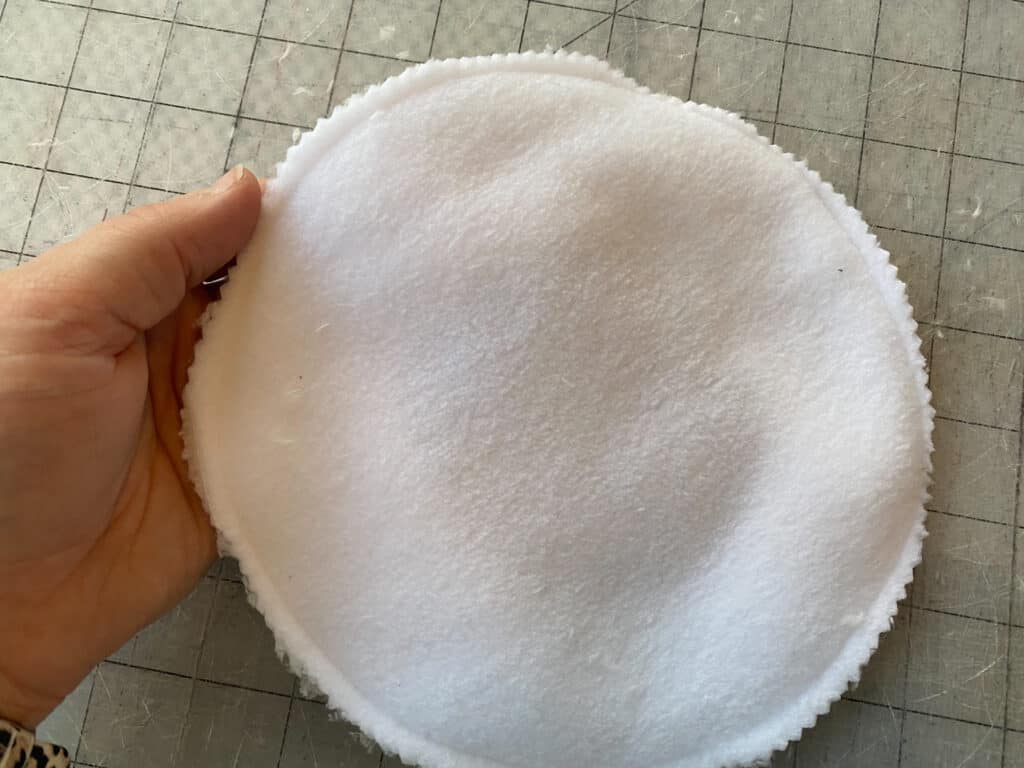
Using 1/2″ seam allowance, sew around entire round edge.
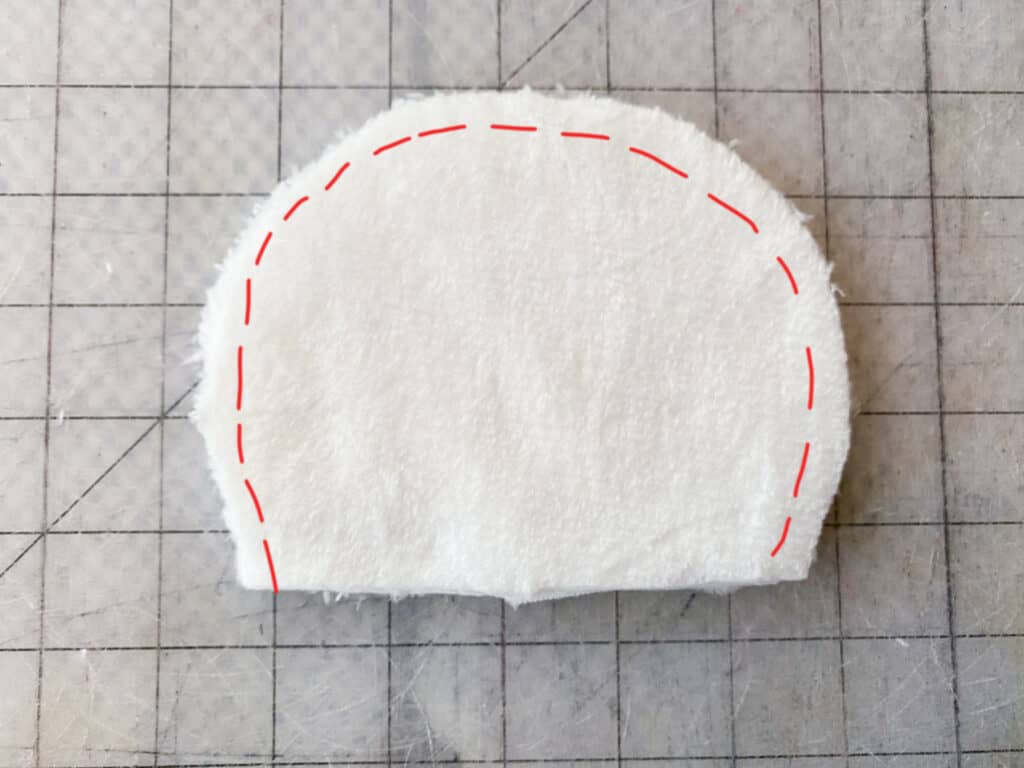
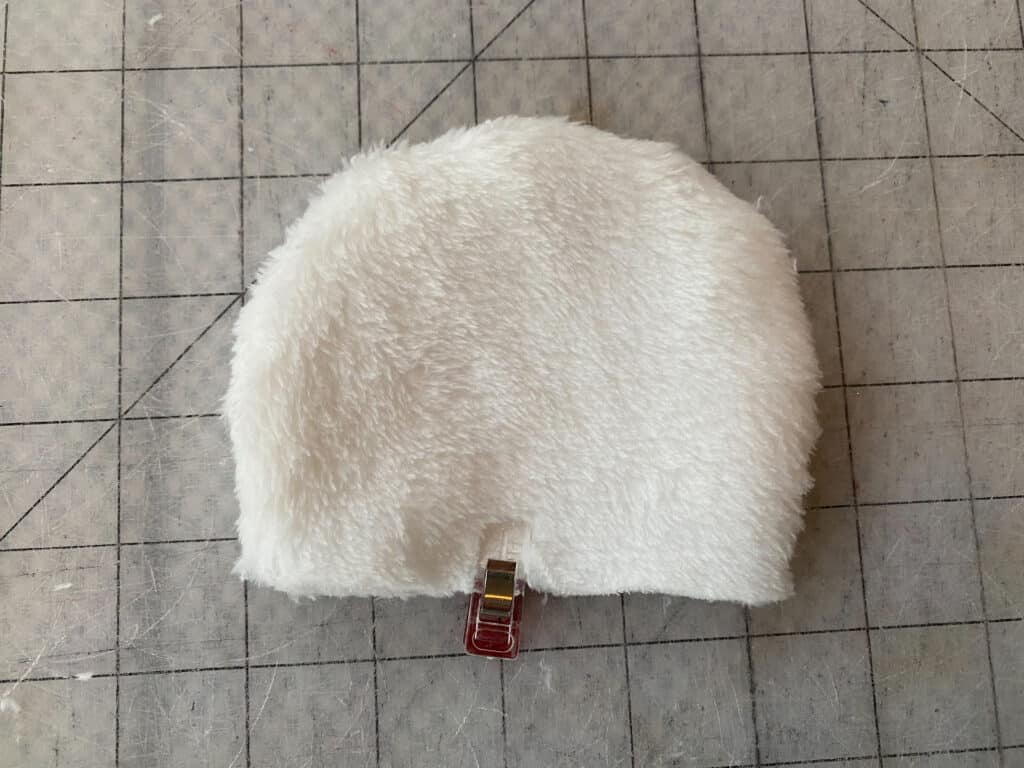
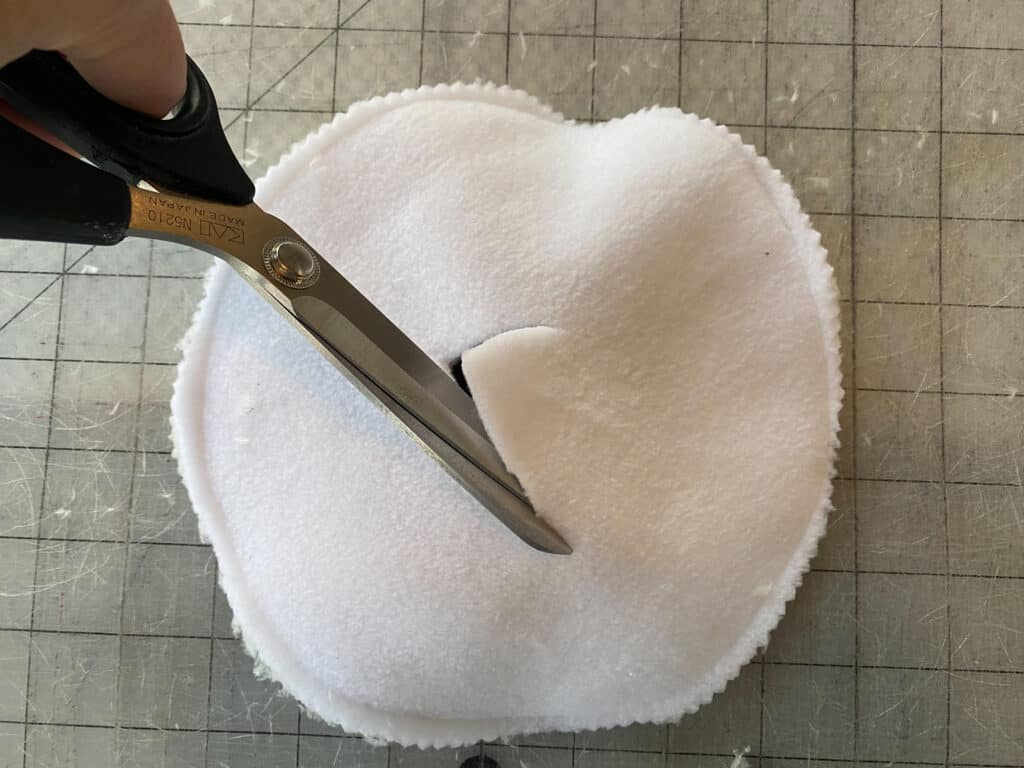
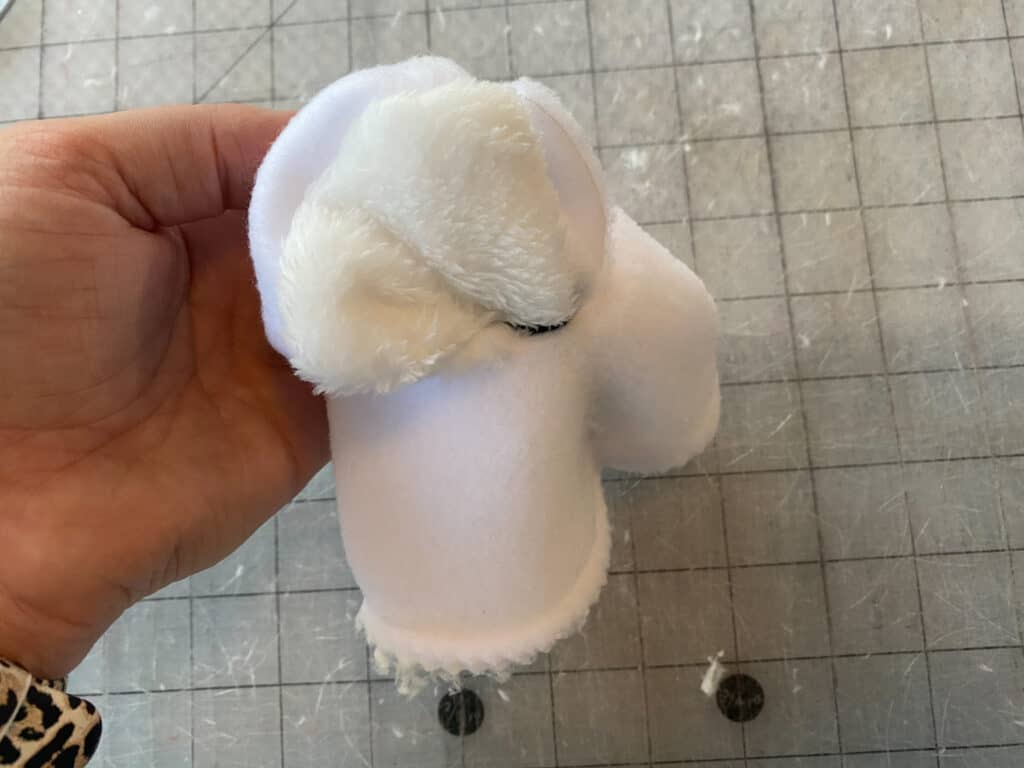
Turn right side out and place pin/clip at the middle, bottom edge. Repeat for second ear.
**Tip from our testers: if your ears are on the floppy side, you might want to add a little polyfil to them to help them stand up.
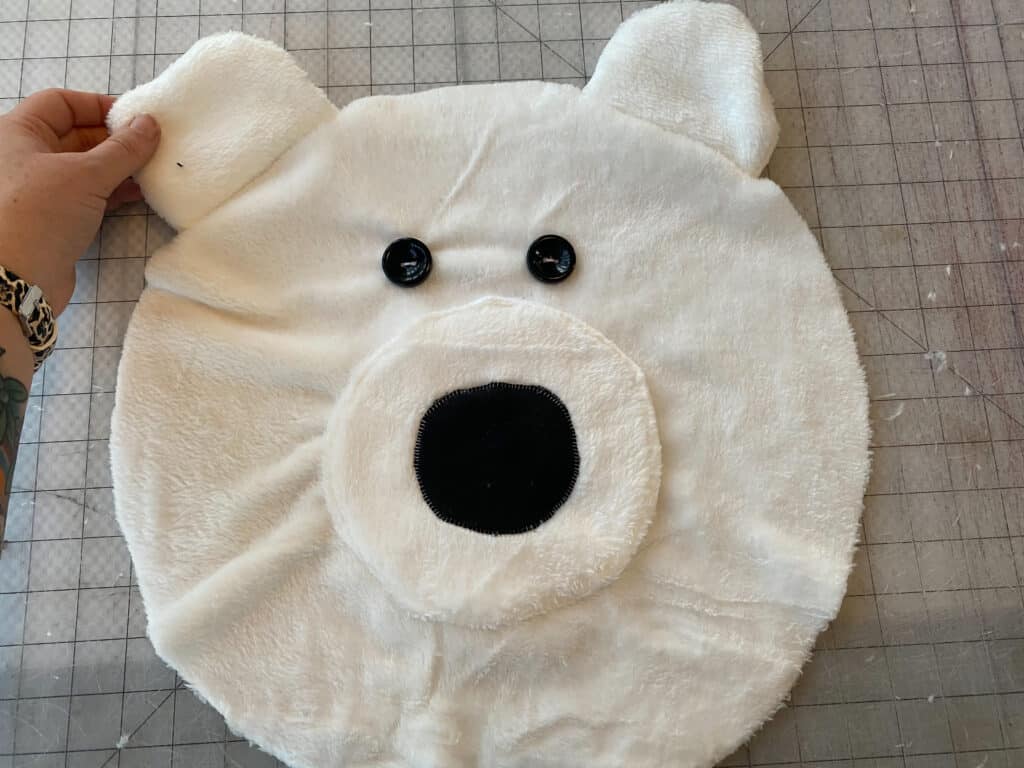
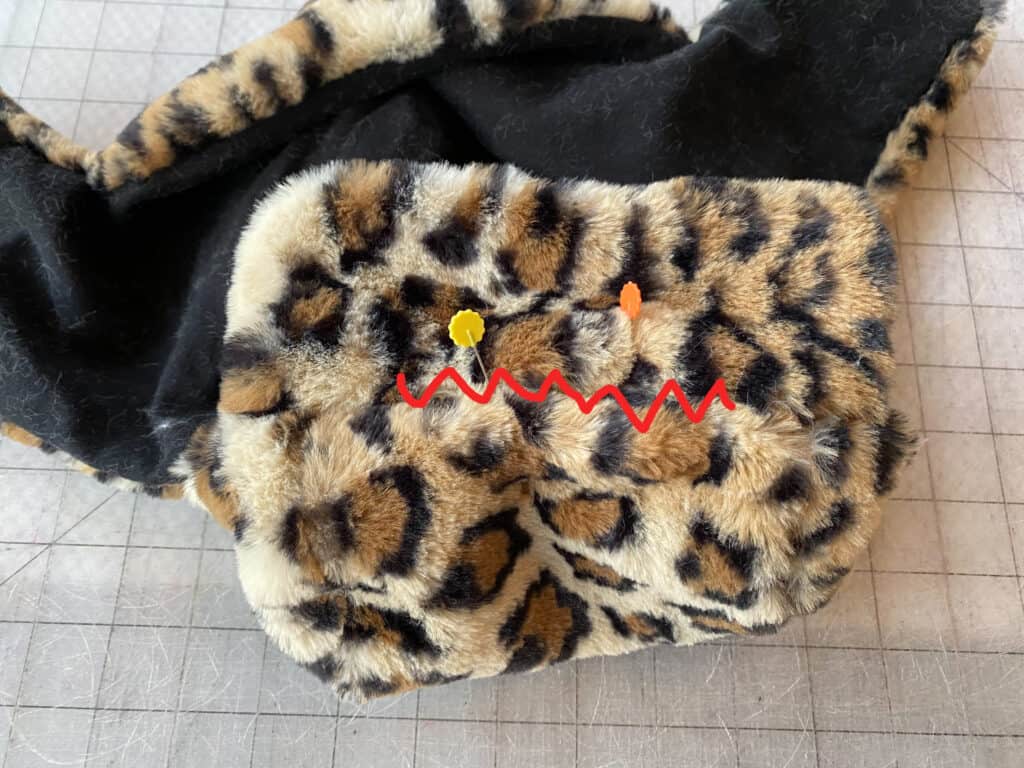
On head piece, use the pattern piece to place pin/clip for ear markings.
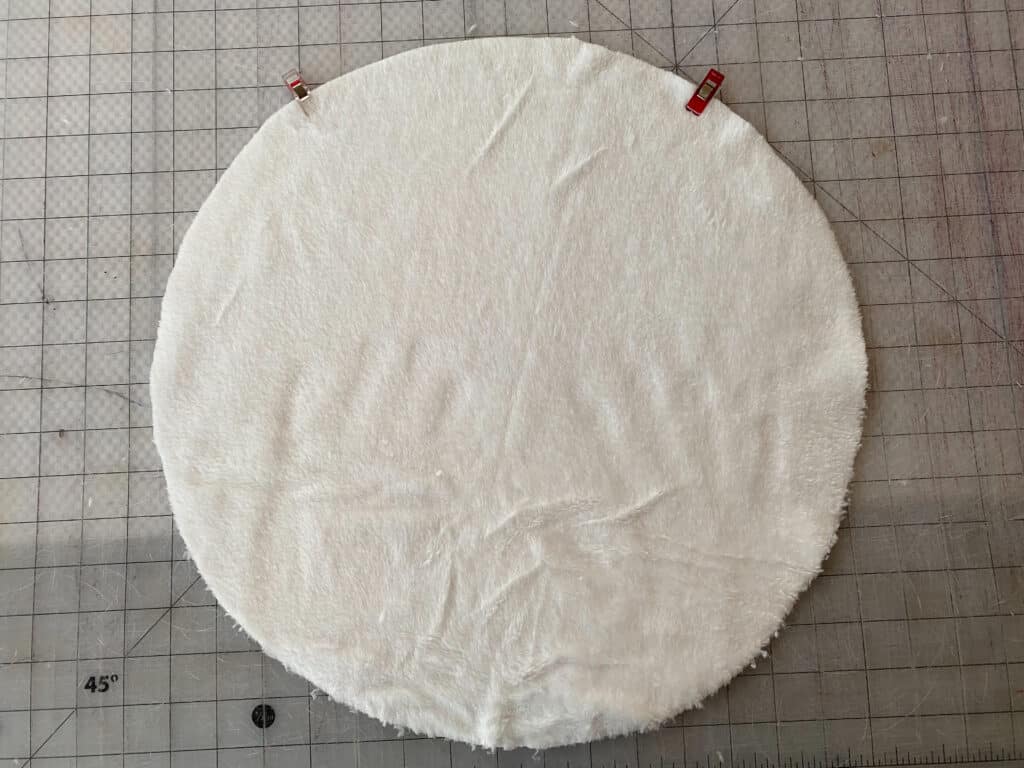
With right sides together, match ear pieces to markings on the main head piece. Baste ears in place.
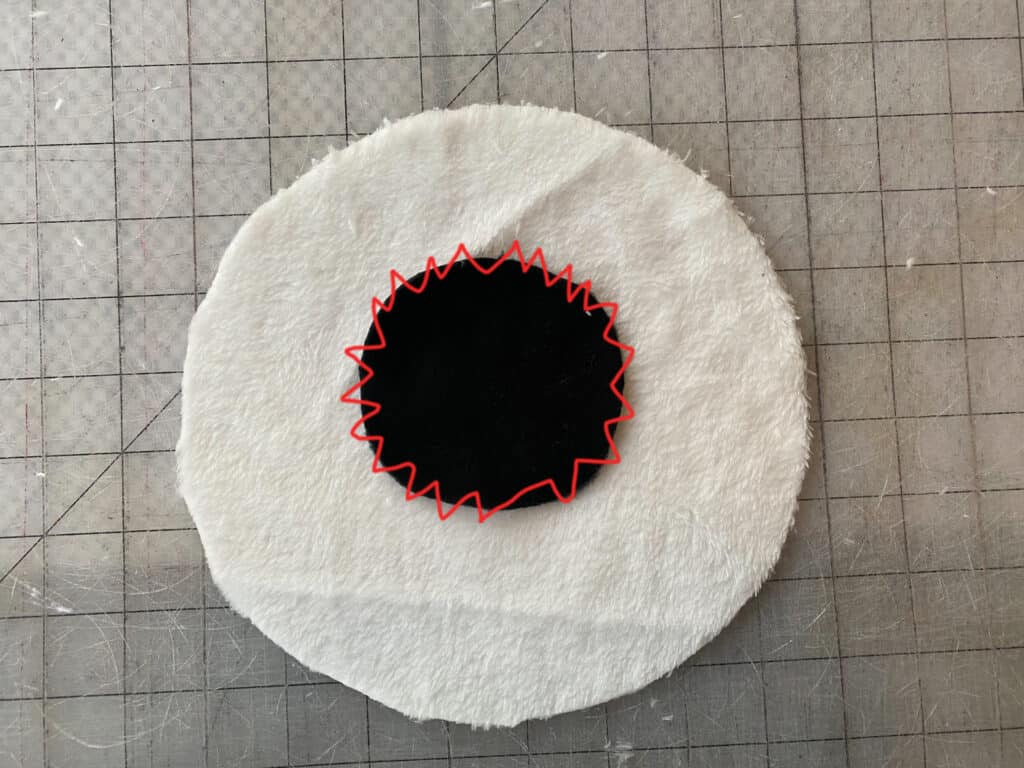
On main snout piece, center the nose piece and attach using your favorite applique stitch.
Note: If nose fabric is woven / can fray, be sure to use an interfacing before fixing it to the snout to avoid future issues with fraying.
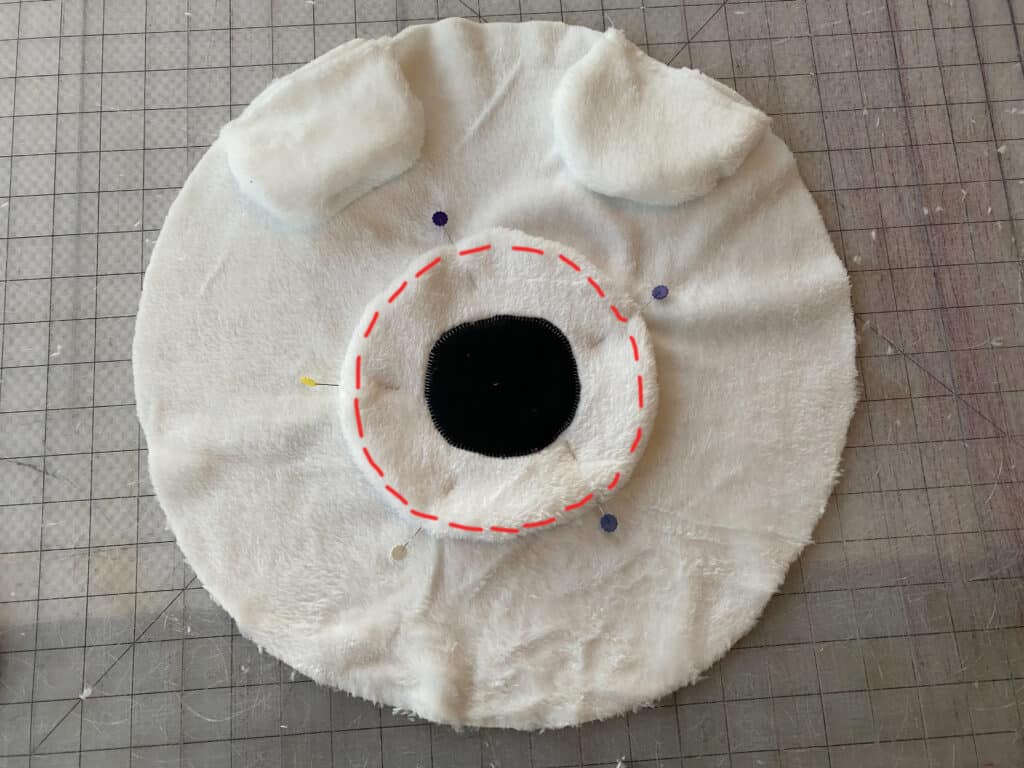
With main snout facing up, place lining fabric on top, right sides together.
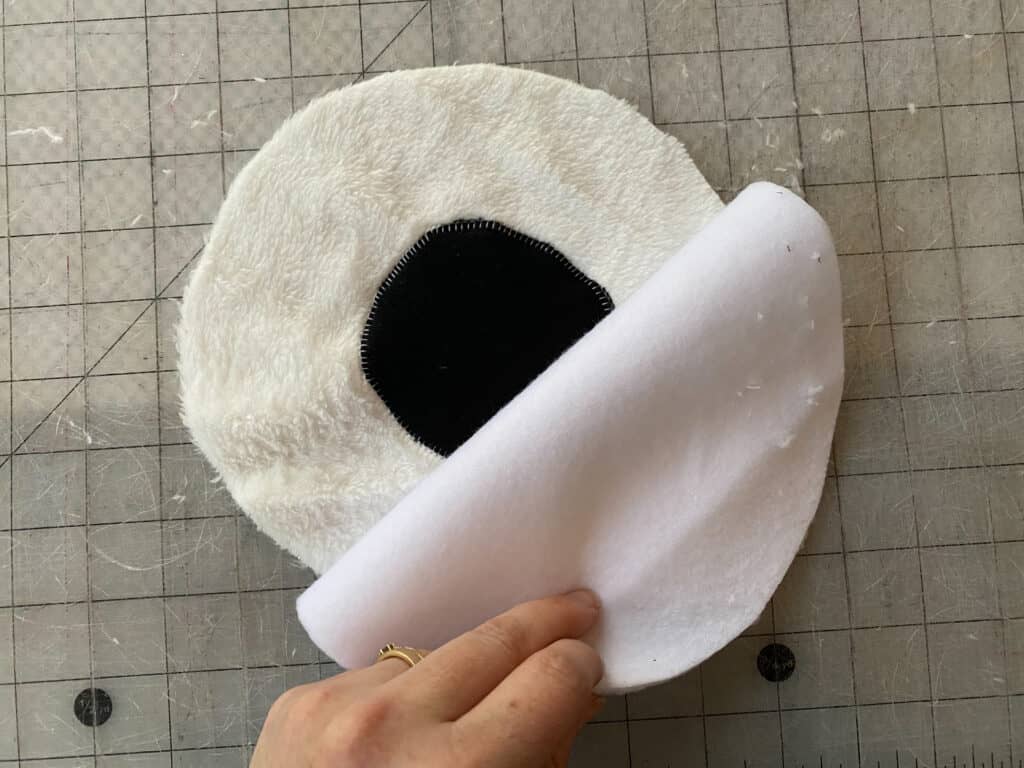
Sew around entire outer edge, using 1/2″ seam allowance.
Clip curved edges, using pinking shears / “v” pattern to help with a smoother turned edge.
Careful not to cut through the main fabric, clip a hole through the middle of your lining fabric piece.
Turn the snout right sides out, through the hole you just cut.
Press out all of your seams.
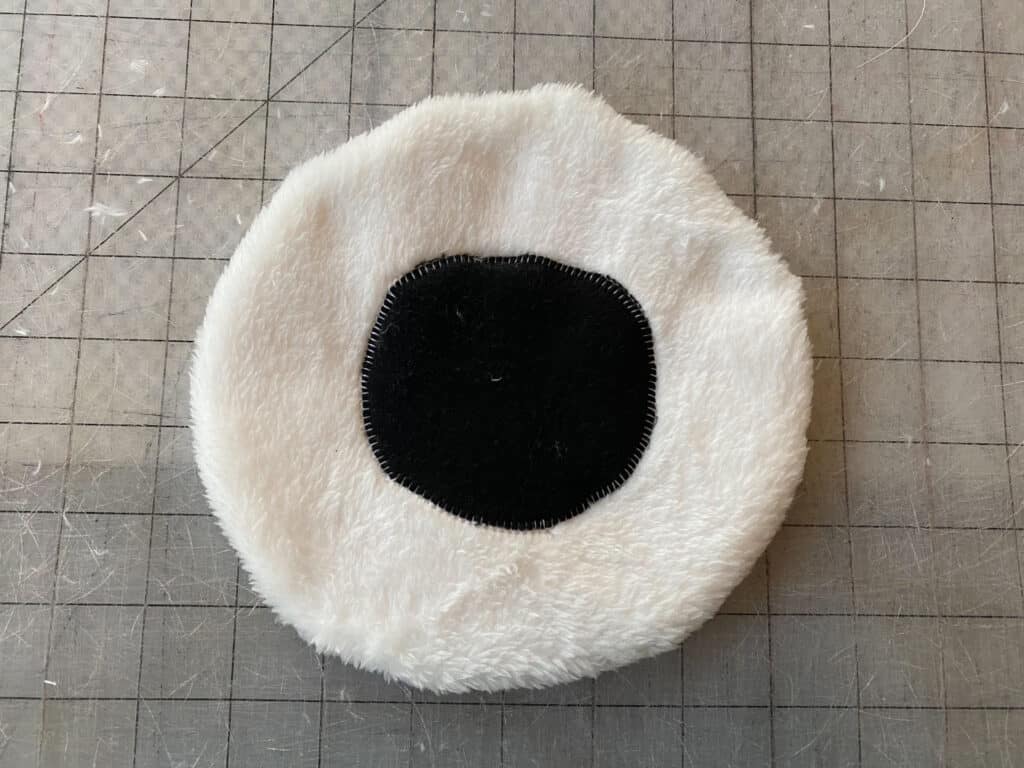
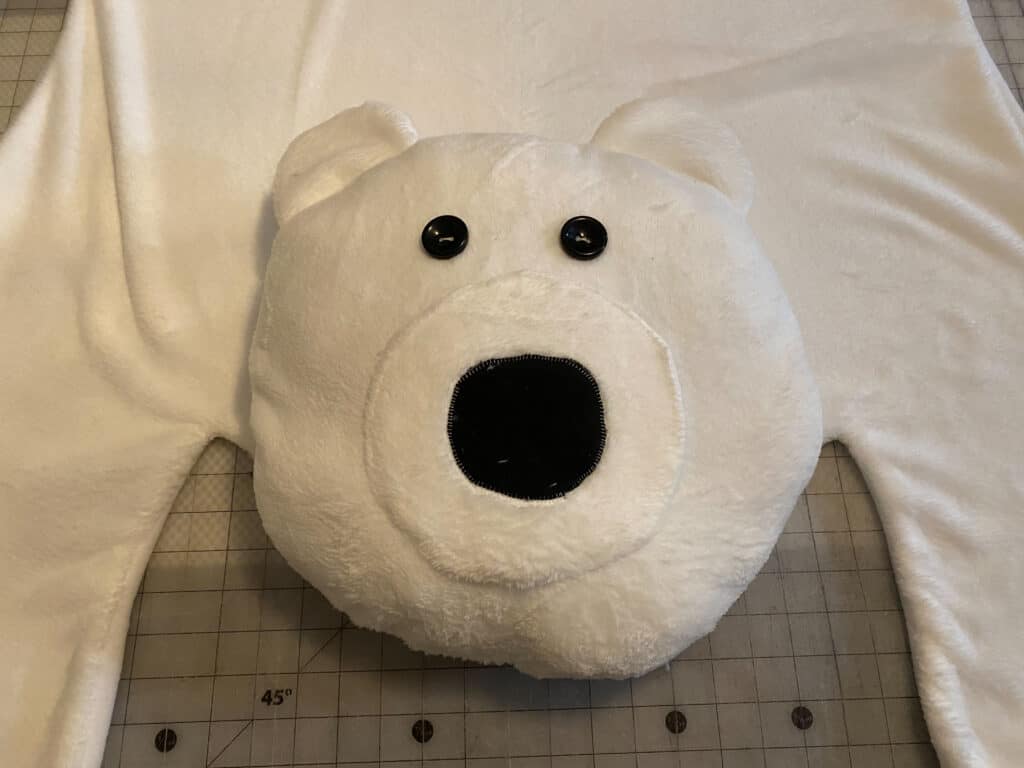
Place the snout piece, centered on the main head piece. Edge or applique stitch snout to attach it.
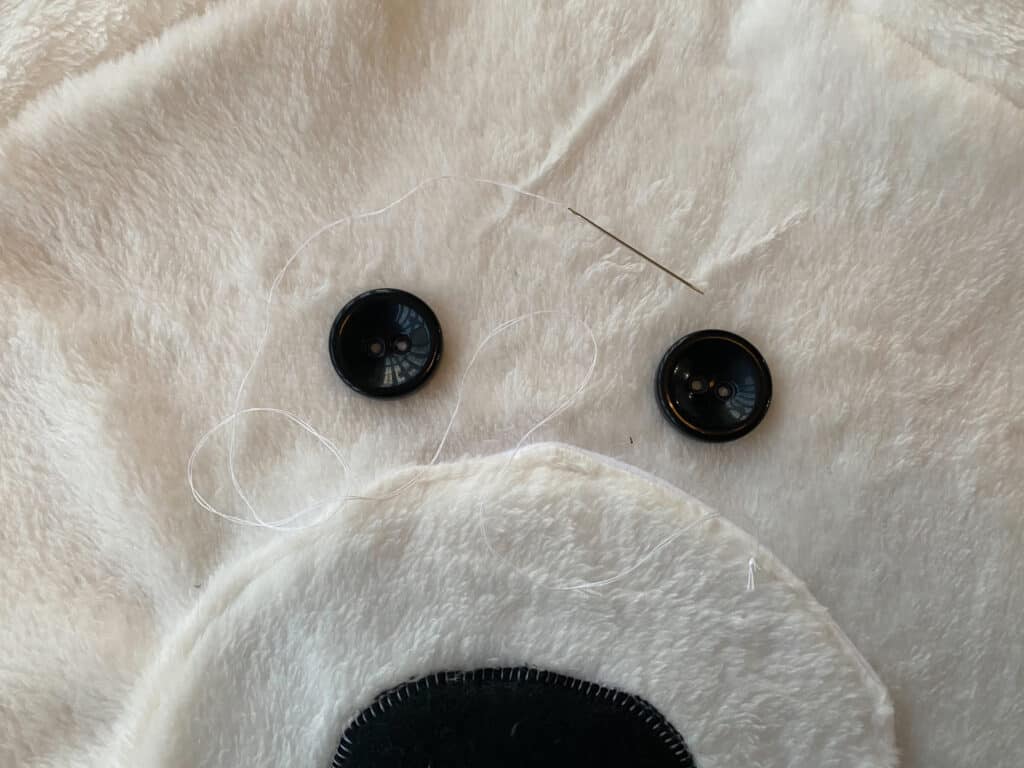
Add your eyes.
**I used these large buttons and hand stitched them on. You can also choose to embroider this detail, or add fleece circles. Whatever your preference is!
Your bear’s face should be nearly complete!
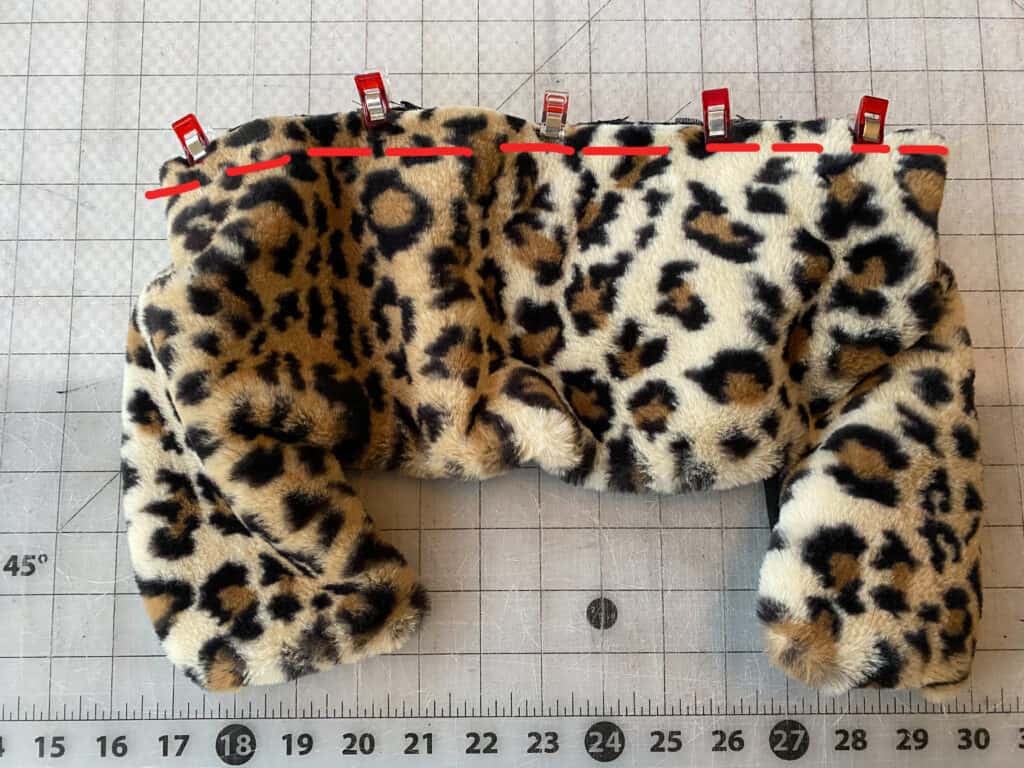
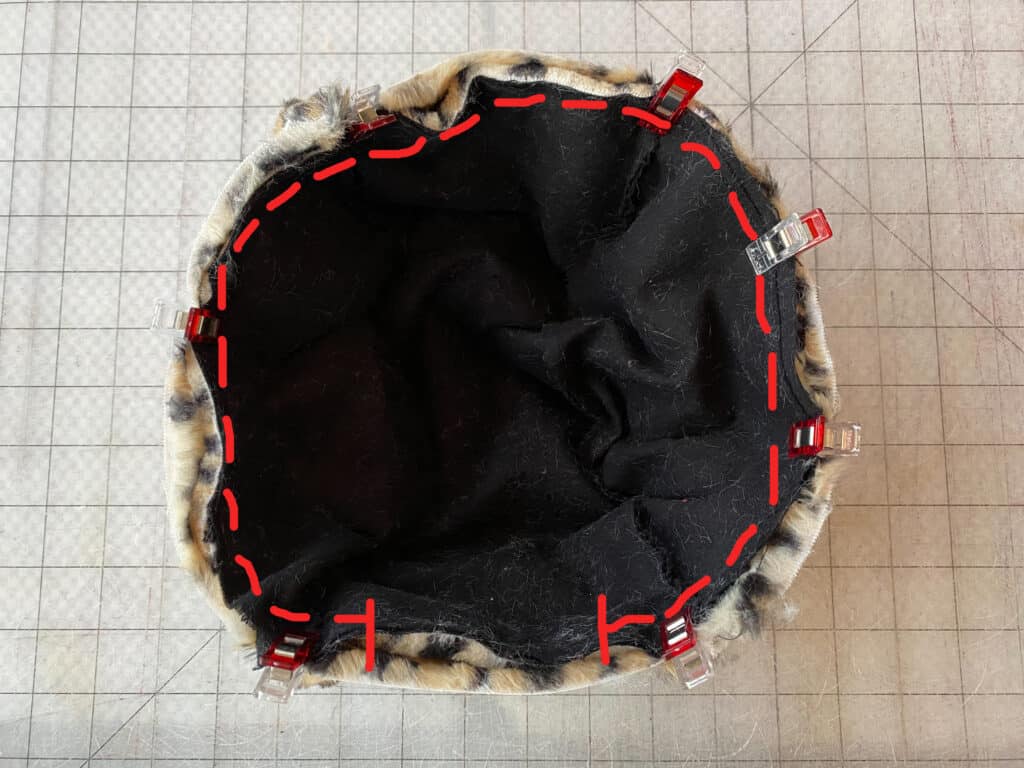
With the head right side up, place the lining fabric on top, right sides together.
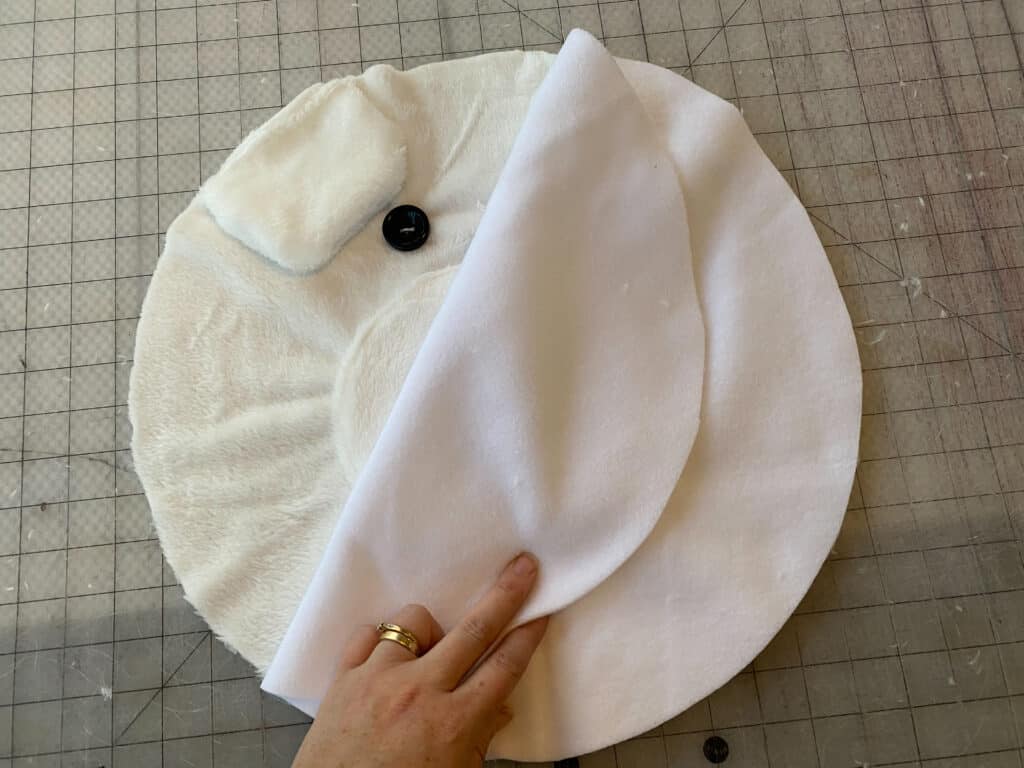
Using 1/2″ seam allowance, sew around the outer curved edge, leaving about 5″ open at the bottom for turning.
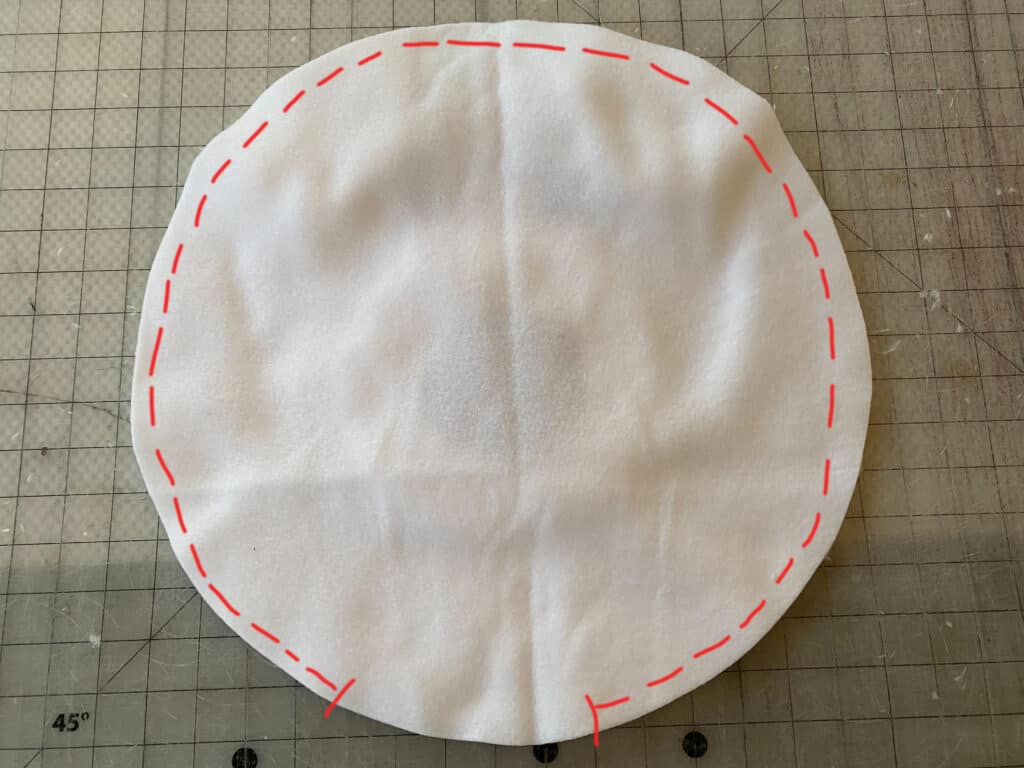
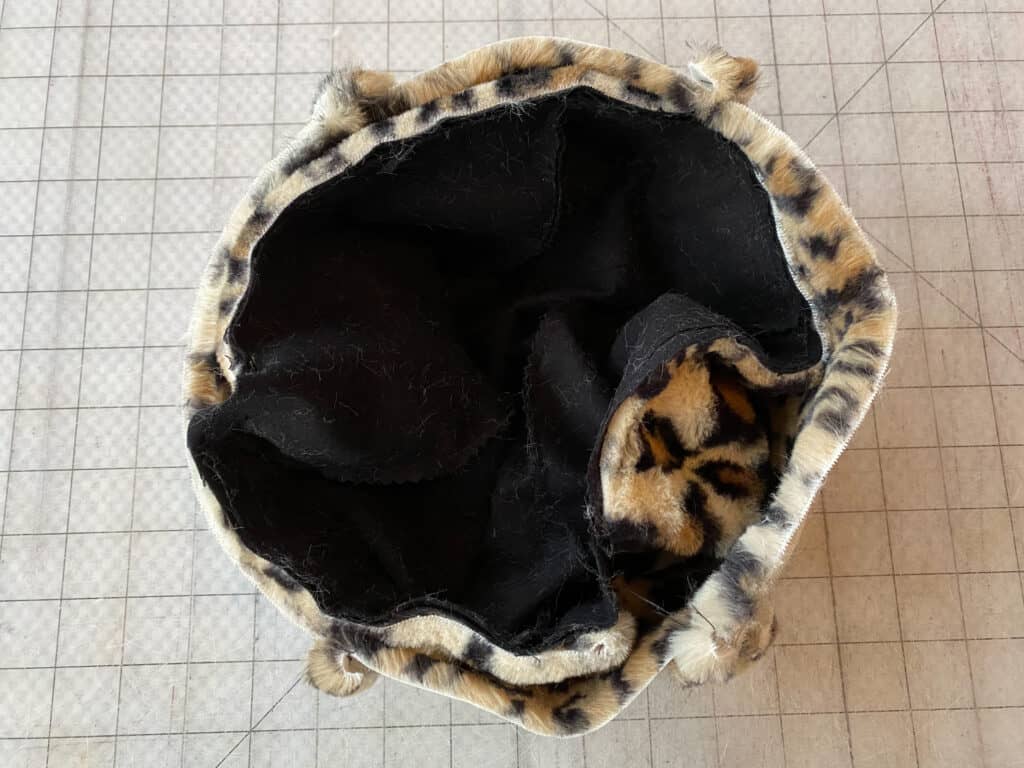
Turn the head right sides out, through the opening.
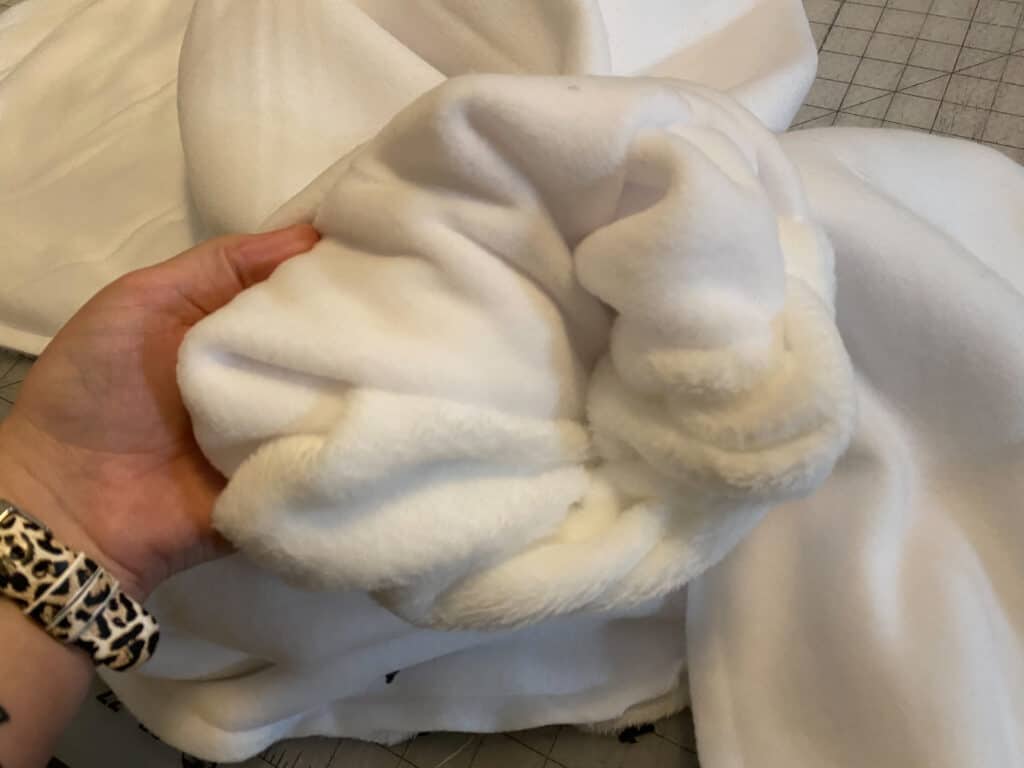
Being sure not to overstuff the head, fill it with fiberfill.

Using a blind stitch, close the opening on the head piece.
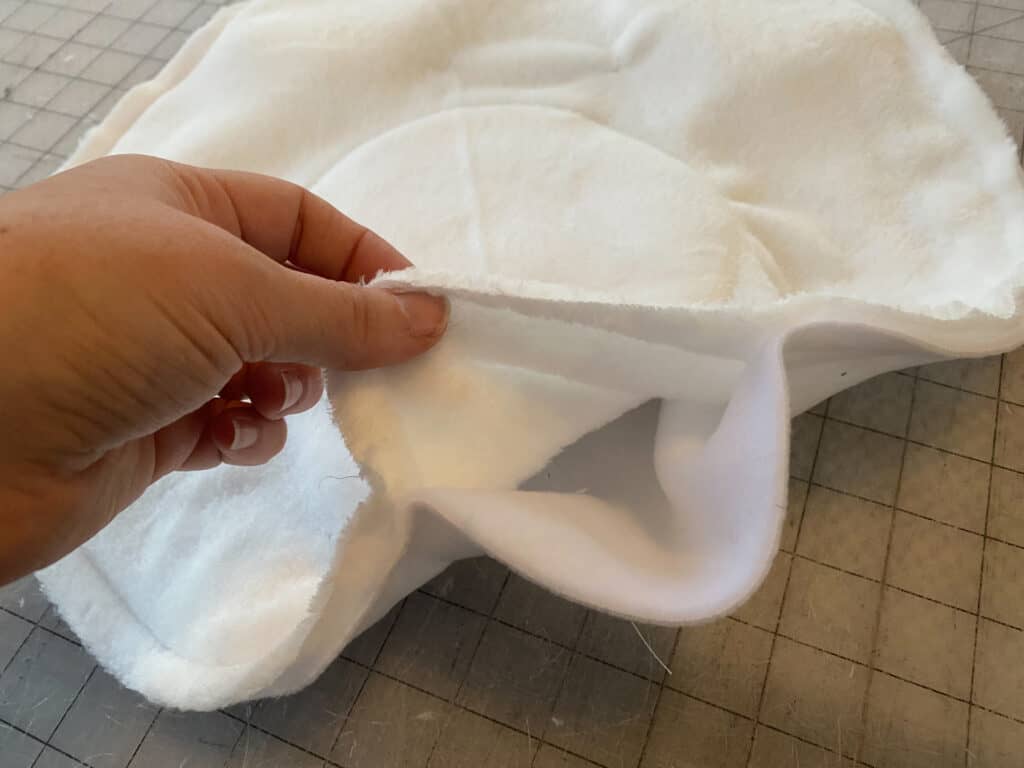
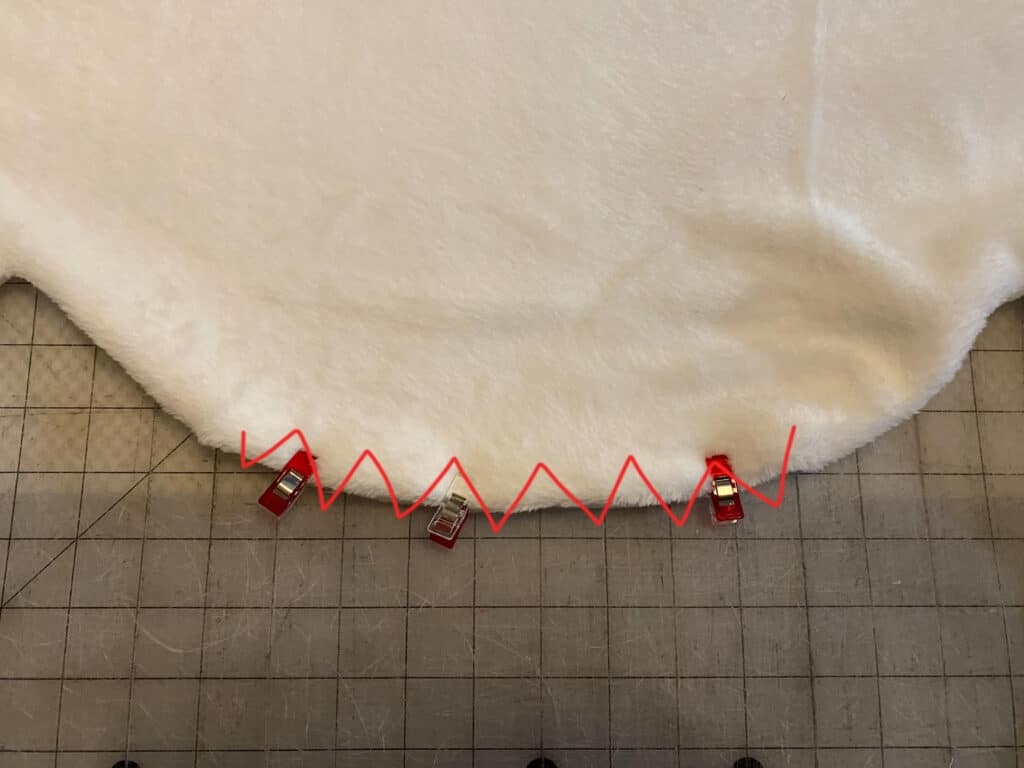
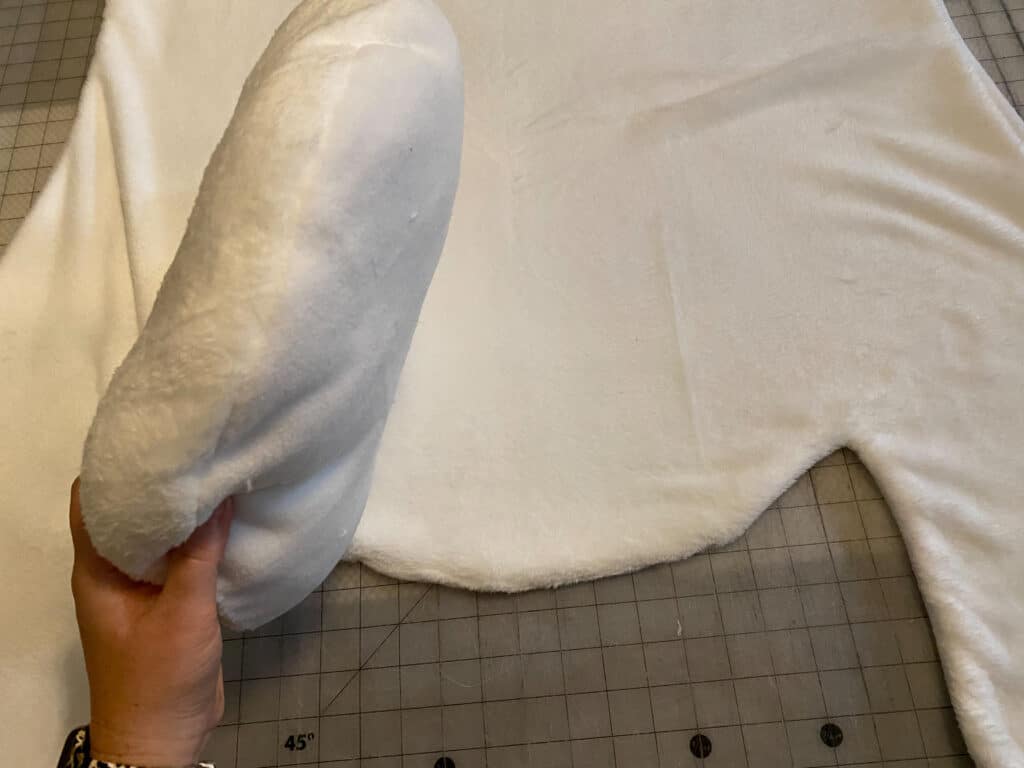
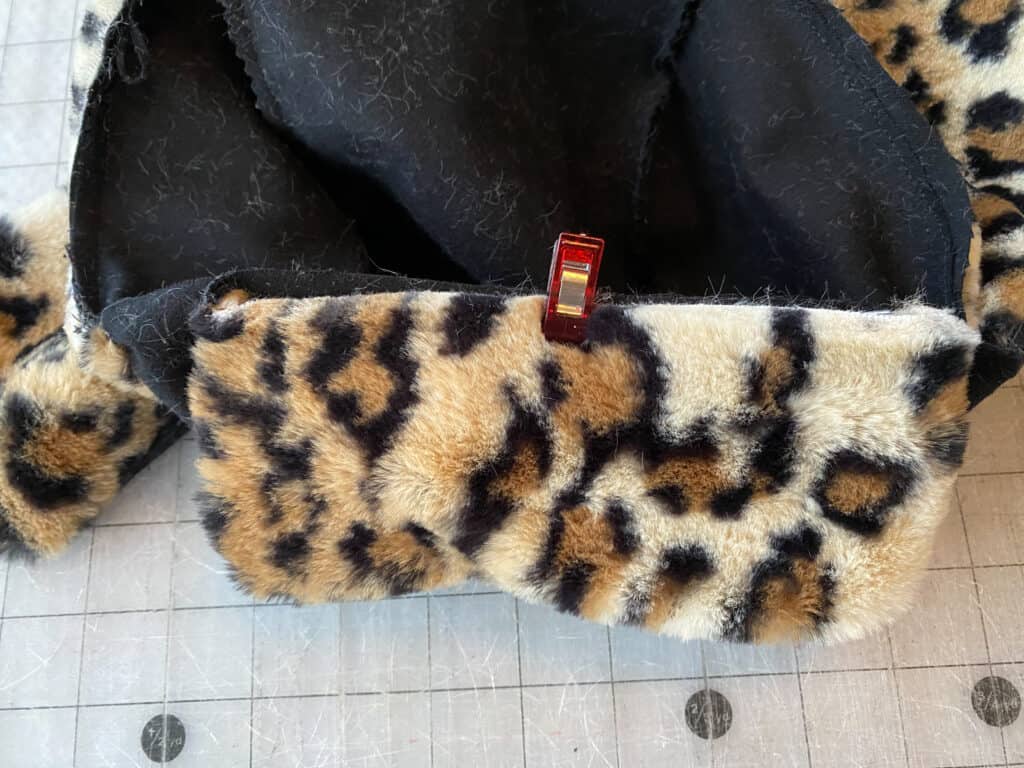
With the body pieces right sides together, sew around entire outer edge, leaving a 5″ opening for turning.
Clip all of your extra seam allowance for easier turning.
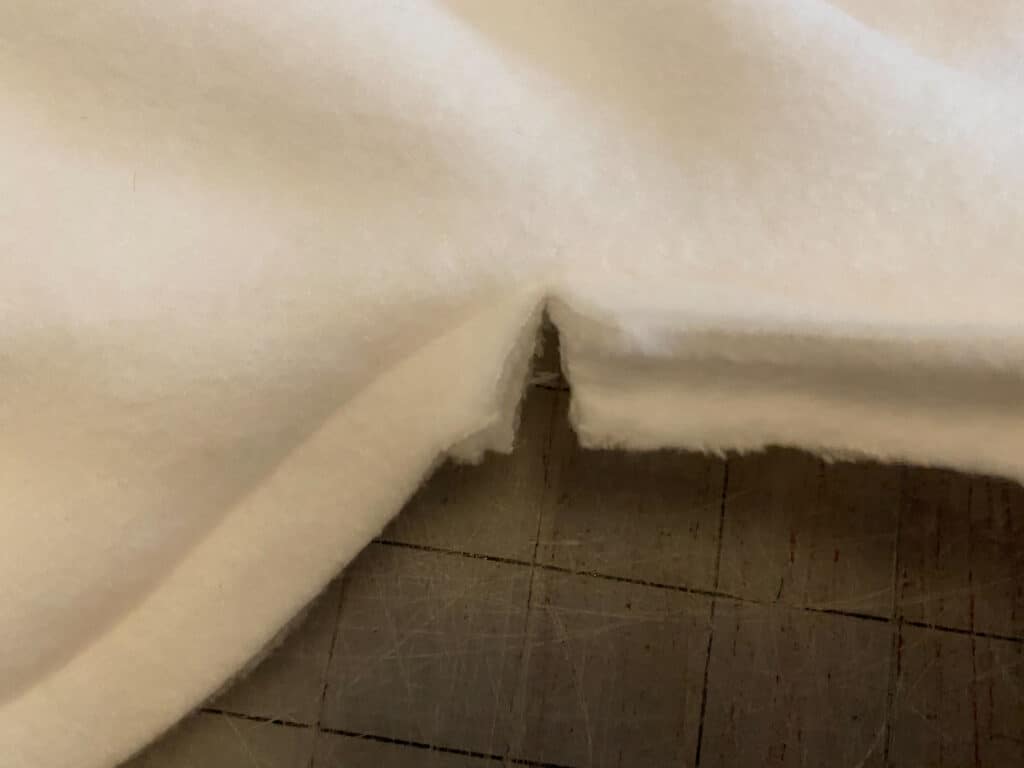
Turn through the opening.
Tuck your seam allowances into the opening and blind stitch closed.
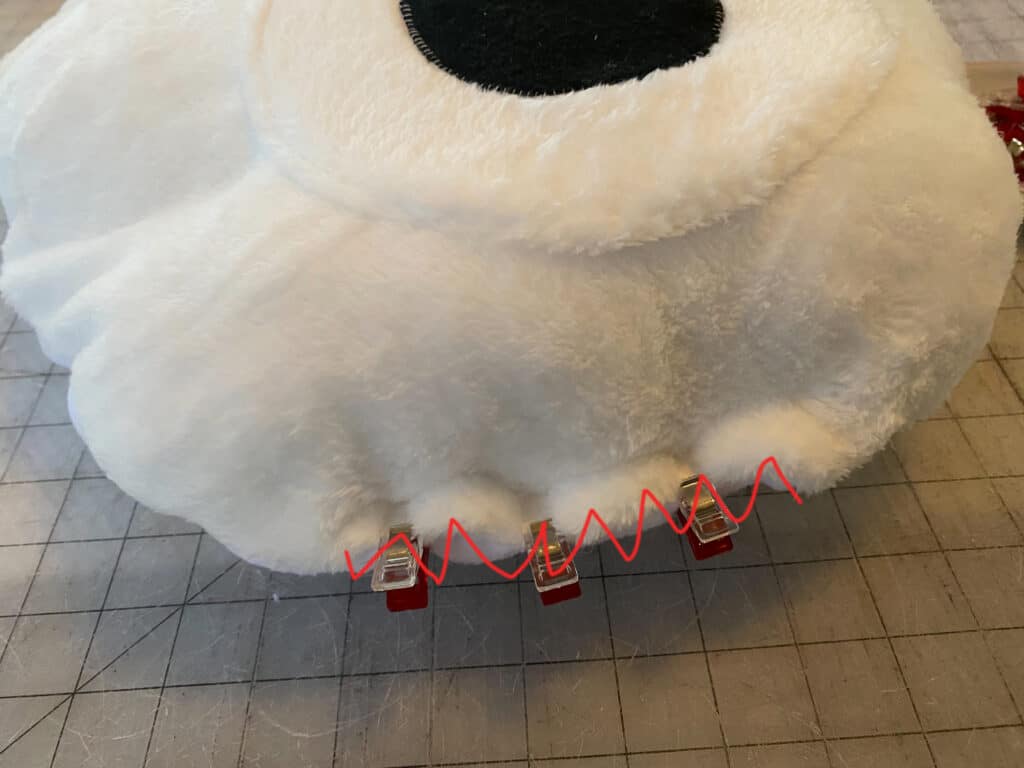
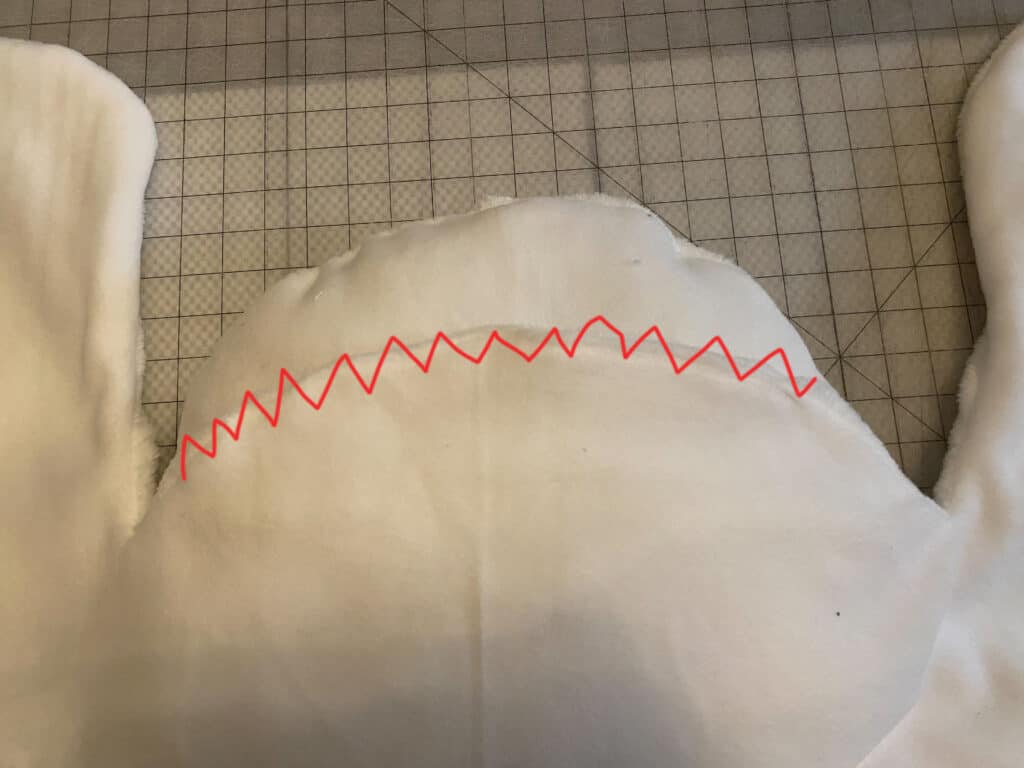
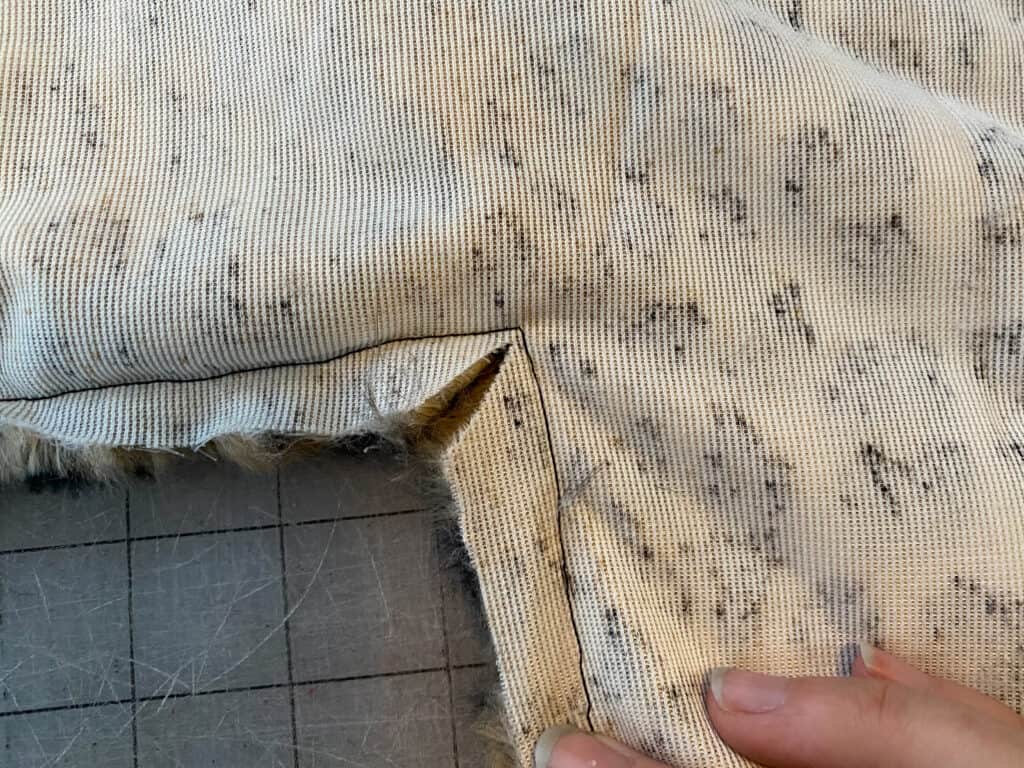
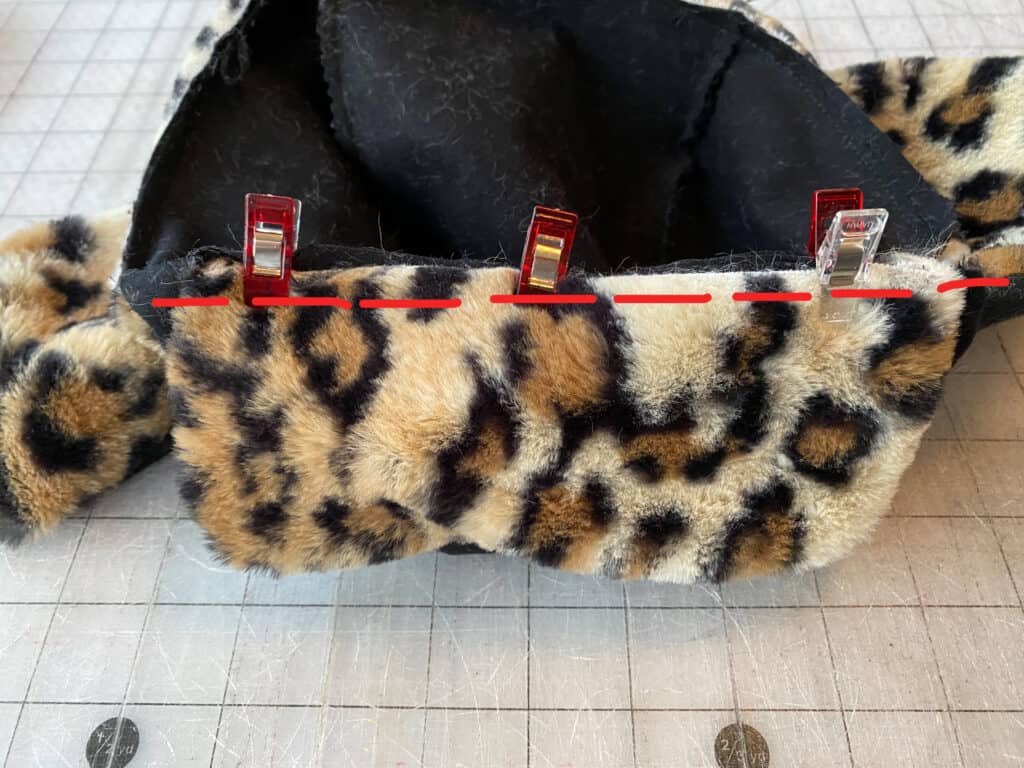
Align the head between the front legs.
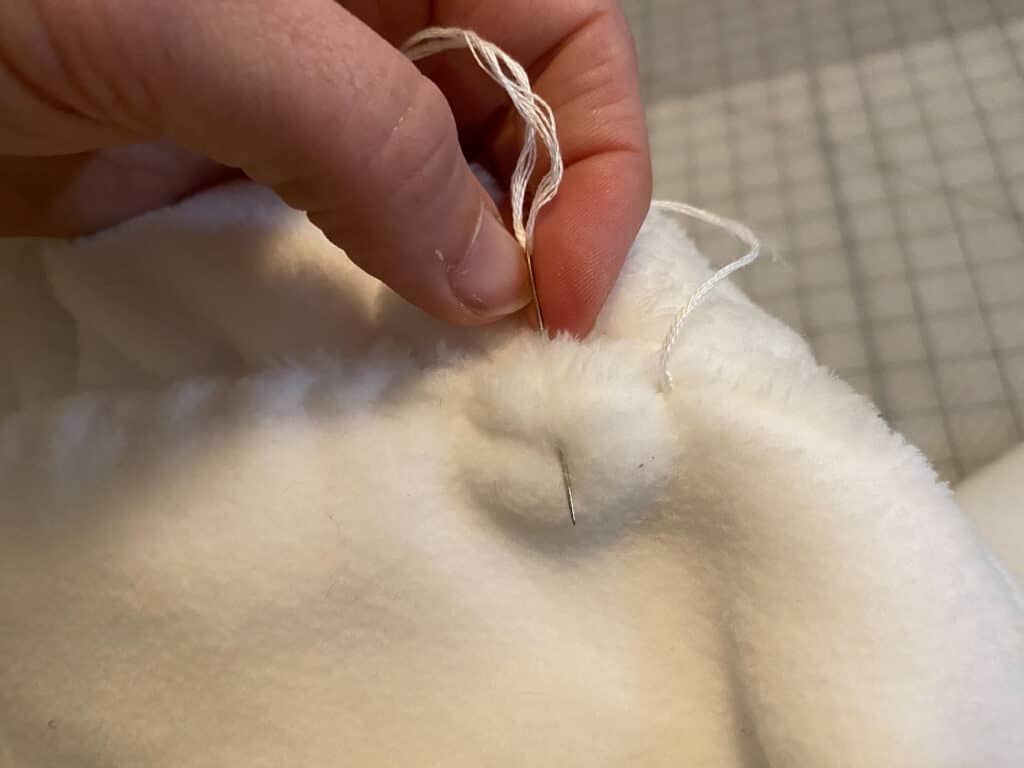
Hold head in place and flip both the body and head over. By hand, use a whip stitch to secure the head to the body piece.
I like to use a wider-eyed needle, with embroidery floss, for some extra hold.
You’re finished!
Check out what our fabulous testers were able to create with this very same tutorial!


I la-la-love when you share your photos with me! Head over to the Patterns for Pirates Facebook Group and show us what you’ve made!
Happy Holidays, Pirates!

2020 Holiday Freebies :: Braided Infinity Scarf Tutorial
Happy Holidays, Pirate Friends! We are excitedly back for another year and another round of holiday freebies to share with you! Over the years, we’ve compiled different tutorials and patterns that we think would make *perfect* gifts for your friends and family. Curious about what we’ve already released in the way of holiday freebies? Head right here to see all of them: Holiday Freebies Roundup.
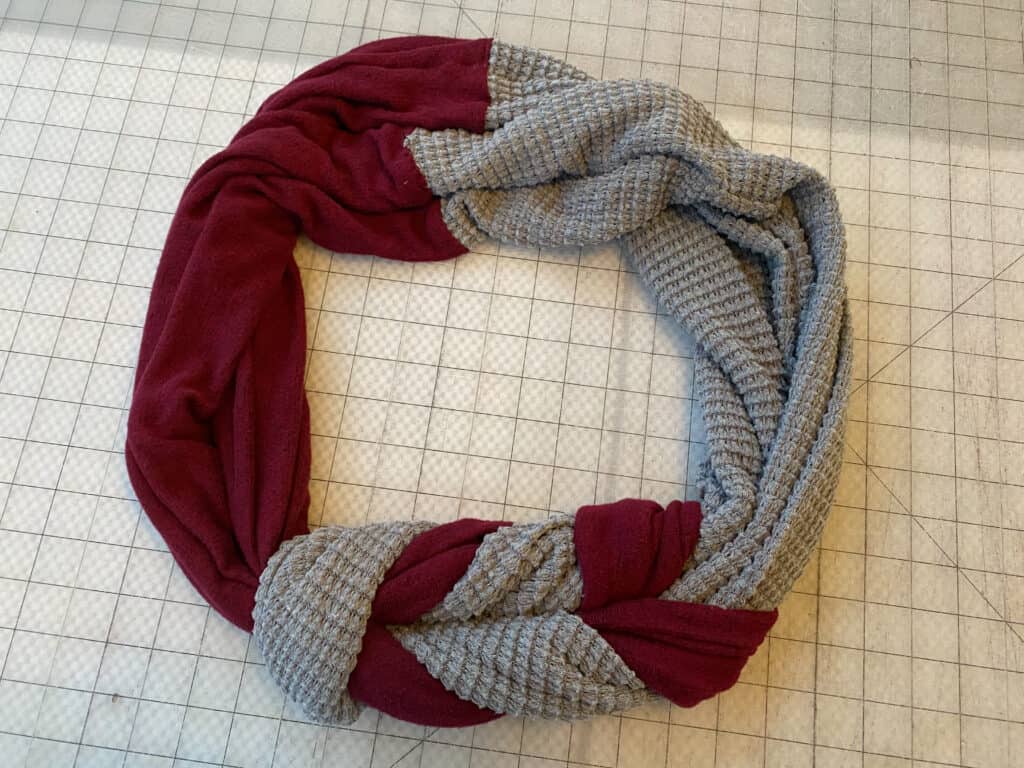
Today, we are bringing you the: Braided Infinity Scarf!!
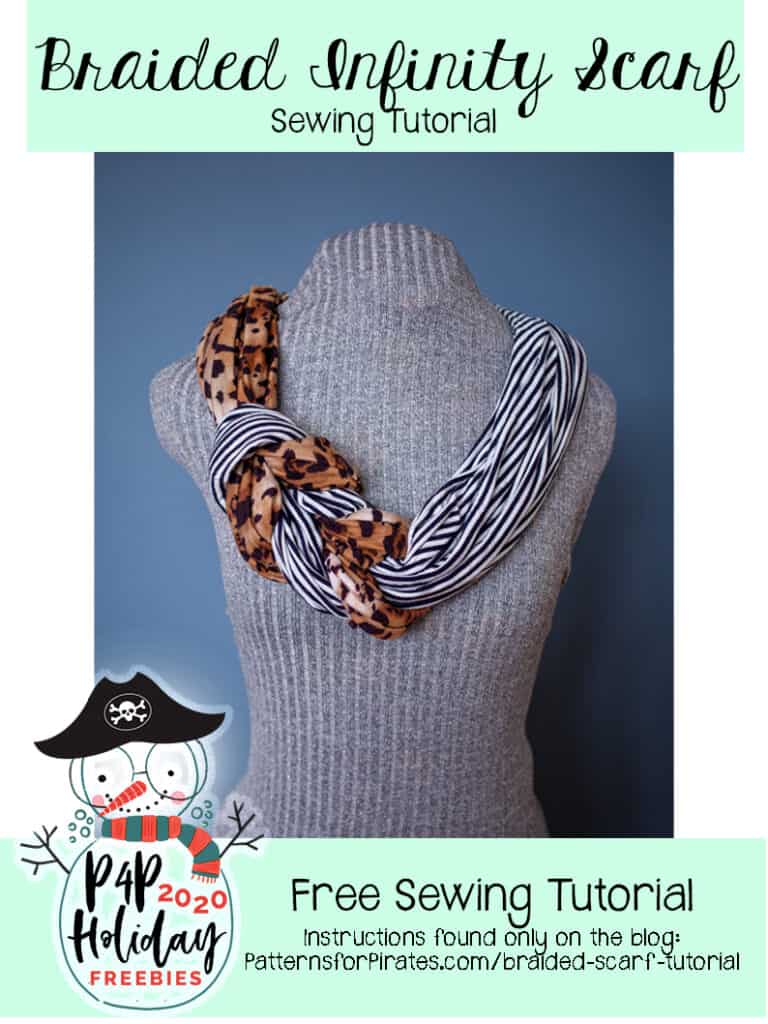
If you were looking for a quick gift to give someone, look no further. Because this “braided” infinity scarf just might do the trick! I don’t want to toot my own horn just yet, but I think you might love this even more than the Hidden Pocket Infinity Scarf from a couple of years ago. We will see, won’t we? 😉
Supplies Needed:
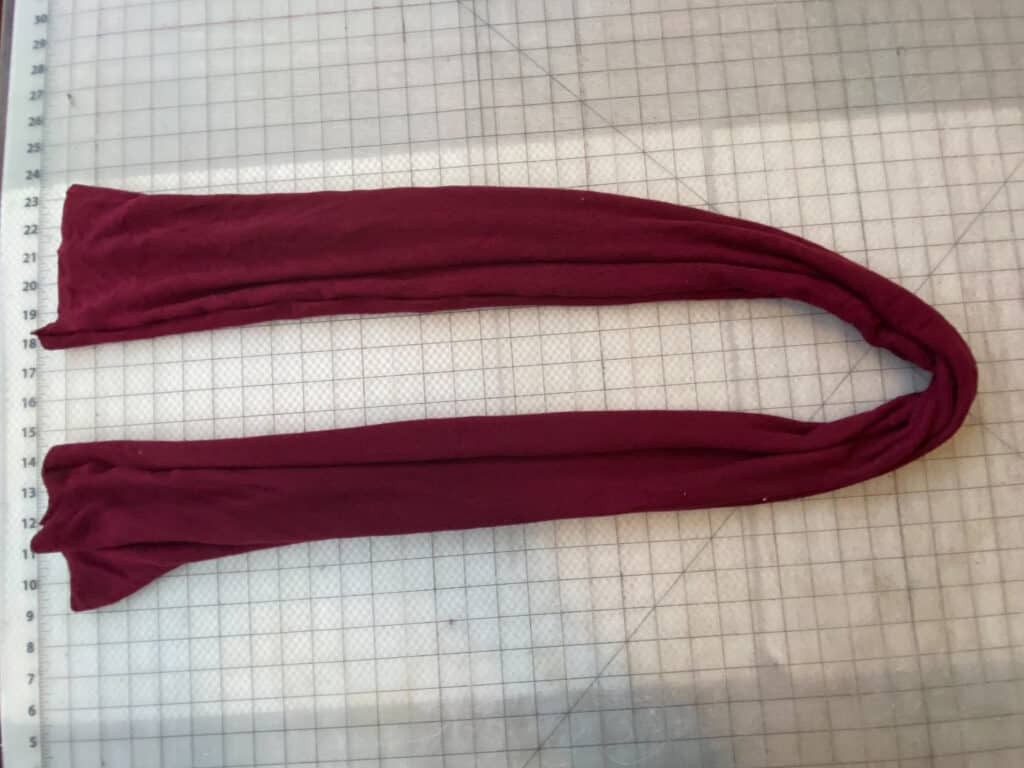
- Two (2) 18″ L x 54″ or (width of fabric) W pieces of knit fabric
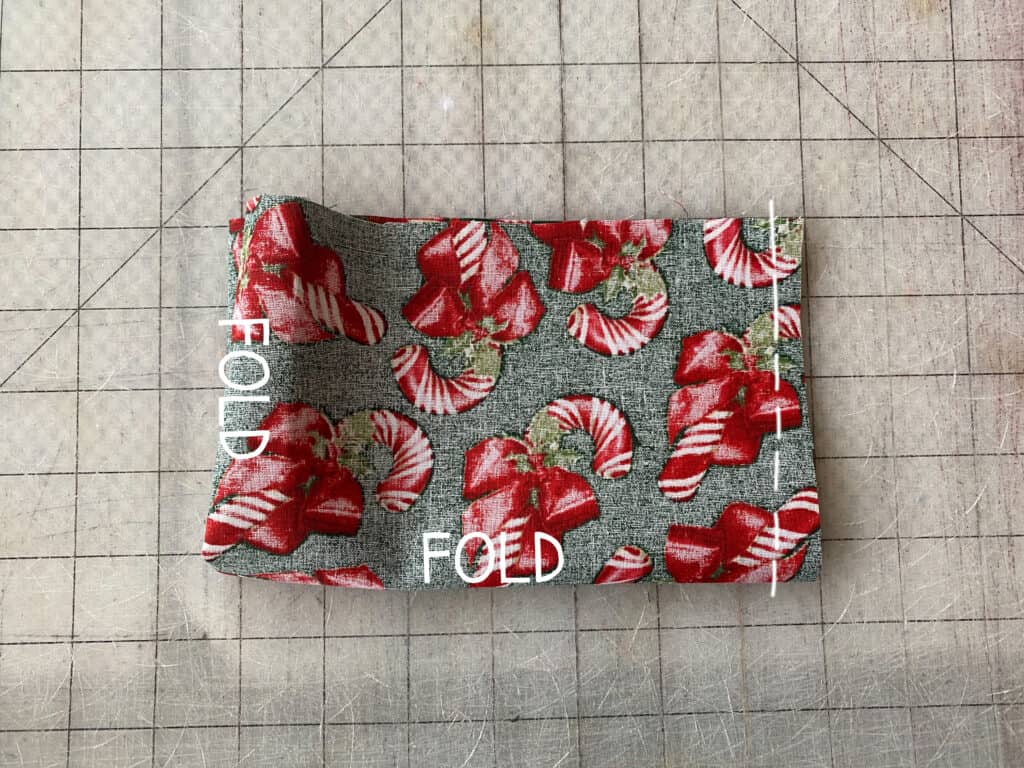
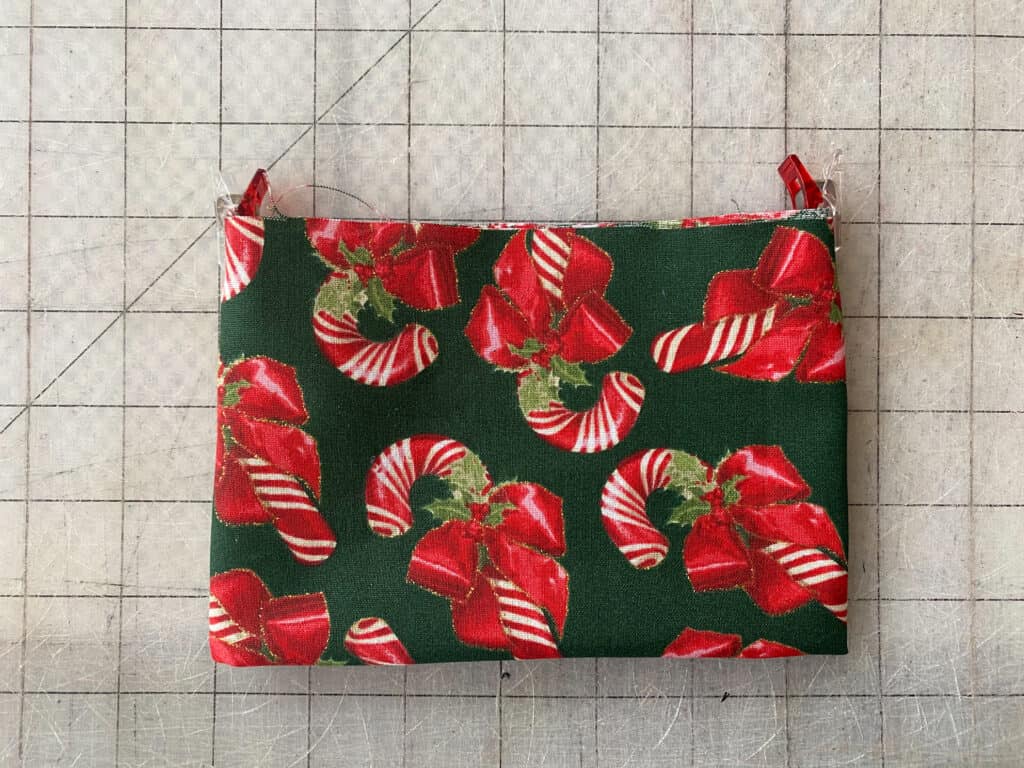
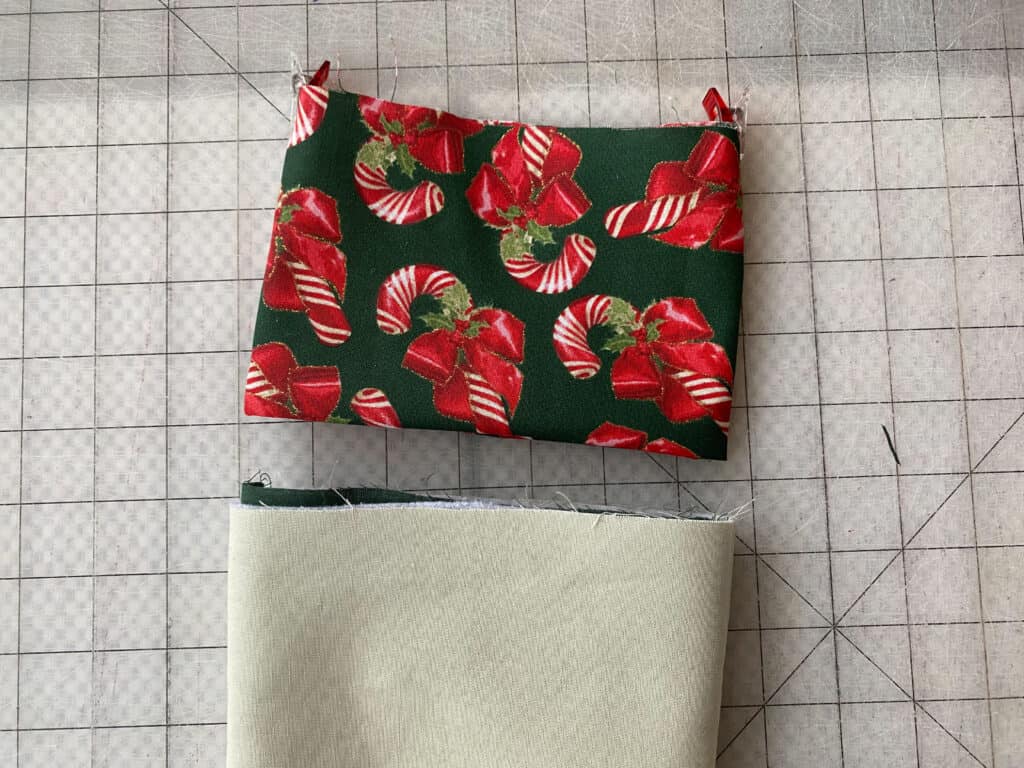
Lay one piece with right side facing upward, and fold in half meeting the long edges together, right sides together.
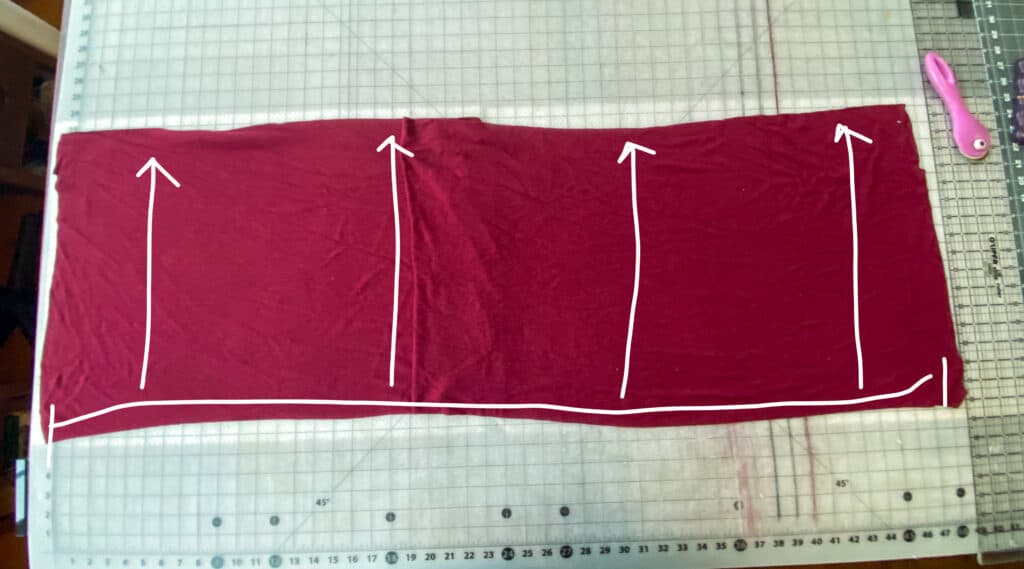
Sew along long, raw edge, using 1/2″ seam allowance.
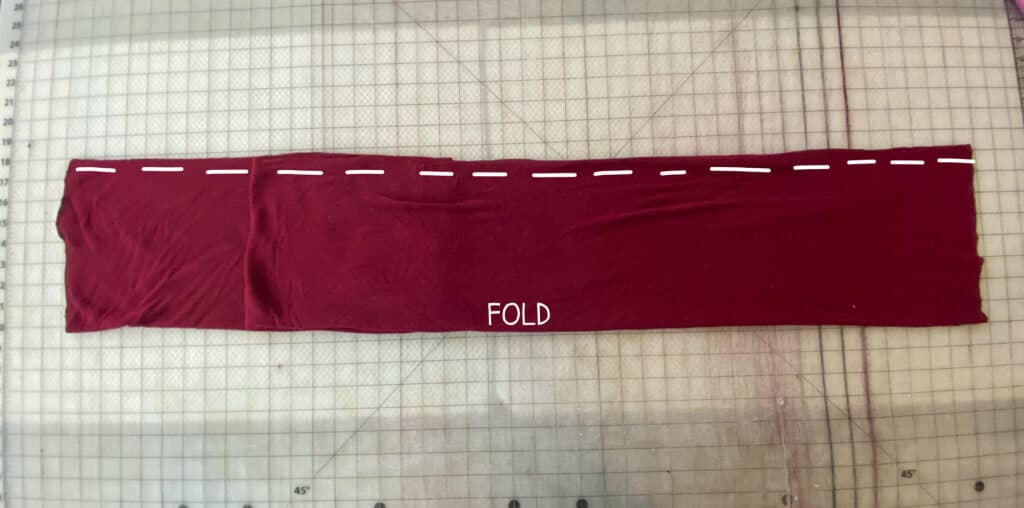
Turn piece right side out.
Repeat with second fabric piece.

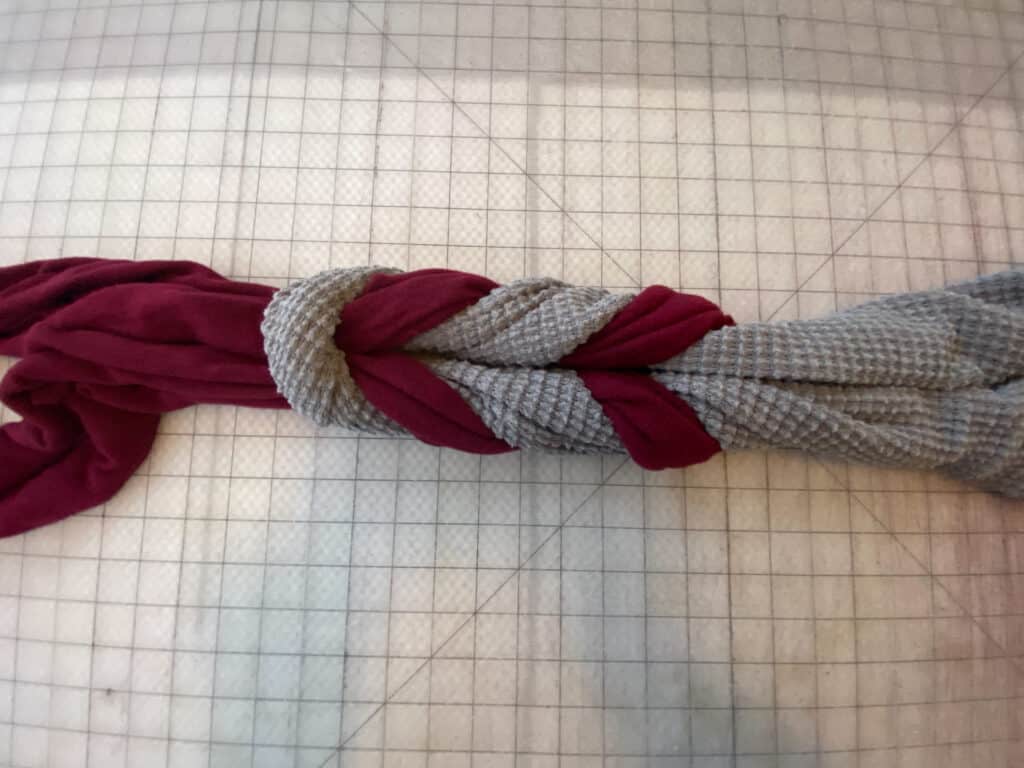
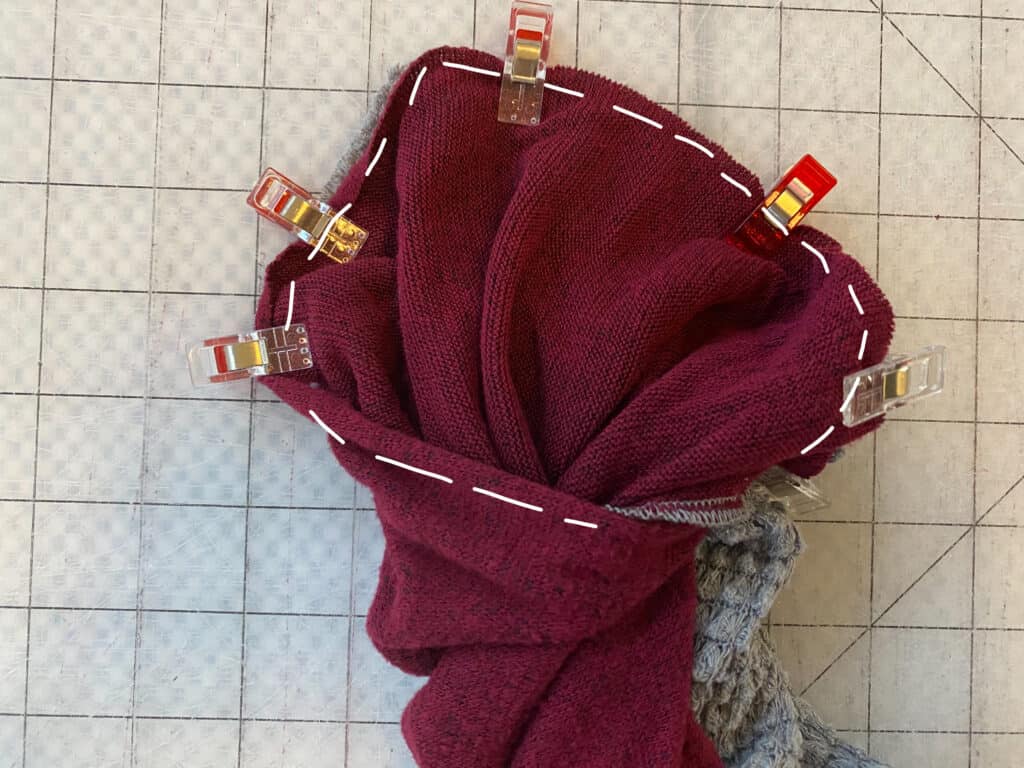
Lay one tube of fabric in half, in a “u”-shape
Lay second tube of fabric on top, in a similar “u”-shape.

Reach your hand over the top fabric loop, and through the bottom fabric loop.
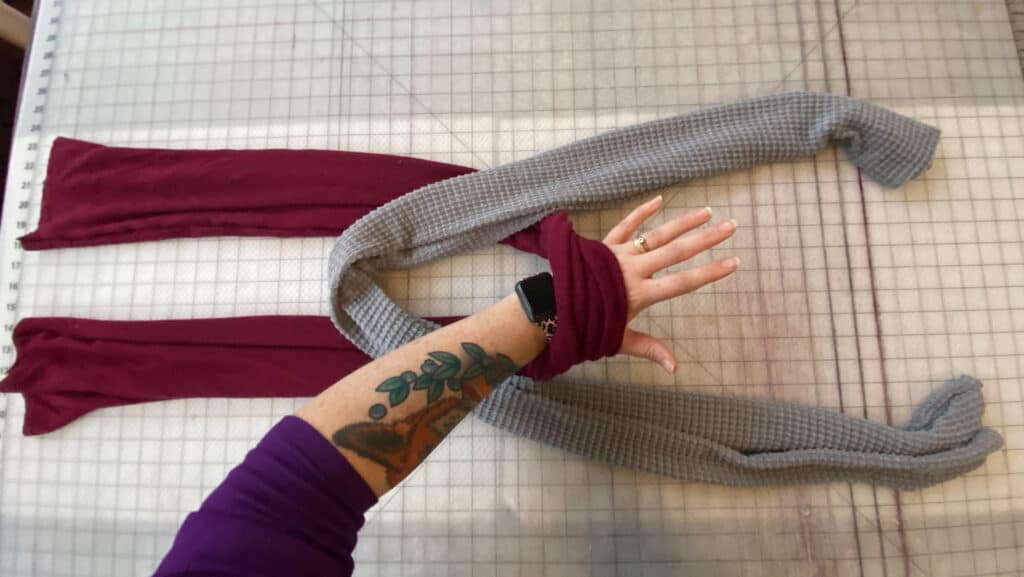
Gather both ends of the top fabric with your hand.
Pull the ends through the bottom loop.
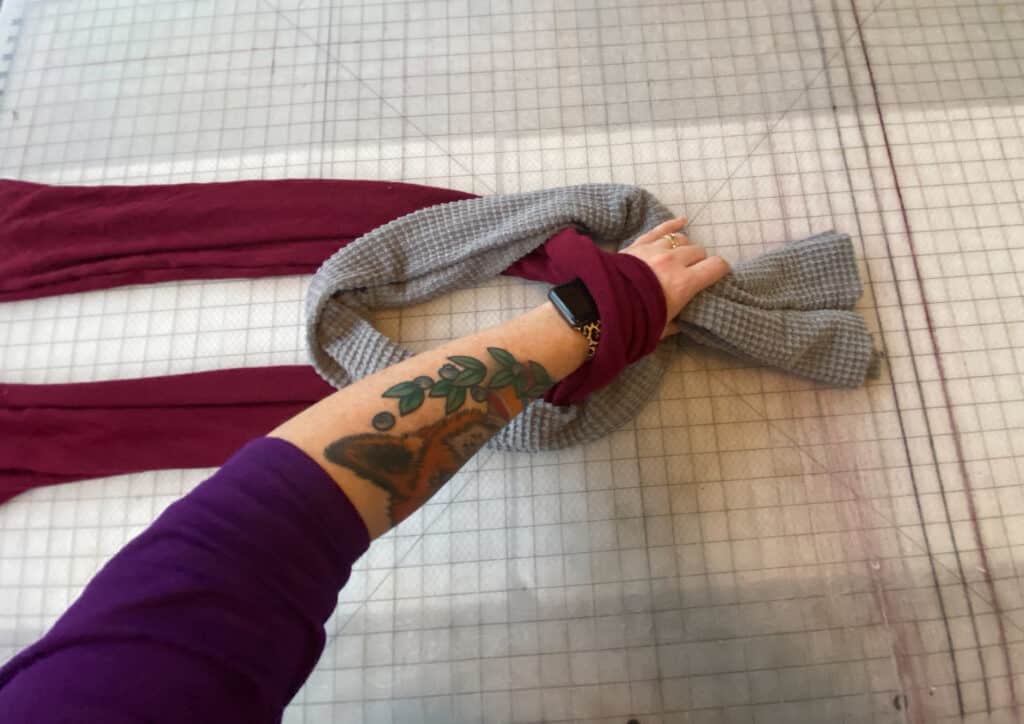
Separate the top fabric ends.
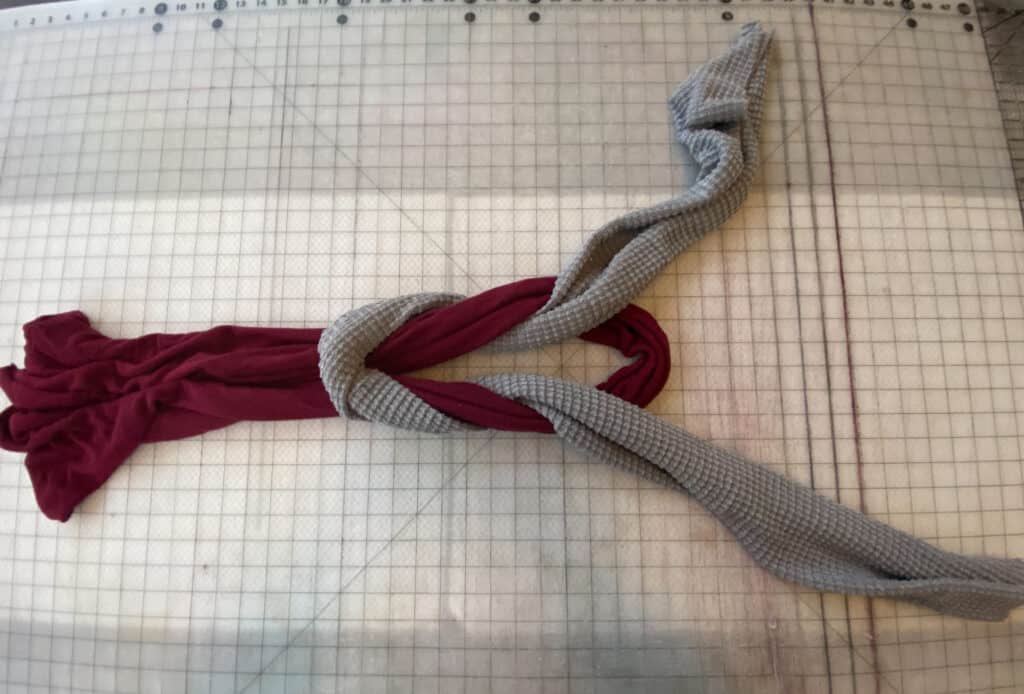
Put your hand through the bottom loop and grab the end furthest from you.
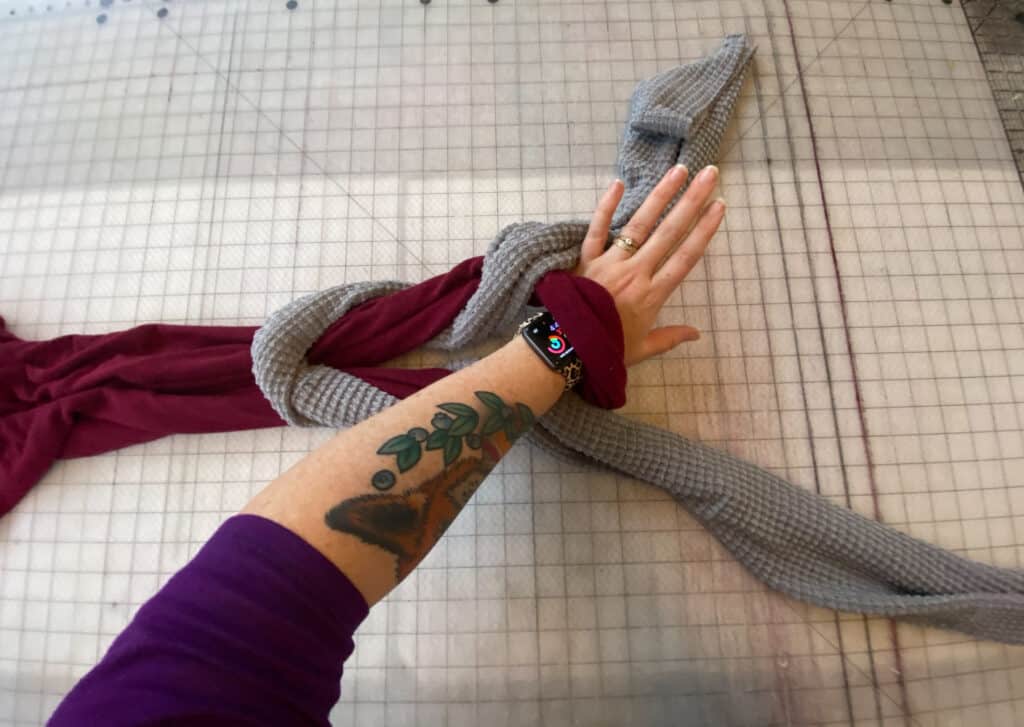
Pull end through the loop.
Put your hand through the bottom loop and now grab the end closest to you.

Pull end through the loop.
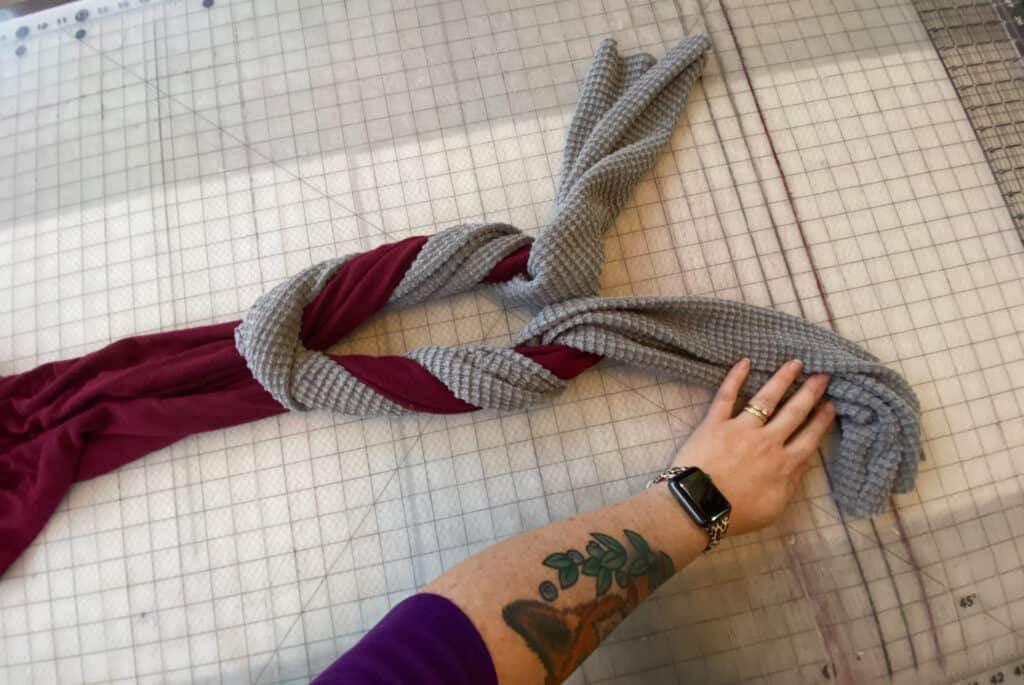
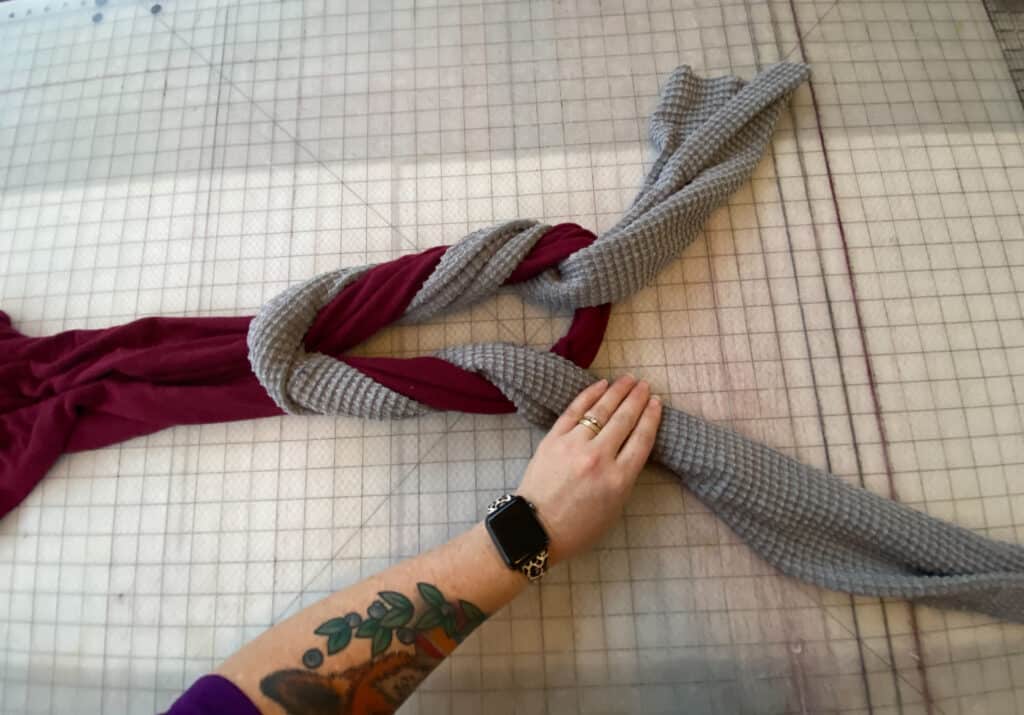
Adjust the “braids” to your liking.
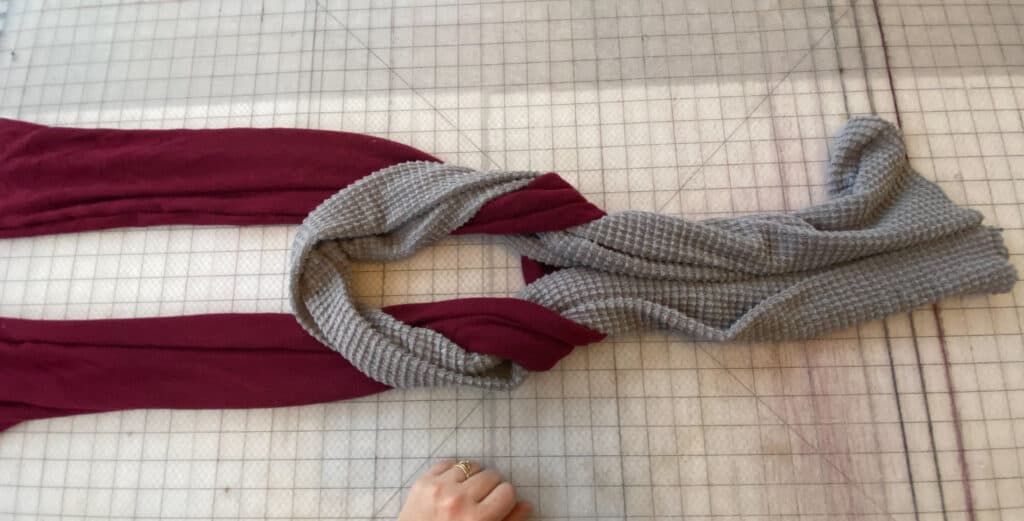
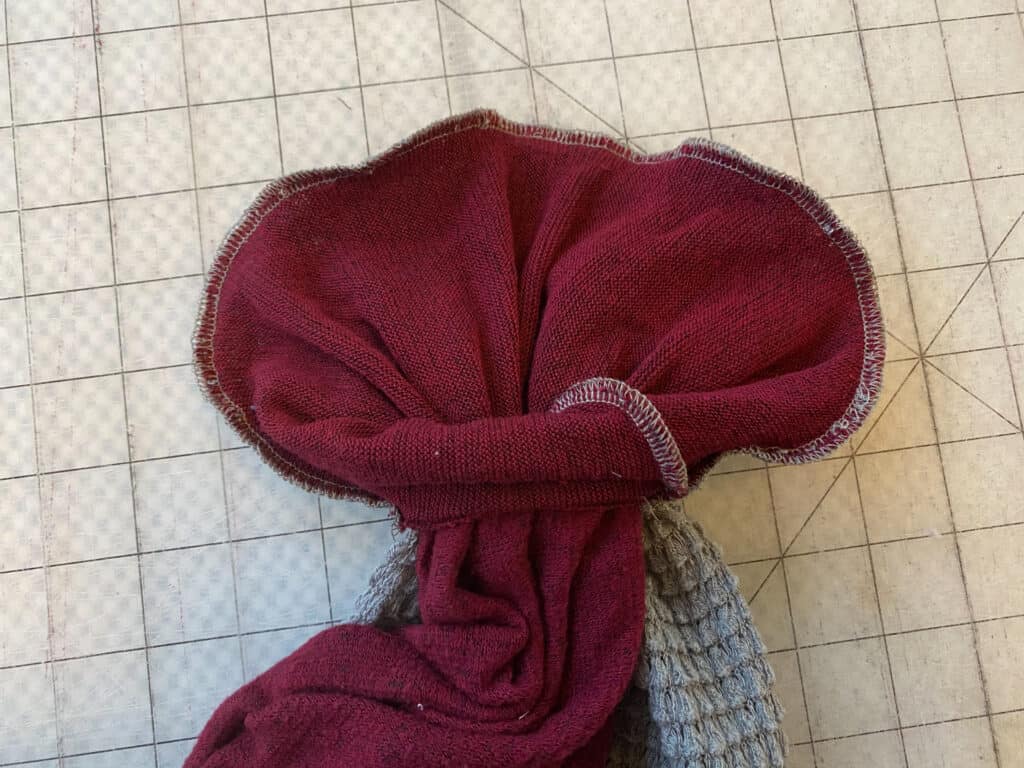
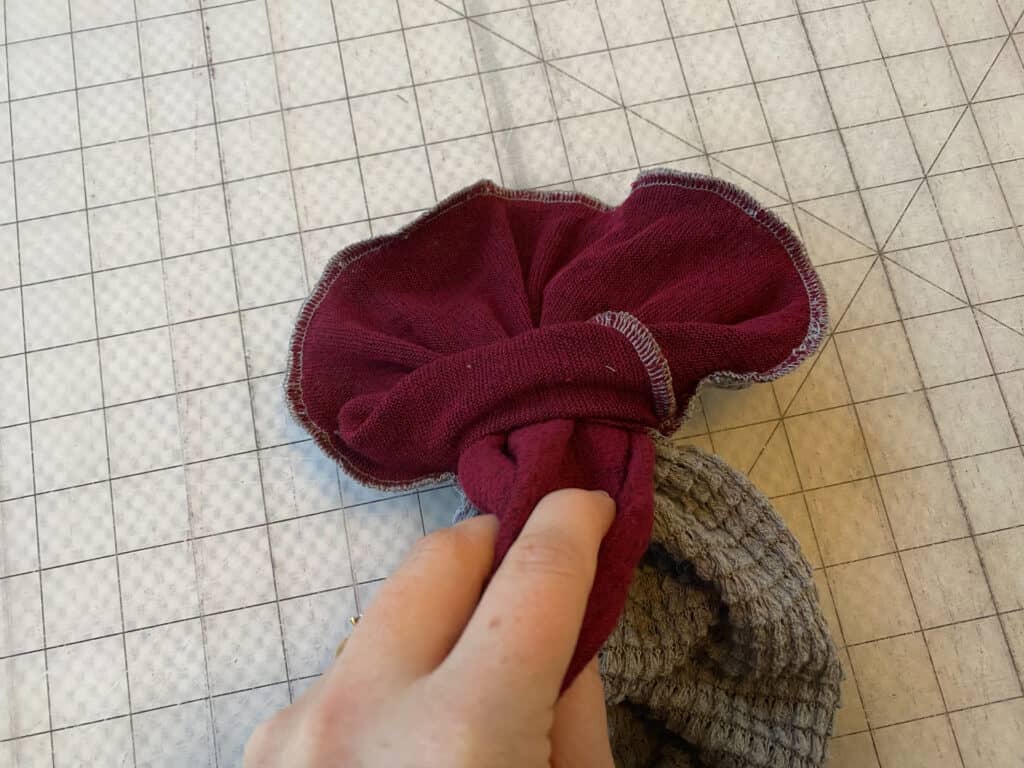
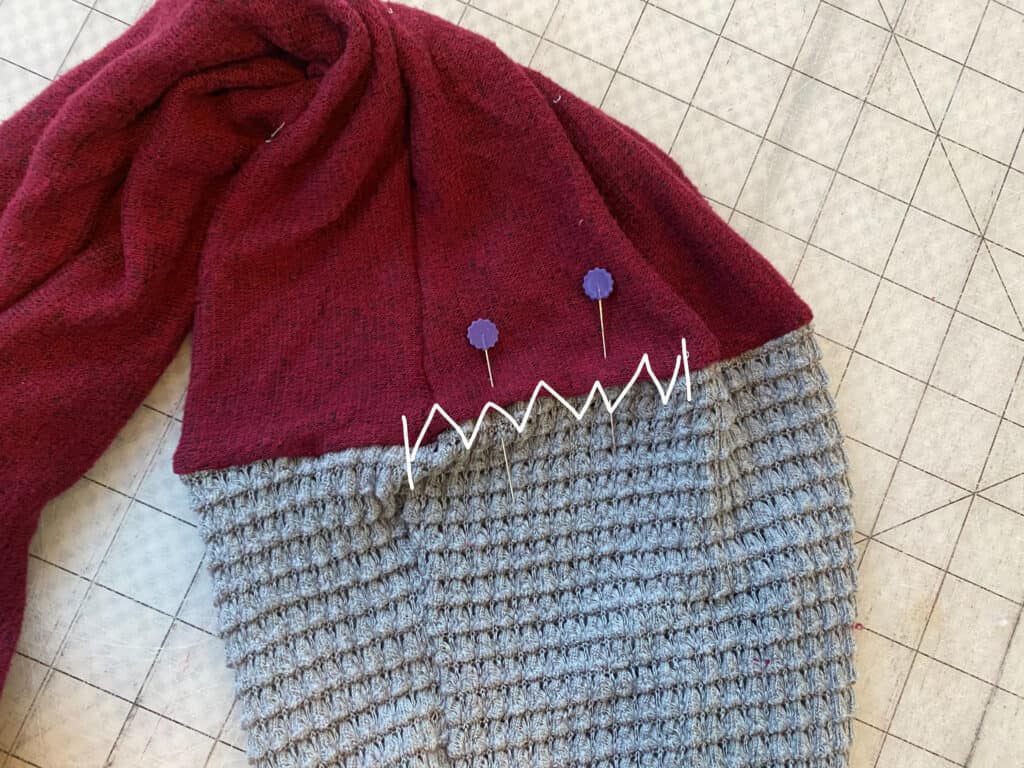
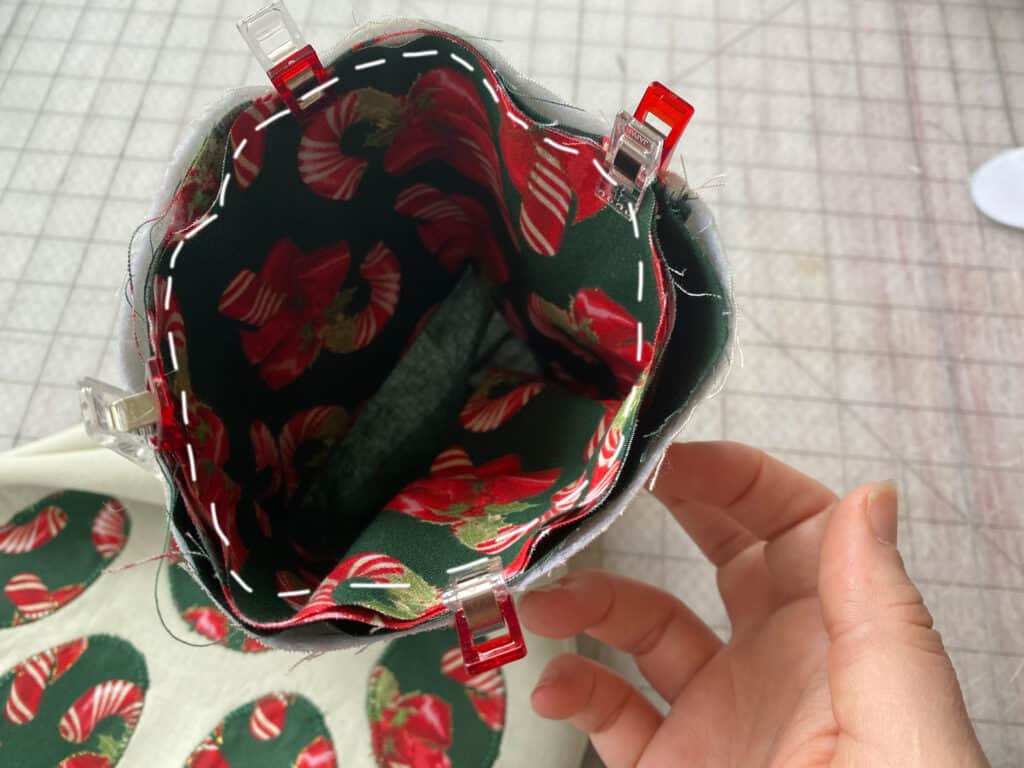
Open up the ends and match the opposite sides to one another.
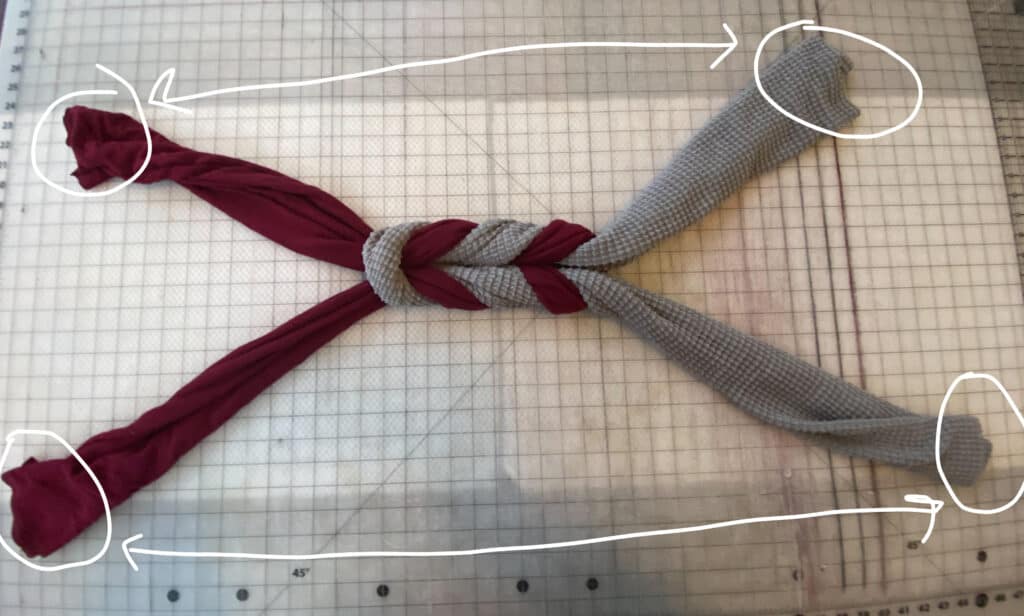
With right sides together, match up the two seams along the raw edges.
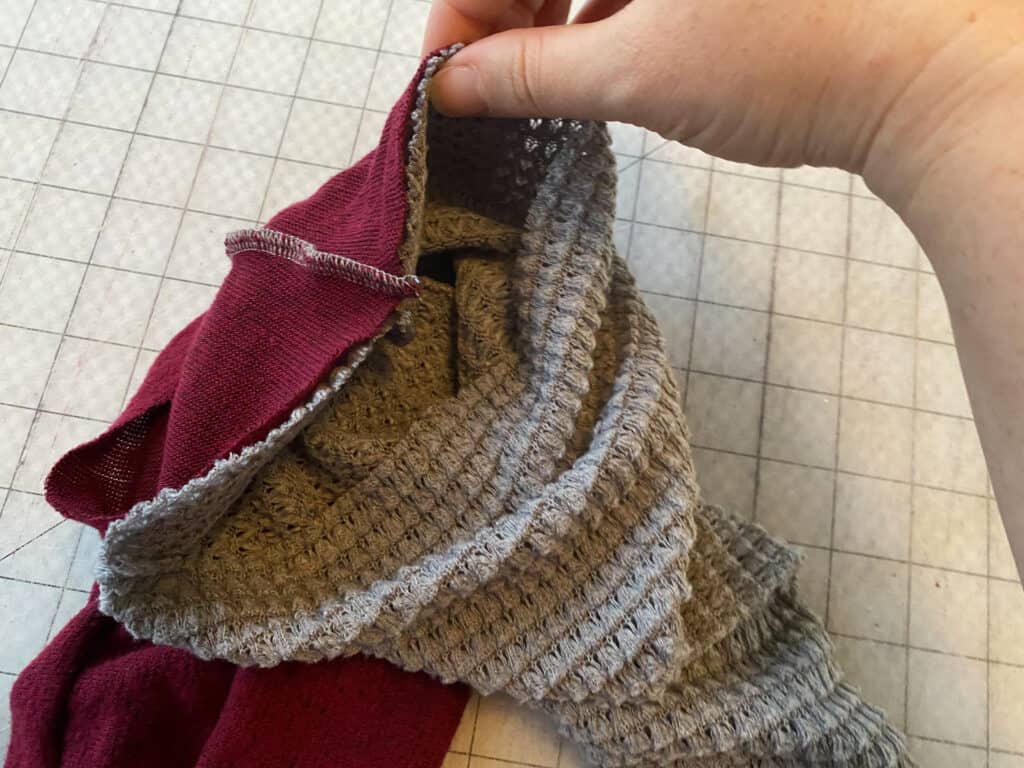
Pin / clip around the opening, matching right sides together.
**This step is a little tricky. You won’t be able to align the two pieces all the way around. Go as far as you can without stretching out your fabrics.
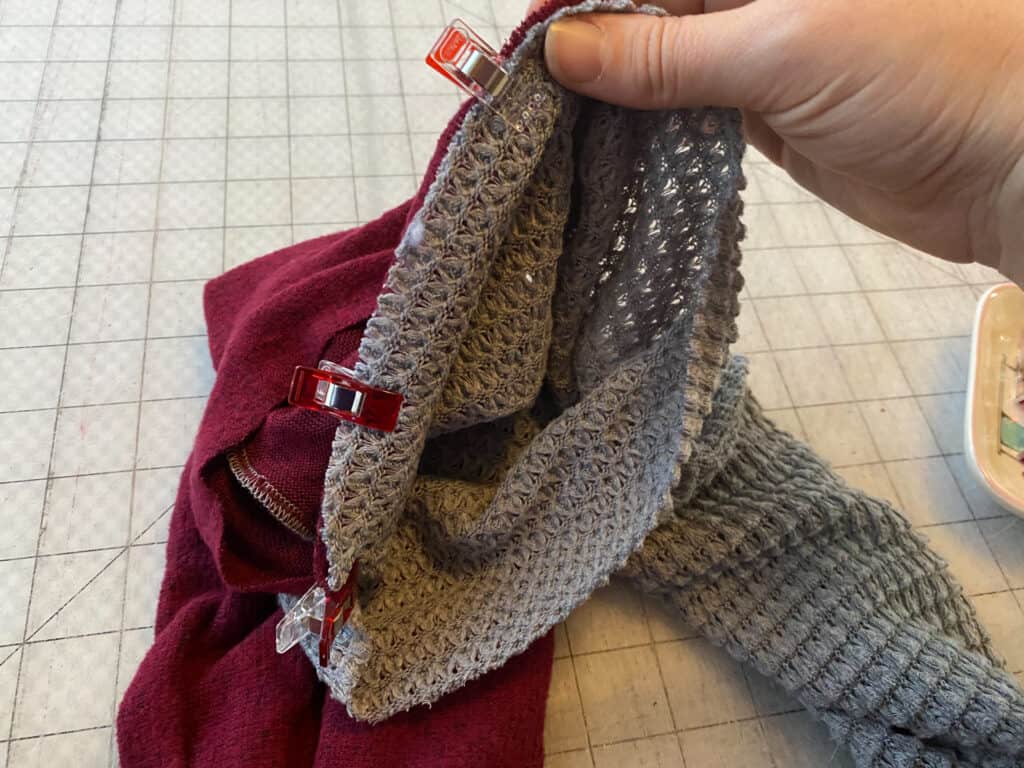
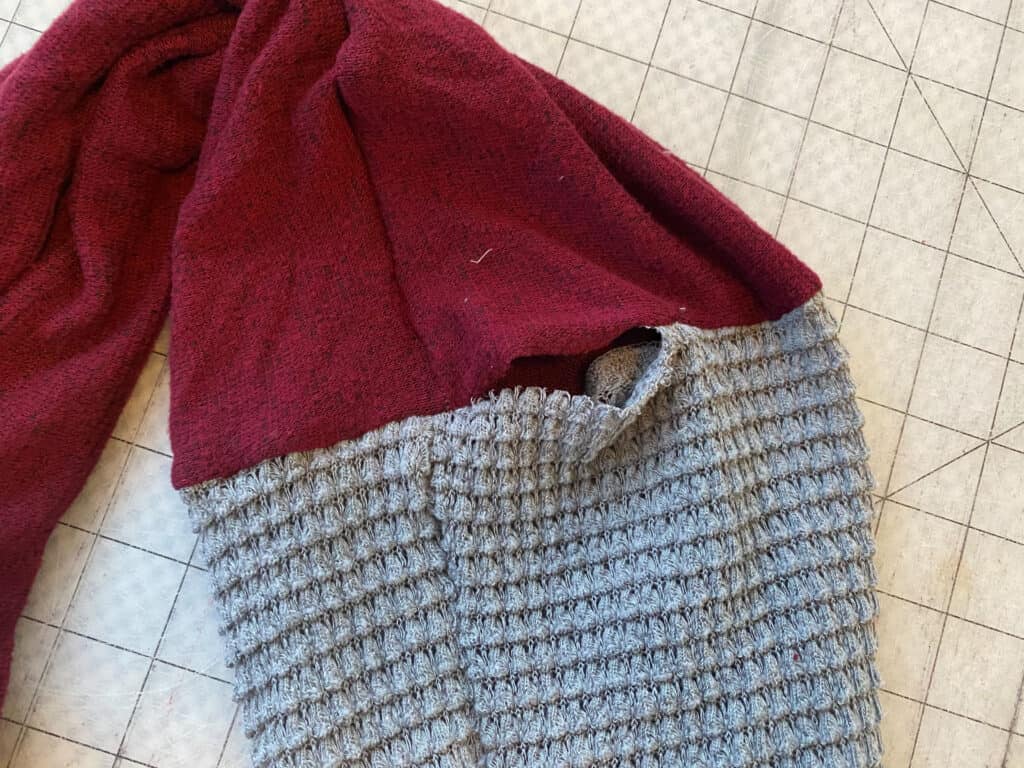
Using 1/2″ seam allowance, sew around entire raw edge. Leaving an opening for pulling/turning the fabric.
Pull the fabric through, to turn everything right sides out.
Tuck the seam allowances into the opening.
Pin and, using your favorite stitch, close the opening.
You’re finished!
In case you consider yourself a more “visual learner” here’s a video tutorial that walks you through the entire tutorial, start-to-finish.
Check out what our fabulous testers were able to create with this very same tutorial!


I la-la-love when you share your photos with me! Head over to the Patterns for Pirates Facebook Group and show us what you’ve made!
Happy Holidays, Pirates!
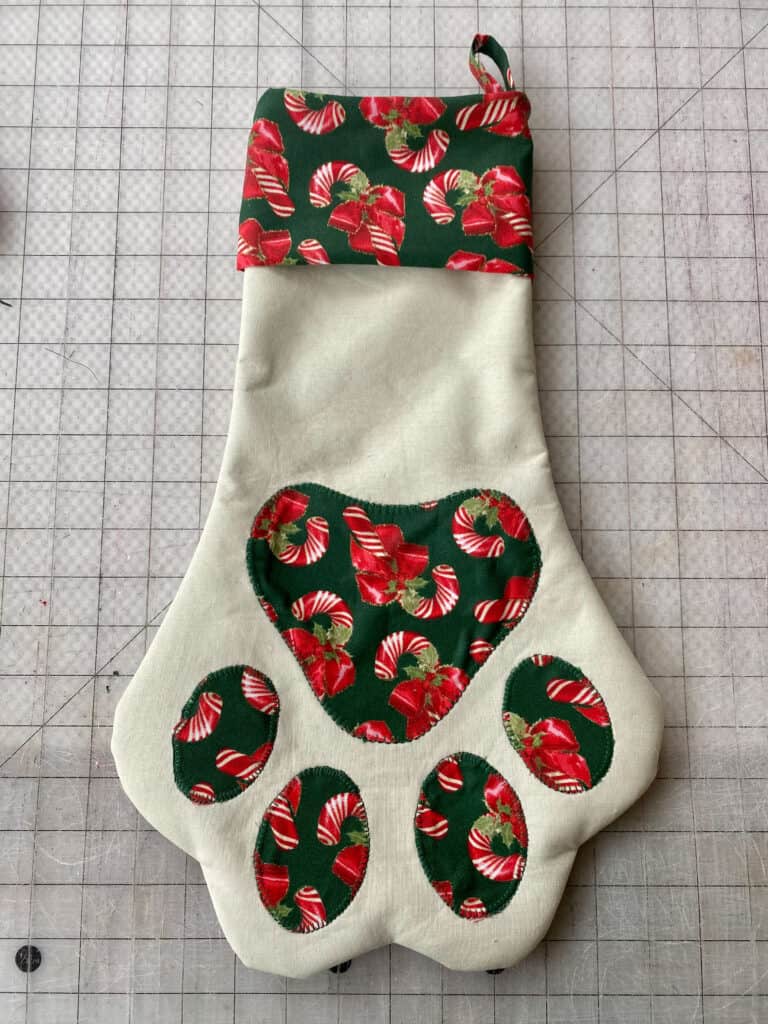
2020 Holiday Freebies :: Paw-Fect Stocking Tutorial
Happy Holidays, Pirate Friends! We are excitedly back for another year and another round of holiday freebies to share with you! Over the years, we’ve compiled different tutorials and patterns that we think would make *perfect* gifts for your friends and family. Curious about what we’ve already released in the way of holiday freebies? Head right here to see all of them: Holiday Freebies Roundup.
Today, we are bringing you the: Paw-fect Stocking!!

If you’re anything like me, your fur family members also get visits from Santa Claus — or maybe Santa Paws? (ba-dum-ching!) We’ve always hung stocking for our pups and filled them with toys and treats. And since we added another furry family member this year to my own household, I felt like maybe it was time to make new stockings for all three of our babies!
And I’m thinking maybe you might like this for your canine and feline family members as well!
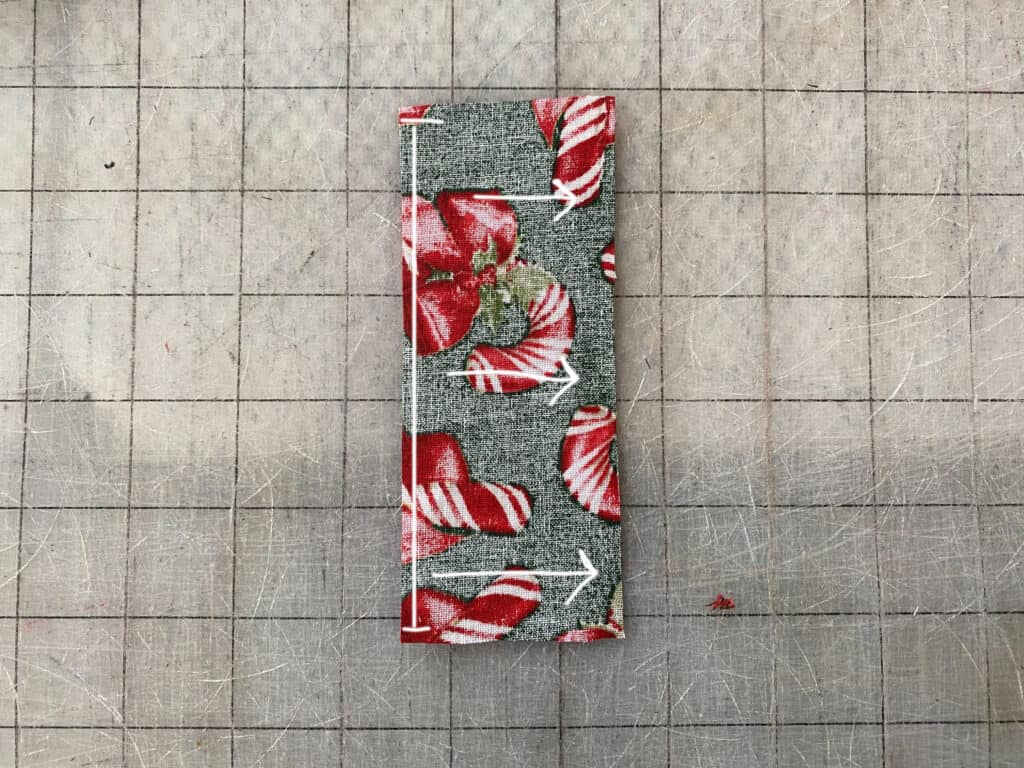
Supplies Needed:
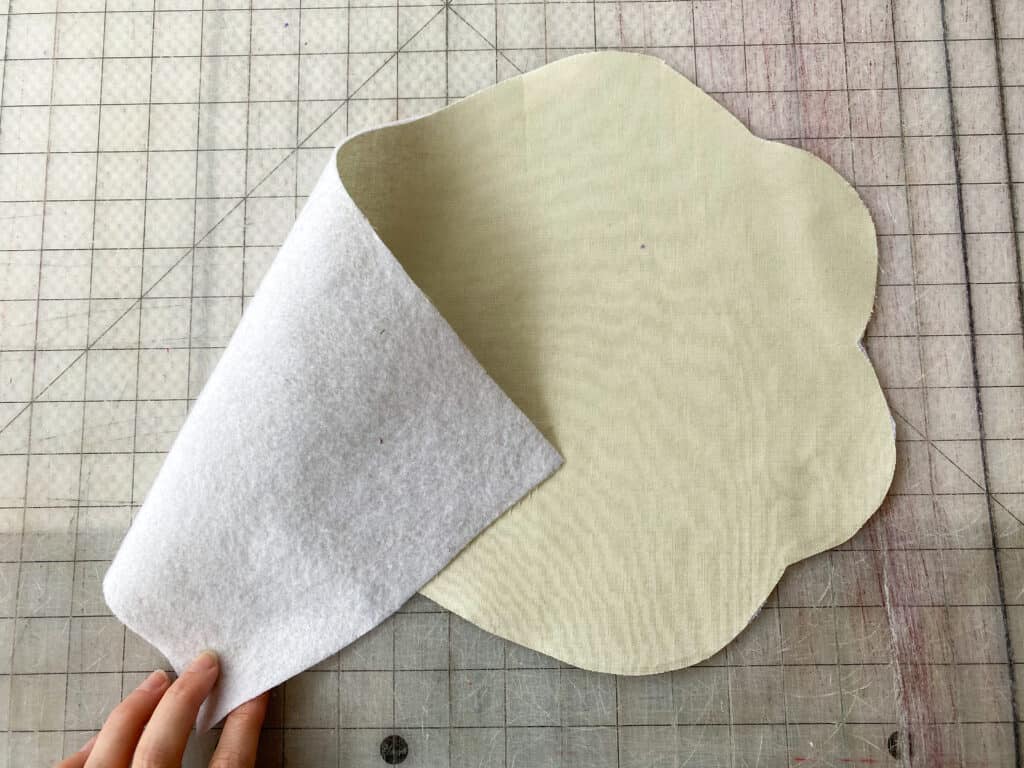
- Paw-fect Stocking pattern pieces
- 1/2 Yard each: Outer + Lining Fabrics and Fusible Fleece Interfacing
- 1/4 Yard Accent Fabric (for cuff and paw details)
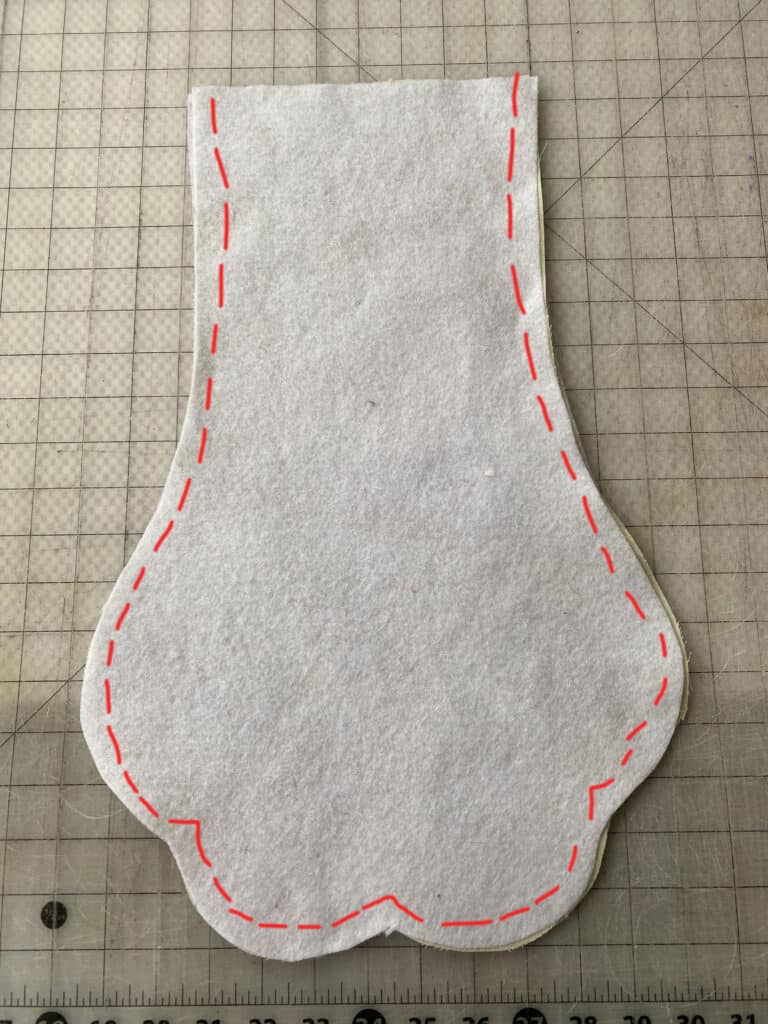
Prepare all of your pieces.
Cut:
— 2 each: Main, Lining + Interfacing Stocking Pieces
— 2 Large “Toes” in Accent Fabric + Interfacing
— 2 Small “Toes” in Accent Fabric + Interfacing
— 1 “Pad” in Accent Fabric + Interfacing
— 1 Cuff in Accent Fabric
— 1 Hanging Tab in Accent Fabric
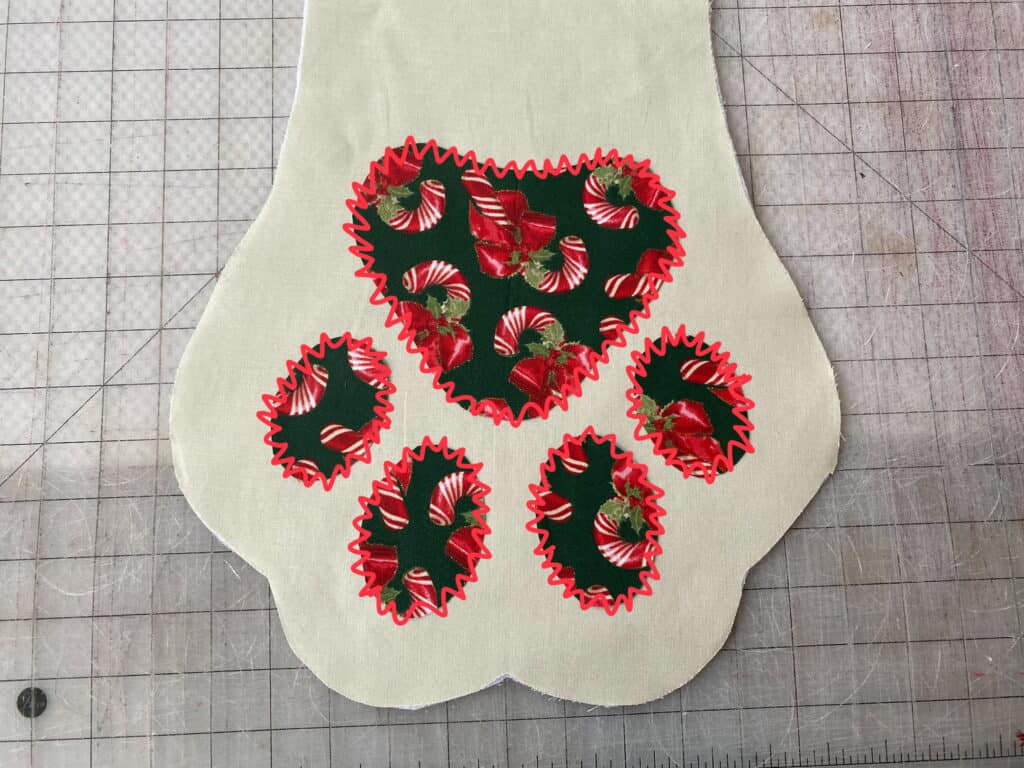
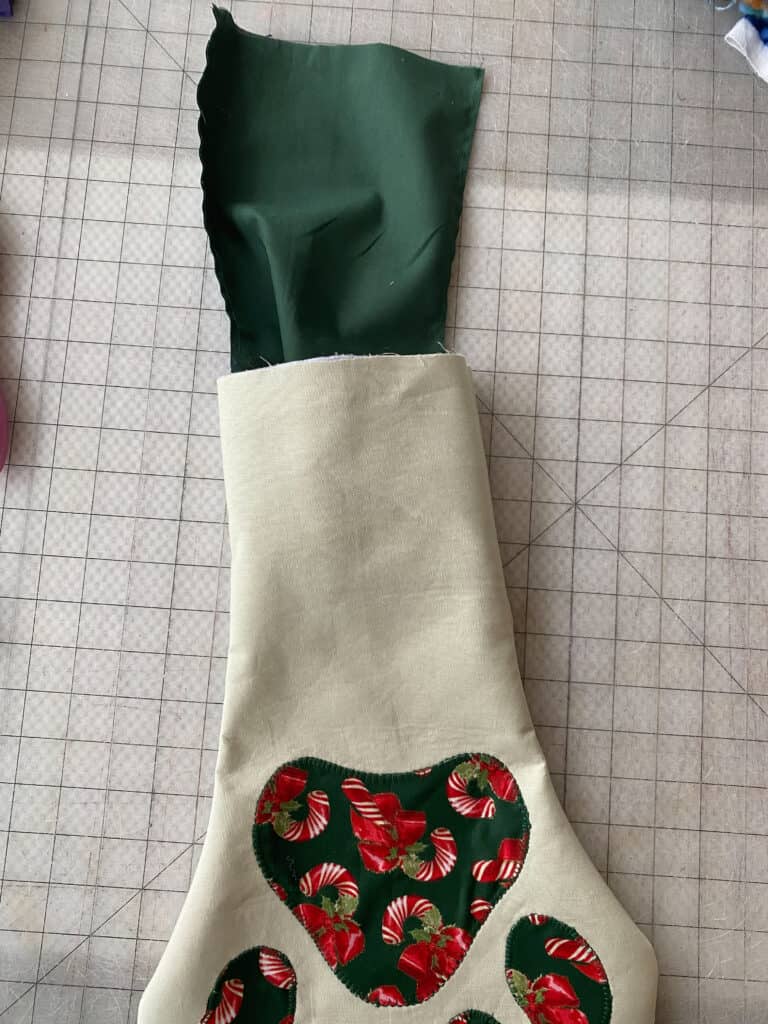
Apply interfacing to the main outer stocking pieces and the paw print applique pieces.
Using the stocking piece as a guide for placement, lay out the applique pieces.
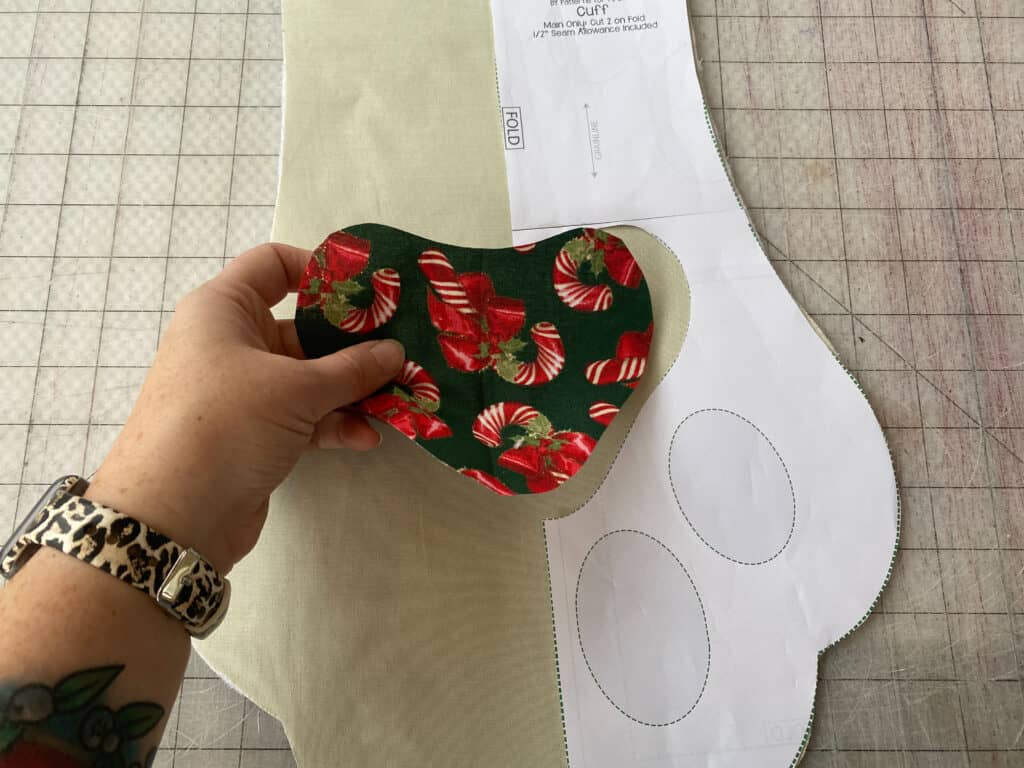
Using your favorite stitch, applique the pieces to the front stocking.
Place the back outer stocking piece on top of the front piece, right sides together.
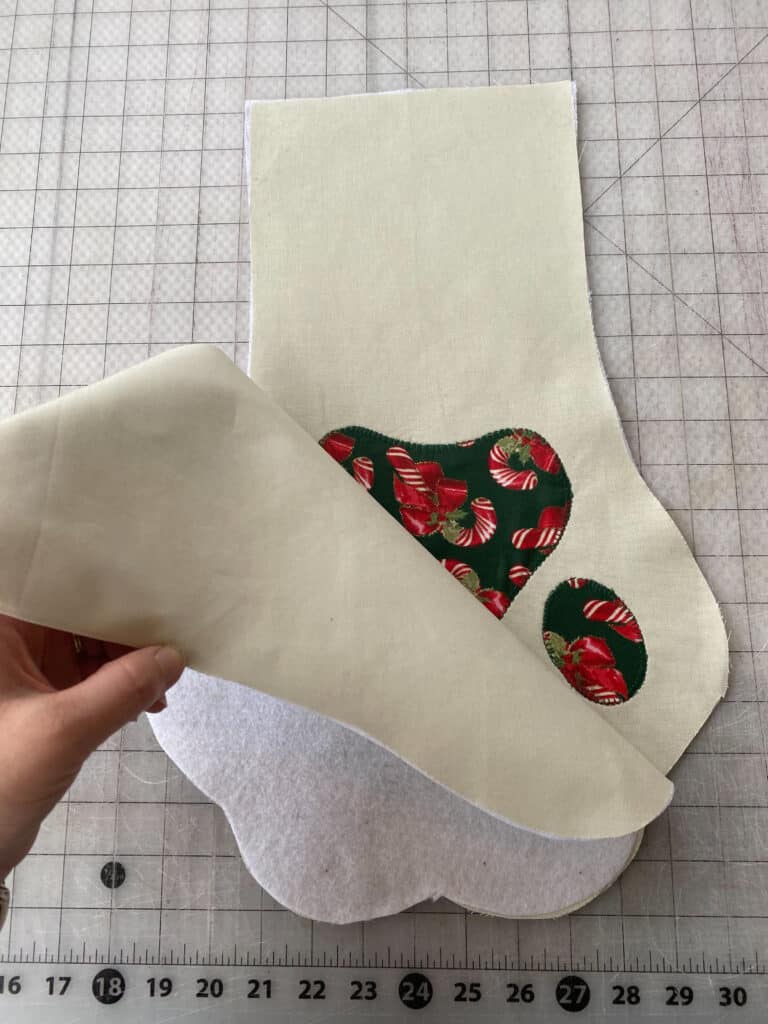
Using 1/2″ seam allowance, sew along all edges, leaving only the top, straight edge open.
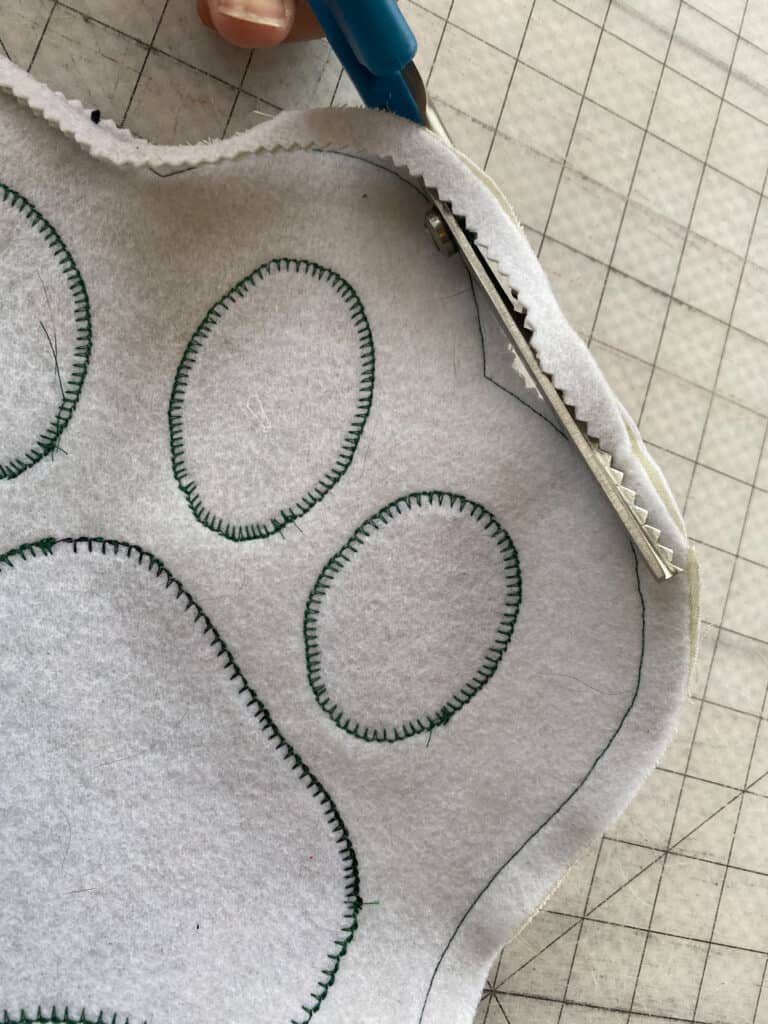
Trim down your seam allowance, and clip into the corner points of the paws, being careful not to cut your stitches.
**Repeat last three steps with stocking lining pieces.
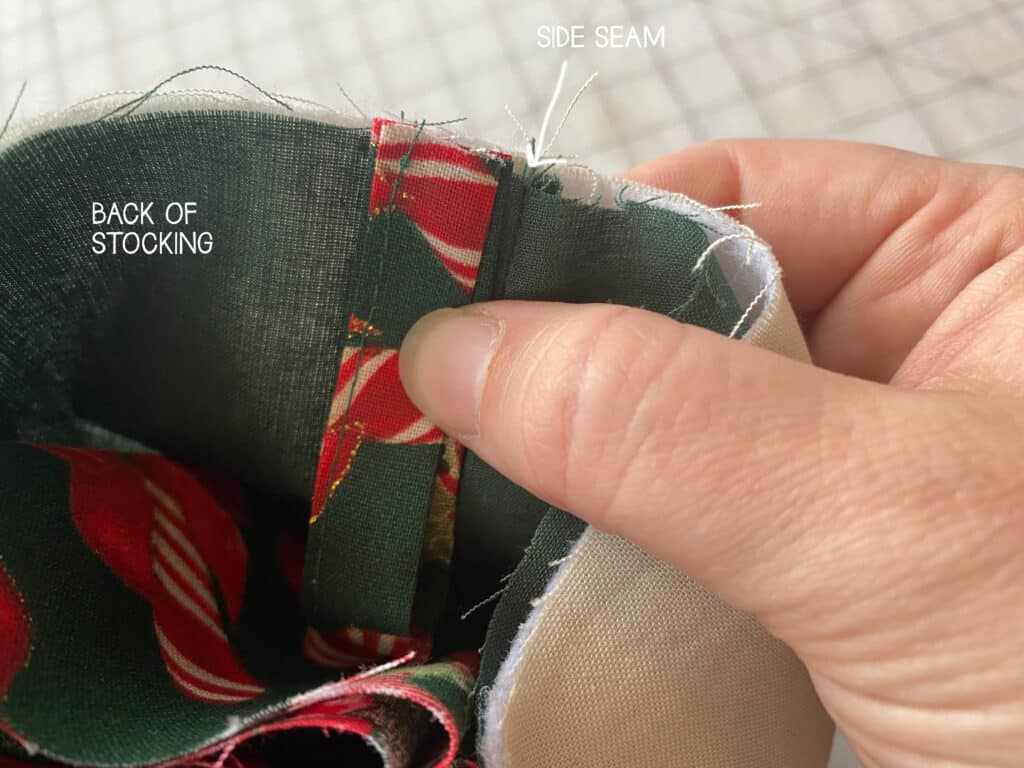
Leave your lining piece wrong sides out, and turn your main piece right sides out. Slip the lining into the main piece.
Fold hanging tab in half, wrong sides together. Iron.
Open up hanging tab piece and fold outer long edge toward crease. Iron.
Repeat with other outer edge.
Edge stitch along double folded edge.
Fold hanging tab in half.
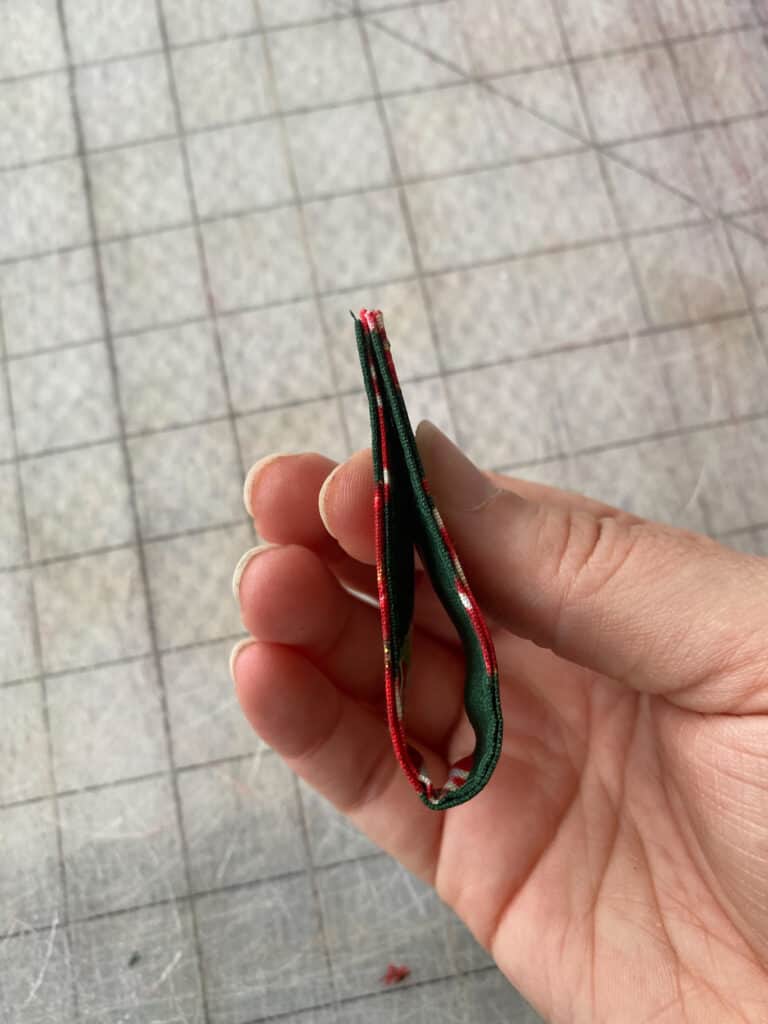
Place hanging tab inside of stocking. Align it just behind the side seam, toward the back of the stocking. Clip or pin in place.
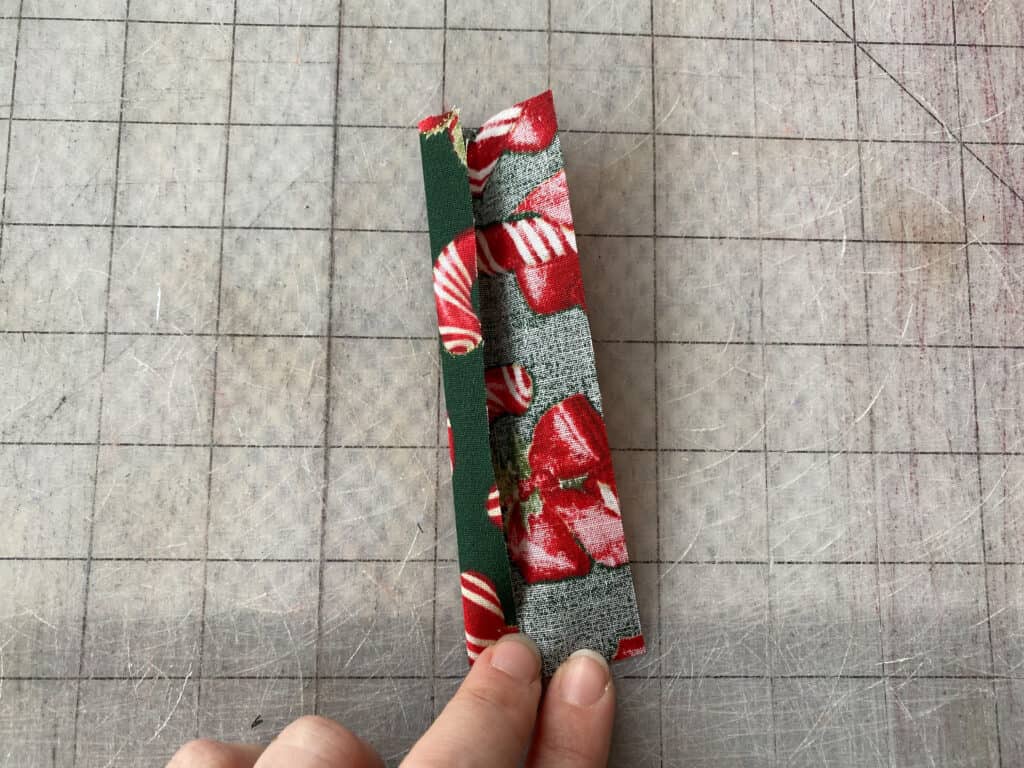
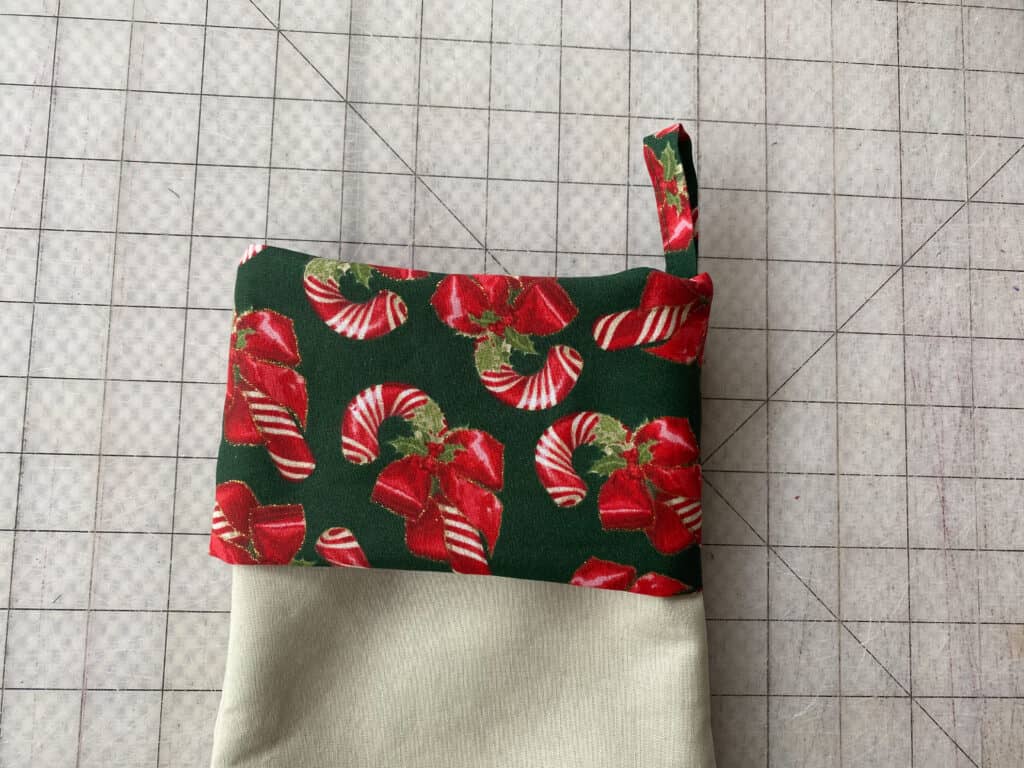
Fold cuff piece in half, along short edges. Right sides together.
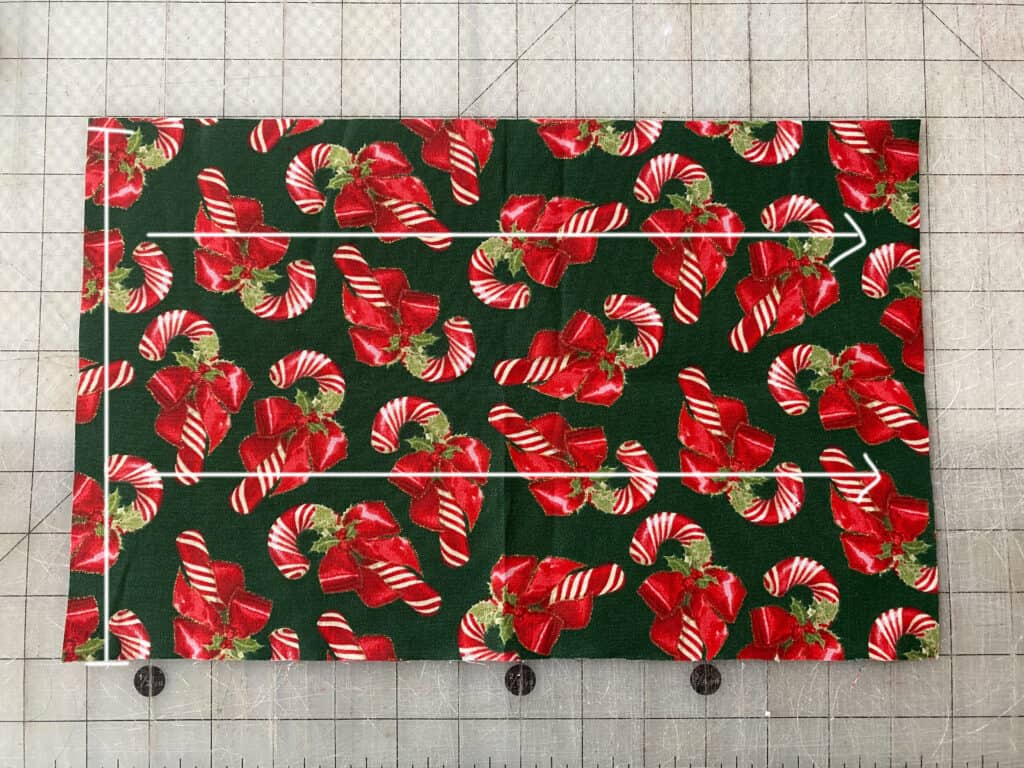
Fold in half again, this time meeting the shorter raw edges together.
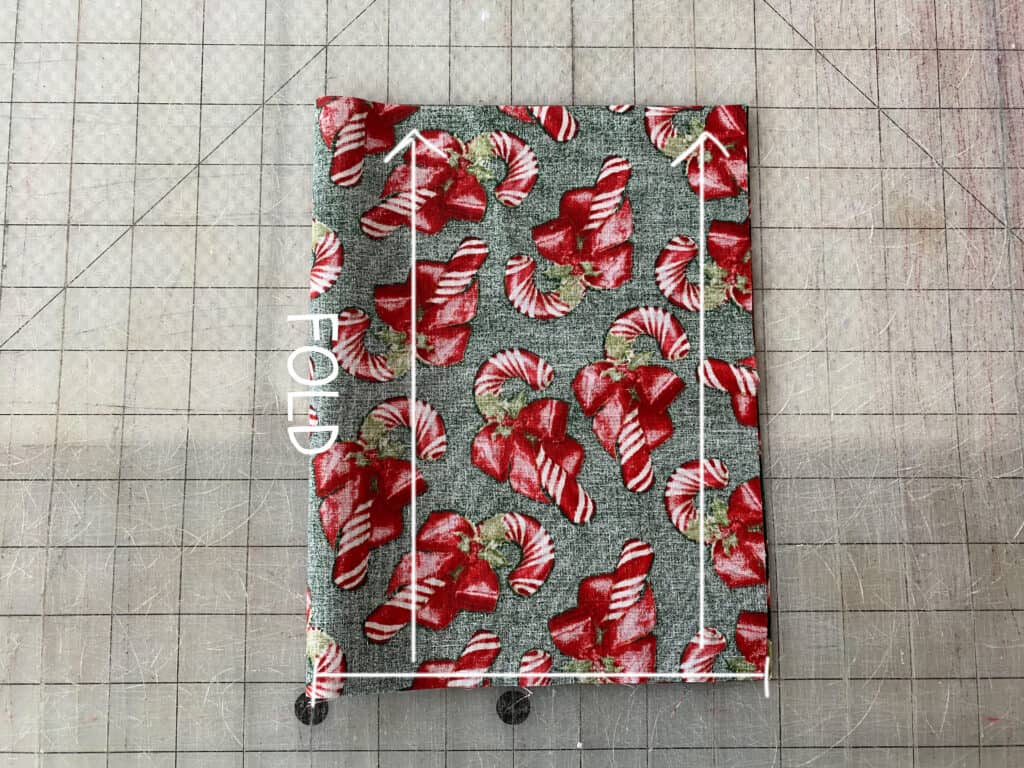
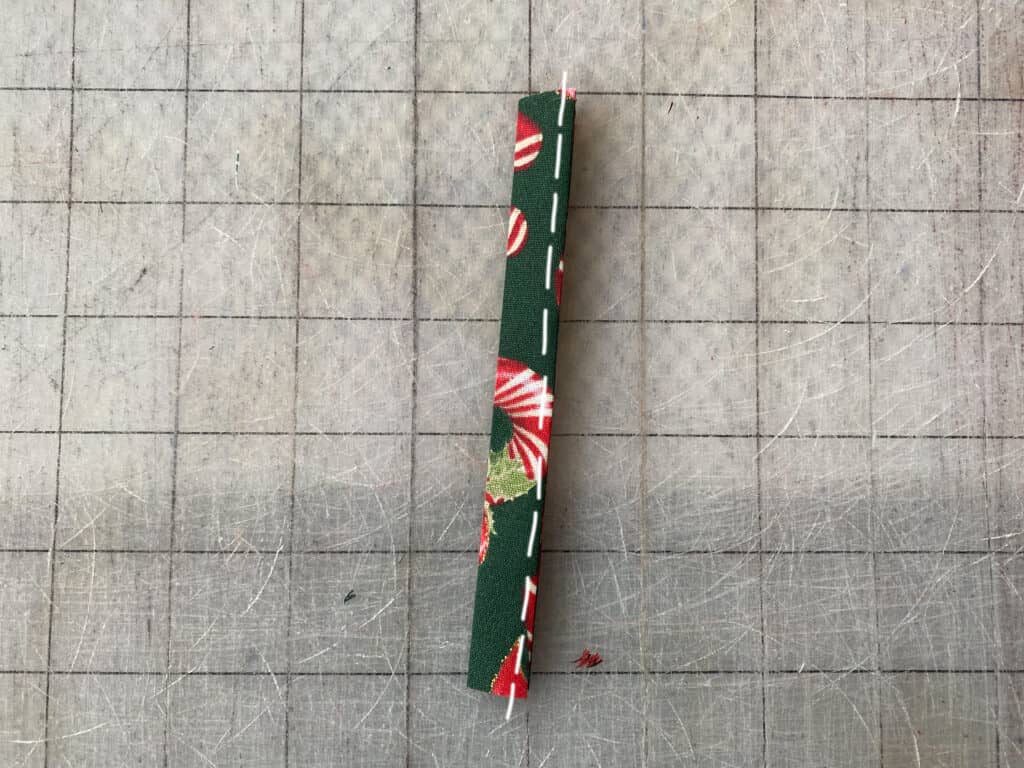
Sew along side edge, using 1/2″ seam allowance.
Flip cuff right sides out. Using pins / clips, mark half points of cuff.
Slide cuff piece inside of the stocking, aligning the half points to the side seams.
Sew along entire raw top edge, using 1/2″ seam allowance.
Pull cuff up and out of the stocking.

Flip cuff down toward body of stocking.
You’re finished! (Don’t forget to press your stocking before hanging it up!)
In case you consider yourself a more “visual learner” here’s a video tutorial that walks you through the entire tutorial, start-to-finish.
Check out what our fabulous testers were able to create with this very same tutorial!


I la-la-love when you share your photos with me! Head over to the Patterns for Pirates Facebook Group and show us what you’ve made!
Happy Holidays, Pirates!
2020 Holiday Freebies :: Hickory Hat Tutorial
Happy Holidays, Pirate Friends! We are excitedly back for another year and another round of holiday freebies to share with you! Over the years, we’ve compiled different tutorials and patterns that we think would make *perfect* gifts for your friends and family. Curious about what we’ve already released in the way of holiday freebies? Head right here to see all of them: Holiday Freebies Roundup.
Today, we are bringing you the: Hickory Hat!
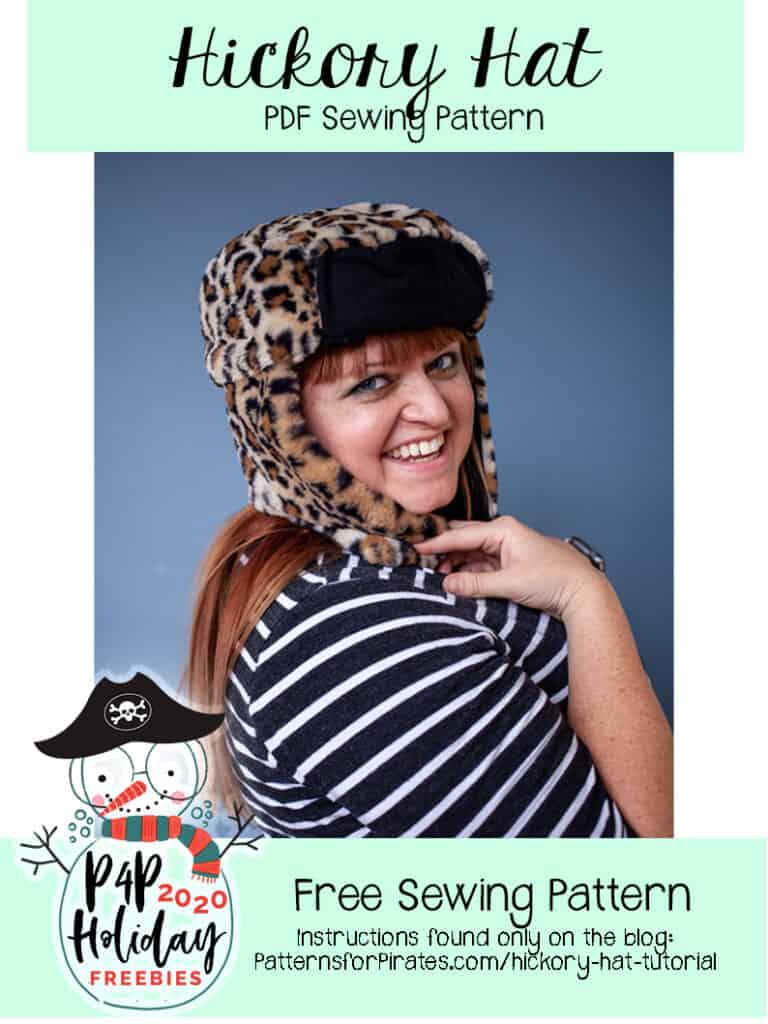
The Hickory Hat is a classic “aviator” or “lumberjack” style cap. It is available in four sizes, for head circumferences 18″ – 24″ and was drafted for non-stretch fabrics. Grab all of your favorite fun furs + fleeces, because this pattern is perfect for those!
**If using a super plush / thick fabric, you may want to size up — as those fabrics take up a bit more space and leave less room for your noggin.
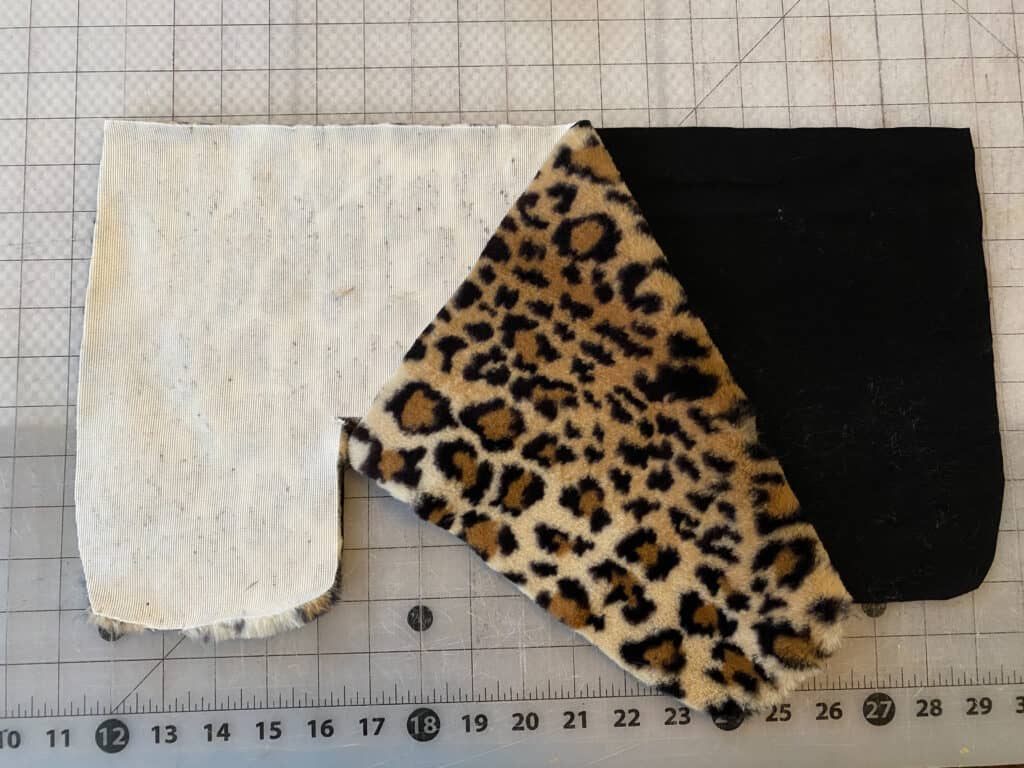
Supplies Needed:
- Hickory Hat pattern pieces
- 1/3 yard fabric each (outer and lining)
- Optional Buttons
TUTORIAL
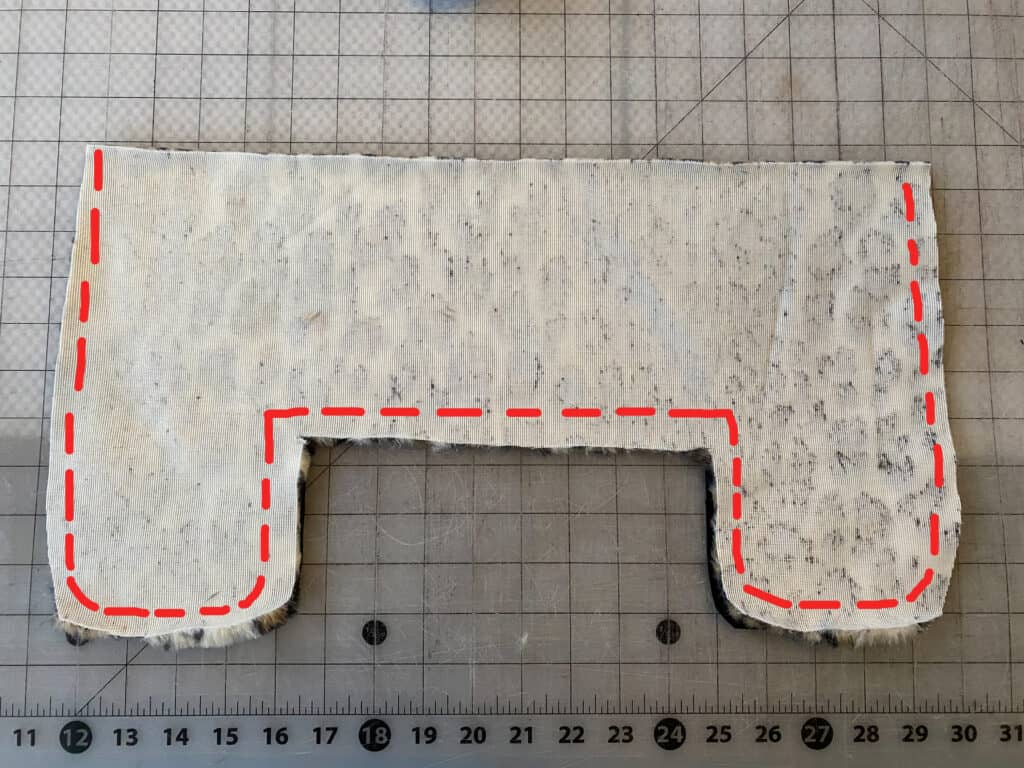
Cut all of your pieces. The assembly for the lining and outer cap will be the same for the first few steps.
With a pin or clip, mark the middle points of the curved side cap pieces, and both sides of the middle cap of your lining fabric.
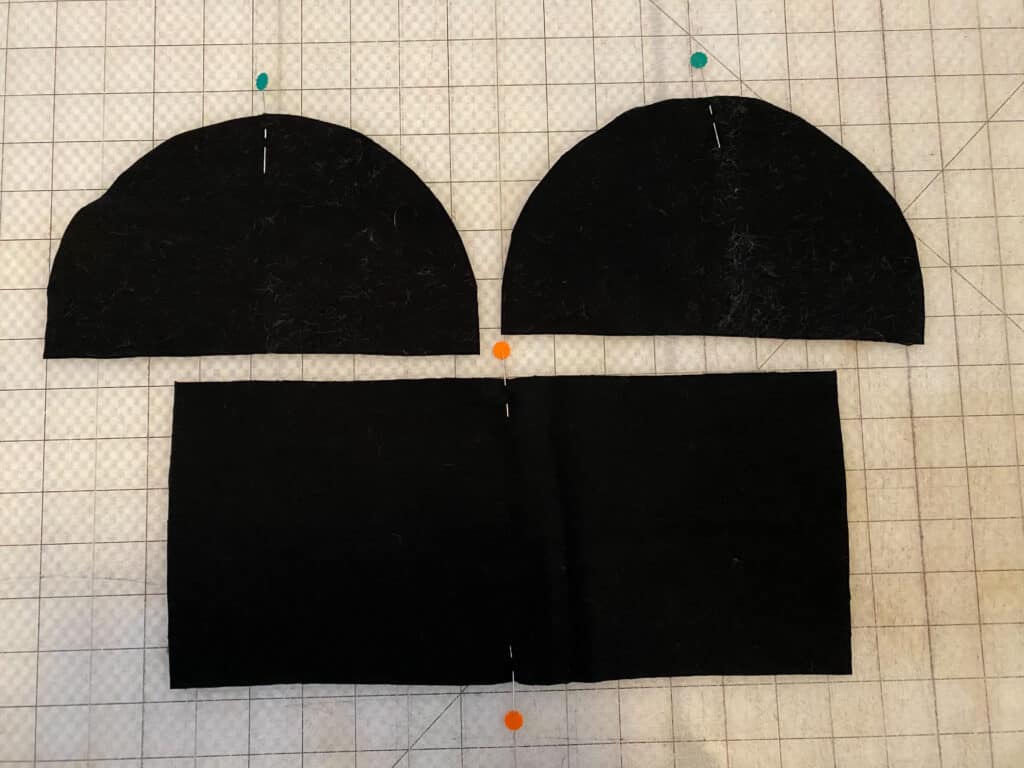
With right sides together, place the side cap piece on top of the middle cap. Aligning them at the center points.
Ease the pieces together, and sew using 1/2″ seam allowance.
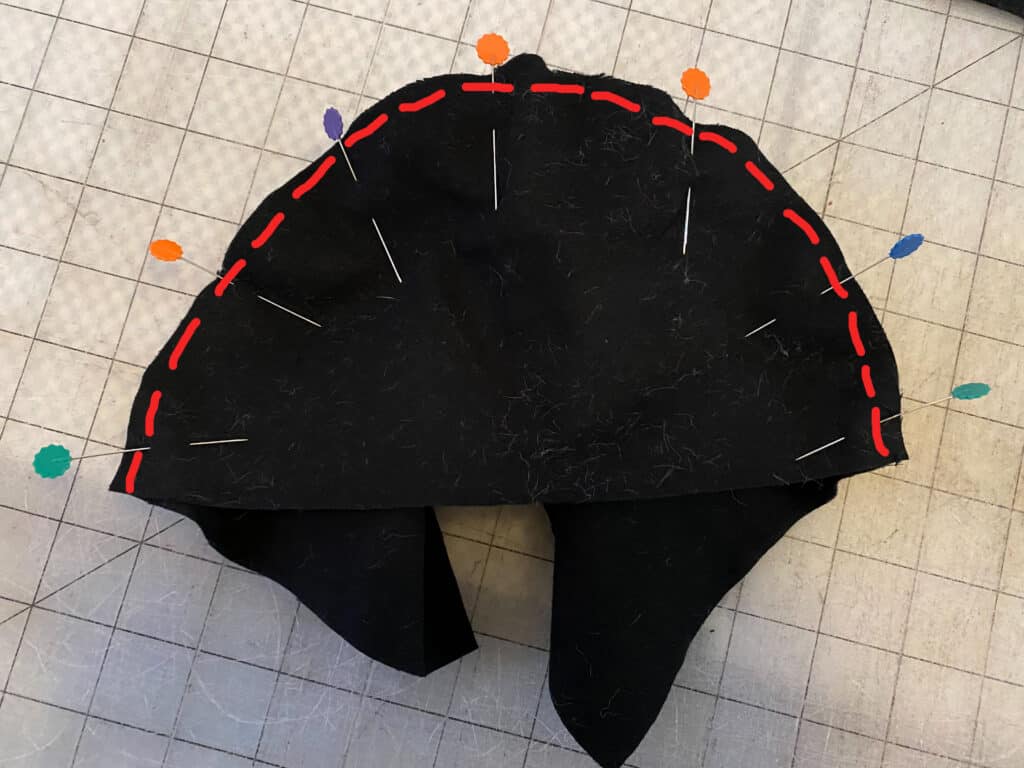
Using pinking shears, or cutting with a “v”, trim excess fabric along curved edge.
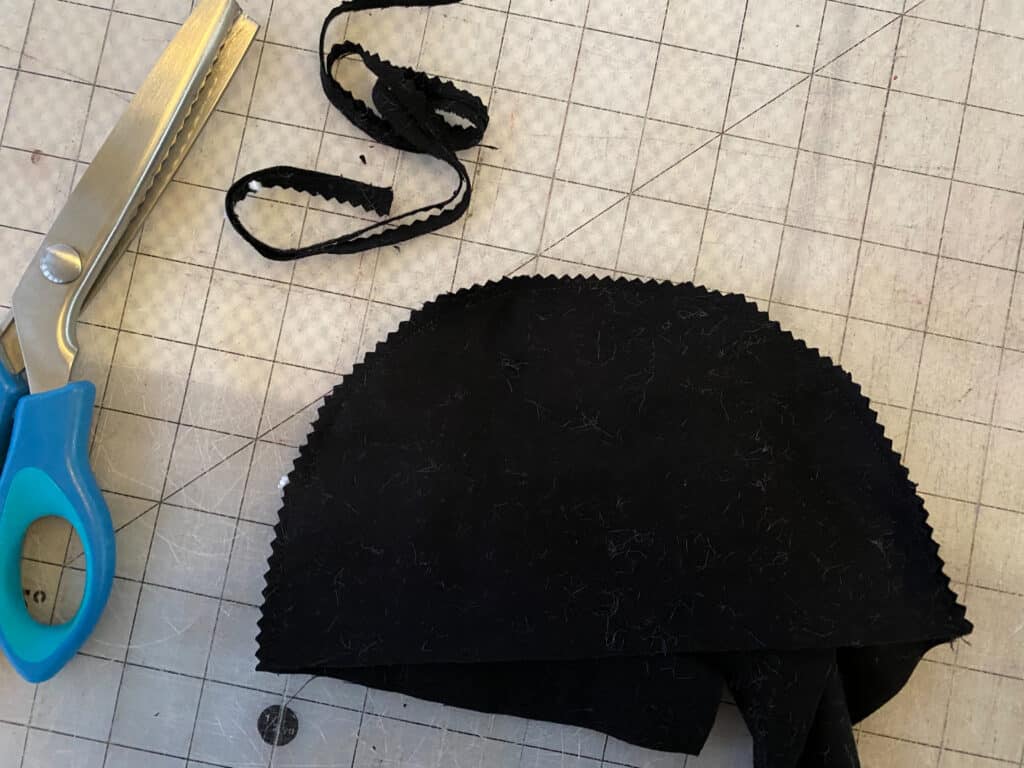
**Repeat with second side cap piece. And repeat all steps with outer fabric.
Place the ear flap pieces with right sides together.
Using 1/2″ seam allowance, sew along entire side and bottom edges. Leave the top, straight edge open.
Trim all excess seam allowance, making sure to pay special attention to the corner points. Clip as close to your stitches as you can, without going through them.
Turn right sides out. With a pin or clip, mark the middle point of the top, raw edge.
Place the brim flap pieces with right sides together.

Using 1/2″ seam allowance, sew along entire outer edge, leaving the top, straight edge open.
Clip excess seam allowance. Turn right sides out.

Locate the middle front and back of the cap lining piece and mark with clips / pins.
With lining fabrics right-sides-together, match the ear flap piece to the lining cap piece.
Baste in place.
Repeat with the front flap piece. With lining fabrics right sides together, match front flap piece to the lining cap piece at the middle front point.
Baste in place.
Locate the outer cap piece. Place it in front of you, wrong sides facing out.

Place the lining piece (with the ear flap and front flaps basted onto it) inside of the outer cap. Tuck the flap pieces inside and align the seams against each other.
Using 1/2″ seam allowance, sew along entire circle, leaving 3″ opening for turning.
Turn right sides out. Tuck opening seam allowance in. Pin, and blind stitch the opening shut.
If desired, tack the front flap up — using buttons or a quick hand stitch.

You’re finished! Go wear your new Hickory Hat and then make 10 more. You know you want to!
——–
In case you consider yourself a more “visual learner” here’s a video tutorial that walks you through the entire tutorial, start-to-finish.
Check out what our fabulous testers were able to create with this very same tutorial!


I la-la-love when you share your photos with me! Head over to the Patterns for Pirates Facebook Group and show us what you’ve made!
Happy Holidays, Pirates!
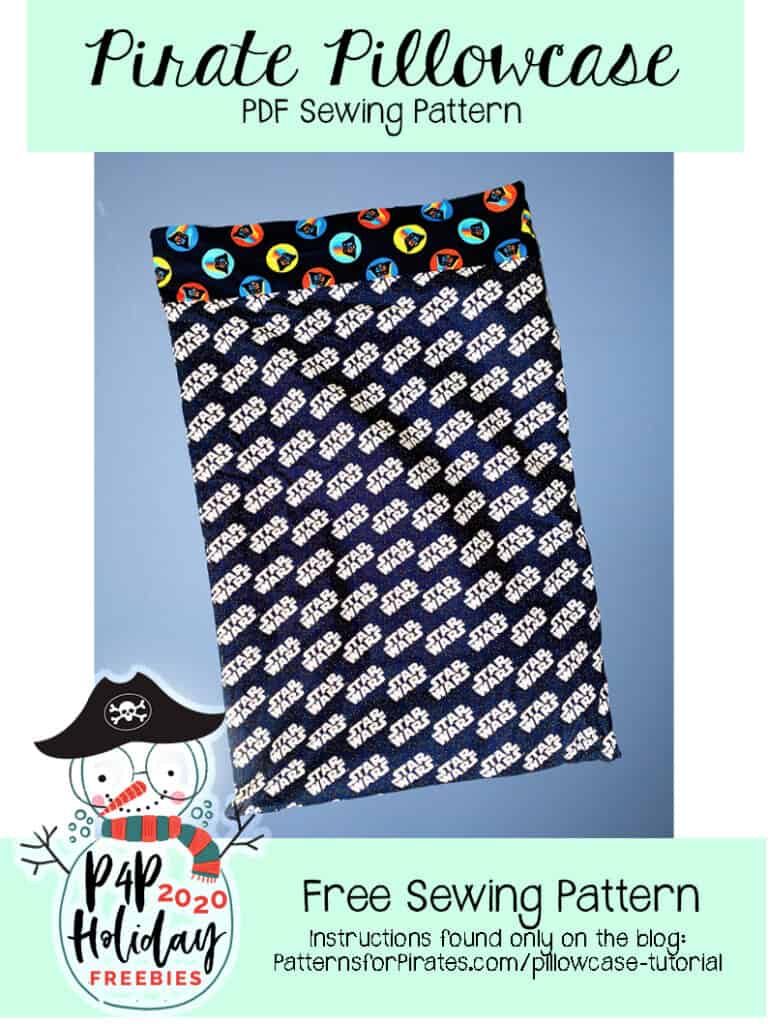
2020 Holiday Freebies :: Pirate Pillowcase Tutorial
Happy Holidays, Pirate Friends! We are excitedly back for another year and another round of holiday freebies to share with you! Over the years, we’ve compiled different tutorials and patterns that we think would make *perfect* gifts for your friends and family. Curious about what we’ve already released in the way of holiday freebies? Head right here to see all of them: Holiday Freebies Roundup.
Today, we are bringing you the: Pirate Pillowcase!!
Pillowcases are such a fun, quick sew. And they make perfect gifts because they’re easy to customize to anybody’s liking. My mom used to be in a “Pillowcase of the Month Club” when I was in college and she would send me a new pillowcase each month. It was so fun to have something from home, and a fun surprise to see what fabrics she selected for me each time.
| Pillowcase Size | Cuff (L x W in inches) | Body (L x W in inches) |
|---|---|---|
| Standard | 9″ x 41″ | 23″ x 41″ |
| Queen | 9″ x 41″ | 27″ x 41″ |
| King | 9″ x 41″ | 33″ x 41″ |
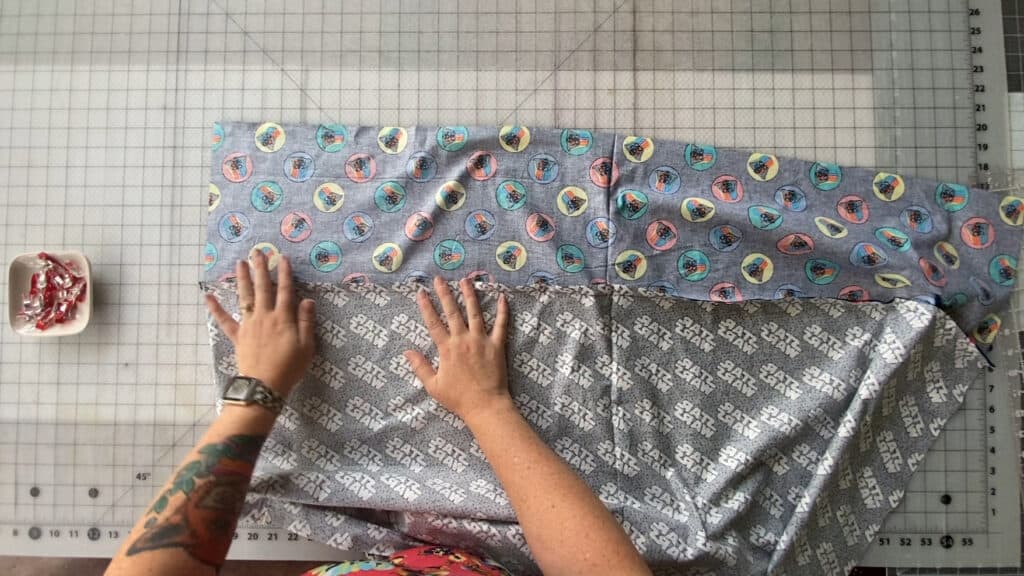
You will need: 1 Cuff Piece and 1 Main Body piece.
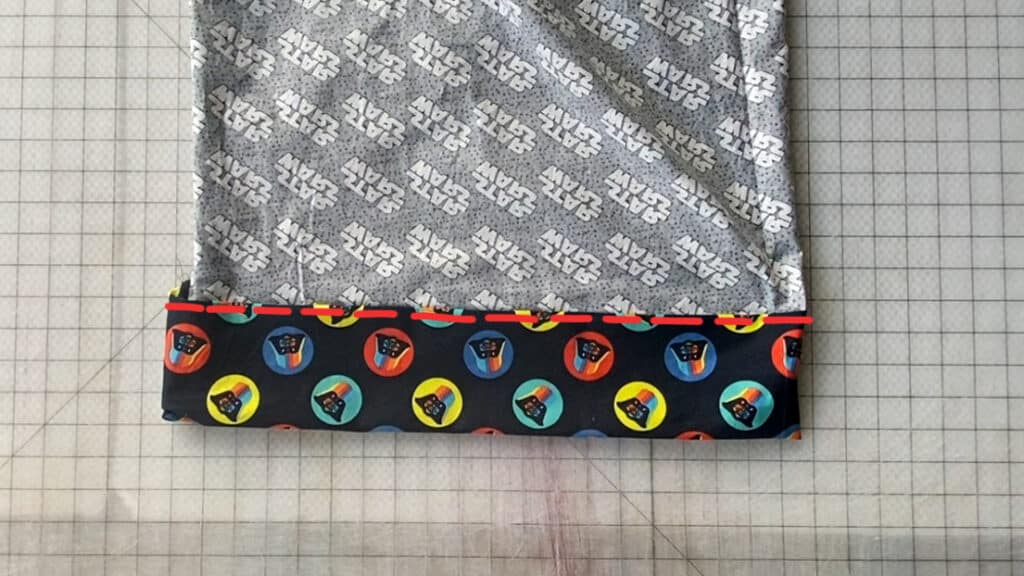
With right sides together, align the top long edge of the main body and bottom long edge of the cuff piece.
Sew along long, raw edge, using 1/2″ seam allowance.
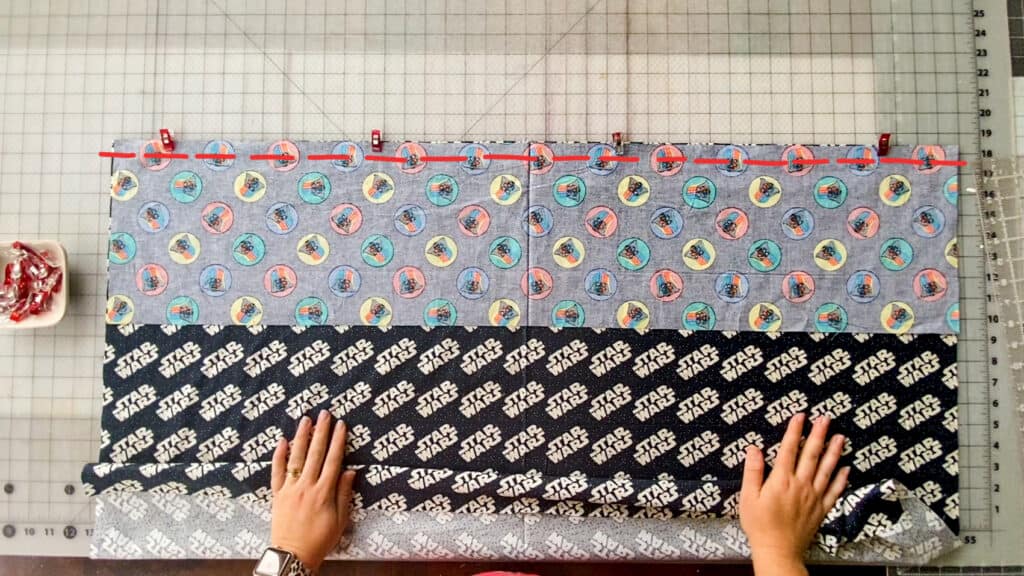
Open up the sewn pieces. Using an iron, press the seam allowance up, away from the main body.
Using your iron, create a 1/2″ memory press the top raw edge of the cuff piece.
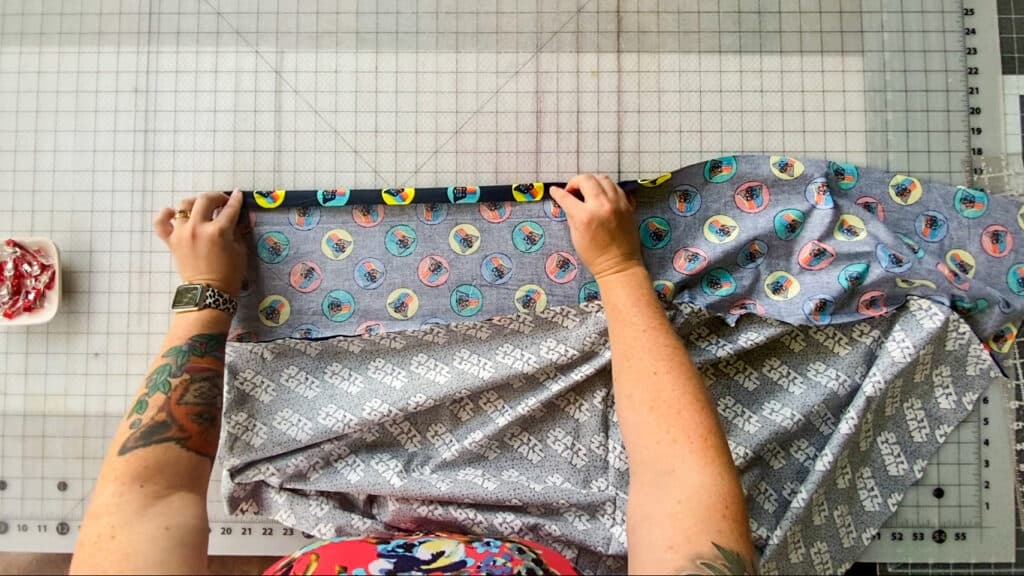
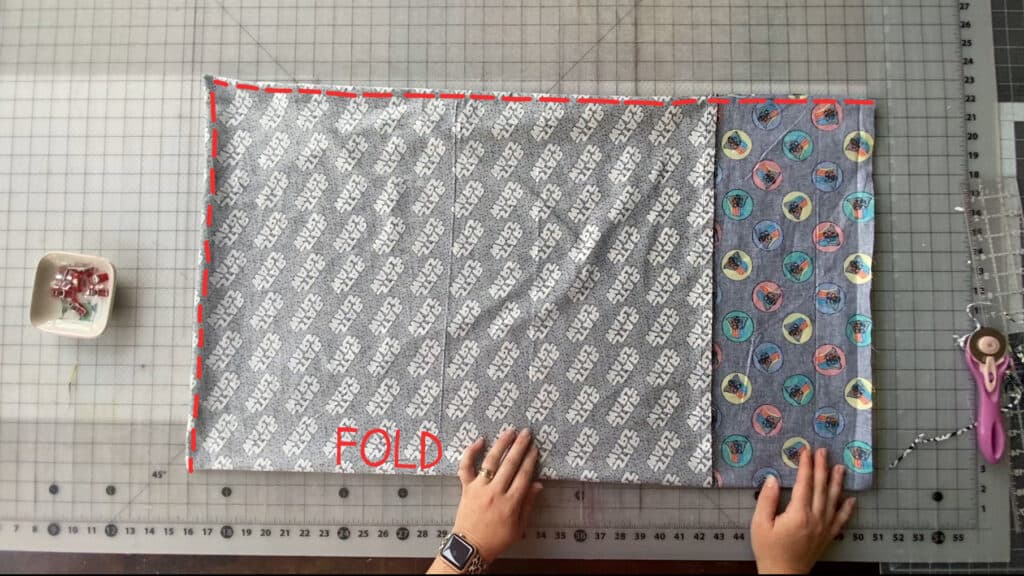
With wrong sides together, fold in half, matching the short ends together — creating your pillowcase shape.
Using 1/4″ seam allowance, sew along side and bottom seams.
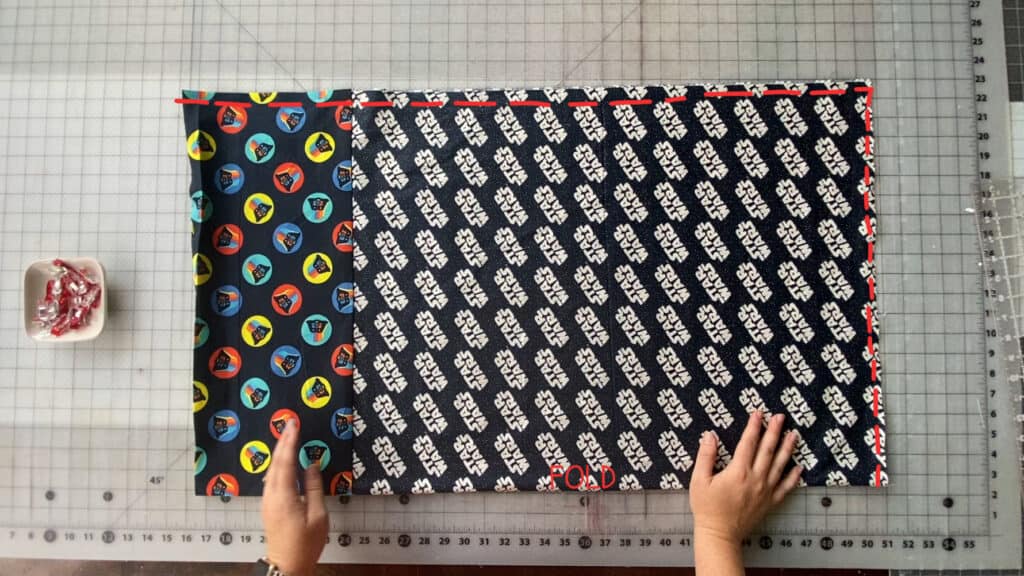
Trim seam allowance down to 1/8″. Careful not to clip through your stitches.
Turn the pillowcase inside out.
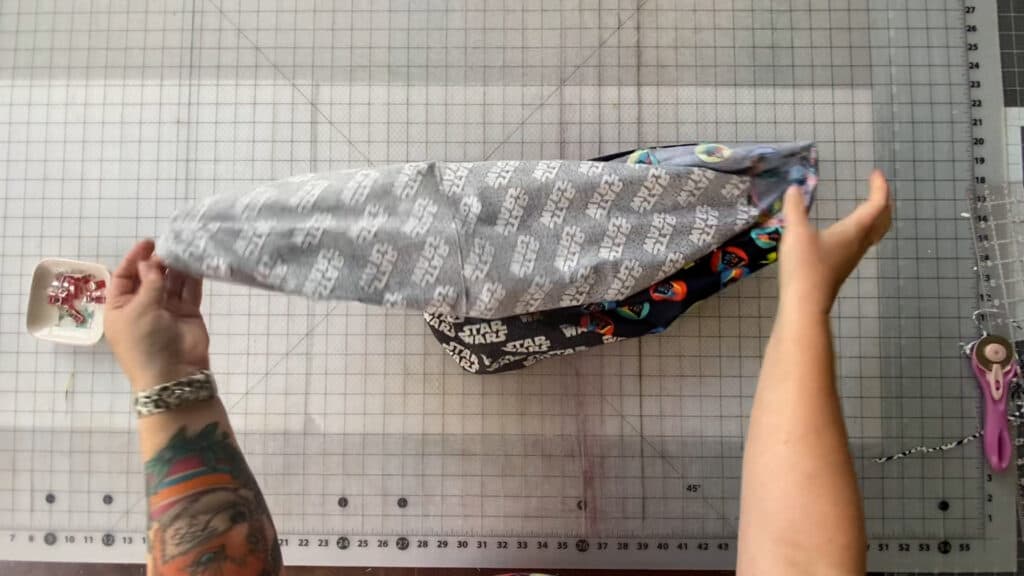
Using 1/4″ seam allowance, sew along entire bottom and side seams, enclosing all raw edges.
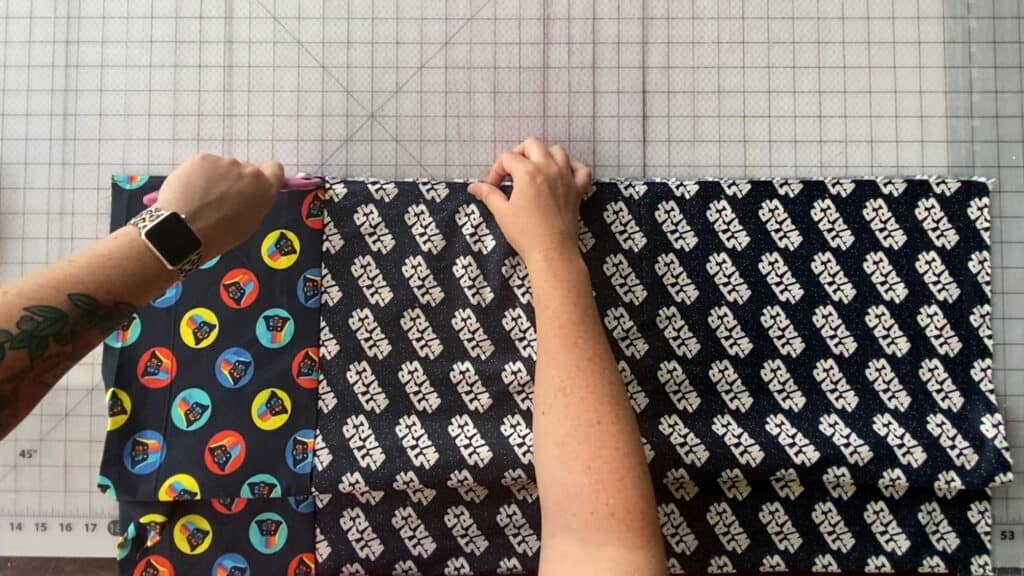
Keeping the pillowcase inside out, fold the cuff piece down toward the body.
Use the 1/2″ memory press you created earlier to fold the top raw edge under.
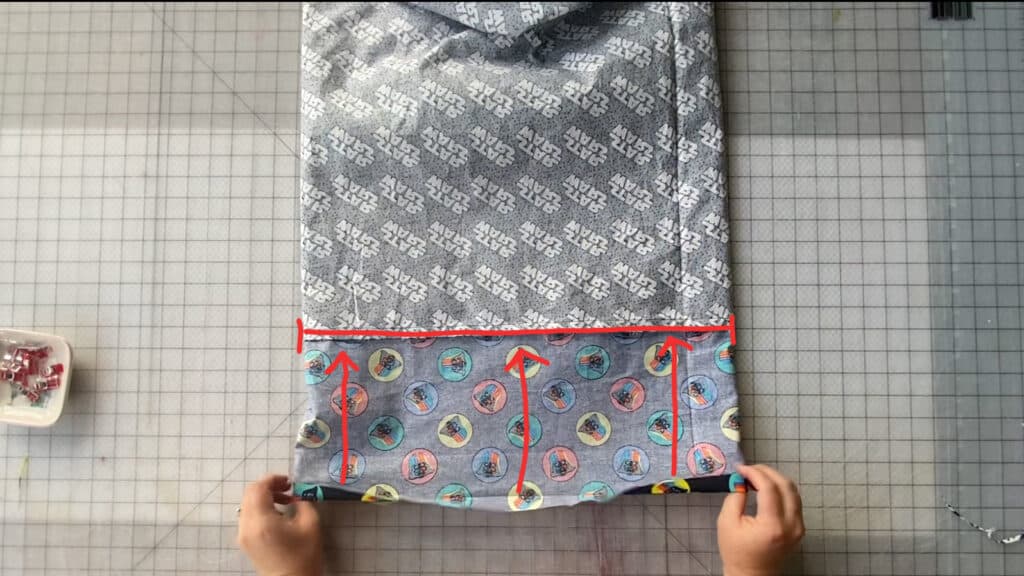
Align the folded edge along the seamline.
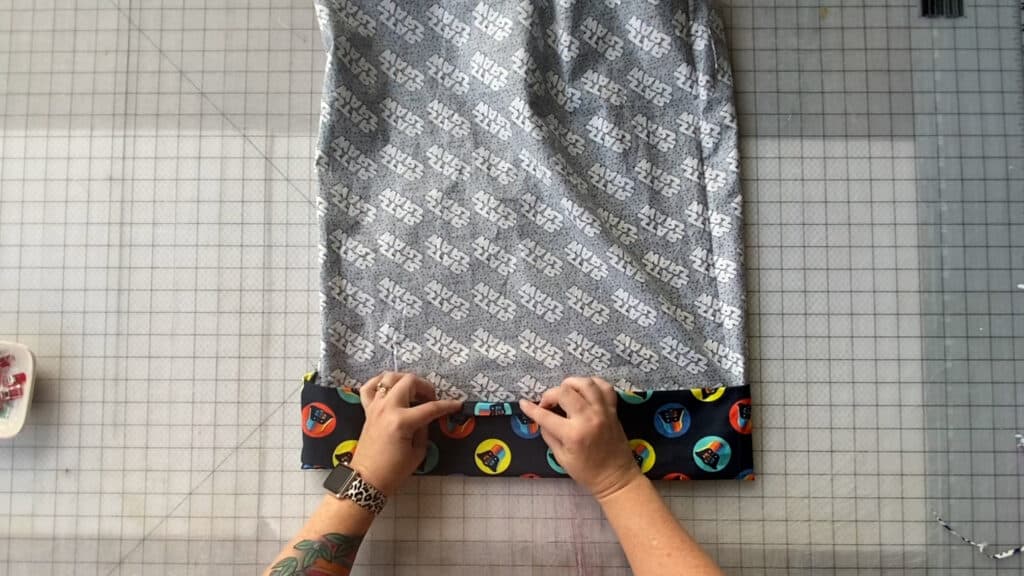
Using a scant 1/8″ stitch, topstitch around the entire cuff.
Turn the pillowcase right sides out. Press. And stuff it with a pillow! You’re done!
In case you consider yourself a more “visual learner” here’s a video tutorial that walks you through the entire tutorial, start-to-finish.
Check out what our fabulous testers were able to create with this very same tutorial!


I la-la-love when you share your photos with me! Head over to the Patterns for Pirates Facebook Group and show us what you’ve made!
Happy Holidays, Pirates!
- « Previous Page
- 1
- …
- 21
- 22
- 23
- 24
- 25
- …
- 68
- Next Page »