Patterns for Pirates

P4P stylish, modern, wearable patterns

  • Home
  • Blog
    • Frequently Asked Questions
    • Pattern Releases
      • Free Patterns
    • P4P University
      • Fitting
      • Sewing with Stretch, Knit Fabrics
      • Sewing with Woven Fabrics
      • Sewing Machines
    • Sew-A-Longs
    • Fabric for Pirates
    • Pattern Hacks
    • Announcement
      • Blog Tours
      • Contest/Giveaway
  • Shop
  • Bundle Discounts
  • Flash Friday
  • Gift Cards
  • My Account
  • Cart

P4P Raglan Week: Keyhole/Scoopback Raglan Hack

September 23, 2016

raglan-week-day5

The classic basic silhouette of a raglan makes for a great base to play with fabric pairings and adding extra details to  change them up a bit.  I often look at boutique style for inspiration and the keyhole, scoop back has been a popular request among members in the P4P Facebook Group so we thought we’d share the how-to.  I used the Slim Fit Raglan for my example, but this could easily be applied to any of the raglan patterns.

  • Print and assemble your pattern as usual.
  • Decide how low you would like your key hole and measure from the nape of your neck to desired length.  I wanted the keyhole to sit just above my bra-line so went with 8″.
  • Draw your keyhole curve, starting 1″ inside the edge where you would attach your sleeve down to the length you desire.  I didn’t have a french curve handy, so actually used the curve from the armscye of the sleeve pattern piece as a guide.  Cut out keyhole.

P4P Raglan Week Keyhole


\


  • Construct your raglan as usual.
  • We are going to bind the keyhole with the traditional knit binding method but you could also do a t-shirt band (like the neckband in the pattern) as another option.  Measure the keyhole length then multiply by 90% (this is your width measurement)  You will stretch the binding just ever so slightly to fit the opening.  This will help keep the keyhole from gaping and lie flat.  Binding = 2″ x  width. 

P4P Raglan Week Keyhole


  • With right sides together, pin binding to keyhole, matching raw edges. Stitch with 3/8″ seam allowances.

P4P Raglan Week Keyhole

  • Press seam allowance up and fold binding down towards raw edge. Fold again, enclosing seam allowance.

P4P Raglan Week Keyhole P4P Raglan Week Keyhole

Alternatively, if using a thicker fabric for your binding, you can skip the first fold and just fold the binding over enclosing the raw edge.

P4P Raglan Week Keyhole

  • Top-stitch with your favorite stretch stitch.


For the neckline, we will use the same binding method as shown above for the keyhole but need to take a few measurements to determine the length of binding you will use for the neckline only.

  • Measure your neckline.  Pictured: shirt on the fold so my neckline is 2 times the length.

P4P Raglan Week Keyhole

Neckbands are typically smaller than the neckline to bring it in and prevent gaping.  To determine the amount of the binding for the neckline, multiply the length by 85%.  Neckline = 24″ (it looks like 23″ but actually measures 12″ on the fold) so my binding length for the neckline is about 20.5″.   Total Binding = 2″ x 58″.

  • Fold your binding in 1/2 to find the center point.  My neck binding length is 20.5″ so we will measure out 1/2 to each side of center point.  (or 10.25″ for my example). Mark end points.

P4P Raglan Week Keyhole

  • With right sides together and aligning raw edges, match center point and end points of neckline and binding. Stitch with 3/8″ seam allowance from endpoint to endpoint to endpoint (neckline only).

P4P Raglan Week Keyhole

  • Press seam allowance up and press binding down towards raw edge. Fold again, enclosing seam allowance.

P4P Raglan Week KeyholeP4P Raglan Week KeyholeP4P Raglan Week Keyhole

  • Continue folding towards the end of the tails.

P4P Raglan Week Keyhole

  • Top-stitch with your favorite stretch stitch.
  • Tie a bow and your done!

P4P Raglan Week Keyhole


P4P Raglan Week Keyhole P4P Raglan Week Keyhole

If you’ve created your very own version of a Keyhole, Scoopback Raglan during P4P Raglan week, we would love for you to share it with us!  Head over to the Facebook Group or share on Instagram.  And be sure to use the tag #P4PRaglanWeek so we can find you!


Curious about what else has been happening during our raglan-loving week of fun?

Just take a look at our schedule!

Monday, September 19: Jolly Roger Raglan Pattern Update + Jolly Roger Add-On Pack Pattern Release

Tuesday, September 20: JRR Woven Fabric Hack

Wednesday, September 21: JRR Animal Faces Add-On

Thursday, September 22: Contrast Band Hack for Kangaroo Pockets

Friday, September 23: Women’s Keyhole / Scoopback Raglan Hack

Saturday, September 24: Off-The-Shoulder Raglan Hack

Sunday, September 25: Adding Stripes to Your Raglan Sleeves

Filed Under: Blog Tours, Contest/Giveaway, Pattern Hacks, Uncategorized 1 Comment

P4P Raglan Week: Animal Faces

September 21, 2016

raglan-week-day3

I don’t know about anyone else, but my daughter is completely obsessed with animals. Lucky for me, she also loves the Jolly Roger Raglan- so it was a natural choice to put an animal face on a raglan for her. Raglans are an essential piece of her fall wardrobe and such a great style on girls or boys and now with the Add-on pack you have so many more options but it’s still fun to add some character to the front. The shape of the raglan sleeve are perfect for fun details like animal ears so we have created 2 different ear options and 5 animal faces for you- a kitty, panda, fox or deer, and pirate puppy! You can find the face file and ear pieces here.

Here is a quick tutorial on what to do!

First we are going to cut 4 of whatever ear option you are choosing (2 pieces for each ear). You can mix and match as you choose, we had quite the discussion on what ear belongs to which animal and we are still undecided on if a raccoon has rounded or pointed ears so we are going to leave it to you to decide!  I used a fairly heavy weight cotton lycra on my ears but if you are using a thinner knit you may want also want to use interfacing on your ears (if so, cut your interfacing and iron it on now).  Next we are going to take our ears and place right sides together, then sew with a 1/4 inch seam allowance around our ear leaving the bottom straight edge open.  I like to trim my seam allowance down with my pinking shears but you can also make tiny clips around your curve.  Turn your ears right side out and press them well.  You can top stitch your ears if you would like, I chose not to top stitch mine.

img_55721img_55731

img_55741

Next we are going to take our front piece and line up our ears.  I placed the edge of the kitty ear 1.5 inches down from the top of the shoulder on a size 5.  With the rounded ear I would move it farther down just a tad, I placed my panda ear at 1.75.  You may want to move your ear up a bit on the smaller sizes or down a bit on the larger sizes, do whatever you like but be mindful of the 0.5 inch seam allowance on the neckband as you don’t want to place your ear too close to the top and sew it into your neckband.  Once you have your ear placed on your front add your sleeve pin or clip in place and repeat on the other side.  Sew your sleeves into your front piece and continue construction as normal.  TIP: before your attach your neck band iron all your seams, you want your seams where your ears are placed to point towards the shirt and not the sleeve, it makes a huge difference on keeping your ears standing up!  Once you’ve finished your shirt, if your ears are wanting to fall forward just tack them in place on the top of each ear.  I just pinned them in place and did a couple stitches on my machine. Or you could stitch them all the way around onto your sleeve, completely up to you.

img_55761img_55771

Now you just need to iron on your vinyl!  This again, is a personal choice. I like my face fairly high on the shirt but others like it lower. Don’t have a way to cut vinyl, that’s OK! You can cut the pieces out of fabric and applique them on, add buttons for eyes, rick rack for whiskers… just have fun with it!

Go sew a bunch of animal faced raglans and let your inner animal out! Happy sewing and as always post your creations in the Patterns for Pirates Group- we are excited to see what your create! Don’t forget to tag your posts #p4praglanweek

P.S. Another quick tip, the kitty face raglan below is more of a tunic length, but you will see that is not an included option in the pattern.  A quick way to achieve a tunic length for girls is by adding the band to the hemmed length! Quick, easy and gives you one more cute option.

img_56541

img_56491img_55811img_5579114424768_10210631319370302_8079611700312509247_o

14317592_10210631319450304_566160835777953597_n

14124316_10153844301153317_1921540397317453212_o

If you’ve created your very own adorable animal version of the  Jolly Roger during P4P Raglan week, we would love for you to share it with us!  Head over to the Facebook Group or share on Instagram.  And be sure to use the tag #P4PRaglanWeek so we can find you!

Curious about what else has been happening during our raglan-loving week of fun?

Just take a look at our schedule!

Monday, September 19: Jolly Roger Raglan Pattern Update + Jolly Roger Add-On Pack Pattern Release

Tuesday, September 20: JRR Woven Fabric Hack

Wednesday, September 21: JRR Animal Faces Add-On

Thursday, September 22: Contrast Band Hack for Kangaroo Pockets

Friday, September 23: Women’s Keyhole / Scoopback Raglan Hack

Saturday, September 24: Off-The-Shoulder Raglan Hack

Sunday, September 25: Adding Stripes to Your Raglan Sleeves

Filed Under: Free Pattern, Pattern Hacks, Uncategorized 2 Comments

P4P Raglan Week: Woven Front Hack

September 20, 2016

Welcome back for Day 2 of P4P Raglan Week!  Now that you’ve all grabbed your copies of the Jolly Roger Raglan and the Add-On pack for it, I’m here to share an easy “hack”!

raglan-week-day2

I love being able to make fun shirts for my son.  However, I don’t always love having to spend the money for fancy knit prints, or having to search high and low for something that is geared toward the interest of my 6-year old.  How to do I get around it?  With fun, WOVEN cotton prints, from my local fabric stores!  They are money savers and tend to have a million fun prints that are loved by my little guy.  Want to know how I manage to mix a woven fabric into a knit pattern?  It’s so simple!

jolly-roger-hack-002

No adjustments are needed for the pattern pieces itself.  Out of your knit fabrics cut your neckband, sleeves and back panel as the pattern calls for.  And for the front, simply opt in your woven print instead of a knit!  It’s as easy as that!  Because of the way raglan sleeves are attached, they still provide enough ease, stretch, and room for the shirt to fit over your little’s heads.  And the Jolly Roger Raglan has enough of a relaxed fit that there isn’t any need to add extra space in the body.  Easiest hack ever, am I right?

jolly-roger-hack-004

Create your raglan as the pattern calls for.  I always use a serger to finish the bottom hem of my woven-front raglans, but you don’t have to.  I just like having that serged piece for a sturdier grip when I’m turning the edge under 1/4″ and then another 1/4″ before I edge stitch the hem.  You are welcome to finish the bottom edge however it suits you the best.

jolly-roger-hack-006 jolly-roger-hack-007

Be sure to press your fabric and then have your child wear it (to distract them while you make a million more).

jolly-roger-hack-008jolly-roger-hack-020

If you’ve created your very own woven-front Jolly Roger during P4P Raglan week, we would love for you to share it with us!  Head over to the Facebook Group or share on Instagram.  And be sure to use the tag #P4PRaglanWeek so we can find you!

Curious about what else has been happening during our raglan-loving week of fun?

Just take a look at our schedule!

Monday, September 19: Jolly Roger Raglan Pattern Update + Jolly Roger Add-On Pack Pattern Release

Tuesday, September 20: JRR Woven Fabric Hack

Wednesday, September 21: JRR Animal Faces Add-On

Thursday, September 22: Contrast Band Hack for Kangaroo Pockets

Friday, September 23: Women’s Keyhole / Scoopback Raglan Hack

Saturday, September 24: Off-The-Shoulder Raglan Hack

Sunday, September 25: Adding Stripes to Your Raglan Sleeves

Filed Under: Pattern Hacks, Uncategorized 4 Comments

Timeless Tunic and Tiny Timeless-Pattern Release!!

September 13, 2016

I’m asked for more patterns drafted for non-stretch woven fabrics all the time! And although my heart will always sing for those quick knits 😉 I do love a nice woven top or dress too!

So without further ado, let me introduce the Timeless Tunic and the youth version the Tiny Timeless (because Baby Girl needs to match Mama sometimes)!  We also have them bundled together for a discount in the Timeless Bundle!   All will be on sale through Sunday 9/18/2016 US Central Time Zone.

new-release

listing-pictures-bundle

I love a softer drape for my own tops.  I feel like the drape gives a more flattering silhouette.  Personal favorites are rayon challis, crepe, peachskin, poly chiffon and voile.  But, I drafted it so that you can get away with using a stiffer woven like a chambray or flannel without loosing too much of the glamour!  Now you will have a great, timeless pattern that allows you to use up that gorgeous woven fabric you’ve been hoarding for that “perfect pattern”!  (ah ah ahhhhhhhhhh…)

14324626_10157531259405599_1898415430425264769_o

Both include the same options:

Tank– Perfect for warmer weather or for a nice layering piece. I loved to wear a nice silky tank under a cardigan!

14242301_10210716022718957_378574312330514505_o14241659_10100199813559177_5606052251135658841_o14125490_10207570896533783_6302897511345138404_o

Short Sleeve– A bit more coverage, but still great for warmer weather and layering!

14184470_10206952209069922_8833346384594323059_n14241581_10102547913260398_7254487766094641562_o14242208_10210571073896937_805838614165298697_o

3/4 Sleeve– A great transition length that you can wear year round.

14249950_10154503698239666_7646869345079131584_o14352546_10210567848103560_4851958667013892215_o14206059_10157281958945562_7297118569733716242_o

Long Sleeve- Take this length into the colder months no problem! A lot of our testers loved the longer sleeve paired with a cozy flannel!

14242334_10104325619441019_6908037680625653308_o14125531_10157496754100599_3483788795218596629_oimg_3072

Top/Shirt Length- Cute, comfy, and easy to wear!

14324611_10153780722145841_3662509677212397532_o14238084_10153700243027016_1014006267670653907_n

Curved Tunic Length- My personal favorite 🙂 It’s flattering and has some coverage but still looks trendy and put together. Younger girls love that curved tunic for pairing with skinnies or leggings!

img_279114231138_10153769419810841_3613078633363806887_o14290074_10153768368870841_553585620824454842_o

Dress Length- Meant to hit about 2″ above knee (a super flattering length on all shapes) you can make it casual everyday or sew it up in a nicer fabric and pair with heels to dress it up!

14258341_10207132892821807_6136906350317382751_o14207652_10157496740100599_2033111073842957631_oimg_2624

So, just how versatile is this pattern? It can really be styled up or down so many ways you could wear this anywhere!

This is such a classic look you can make it a casual, everyday/play look:

14249963_10154503755929666_9129185631609573782_o14231413_10207876129193547_6674605127882798680_o14205954_10210512674724260_4397482894494798683_o

Maybe a casual date, girls meet up, or shopping day:

14207814_10154300057696539_8237162624284821183_o14203258_10208929354683616_2720049744373384192_n14207750_10210551066636768_7037204826372407243_o

Use something a bit nicer and you have a great office or work wear attire staple. Send your littles in it for school ceremonies or picture day:

14231234_10153612253591735_8839325507524326519_o14232033_10208995061987559_5269068041149513619_o14188314_721772925249_1691406524578386645_o

It’s the perfect style for a shower or party! Perfect for those adorable border prints as well!

14196081_10153869020893317_5082474374666622486_o14291746_10100703800196229_1962536080284580740_n14249724_1066496020113465_6724777699018234887_o

You can even do a great silky fabric and make a more formal version:

14222301_10154394234975185_4863718361316041852_n14206175_10103253572656169_8892717186004317338_o14207838_10154332104716539_4627475586566883372_o

Warning though, doing this dress in a fabulous silky leopard print can really make you feel glamourous!! This little one had some great modeling poses in her fancy dress!! Don’t we all love to feel beautiful! <3 <3 <3

14311451_10154332105296539_2865024478159272751_o

I hope you enjoy this new pattern as much as we all do!

The Timeless Tunic and Tiny Timeless will be a great weapon to pull out when you or your little one find that perfect woven fabric!

img_9056

Filed Under: Pattern Release, Uncategorized 2 Comments

Free Spirit Tank – mash up & high low hem

August 30, 2016

IMG_0490

I’m sure by now we’ve all been invited to a least one “Buy these clothes” Facebook party and we’ve been tempted to buy some outfits only to think “nah…I can make it myself”.  Am I right? Well that was my thought when I saw one of this big online company’s newest relaxed fit dress that features a high low hem.

IMG_0556-1

Today on the blog I wanted to show you my version of this popular dress and teach you how to use your favorite P4P patterns to make yourself one. First you will need the Free Spirit Tank (which just got updated to include the Layer Feature!) and the Boyfriend Vneck shirt patterns, a ruler, markers, paper, your fabric of choice, a measuring tape and a French curve ,if possible (A great investment if you don’t have one!). Start by printing the patterns according to the instructions and then cut your size and the high low option.

Screen Shot 2016-08-26 at 11.15.13 AMScreen Shot 2016-08-26 at 11.16.06 AM

I used the sleeves and armcyce from the Boyfriend V neck shirt because it has a looser fit. If you are unsure how to mash the two patterns to add sleeves to the FST, use Judy’s Free Spirt Tank- Layer Me Up mash up tutorial. You would apply the same guidelines and tutorial. Even better, the Vneck Boyfriend tee includes a pocket piece too!

Now that we have the sleeves part covered, let’s move on the the high low hem. Grab your measuring tape because it’s time to take some additional measurement to create the above knee dress length. Measure the length from underarm to above knee, now measure the FST pattern piece from underarm to the hi low hem mark line. In doing so you’ll figure out how many inches you’ll be extending the side. In my case it was approximately 10 inches.

Attach some blank papers to the bottom of your pattern so you extend it. Using a straight ruler add the 10 inches side extension to both the front and back pattern pieces. Now we will create the front and back curved hems. The back curve will be a much more deep one than the front. Take the front piece and mark 12 inches down from the high low hem. Using a French curve draw a curve from the side point to the center seam. We will draft the back curved hem the same way only this time we’ll mark the extended center  mark at 14 inches and carefully draw a curve between the side mark and the center.P4PGRAPHIC

That’s all! You’ve now drafted your own “Carly” inspired dress. Cut out the pieces and sew them according to the pattern instruction.  The Boyfriend V neck shirt includes a pocket so I added it to the FST front too. Simply mark the pocket placement from the Boyfriend shirt on the FST pattern.

TIP: the bottom hem will have a pretty big back curved hem so don’t forget the tips I gave you in a earlier blog about hemming knits.

IMG_0541IMG_0561IMG_0544

Let me know if you have any questions by posting them in the comments below. As always, don’t forget to show off your creations in the group. I can’t wait to see your versions of this dress.

Alex

Filed Under: Pattern Hacks, Uncategorized 16 Comments

Darts 101

August 10, 2016

13886338_10102825780914283_2473314520084428633_n

You may have already heard, but Patterns for Pirates has some ladies woven patterns in the works! Woven patterns tend to use a few techniques that are not often used in sewing knits.  One common technique on woven patterns are darts and I’m here to give you a few tips on how to make the perfect dart.  Darts are used to create contour and shape in your woven fabrics and accentuate your curves. You will find them quite often used in ladies patterns at the bust, and often on the back of pants or skirts.  Don’t be intimidated by darts as they are actually very easy to sew!

I am using the Everyday Elegance Pattern for my example today and we will be focusing on the front piece. The first thing that I like to do before I even start cutting out my pieces is poke a little hole right thru my pattern piece at the tip of the dart.  I usually just use a pen and make a hole big enough that I’ll be able to put the tip of my marking tool into it after I cut my pieces.dart

Once you have your front piece cut out you don’t want to remove your pattern piece from your fabric.  I’m going to show two ways that I like to mark the dart depending on the type of fabric that I’m using.  First, if I’m using something that is a bit more stable like a quilting cotton, chambray, or shirting fabric I will just take my marking pen (I use washable crayola felt pens or a disappearing tailors pen) I poke my pen thru the little hole that I made in the pattern piece. I then take a pair of scissors and make a 2 little snips in right where your darts end, on the side seam of your piece.  You will then flip your fabric over, still folded, and repeat the same process on the other side.

IMG_5014

IMG_5017

If my fabric is slippery or really lightweight and tends to slip I will mark where I made the little hole with a needle and thread. Yes, I said needle and thread but I promise that it is much easier then trying to flip your fabric over and lining it all up again with your pattern piece.  You are just going to make a little cross stitch with your needle and thread, keep it nice and loose and leave a long tails.  Then as above make your two little snips on the side seams.

IMG_5029

You’re now ready to remove your pattern piece.  If you used the needle and thread method to mark the point of your dart gently pull your fabric apart and snip the threads that connect the 2 sides.  Next we are going to connect the tip of the dart to where we snipped at the side seams.  I use a ruler and draw from my point to the side seam on both sides. I then like to draw a line from the point straight down the middle.  Now you are going to fold on that center line and press it with your iron making sure that your snips line up together.  I then secure my dart with a few pins.  Time to sew!

IMG_5018IMG_5021
I like to decrease my stitch length just a bit, usually I sew at a 2.4 stitch length but for darts I go down to a 2 stitch length, this is just to make sure that when you press it after you’re done none of your stitches show.  We are going to start at the side seam and sew right on the line that we drew earlier.  When you get to the tip of the dart, DON’T BACK-STITCH!  You want to sew right off the end of the dart, leave long thread tails.  You can back-stitch at the side seams but never back-stitch at the tip of the dart.  You want to tie off the end of the dart and then trim your threads.  I usually knot my threads 3 times.  This helps keep the very tip of your dart nice and clean/crisp.

IMG_5025

Now we are done sewing the dart we want to press it.  I like to use something that curves to press my dart.  I have this little pressing tool that is used to press sleeves but it works great for darts to, you could also use a tailors ham.  Don’t have anything? You can roll up a bigger piece of fabric you have in your stash.  You want to press the dart down towards the bottom of the top from the wrong side.  Then I flip it over and press it from the front and you’re all done!

IMG_5033IMG_5035IMG_5036
Not that bad right?!  Take the time to be accurate and press well.  If you try to rush or skip out on the pressing you’ll be sorry!

Now go and practice your darts and get ready for the new woven patterns coming really soon!


Filed Under: Frequently Asked Questions, P4P University, Sewing Techniques, Uncategorized 1 Comment

Pattern Testing: How to become part of the Crew

August 6, 2016

P4P-Pattern-Testing


So you want to be a Pirate?

“Ooooo! I would love to test for you.” and “How do I become a tester?” are frequent posts in the P4P Facebook Group.  We are constantly on the look out to add talented ladies to our testing pool so we thought we’d give you the nitty gritty of what it takes to be a pattern tester and how to get picked.

Why do we need Pattern Testers?  All patterns are drafted based on average body measurements but we need people to sew them up and try them on to ensure the proper fit.  We also want to be sure that the instructions are not only grammatically correct but understandable by all levels of seamstresses.

The Pattern Testing Process:

  • Pre-testing: Once a pattern has been drafted, it is pre-tested.  Before we even send out the pattern to our testers, we sew them up to determine if the fit and ease of the pattern is what we are looking for. We usually sew up one of each of the options to be sure to work out any issues before it goes in to live testing.  In some cases, we will modify a pattern numerous times before deciding on the final versions.  This is also where we really hash out what options, finishing methods, fabric suggestions we will include in the pattern.  Our phones are filled with tons of pre-test and fit pics so we thought we’d share a few!  😉
    pre-test
  • Tester Call: We are ready to do a full test on the pattern.  We post a call in our tester pool and our testers sign up for the size and options they’d prefer.  Our testing period usually runs about 1 week, unless we find there are issues and it needs to be extended.  It is crucial to be sure that the deadlines are able to be met as well as having updated and current measurements.  We rely on feedback from the testers regarding fit so is very important to be testing the item in the proper size. We usually have 20-40 testers per pattern depending on the options and size range.
  • Testing: Sizes and options are assigned to testers.  This is when all fit issues and edits to the tutorial are completed.  Testers are to provide feedback about the the overall tutorial as to if its understandable and concise as well as any fit issues. Some fit issues that we may run into are too low of an armscye, too much or not enough ease, gaping armholes and necklines, etc. so some patterns will require multiple revisions.   Although a tester is only required to complete one full item, many decide to sew up the revised and final versions during the testing week.  This means, the pattern pieces are printed multiple times and lots of fabric is used.  Any photos that will eventually be used for promotion (listing pictures, pattern covers, Facebook and blog posts, etc.) are typically only the final version, or one that reflects the final version of the pattern.  This was not quite the norm for us, but the slim fit raglan went through close to 5 versions in testing and 7 in pre-testing.  Not everyone sewed up all versions but we did have a few that ended up making more than 5 shirts that week.  During the testing week we have two deadlines; one for fit and one for feedback and final styled photos.   Fit pictures are basic photos of the garment being worn and point out any issues one may have. We ask for at least 5 final styled photos that showcase the front, back, side and any details of the pattern (like pockets).   These do not have to done by a professional photographer or taken with a high end camera but clear photos of the item and model are a must. We also like clean editing, so no over the top filters or photo-shopping.  An example of fit and styled photos are below.    P4P pattern testing photo example
  • Pattern Release: All fit issues and tutorial edits have been addressed, testers final pictures have been submitted and we are ready to release to the public.  We work behind the scenes to get the pattern files ready, website listings and round up blog posts and then we release.  A new release is usually on sale for a week and we ask testers, if they love the pattern to share it.  Some have their own blogs and will provide their own “review” and write-ups and other simply post their pics in our Facebook Group as well as other sewing groups.  Final photos are also posted in an album in our Facebook Group for inspiration and promotional purposes that the members can access at any time. Check out some of our awesome testers from one of our last releases. Essential Tank Facebook Photo Album.
  • Celebrate:  We wouldn’t be able to get this point without all our awesome testers!  Testing is voluntary and not a paid position.  Upon completion of the test, the tester will receive the final pattern and a big thank you.


So now that you see what we do in testing, you ask, “How can I become part of the testing pool?”

  • When a new pattern is ready to go in to testing, we do a call in our testing pool first.  Sometimes we fall short on volunteers so will do a wide spread call in our Facebook Group to fill in where we need.  This is rare, but has happens a few times and if the test is successful, we add those ladies to the testing pool.
  • Facebook Members are given the first opportunity to test. We hand pick a few ladies from the group and ask if they would like to test the next pattern.   We “get to know you” by your posts in the group.  We are constantly looking for familiar faces that show off their P4P items in the group to add to the group! We look for the following:
    • Active group members who are familiar with our patterns and help out in the group by answering questions (Why? Testers are often asked a lot of questions about the new release and we love for the testers to be available and active in the group!)
    • Posting pics of their completed P4P projects
    • Ladies who are in the size range that we need to fill-in

Check out some of the gorgeous ladies we recently hand picked to test for us from our Facebook Group!!

13391387_10156987531095282_9212836292458574362_o 13717189_10207102251900050_8188682876773372792_o 13403763_10100540252776242_6199973707243297559_o 13723870_10103163709956739_3747945316400350143_o 13734906_10100188299473497_1585660700122181296_o  13698299_10157292206150599_225019478249495708_o


We currently have over 100 ladies in our testing pool so I asked them to share a few things about what they felt anyone that has never tested before should know. Here’s some of  what they had to say:

  • You’re going to use a lot of fabric, ink, tape, and paper. You’re going to take 10000000 pics that you hate and settle on 3.
  • It costs the tester quite a bit. It’s not just a time commitment, but a financial one as well. Also, MAKE THE PATTERN AS-IS. Its impossible for a designer to test their pattern correctly if the actual pattern is never actually tested. It doesn’t matter if you’re afraid that you or your child will grow out of it in a few months. You are testing and that’s a sacrifice you have to make.
  • People will expect you to know everything about the pattern. All the options, best fabric to use, where to get fabric, how it fits on various sizes etc. Sale info.
  • You can’t be shy! If you see a fit problem you have to say something. I know when I first started testing I felt bad saying something that might come across negative but had to get over that fast! 
  • Remeasure for EVERY test. 
  • Don’t wait until the last minute to make your garment. You never know which kid will start puking, which needle will break, or when the power decides to go out. Start ASAP and get it done on time. When in doubt of time, opt out of volunteering. There are many people that would love to take your place for that test. Making a commitment you can’t keep is way worse than politely declining and maybe trying again next time.
  • You need to sew step by step with the tutorial steps as written. It takes me 10x longer than if I were sewing on my own but you need to be as precise & exact to what’s instructed & as the pattern prints.
  • Get a remote clicker for your camera or find a buddy because most husbands don’t understand this process!
  • Most patterns are not perfect the first run, so patience with fitting and adjustments are a must. You are a tester… Testing by trial and error. Take it for all the pain and glory.

Pattern testing is a lot of WORK, but it is also fun and can be so rewarding! Our testers agree.

  • I enjoy testing because having a deadline really helps to motivate me to sew!
  • My absolute favorite is being a part of the team that helps these fabulous mamas succeed in their dreams!
  • Pros: making friends all over the world, being part of the design process, sharing and being proud of your work, learning new techniques and improving my sewing and photography skills
  • I think the biggest thing to realize is that it’s not about the “free pattern” or getting it first- testing for me is truly about being a part of the process! It is so much fun to see the behind the scenes, how much work it takes to get the pattern perfect (which often means a lot of fabric, printing, taping= $$ which counteracts the notion of a free pattern!), learning from all of the amazing women in the group, but most of all- getting to know all of the amazing women!

Phew! So there you have it!  Are you ready to join the crew?  Show us what you got and share you creations in the P4P Facebook Group. You might just be the next member to be given a chance. Happy Sewing!


Filed Under: Frequently Asked Questions, Uncategorized 6 Comments

5 TIPS for successfully hemming knits

July 28, 2016

IMG_9357

We have seen a lot of questions in the group about getting the perfect hem on your knit outfits. Most hems are sewn perpendicular to the grain and on the bias in the case of curved hems…this makes hemming sometimes appear stretched out, puckery or wavy.

I needed to sew a shirt to showcase this fabric so the first pattern that came to mind is the Women’s Henley. The only modification I did was to shorten the neckline placket so it would not interfere with the design of the fabric.listing pictures

I will give you my 5 best tips for avoiding stretched out hems (especially curved hems) and getting the perfect finish.

1. You IRON is your best friend!

Always have your iron hot and with plenty of water in the steamer. Iron your hem before your sew it, it will make hemming easier! This process is called a memory hem. Be sure to follow your pattern’s directions for the amount of fabric that needs to be folded. Pressing and steaming the seams once sewn will also remove the puckering and waviness back and make them look beautifully finished. Ironing and steaming your garment every step of the way is one of the most important parts of sewing. While steaming your hems may not fix all issues it will definitely fix most of them.

IMG_9203

Before pressing and removing excess fabric.

IMG_9210

After a good steam and press.

2. CLIPS and PINS galore!

When hemming, I clip/pin my fold over fabric almost every two inches. Having a stable seam will make sewing it a breeze. Whether you are using your coverstitch machine or your sewing machine having your fabric pinned every inch and a half or so will make your hemming experience much more pleasant. Sewing clips vs. pins is a matter of personal preference. I like sewing clips best because I find them to help me secure my hems faster than pinning used to. So, are you a “pin-er” or a “clip-ser”? 🙂 – insert pictures of the clipped hem

IMG_9197-1

3. HEMMING TAPE is magical!

Stitch Witchery or Easy Knit Tape will become your go to notions for hemming. Stitch Witchery is great for stabilizing and fusing together knit fabric. Simply lay the tape inside the memory hem and press it. This will not only fuse it but it will also give it more stability, making sewing so much smoother and hassle free. It is very important to make sure that the hemming tape you use it’s sew-able. Some no-sew tapes may leave a gooey residue that will damage your needles. Insert photo of hemming tape and photo of ironing it.

I also like to spray Best Press when I press my hems. The starch in it makes the hem more stable so it becomes easier to sew.

IMG_9193-1

Hemming tape can be transparent or opaque.

IMG_9196-1

4. Length of the STITCH and TENSION matters!

Whether you are using your sewing machine or your coverstitch machine, you must remember to adjust the stitch length and tension according to the type of fabric you use. Some coverstitch machines will adjust the tension automatically but most of them will not, so be sure to test your hemming on a scrap piece of fabric. It’s imperative that the scrap fabric you use is the same as your project. Usually hemming knits will require you to lower the tension and length the stitch. Some machines will prefer a longer stitch, some will work great with just a 3.0 length.

IMG_9199-1

If your machine will allow you to set up the stitching speed, do it!

IMG_9207-1

I tend to coverstitch at about 1/2 to 3/4 inches away from the fold so I remove the excess fabric with my applique scissors. You can use your regular scissors too, just be careful not to snip your stitches.

5. Last but not least, have PATIENCE! Go slow!

We all know that rush feeling we get when reach the hemming part of the project…one more step and then it’s ready!! Well, last thing you want is for this last step to ruin your hard work. Take a little more time and go slowly when hemming. Coverstitch machines sew pretty fast so remember to slow down and guide your fabric through.

IMG_9339-1

IMG_9211 IMG_9213-1

I hope you find my tips helpful and that you will tackle your next P4P project with more confidence. Don’t forget to post your creations in the group. Sew like a Pirate!

Filed Under: P4P University, Sewing Techniques, Sewing with Stretch, Knit Fabrics, Uncategorized 8 Comments

Pivot and Slide FBA Method`

June 22, 2016

fba header picture

We get a lot of questions about Full Bust Adjustments.  Since I draft for a true hourglass, curvy figure lots of our ladies have bigger busts. So here is a quick and easy method for knit tops if you need a FBA.

Do you need a FBA?

I see a FBA suggested A LOT in sewing groups, even though it’s not always the problem/solution for ladies (Especially for a P4P pattern that already drafts for a bigger bust.)

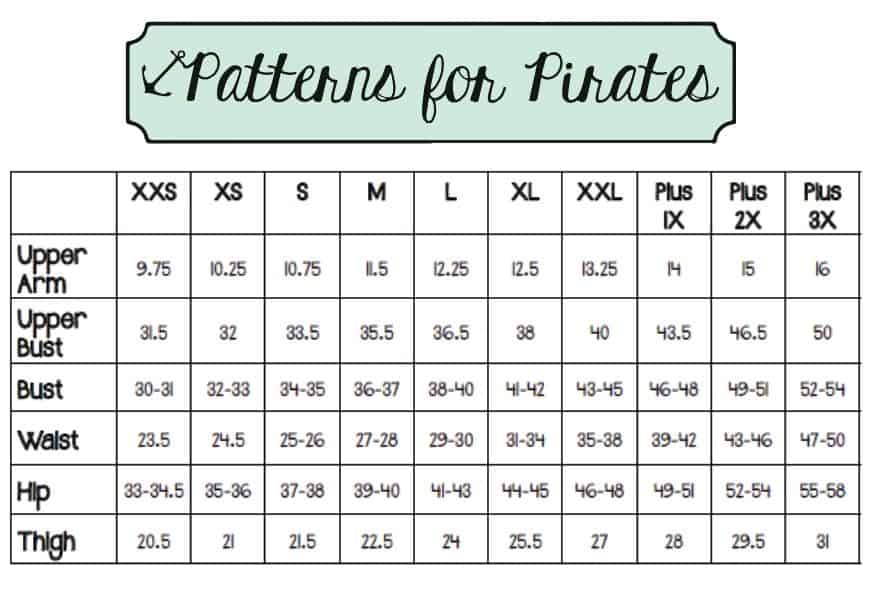
So, how do you know?  I began putting both upper/over bust and full bust in my measurement charts to help! (Need a refresher on these measurement terms? Here is our How to Measure Yourself post explaining them.)

If your upper bust is a size smaller than your full bust- you need a FBA.  If you don’t have those measurements on your pattern then you will have a neckline and shoulder fitting too large when choosing your size from your full bust measurement.

I do NOT advise “choosing your size based on your upper bust measurement” and doing a FBA for that many inches.  Indie patterns like mine are much more “true to size” than traditional paper patterns that tend to have a lot more ease built into them. With traditional paper patterns it is often very easy to size down 1-2 sizes on them and still have enough wearing ease.  Most indie patterns are not drafted with that much extra ease.  I draft my patterns right from that measurement chart meaning if I picked my size based on my upper bust (34.5) I would choose a size small, but I don’t need a small! Both my upper and full bust fit into a medium on the full size chart.  I do not need a small with a FBA becuase my frame/upper body isn’t a small.  It’s a medium 🙂 This is why I began adding the upper bust measurement into my patterns, to take out that guess work when I saw this recommendation quite a lot.  And while it might work well for those traditional paper patterns with more ease- I do not suggest using this method for P4P patterns-or most indie patterns in general.

Here is my size chart with both upper/over bust and full bust.

listing pictures3

Got some wrinkles on the full bust area? A FBA is NOT always the answer 🙂 There are a lot of other reasons you might have some wrinkling there!

Both raglan and dolman style sleeves will naturally have some wrinkling there. No matter who that pattern designer is, who is wearing it, fabric choice, or even gender wearing it! The drafting of these two sleeves lay flat when arms are out, which means when arms are down it naturally creates some wrinkling in the armpit area. No biggie 😉

IMG_0238 IMG_0413 IMG_9552 IMG_3842 IMG_4147 IMG_4387

Length is the armsyce is another reason one might have some gaping or pulling.  If you are shorter or taller then the height the pattern is drafted for (P4P drafts for average 5’5″), or if you happen to have a different proportion there. You might need to adjust the length of your pattern from the top of shoulder to the armpit rather than needing a FBA.   This is difficult to tell just from a picture.  It is however much easier in person to see.  If you’re not sure try pinching at the shoulder seam to take out some length if you think it might be too long.  If it is too short you will feel like the entire shoulder area is too tight and that armpit seam will be up touching your armpit too tightly.  For both it is easy to see if you try on the shirt prior to putting the sleeves in.  If it is a tank, remember the bands will pull the armysce in though.

Here my lovely tester and model has a little wrinkling because she is a bit shorter than the drafted height. She would benefit from taking just a touch of length from the armsyce.

11036978_10207178765452450_6301409831053611894_o

Here my lovely tester would benefit from the opposite, a bit more length in the armsyce.

11807358_10207360915846870_5189633883074489071_o


You might have some issues with fit through the armsyce and bust if you are wide chested/through the upper back.  You would find your upper bust measurement in a bigger size than your full bust.  You would need a Small Bust Adjustment (follow the same method just pivoting and tracing to the smaller full bust size).

Here is a gorgeous tester of mine who has begun to trace off a size larger through the neckline and shoulders and adjust down to her smaller bust. This is prior to doing so. You can see it is a bit tight across her shoulders and upper chest area. but fits well in her full bust.

12512545_10156480108785282_629169134466680487_n12669689_10156480108610282_565742808129966782_n


The last reason you might be having fit issues through the bust is not using the appropriate fabric for the top.  If your pattern suggest 50% and you sew up a cotton jersey with only 20% you might have pulling at the chest.  The opposite problem would be using a very stretchy fabric like a lightweight rayon spandex with a lot of horizontal and vertical stretch making the armsyce droop lower or even gape.

Here I am in the exact same size, but the feathers are a more stable cotton jersey with very little stretch and the grey is a rayon spandex with a ton of stretch and drape.  The armsyce is an 1-1.5″ lower in the drapey, stretchy rayon spandex.

IMG_7635 IMG_7920

One more thing I see sometimes is the drag lines from bust to waist.  This is something you will get naturally with an hourglass figure. You have a large difference from your full bust to waist.  If your shirt/dress is semi-fitted then you will see those drags pulling into that smaller measurement at the waist.  This isn’t asking for a FBA, it’s asking for a dart 🙂 But, most knit shirts don’t have darts, just curves along the side seams. You can’t get as drastic of a change from full bust to waist without a dart.  But that’s okay! It’s the nature of a semi-fitted knit top.  It doesn’t mean it is ill-fitting.  Here are some pictures showing those drag lines, but I have room for my bust and the armsyces are fitting perfectly for my frame.  My side seams aren’t pulling drastically to the front of my body on my bustline and it isn’t too tight across my back at the bustline.  I don’t need a FBA for my patterns (yay! I do need them on patterns drafted for a more rectangular figure like traditional paper patterns! Just one reason why I love drafting for a curvy figure).

IMG_7564 IMG_7753 IMG_1758 IMG_1791 IMG_1804

Okay, now if you’re still with me 😉 and you need a FBA here is my favorite, quick and easy method for a knit top. This only adds a bit of width right at the bust.  It doesn’t add length.  For most women and most knit tops this is sufficient.  If you have 2 sizes difference in your upper and full bust you might also add some length to the front center at the bust line and ease it back into the side seam (making the front center curve down). To give your bust some extra length as well.

Here is one of my favorite testers.   She has a smaller size upper bust than full bust.  Here she did not do a FBA.  You can see she has a bit of pulling pointed right to the apex of her full bust. She is your classic case of needing a FBA 🙂 Her side seam will be pulling towards the front of her body instead of laying more evenly along her side.

12109259_10156165083900790_2794494373974819072_n  12094846_10156165083630790_3745559963982436088_o


Here is the “Pivot and Slide FBA Method”:


Step 1: Choose your sizes based off the measurement chart.

z

Step 2: Pivot

fba pictures-02

Step 3: Trace

fba pictures-03

Step 4: Slide back

fba pictures-04


Now you have a new armsyce that goes wider at the bust, but the same smaller neckline/shoulder fit as the smaller size.

I hope this helps those out there needing this fit adjustment! Once you’ve got it down it really is a very quick and easy method to adding a bit more room for the ladies 🙂

Filed Under: Fitting, P4P University, Uncategorized 35 Comments

P4P University:: Grading Sizes

June 20, 2016

grading sizes

Patterns for Pirates grades to a true curvy, hourglass, 5’5″ frame.  Often times, one’s measurements may not fit within one size for bust, waist, and hip and in order to keep the intended fit of the garment, grading sizes is needed.  Is it always necessary to grade sizes? No, but depending on the fit and ease of the item, it may be worth taking the extra step to custom fit it to your measurements.  Unsure if you want to grade?  Check out the Shirt Fits Explained post and our post about Ease as they may help you decide if you are comfortable with a different fit.  For some of the looser cut tops like the Everyday Elegance and Relaxed Raglan, grading up a size for the waist is likely, not necessary as they are straight cuts from the bust down.  But a top like the Layer Me Up, that is very fitted to the body would fit the best if graded to your measurements/size.  Be sure to measure yourself prior to sewing!  Our measurements tend to fluctuate without us really noticing, so I try to measure myself every couple of weeks to be sure I am still sewing the same size my measurements put me.  Not sure where to measure? Read this: How to Measure Yourself.  Below is the size chart for reference.


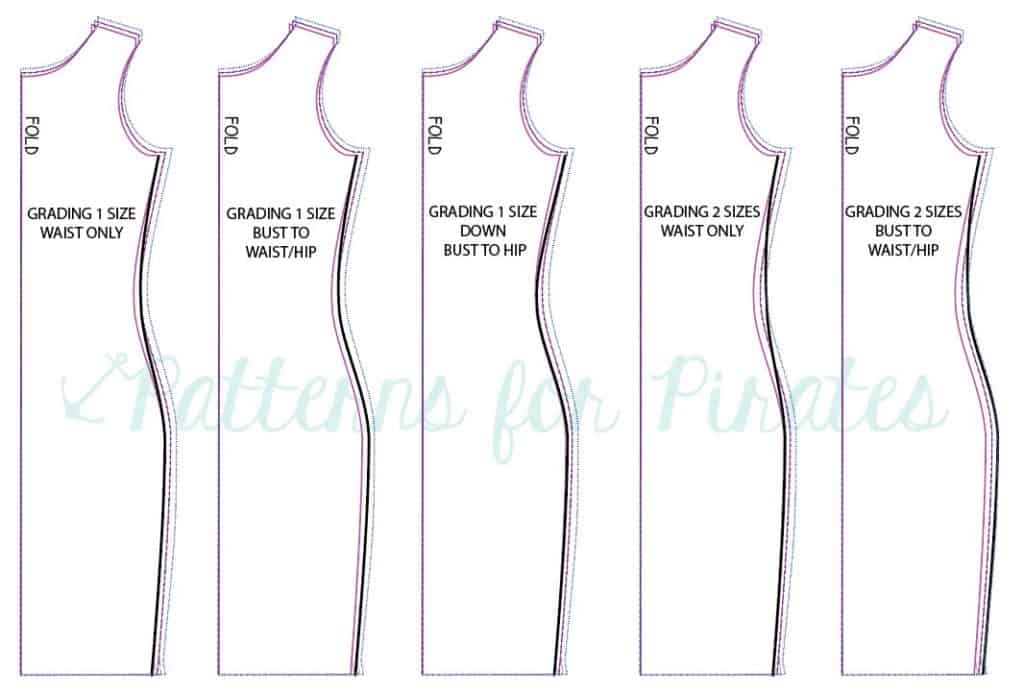
Now that you have determined your size and if you’d like to grade, how do you do it? Below are a few examples of grading for a larger waist and hip size.  Any adjustments should be made to both the FRONT and BACK pieces.  Do not be discouraged if your measurements put you within different or larger sizes than ready-to-wear store-bought clothes as pattern sizing does not translate the same.  Our bodies come in all shapes and sizes, and we are all uniquely beautiful.  The beauty of sewing for oneself is the ability to create an item custom fit to you.

P4P grading sizes, pdf patterns

Still need help or have more questions about P4P patterns?  Join us over in the P4P Facebook Group and get to sharing!


Filed Under: Fitting, P4P University, Uncategorized 19 Comments

  • « Previous Page
  • 1
  • …
  • 25
  • 26
  • 27
  • 28
  • 29
  • Next Page »

Featured Patterns

  • Mae Top - Bundle Mae Top - Bundle $20.00
  • Mae Bottom - Bundle Mae Bottom - Bundle $20.00
  • Loosey Goosey - Bundle Loosey Goosey - Bundle $20.00
  • Bacall Bodysuit Bacall Bodysuit $12.00
  • Privacy Policy
  • Refund Policy
  • Affliliate Program
  • Contact Us
  • About

Copyright © 2025 Patterns for Pirates

Copyright © 2025 · Genesis Framework · WordPress · Log in