Patterns for Pirates

P4P stylish, modern, wearable patterns

  • Home
  • Blog
    • Frequently Asked Questions
    • Pattern Releases
      • Free Patterns
    • P4P University
      • Fitting
      • Sewing with Stretch, Knit Fabrics
      • Sewing with Woven Fabrics
      • Sewing Machines
    • Sew-A-Longs
    • Fabric for Pirates
    • Pattern Hacks
    • Announcement
      • Blog Tours
      • Contest/Giveaway
  • Shop
  • Bundle Discounts
  • Gift Cards
  • My Account
  • Cart

P4P University – Adding Trim to Hems

January 29, 2021

P4P UNIVERSITY – Adding Trim to Hems!

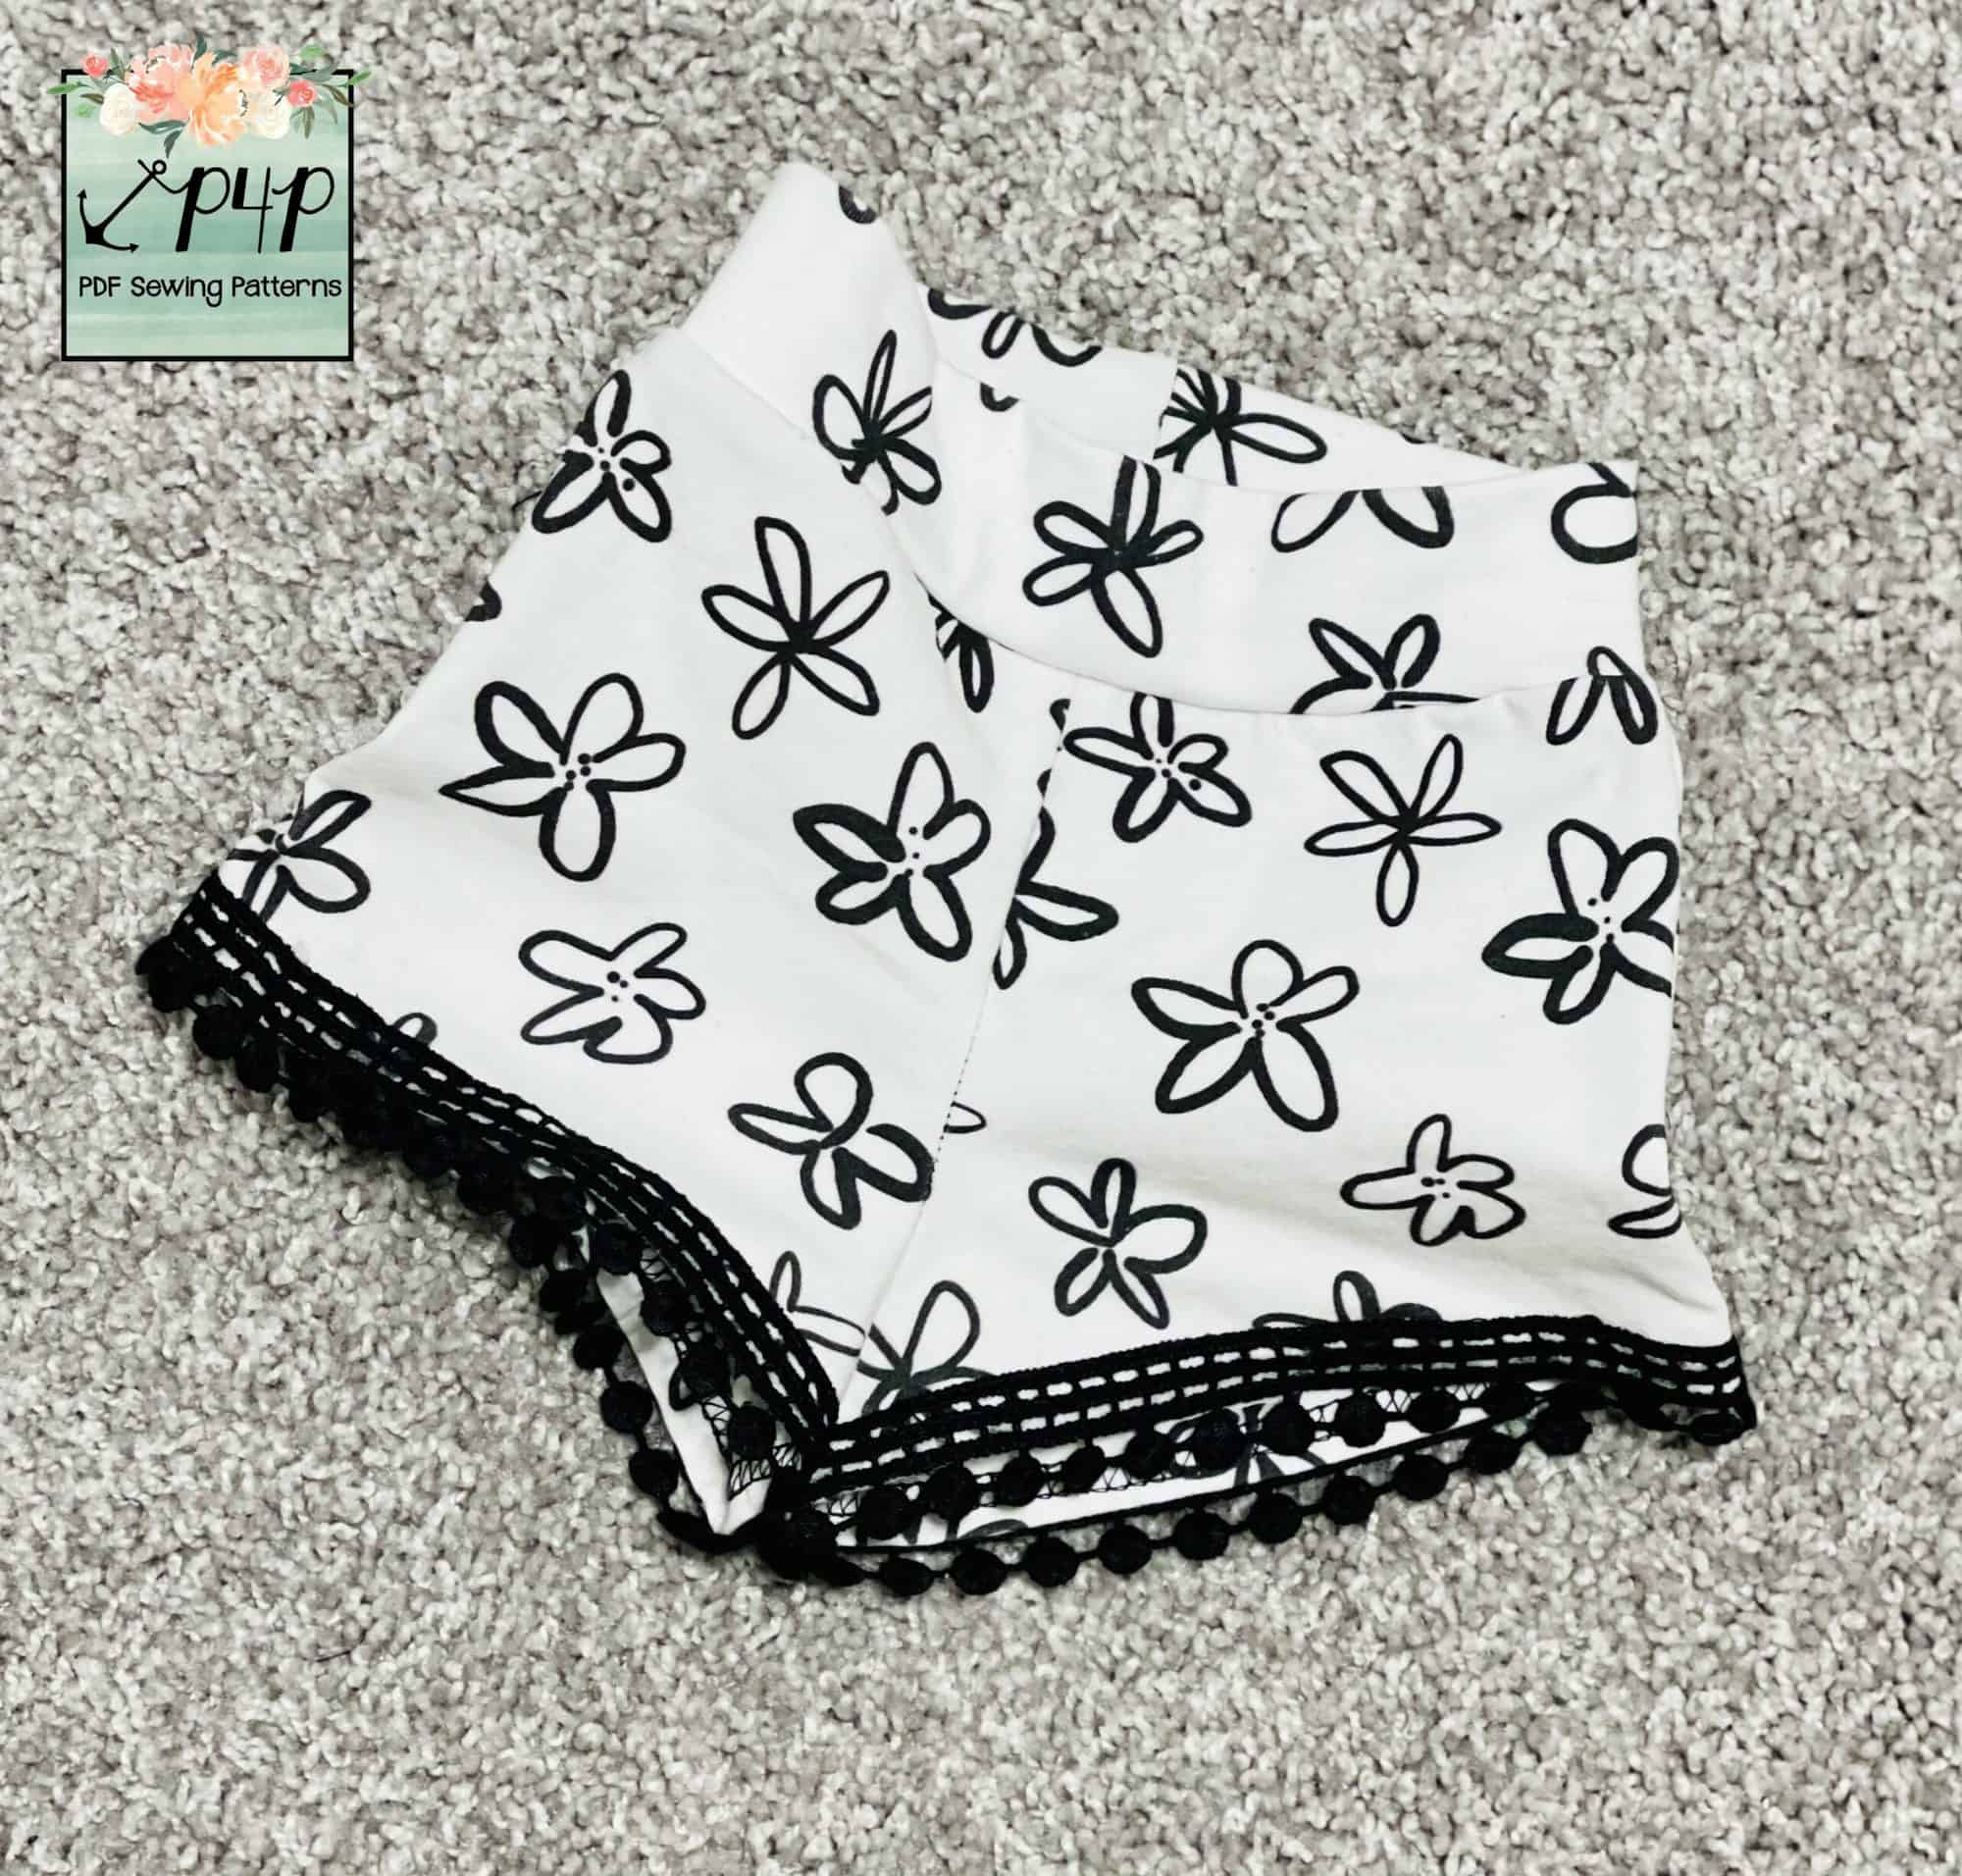
Hello pirates! Today’s topic will focus on how to add a decorative trim to any hem – this is a super easy way to add a unique and decorative touch to your garments! This post will walk you through the steps to select your trim, prepare your hem, add trim to your hem, and also to launder your garments with trim. For this example, I will be using the Cozy Pants – Youth pattern, and I have chosen to do the shorts with the plain waistband and no pockets. I love adding trim to the most basic options because I feel that it adds a fancy design element while still keeping the project quick and easy – my favorite!

Now let’s get started!


Helpful Tips in Selecting the Trim: 

  • STRETCH FACTOR – If your trim is not as stretchy as your garment fabric, you will want to be sure the pattern you’ve chosen will still be wearable with a non-stretchy hem. Adding a non-stretchy trim will restrict any stretching. For the shorts pattern I have chosen, the legs are wide enough that it’s okay if the hem no longer has stretch. But if it was more fitted, then I’d have to switch to a trim that has an equal or similar amount of stretch.
  • TRIM WIDTH – For added convenience, I recommend selecting a trim that is either as wide or wider than the length of the finished hem. This allows for you to stitch the trim and hem in place in one step! This is optional of course, but I like to minimize the steps wherever I can! 🙂 Wideness of the trim will also depend on if the trim is placed on top or under the hem. For example, if you’d like for the trim to be on the underside of the hem, you may want to choose a thicker trim and/or a trim that you don’t mind will have a portion of it hidden behind the hem.
  • PLAN AHEAD – It is a good idea to already have your pattern, fabric, and location of trim decided on before selecting your trim. This way, when you select a trim you will be able to envision how it will look.  Also – be sure to have a scrap of your fabric nearby when shopping to ensure color coordination!
  • TRIM CONTENT – Be sure to see if the trim is made from material that could shrink. Trim made from cotton will likely shrink, so before sewing with it I recommend washing it in a similar manner that you plan to wash the finished garment (see end of post for laundering tips). 


Preparing for the Hem:

Now that we have selected our trim, we are ready to add it to our garment! Construct your garment as usual, but stop before hemming where you plan to add the decorative trim. Follow the steps below:

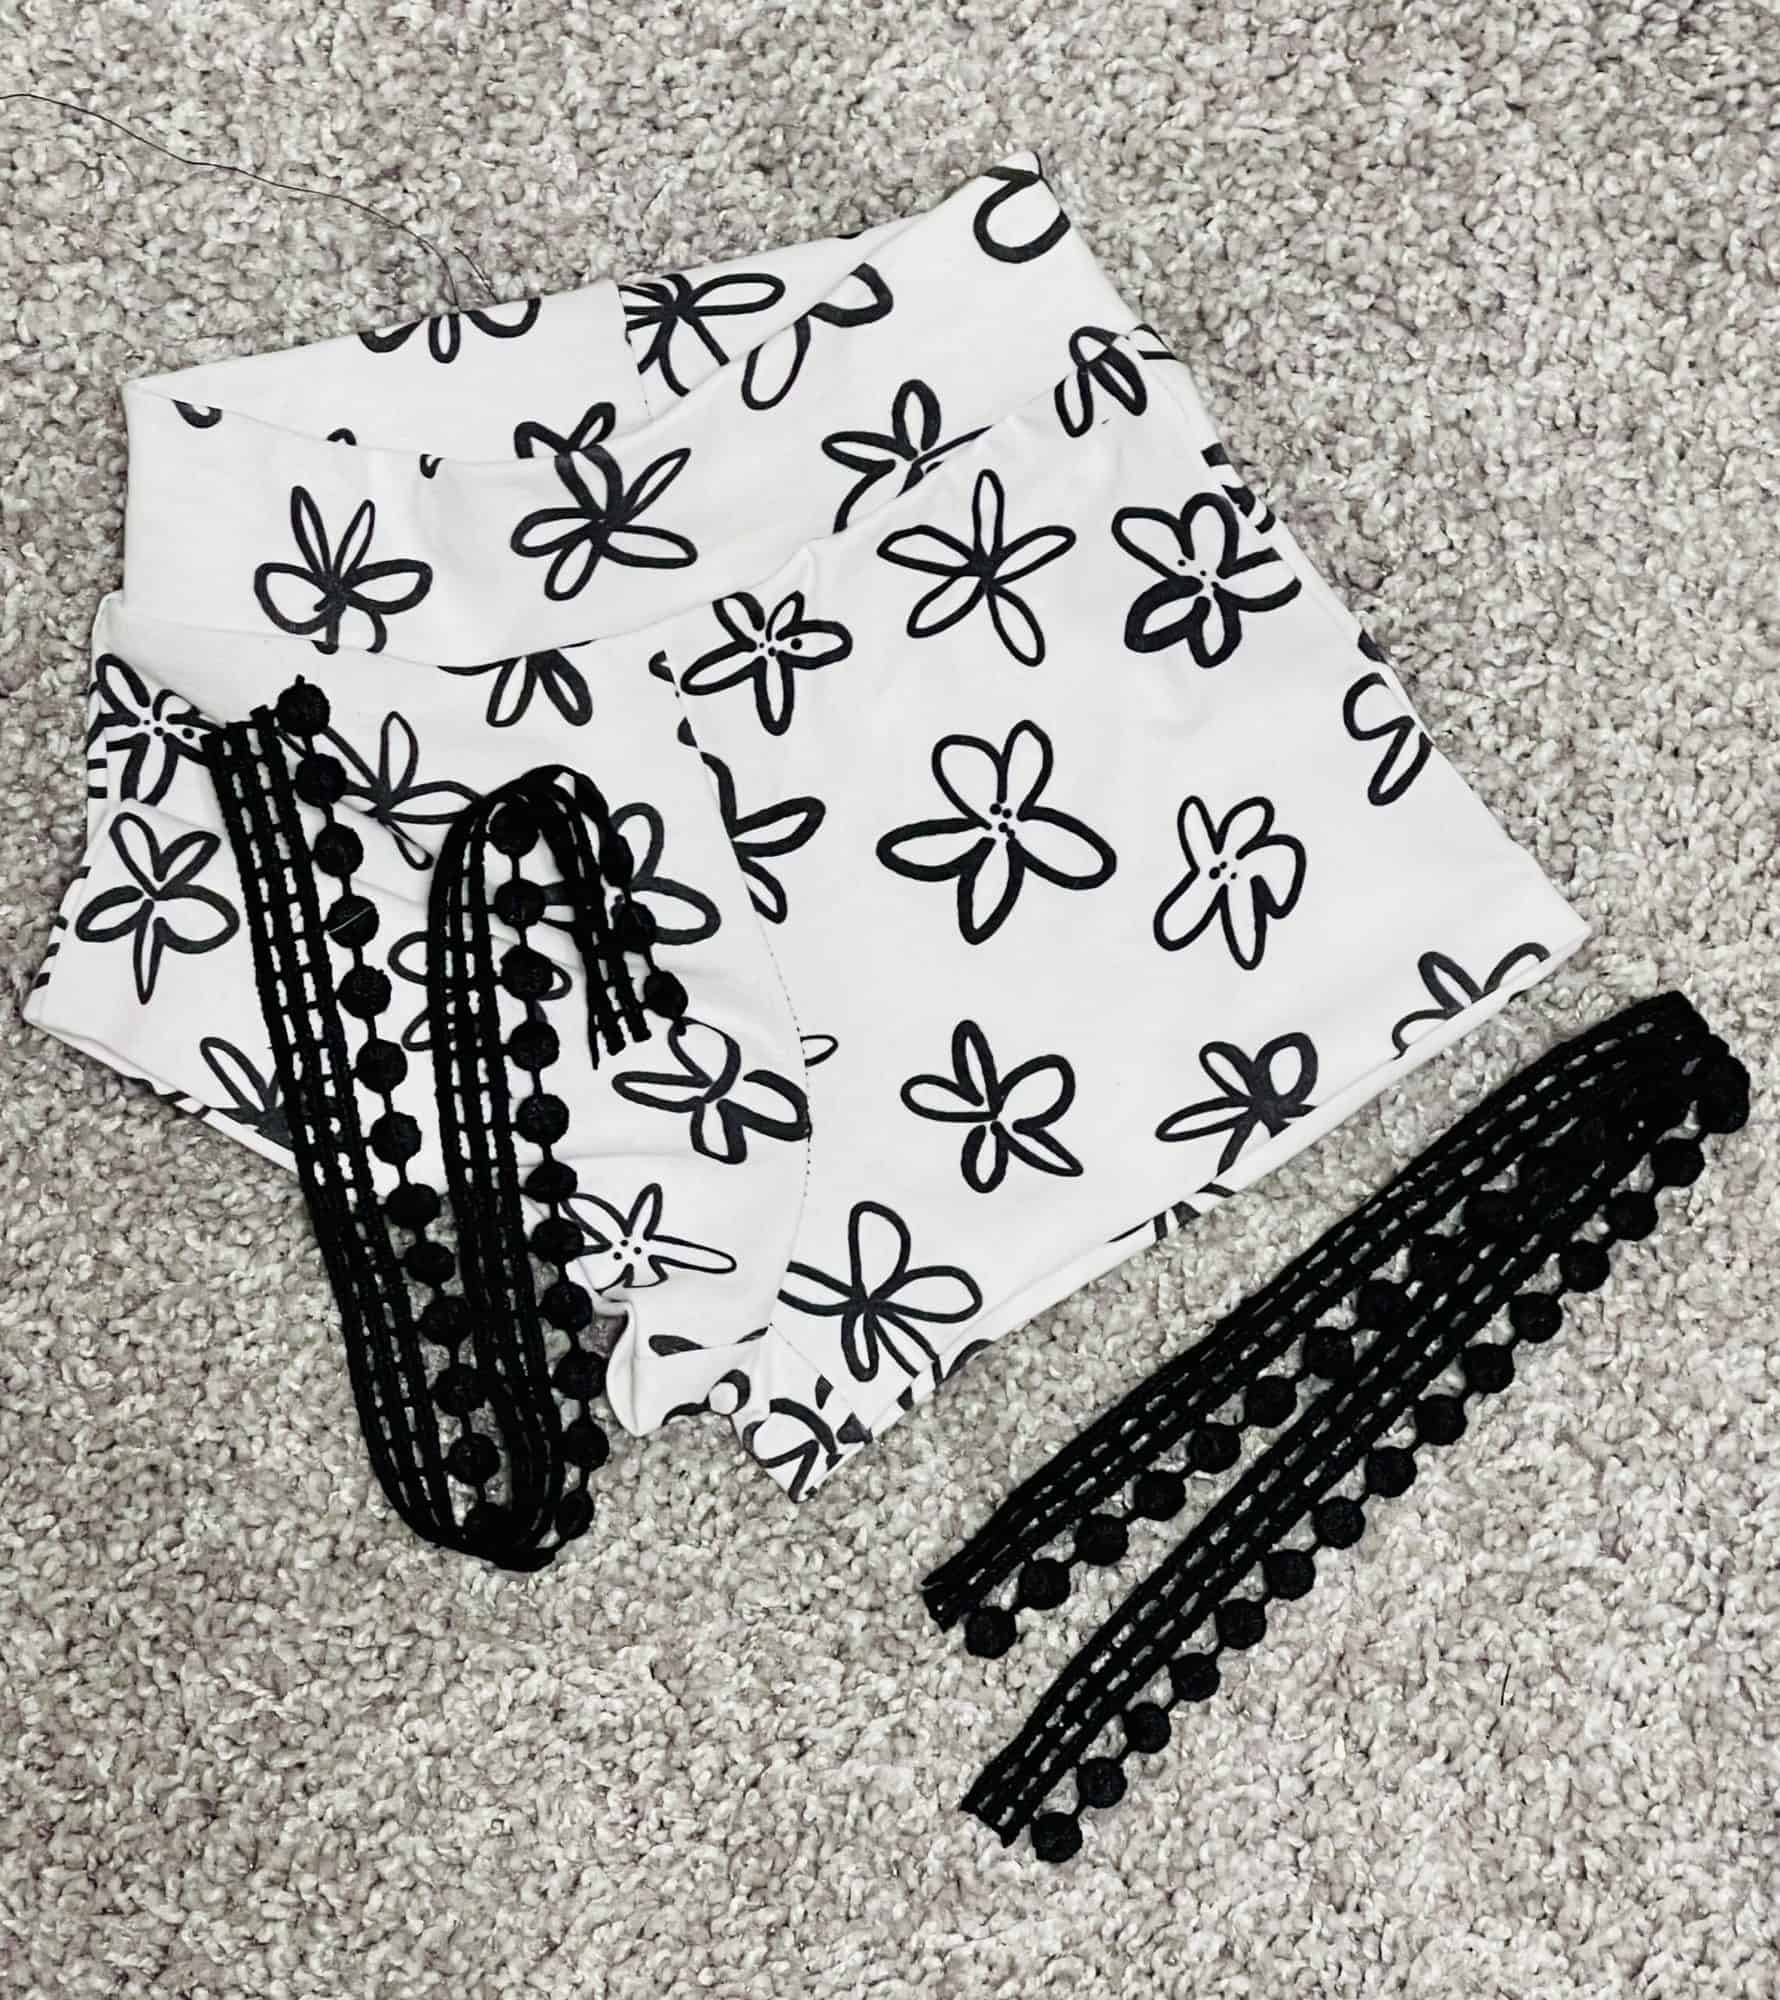
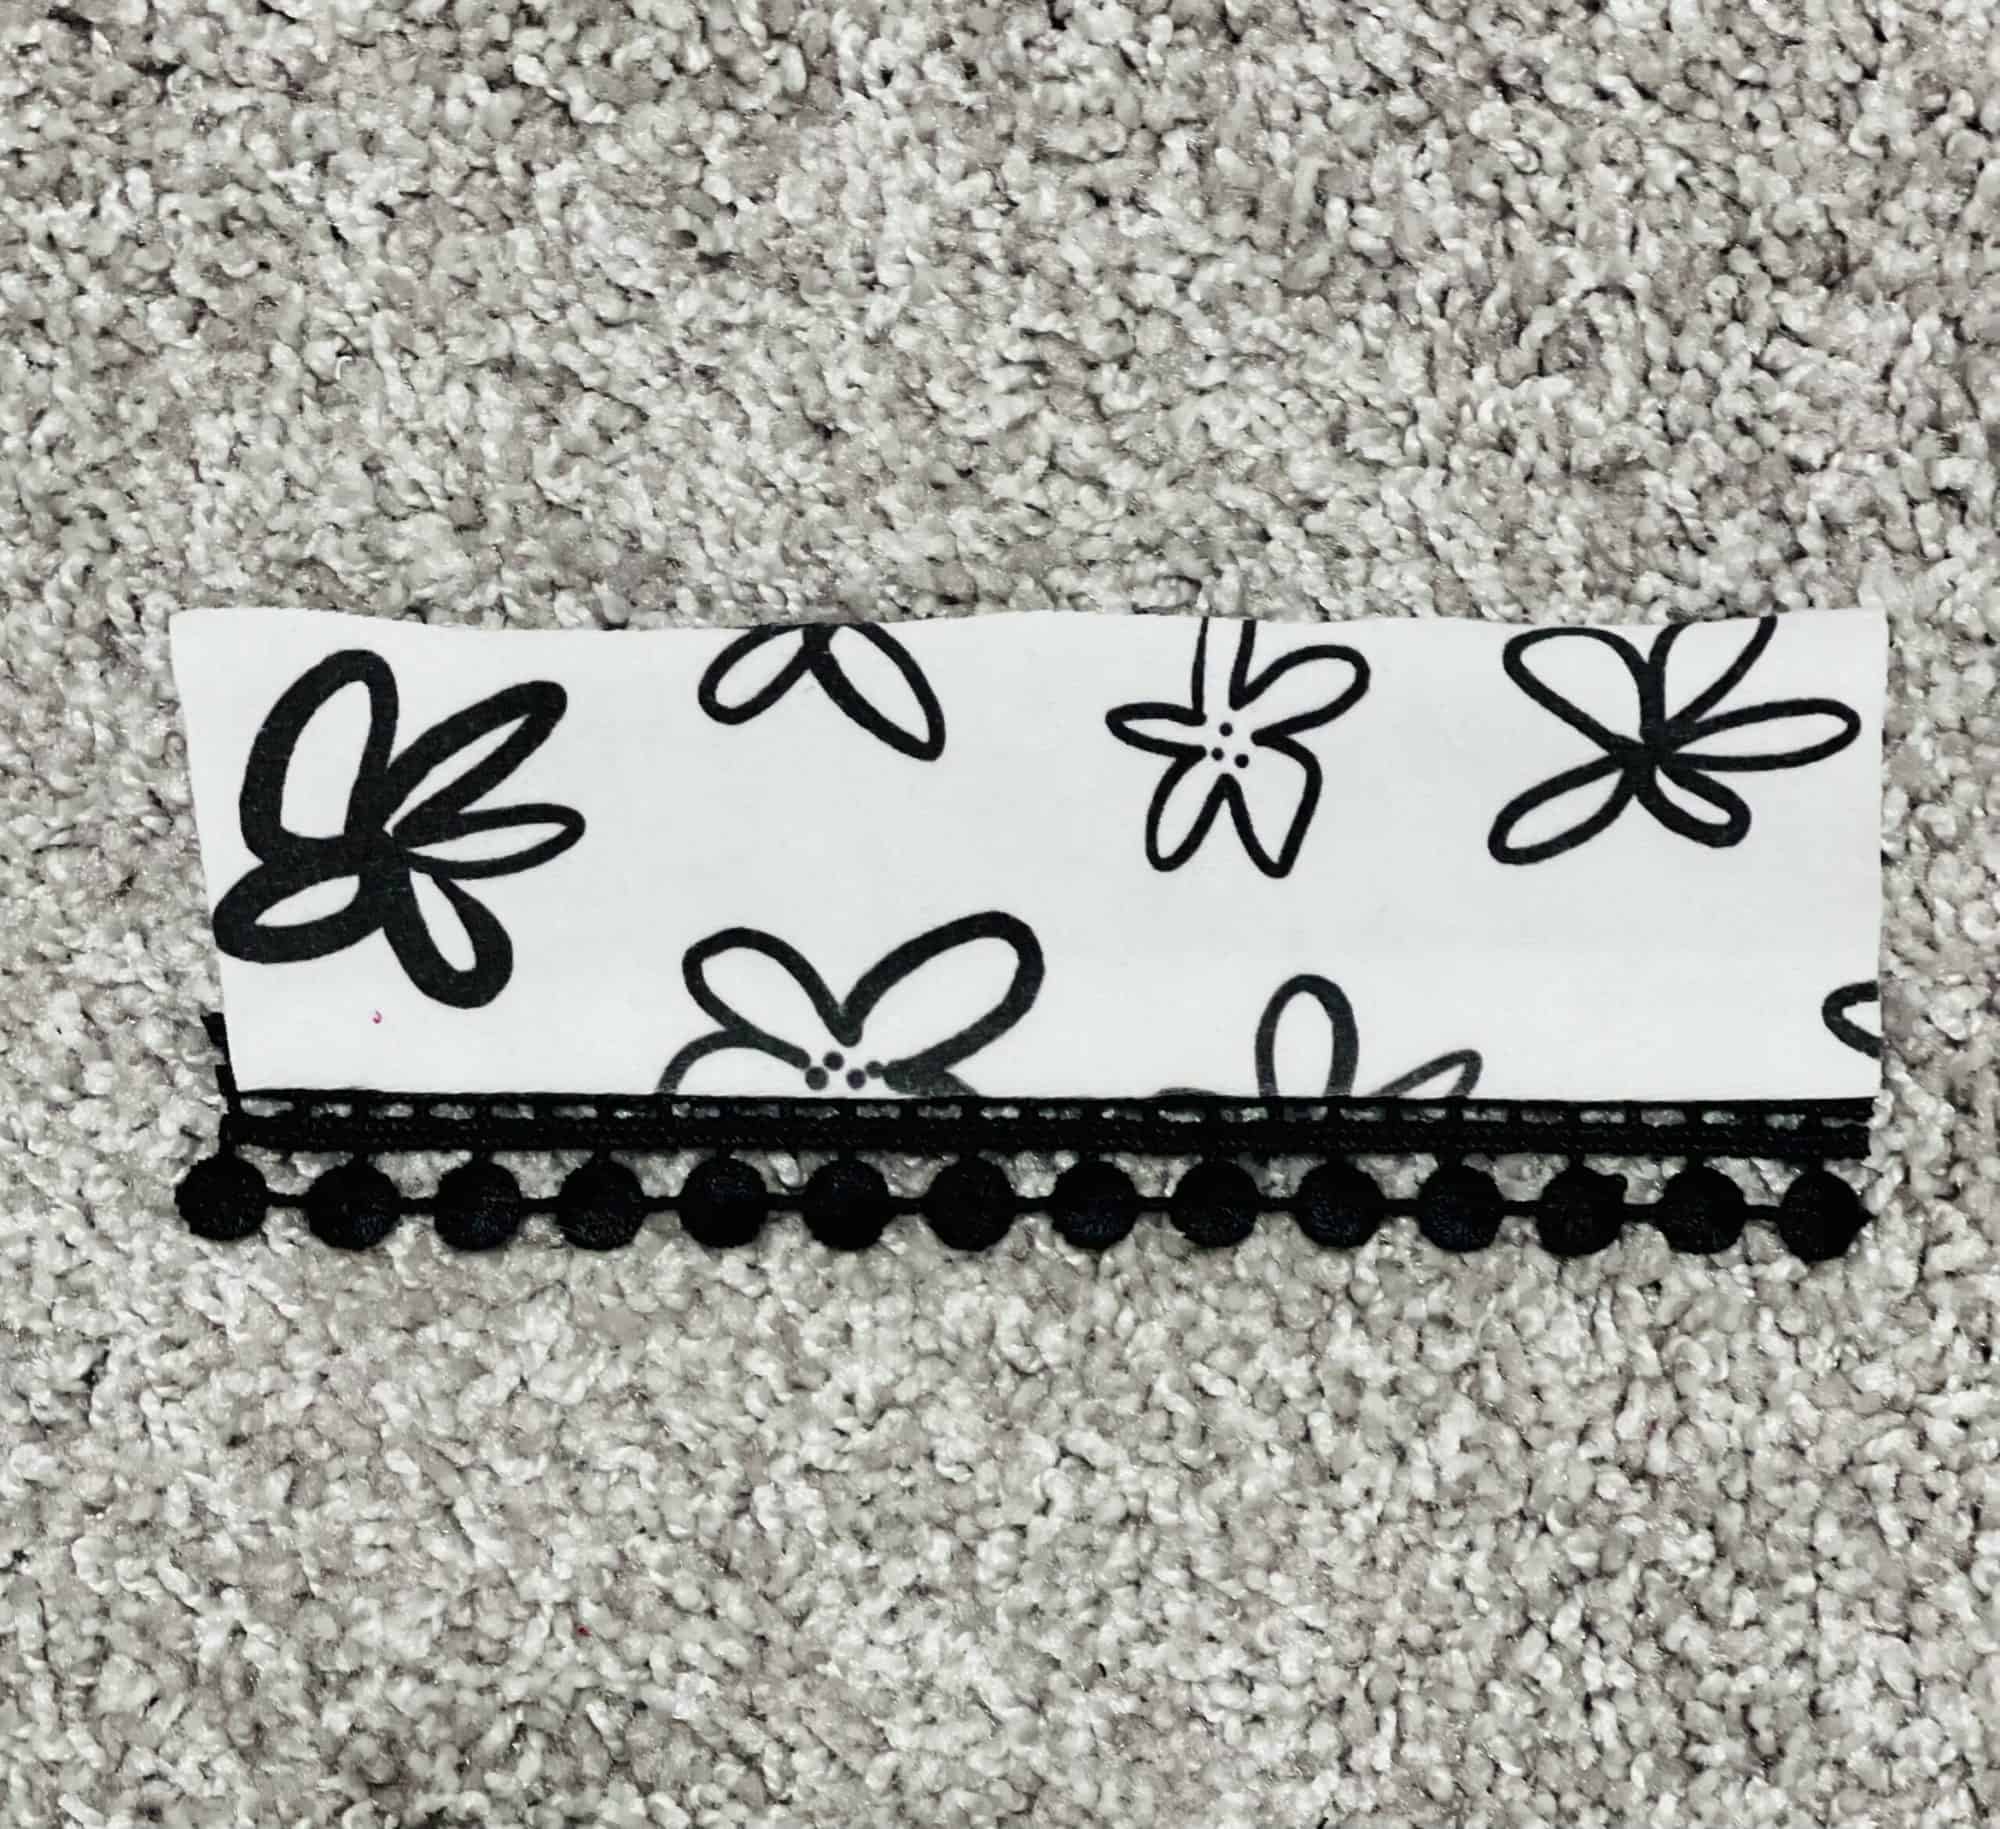
  • PRESS YOUR HEM & MEASURE TO CUT TRIM, press hem as indicated by the pattern and measure the length along the edge of your hem. Cut your trim at that length plus an inch or two. I like to add a little extra length to allow some wiggle room, and I cut off the excess later (pictured first below).
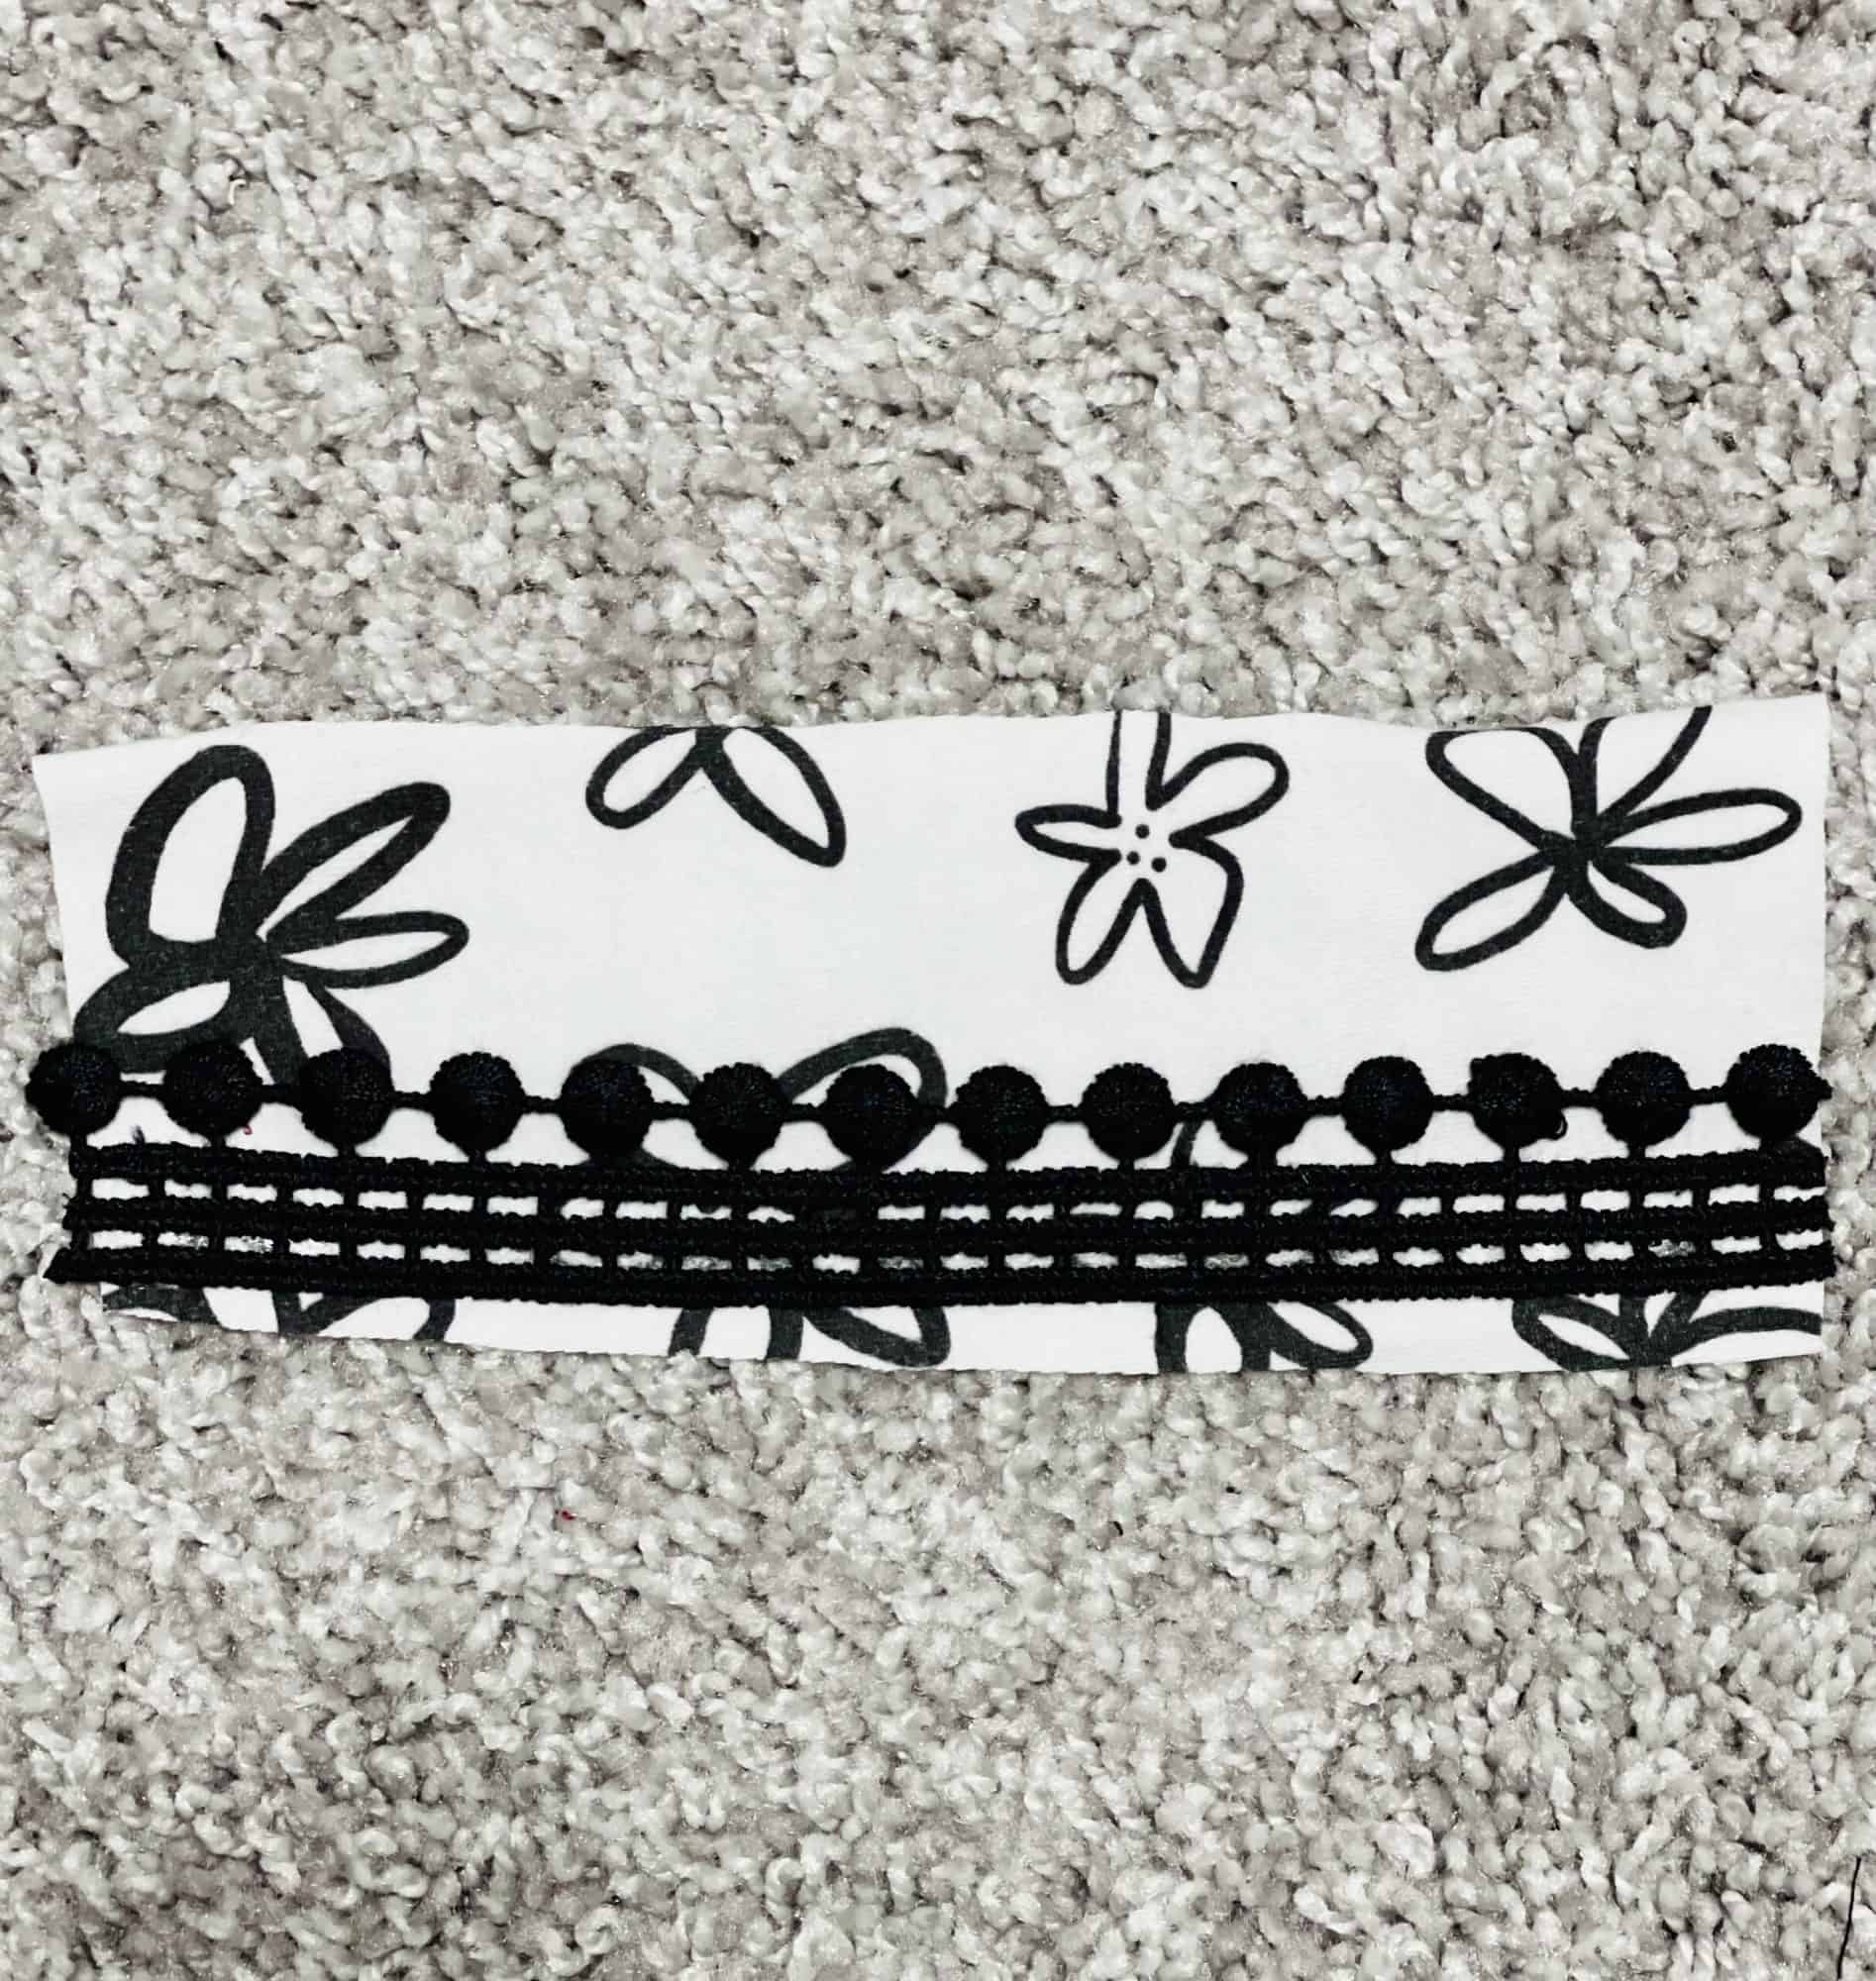
  • PLACE TRIM ON OR UNDER HEM, place trim as desired to verify that the length of the trim has been cut correctly and also to visualize the end goal. Adjust the hem and/or recut trim as needed. Pictured below: trim placed under the hem, also referred to as the underside (pictured second), and trim placed on the topside of the hem (pictured third).


Add Trim on Topside of Hem:

  • PIN, CLIP, and/or TAPE TRIM IN PLACE, secure trim in place and leave any excess trim unpinned/not taped – I prefer to leave the excess until after I’ve sewn it to ensure I don’t end up with a gap. I use wash away wonder tape for adding trims, bindings, and difficult hems – it is my absolute favorite tool! It sticks everything in place, is clear, and washes away – perfect for this project! For these shorts, I used my tape and also a few clips for extra security (pictured first below). 
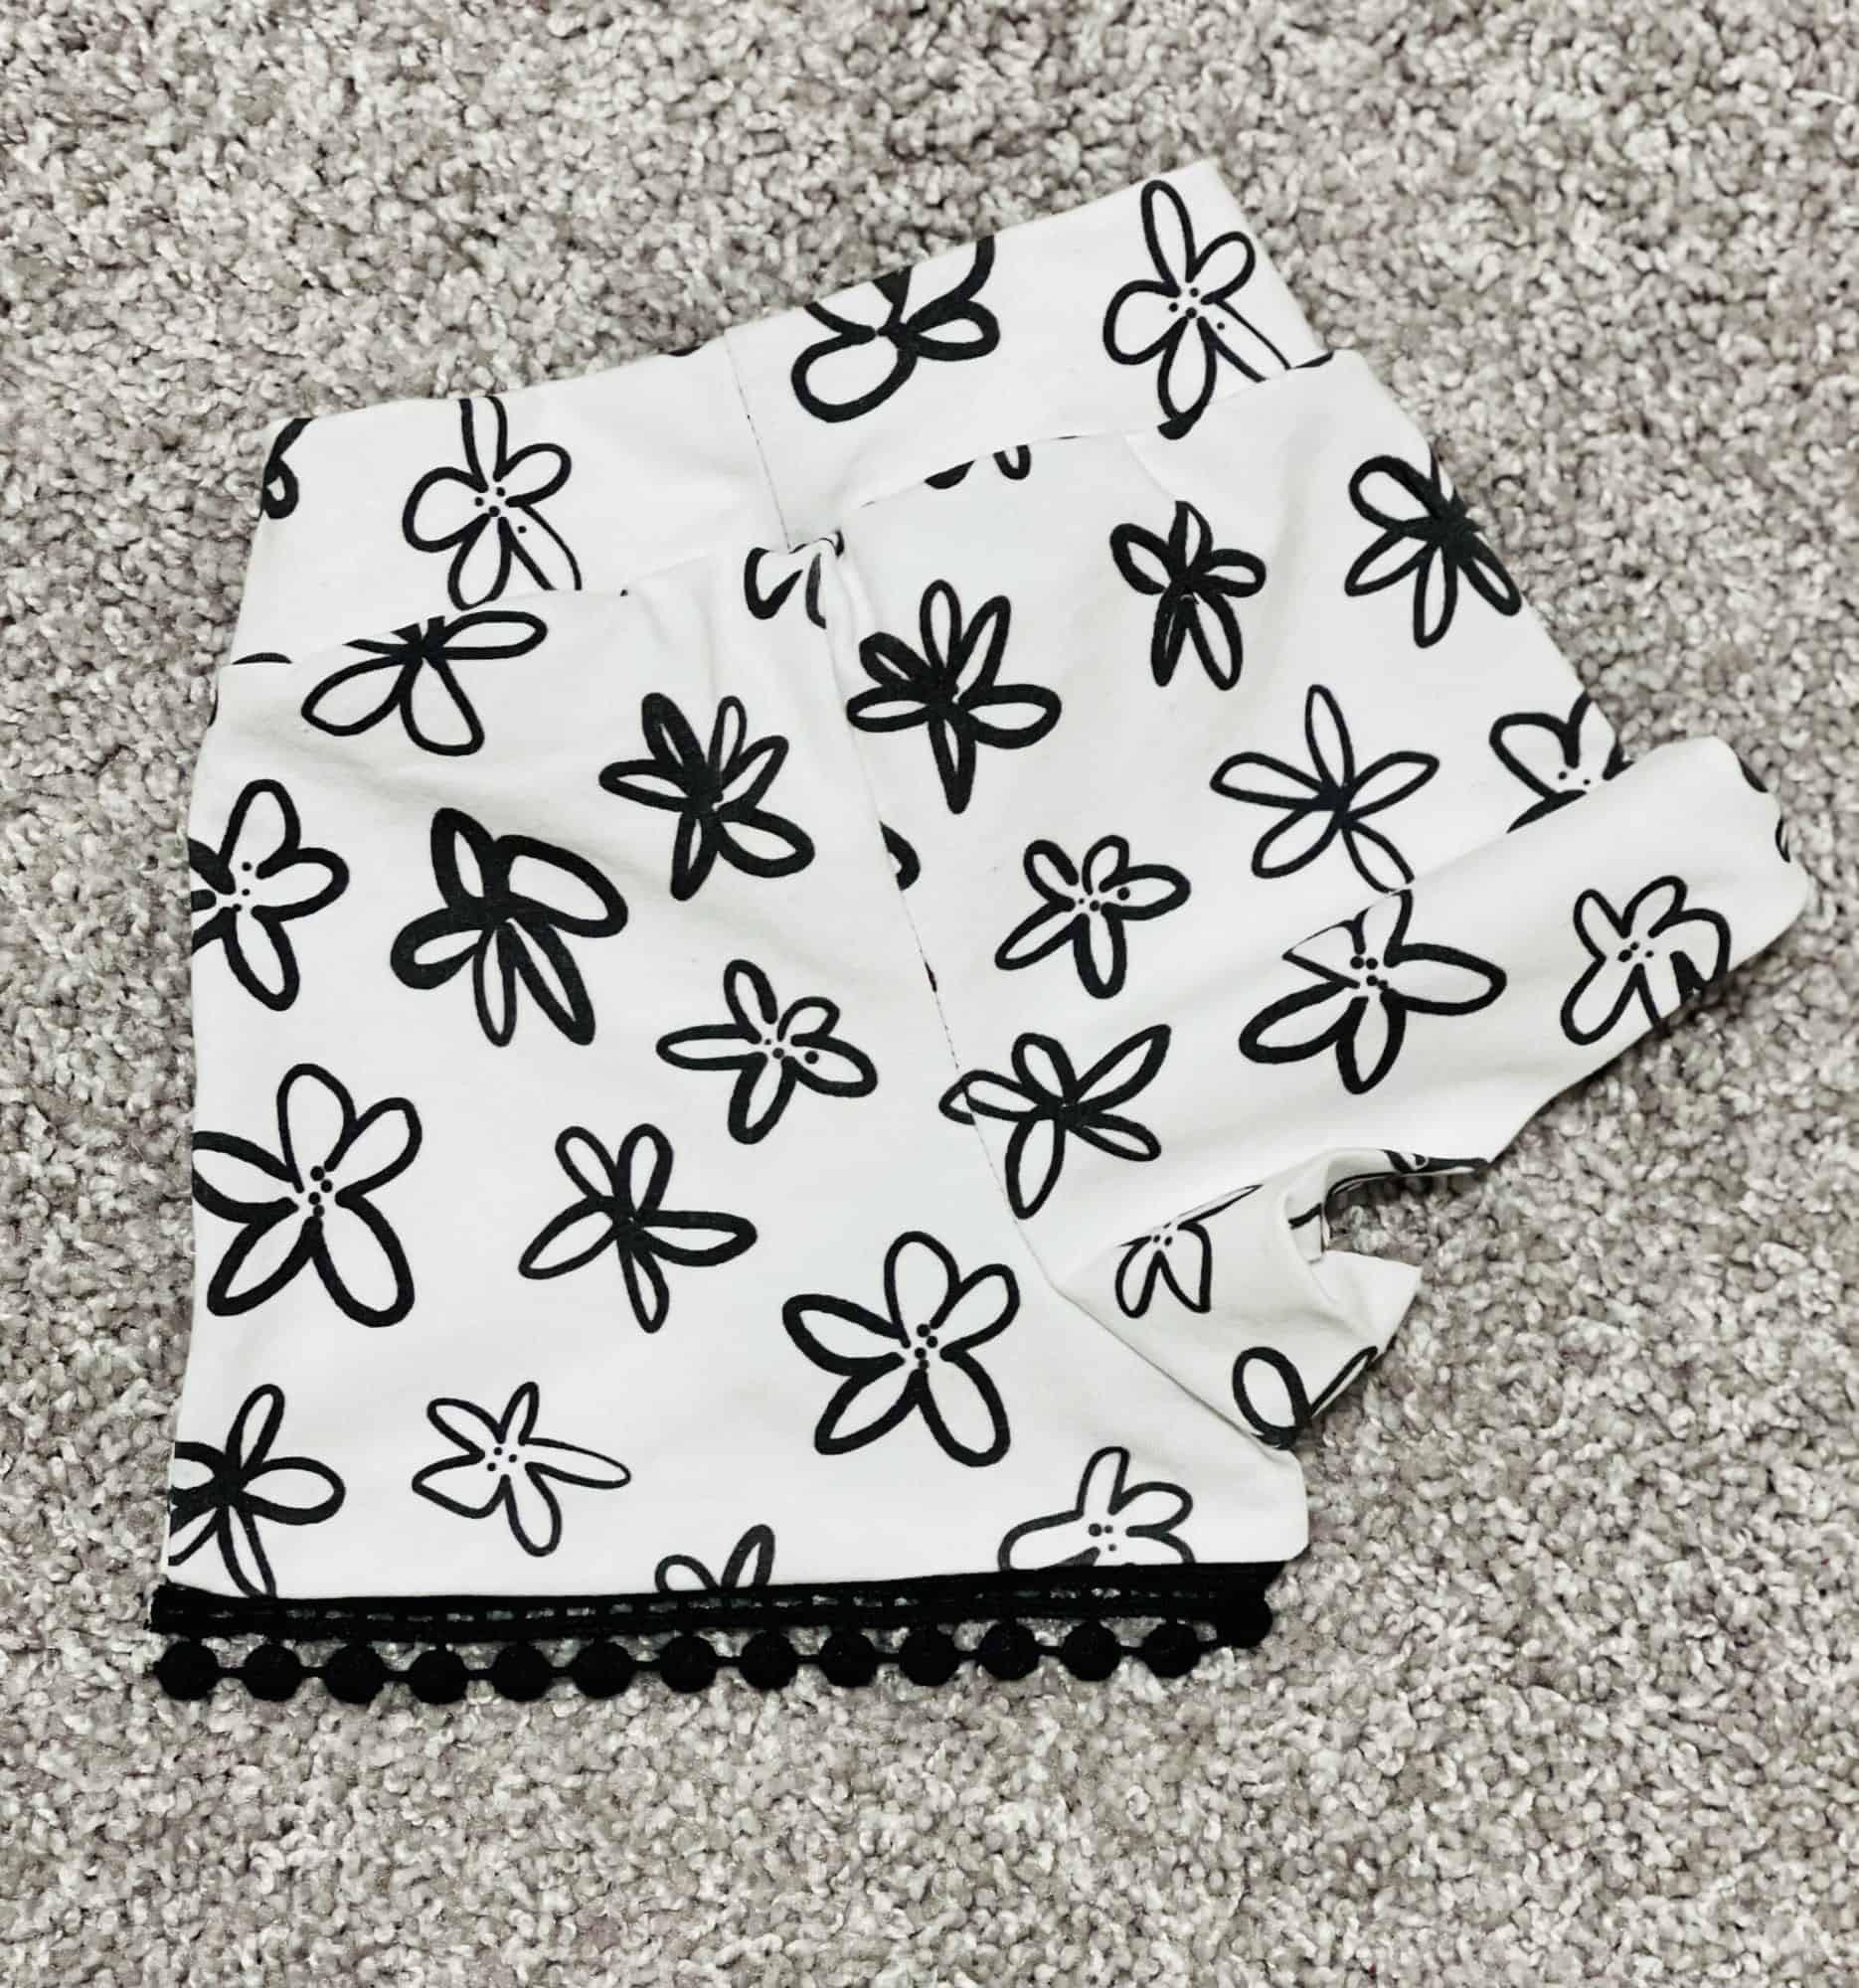
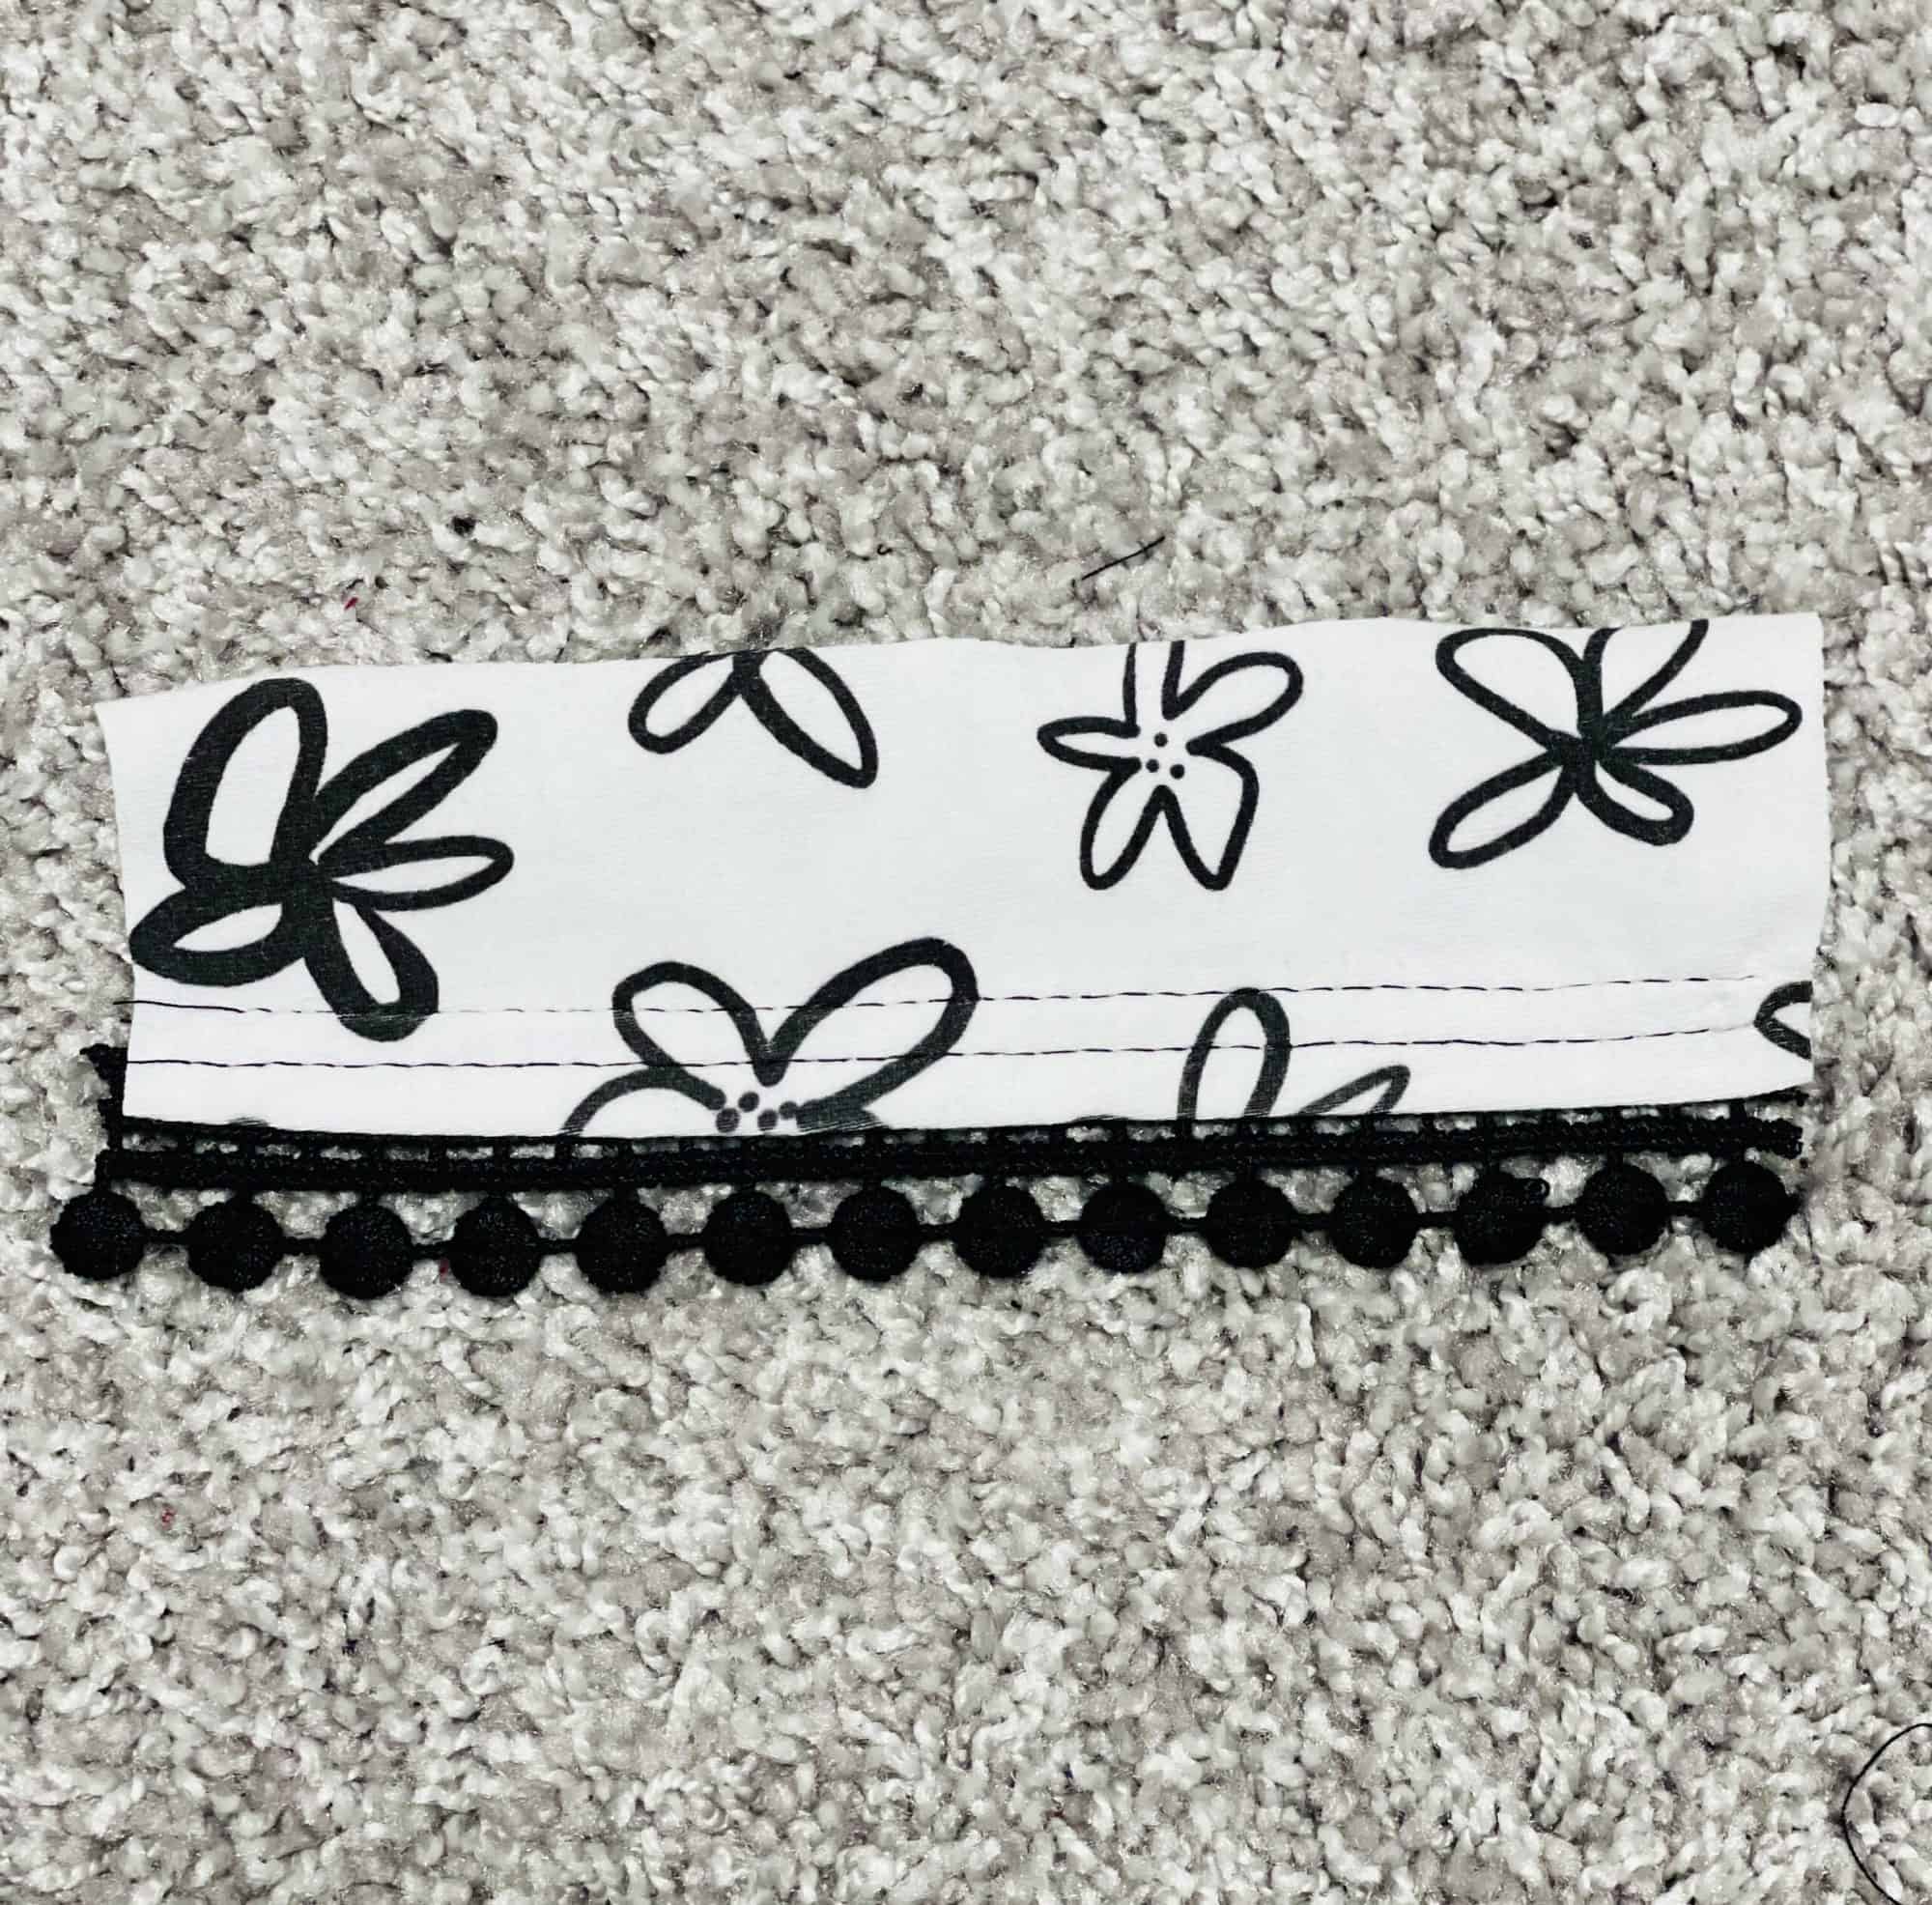
  • TOPSTITCH TRIM IN PLACE, finish using your favorite topstitch to secure both your trim and your hem. Be sure your stitching is catching both the hem and the trim. Once you reach the end, cut off the excess trim where needed. I like to overlap the ends of the trim just smidge and cover the edges with a little fray check. Here, I use my coverstitch – but you can also use a zig-zag stitch, triple stitch, etc. My thread is the same color as my trim – so you can’t see the stitching, but here it is stitched on (pictured second).
  • Note: if you are attaching a narrow trim that is smaller than the size of your hem, you will want to first hem your item, and then sew your trim in place. You may also consider using a blind hem to minimize the appearance of stitching before adding the trim. *Tip* For very narrow trims, use a narrow zipper foot on your sewing machine to help you sew right along the edge of the trim!


OR

Add Trim on Underside of Hem:

  • PIN, CLIP, and/or TAPE TRIM IN PLACE, leave excess trim unpinned/not taped. I prefer to leave the excess until after I’ve sewn it to ensure I don’t end up with a gap. I use wash away wonder tape for adding trims, bindings, and difficult hems – it is my absolute favorite tool! It sticks everything in place, is clear and washes away – perfect for this project! For this example, I am using just a small strip of fabric to show how to finish the hem since I decided to add the trim on top (previous example). Here, I have only used tape to secure the trim in place (pictured first below).
  • OPTIONAL STEP FOR NARROW TRIMS, open up the hem and stitch along the edge of the trim closest to the bottom (pictured second). In the example below, we would stitch along the trim edge opposite of the pom-poms/circles. This is needed if your trim will not be secured by the final hemstitch. If you complete this step, using wonder tape would be the easiest method to ensure the trim doesn’t shift around while you open up your hem. If you don’t have tape, you could use pins, but be sure to only pin through one layer of fabric while securing the trim to the underside of the hem. Clips would not work because you wouldn’t be able to open the hem up. When stitching towards the end, cut off the excess trim where needed. After you have stitched the trim to the fabric, refold your hem.
  • *Tip* For very narrow trims, use a narrow zipper foot on your sewing machine to help you sew right along the edge of the trim!
  • TOPSTITCH TRIM IN PLACE, finish with your favorite topstitch (pictured third). If you did not complete the optional step, this stitch will also serve to stitch your trim in place – so be sure your stitching is catching both the hem and the trim. Once you reach the end, cut off the excess trim where needed (if you haven’t already). When the edges of the trim meet, I like to overlap the edges just smidge and cover the edges with a little fray check. Here, I use my coverstitch to finish the hem – but you can also use a zig zag stitch, triple stitch, etc.


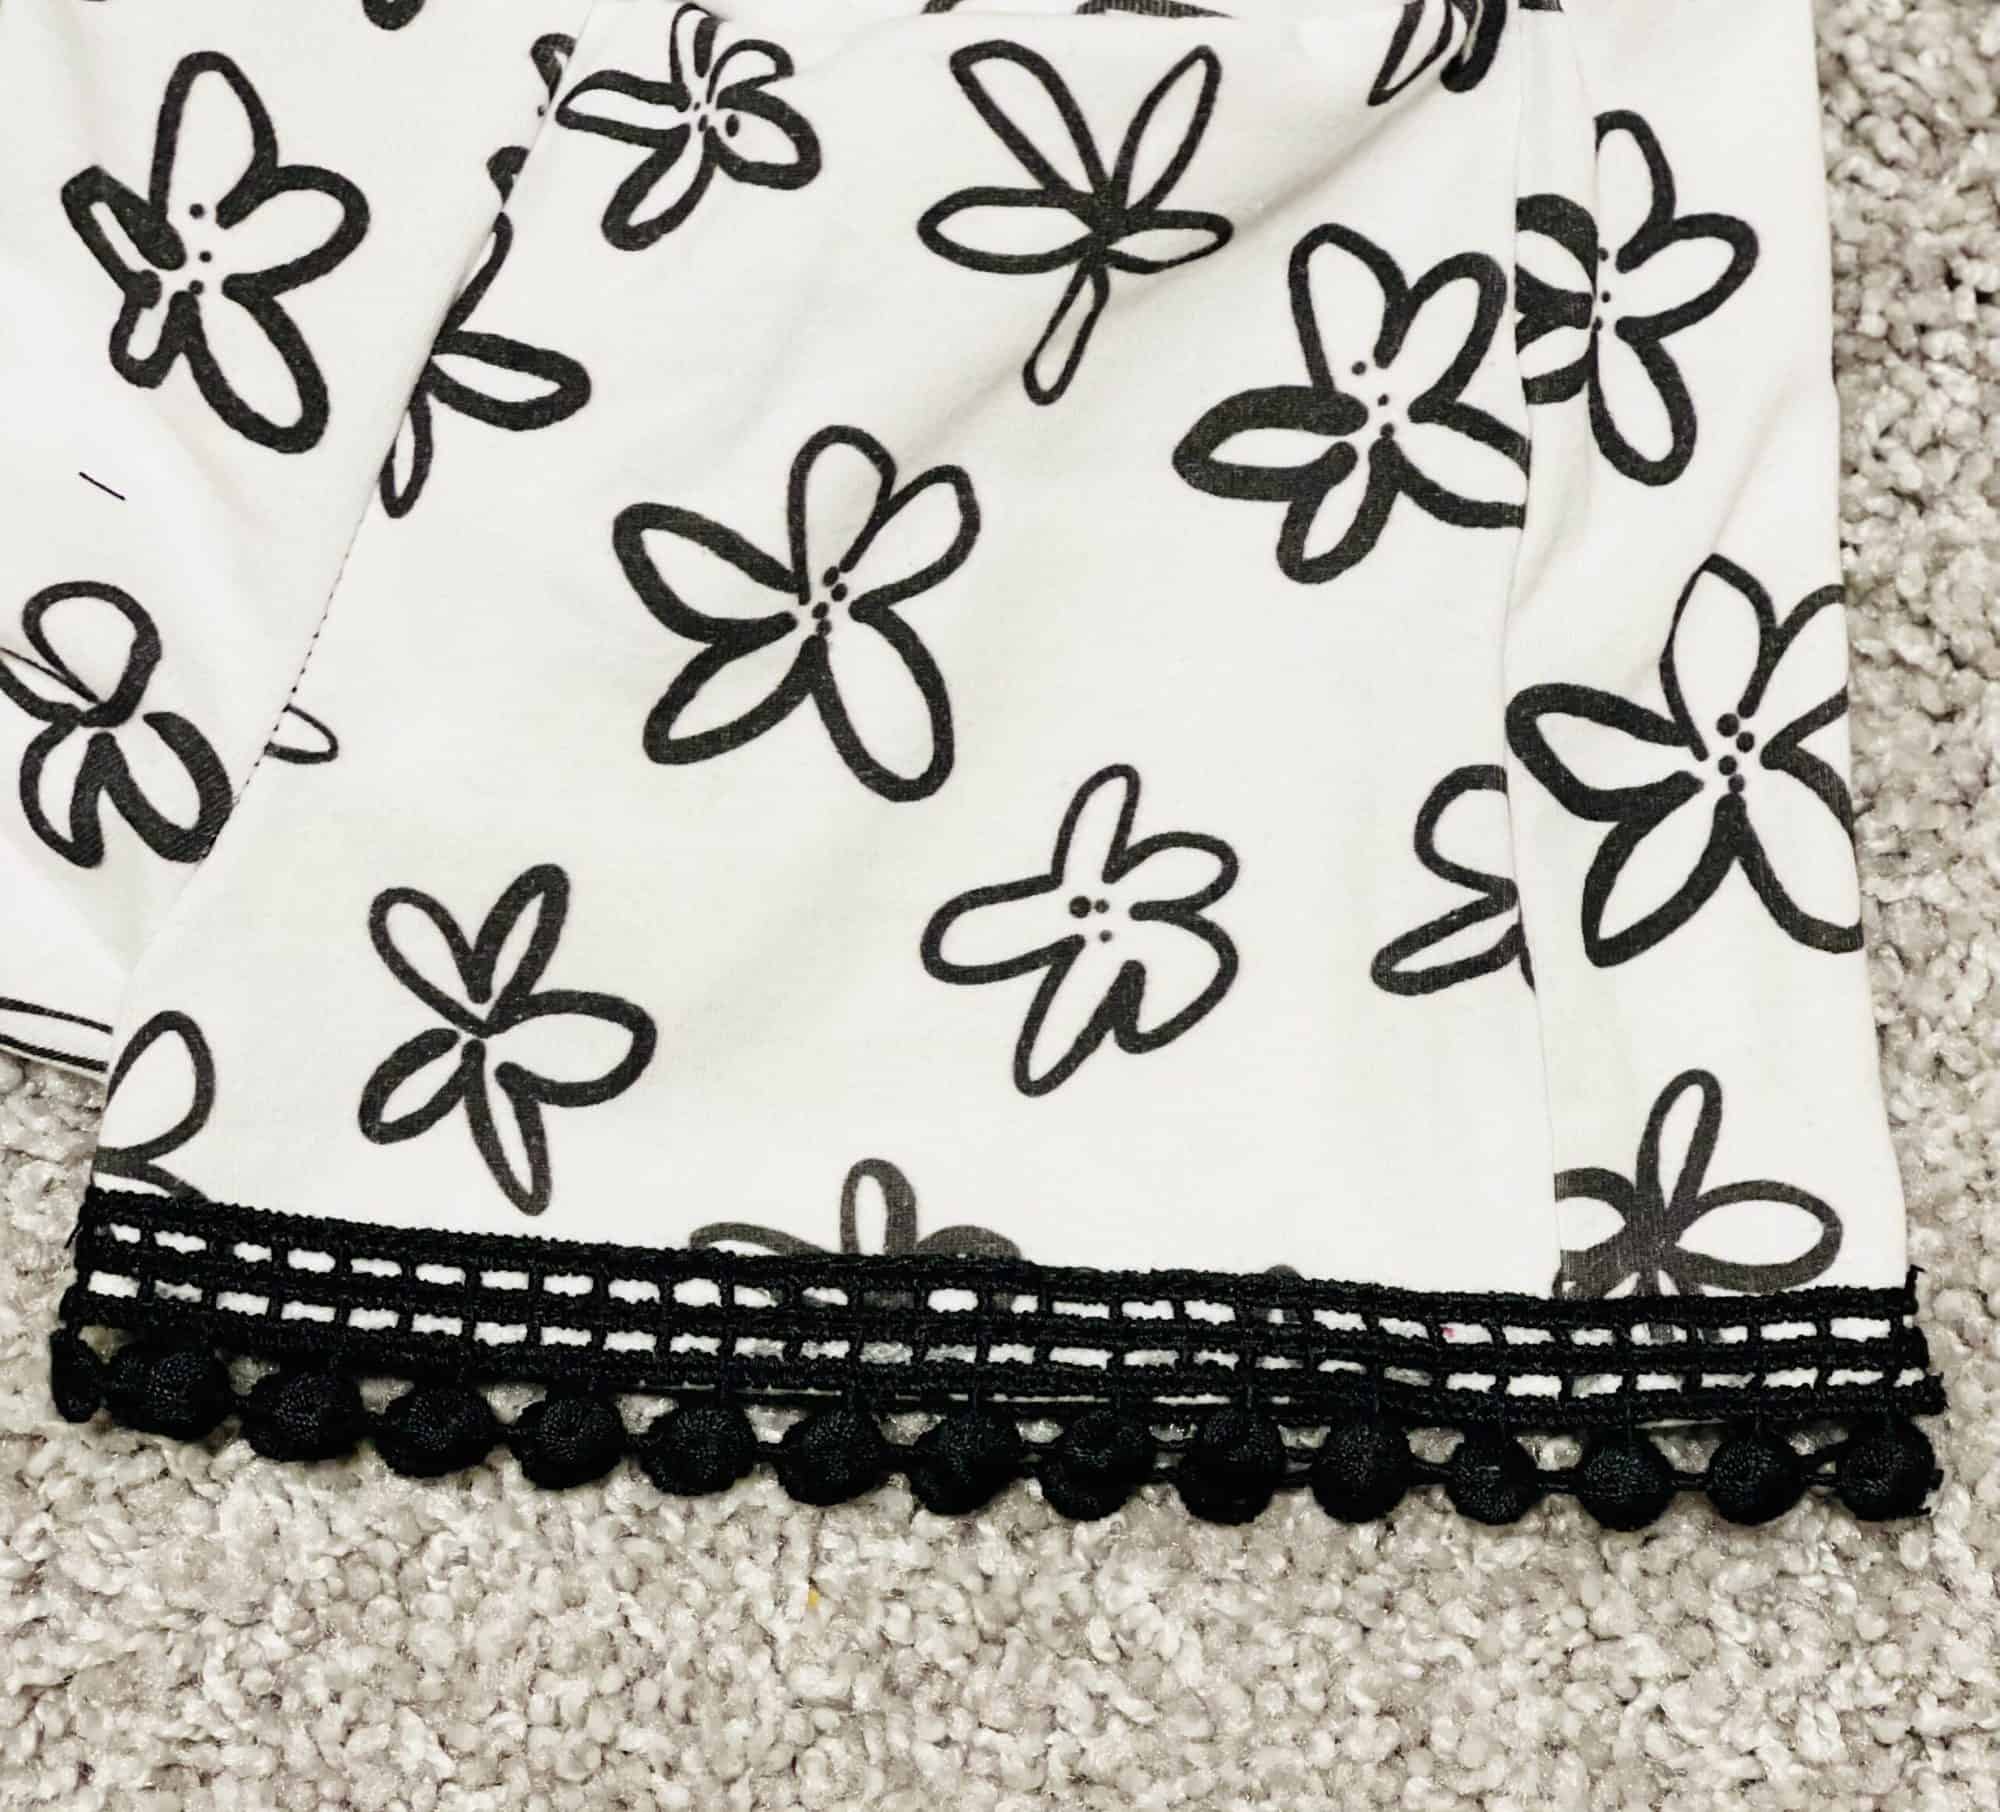
And that’s it! Here is my finished product, with the trim stitched on top of the hem. How cute is this?? 


Caring for Garments with Decorative Trim:

Below, I have included my recommendation for caring for your garments with trim. However, this is just my preference, so be sure to defer to your own best judgement – especially when working with delicate fabrics and trims. I tend to use pretty versatile fabric that can handle a little more activity :). Also, I would be lying if I said I ALWAYS do this for items with decorative trim because I’m known to just throw everything in the wash together without a second thought. However, this has honestly led me to some sad occasions while folding laundry and seeing that my pom poms or fringe are now a mess and they are not always salvageable!! So I recommend the following:

  • WASH IN COLD WATER ON DELICATE/GENTLE CYCLE, preferably by itself so it doesn’t risk getting tangled with any straps or strings from other clothing.
  • SKIP THE FABRIC SOFTENER, fabric softener can lead to build-up on fabric over time. This can cause some fabrics to actually lose softness, and it can even lead to discoloring some fabrics. 
  • HANG/AIR DRY, this is strongly recommended based on personal experience! But if you must, you can try drying on the lowest heat setting in the dryer and taking out the garment as soon as it is dry to avoid allowing it to continue drying and get overheated. However, air drying is the safest and most reliable option.

I hope you enjoyed this post and found it helpful! Have fun sprucing up some of your garments quickly and easily, and be sure to share your embellished P4P items in the Patterns for Pirates Facebook Group! 


Filed Under: Frequently Asked Questions, P4P University Leave a Comment

Cozy Wrap Sew Along – day 5

January 29, 2021

Welcome to day 5 of our Cozy Wrap sew along. Today is probably my favorite day because I get to make those cute, trendy gathered sleeves. The pattern includes a banded short sleeve, a cuffed regular sleeve and a gathered one. 

If you opted for short sleeve, you will create the bands by sewing each one right sides together to form loops. I highly encourage you to pre-press the cuffs wrong sides together before creating the loops. Just like we did the past few days. 

The standard long and gathered sleeves are attached in the round. That means you are sewing the side seams of the sleeves first. Matching the armpit seam to the sleeve side seam, attach the sleeves to the opening. If you opted for the gathered sleeves, you need to run a gathering stitch or two at the wrist. Pull the gathering threads so that the opening matches the cuff. I personally love gathering with my serger. Our P4P University Gathering blog covers a few gathering methods. 

To attach the cuff, simply match the cuff seam to the sleeve seam and sew right sides together. We have a tips and tricks P4P University cuffs 101 blog that I encourage you to check out. 

We are so close to finishing! All we have left to do is create the waist tie tomorrow. You can see today’s video below. Check in with your progress in the comments of day 5 photo of the Cozy Wrap sew along album. 


Cozy Wrap SAL day 1 | Cut fabric

Cozy Wrap SAL day 2 | Sew shoulder and side seams

Cozy Wrap SAL day 3 | Add bottom bands

Cozy Wrap SAL day 4 | Add neckband

Cozy Wrap SAL day 5 | Add sleeves

Cozy Wrap SAL day 6 | Add waist tie

Cozy Wrap SAL day 7 | Winners announcement  

Filed Under: Fabric for Pirates, Frequently Asked Questions, Sew-A-Long, Uncategorized Leave a Comment

Cozy Wrap Sew Along – day 4

January 28, 2021

Welcome to day 4 of our Cozy Wrap Sew Along. Easy day today! All we have to do is add the neckband…the very long neckband. You should have two narrow long strips of fabric (do not mix them up with the tie pieces!) Sew them right sides together on one end so you have an even longer neckband. 

Fold the band wrong sides together and give it a good press…just like we did yesterday! Unfold it and fold each end right sides together, sew  and re fold wrong sides together. You should not have a neckband with no raw ends anymore. Time to pin it to the neckline and front raw edge. I recommend pinning the center seam to the center back of the neckline first. Proceed with pinning each front raw edge to the band, right sides together, without stretching the band. The only part of the neckband that will be slightly stretched to fit it’s between the two shoulder seams. 

After you serge the neckband on, you need to finish the serger tails. I cover a few ways to do that in this P4P University blog. 

You can see in today’s video how I attach the neckband to my tunic Cozy Wrap. When you finish adding the neckband, give it a good press and add a picture of your progress to the comments of Day 4 photo. 

Cozy Wrap SAL day 1 | Cut fabric

Cozy Wrap SAL day 2 | Sew shoulder and side seams

Cozy Wrap SAL day 3 | Add bottom bands

Cozy Wrap SAL day 4 | Add neckband

Cozy Wrap SAL day 5 | Add sleeves

Cozy Wrap SAL day 6 | Add waist tie

Cozy Wrap SAL day 7 | Winners announcement  

Filed Under: Fabric for Pirates, Frequently Asked Questions, Sew-A-Long, Uncategorized Leave a Comment

Cozy Wrap Sew Along – day 3

January 27, 2021


Good morning, pirates! What a wonderful start to the sew along it has been! Today we add the bottom bands. All Cozy Wrap lengths have the same bottom finish. The most important tip I can give you for today’s steps is to start by pressing all 3 bottom bands. Fold them wrong sides together along the length and give them a good steam press! This will help tremendously when you attach them to the bottom raw edge.

Unfold the back band and sew each side folded right sides together. Turn the band out! See how easy that was now that it was pressed. You’ll repeat this steps for the two front bands, except you will only be sewing on one of the sides for each, not both. 

The bottom bands are cut at 1:1 ratio to the raw edge of the top so you will not be stretching them to fit. You can sew these steps with a sewing machine or a serger, just remember to keep a constant 1/2″ seam allowance. All you have left to do is give your stitches a good steam press to reduce any waviness from sewing.

You can see today’s steps in the video below. Remember to take a picture of your progress and post it in the comments of day 3 Cozy Wrap sew along album.

See you back here tomorrow!


Cozy Wrap SAL day 1 | Cut fabric

Cozy Wrap SAL day 2 | Sew shoulder and side seams

Cozy Wrap SAL day 3 | Add bottom bands

Cozy Wrap SAL day 4 | Add neckband

Cozy Wrap SAL day 5 | Add sleeves

Cozy Wrap SAL day 6 | Add waist tie

Cozy Wrap SAL day 7 | Winners announcement  

Filed Under: Fabric for Pirates, Frequently Asked Questions, Sew-A-Long, Uncategorized Leave a Comment

Cozy Wrap Sew Along – day 2

January 26, 2021

Let’s start sewing! Today we stitch the shoulder seams and side seams. If you are making the midi length and your fabric has lots of vertical stretch I encourage you add clear elastic the shoulder seams. It will help prevent any stretching during wear. I am using a waffle knit with minimal vertical stretch for my tunic Cozy Wrap so there is no need for shoulder reinforcements.

Once the shoulder seams are done we sew the side seams. Yes! This Cozy Wrap pattern has the sleeves added in the round so we will do that in a couple of days. For the side seams you must use your sewing machine as well. Remember, the whole pattern can be sewn with a sewing machine (using stretch stitches). If you chose to use the serger, like I have, you do need to stitch part of the side seams with the sewing machine to ensure a nice clean finish. You can see in the video below achieved a beautiful side seams going between my two favorite machines. 

Once you finish today’s steps, post a photo of your progress in the comments of the Day 2 photo of this sew along’s album. You can find the album (and lots of new sewing friends 😉) here, in the SAL group.


Cozy Wrap SAL day 1 | Cut fabric

Cozy Wrap SAL day 2 | Sew shoulder and side seams

Cozy Wrap SAL day 3 | Add bottom bands

Cozy Wrap SAL day 4 | Add neckband

Cozy Wrap SAL day 5 | Add sleeves

Cozy Wrap SAL day 6 | Add waist tie

Cozy Wrap SAL day 7 | Winners announcement  

Filed Under: Fabric for Pirates, Frequently Asked Questions, Sew-A-Long, Uncategorized Leave a Comment

Cozy Wrap Sew Along – day 1

January 25, 2021

Welcome to the Cozy Wrap Sew Along!

Happy New Year! I’m so excited to start our 2021 sew alongs with the Cozy Wrap top. The pattern comes in Youth and Adult and you purchase the bundle and save. Don’t forget the Cozy Pants if you’re looking to pair your top with a new bottoms.  If you are still undecided which style to make, our Round Up blog will give you an overview of all options included, from sleeve styles to top lengths. You can also use the Easy Hacks blog for added options.

Let’s start by taking the measurements needed for the best fit. P4P has an amazing blog that gives you tips for accurately taking your measurements. You can read all about it here. If your measurements put you in a different size for chest/waist/hips be sure to check out our P4P University blog and grade to achieve the perfect fit. Our most recent patterns include videos as well. On page 3 you will notice an active button that will take you to the video about adding or removing length. Please refer to it if you are taller or shorter than 5’5″.


Still debating which knit type will work best for your desired look? Take a look over our P4P University Knit Types blog. We also included a cheat sheet that you can print. If you are like me and sometime are just keen on using a specific print for a specific pattern, read our Different fabric, different fit blog post before you cut your fabric.

The Cozy Wrap patterns includes a shirt, tunic, knee and midi length as well as short sleeves, long hemmed sleeves and gathered sleeves. This pattern is drafted from light to medium weight fabrics with 20-30% stretch. The Cozy Wrap can be worn both as a wrap or as a cardigan. For my Cozy Wrap tunic I will be using January’s Fabric for Pirates.  Fabric for Pirates is this sew along’s sponsor so our winner will get to enjoy their very own January box!


Day 1 video is posted below. I have used the projector file . Once you cut the fabric, post a picture of your pretty pile in the comments of DAY 1 photo of the Cozy Wrap album in the M4M & P4P Sew Along Group.

Cozy Wrap SAL day 1 | Cut fabric

Cozy Wrap SAL day 2 | Sew shoulder and side seams

Cozy Wrap SAL day 3 | Add bottom bands

Cozy Wrap SAL day 4 | Add neckband

Cozy Wrap SAL day 5 | Add sleeves

Cozy Wrap SAL day 6 | Add waist tie

Cozy Wrap SAL day 7 | Winners announcement

Filed Under: Fabric for Pirates, Frequently Asked Questions, Sew-A-Long, Uncategorized Leave a Comment

Sporty Piko Sew Along – day 7 (winners announcement)

November 3, 2020

Ahoy, pirates! Thank you so much for joining me last week in our last Sew Along of 2020. I absolutely loved watching you sew all the Sporty Piko, littles and adults. There were so many beautiful entries, we had a hard time picking the two winners.

Congratulations Nicole Palma! You are our first winner. Nicole won a $20 gift card to Patterns For Pirates and a $25 gift card from Hapa Fabrics. 


We chose a second winner as well. Congratulations Rachel Griffin! You won a $20 gift card to Made for Mermaids. 


Huge thank you to Hapa Fabrics who kindly sponsored this sew along. 


I look forward to sewing along with you back here in January! The Mermaids are sewing their Carli pattern this month. In the meantime, don’t forget to share you beautiful Pikos in the Patterns for Pirates Facebook group too. You did fantastic! 

Sporty Piko SAL | day 1

Sporty Piko SAL | day 2

Sporty Piko SAL | day 3

Sporty Piko SAL | day 4

Sporty Piko SAL | day 5

Sporty Piko SAL | day 6

Sporty Piko SAL | day 7

Filed Under: Frequently Asked Questions, Sew-A-Long, Uncategorized Leave a Comment

Sporty Piko Sew Along – day 6 (cuffs and waistband)

October 31, 2020

We made it to the last day of the sew along. Today we add the cuffs to the long sleeves and waistband to the shirt option. If you opted for the crop, tunic and short sleeves you finished yesterday so today you just admire your creation. 

When creating the cuffs and waistband it’s highly important to press the wrong sides together lengthwise. Stitch each cuff and the waistband, right sides together to create a loop. Take a look over our P4P University Knit Cuffs blog to get some tips and tricks for beautiful cuffs. When adding the waistband, remember to mark the quarter points on both the raw edge of the waistband and bottom of the shirt. Dana talks about waistbands in the P4P University blog. I highly recommend giving it a look. 


That’s it!! Great job! All you have to do now is post a picture of the completed Sporty Piko in the comments of DAY 6 sew along album in the SAL group. We will select the winners from the pictures in the comments there. Meet us back here on Monday evening for the winners blog. 

Sporty Piko SAL | day 1

Sporty Piko SAL | day 2

Sporty Piko SAL | day 3

Sporty Piko SAL | day 4

Sporty Piko SAL | day 5

Sporty Piko SAL | day 6

Sporty Piko SAL | day 7

Filed Under: Frequently Asked Questions, Sew-A-Long, Uncategorized Leave a Comment

Sporty Piko Sew Along – day 5 (hood and hems)

October 30, 2020

Good morning! Today we create and add the hood as well as hem the short sleeves and crop/tunic length. The hood can be lined or not. My personal preference is lining the hood as it gives it more structure. If you like a more loose hood, definitely go for the unlined option. You will just hem the front before overlapping. I opted for the lined hood so you will see the process in the video below. 

My little one’s Sporty Piko will be the banded shirt style. I will show you how to add those tomorrow.

If you are sewing the tunic , you can hem it using your sewing machine’s twin needles option or your coverstitch. Before you start, take a look over our Hemming blog because we have a few tips for easy and successful hemming. If you are finishing the bottom hem using twin needles, a good refresher blog is the P4P University Twin Needles Tips. The crop style hem includes a drawstring and grommets. Be sure to check out our P4P University Grommets blog. Rachel gives you great tips for using them. Katy shows you how to add  elastic in the crop hem and skip the drawstring. Read all about it here. 

Once you complete today’s steps, snap a photo of your progress and add it to the comments of day 5 photo of the sew along album. See you back here tomorrow! 

Sporty Piko SAL | day 1

Sporty Piko SAL | day 2

Sporty Piko SAL | day 3

Sporty Piko SAL | day 4

Sporty Piko SAL | day 5

Sporty Piko SAL | day 6

Sporty Piko SAL | day 7

Filed Under: Frequently Asked Questions, Sew-A-Long, Uncategorized Leave a Comment

Sporty Piko Sew Along – day 4 (side seams and neckband)

October 29, 2020

Another easy day in the Sporty Piko sew along, but let’s face it…they are all pretty easy. All of us will be sewing the side seams first. Pin the seam, right sides together, matching the under arm, sleeve ends and bottom. Sew with a stretch stitch, or your serger, following a 1/2 ” seam allowance. 

If you are making the hooded option, like I am, you are pretty much done for today. Snap your picture and check in by commenting on the day 4 photo of the sew along album. If you are sewing the neckband option, you will add that now. Take a look over our P4P University Neckbands 101 blog post. The key to a beautiful neckband is using fabric with excellent recovery and quartering the neck opening. If you followed previous sew alongs here on the blog, you have seen how I like to add the neckband to various P4P patterns. By the way, did you know all P4P blogs and videos stay up forever? Check out our YouTube Channel!

Great job so far! Don’t forget to check in for today so you qualify for the prizes!

Sporty Piko SAL | day 1

Sporty Piko SAL | day 2

Sporty Piko SAL | day 3

Sporty Piko SAL | day 4

Sporty Piko SAL | day 5

Sporty Piko SAL | day 6

Sporty Piko SAL | day 7

Filed Under: Frequently Asked Questions, Sew-A-Long, Uncategorized Leave a Comment

  • « Previous Page
  • 1
  • 2
  • 3
  • 4
  • 5
  • …
  • 17
  • Next Page »

Newest Patterns

  • Friendly City Sweater $12.00
  • Friendly City Sweater - Youth $10.00
  • Friendly City Sweater - Bundle $20.00
  • Red Carpet Dress $12.00
  • Gather 'round $12.00
  • Privacy Policy
  • Refund Policy
  • Affliliate Program
  • Contact Us
  • About

Copyright © 2023 Patterns for Pirates

Copyright © 2023 · Genesis Framework · WordPress · Log in