Patterns for Pirates

P4P stylish, modern, wearable patterns

  • Home
  • Blog
    • Frequently Asked Questions
    • Pattern Releases
      • Free Patterns
    • P4P University
      • Fitting
      • Sewing with Stretch, Knit Fabrics
      • Sewing with Woven Fabrics
      • Sewing Machines
    • Sew-A-Longs
    • Fabric for Pirates
    • Pattern Hacks
    • Announcement
      • Blog Tours
      • Contest/Giveaway
  • Shop
  • Bundle Discounts
  • Flash Friday
  • Gift Cards
  • My Account
  • Cart

P4P University :: Twin Needle Tips

March 16, 2017

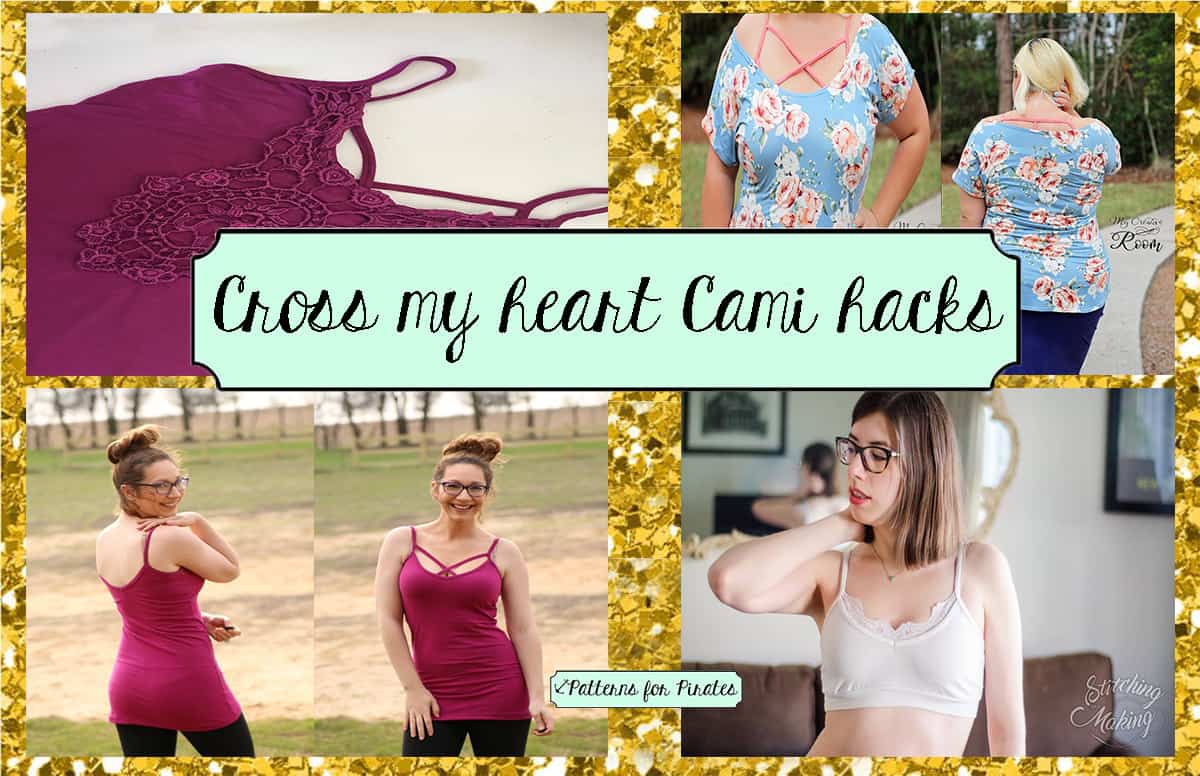
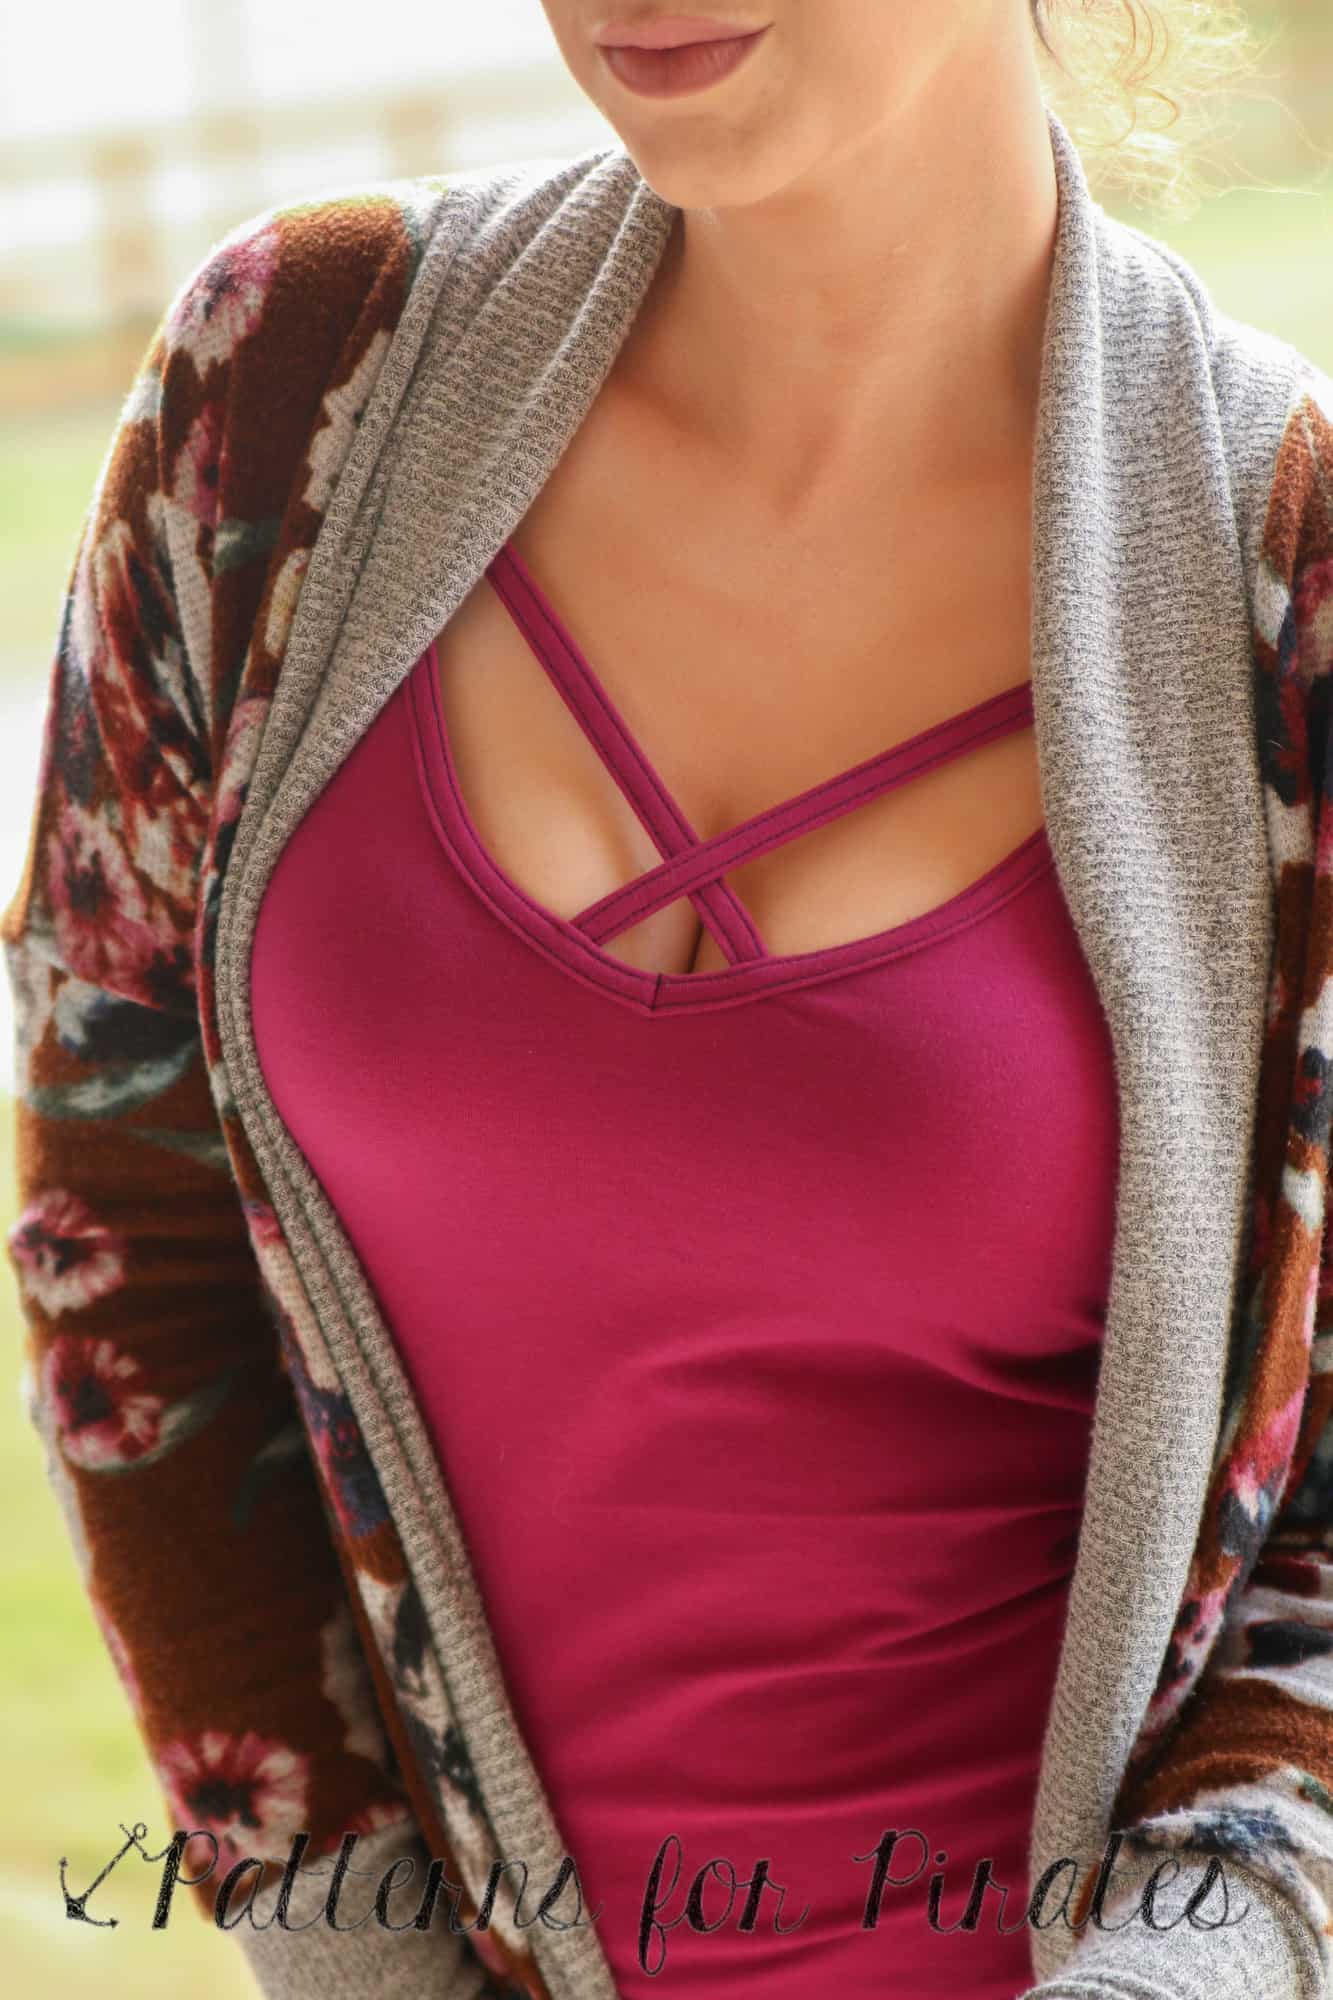
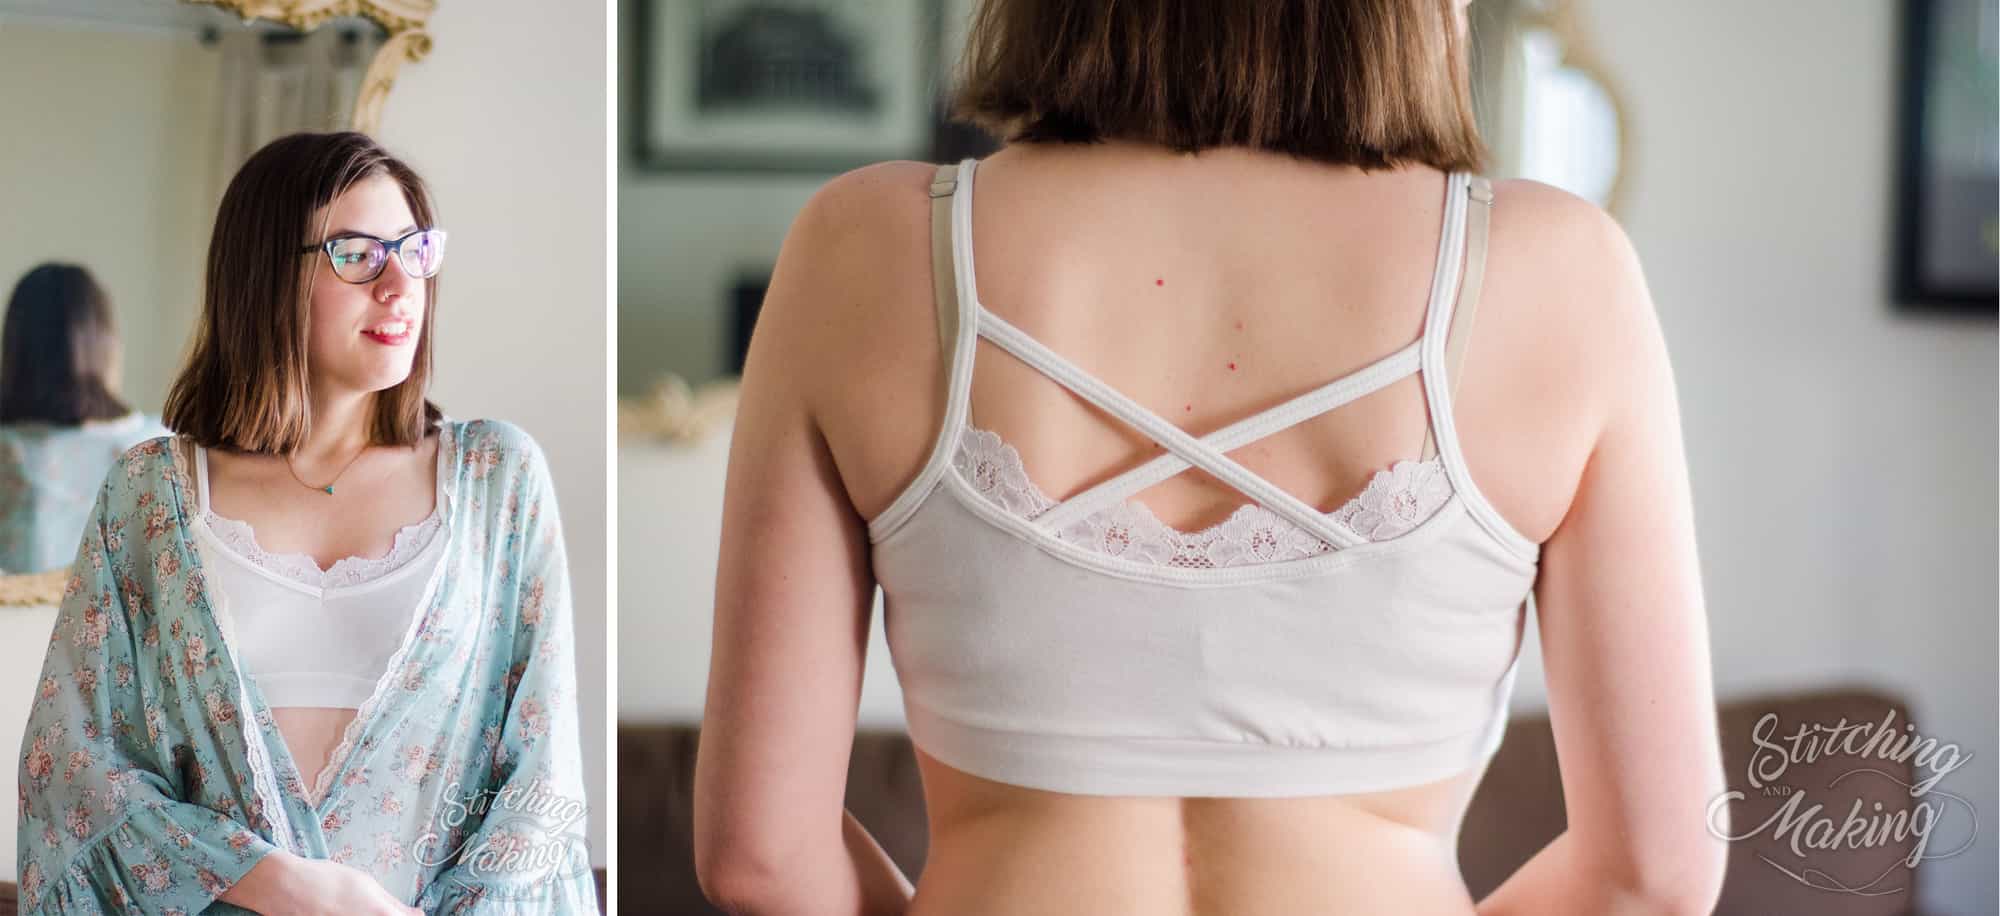
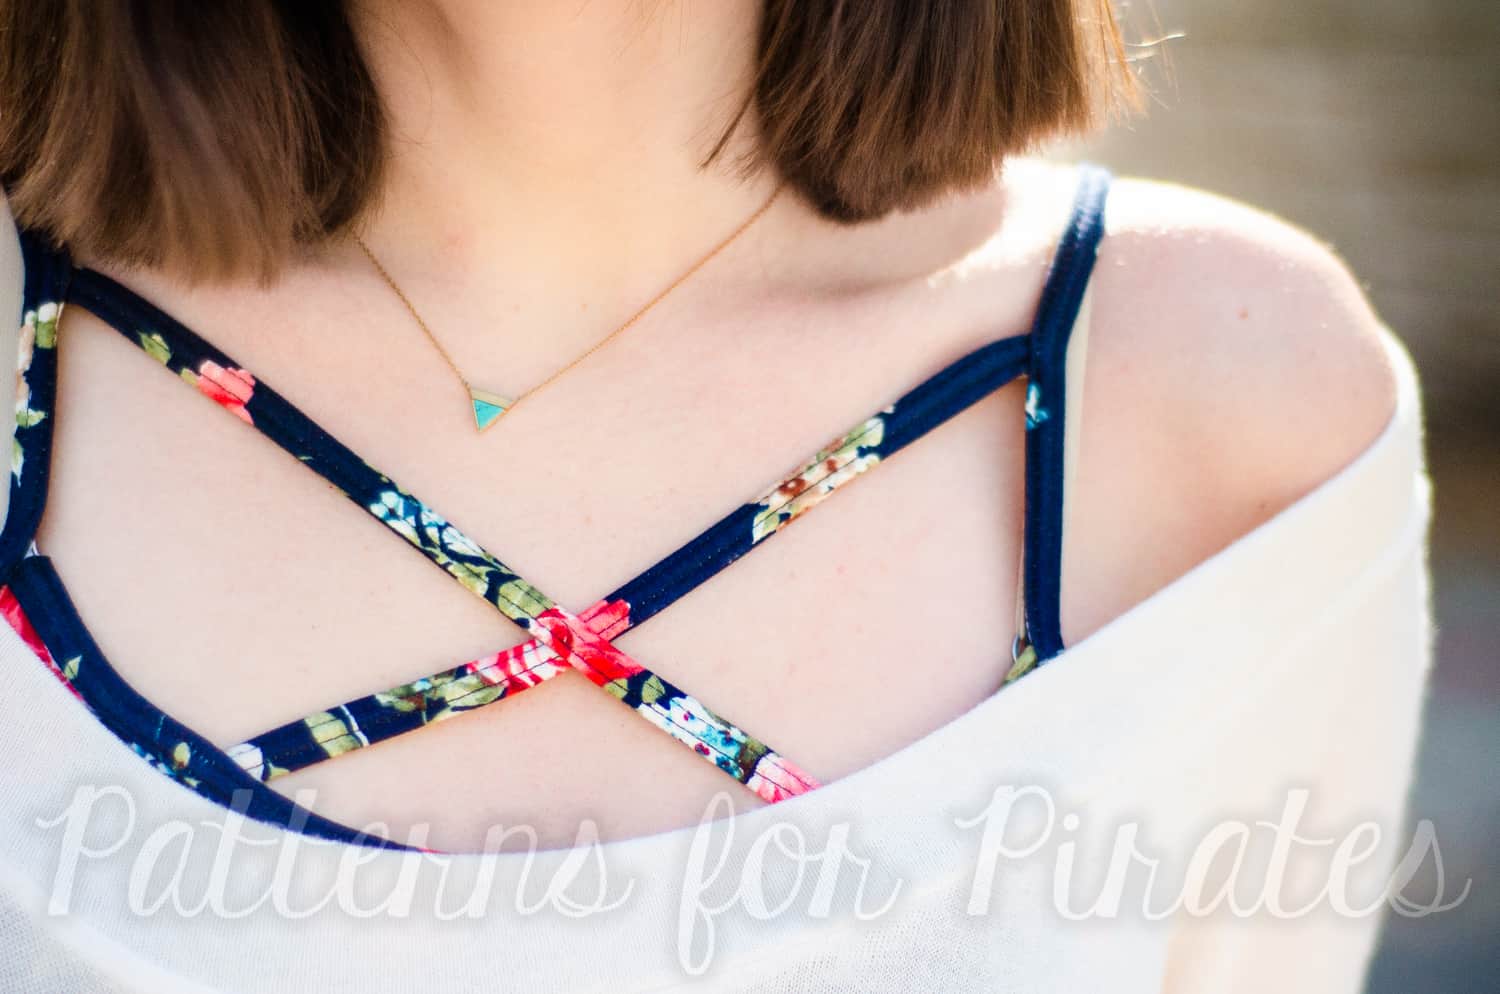
Hello Pirates!  Today I’ll be walking through some tips on using a twin needle for topstitching as an alternative to a coverstitch machine.  The end goal (of either twin needles or a coverstitch) is two lines of parallel stitching on the right side of the fabric, with the ability to stretch and not break threads when pulled.  This is usually used when hemming, but these tricks will especially come in handy when topstitching binding on our new cami pattern!


1. Stretch Needles

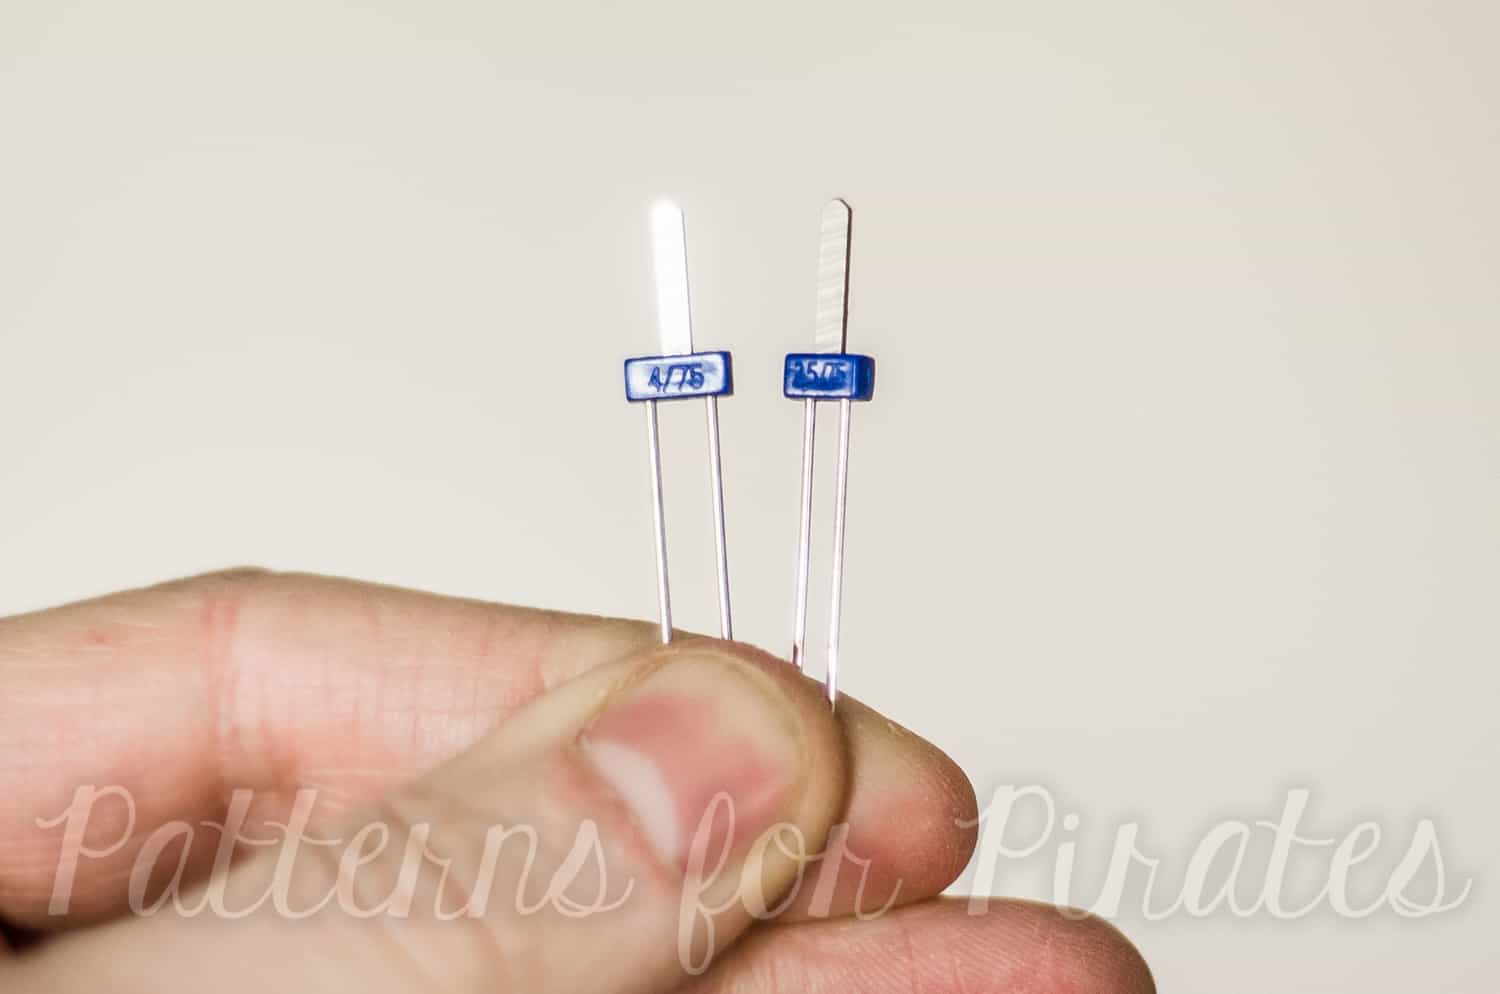
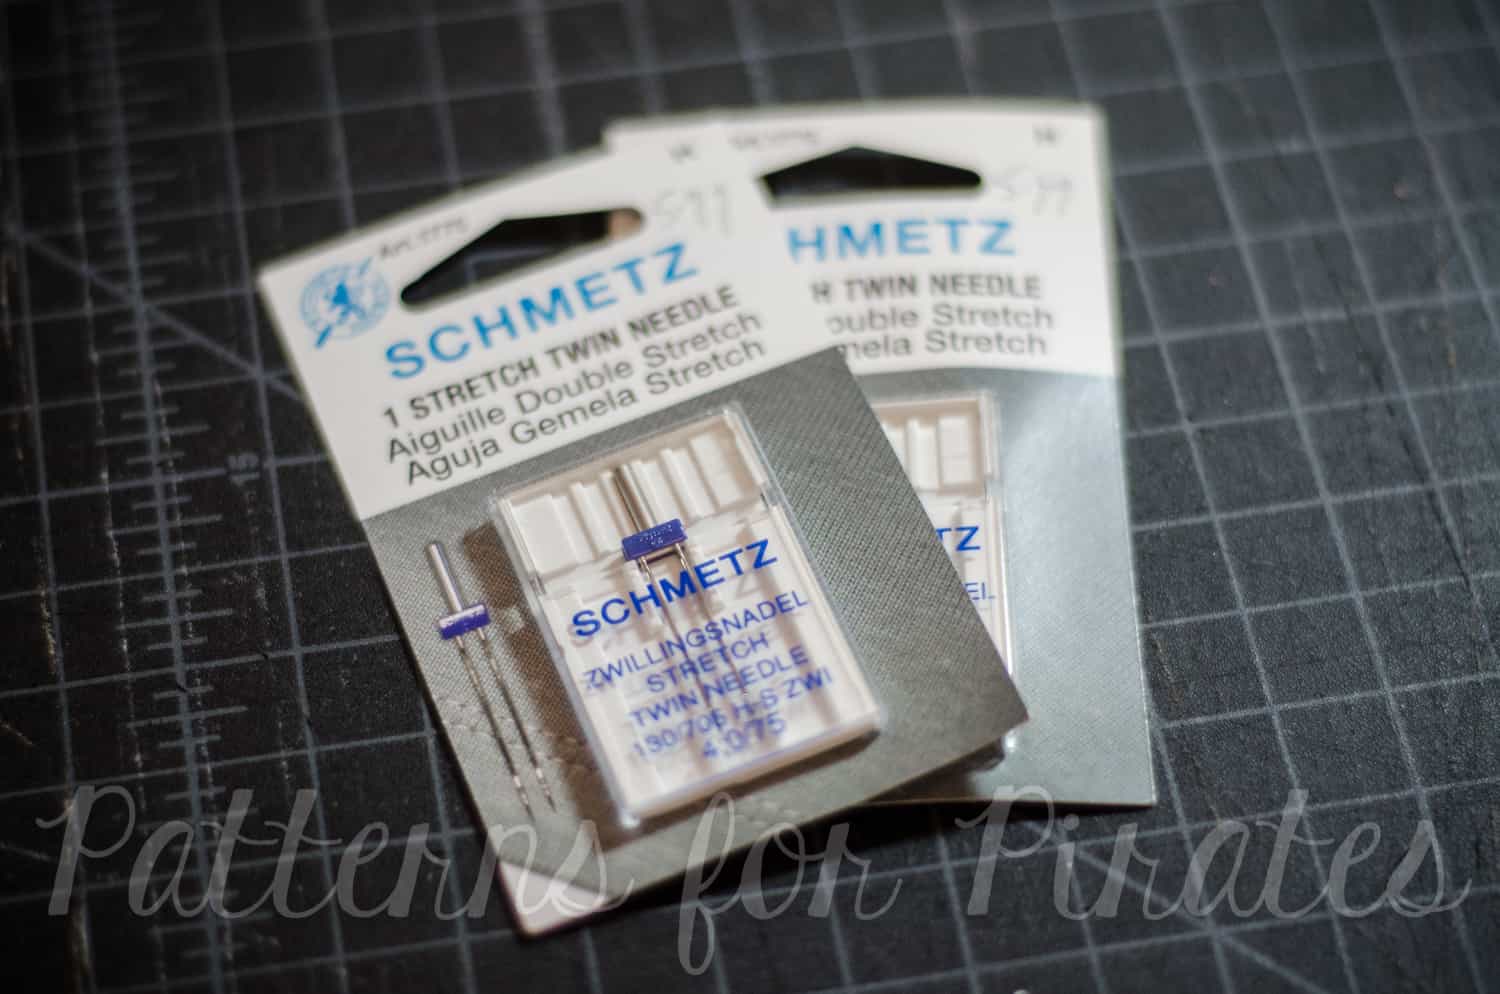
The most important point is to make sure you buy stretch needles.  Schmetz is the most common brand that people tend to use, they are available on Amazon.  I prefer the wider 4.0 width the best because it works better for me; it also comes in a 2.5 width.  These are both 75/11 needle size.
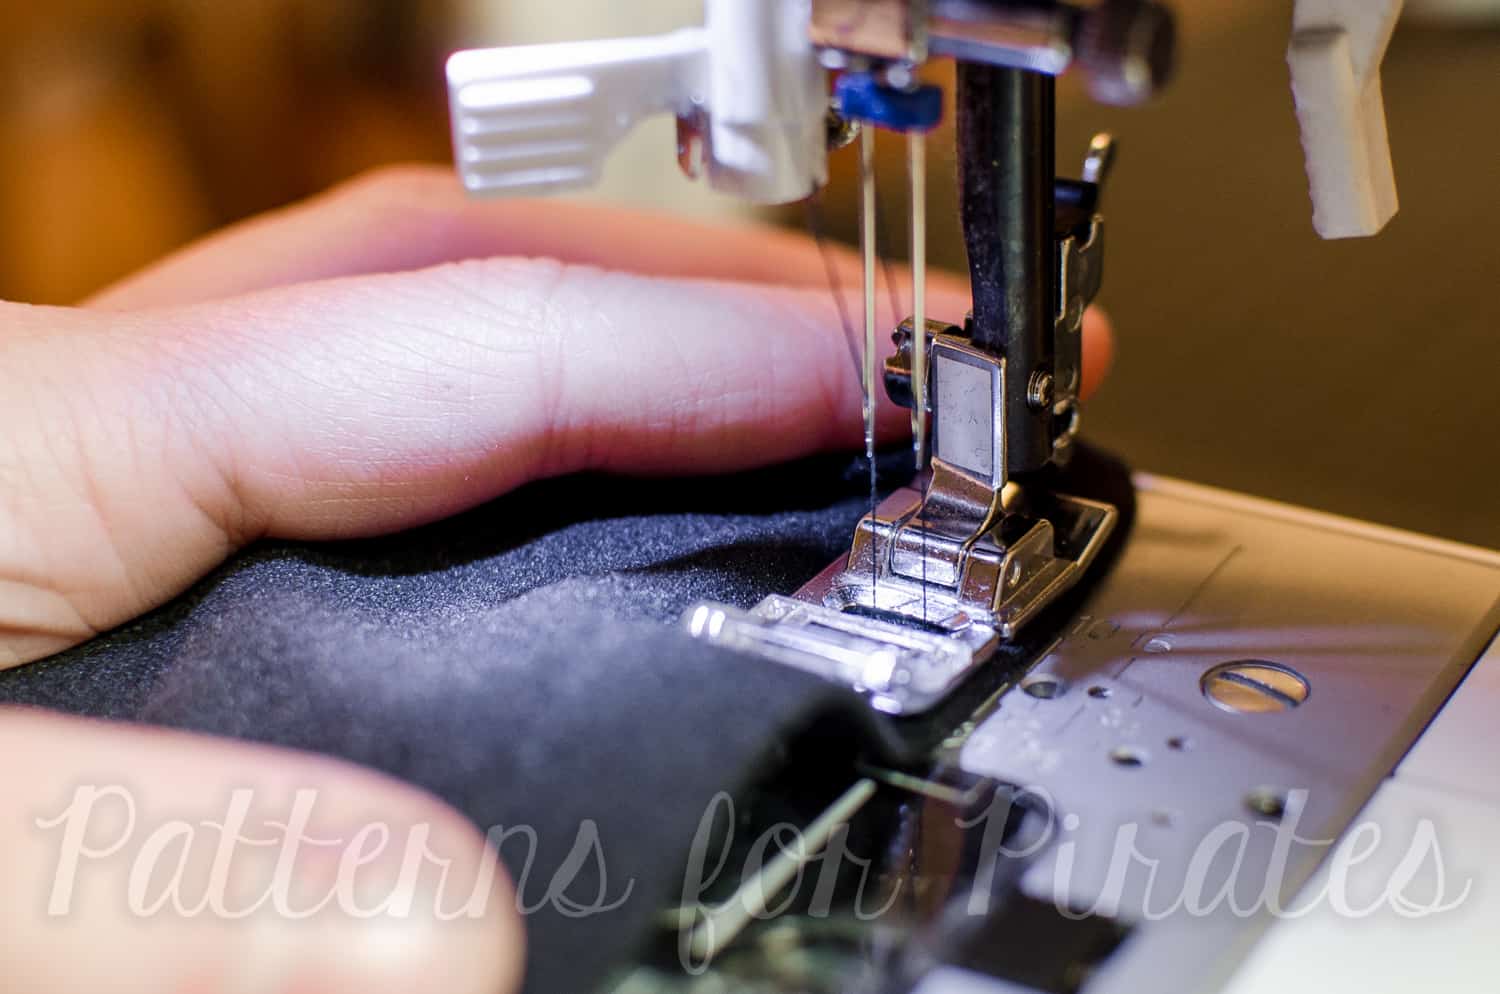
 

2. Threading

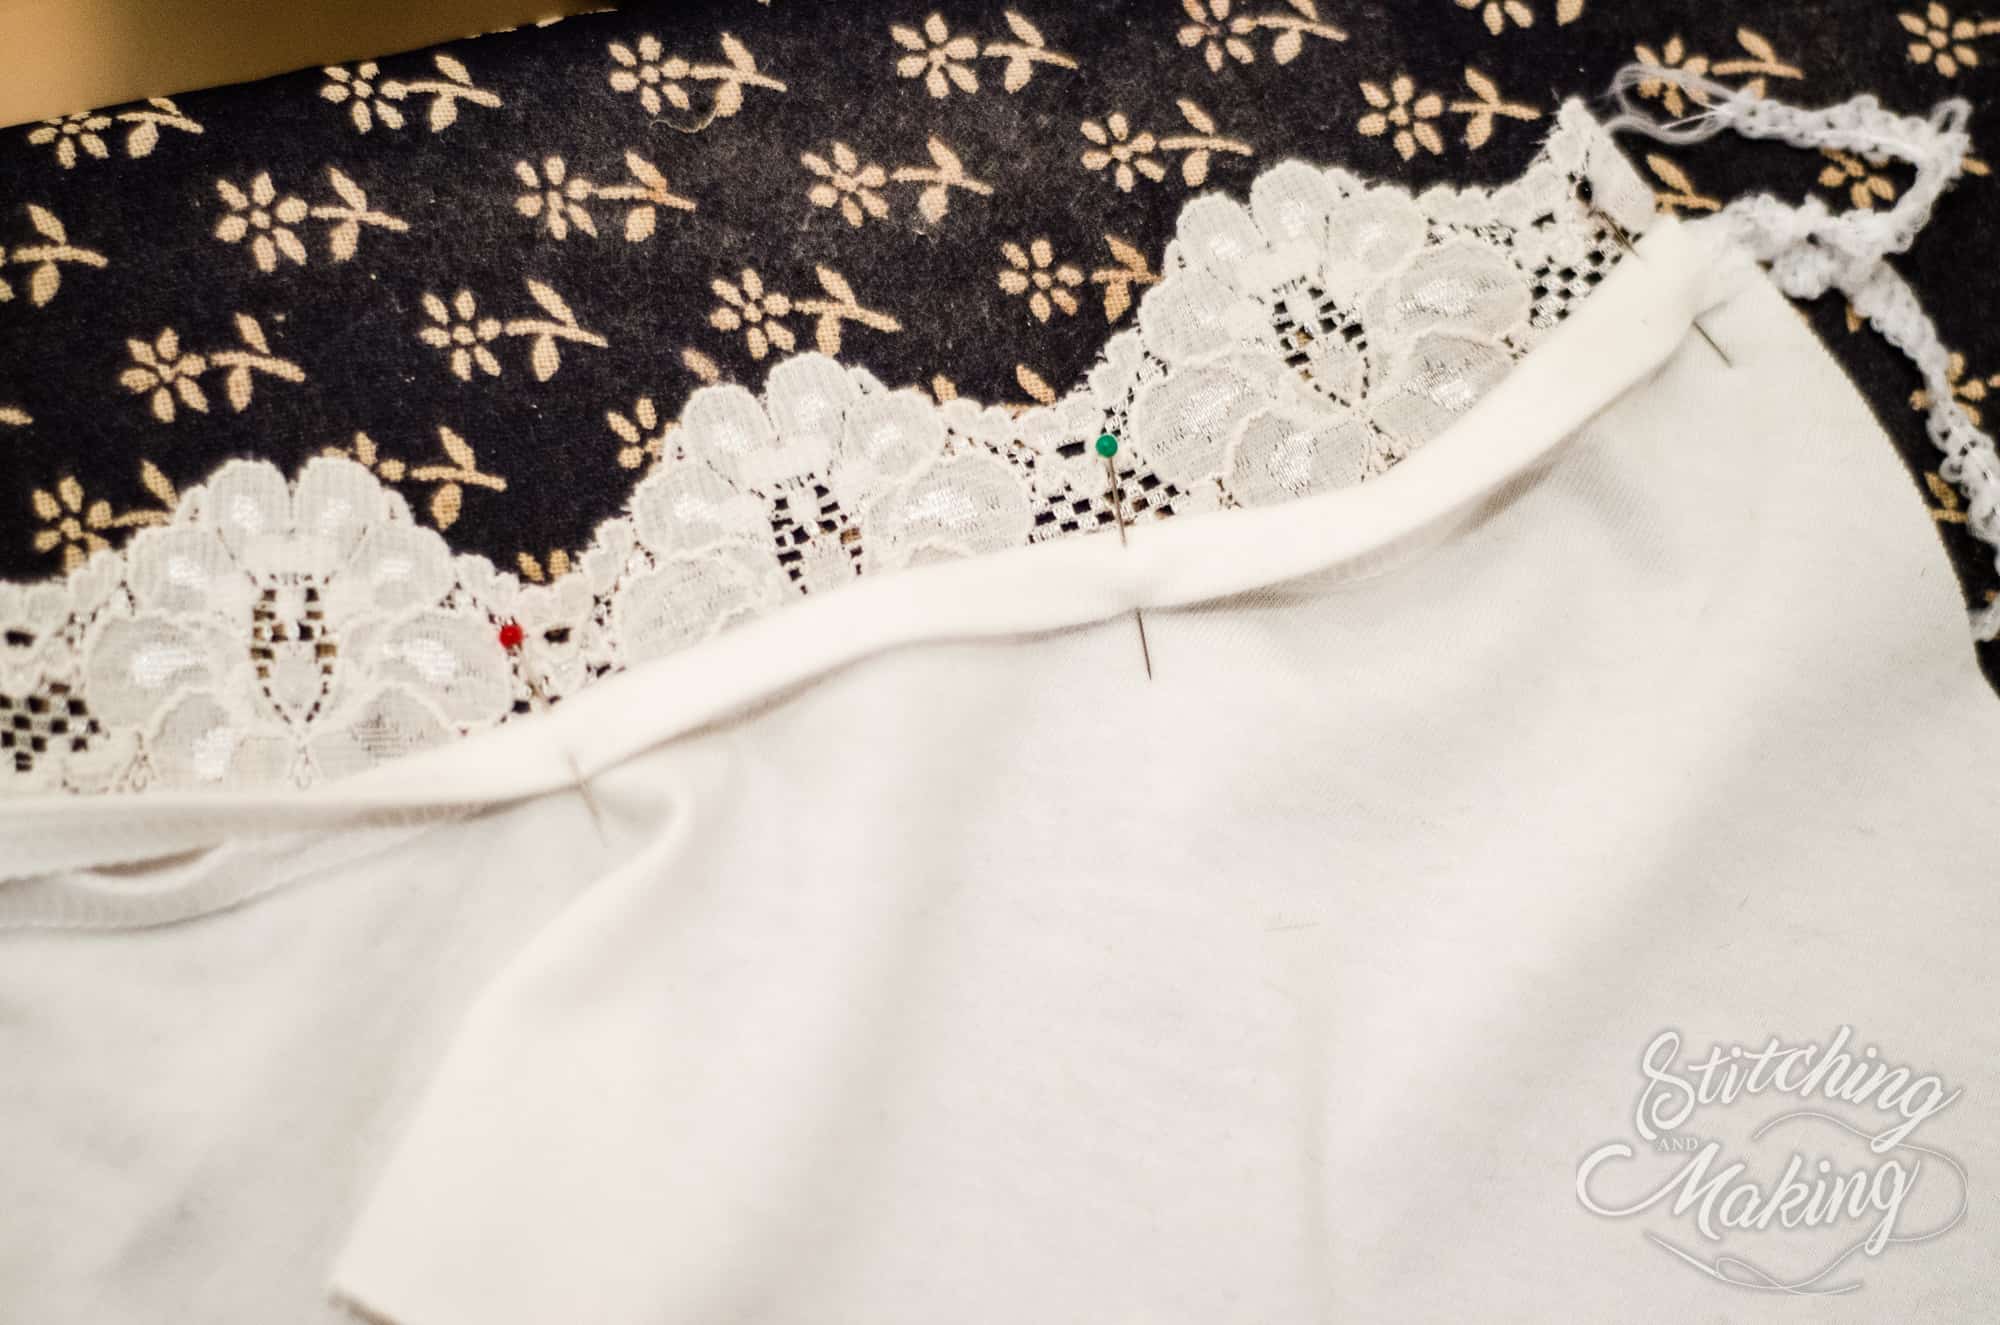
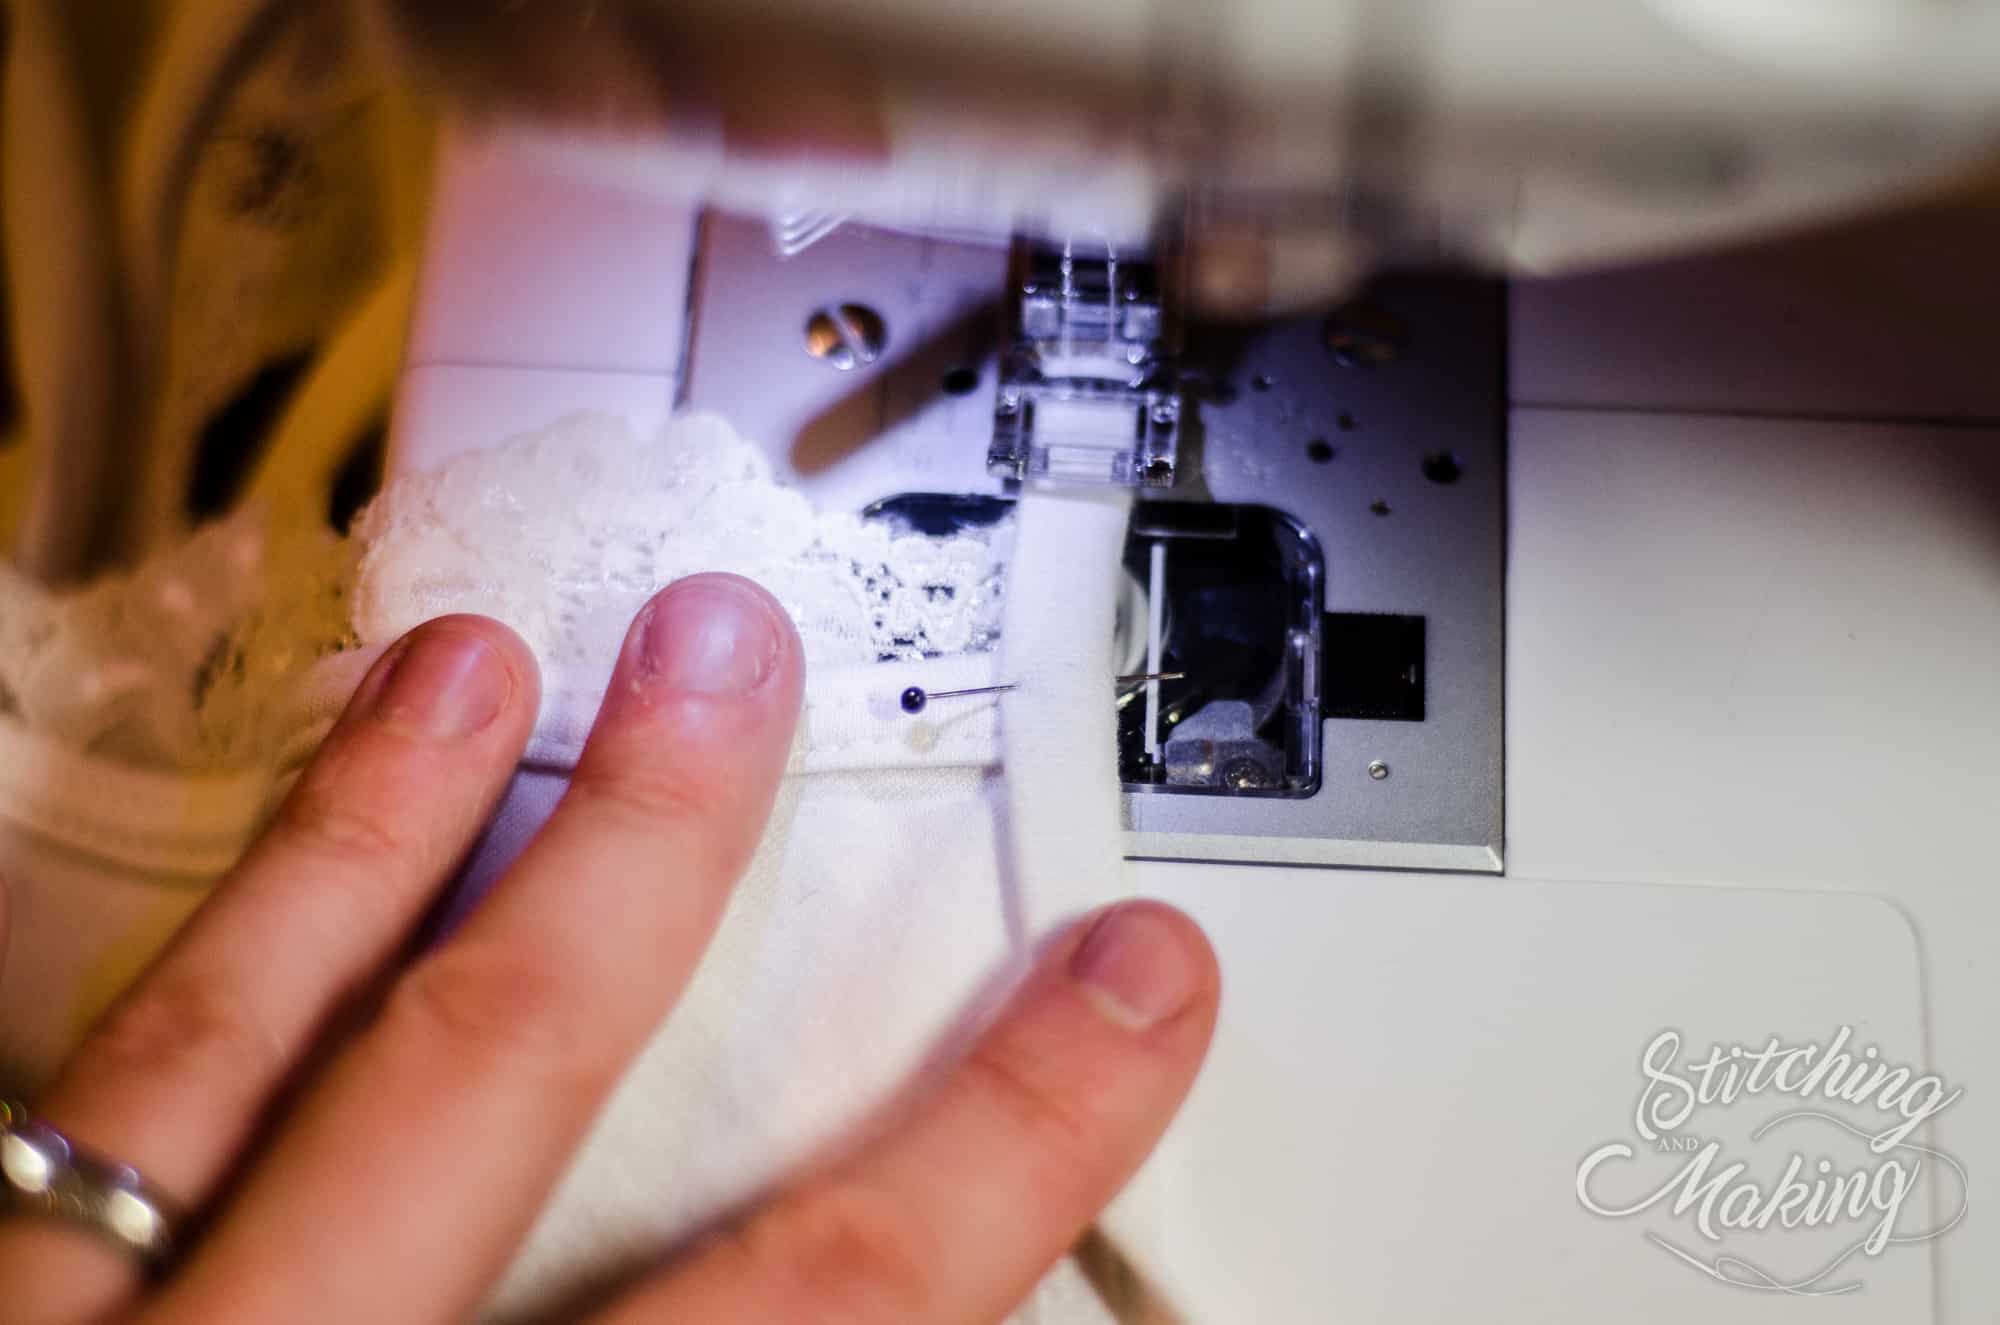
When threading, it helps to thread as shown in the below picture.  This helps stop the threads from twisting when sewing.  Also, make sure your threads are not caught on anything (or each other) at the top of your machine.


5. Stitch Type

Use a regular straight stitch for this; no need to use a triple stretch stitch (|||) or any other stretch stitch like that.


4. Tension

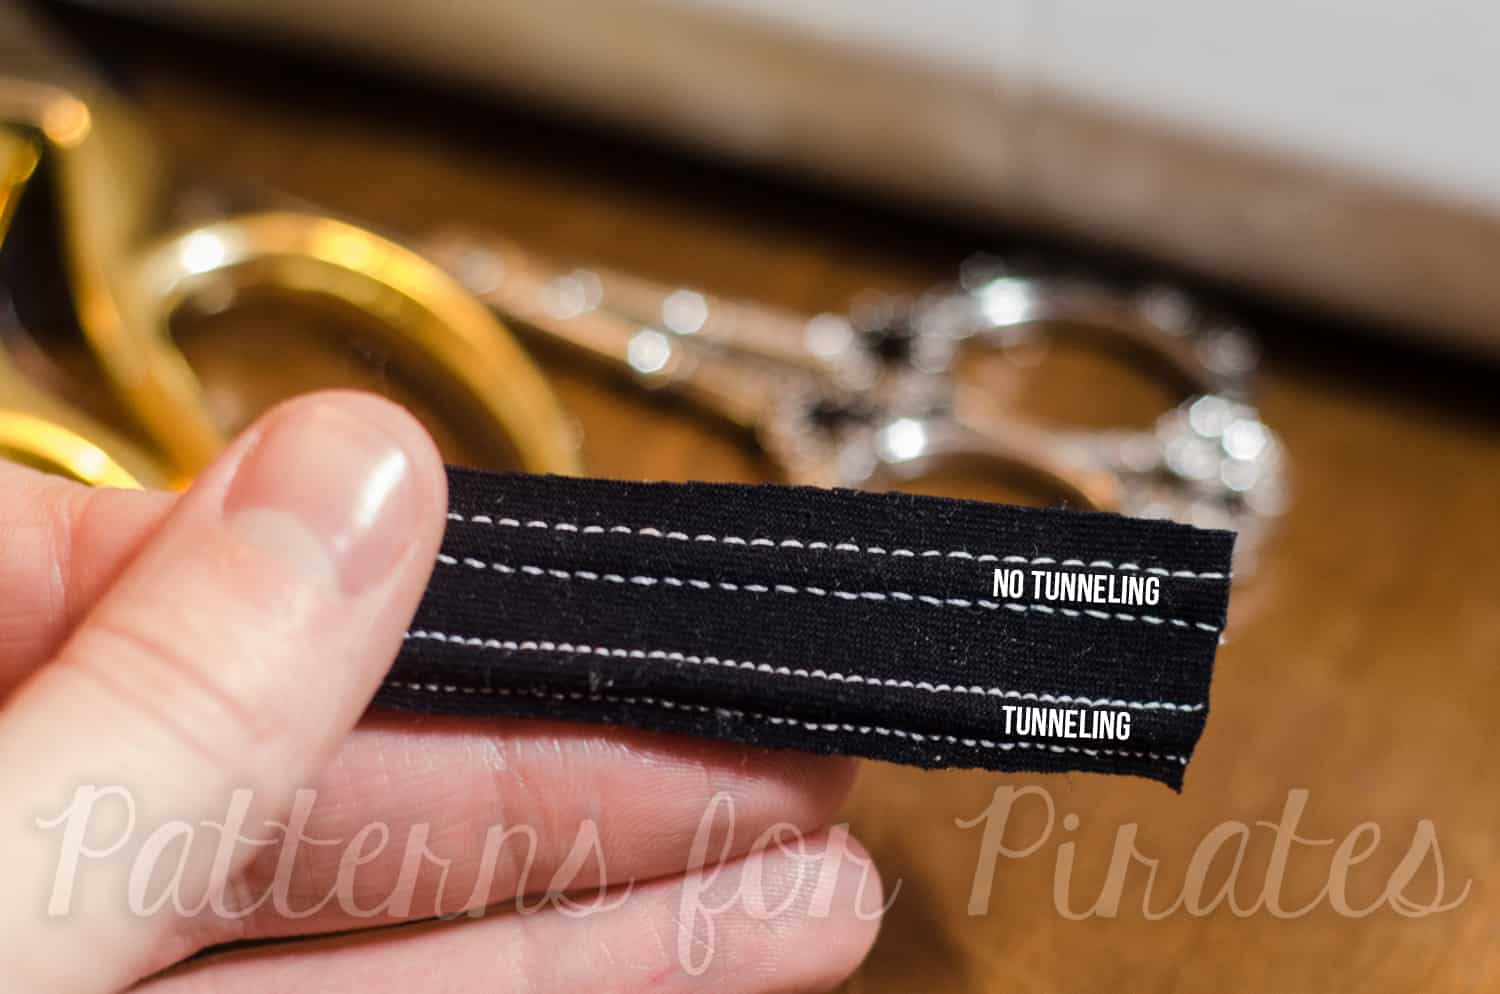
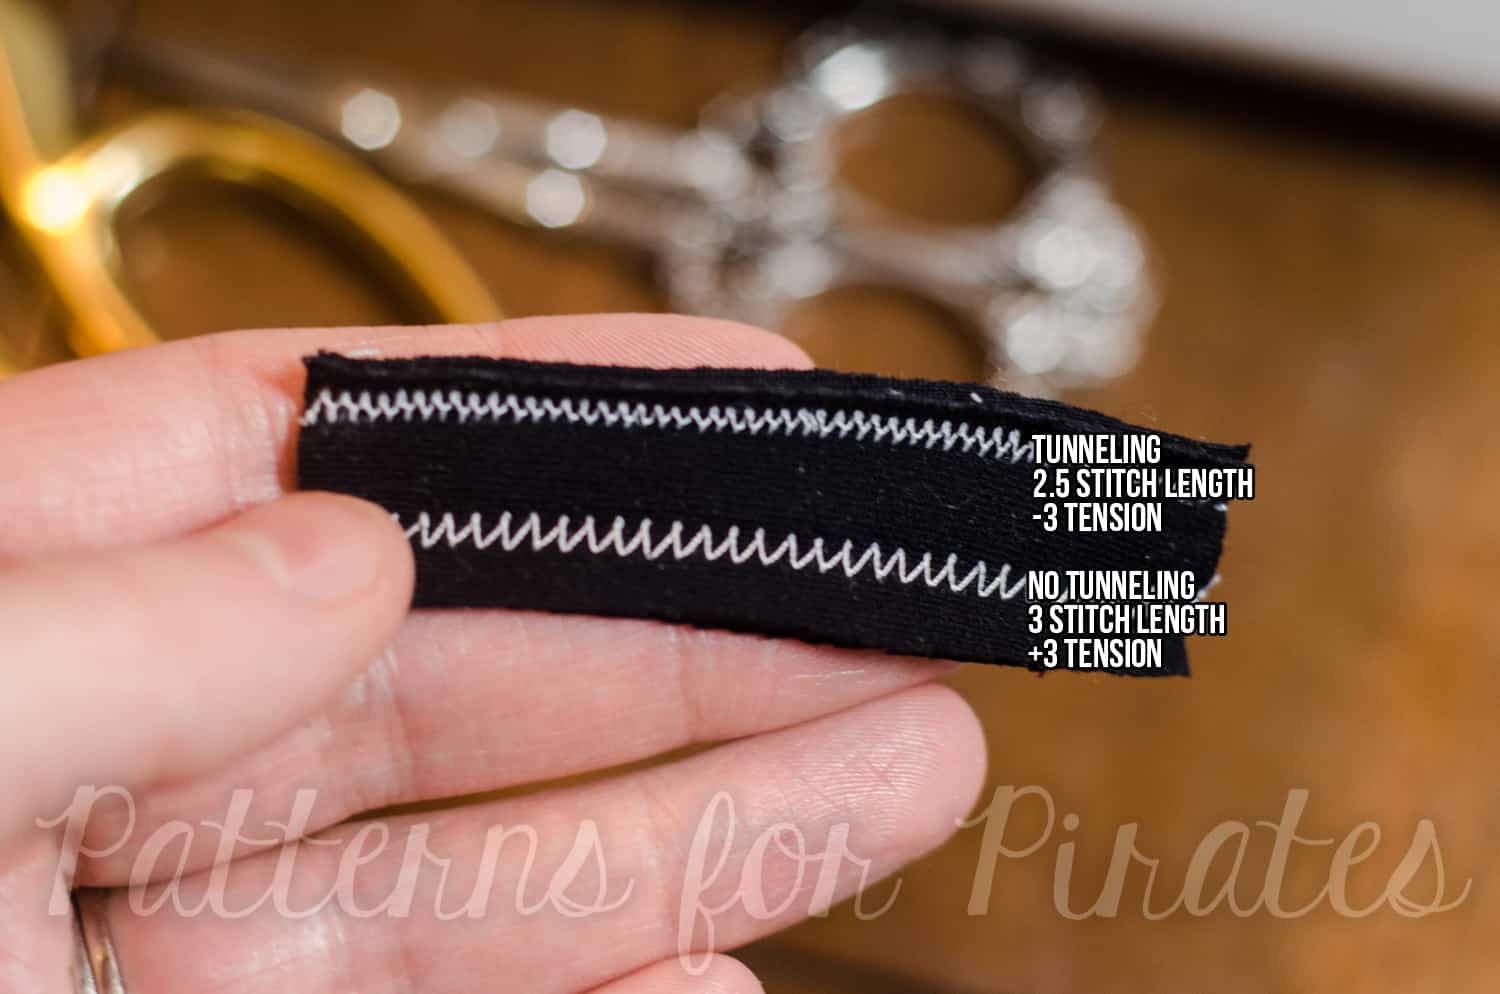
Tunneling is what happens when there is a large bump in between your two rows of stitching.  To avoid this, I’ve found it helps to increase your top thread tension.  Your machine may vary, but I usually set my tension to 3.  If possible, you should also decrease your bobbin tension as well.


5. Stitch Length

Increasing stitching length usually also helps with tunneling, especially on trickier, slipperier fabrics.  Your machine may also vary on this too, but I set mine between 3.0 – 4.0, depending on fabric.  The lower number will help things stretch more though, so you may need to find a happy medium.


6. Go Slowly!

This is a huge one.  It’s so tempting to go full steam ahead, especially if you using a twin needle to hem.  You’re almost done with your project, but don’t ruin it with a sloppy hemming job!  Going slowly can make all the difference between a wavy hem and a perfectly flat one.  If you encounter any thicker areas of fabric, it may also be a good idea to use the hand crank on your machine, turning it slowly to ensure no mistakes as you pass over the thicker area.


7. Don’t Stretch as You Sew

This applies to all knit fabric projects, but especially when using a twin needle.  Don’t pull or stretch the fabric as you feed it into the needle area.  I’ve found that even creating a little extra negative tension as you guide the fabric can help to avoid any pulling as you sew.
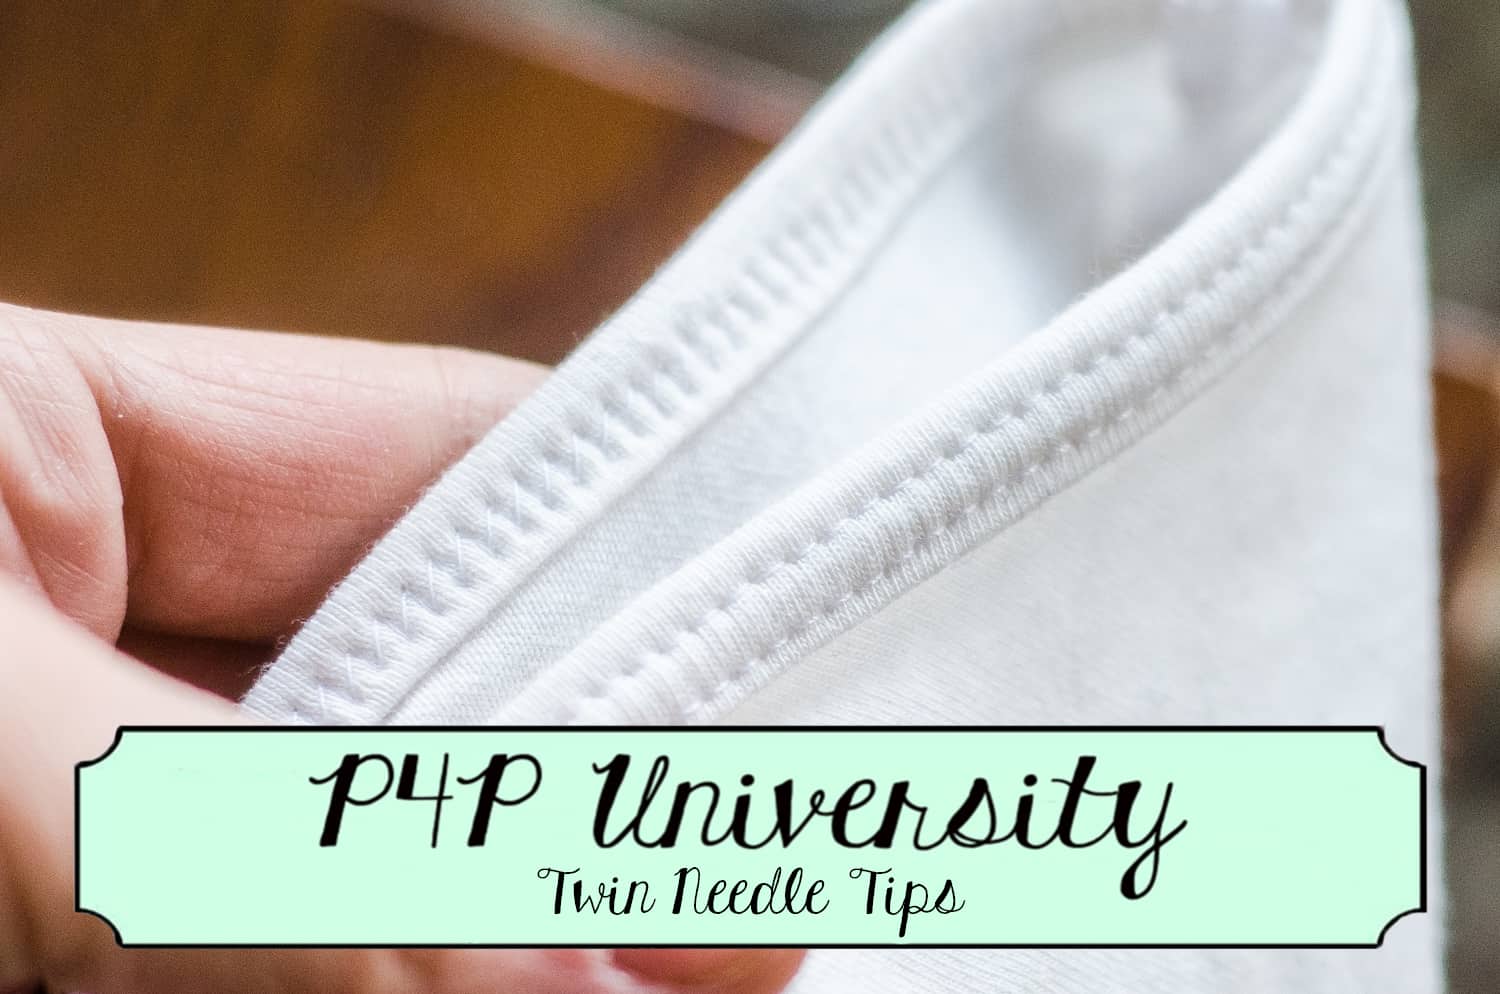
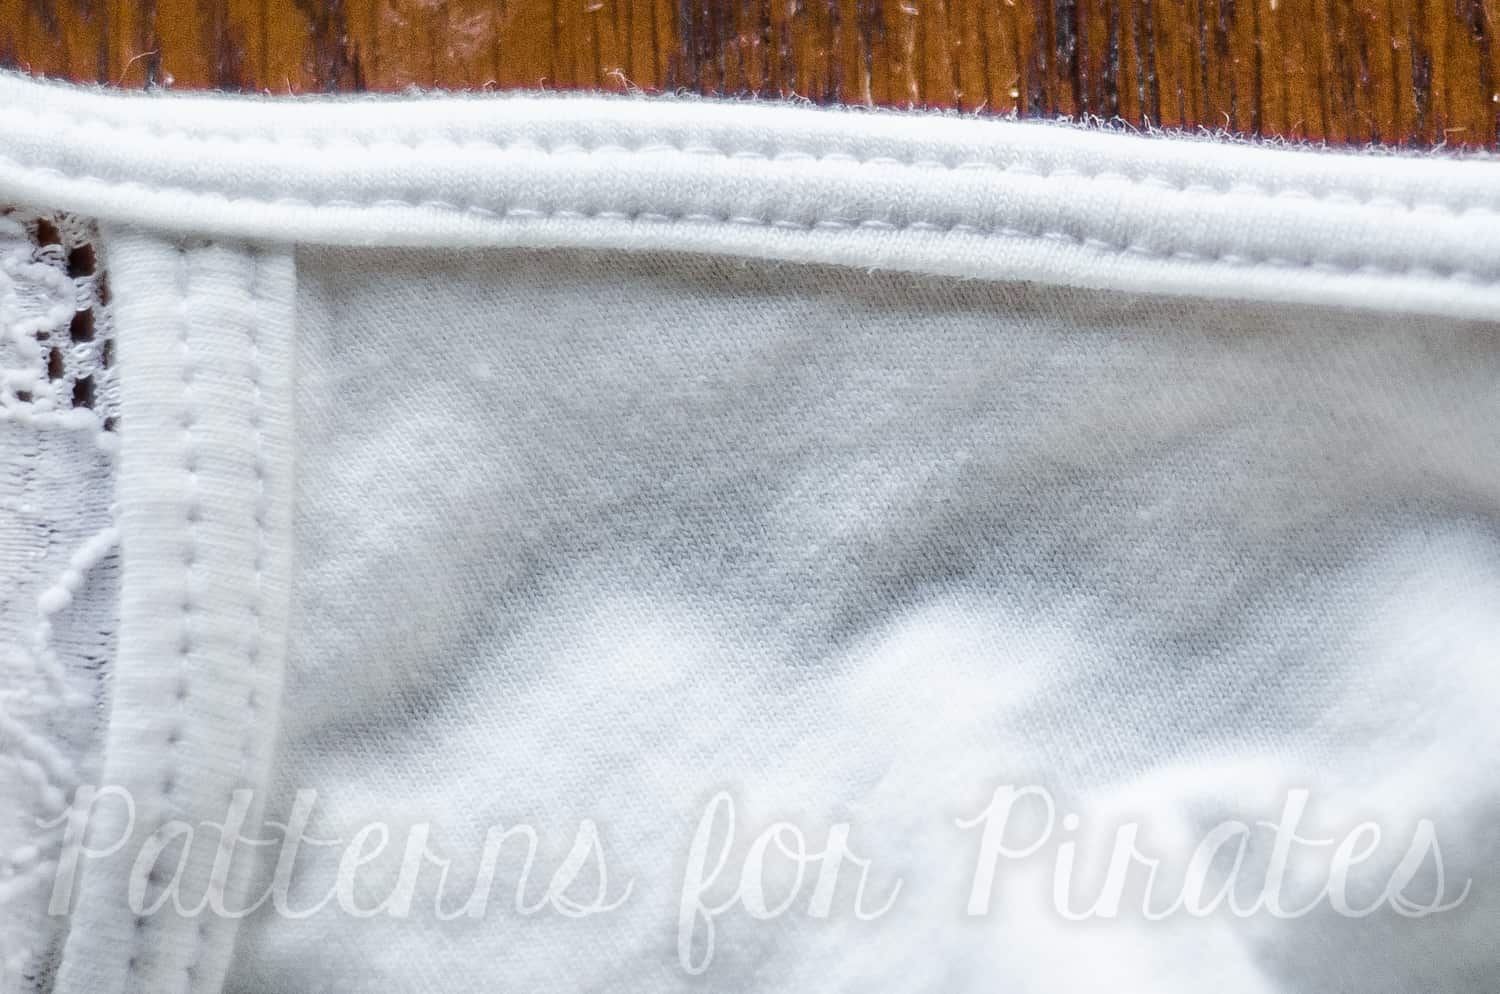
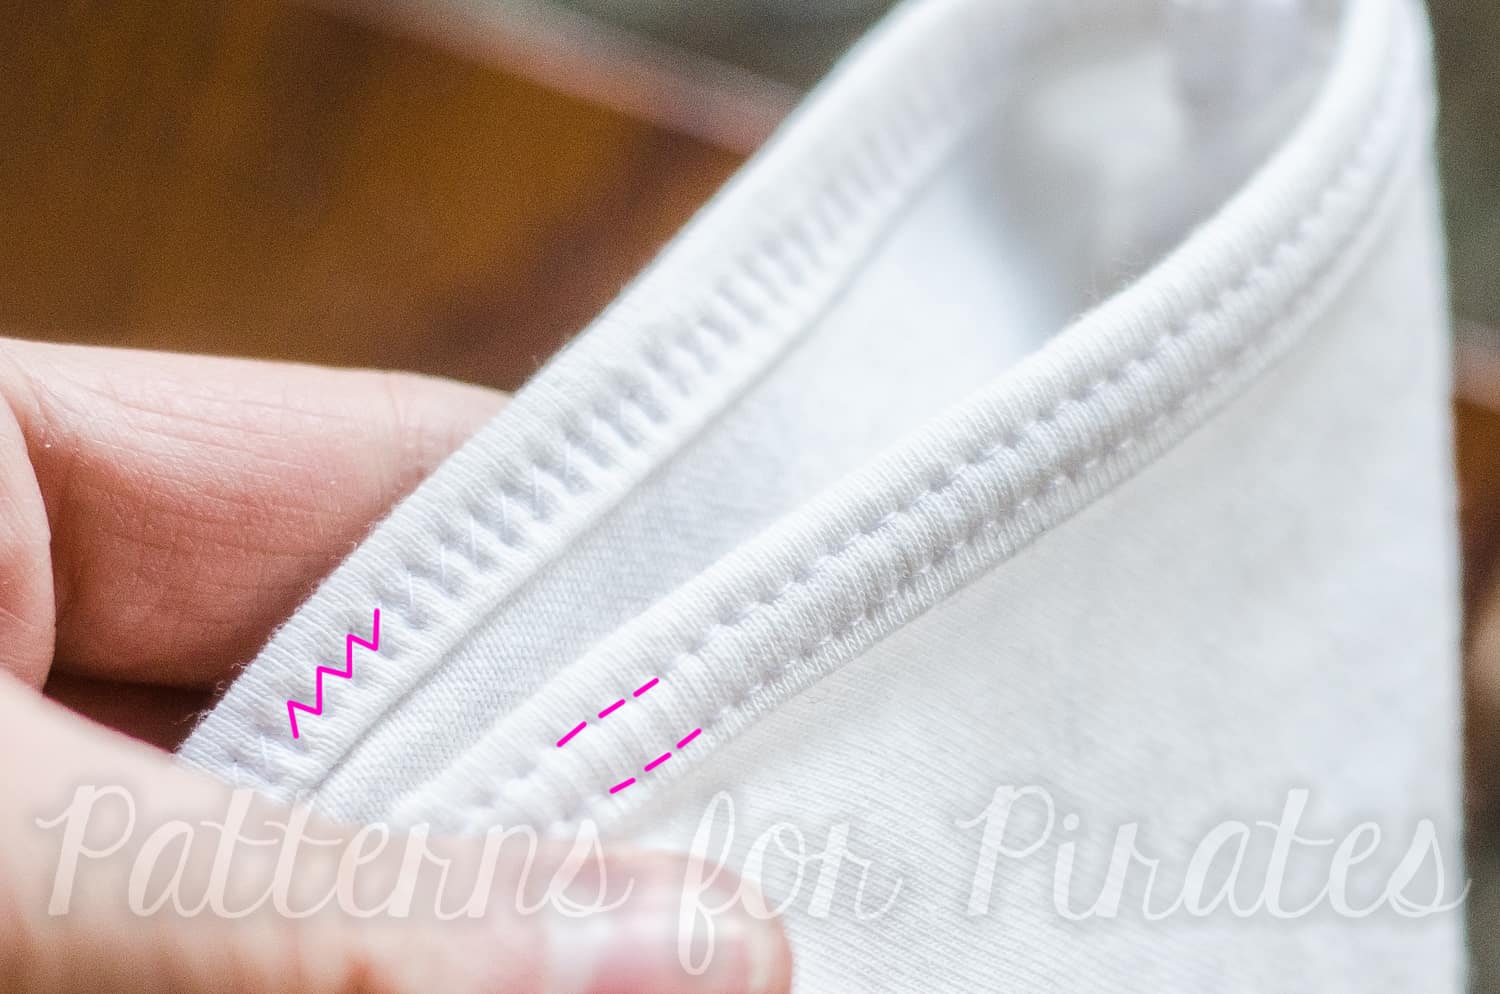
 

8. Top vs. Bottom

When everything is done correctly, you should have two parallel lines on the top of your fabric, and a perfect zigzag on the back.  The zigzag is what allows your fabric to stretch after it’s sewn, so if you have super tight or non-existent zigzags, then you likely need to adjust (likely increase – confusing, I know) your top thread tension.  Here’s how it should look, the underside of the fabric is at the top of the picture and the right side is on the bottom.  Note the zigzags!


I hope these tips help you as you prepare to topstitch lots of fun binding or finish up a fancy new garment with a twin needle hem!  Let us know in our Facebook group or here in the comments if you have any questions about twin needles!

Elisabeth

Filed Under: Frequently Asked Questions 15 Comments

Cross My Heart Cami Hacks

March 14, 2017

So you love the X option but you also love the T option of the Cross My Heart Cami and now you’re in a pickle…which one do I make? The answer is obvious, you make both! And if you’re anything like I am, you make both style in one cami! 🙂

IMG_6658

IMG_6671

The beauty of the CMHC pattern is that you don’t even need to make any modifications to achieve this look. Simply cut two pieces of the front pattern and follow the directions for adding the T and the X details to the pieces. Finish the cami as per the tutorial and voila! You made yourself a brand new cami that can be worn both way. You can wear the X in the front and the T in the back like I did or you can wear the T in the front.

cami 2fronts

I paired this cami with a Pirate Pencil Skirt and a Sweet Tee with curved hem and an off the shoulder mod. Which styles will you be making first?

Judy made this one with two backs! Such a simple mode that can add so many more options to this pattern!

The V front and low x makes a sizzler! I mean, who doesn’t love to have that piece of clothing that you can pull out, slip on feel a little sexy every once in a while?

Are you looking for a more delicate, feminine feel?  Grab some stretch lace for an easy hack!

Here’s a simple how-to:

1. Cut the lace the same length as your binding pieces, for whichever neckline you are using.

2. After you’ve attached and folded over the binding as directed in the tutorial, pin the right side of the lace to the wrong side of the neckline/binding. In the picture below, the fabric is right side up.


3. Repeat for the back as well, if you’d like.  Then, sew it on as you top-stitch the binding, per the pattern tutorial.  Here’s how it should look all said and done; wrong side up shown on the bottom of the picture, right side up shown at the top.


4. Be sure to catch the edge of the lace on the side of the shoulder binding as you attach it.


5. Finish the shirt as the pattern tutorial directs.  That’s it – easy peasy!

~ Elisabeth


Not sure what to do with all those pretty lace appliques? Attach one to the front or back of the cami.  I happened to up-cycle one from an old shirt that didn’t fit anymore and have some knit on hand that matched perfectly!  I used to V back because of the shape of the applique.  I left the front neckline raw and stitched the lace just overlapping the top edge using a zigzag stitch.  (Knit does not unravel so no need to finish those edges).  Attach to the right side of the cami prior to doing the shoulder binding if your applique extends to the armholes.  For the main body of the applique, I chose to tack down in a few areas (center of the flowers) as the applique itself was pretty open throughout.  Easy Peasy!


Filed Under: Frequently Asked Questions, Pattern Release, Uncategorized 1 Comment

all p4p today

March 1, 2017

p4pcontest

One of our biggest joys is seeing you wear P4P outfits and feeling beautiful! From Slim Fit Raglans to SOS pants, from Timeless Tunics to Free Spirit tanks, we love them all!

Are you wearing head to to P4P today? Will you be rocking a full Patterns for Pirates outfit tomorrow? Post a picture in the Facebook group or on Instagram of your outfit and hash tag it #allP4Ptoday. We will pick our favorite each month. In order to qualify for the contest, the photo must be taken when you’re wearing the outfit, whether it’s at home or out and about. Selfies in the mirror in your sewing room will not count. We want to see you wearing what you’re sewing and love it!😊 The lucky winner will be receiving a P4P pattern of their choice! Sounds fun?

Just in case you need some inspiration here is some of our “all P4P” looks that we rocked this past year.

judypsd

Pumpkin Spice Dolman and SOS Pants

katy 1

Sweetheart peplum and pirate Pencil skirt

Nicole3

Boundless maxi dress and Men’s Henley

Nicole1

Essential Tank, Cocoon Cardigan and SOS Pants

Timeless Tunic and pirate Pencil Skirt

Timeless Tunic and pirate Pencil Skirt

Slim Fit Raglan

Slim Fit Raglan and SOS pants (adjusted for shorts)

Sunshine dress

Sunshine dress

Mama Bear Joggers and Women's Henley with faux layers

Mama Bear Joggers and Women’s Henley with faux layers

Essential Tank - dress length

Essential Tank – dress length

judy3

Free Spirit Tank dress with the LMU sleeves hack and the free scarf (available on the blog)

Nicole2

Relaxed Raglan and Peg legs

Sweet Tee dress and Cocoon cardi

Sweet Tee dress and Cocoon Cardigan


So get to sewing and show off your outfits, pirates! Don’t forget to hashtag #allP4Ptoday !

Alex

Filed Under: Contest/Giveaway, Uncategorized 8 Comments

P4P Cardi Week is here!

January 22, 2017

We had so much fun when we ran #P4PRaglanWeek that we decided to do it again.  But this time, we are focusing on our favorite layering pieces: Cardigans!  That’s right, Pirates!  We are asking you to dig out your Grandpa/Cpt Mack, Carefree, and Cocoon/Butterfly Cardigan patterns…and the Kimono pattern too!  Let’s get busy sewing!

cardi logo

We are giving you a full week of cardigan sewing, with hacks and add-ons and easy tutorials.  This is going to be so much fun!

Take a look at our jam-packed schedule of cardigan love!

Saturday, January 21: #P4PCardiWeek Announcement

Sunday, January 22: Cocoon / Butterfly Ruffle + Lace Hems

Monday, January 23: Ribbon Tie Closure Hack

Tuesday, January 24: Carefree Cardigan Fringe Hack

Wednesday, January 25: Duster-Length Adjustment

Thursday, January 26: Kimono Ruffle Sleeves

Friday, January 27: Varsity Sweater Style Hack

Saturday, January 28: Carefree Cardigan Flannel + Vest Hack

Monday, January 30: #P4PCardiWeek Winner Announcement

You can follow along on the blog here, or in our Facebook group.  Search #P4PCardiWeek to be able to find our posts all over social media.  And please feel free to sew-along with us on one or all of the days.  The more the merrier!


To sweeten the deal, we’ve gone through and updated the older patterns to include the layers feature, as well as the international and copy shop files.  How do you get the updated copies from previous purchases?  That’s easy!

  • If you purchased from PatternsforPirates.com or Craftsy, log into your accounts and download the updated file.  It’s already in there, waiting for you!
  • If you purchased from Etsy, email a copy of your receipt to help@patternsforpirates.com and the Pirate crew will email you with your updated files.

But wait, there’s more!  We wanted to create a friendly pirate-y competition with our P4P Cardi Week!

Between tomorrow and Saturday, January 28, sew up a Patterns for Pirates cardigan using one of our hacks, or by keeping the pattern as-is.  Share your photo with us on Instagram or in our Facebook group and use the tag#P4PCardiWeek We will pick our favorite and the winner will win a free P4P pattern of choice AND be featured on this blog.  Fun right?

To make it even better we have put all the cardigan patterns in the shop on sale all week (no code needed)!

Grandpa Cardigan | Cpt. Mack Cardigan | Carefree Cardigan | Cocoon Cardigan
Butterfly Cardigan | Summer Kimono

Now get out there and sew some cardigans, matey!

Filed Under: Announcement 8 Comments

Butterfly Cardigan :: New Pattern Release!

January 17, 2017

We are celebrating another pattern release day and you’re going to love it!  Remember the Cocoon Cardigan that we put out right before the holidays?  It’s in mini size now!  Meet the Butterfly Cardigan!

listing pictures youth

The pattern is drafted for girls sizes 3M – 14.  It’s a dolman style sleeve, so it’s got a looser fit and is quick to put together, just like other dolman style tops.  There are THREE sleeve lengths (short, 3/4 and long — each with multiple band options), TWO hem lengths (cropped or tunic length), TWO neckband options (short or tall), and optional pockets (patch or inseam)!  On top of all of that, we have also included a  PDF layers feature for printing.

line drawing

The three different sleeve length options will take your littles from one season to the next.  Choose between short sleeve, 3/4 length, and long sleeves and your littles can easily transition between all four seasons.

butterfly-sleeves

With two different hem lengths, you’ve got all of your bases covered.  Get more coverage with a longer-length tunic…

butterfly-tunic

…or make it in a short and sweet cropped length!

butterfly-cropped

Don’t worry, we made sure to include pockets (!!!) in the Butterfly Cardigan! Who doesn’t love pockets?

butterfly-pockets

Not quite convinced yet?  Go check out all of the rest of the adorable tester images in our Facebook group HERE and get inspired!

Can’t take it any  longer and need the pattern right now?!  Go grab your very own copy of the Butterfly Cardigan and get to sewing!  Don’t have the Mama version of the Cocoon Cardigan yet?

Go grab a special bundle pricing for the Butterfly + Cocoon Cardigans HERE.  Butterfly and bundle will be on sale (no code needed) through Monday January 23,2017.

And don’t forget to share your gorgeous makes with us over in the Patterns for Pirates Facebook group!

Filed Under: Pattern Release Leave a Comment

2016 Holiday Freebies: Fleece Mittens Pattern!

December 8, 2016

The Pirate Crew is here to bring a little more “yo ho ho” into your holiday with some freebies!  Today is the first of three patterns we are releasing, for FREE!  In case you were stumped on Christmas sewing ideas, here is the first of our scrap-busting, super quick, free patterns.

p4p-fleece-mittensp4p-fleece-mittens2 p4p-fleece-mittens3

These mittens are a one-size fits most.  We’ve also provided a cuff and a non-cuff version, so you can mix other fabrics into these easily if you’d like.  The pattern is written for a basic fleece fabric, though some of our testers have had success with sweater knits and other various fabrics.

Grab your free pattern pieces here. If you need help putting the pattern together, pop over to the First Time Users Tips page or ask in our facebook group .

Note: I use my sewing machine for the construction of the mitten body, because the thumb area can be really tricky if you’re using a serger.   When using fleece, it helps to use a walking foot in your machine to help reduce pulling.  It also makes feeding the fleece through your machine a more even process.

Recommended fabrics: Fleece, cuddle/minky, sweatshirt fleece, upcycled sweaters, etc. I suggest washing your fabric before you begin to pre-shrink & help prevent color bleeding in the future.
(Optional cuff) Any knits with at least a 20% stretch.


Supplies needed:

1/3 yard Fleece fabric
(optional cuff) less than 1/4 yard required

Step 1: Assemble your pattern and cut your pieces out.  You will need two sets of mirror images of the main body pieces.

mitten1

Step 2: Lay two mirror images, right sides together.  Using 1/2″ seam allowance, sew around the entire outside of the mitten body.  Make sure to leave the bottom open.

mitten2

Step 3: Clip the corner between the thumb and fingers, making sure not to cut into your stitching, but getting as close as you can to it.  This step is super important, otherwise the mitten will fit really strange in the thumb and it’ll be super uncomfortable.

mitten3

Step 4: [If doing the cuff version, skip to step 6] Turn the opening up 1″ and hem.  (Optional: turn 1/2″ and then another 1/2″ to enclose raw edge.)

mitten4

Step 5: Turn mitten right-side-out.  Repeat with second mitten.

mitten5

Step 6: CUFF VERSION ONLY Complete steps 1-3.  Also cut 2 cuff pieces, one for each mitten.

mitten6

Step 7: Fold your cuff piece, right sides together, meeting the shorter ends together.

mitten7

Step 8: Stitch (using 1/2″ seam allowance) short ends together.

mitten8

Step 9: With wrong sides together, fold the raw edges together to meet each other.

mitten9mitten10

Step 10: On both your mitten body and cuff pieces, mark raw edges into halves.  (The mitten body will be the two seams.  The cuff will be one seam and the halfway point on the opposite side.)

mitten11

Step 11: Slide the cuff over the mitten body, aligning the raw edges and matching the half-marked points.  Note: The cuff is slightly smaller than the mitten body.

mitten12

Step 12: Stretching the cuff only, stitch through all three layers of raw edges.

mitten13

Step 13: Flip cuffs down.  Repeat with other mitten.

mitten14

Step 14: Sit back long enough to admire your handiwork, and then go sew a million more pairs of these comfy mittens!

mitten15


Check out the adorable mittens that our gorgeous testers made!  (And check back with us next week, because we’ve got more freebies coming your way!)


As always, we love when you share what you’ve made with us.  Head over to the Patterns for Pirates Facebook group and show off the fabulous mittens you’ve managed to make from our freebie pattern!

Filed Under: Free Pattern 2 Comments

Cocoon Cardigan :: New Pattern Release!

December 1, 2016

Lately, we seem to tease you a lot with patterns in-the-making.  Tease.  It’s what we do.  The Cocoon Cardigan was a long, drawn out tease, with multiple appearances in our Instagram feed.  But guess what?  It’s here!  The wait is over!  No more teasing, we promise.

15304627_10103072937769963_6207666889718635781_o

Oh boy, you are going to LOVE this cardigan.  It’s like wearing a hug.  A hug that is full of customizable options, that is!

The pattern is drafted for sizes XXS – Plus 3X.  It’s a dolman style sleeve, so it’s looser fitted and insanely fast to put together.  There are THREE sleeve lengths (short, 3/4 and long — each with multiple band options), TWO hem lengths (cropped or tunic length), TWO neckband options (short or tall), and optional pockets (patch or inseam)!  On top of all of that, we have also included a  PDF layers feature for printing.

**Want to learn more about how to measure yourself for this pattern?  We’ve got you covered with an in-depth blog HERE.

15137489_10154721002299666_8899097620736985124_o

The three different sleeve length options will take you from one season to the next.  Choose between short sleeve, 3/4 length, and long sleeves and transition between all four seasons.

cocoon-sleeves

With two different hem lengths, you’ve got all of your bases covered.  Get more coverage with a booty-covering tunic…

cocoon-tunic-length

…or take it a little shorter and a whole lot sassier with a cropped length!

cocoon-cropped-length

And ladies.  Have we talked pockets yets?  POCKETS!  Doesn’t that make literally every outfit better?  We have included both in-seam and patch options.  So you can go wild!  (As wild as one could go with pockets on a cardigan, haha.)

cocoon-pockets

Were you wondering if the Cocoon Cardigan would work for maternity wear?  Yes, yes, a million times yes!  It’s perfect, no alterations required!

cocoon-maternity

Not quite convinced yet?  Go check out all of the rest of the gorgeous tester images in our Facebook group HERE and get inspired!

Can’t take it any  longer and need the pattern right now?!  Go grab your very own copy of the Cocoon Cardigan and get to sewing!


Filed Under: Pattern Release 9 Comments

P4P Halloween Costume Contest: The Winners!

November 3, 2016

Halloween costume sewing is basically my (Katy) favorite type of sewing.  It’s allowed to be over-the-top, silly, and super creative.  And I feel like it pushes sewists out of their usual comfort zones.  We held a costume contest in a thread on the Patterns for Pirates Facebook group!  If you were curious about all of the costumes shared, head HERE to find all of the amazing sews.

costume-contest

I have a hard time choosing just one winner.  So I decided to let my husband and son pick their favorites too this time around!  Here are our picks!

Louis’ Favorite (in the least surprising choice…from my Pokemon obsessed 6-year old): Jennifer Rowe with her Pikachu, made from the P4P Jolly Roger Raglan + Add-Ons, and the Pirate Playground Pants!

14695579_10211083149336893_9114943008414542237_n

Bennett’s Favorite (another non-surprise from my Star Wars nerdy husband): Jennifer Richardson with her Darth Vader / Rebel Pilot dresses using the Me Hearties Peplum/Dress pattern.

14902904_1120397181411499_9071670995202499178_o

Katy’s Favorite (I couldn’t help but die a little bit over this unicorn.  I think the hooves sold me.): Jamie Grey with her Unicorn made from the Sweet Tee and Peg Legs.

14900463_10209583853211881_6198337319903692706_n

Congratulations to the winners!  I’ll be contacting you about your winnings!

And thank you so much to everyone who shared their amazing creations.  I’ve now got a lot of new ideas for next year’s costume sewing extravaganza!

Filed Under: Contest/Giveaway Leave a Comment

Timeless Tunic and Tiny Timeless-Pattern Release!!

September 13, 2016

I’m asked for more patterns drafted for non-stretch woven fabrics all the time! And although my heart will always sing for those quick knits 😉 I do love a nice woven top or dress too!

So without further ado, let me introduce the Timeless Tunic and the youth version the Tiny Timeless (because Baby Girl needs to match Mama sometimes)!  We also have them bundled together for a discount in the Timeless Bundle!   All will be on sale through Sunday 9/18/2016 US Central Time Zone.

new-release

listing-pictures-bundle

I love a softer drape for my own tops.  I feel like the drape gives a more flattering silhouette.  Personal favorites are rayon challis, crepe, peachskin, poly chiffon and voile.  But, I drafted it so that you can get away with using a stiffer woven like a chambray or flannel without loosing too much of the glamour!  Now you will have a great, timeless pattern that allows you to use up that gorgeous woven fabric you’ve been hoarding for that “perfect pattern”!  (ah ah ahhhhhhhhhh…)

14324626_10157531259405599_1898415430425264769_o

Both include the same options:

Tank– Perfect for warmer weather or for a nice layering piece. I loved to wear a nice silky tank under a cardigan!

14242301_10210716022718957_378574312330514505_o14241659_10100199813559177_5606052251135658841_o14125490_10207570896533783_6302897511345138404_o

Short Sleeve– A bit more coverage, but still great for warmer weather and layering!

14184470_10206952209069922_8833346384594323059_n14241581_10102547913260398_7254487766094641562_o14242208_10210571073896937_805838614165298697_o

3/4 Sleeve– A great transition length that you can wear year round.

14249950_10154503698239666_7646869345079131584_o14352546_10210567848103560_4851958667013892215_o14206059_10157281958945562_7297118569733716242_o

Long Sleeve- Take this length into the colder months no problem! A lot of our testers loved the longer sleeve paired with a cozy flannel!

14242334_10104325619441019_6908037680625653308_o14125531_10157496754100599_3483788795218596629_oimg_3072

Top/Shirt Length- Cute, comfy, and easy to wear!

14324611_10153780722145841_3662509677212397532_o14238084_10153700243027016_1014006267670653907_n

Curved Tunic Length- My personal favorite 🙂 It’s flattering and has some coverage but still looks trendy and put together. Younger girls love that curved tunic for pairing with skinnies or leggings!

img_279114231138_10153769419810841_3613078633363806887_o14290074_10153768368870841_553585620824454842_o

Dress Length- Meant to hit about 2″ above knee (a super flattering length on all shapes) you can make it casual everyday or sew it up in a nicer fabric and pair with heels to dress it up!

14258341_10207132892821807_6136906350317382751_o14207652_10157496740100599_2033111073842957631_oimg_2624

So, just how versatile is this pattern? It can really be styled up or down so many ways you could wear this anywhere!

This is such a classic look you can make it a casual, everyday/play look:

14249963_10154503755929666_9129185631609573782_o14231413_10207876129193547_6674605127882798680_o14205954_10210512674724260_4397482894494798683_o

Maybe a casual date, girls meet up, or shopping day:

14207814_10154300057696539_8237162624284821183_o14203258_10208929354683616_2720049744373384192_n14207750_10210551066636768_7037204826372407243_o

Use something a bit nicer and you have a great office or work wear attire staple. Send your littles in it for school ceremonies or picture day:

14231234_10153612253591735_8839325507524326519_o14232033_10208995061987559_5269068041149513619_o14188314_721772925249_1691406524578386645_o

It’s the perfect style for a shower or party! Perfect for those adorable border prints as well!

14196081_10153869020893317_5082474374666622486_o14291746_10100703800196229_1962536080284580740_n14249724_1066496020113465_6724777699018234887_o

You can even do a great silky fabric and make a more formal version:

14222301_10154394234975185_4863718361316041852_n14206175_10103253572656169_8892717186004317338_o14207838_10154332104716539_4627475586566883372_o

Warning though, doing this dress in a fabulous silky leopard print can really make you feel glamourous!! This little one had some great modeling poses in her fancy dress!! Don’t we all love to feel beautiful! <3 <3 <3

14311451_10154332105296539_2865024478159272751_o

I hope you enjoy this new pattern as much as we all do!

The Timeless Tunic and Tiny Timeless will be a great weapon to pull out when you or your little one find that perfect woven fabric!

img_9056

Filed Under: Pattern Release, Uncategorized 2 Comments

How to Sew a Faux Layered Look using Just One Pattern

September 9, 2016

IMG_0856- p4p

The other day I was browsing Pinterest for some fall inspiration outfits but since I am now a resident of the sunshine state many of the fall looks I liked were not weather friendly. So what better way than to add “faux” layering to my shirts to pretend fall is in the air? 🙂

IMG_0869

Today I’ll show you how I used the Women’s Henley shirt to make myself a “layered” shirt. I chose the simple crew neckline and the rolled sleeves option but this style would look amazing with the Henley style neckline or the hooded style.

listing pictures

Start by cutting the pattern based on your measurements. Ohh, by the way…did you see that the Henley got an updated? It now has layers so you can just print your desired size. Cut the hemmed shirt option and grab a piece of paper so you can draft the faux layers part. It’s easy-peasy, don’t be scared! Simply trace the curved hem option of the front pattern piece, measure 1.25 inches on the side seam and draw a straight line from that point to the center seam. Repeat the procedure with the back piece of the pattern. Now you will have two extra pattern pieces (front and back) that you need to cut on fold at the center.

fauxlayeredpieces

IMG_0786

Sew your shirt according to the pattern instruction, iron the 1 inch memory hem and set it aside before stitching it. We will now prepare the “faux” layer. With the right sides together sew the side seams with 1/2 inch seam allowance.

IMG_0789

Once you have a loop-like piece you can go ahead and stitch the curved hem with your coverstitch or sewing machine. Press it! You are almost done. All you have left to do now is attach the layered part to your main shirt. Lay the main shirt on a flat surface and insert the faux layer piece matching the side seams. You can match the raw edges inside the shirt and pin all around the hem.

IMG_0798


If you prefer your faux layer to be just “peeking” from under your shirt you can certainly place the layer a little higher inside the main shirt and pin in place. Stitch the bottom hem of the shirt and the faux layer together at about 1 inch above the fold.


IMG_0799

You just made yourself a beautiful shirt that takes you from summer to fall. This style shirt pairs beautifully with the SOS pants and the Pirate Pencil skirt. As always, don’t forget to show off your layered creations in the group. Happy sewing, pirates!

Alex

IMG_0845-1IMG_0857

Filed Under: Pattern Hacks 9 Comments

  • « Previous Page
  • 1
  • 2
  • 3
  • 4
  • Next Page »

connect with me

  • Email
  • Facebook
  • Instagram
  • Pinterest
  • YouTube
Privacy & Cookies: This site uses cookies. By continuing to use this website, you agree to their use.

To find out more, including how to control cookies, see here: Cookie Policy
  • Privacy Policy
  • Refund Policy
  • Contact Us
  • About

Copyright © 2026 Patterns for Pirates

Copyright © 2026 · Genesis Framework · WordPress · Log in